Report
On the ascent via the classic route on the E ridge to Allalinhorn (4027 m), cat. 2B. Saas-Fee region. Pennine Alps. Switzerland.
Leader: V.P. Primerov
Coach: V.P. Primerov
Ascent Passport
- Alps. Pennine Alps. Switzerland. Section according to KMGV 2015 – 10.3.
- Allalinhorn peak (Allalinhorn). Height 4027 m. Route name: classic route via the W ridge.
- Proposed rating – 2B cat. sl., first ascent: H.W. Topham, G.H. Rendalls, and A. Supersaxo in 1887.
- Route type: combined.
- Route elevation gain: 3027 m (according to maps)
Route length: 4.4 km – ascent, 2.2 km – descent (according to GPS). Section length: V cat. sl. – 0 m, VI cat. sl. – 0 m. Average slope: main part of the route – 25°, entire route – 15°.
-
Pitons left on the route: total 0; including bolted 0.
-
Team's travel time: 7 h, descent 2 h (to Mittelallalin mountain metro station).
-
Leader: V.P. Primerov (CMS), instructor 3rd cat.
Participants:
- S.T. Zimin (CMS)
- A.M. Polyakov (3rd sports category)
- M.V. Morozov (3rd sports category)
- G.A. Kim (3rd sports category)
- G.R. Ramazanova (badge holder)
- Coach: V.P. Primerov (CMS), instructor 3rd cat.
- Access to the route from Felskinn station (3000 m).
Route start: 9:00, July 26, 2015. Summit reached: 14:00, July 26, 2015. Descent via the W ridge to the col, then via the glacier to the north to Mittelallalin mountain metro station – proposed 1B cat. sl.: 16:00, July 26, 2015.
Return to the base camp (Saas-Fee village): 17:00, July 26, 2015.
- Organization: MGK "Voskhogdenie", Yekaterinburg.
- Report responsible: Polyakov A.M., alex.m.polyakov@gmail.com, +79024102163.
Overall summit photo

- July 26, 2015. Taken from the trail from Britannia Hut to Hohlaub glacier.
- August 2, 2006. Taken from the NE ridge (Mittelallalin ridge). Author: Michal Jurosz.
Source: https://en.wikipedia.org/wiki/Allalinhorn↗
Route profile photo

Area photopanorama

Photograph taken from Jegihorn summit (3206 m). Author: Silvia Mazzani.
Source: http://www.summitpost.org/strahlhorn-mischabel-group-seen-from-iagihorn/769404↗
Area map

Map taken from https://map.wanderland.ch↗. Exact link to this map: https://map.wanderland.ch/?lang=en&bgLayer=pk&resolution=20&X=635300&Y=102400↗
Area diagram

Source: https://commons.wikimedia.org/wiki/File:MapMischabelAllalin.png↗
Area overview
Allalinhorn is located between Strahlhorn (4190 m) and Rimpfischhorn (4199 m) peaks to the south and Alphubel (4206 m) and the Mischabel Group peaks with the highest point Dom (4545 m) to the north.¹
The first known ascent of Allalinhorn was made by London lawyer Edward Levi Ames, priest Johann Joseph Imseng with a member of the Imseng family and Imseng's servant Franz-Josef Andenmatten on August 28, 1856.²
The route to Allalinhorn summit from Mittelallalin station (3500 m) is considered one of the simplest and most accessible routes to a 4000-meter peak in the Alps. This route is called "Allalin Normalweg". Despite this, the route has objective dangers such as:
- crevasses on the glacier.
This classic route goes along the western ridge.
Another classic route starts from Britannia Hut (3030 m). It is longer, with a greater elevation gain and, accordingly, longer.
This route goes from the hut along a mountain trail to Hohlaub glacier, then along the eastern ridge. This route is called "Hohlaub".
The first ascent via the Hohlaub route – along the eastern ridge – was made by H.W. Topham, G.H. Rendalls, and Aloys Supersaxo in 1887. However, earlier, in 1882, Heinrich Dübi, along with Alphons Supersaxo and Peter Supersaxo, descended via this route.³
Geographic coordinates of the summit: 46°02′46.1″ N, 7°53′41.3″ E.⁴ Our team ascended to the summit via the classic route along the eastern ridge. The descent route was via the classic route along the western ridge. The backup descent route is along the ascent route to Britannia Hut.
Route classification: Ascent (via E ridge) – III according to UIAA, AD according to the French scale. Descent (via W ridge) – I according to UIAA, F according to the French scale.⁵
Technical photograph of the route
The route thread is built according to GPS.

Route diagram on a satellite photograph

Route diagram on an elevation map

Elevation profile of the route. Built according to GPS

Table of difficulty by route sections Approach – sections A1–A2 and A2–B3.
| Section | Length, m | Slope, ° | Terrain type | Difficulty category | Number of pitons |
|---|---|---|---|---|---|
| Ascent | |||||
| B3–B4 | 1100 | 10 | Snow | 2 | 0 |
| B4–B5 | 600 | 25 | Snow | 1 | 0 |
| B5–B6 | 400 | 15 | Snow | 1 | 0 |
| B6–B7 | 250 | 25 | Snow | 1 | 0 |
| B7–B8 | 350 | 0 | Snow | 1 | 0 |
| B8–B9 | 450 | 30 | Snow | 3 | 0 |
| B9–B10 | 350 | 10 | Snow | 3 | 0 |
| B10–B11 | 300 | 30 | Snow | 3 | 0 |
| B11–B12 | 50 | 35 | Rocks | 3 | 0 |
| B12–B13 | 200 | 5 | Snow | 1 | 0 |
| Descent | |||||
| B13–B14 | 450 | 15 | Snow | 1 | 0 |
| B14–B15 | 1000 | 25 | Snow | 2 | 0 |
| B15–B16 | 800 | 5 | Snow | 1 | 0 |
Description of route passage by sections
Approach. Sections:
- A1–A2 – from Felskinn ski lift station to Britannia Hut (Britaniahut)
- A2–B3 – from Britannia Hut (Britaniahut) to the start of Hohlaub glacier (Hohlaubgletcher) – good mountain trails on rock or snow. The trail is good, well-trodden, with signs to the hut. Crampons are not required.
Ascent
B3–B4. On Hohlaub glacier.
A good, well-trodden trail from Britannia Hut leads to the start of the route. From the start point, a trail goes SSW, crossing the glacier. The trail is marked with poles and flags.
Our route goes:
- up the glacier (better to stay on the right – fewer crevasses) to the W until 3050 m,
- then to the WSW until the low part of the snowy ridge, which will be on the left.
The glacier is snow-covered. There are open and closed crevasses on the glacier! 1100 m, 10°, 2.
B4–B5. Ascent along the slope "en face", direction WSW. At first, the slope is steep, then it quickly becomes more gentle. After 600 m, there will be a platform with a rock outcrop on the left. From the platform, there is a view on the other side of the ridge to the S and SE. Further to the summit, the route goes along the snow along the ridge on its N side (direction WSW).
- 600 m
- 25°
-
B5–B6. From the platform, the ascent continues along a less steep slope along the ridge in the direction WSW. After 400 m, there will be rock outcrops along the slope.
- 400 m
- 15°
-
B6–B7. From the rock outcrops, the ascent continues along a steeper section. After 250 m, there will be a local snow dome. From the dome, there is a view almost to the summit (the summit is hidden behind the rock section), the route is visible until the start of the rock section (B11).
- 250 m
- 35°
-
B7–B8. A small descent and a gentle ascent.
- 350 m
- 0°
-
B8–B9. On the left of the ridge, there are snow cornices, on the right, the slope is steep (more than 45°) with crevasses. The corridor between the cornices and crevasses is 10 to 50 m wide. It is necessary to choose the safest path to avoid triggering a snow cornice on the left. The slope is steep and long; self-arrest on such a slope is real but problematic. Therefore, it is recommended to travel in rope teams and use ice axe belays until the start of the rock section (B11)!
- 450 m
- 30°
-
B9–B10. A small, more gentle section.
- 350 m
- 10°
-
B10–B11. Again, a steeper snow section. The section ends at a rock wall. There is a stationary station on the rock.
- 450 m
- 30°
-
B11–B12. A rock section with simple climbing. Stationary pitons are installed along the route. One 50 m rope is enough for the entire rock section. From the stationary station, the route goes to the right into a crack (the lowest point of the transition over the wall), then the rock becomes more gentle. There are many loose rocks on the rock!
- 50 m
- 35°
-
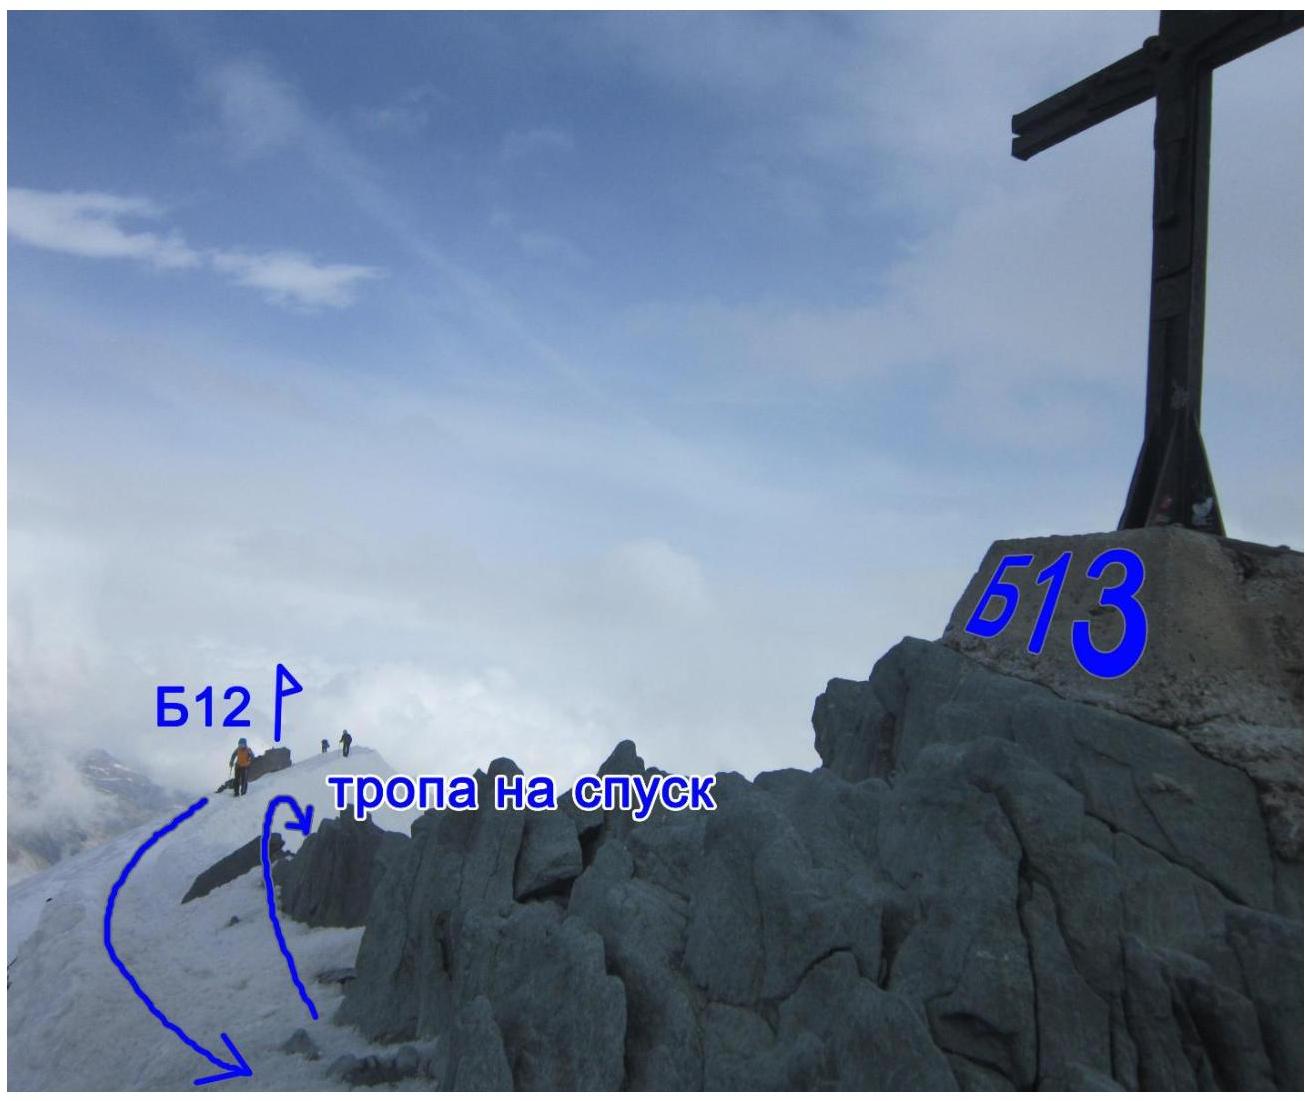
B12–B13. A practically horizontal section from the rocks to the summit along the ridge. There is a cross on the summit.
- 200 m
- 5°
-
B13–B14. For descent, it is necessary to return from the summit back a couple of dozen meters and bypass the summit (flat and sharp rocks) to the south. There may be a trail to Feejoch col between Allalinhorn and Feekopf peaks. Movement is along the ridge to the col, gradually moving away from the ridge to the N (along the glacier towards the ski lift). After 450–600 m (at an altitude of 3800–3700 m), it will be possible to turn NW towards Mittelallalin.
- 450 m
- 15°
-
B14–B15. Descent from the col goes along Fee glacier (Feeglatcher). There are open and closed crevasses on the glacier (quite large). The descent goes closer to the right ridge (towards Mittelallalin), but it is better to bypass crevasses on the left. A large, partially open crevasse is located at an altitude of 3700 m. At the points of crevasse crossings via snow bridges, ice axe belays are required. The section ends with an exit onto ski slopes.
- 1000 m
- 25°
-
B15–B16. Crampons are no longer needed. Further – to Mittelallalin mountain metro station.
- 800 m
- 5°
-
General recommendations for the route
Both routes – the route from Mittelallalin along the W ridge (Allalin Normalweg) and the route along the E ridge (Hohlaubgrat) – are quite popular during the summer season. Since the route along the W ridge is simpler and faster, it is more popular than the route along the E ridge.
For ascending Allalinhorn 4027 m, high-altitude acclimatization is required. It can be obtained in the same Saas-Fee region by hiking along trekking routes to altitudes up to 3500 m.
To get to Britannia Hut, you need to take a ski lift in Saas-Fee and ride to Felskinn station and then follow the signs along the trail. The distance from Felskinn to the hut is a little more than 2 km, 30–40 min. From the hut to the start of the glacier, there is a marked trail (white-blue-white) to walk about 1 km, 15 min.
It is recommended to start the ascent from Britannia Hut in the morning. According to local climbers, the weather on the mountain often deteriorates (strong wind, poor visibility due to low clouds) after 13:00 (local time). Therefore, the recommended time to reach the summit is 12:00.
Also, according to local climbers, the glaciers along which the ascent and descent routes pass are gradually melting and exposing new crevasses, creating additional danger.
It is recommended to descend either along the W ridge route to Mittelallalin station or along the ascent route. If you descend to Mittelallalin station, note that the last train leaves for the bottom at 16:20. The descent time along the W ridge in good conditions is about 2 h. In case you miss the last train, you can either descend on foot to Saas-Fee (about 3–4 h) or try to get to Saas-Fee with the ski resort workers.
Required special equipment: harnesses, ropes, crampons, ice axes, quick draws (5 for the rock section).
Report photo illustration
View from Saas-Fee. Allalinhorn is the leftmost peak, Alphubel is in the center

Area diagram with ski lifts, mountain metro, peaks, and huts.

Trail from Felskinn to Britannia Hut
Top photo – view from Felskinn station

- Left photo – Britannia Hut is visible in the middle of the frame

- Left photo – trail to Hohlaub glacier from Britannia Hut, Allalinhorn is at the top right
- Right photo – glacier and Hohlaub ridge

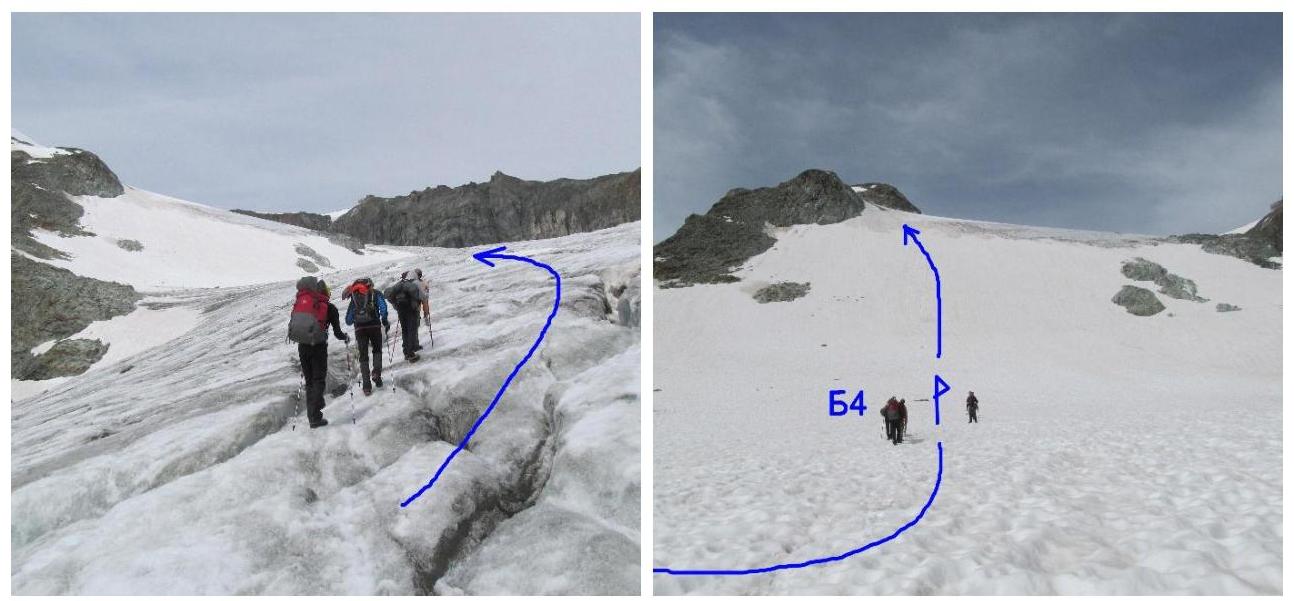
Left photo – movement on Hohlaub glacier (B3–B4). Right photo – section B4–B5.
 Left photo – view from B5 to the south. Right photo – section B5–B6.
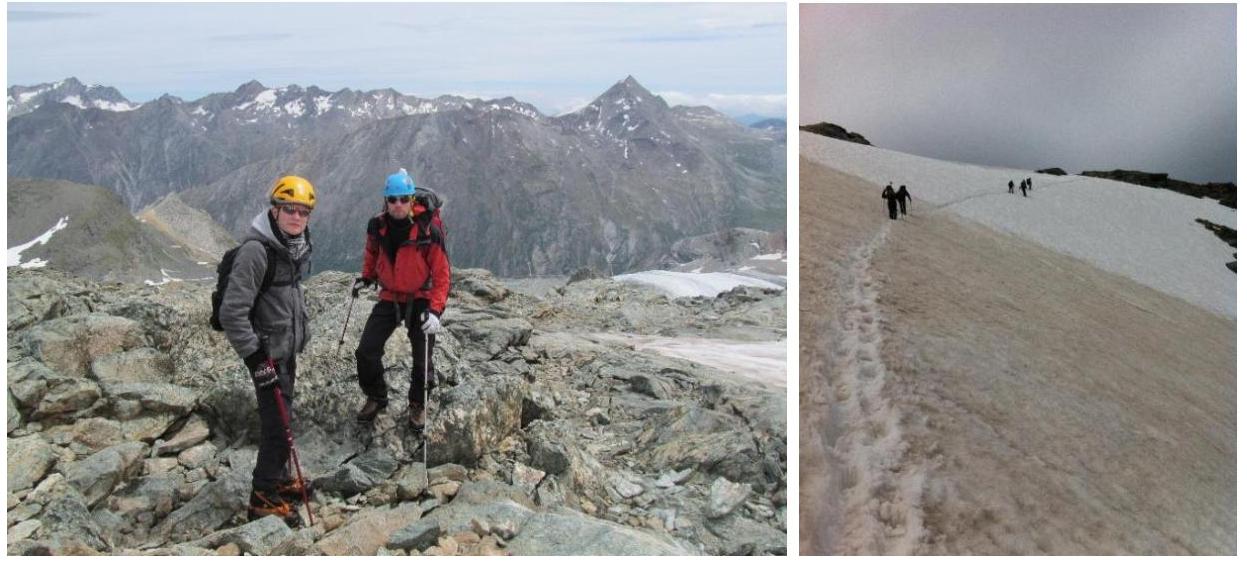
Views from B7. Left – on Hohlaub ridge. Right – on Mittelallalin station

Left – on section B8–B9. Right – B11.
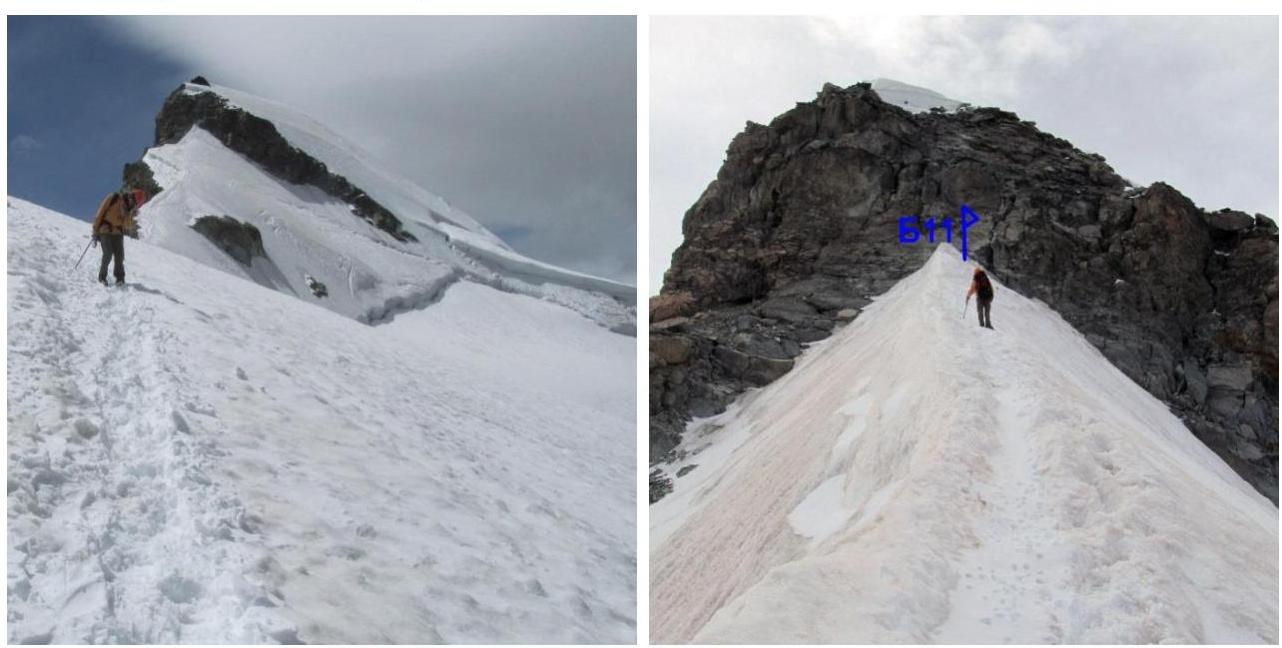 Left – start of the rock section (B11–B12) – view from B11. Right – view on Mittelallalin from B11.

Section B12–B13 – photo from B13.
 Photograph on the summit (B13).

Photograph on descent (B14–B15). The crevasse is visible on the photograph, at an altitude of about 3700 m, marked on the diagrams.

All photographs used in the report, except those with explicitly indicated sources, were taken by our group during the ascent.


