World Alpine Championship
in the technical class
Report
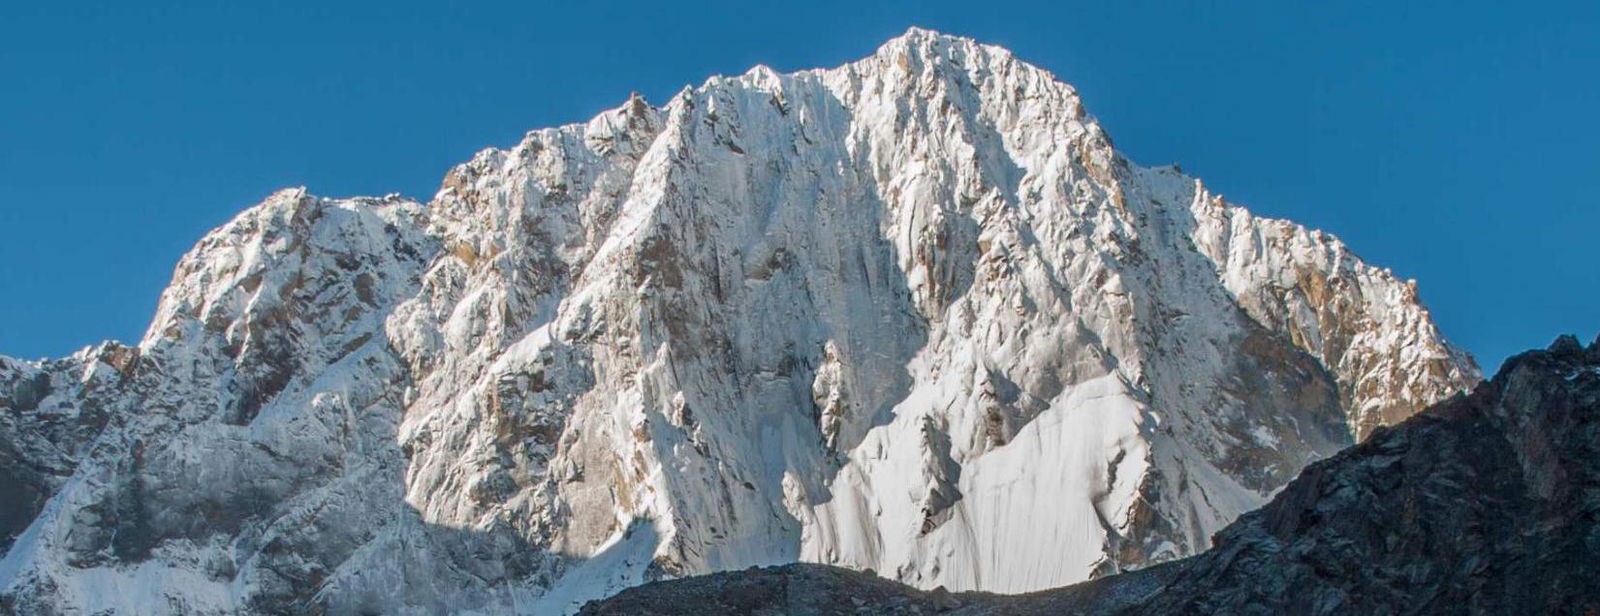
on the ascent of Sabakh Peak (5300 m) via the center of the left buttress of the N wall (first ascent, category 6B proposed) by the Russian national team
Ascent Passport
-
Region: Pamir-Alai, Lyaylyak valley area, Ashat valley, section 5.4.2 in the 2012 classification table
-
Peak, route: Sabakh Peak, 5300 m, via the center of the left buttress of the N wall, first ascent
-
Category: 6B proposed
-
Route type: combined
-
Route elevation gain: 1560 m
Wall section elevation gain: 1300 m Route length: 2010 m Sections of 5–6 category: 1090 m Average steepness of the wall section: 68° Pitons left on the route: 2
-
Pitons used on the route:
stationary bolt pitons — 1/1 anchor pitons, cams — 308/218 friends — 88/69, stoppers — 23/17 ice screws — 17/0, skyhooks — 32/32
Total artificial protection used: 336
-
Team climbing hours: 79.5 h (11 days)
-
Team leader: Vasiliev Andrey Sergeevich, CMS
Team members:
- Antoshin Alexey Viktorovich, CMS
- Osipov Ivan Dmitrievich, CMS
- Shipilov Vitaly Viktorovich, CMS
-
Coach: Pyatnitsyn Alexander Alekseevich
-
Approach to the route: July 27, 2013, 8:00 AM
Acclimatization: July 27 – July 31, 2013 (5 days, 29 h) Summit push: August 6, 2013, 5:20 PM Return to Base Camp: August 7, 2013, 11:00 PM
Map and Area Description
The Sabakh Peak area (Ashyat valley) is located near the Ak-Su peak area. The path starts from the Uzgu rush settlement and goes through the Lyaylyak main valley and then through the Ashat valley (with packhorses, 10–12 hours to the base camp at the glacier's foot).
The area was actively explored during 1985–1990.
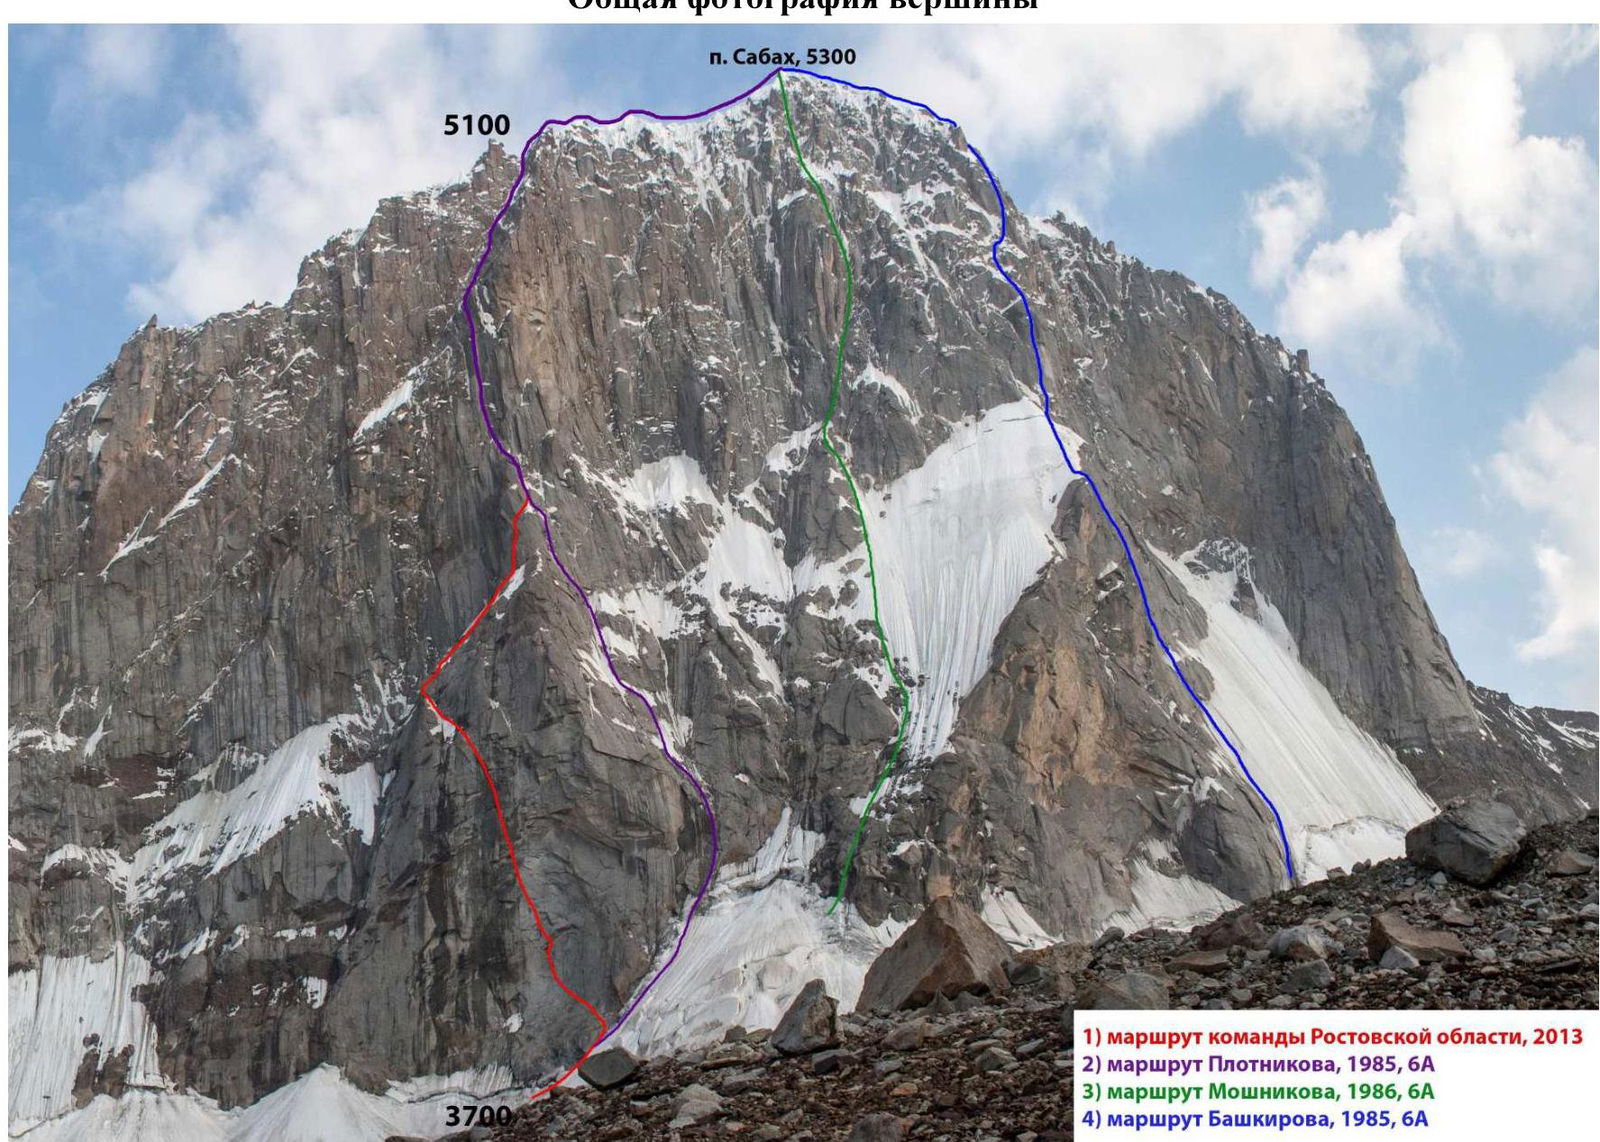
Only four successful ascents were made to the main peak of the area, Sabakh Peak (5300): three via the N wall (Plotnikov 1985, Bashkirov 1985, and Moshnikov 1986) and one during the traverse of the Ashat wall (Petrov 1990). As far as we know, none of these ascents were repeated.
The main peaks of the area are the four peaks of the Ashat wall (Peak 4700, V 4750, V 4810, and Sabakh), as well as Peak Parus with its three summits:
- Western (4850)
- Eastern (4800)
- Main (5053).
The heights of the Ashat wall peaks (as per the 2012 FAP classifier) require clarification. For example, Peak 4700 is clearly higher than the adjacent Peak 4750, and Peak 4810 appears much higher, around 5000 m (see photo 10). However, Plotnikov's report (1985) indicates different heights.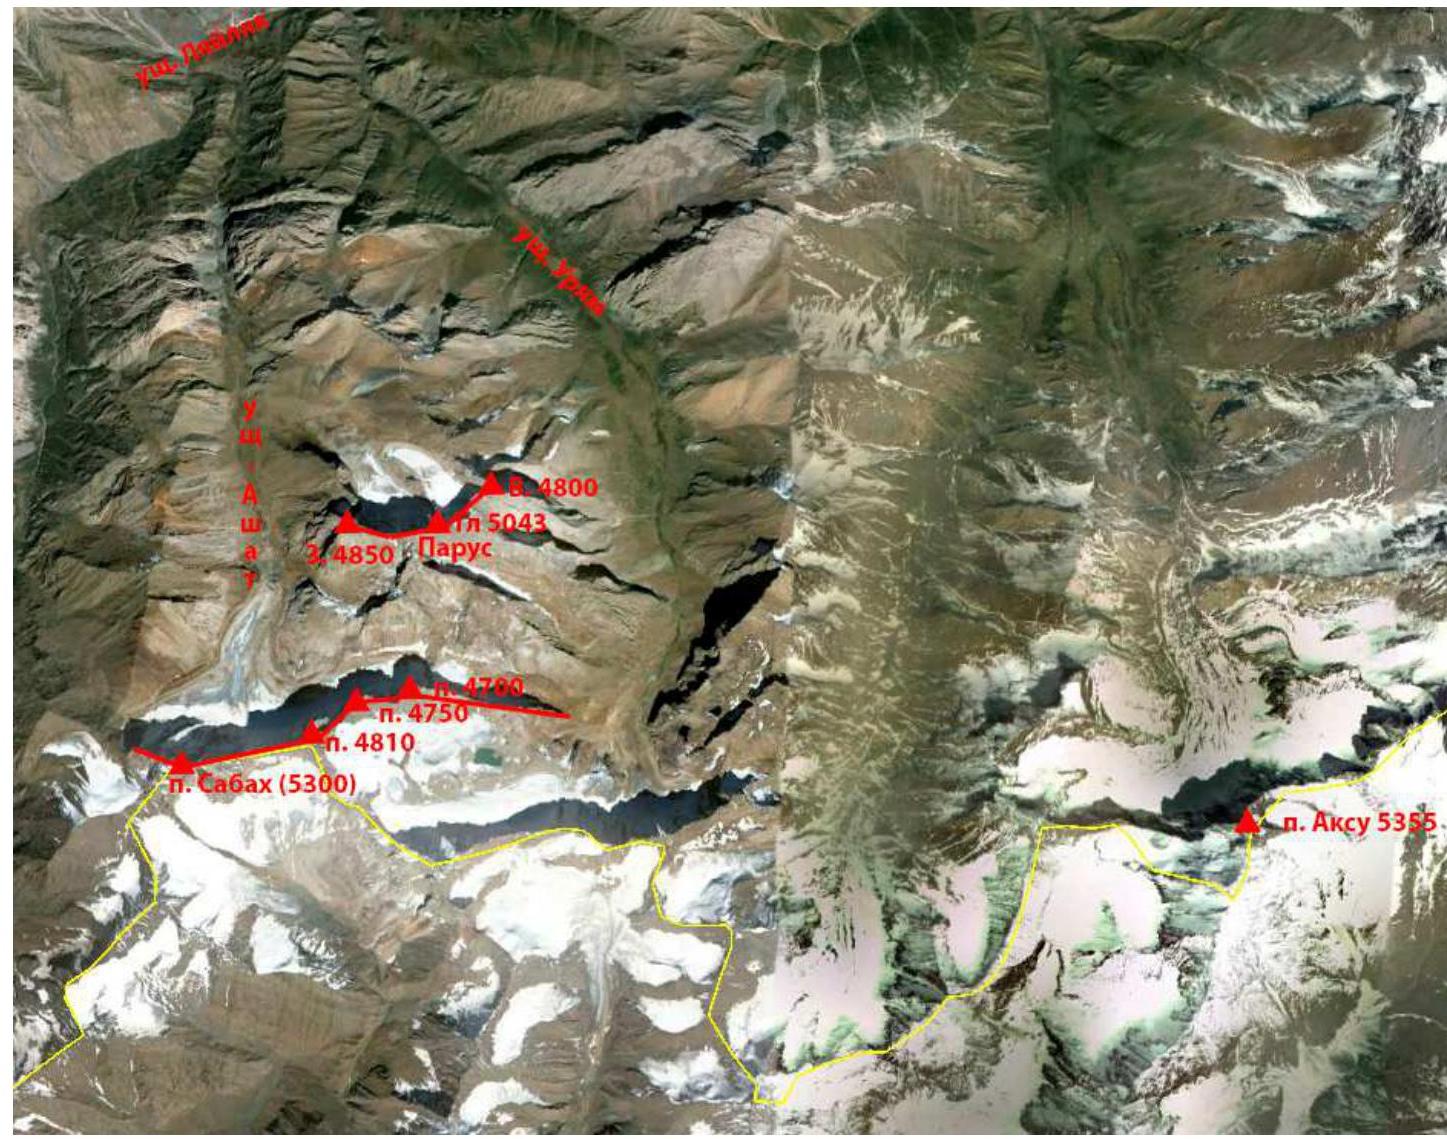
Yuri Koshelenko has made a good overview of the area with information on the ascents (http://yurikoshelenko.livejournal.com/8280.html↗).
Area Photopanorama

General View of the Peak
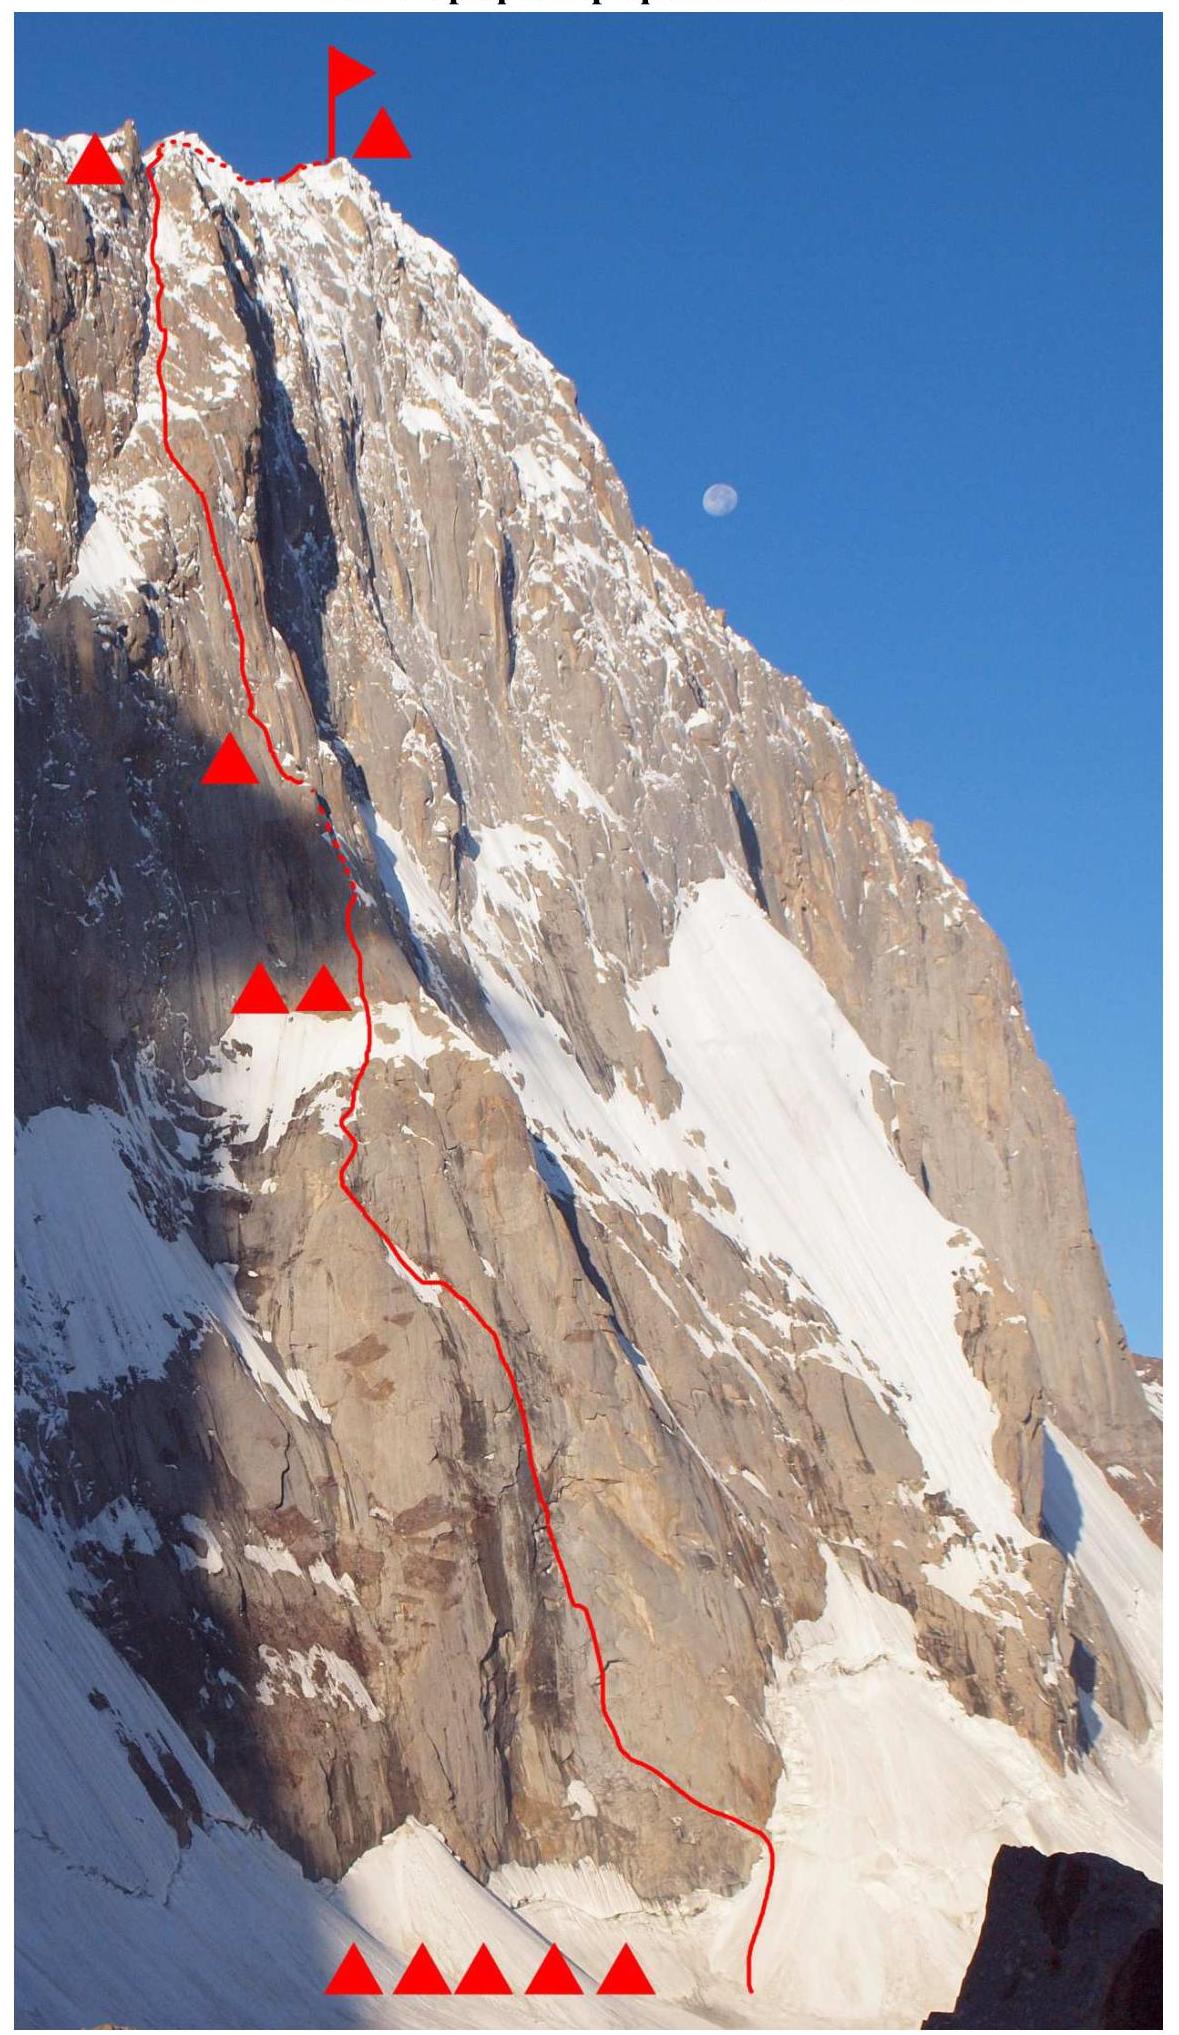
Technical Photograph of the Route
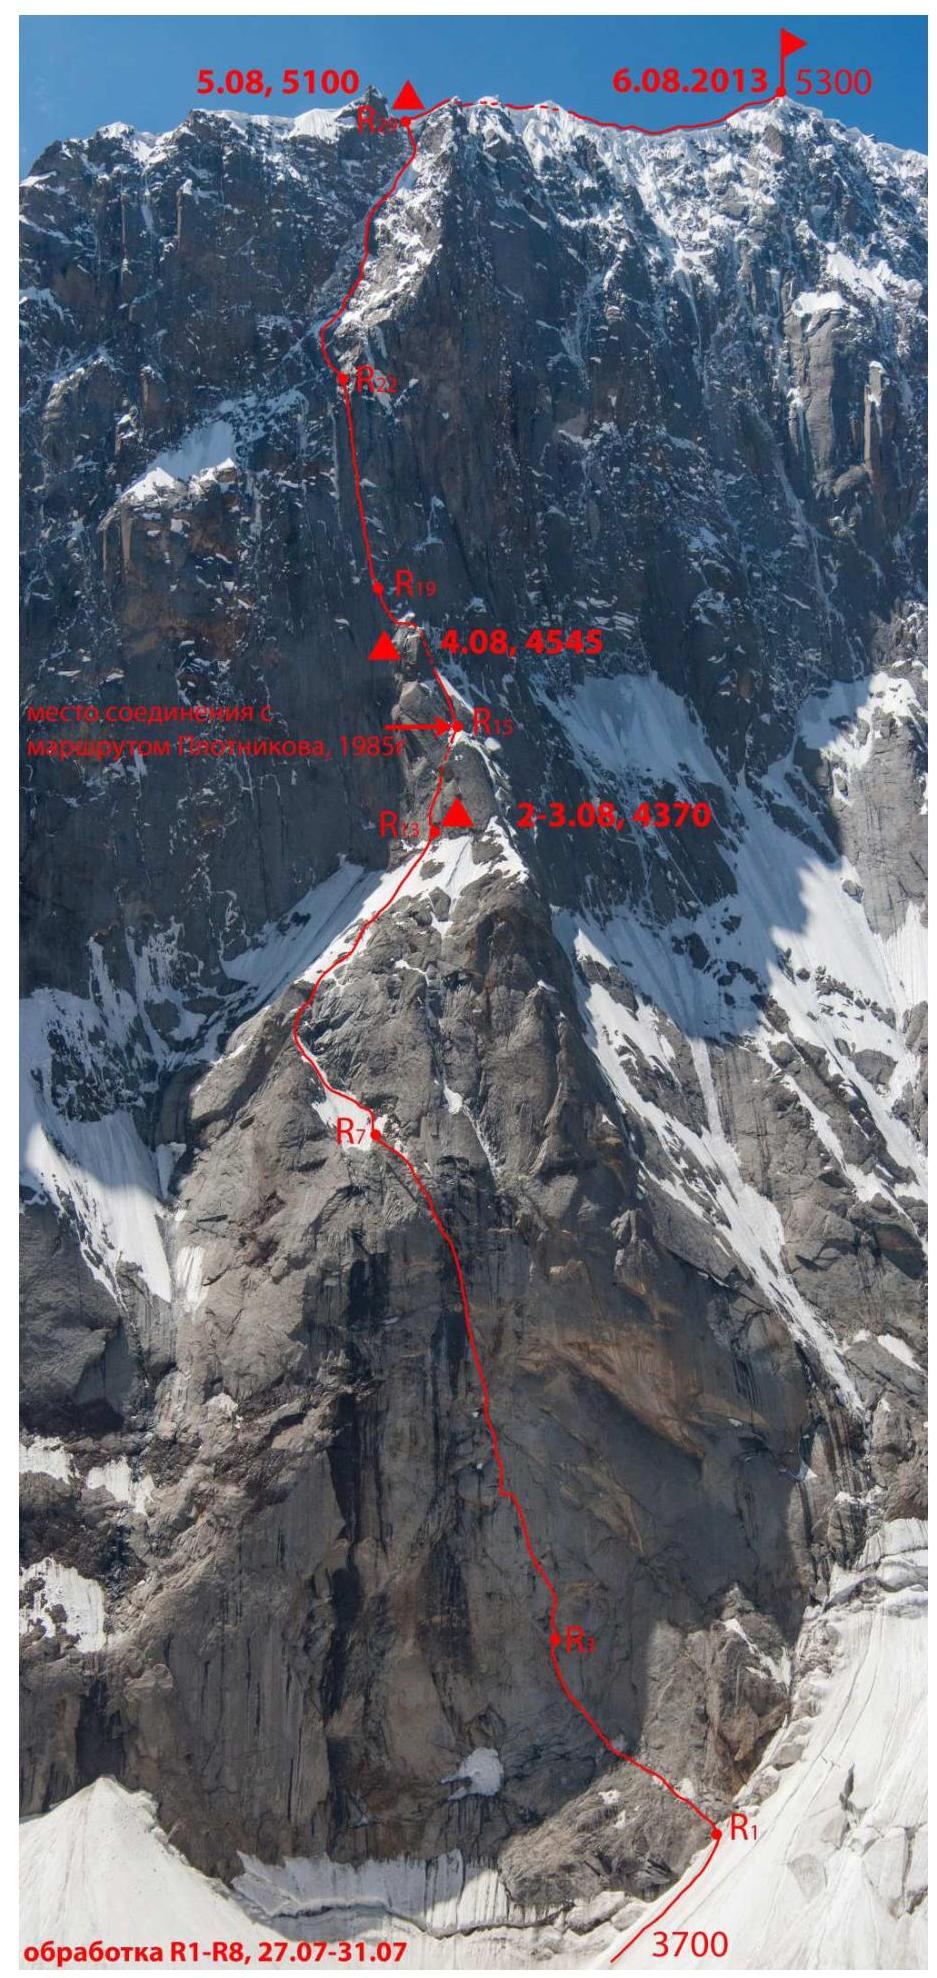
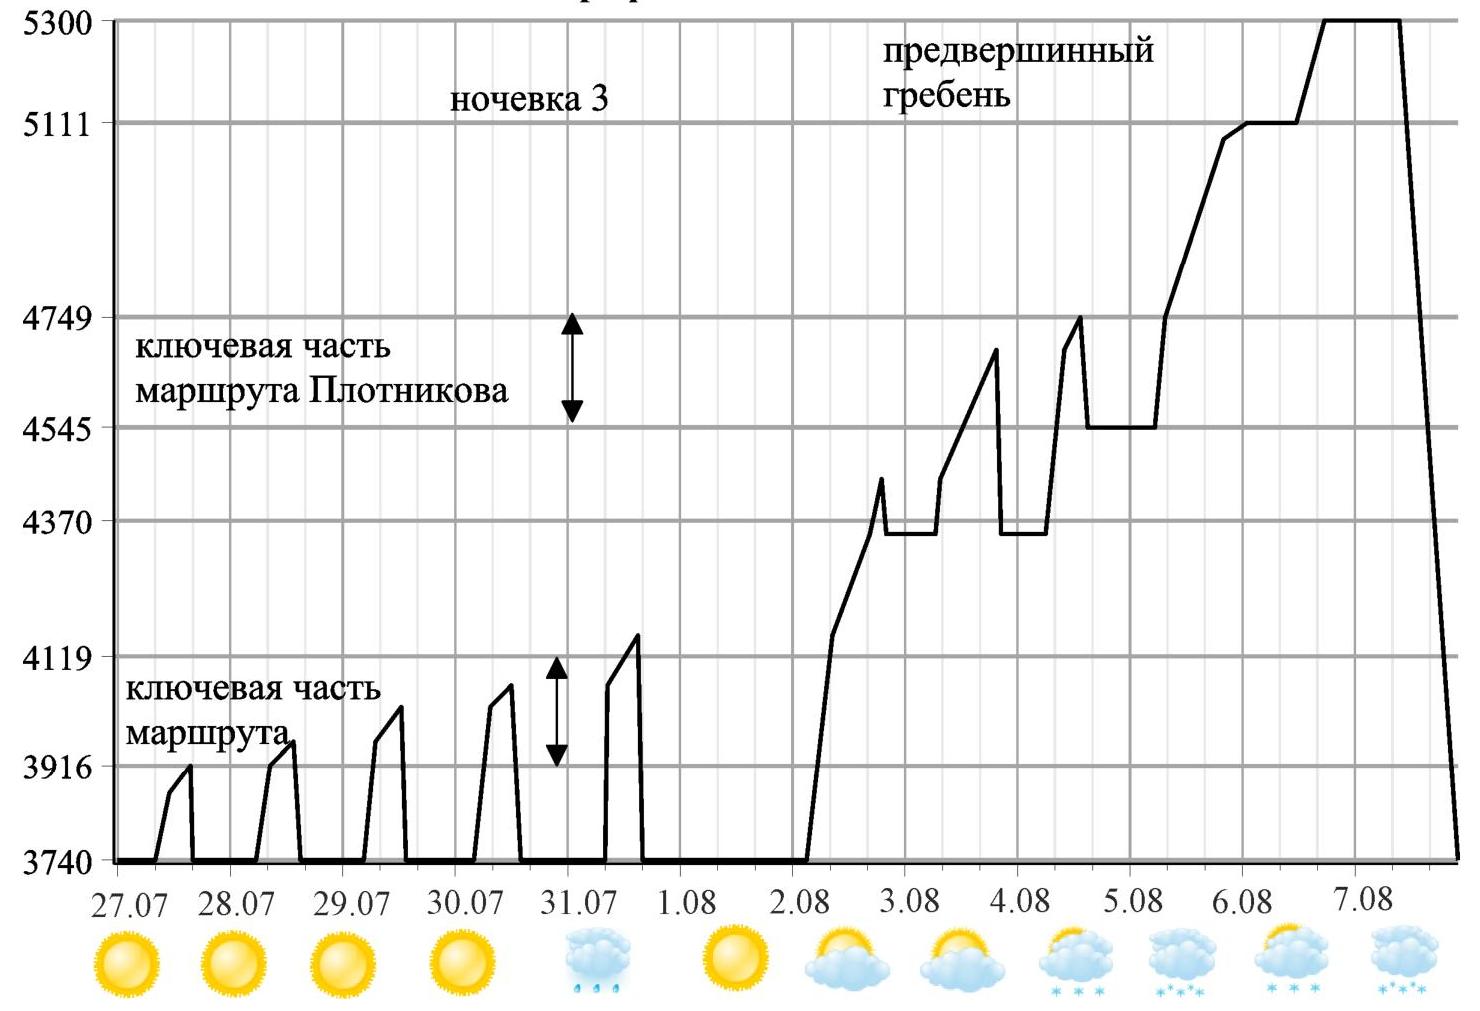
Ascent Graph
Team's Tactical Actions
When choosing the route to Sabakh Peak, we were primarily guided by safety considerations. Due to the abnormal heat, the lower parts of the existing routes were extremely hazardous, with rockfall occurring both day and night, literally every hour.
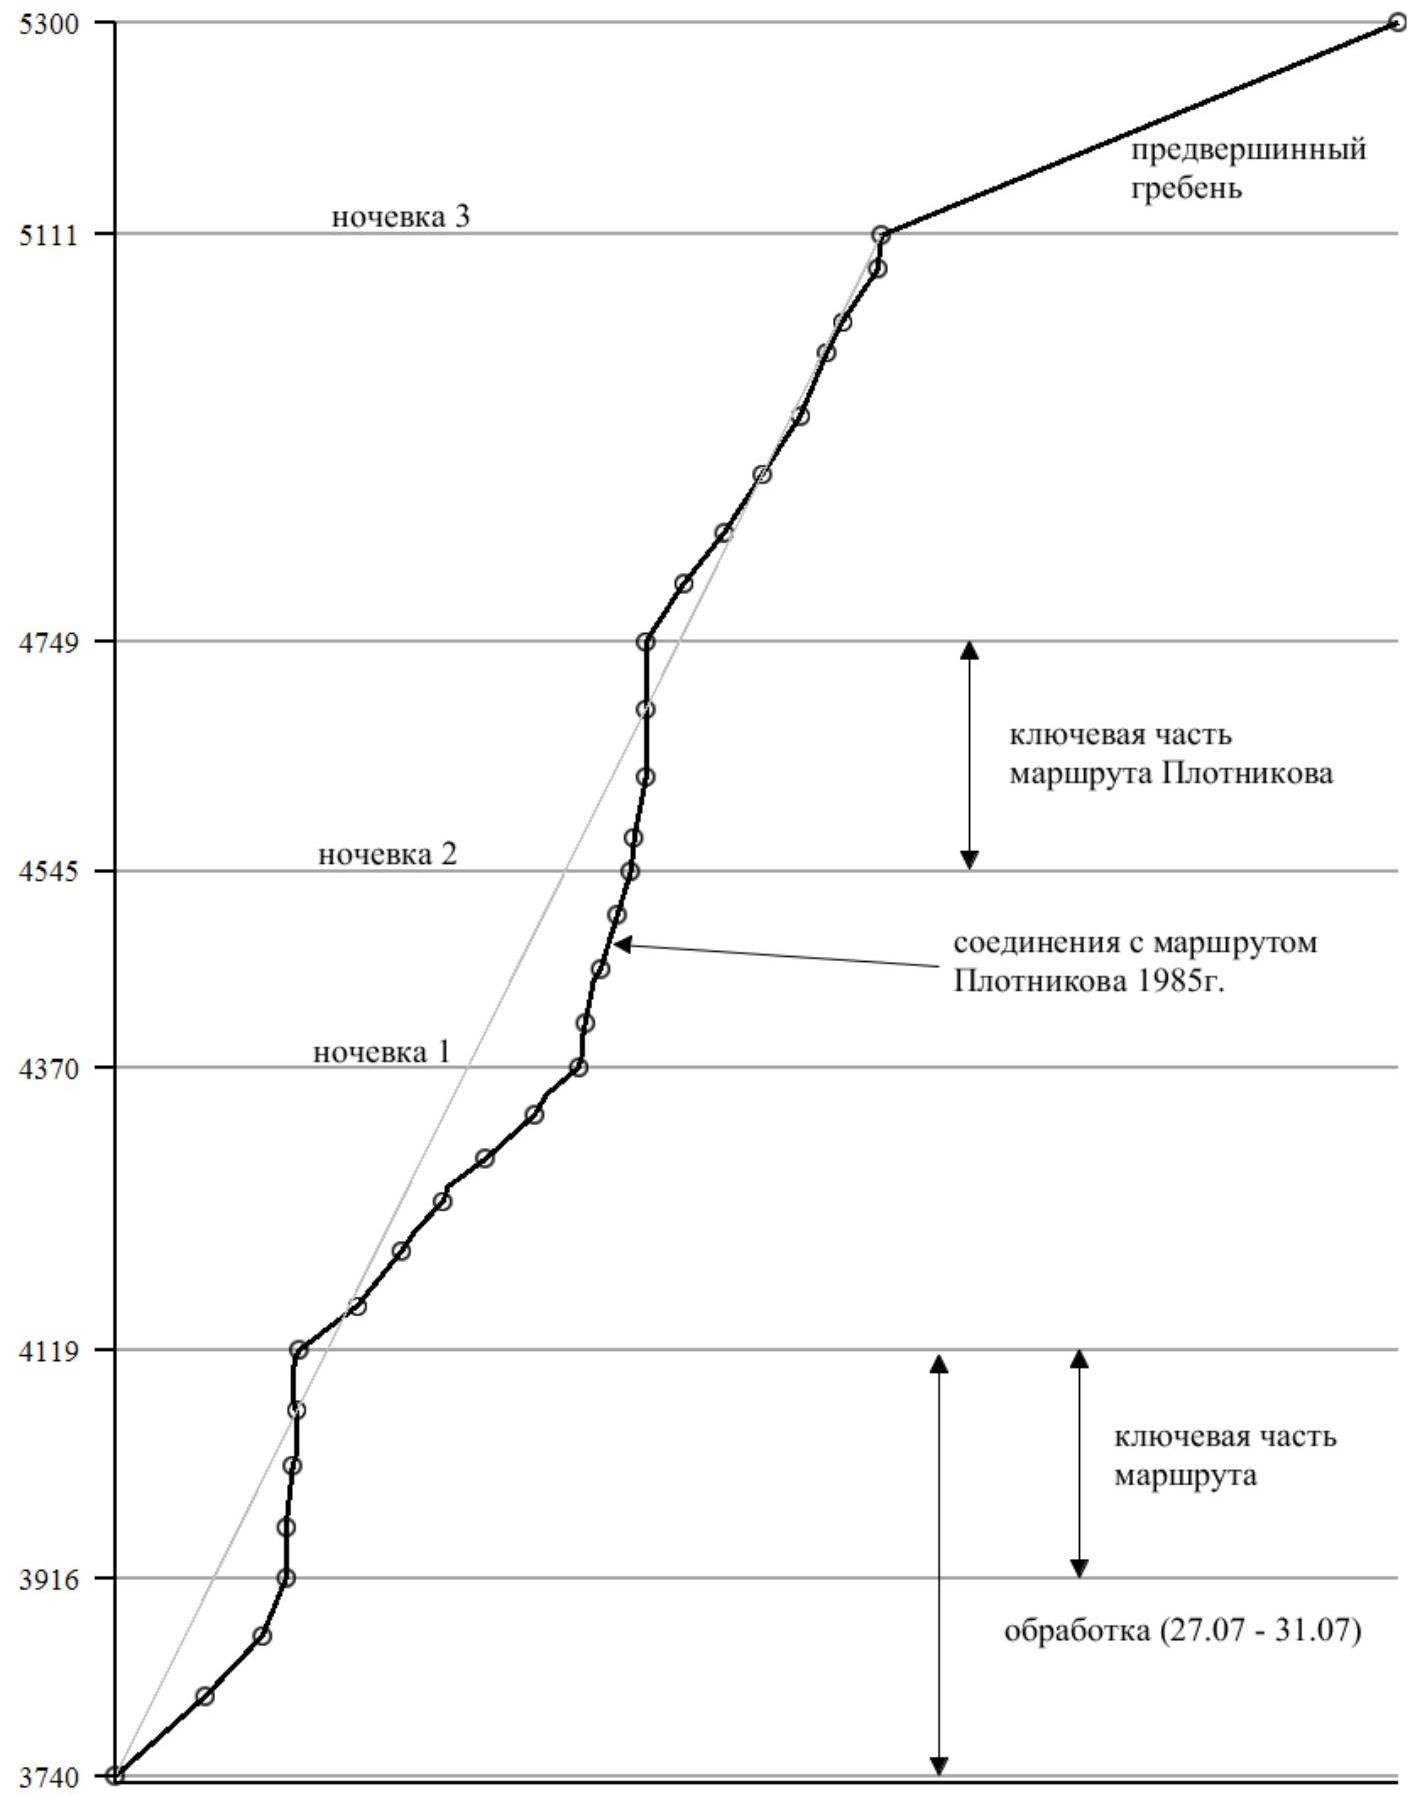
We chose a logical route through the left buttress of the N wall, which had not been climbed before. We then planned to move left of the counterfort along a series of monolithic cracks leading to a large, gentle internal angle (the upper part of Plotnikov's route).
The lack of ledges and rockfall danger made it impossible to set up a safe bivouac on the buttress, so we decided to use acclimatization days. On sections R4–R7 (the key part of the route), water was flowing even early in the morning, and by afternoon, it was a waterfall (see photo 4). Therefore, during the acclimatization days (July 27 – July 31), we could only work for 4–5 hours, which resulted in a large number of acclimatization days.
The departure was scheduled for August 1, but due to bad weather on the evening and night of July 31, it was postponed by a day.
After passing the lower buttress (up to R13), upon closer inspection of the middle part of the route, we decided that Plotnikov's route was no less challenging but safer, so we decided to follow a more logical path (the counterfort). After climbing two more pitches, our route joined Plotnikov's route. We then quickly (in 10 hours) climbed the key section of Plotnikov's route (sections R19–R22).
The bivouacs on the wall (August 2–4), although set up on the counterfort in the safest possible locations, were still not fully protected from falling rocks (ricocheting from the left) and ice. Due to the objective danger, we did not plan to bivouac in the gentle internal angle above the second buttress and, after fixing the ropes up to section R21, intended to reach the ridge in one day.
On August 3, the departure was unsuccessful due to bad weather; we fixed another rope and postponed the bivouac further up — to Plotnikov's team bivouac location. Climbing higher in the second half of the day was hazardous. However, during the bad weather, rockfall became significantly less frequent.
August 4:
- The bad weather continued
- We were unable to move as quickly as we wanted
- We reached the ridge at night
The ridge itself was not particularly difficult but turned out to be more challenging than described in Plotnikov's report. In our opinion, it represents a standalone climb of category 2B–3A. We reached the summit by evening and bivouacked just below.
During the descent, the weather deteriorated significantly, with heavy fog and hurricane-force winds, so we had to move extremely cautiously and rappel almost the entire way down to the snow and further down to the debris slope.
We encountered two pitons on the entire route — on sections R21–R22 and R24–R25. During the descent, we found several anchors from previous climbers.
The lead changed every day, with all team members working as the lead. Throughout the ascent, we maintained contact with Yuri Koshelenko and Vasily Kolisnyk from Base Camp, to whom we are very grateful.
Wall Profile Photograph
Route Profile Drawing
UIAA Symbol Scheme
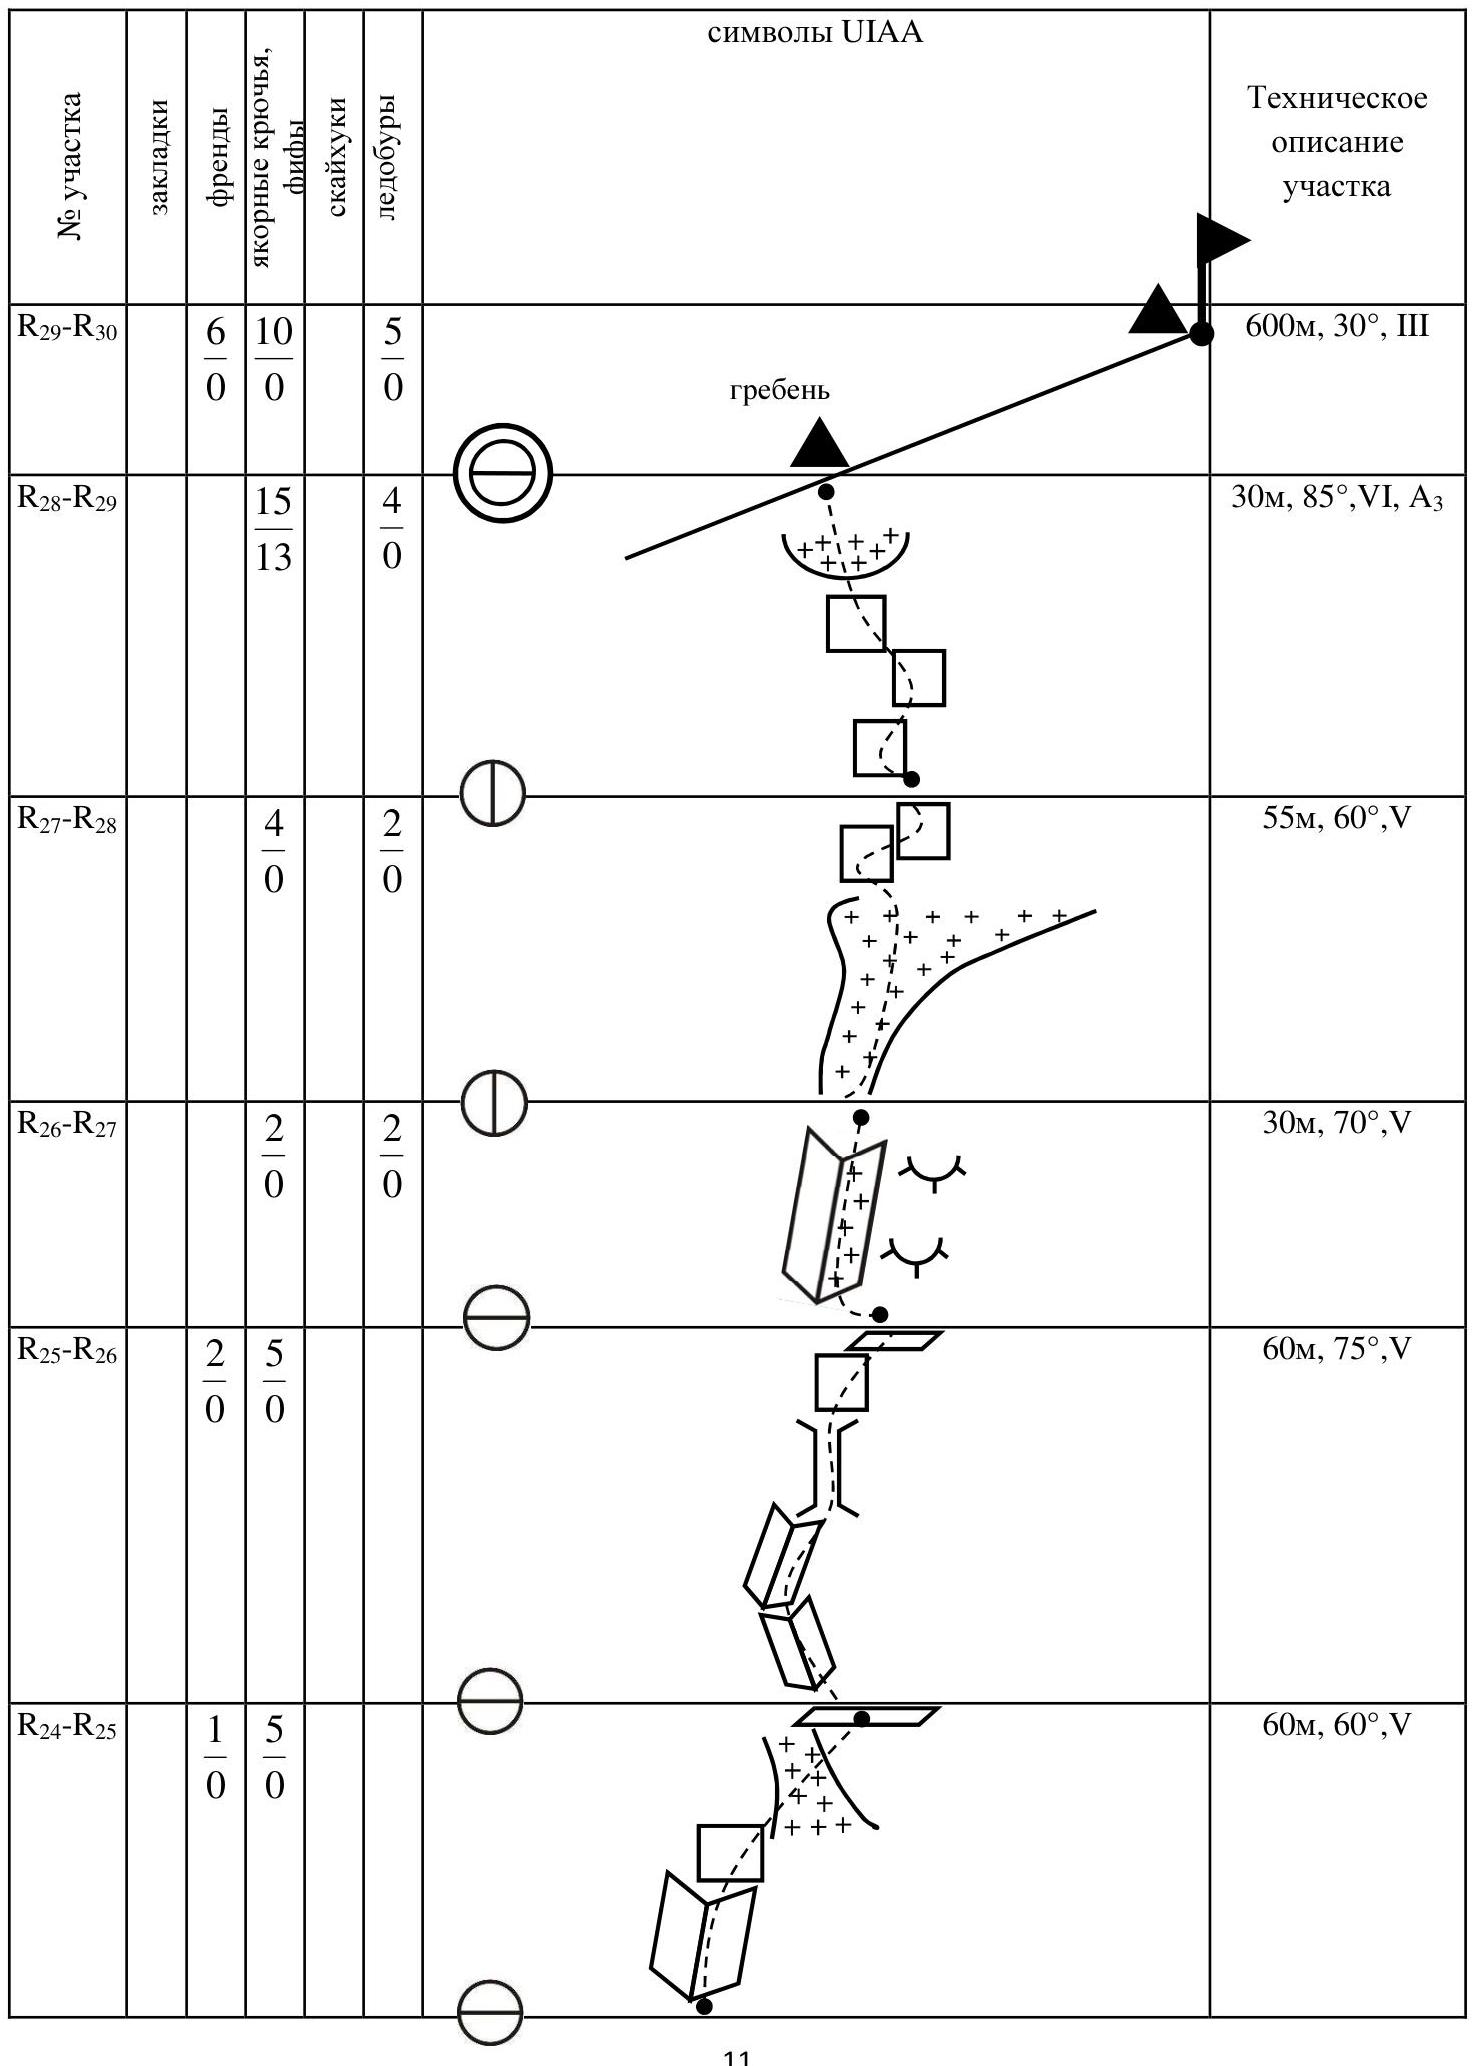
| Section | stoppers | friends | anchor pitons, cams | skyhooks | ice screws | UIAA symbols | Technical description of the section |
|---|---|---|---|---|---|---|---|
| R29–R30 | 6 | 10 | 5 | 0 | 600 m, 30°, III | ||
| R28–R29 | 15 | 13 | 4 | 0 | 30 m, 85°, VI, A3 | ||
| R27–R28 | 4 | 0 | 2 | 0 | 10 | 55 m, 60°, V | |
| R26–R27 | 2 | 0 | 2 | 0 | 0 | 30 m, 70°, V | |
| R25–R26 | 2 | 5 | 5 | 0 | 0 | 60 m, 75°, V | |
| R24–R25 | 1 | 5 | 0 | 0 | 0 | 60 m, 60°, V | |
| R23–R24 | 3 | 0 | 2 | 0 | 0 | 55 m, 70°, V+, A1 | |
| R22–R23 | 2 | 5 | 17 | 1 | 3 | 55 m, 70°, V+, A1 | |
| R21–R22 | 2 | 10 | 25 | 1 | 1 | 60 m, 90°, VI+, A3 | |
| R20–R21 | 2 | 13 | 21 | 6 | 6 | 60 m, 90°, VI+, A3 | |
| R19–R20 | 3 | 7 | 29 | 4 | 4 | 60 m, 90°, VI, A2 | |
| R18–R19 | 5 | 0 | 55 m, 80°, V+ | ||||
| R17–R18 | 2 | 0 | 0 | 30 m, 90°, V+ | |||
| R16–R17 | 3 | 0 | 0 | 40 m, 75°, V | |||
| R15–R16 | 4 | 0 | 0 | 2 | 0 | 50 m, 75°, V | |
| R14–R15 | 3 | 7 | 6 | 2 | 1 |  | 10 m, 60°, IV; 40 m, 80°, VI, A1 |
| R13–R14 | 1 | 6 | 18 | 1 | 2 |  | 30 m, 85°, VI, A1; 10 m, 70°, V |
| R12–R13 | 2 | 0 |  | 30 m, 50°, III; 20 m, 60°, V | |||
| R11–R12 | 1 | 0 | 2 | 0 | 0 |  | 55 m, 50°, III |
| R10–R11 | 10, 4 | 40 m, 45°, III | |||||
| R9–R10 | 2 | 0 | 2 | 0 | 0 |  | 35 m, 60°, IV; 20 m, 60°, IV |
| R8–R9 | 4 | 0 | 0 | 0 | 0 |  | 60 m, 60°, IV |
| R7–R8 | 3 | 0 | 0 | 0 | 0 | 60 m, 50°, III | |
| R6–R7 | 4 | 6 | 33 | 4 | 0 |  | 25 m, 80°, VI, A2; 10 m, 50°, V; 15 m, 90°, VI, A2 |
| R5–R6 | 1 | 26 | 2 | 2 | 0 |  | 10 m, 110°, VI+, A4; 40 m, 90°, VI+, A3; 10 m, 70°, V |
| R4–R5 | 12 | 33 | 5 | 5 | 0 |  | 55 m, 85°, VI+, A3 |
| R3–R4 | 4 | 10 | 25 | 10 | 0 |  | 45 m, 90°, VI+, A3 |
| R2–R3 | 1 | 0 | 6 | 0 | 0 |  | 55 m, 75°, V |
| R1–R2 | 3 | 0 | 0 | 0 | 0 |  | 70 m, 50°, III |
| R0–R1 |  | 100 m, 45°, I |
Section-by-Section Description
R0–R1. The starting point of the route is marked by an avalanche cone to the right of the left buttress of Sabakh Peak's N wall. Climb up the cone to the right and upwards along the rocks to the beginning of a rock shelf.
R1–R2. Traverse a couloir and move left-upwards along a system of ledges to the start of a crack-internal angle.
R2–R3. Climb up the crack with climbing moves left-upwards for 50 m (many loose rocks). Station on a small ledge to the left of a large debris niche.
R3–R4. From the station, move upwards through a system of small overhangs towards a black overhang with a crack, bypassing a large "L"-shaped overhang on the left. Use artificial protection, and drill a few holes for skyhooks (5 mm). After overcoming the black overhang, climb up and slightly left along the crack for 10–15 m. Station on anchor pitons.
R4–R5. Move up the crack (friends, anchors, cams), with many loose rocks. When the crack ends, traverse left for 5 m along a monolithic slab using hole (5 mm diameter) and relief skyhooks to the next crack. Climb up the crack, which turns into an internal angle, through two overhangs to a large black overhang with water flowing from it.
R5–R6. Key section of the route. Bypass the overhang on the right side (anchors, cams), with many loose rocks. Through an overhang into an internal angle closed by another overhang; on the left wall of the angle, there are cracks for anchors. From the end of the crack, move right-upwards under the overhang along "booming" slabs with water flowing. Station under the overhang is dry, with a bolt (Hilti construction anchor, 8 mm, 50 mm long).
R6–R7. Key section of the route. The overhang is heavily destroyed; bypass it on the right along a strongly overhanging wall with holes for skyhooks (5 mm). Then climb up the internal angle for 10 m through a series of small overhangs, followed by a short move left with climbing moves along a heavily destroyed relief to a vertical chimney. Climb up the chimney on the left side for 20 m, sometimes widening into an internal angle. Continue in the same direction for 10 m along an internal angle. Climbing is possible but with many loose rocks and wet conditions. Station is dry.
R7–R8. Simple climbing left-upwards along destroyed rocks towards a snow patch. R8–R9. Climb up the ice for 60 m left-upwards towards a ledge. R9–R10. Climb up the ice for another 20 m and then climb up the rocks for 30 m to a ledge under a steep internal angle.
R10–R13. Climb up the internal angle with climbing moves for 10 m, followed by a challenging exit from the angle (3 m, VI, A1, 90°) and then along simple destroyed rocks, snow, and ice upwards and right to a clearly defined counterfort, 100 m. Ice is sometimes thin, with slabs underneath. Convenient bivouac on the left side of the counterfort under overhangs.
R13–R14. From the bivouac, climb 10 m up along destroyed rocks of blocky structure under a monolithic, sometimes overhanging wall with cracks for anchors and cams. When the wall becomes less steep, an internal angle starts, which is climbed partly with climbing moves and partly with artificial protection.
R14–R15. Continue by choosing the easiest path, transitioning from one internal angle to another, mostly with climbing moves, to reach the counterfort. Here, the route joins Plotnikov's route (1985, 6A).
R15–R17. Climb up an ice groove for 90 m along the counterfort. The groove is sometimes narrow (50 cm), with monolithic slabs on both sides. Protection is partially on ice screws and partially on anchors.
R17–R18. Climb up the rocks with climbing moves left onto the counterfort, reaching a ledge. There is a good ledge 10 m below for a bivouac. Above the bivouac, large icicles hang from the walls of the next buttress, posing a risk of falling ice and rocks!
R18–R19. Climb up and left under a 180-meter vertical crack. Climbing. R19–R22. Key section of Plotnikov's route. Use artificial protection along a monolithic, sometimes destroyed crack through a series of overhangs. It is necessary to have large gear (there is a 30-meter crack for camalots #3, 4), with holes for skyhooks (5 mm). Exit into a large internal angle leading to the ridge.
R22–R28. Climb up the large internal angle for 350 m, mixed V–V+. Ice is unreliable, with protection on rocks. There are only places for sitting bivouacs in the upper part. In warm weather, there is a high risk of rockfall!!!
R28–R29. Exit to the pre-summit ridge along destroyed rocks with ice through an ice overhang.
R29–R30. The ridge is not particularly difficult, with small rock and ice walls of 4th category. The ridge is 600 m long, with jandarms bypassed on the left. There are places for bivouacs on each pitch.
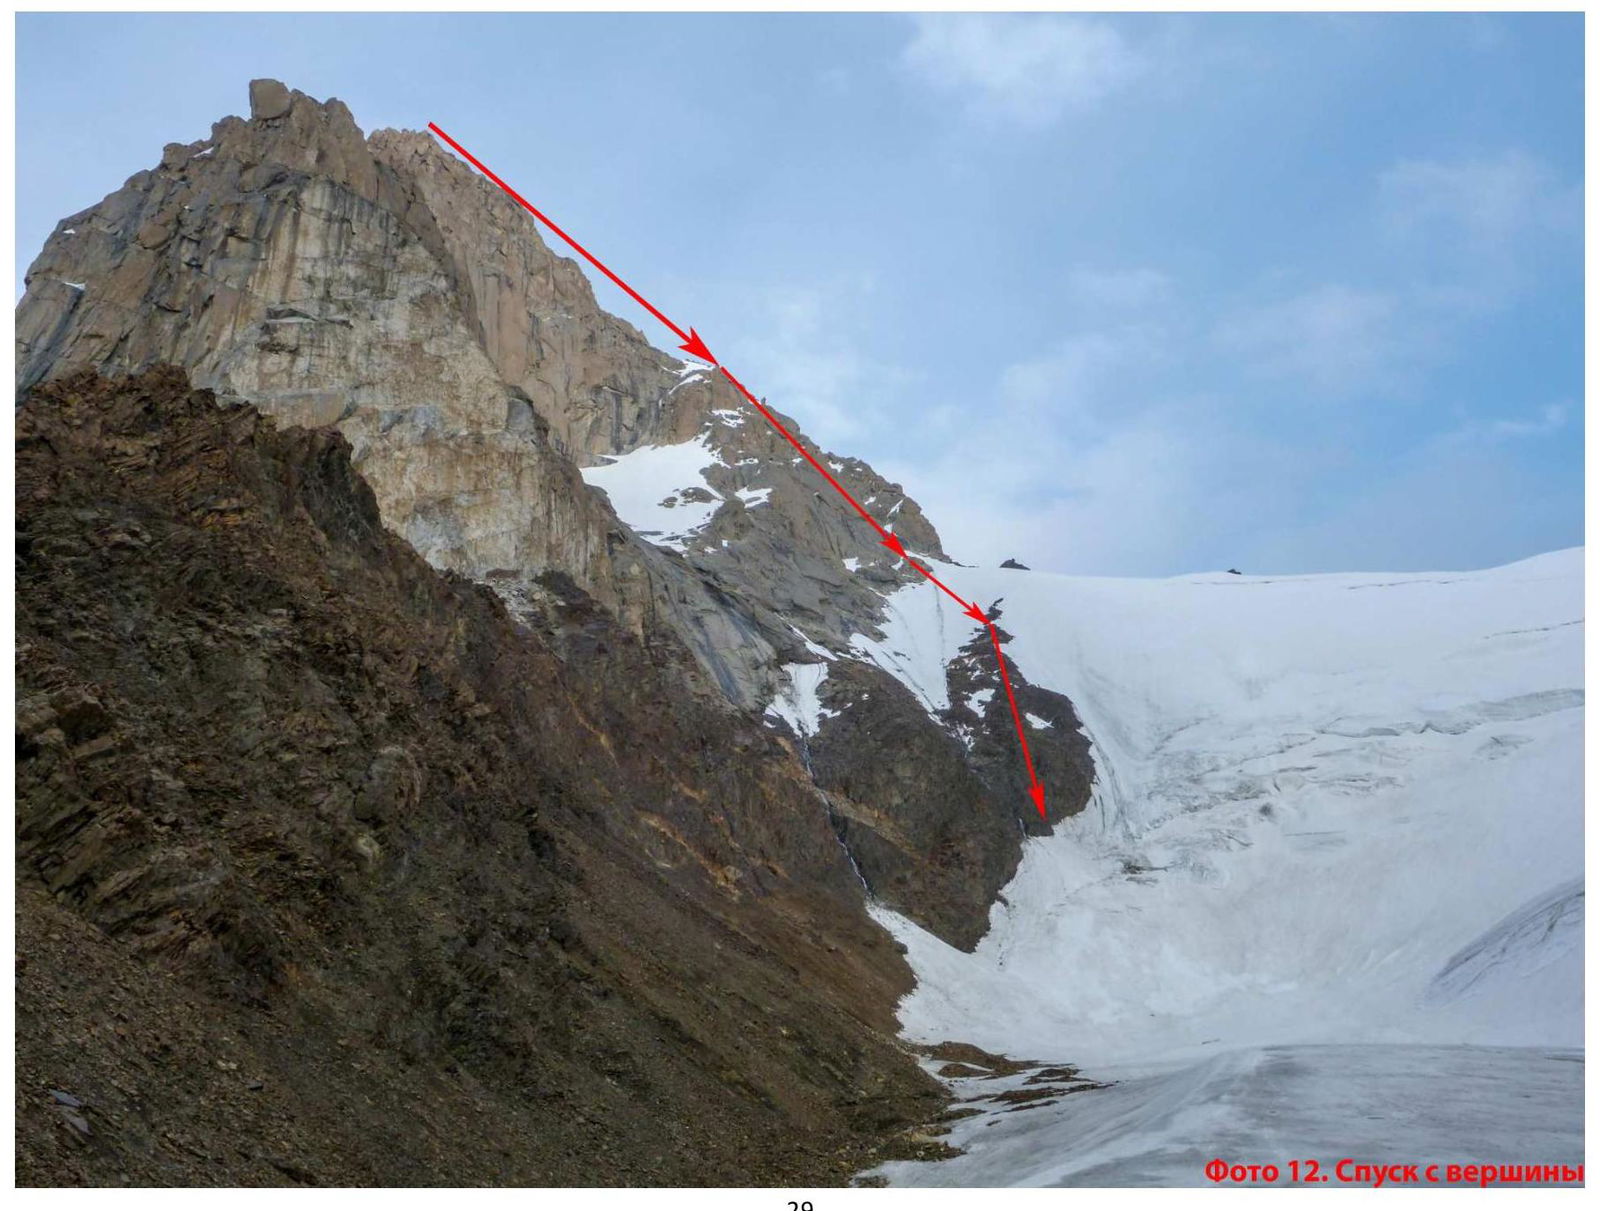
Descent is via the S ridge towards a snow saddle (see photo 12), about ten rappels, sometimes walking. From the saddle (depending on snow conditions), walk or rappel 2–3 times to a rocky debris slope to the right, then walk. At the bottom, one rappel onto a gentle part of the glacier, followed by walking. A small 50-meter ascent to the Sabakh pass and descent under the N wall of Sabakh Peak to Base Camp.
The key section of the route (R4–R7) is a sheer wall with a series of overhangs. There are many cracks, but they are all heavily destroyed. In warm weather, the presence of water on sections R4–R8 adds significant difficulties. Above the first buttress (R13), the rocks become more monolithic.
Recommendations for equipment: it is highly desirable to have large gear (up to camalot #4), hole skyhooks (5 mm), and no platform is needed on the route; all bivouacs are on convenient ledges.
Note from the Summit
"The Moscow sports committee alpine team, completing the traverse of the Ashat wall (peaks 4700–4750–4810–Sabakh), finishes it by ascending Sabakh peak from the col between peaks 4810 and Sabakh. The traverse is part of the 1990 USSR Championship. Team members:
- Petrov N. E. — captain,
- Bashkirov V. A.
- Belyaev N. N.
- Egorov A. A.
- Mikhailov S. V.
- Koroteev V. K.
- Stetsenko V. D.
- Yanochkin V. I.
Summit reached on August 3, 1990, 6:45 PM. Weather: average (heavy cloud cover). Greetings to the next climbers."
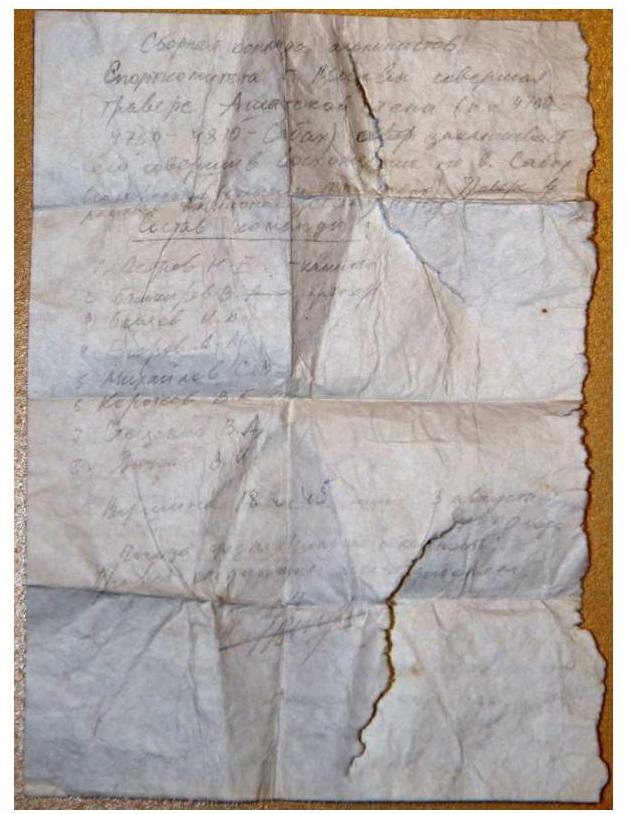
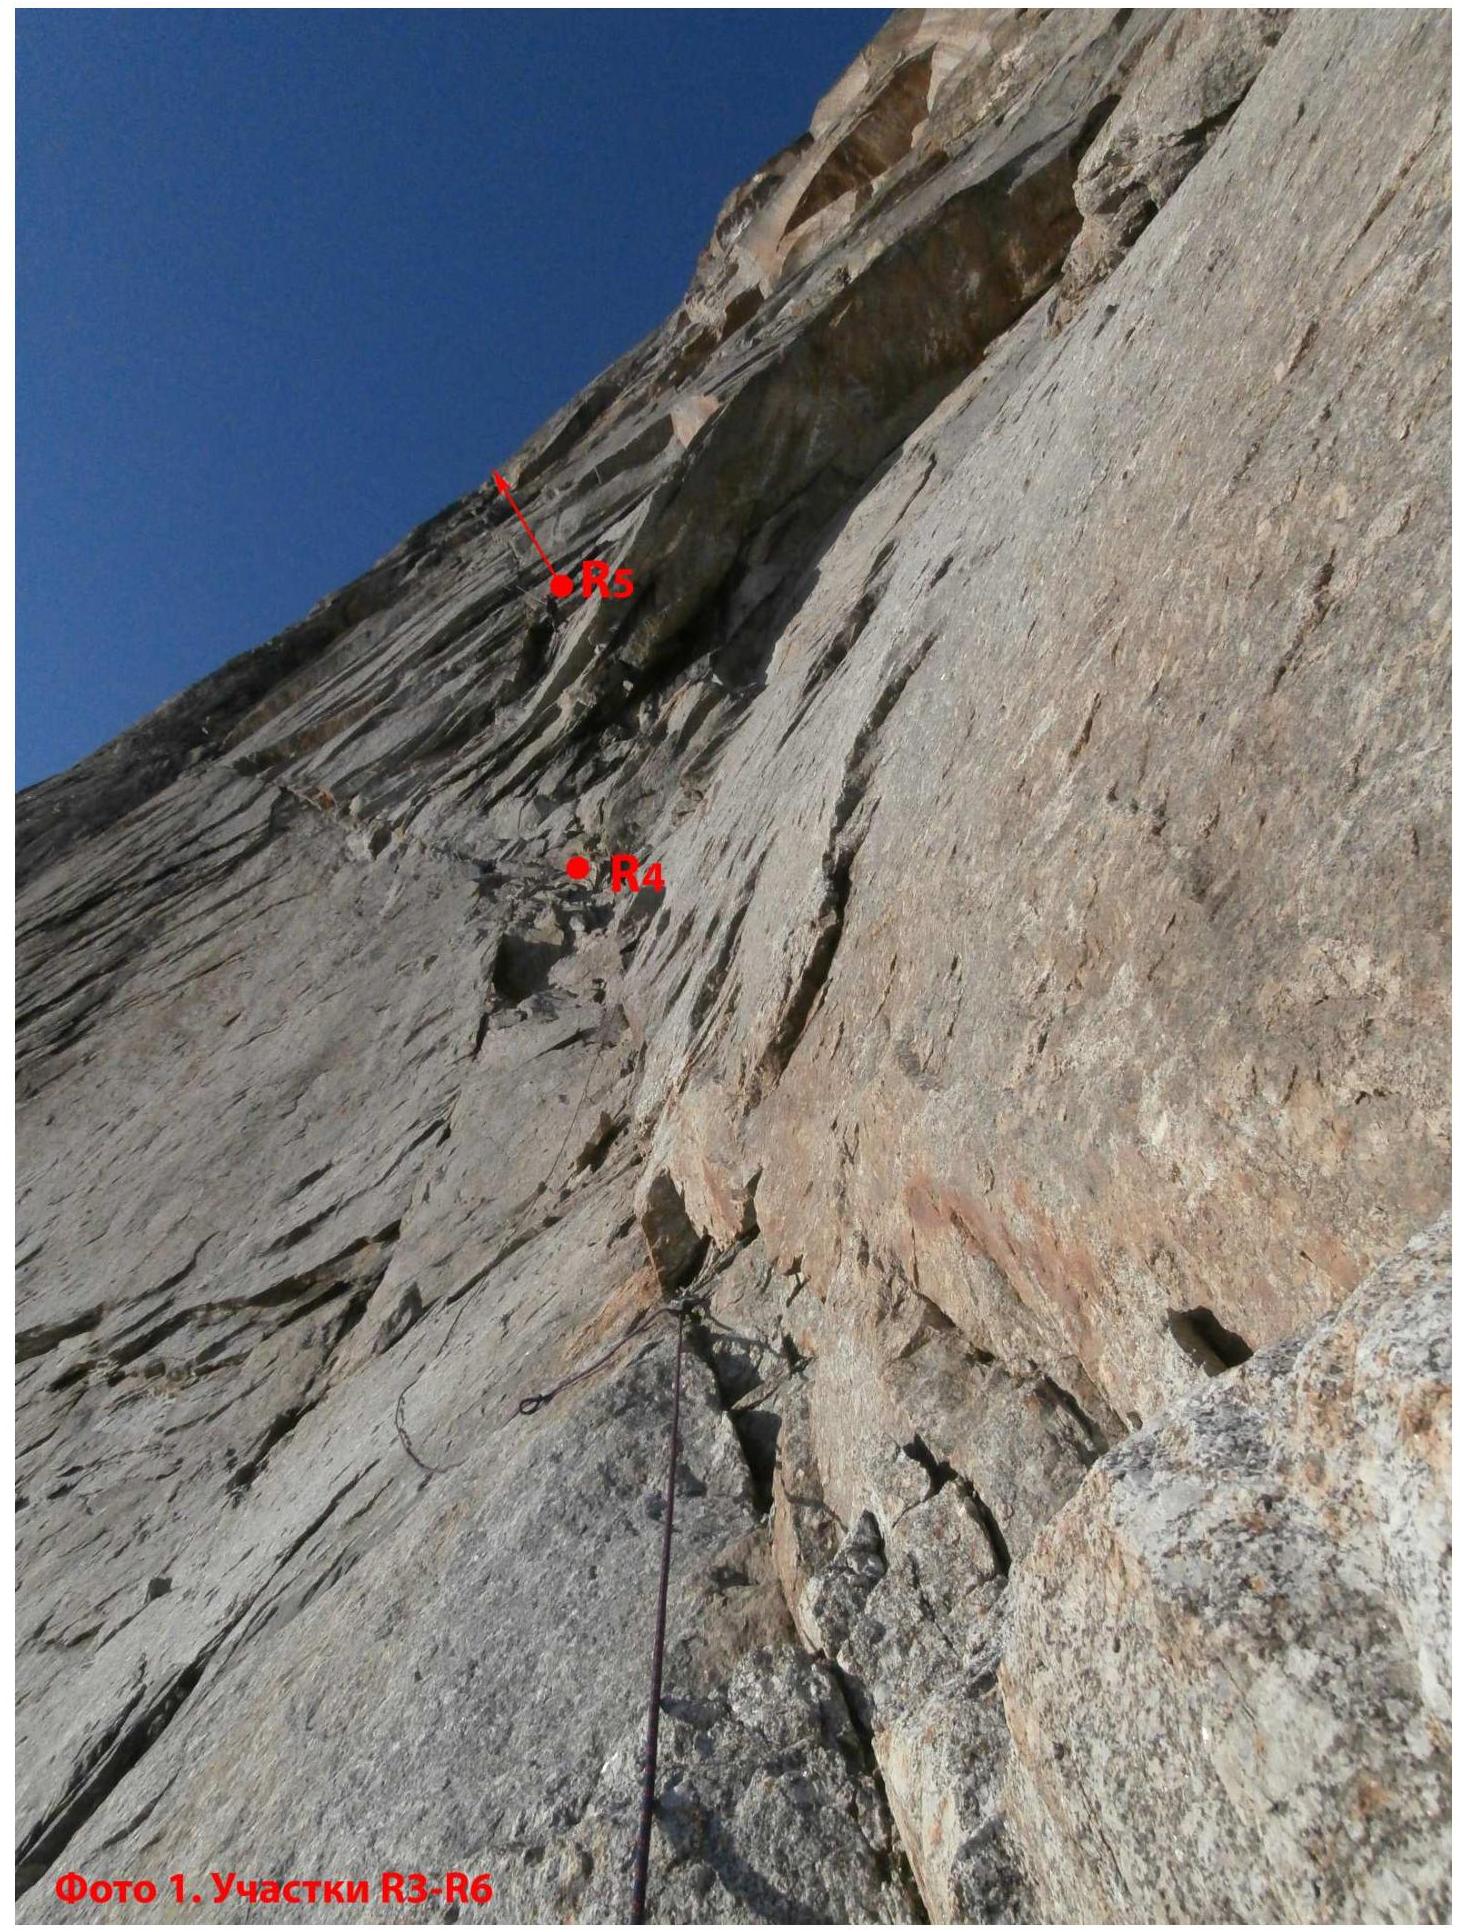
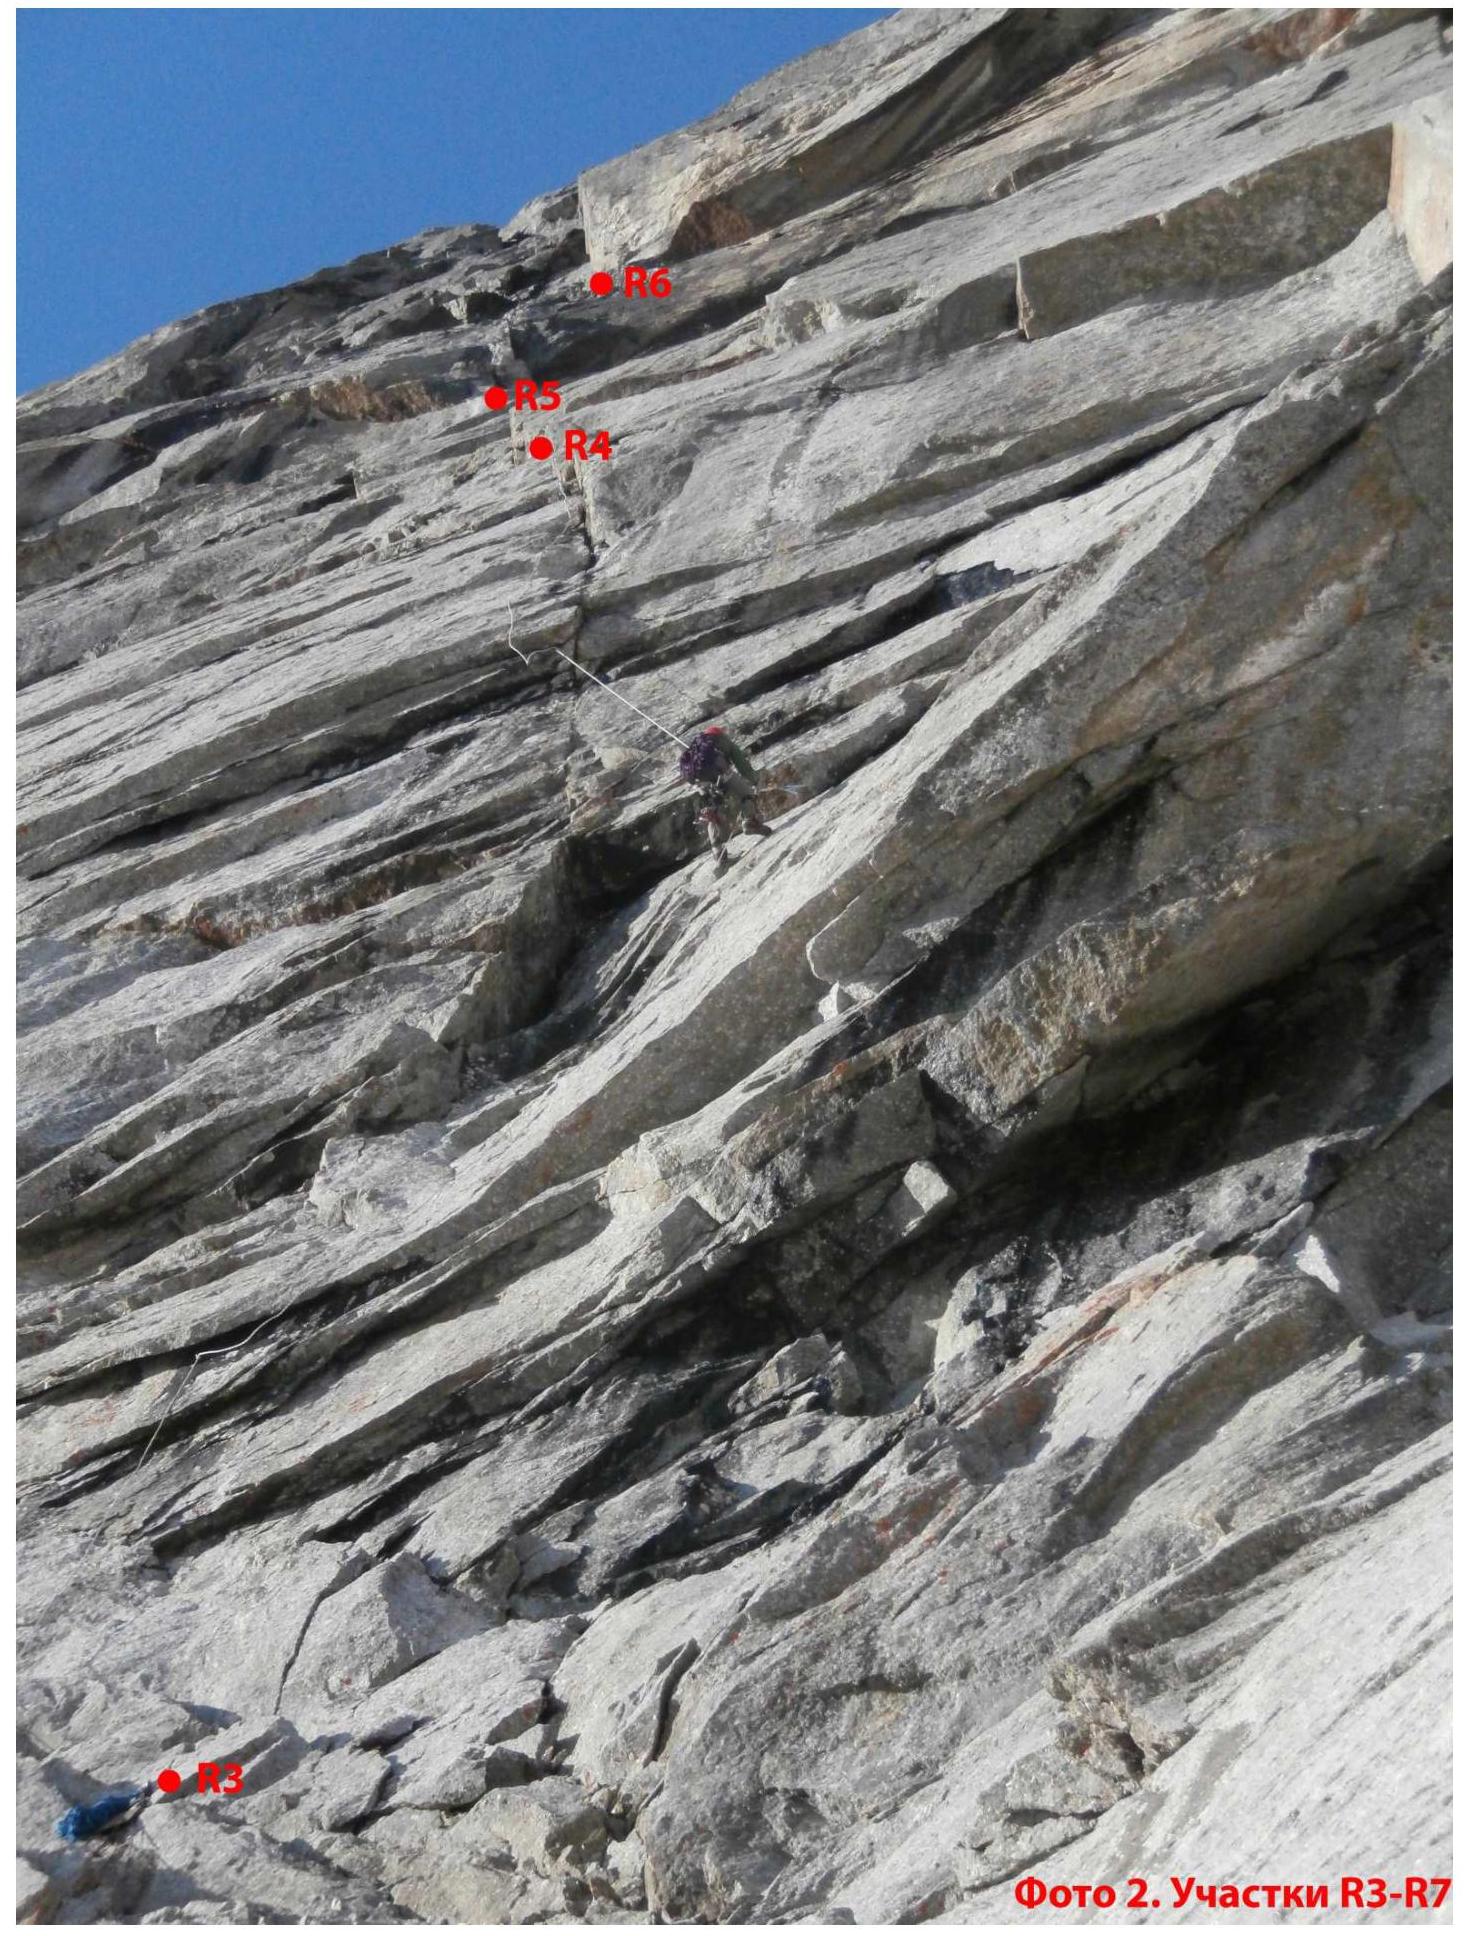
Photo 2. Sections R3–R7
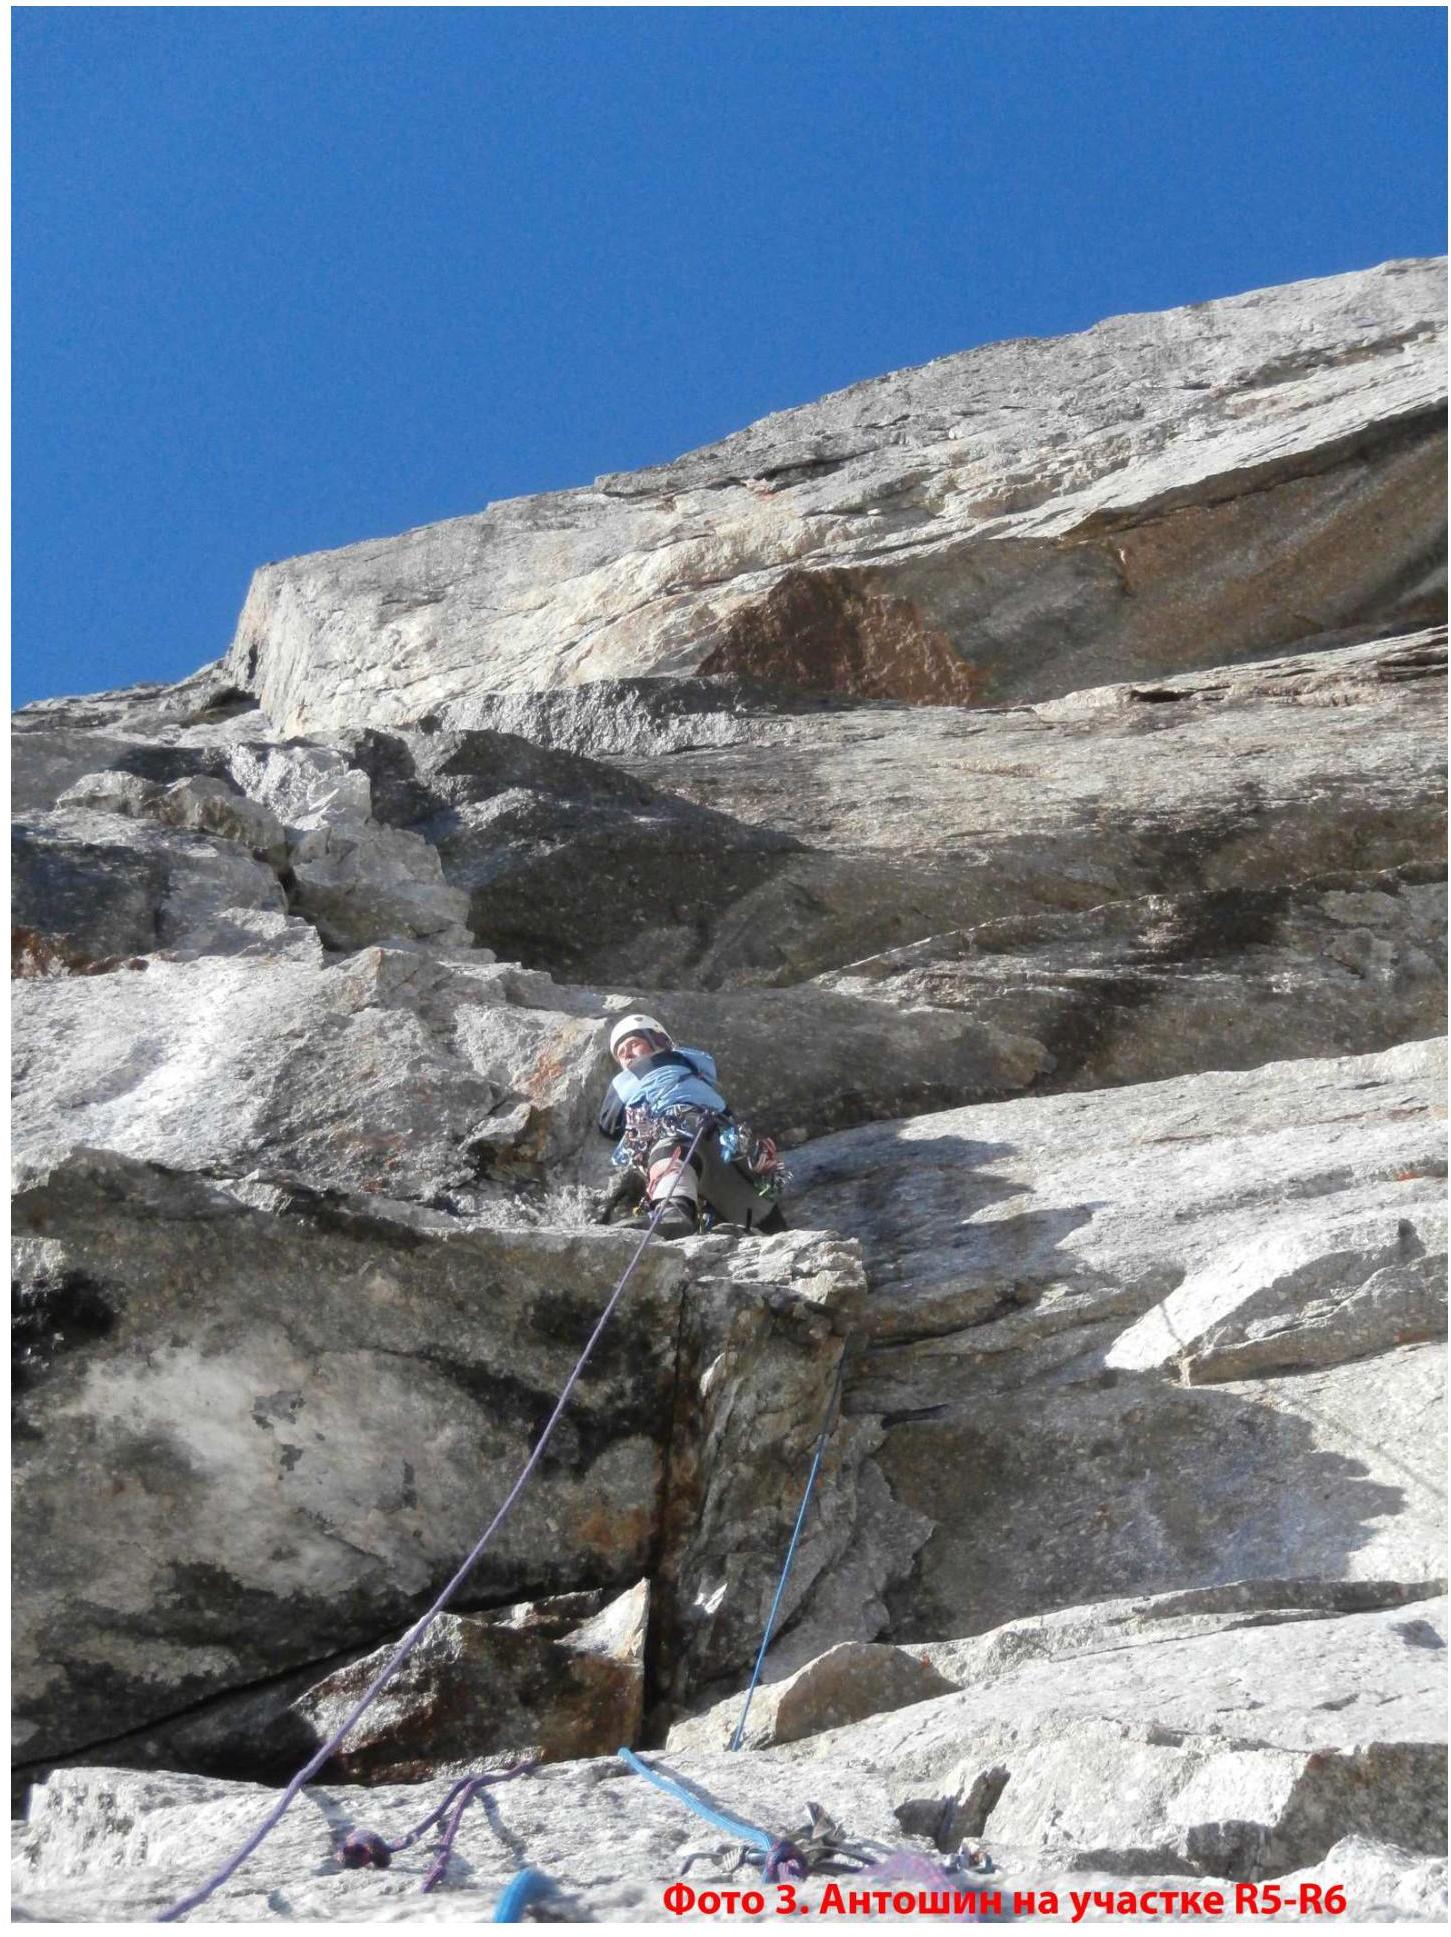
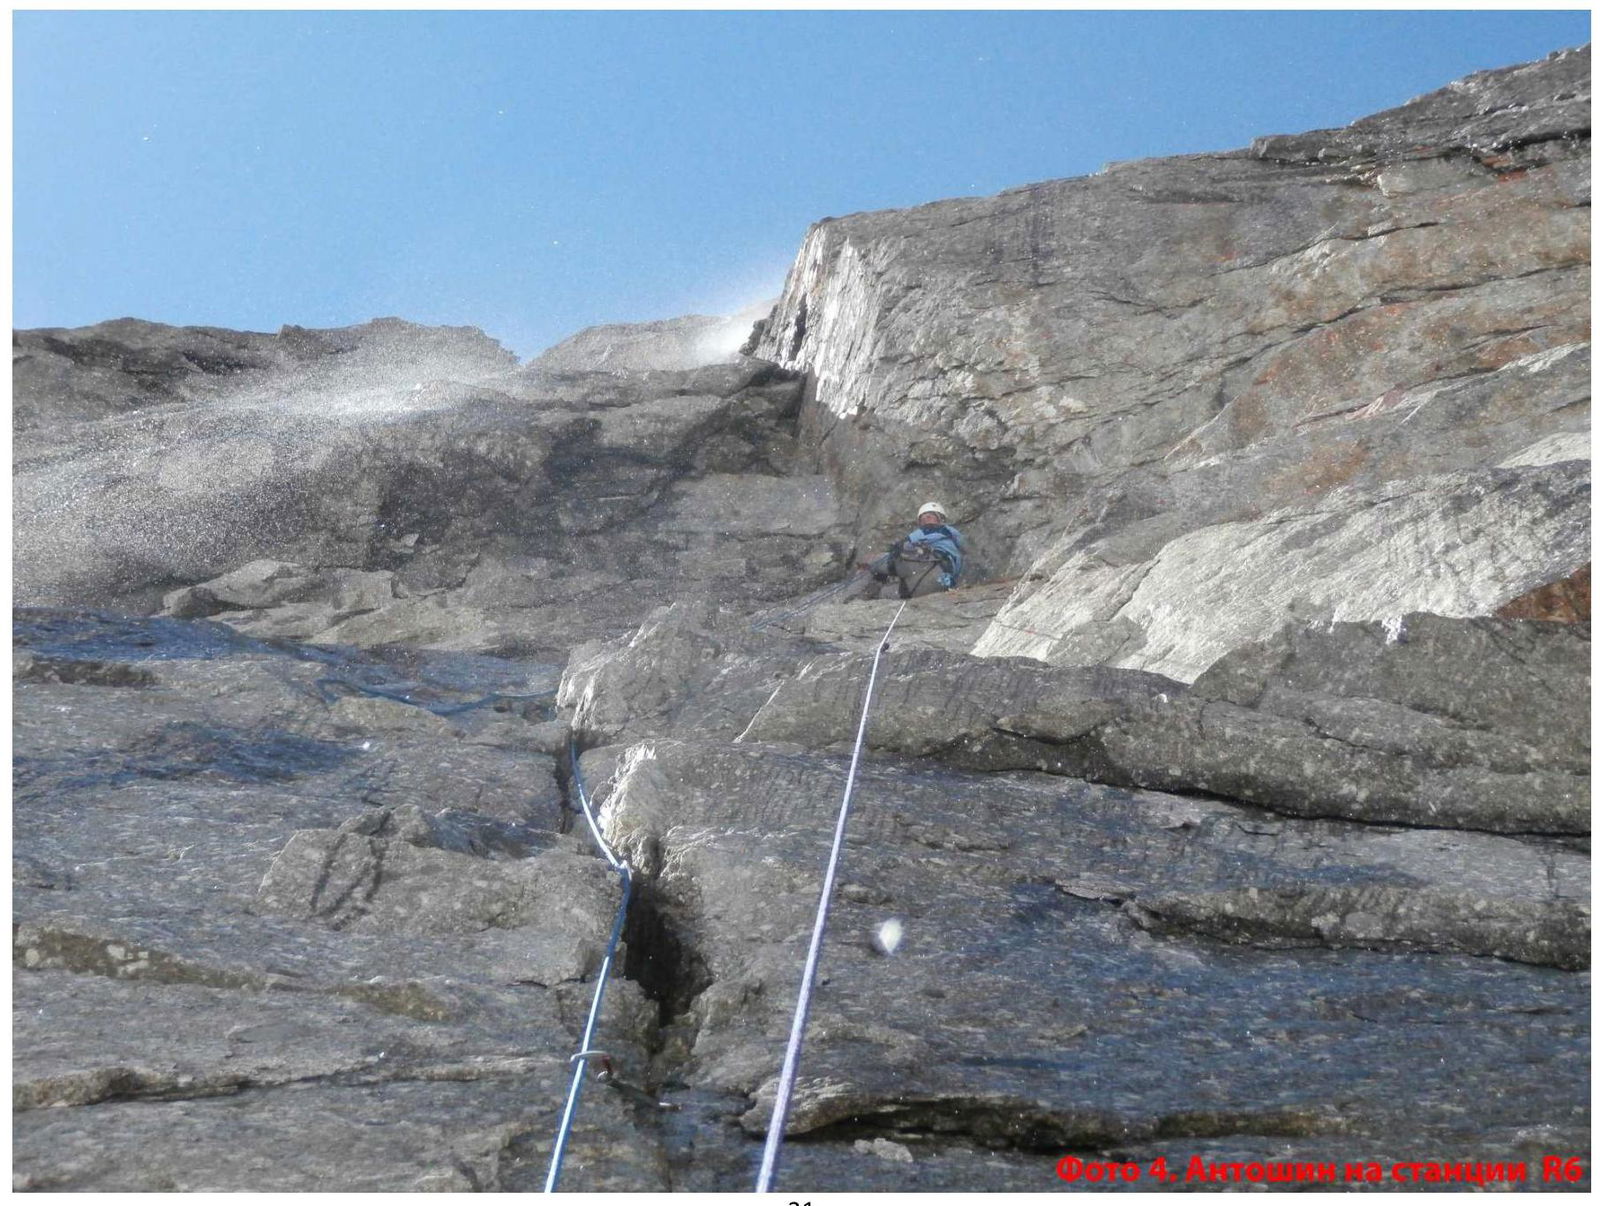
Photo 3. Antoshin on section R5–R6

Photo 5. Osipov on section R10–R11
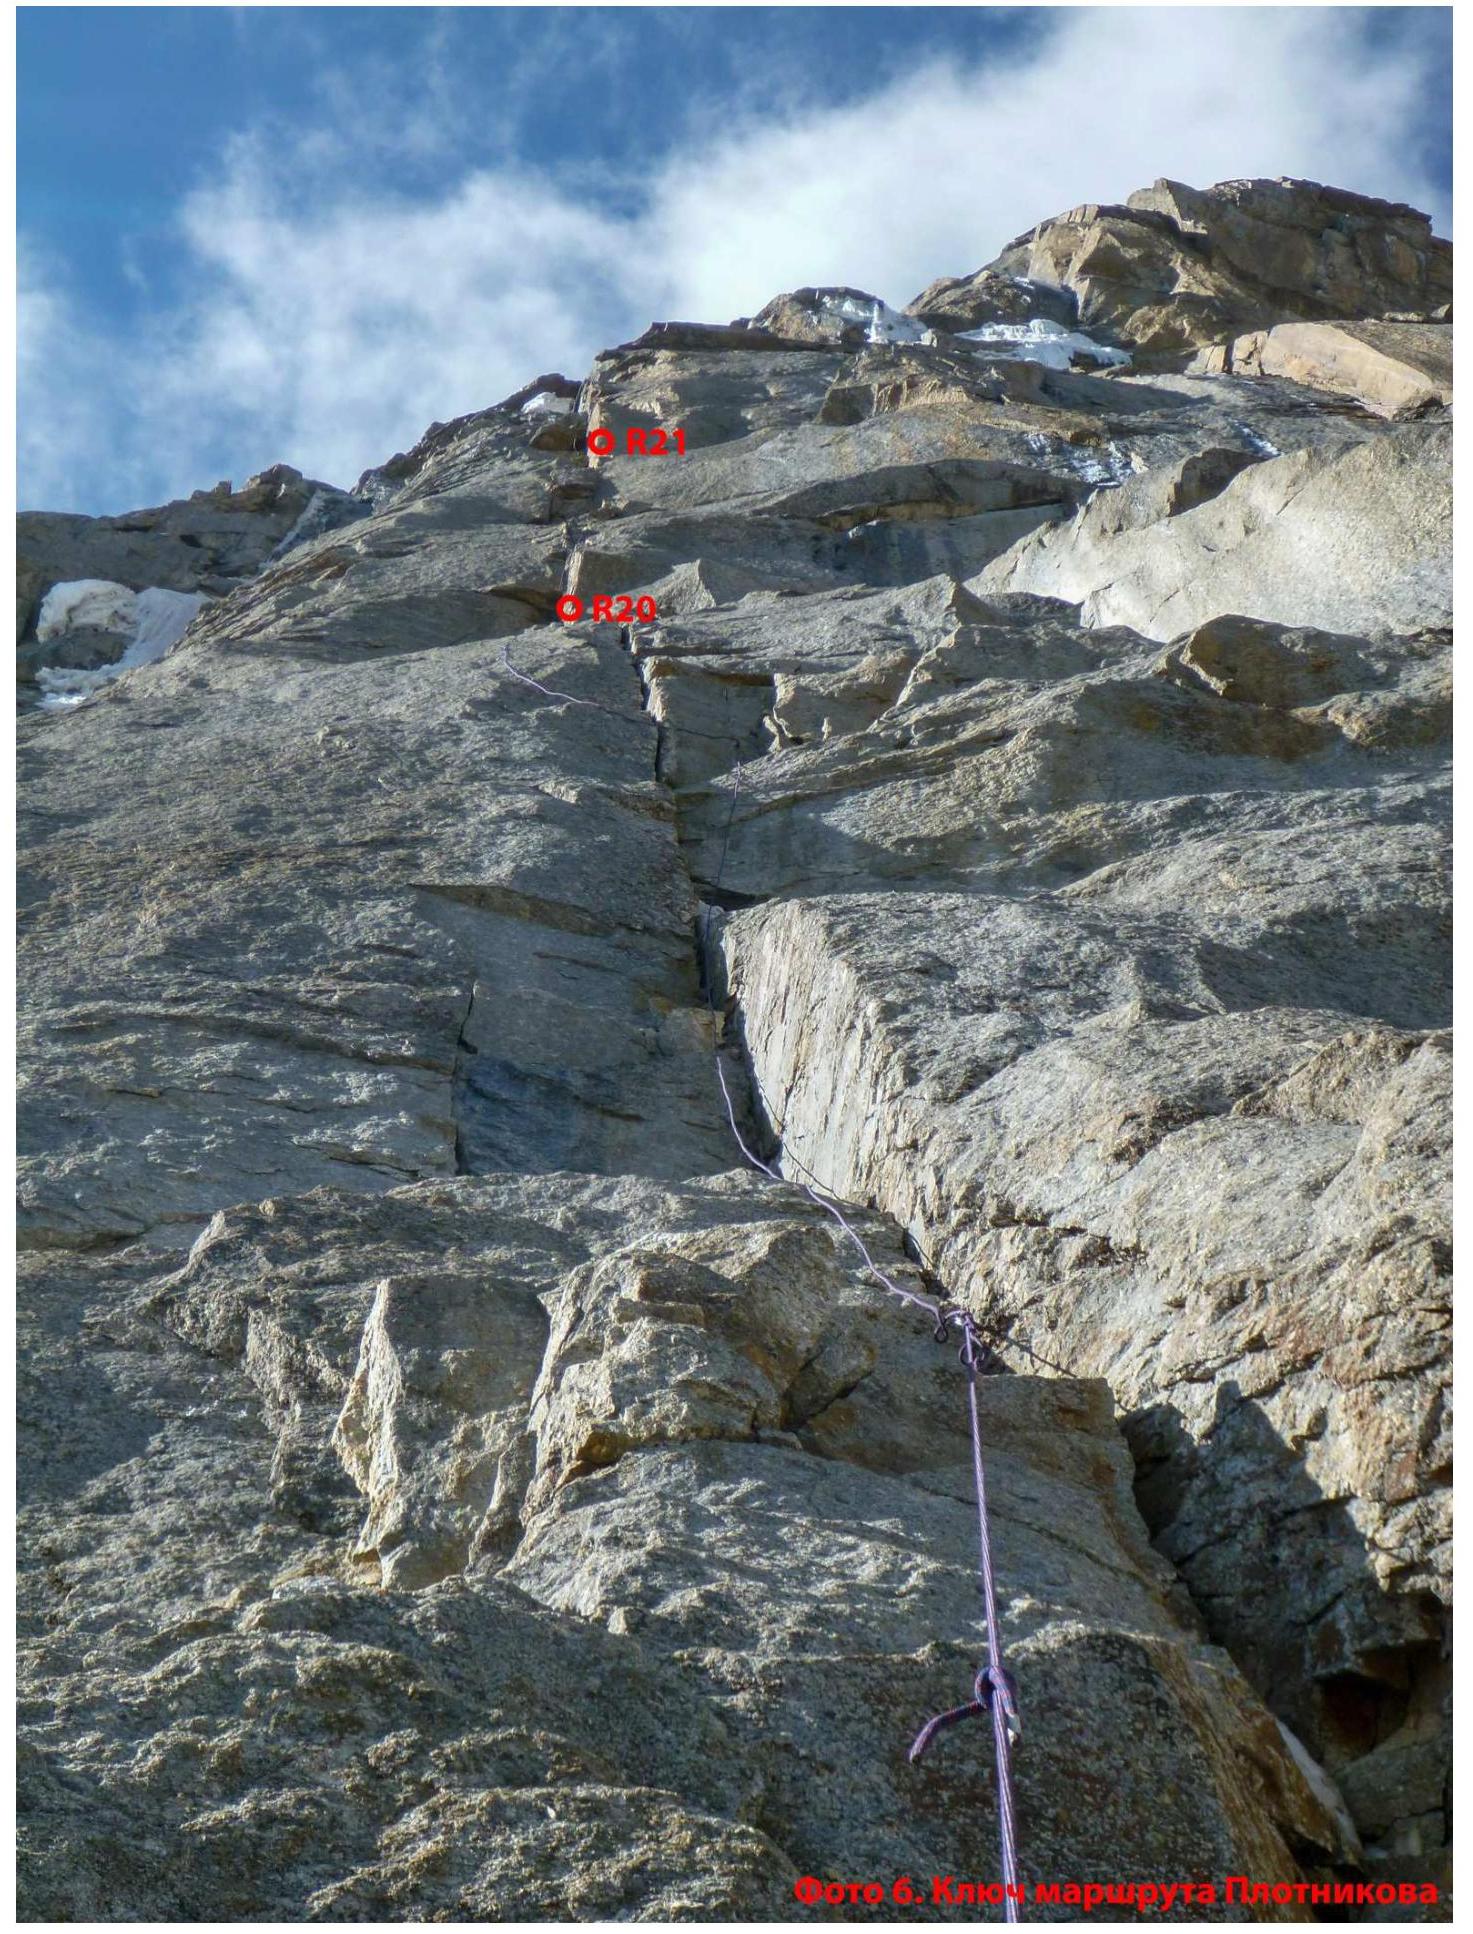
Fig. 6. Quantum Hand.
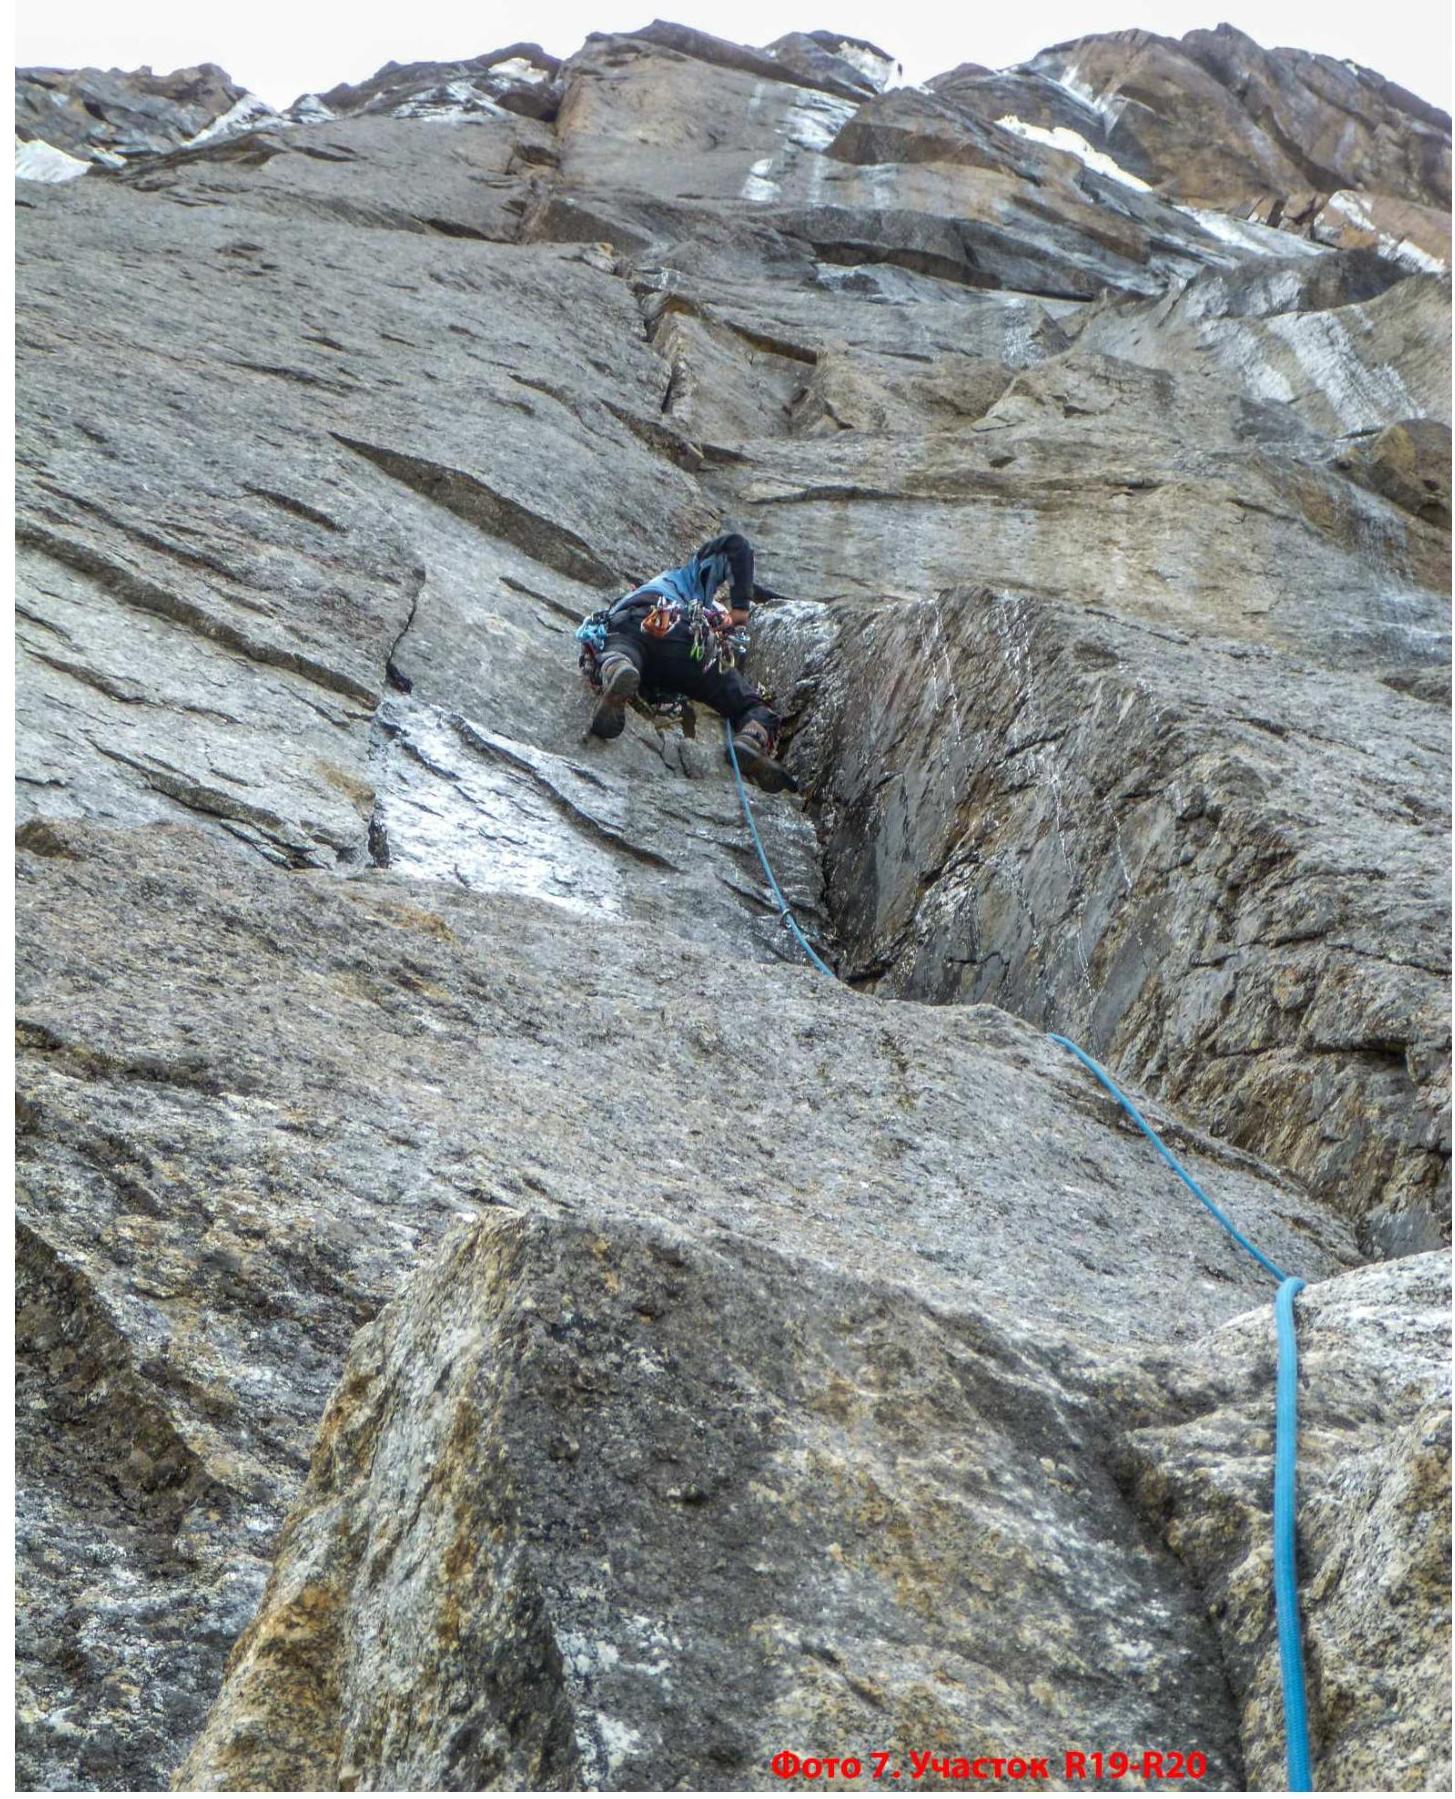
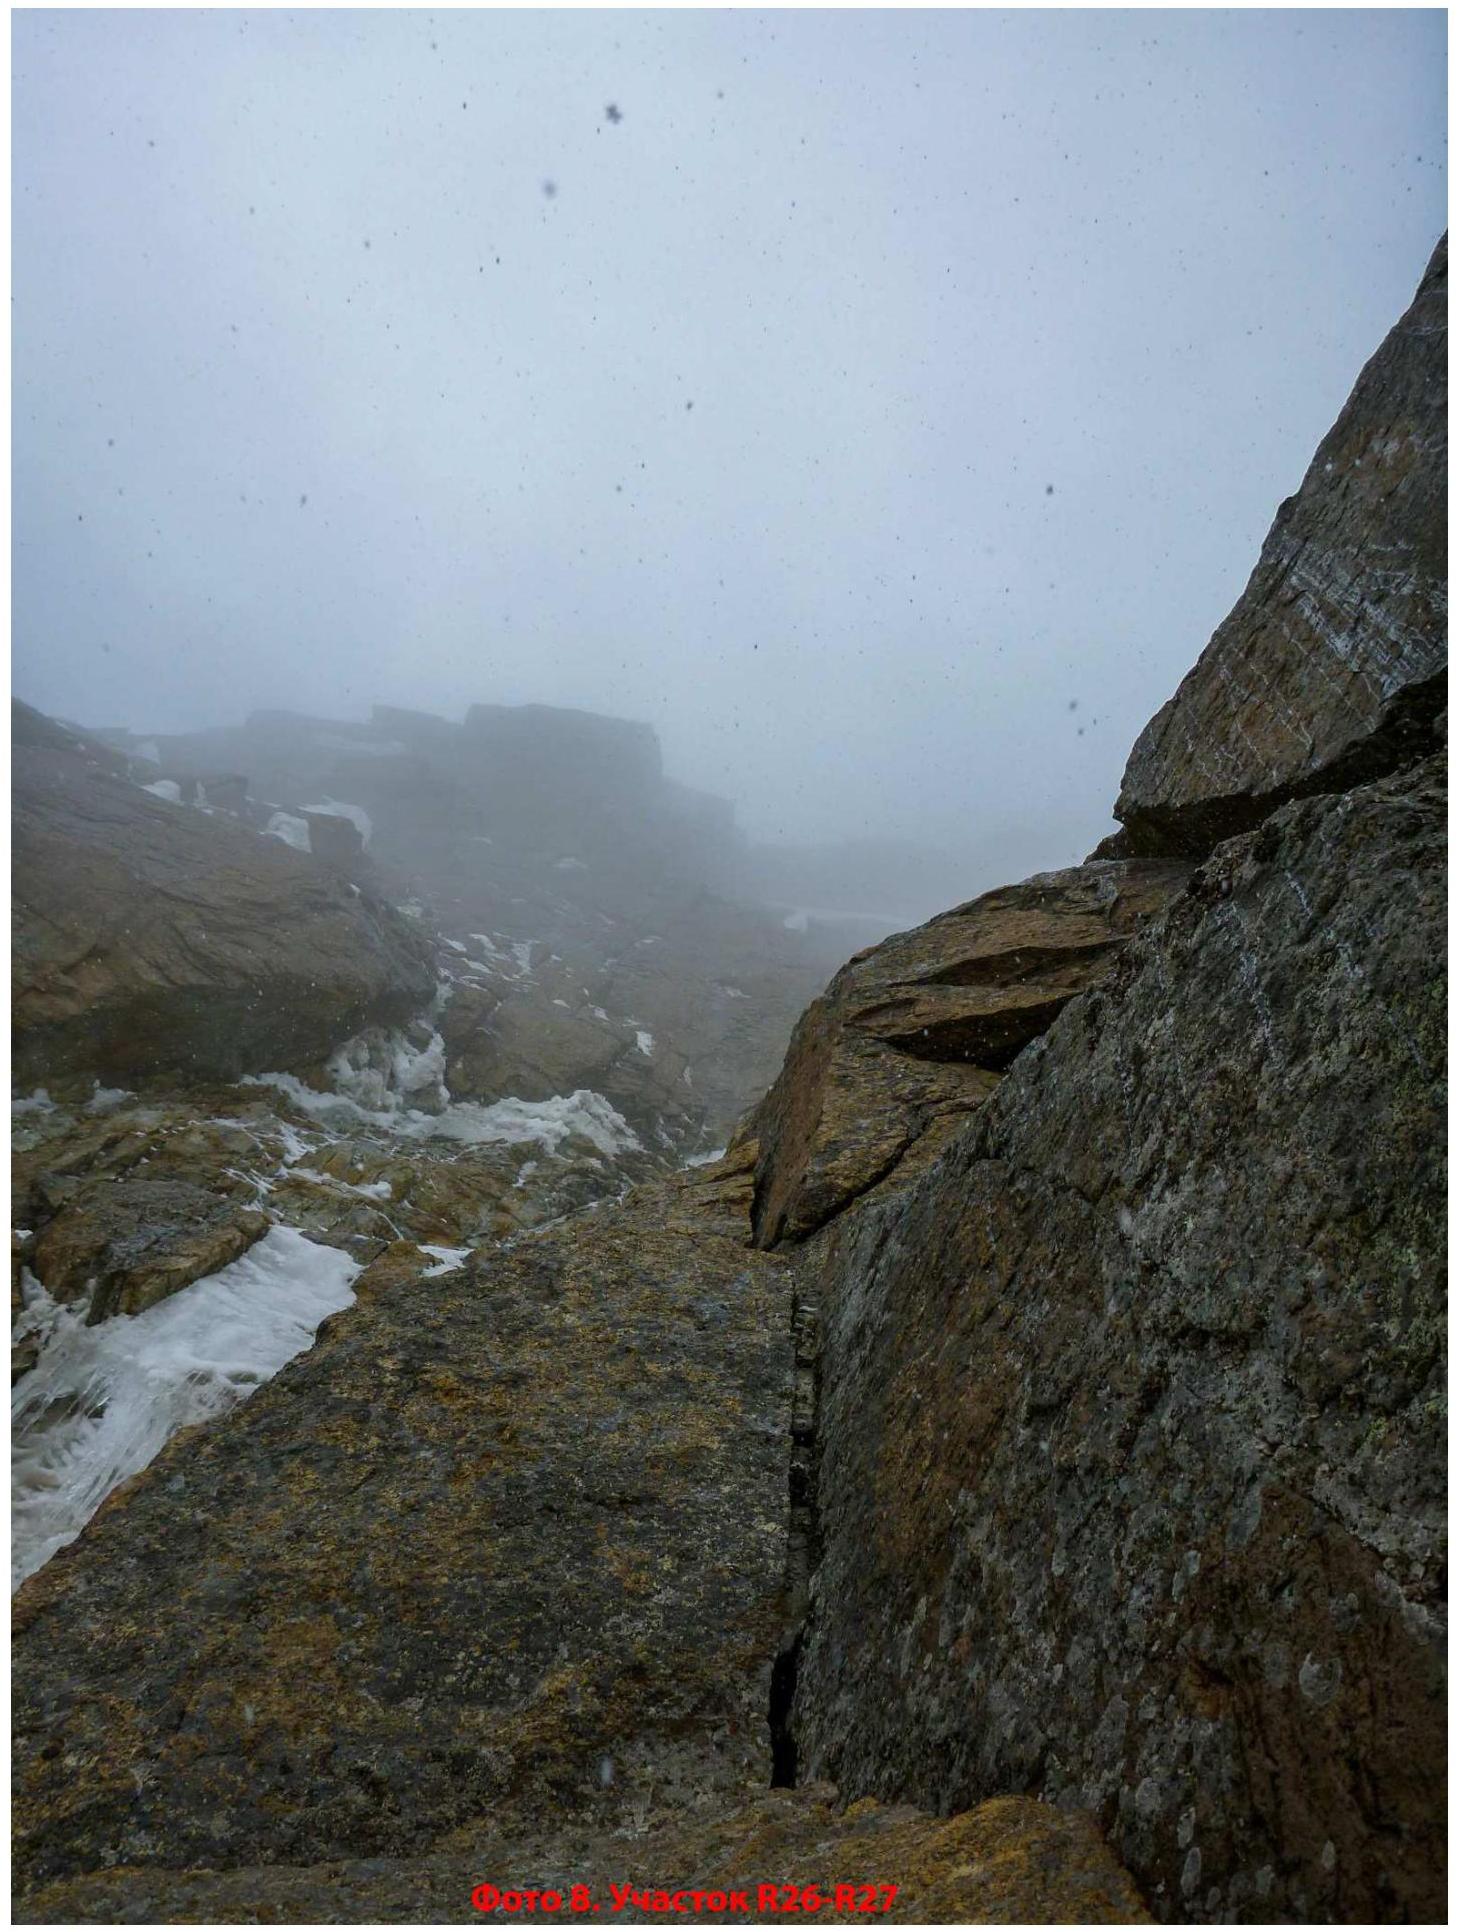
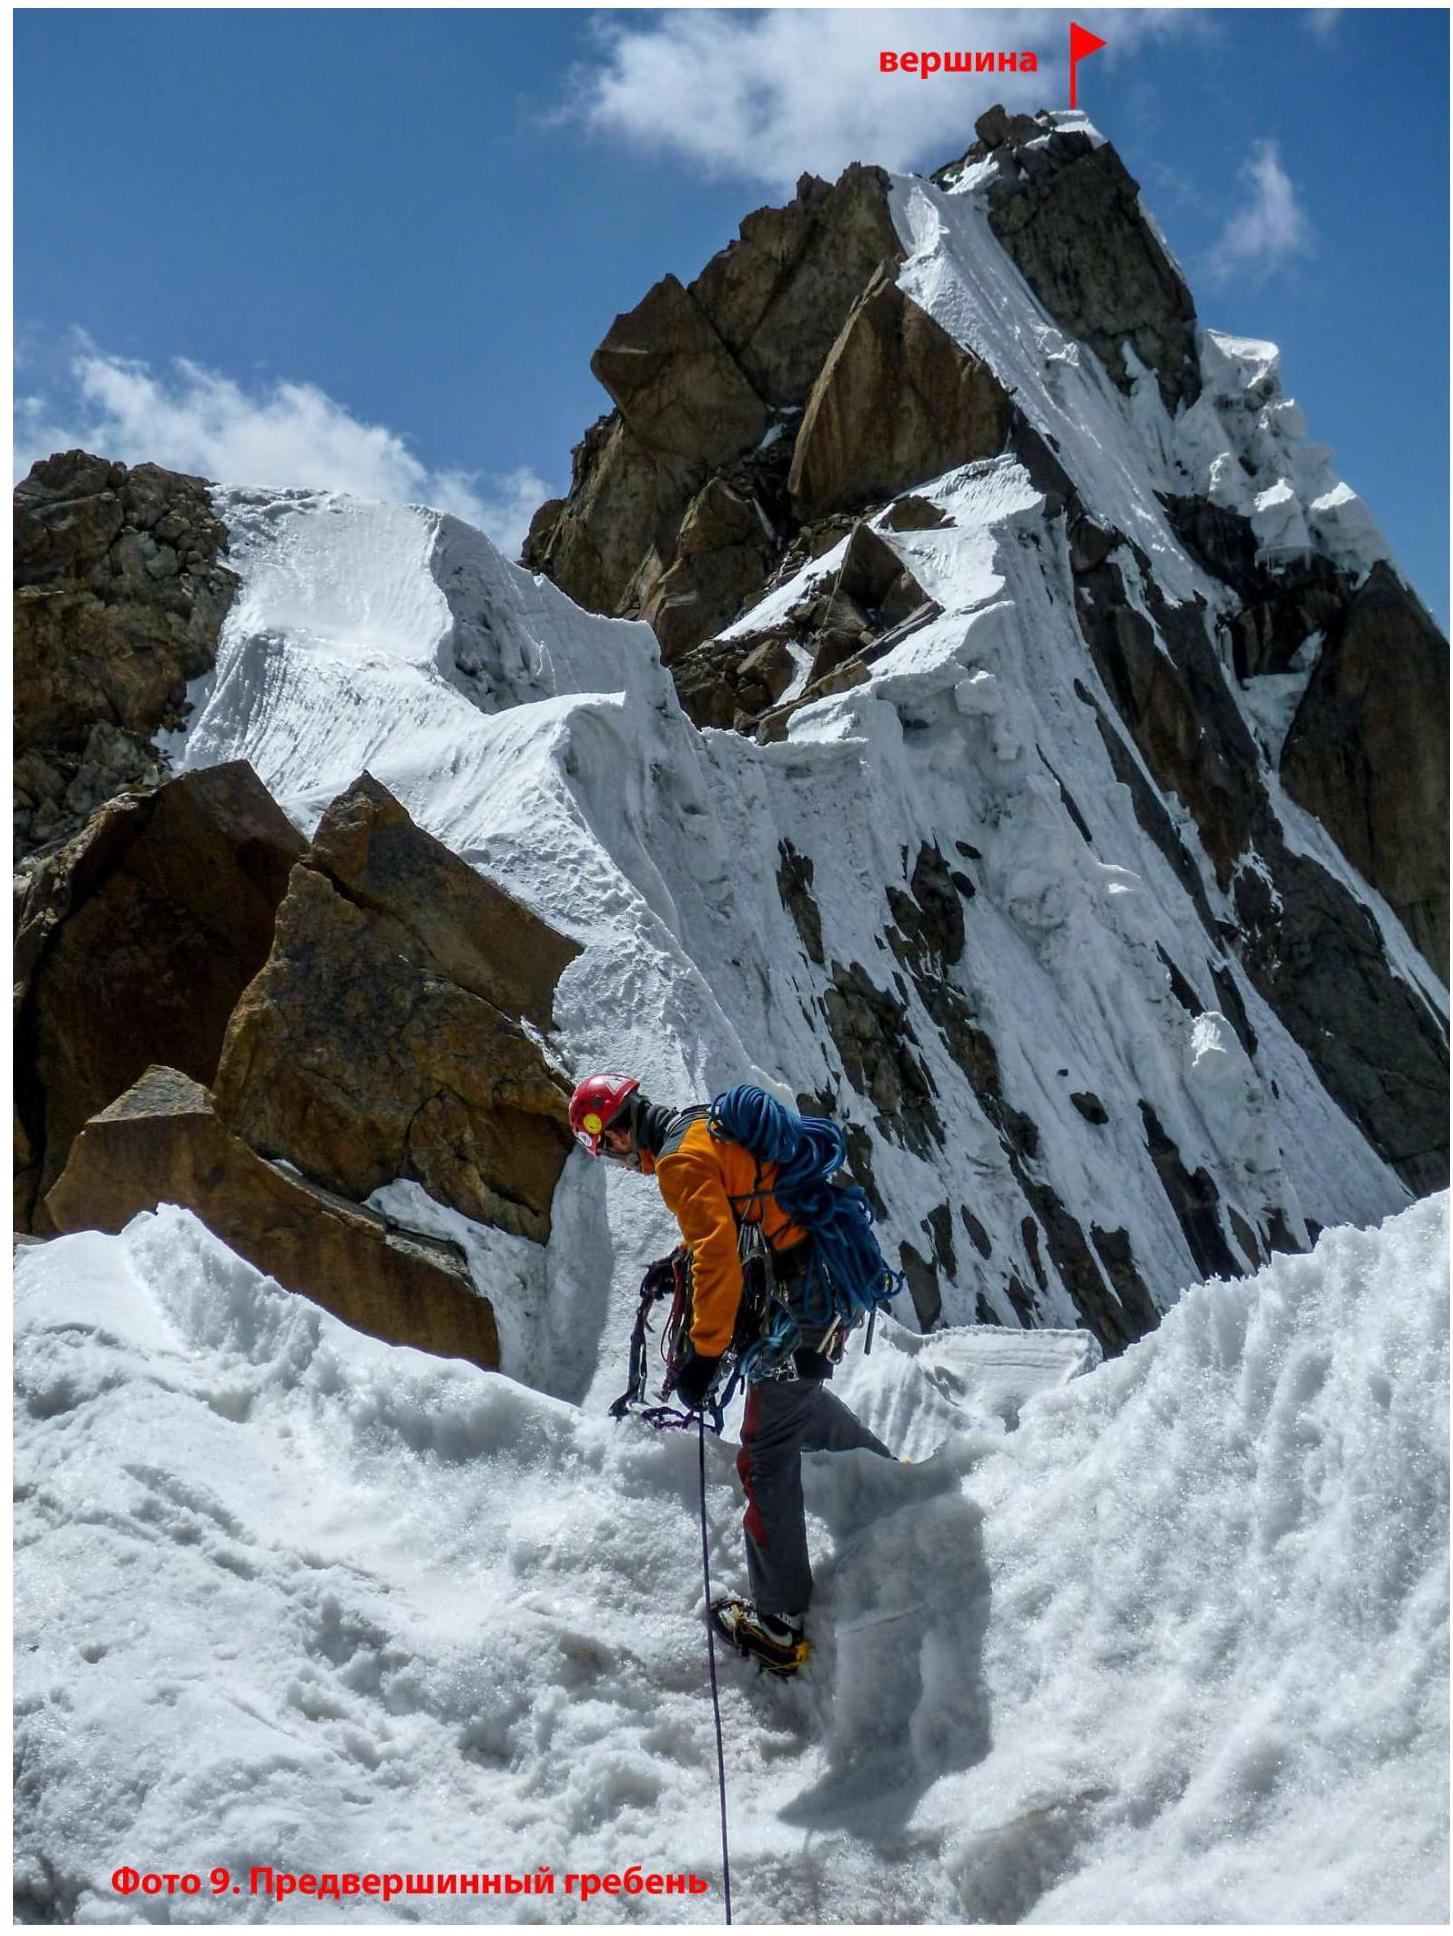
Photo 9. Pre-summit Ridge
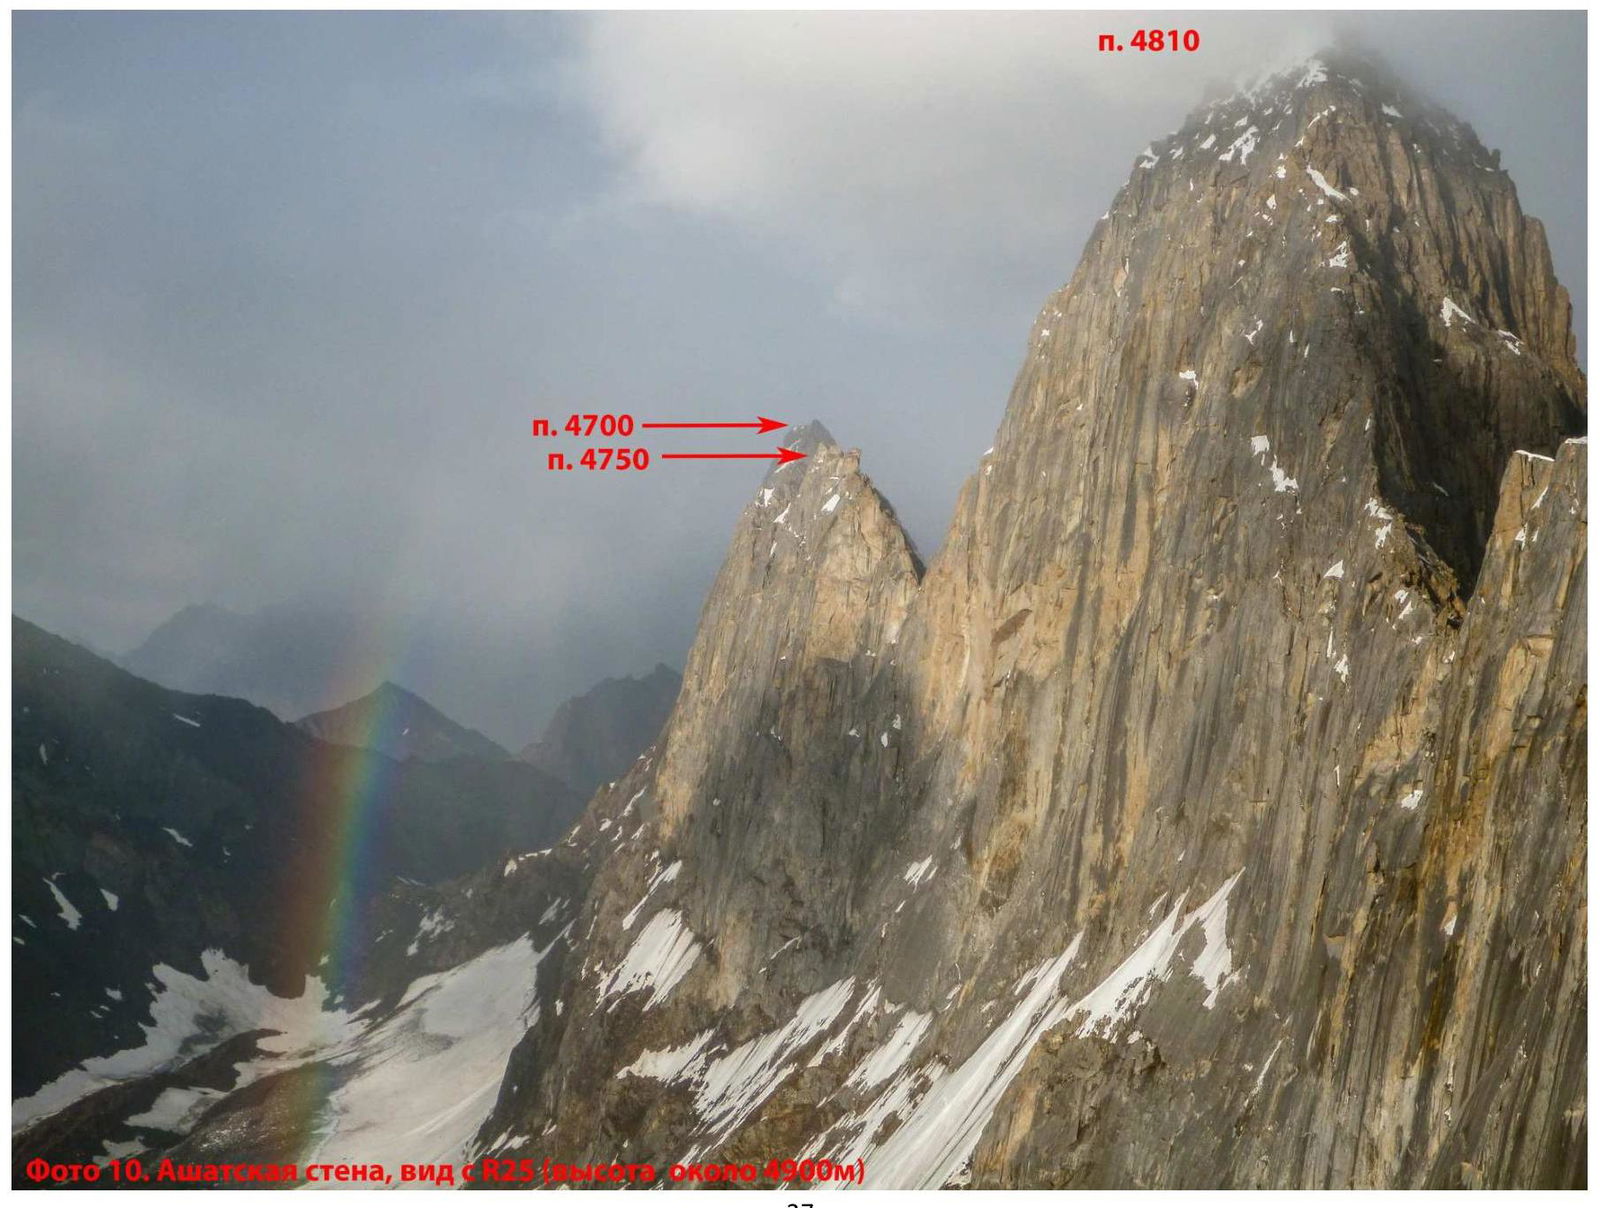
Photo 10. Ashat Wall, view from R23 (48 mm × 24 mm)
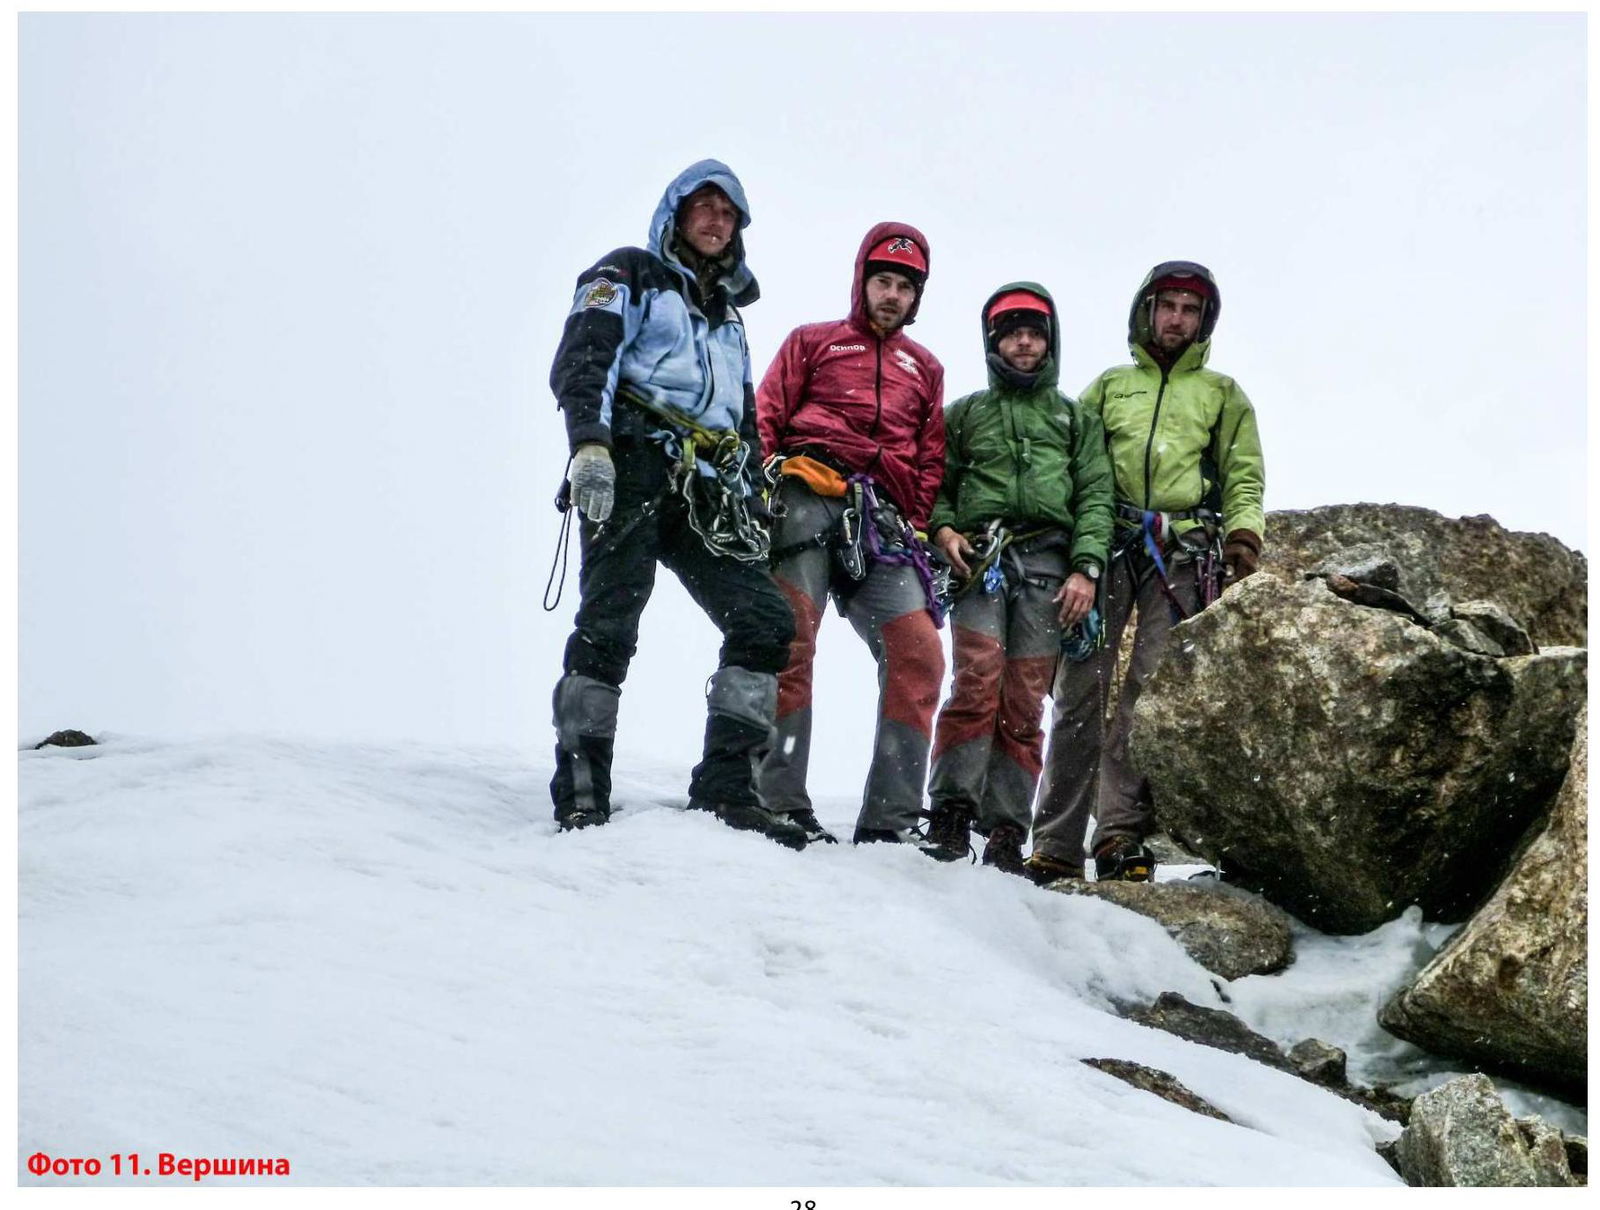
Photo 11. Summit
 2013
2013