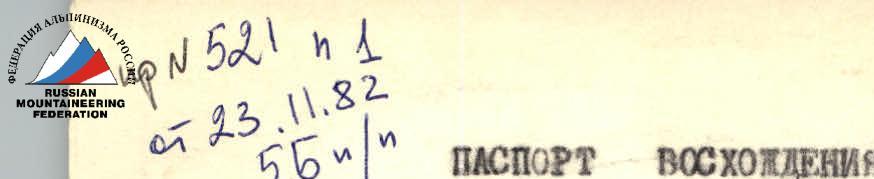
 PN 521 № 1
of 23.11.82
5B/"
PN 521 № 1
of 23.11.82
5B/"
Climbing Passport
- Category — technical
- Pamir, Yazgulyam Range, Vydvyadzh valley
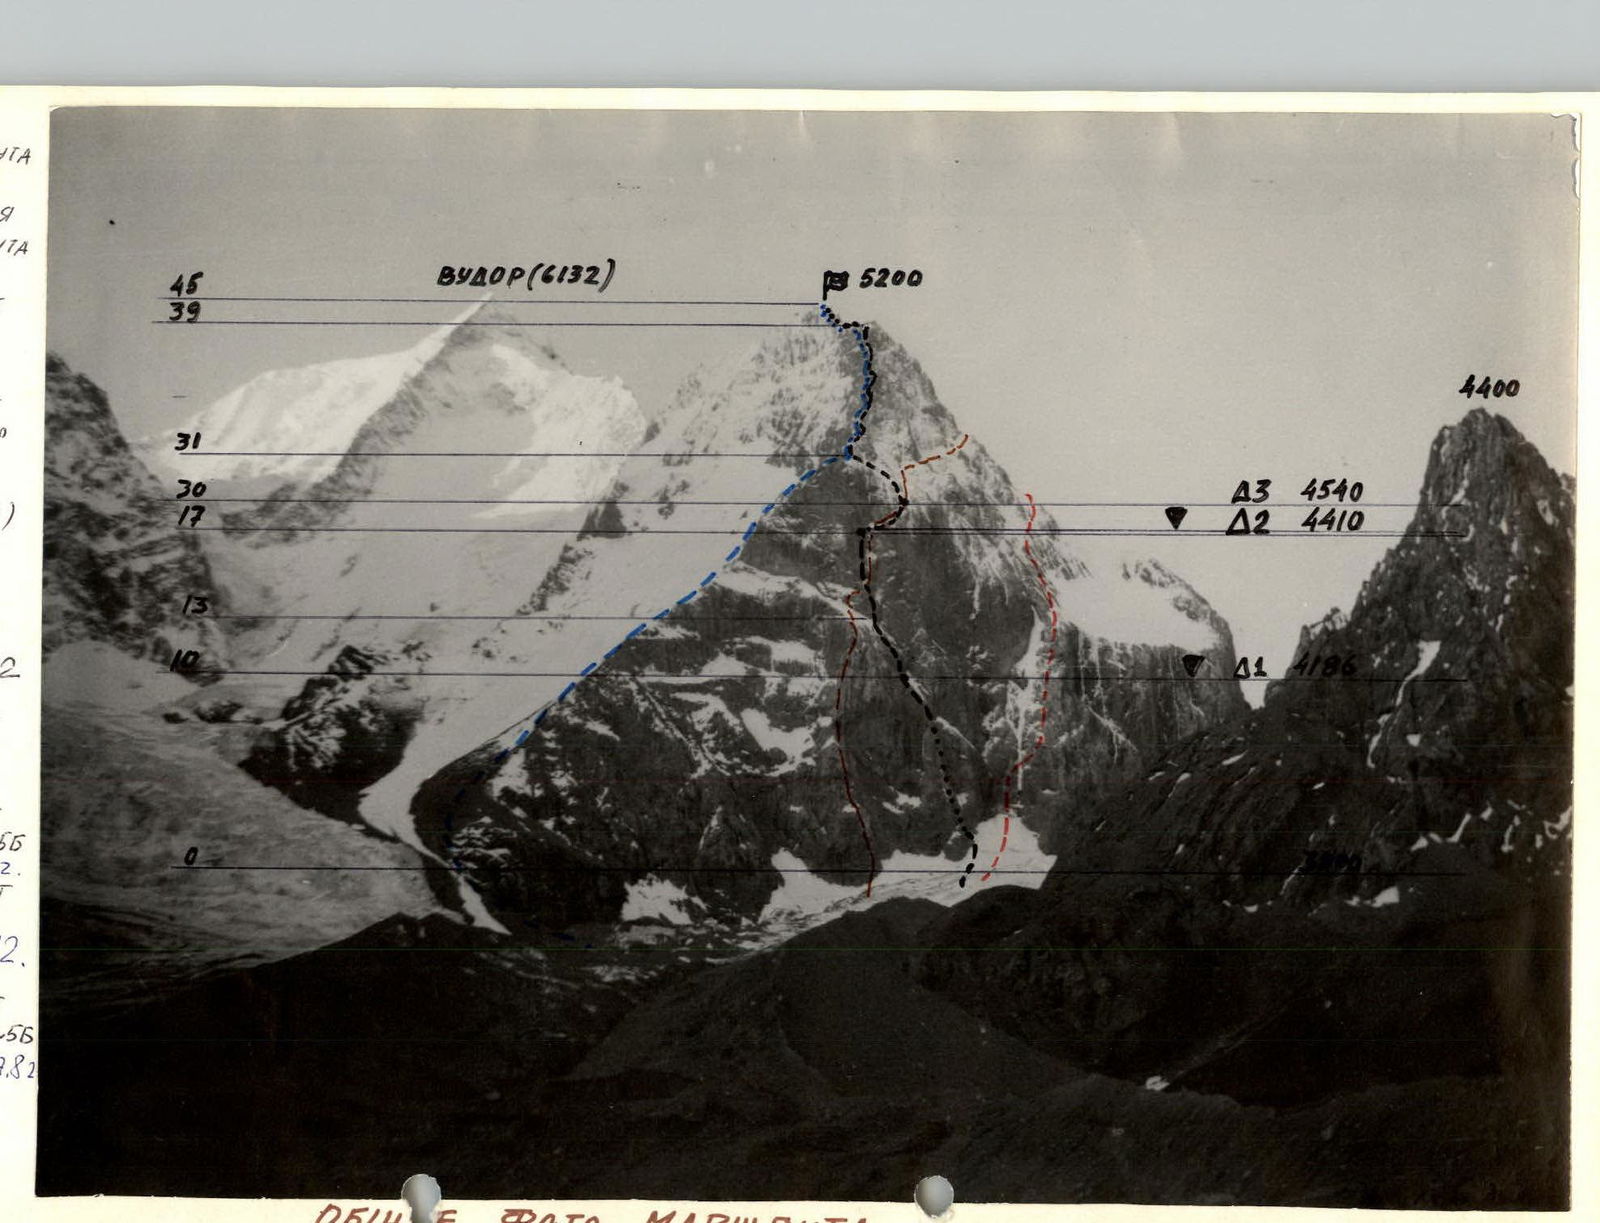
- Peak "5200", via the North-West wall through the "finger" and along the North ridge.
- Assumed — 5B category of difficulty, first ascent
- Elevation gain — 1300 m, length of sections with V–VI category of difficulty — 782 m. Average steepness of main sections — 73° (3960–4445) 74° (4750–5030) including VI category of difficulty — 244 m. 82° (3960–4040) 86° (4280–4445) 85° (4970–5030)
- Pitons used:
| Rock pitons | Chocks & cams | Bolt pitons | Ice screws |
|---|---|---|---|
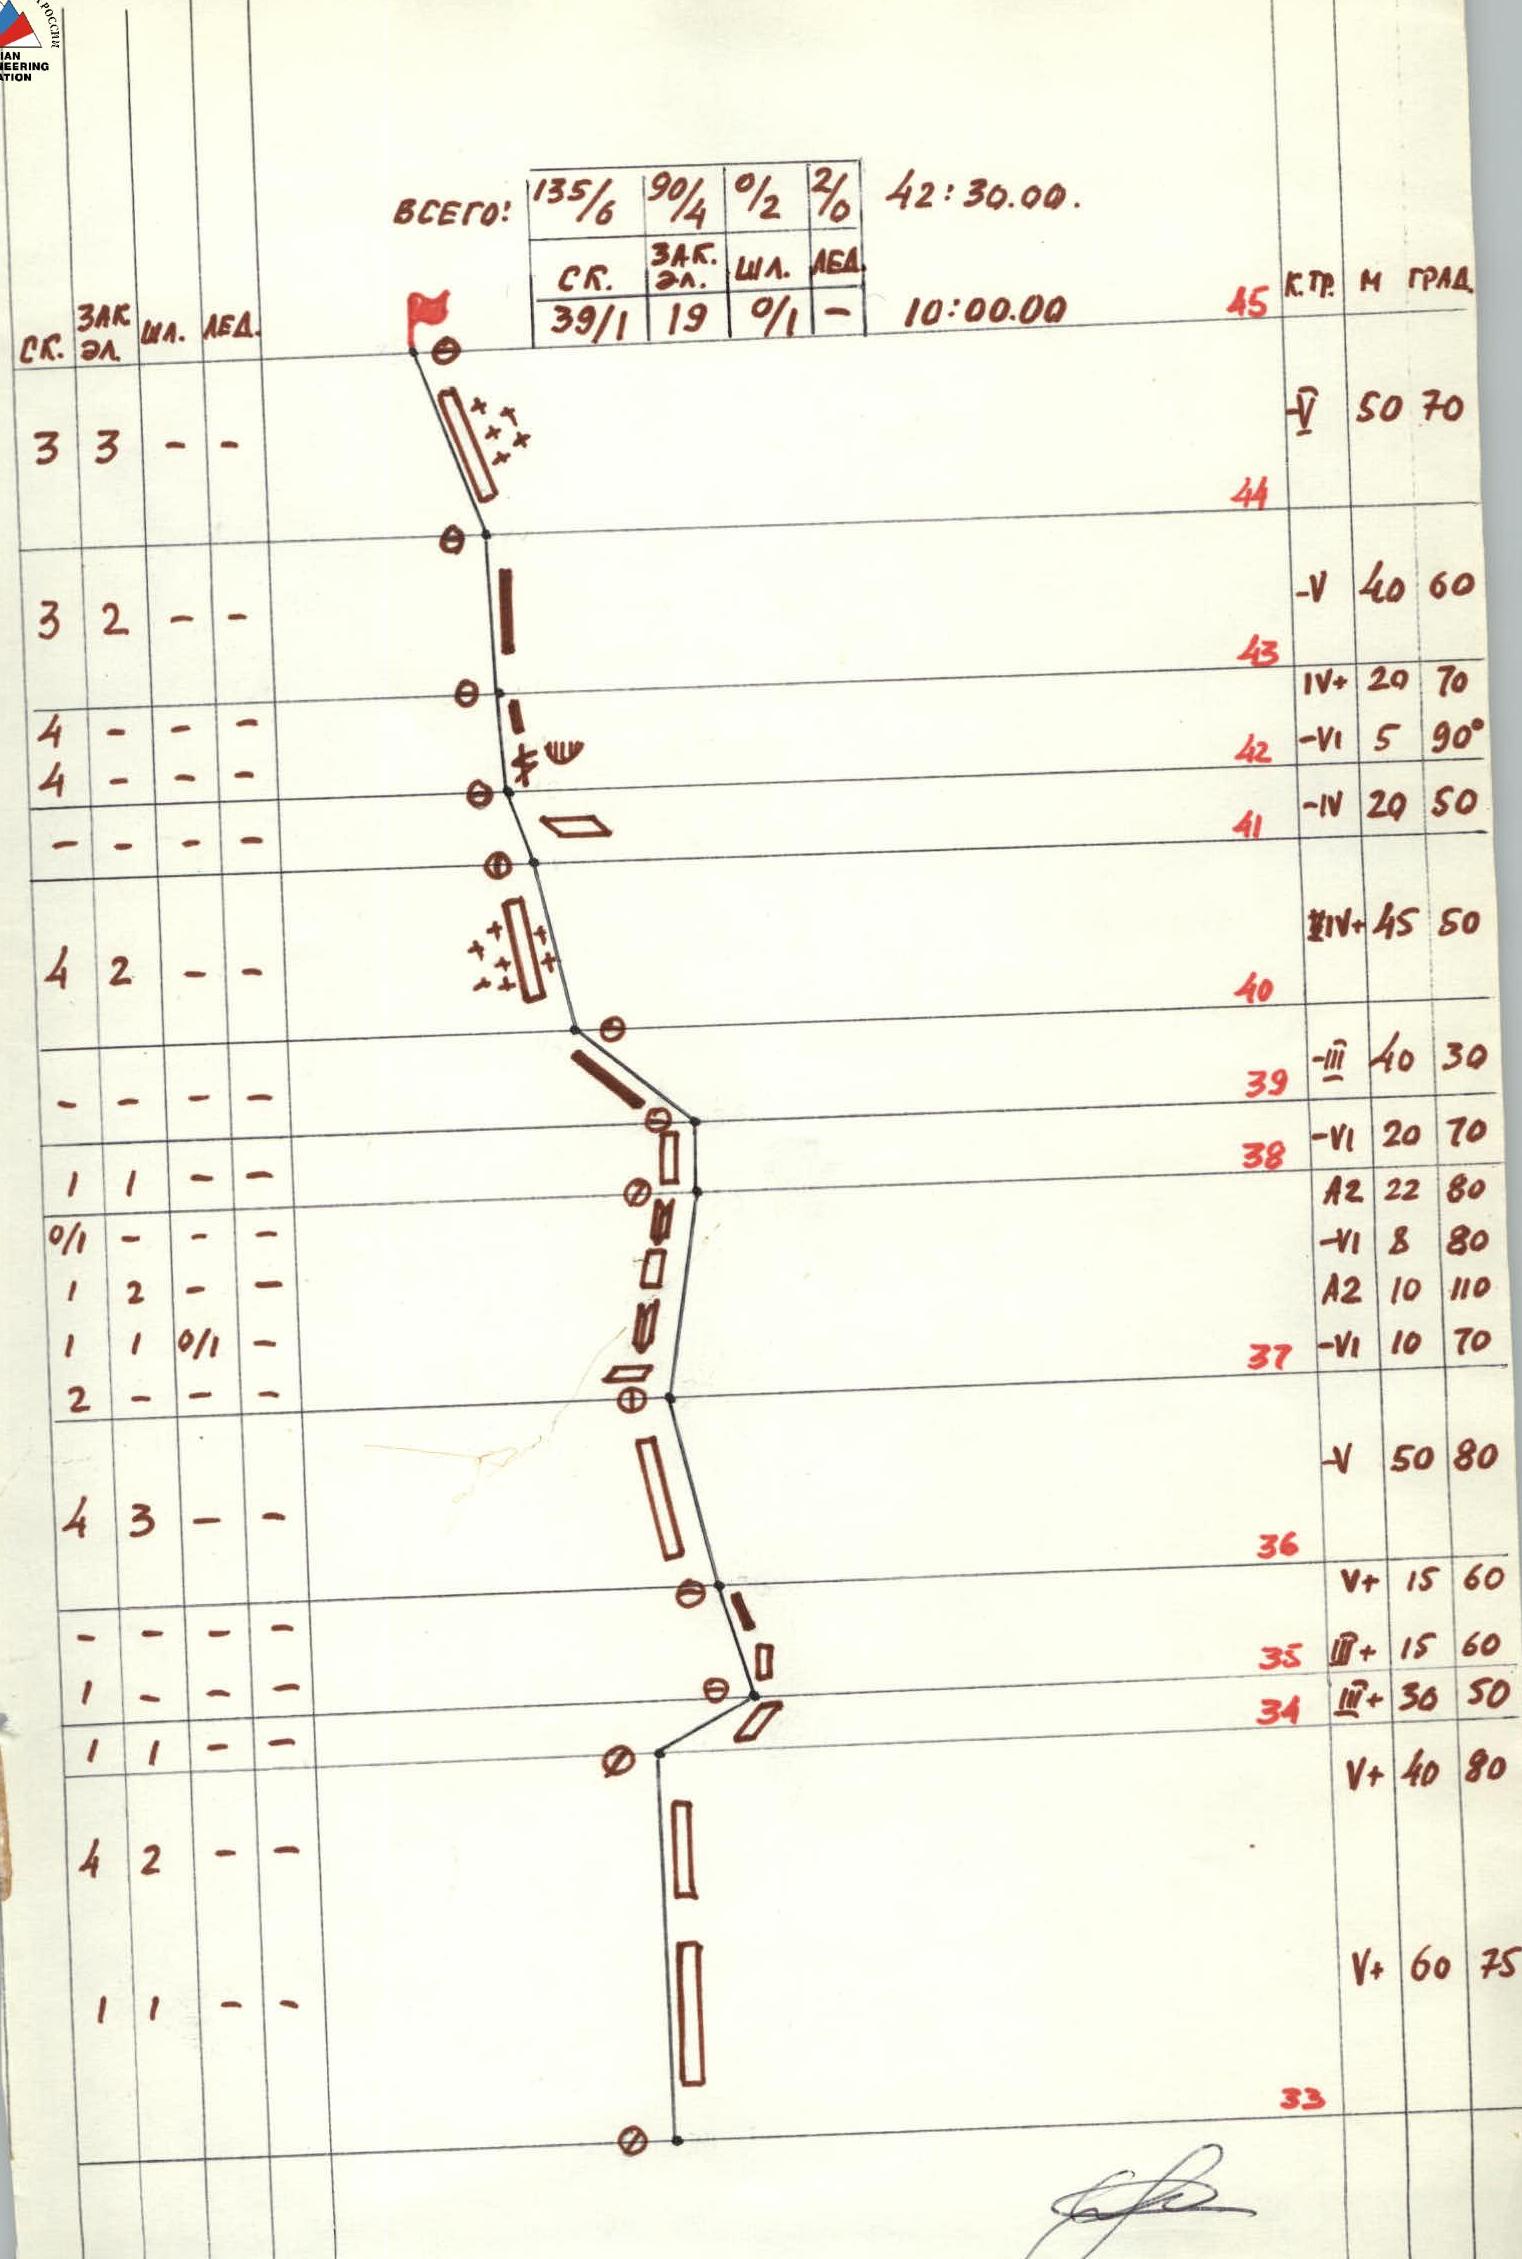
| 135/6 | 90/4 | 0/2 | 2/0 |
- Team's total climbing hours: 42:30, days — 4
- Overnights: 1st — on ledges, bivouacked separately, sitting, water available; 2nd — carved into a snow-ice ridge, semi-reclining, bivouacked separately; 3rd — on a main ledge, reclining, water available
- Team leader — Bogomolov Sergey Georgievich, Master of Sports Team member — Ponomarchuk Viktor Semenovich, Candidate for Master of Sports
- Coach — Mikhailov Andrey Andreevich, Master of Sports
- Approach to the route: July 20, 1982 — 9:00 Summit — July 23, 1982 — 18:00 Return — July 24, 1982 — 11:00

- Visible part of the route
- ... Invisible part of the route
- Δ – Overnight locations
- – Control tour
- Time of photo — 10.07.82)/14:00
- Lens — 743 (Smena-8)
- F-4 cm.
- Distance to the object ~3 km
- Shooting point — №2
- Altitude — 3600 m.
- – Anisimov's route — 7/8–5B Vashenyuk 02.82.
- – Krasavin's route — 7/1–5B 07.82.
- – Simakov's route — 7–5B 07.82.
- Vudorf (6132 m)
- 5200 m
- 4400 m
- A3 4540 m
- Δ2 4410 m
- Δ1 4186 m
General photo of the route
Brief overview of the climbing area
Peak 5200 is located in the western part of the Yazgulyam Range, in the North-West spur of p. Vudorf. The approach to it is from the city of Dushanbe along the Dushanbe–Khorog highway to the confluence of the Yazgulyam and Pyandzh rivers (400 km). Then along the Yazgulyam River, by road, by car to the village of Jamak (27 km). From the village of Jamak on foot along the Yazgulyam River to the confluence with the Vydvydzh River (8–10 hours), which flows into Yazgulyam on the left. Here at the confluence, there is a summer settlement Vychug. Then along the Vydvydzh River, first along the left (orographically), then along the right (bridge) bank to the birch grove (3–4 hours). Here the river spreads out and forms a huge plateau (2900 m). There is also a summer settlement. The trail ends here. Crossing the bridge to the left bank. Ahead is a huge canyon. The left part of the canyon is cut by a couloir, along which 160 m of climbing (4–5 category of difficulty) can be ascended to the upper part of the canyon. Here, two huge stone cairns, as tall as a person, are built, visible from the birch grove. Then along the grassy slopes, rocky slopes, rocky couloir, overcoming the Vydvydzh River by a suspension bridge, exit to the moraine part of the valley, which is called Anderkhiv in the local dialect, under the tongues of glaciers flowing from p. 5864 and p. Vudorf (1–2 hours). Here is a dried-up lake and a place for a helicopter landing. Our base camp was set up here.
Another approach option is by helicopter from the village of Rushan or Vanch to this landing site. It is also possible to approach from the village of Zaich (5–7 km from Jamak) into the side valley Zaichkhov, then along the Zaichkhov River through the pass of the side ridge extending from p. 6124 in the Yazgulyam Range to the same dry riverbed.
In the Yazgulyam valley, there is a Yazgulyam kolkhoz with a central village Anderbakh (15 km from the Dushanbe–Khorog highway). There are about 500 houses in the kolkhoz. The uppermost inhabited village is Zaich — 5–7 houses. There is another village, Jafak, above it, but it is uninhabited. The valley is inhabited by the Yazgulyam people.
According to our information, there were no mountaineering expeditions in this area before us. We obtained data on the peaks, ridges, and orography of the area from Moscow tourists who visited this area in 1979.
Preparation for the ascent
The team familiarized themselves with the object of the ascent through photographs. Upon arrival at the site, the team observed the route for 10 days. The best, safest ascent option was chosen. Photos were taken: frontal, profile, panoramic. Consultations were held with climbers who had ascended nearby peaks. As a result, we planned the route we took. In our opinion, it is logical and safe.
Throughout the season, the team actively prepared for the ascent. Intensive skiing in winter, participation in skiing competitions, cross-country training, and general physical exercises, technical training — in spring. In March and May, there were trips to the mountain area — Eastern Sayan Mountains, where acclimatization and training ascents were made. The team has been climbing together since 1978 on ascents of 4–5 category of difficulty. In June, all team members were at the "Dugoba" alpine camp, where they received high-altitude acclimatization. Upon arrival in the ascent area, a training ascent of 5A category of difficulty was made. Physical fitness standards were passed as part of the USSR Championship in mountaineering. After studying the nature of the area's rocks, the ascent tactics were developed. The first climber ascended lightly, possibly in caloshes. The weather conditions in the area were good and stable, which also determined the ascent tactics. The weight of backpacks was reduced by taking warm and waterproof clothing. From visual observations, the problematic sections seemed to be: climbing on the "finger", passing the upper part of the "triangle" wall. In the first case, due to steep, smooth rocks, in the second — passing the overhang. For successful overcoming of these sections, climbing in caloshes, use of bolt pitons, and "Zalsug" climbing technique were planned.
Ascent schedule
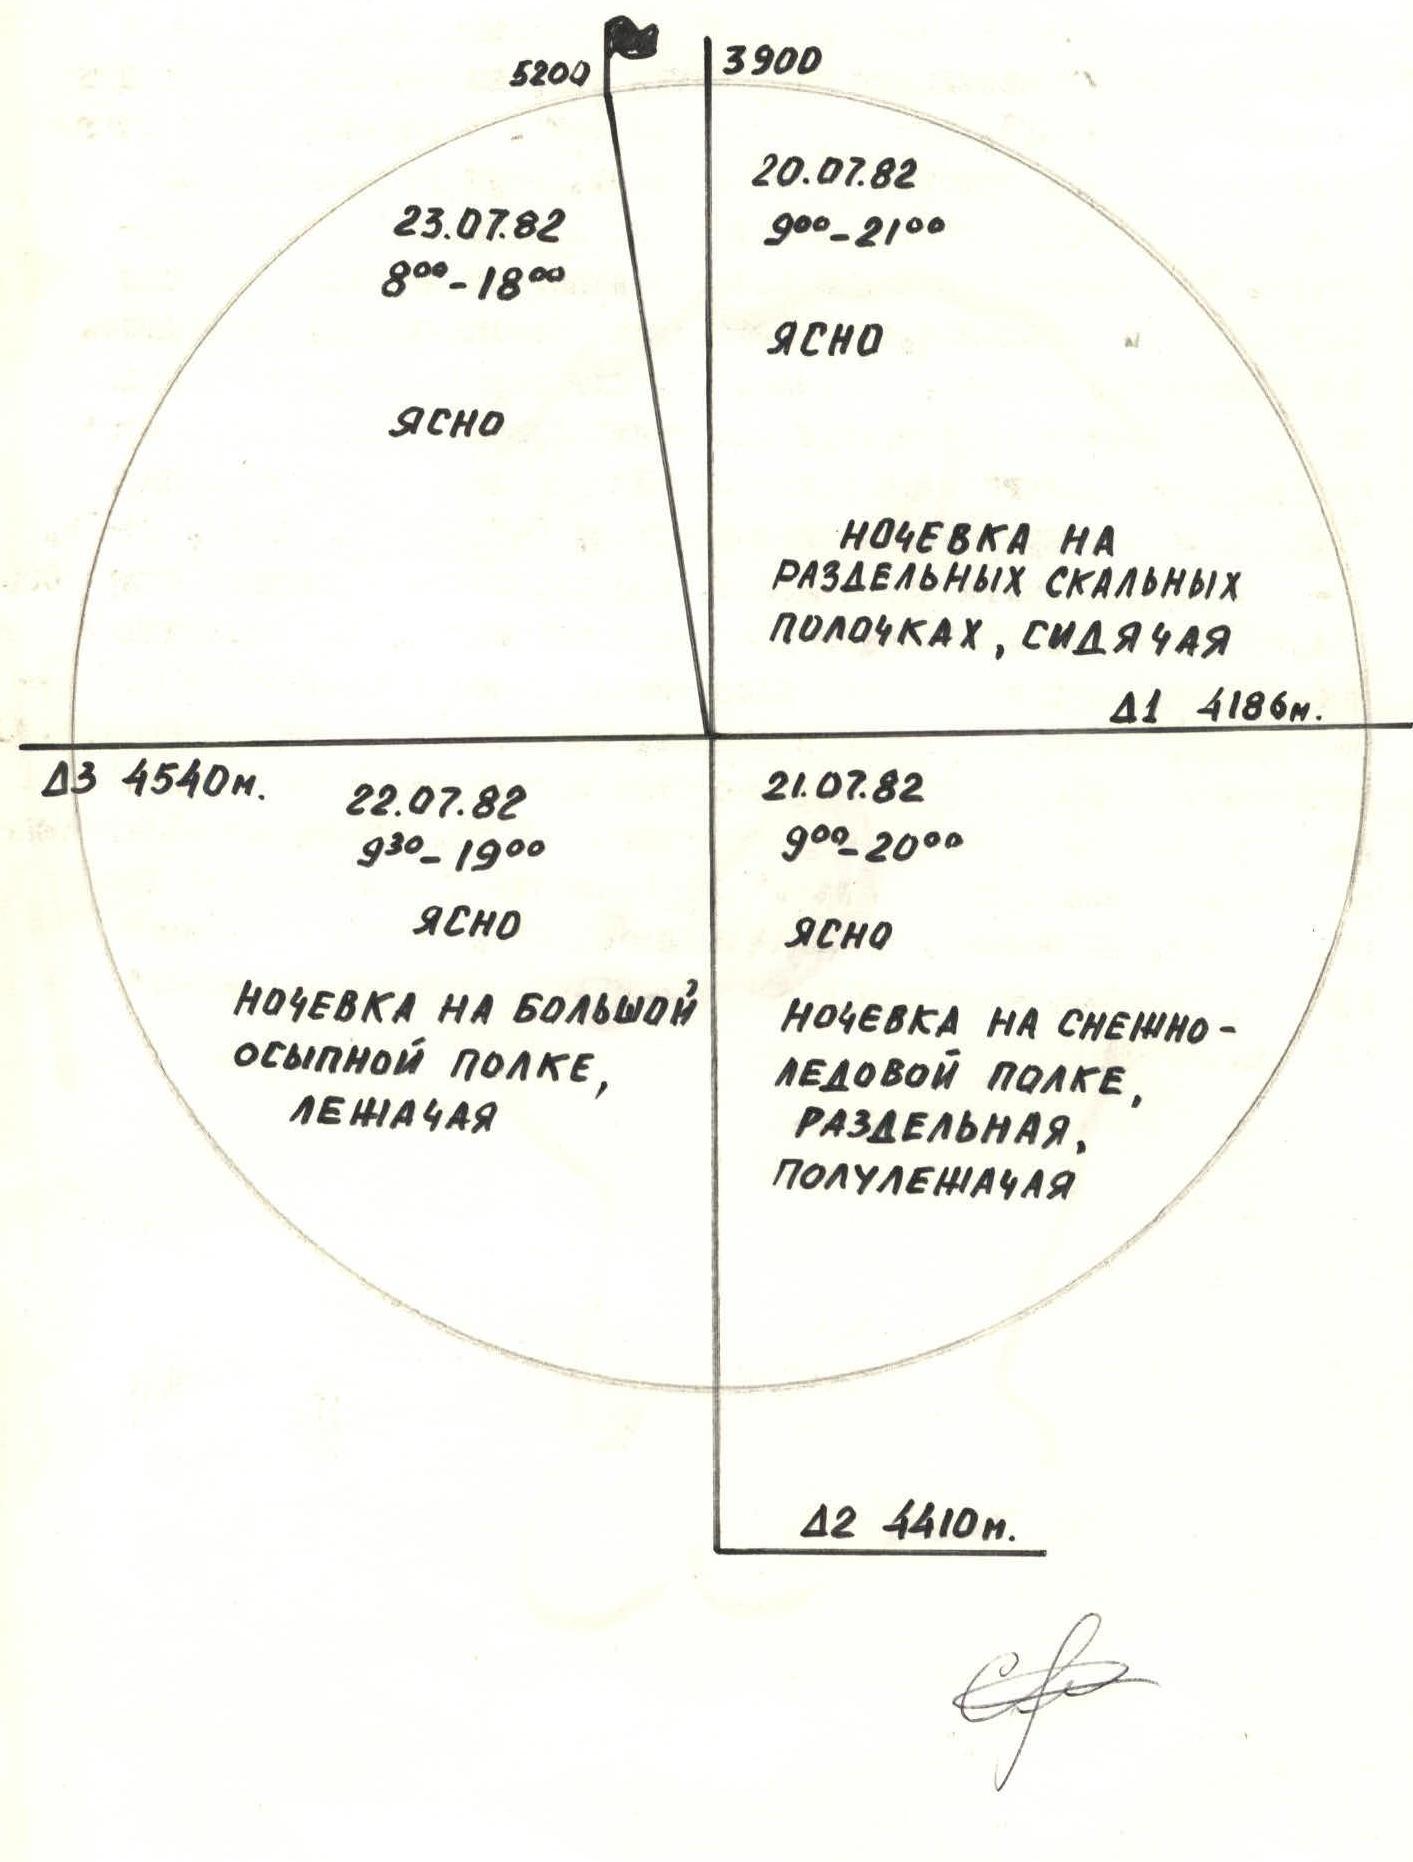
- D3 4540 m
- 5200 m
- 3900 m
- July 20, 1982, 9:00–21:00. Clear. Overnight on separate rock ledges, sitting.
- D1 4186 m
- July 21, 1982, 9:00–20:00. Clear. Overnight on a snow-ice ledge, bivouacked separately, semi-reclining.
- D2 4410 m
- July 22, 1982, 9:30–19:00. Clear. Overnight on a large scree ledge, reclining.
- July 23, 1982, 8:00–18:00. Clear.
Tactical actions of the team
The team started the route at 9:00 — morning hours, thus avoiding the risk of being hit by stones or ice that could fall from the upper part of the "triangle" wall when the rocks are heated by the sun. The route passed through the "finger", which is 15–20 m away from the wall and is therefore safe. On the section R20–R21, above which a huge ice icicle hangs, to ensure safety, they were under a rock overhang. On sections where the via ferrata rope was not vertical and the second climber had a hard time pulling out pitons, they used rope pulls or organized an aerial route for transferring backpacks (R3–R4, R5–R7, R18–R19, R20–R22, R24–R26, R35–R36). To climb quickly, during belaying and climbing, they emphasized the use of chocks and cams. To lighten the weight of backpacks, they took a lightweight hammock with a cloak and a bivouac bag, metallized films, which allowed them to spend the night quite comfortably. The equipment was made of titanium. For quickdraws, they used a 20 mm wide sling. Also, to lighten the load, they used a "Yuvell" primus stove and took high-calorie but light food: sublimated stew, meat broth cubes, tolokno, "Malyutka" milk mixture. The nutrition was quite satisfying.
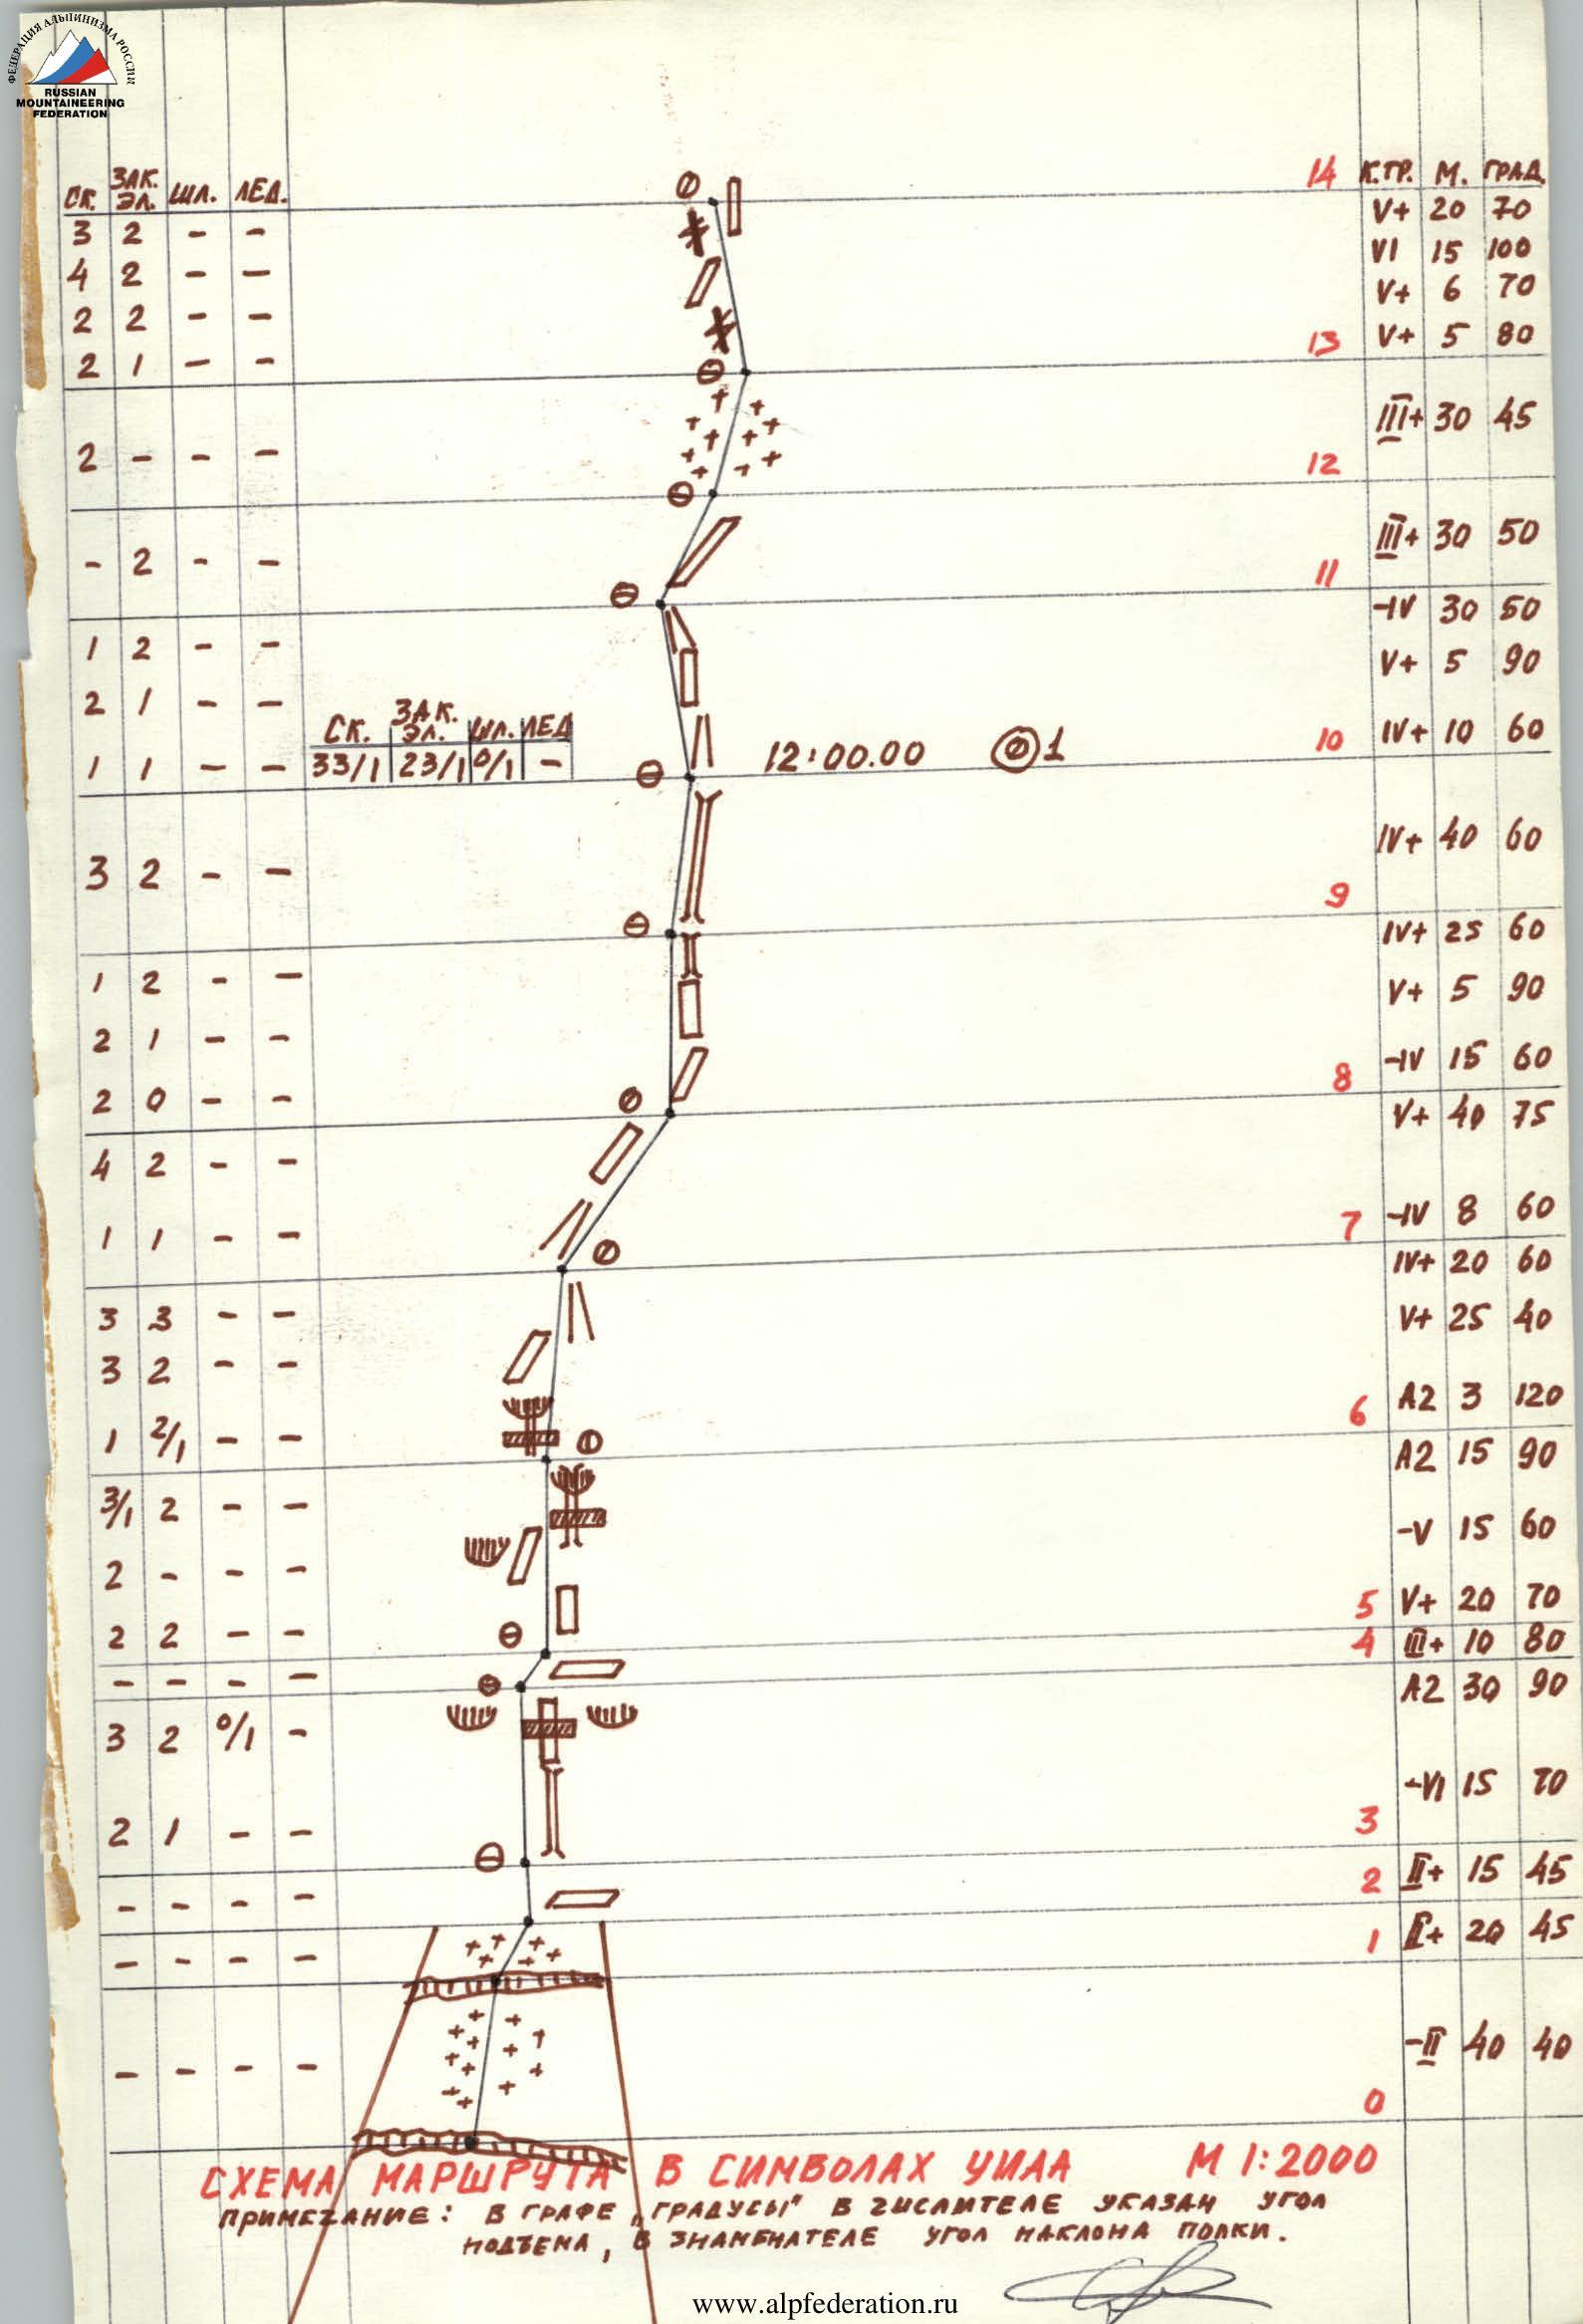
Route diagram in symbols Scale 1:2000 Note: in the "Degrees" column, the numerator indicates the angle of ascent, the denominator — the angle of inclination of the ledge.
| Section | Rock pitons | Chocks & cams | Bolt pitons | Ice screws | Category of difficulty | Meters | Degrees |
|---|---|---|---|---|---|---|---|
| R0 | |||||||
| ... | |||||||
| R1 | |||||||
| ... | |||||||
| R45 |
Route description by sections
R0–R1 — snow slope, firn, simultaneous movement. Overcoming the bergschrund via a bridge, 1 m gap. R1–R2 — snow slope, firn, simultaneous movement. R2–R3 — ledge, simultaneous movement, destroyed rocks. R3–R4 — chimney, monolith, few handholds. Wall, overhang, passed with artificial aids on a smooth wall. Backpacks pulled up. R4–R5 — ledge, movement to the right, rocks are slippery. R5–R6 — wall, monolith. Then a narrow ledge to the right, throwing off. With a backpack, it's impossible to drive in pitons, constantly getting thrown off to the right. Chimney, filled with water, small rock detachments. Backpacks pulled up. Very uncomfortable belay spot. R6–R7 — narrow crack, overhang, difficult exit to a narrow, very steep ledge going up to the right. Tension climbing. Then a ledge. Throwing off. Exit to a couloir leading left. Rocks are slippery. R7–R8 — continuation of the couloir, which leads to a saddle between the "finger" and the wall. Move right onto the wall. R8–R9 — ledge, under the wall, then exit to a chimney. "Live" stones in the chimney. R9–R10 — continuation of the chimney, approach under a wall protecting from possible falling stones. Ledges for one person — overnight stay. Sitting. Snow available. Damp. A can is left on a hook on the wall — 1st control tour. R10–R11 — bypassing the wall on the right, movement into a couloir 10 m, then to the left side of the couloir (along the route) up a wall to a small couloir (couloir is icy), leading to a ledge. R11–R12 — ledge, rocks with "live" stones. R12–R13 — snow ledge, firn with ice. Step-cutting. Exit under a huge bastion. R13–R14 — narrow crack, then a ledge to the left and again a crack through an overhang, exit to a small ledge. "Live" blocks! Large chocks go well. R14–R15 — wall, overhanging, passage with artificial aids, exit to a chimney leading to a narrow ledge with "live" stones. The ledge goes up to the left. R15–R16 — movement straight up the wall, throwing off. For passage, chocks are used as artificial aids. Exit to a long, large internal angle. Large chocks are needed for one crack "inside" the internal angle. R16–R17 — continuation of the internal angle and exit to the left wall of the angle (along the route) to a small snow-ice ridge — a ledge. Second overnight stay, on ledges carved into snow and ice. R17–R18 — up a slab to under a large overhang of the upper part ("triangle"). R18–R19 — movement is difficult due to destroyed rocks and overhang. Here, a 2nd control tour is left on a hook in a blue plastic bottle. Movement to the right and down under the overhang with a pendulum to a very steep, smooth slab leading to the inner part of the "triangle" wall. An aerial route is organized for backpack transfer. R19–R20 — slab, few handholds. Tense climbing. A rock piton is used as artificial aid. The slab ends. R20–R21 — traverse along the wall, throwing off. Artificial aids. Aerial route for backpack transfer. Above, a huge ice icicle. Dangerous! R21–R22 — traverse. Narrow snow ledge, throwing off. Aerial route for backpack transfer. R22–R23 — wall, overhang. Artificial aids. Very dangerous! "Live" blocks! Water pouring. R23–R24 — frozen wall, water seeping. Movement up. R24–R25 — traverse of the wall, rocks frozen, water. R25–R26 — traverse of the ice wall — "river". Ice screws needed. Aerial route for backpacks. R26–R27 — traverse up to the right along the rock wall. Ice, water. Few handholds. R27–R28 — negative internal angle. Movement first along the left side, then in the upper part, transition to the right side, overcoming a cornice, exit to a ledge. R28–R29 — destroyed rocks with snow, simultaneous movement. R29–R30 — movement straight up on snow to a large scree ledge located on the left side of the "triangle" wall. Excellent overnight stay. Snow available. R30–R31 — along a system of ledges, movement to the left to the North ridge, simultaneous movement. Attention! "Live" stones! R31–R32 — ridge. Rocks monolithic. R32–R33 — transition to the left wall (along the route) of the ridge. On the right are smooth slabs with snow and ice. Movement up to the left along the wall. Small handholds. Rocks strong. R33–R34 — transition from the wall, then exit to the ridge and again moving left to the wall. Equally effective are both chocks and rock pitons. R34–R35 — ledge on the ridge, transition to the right side of the ridge and along the ledge, movement up to the right. R35–R36 — exit to the ridge along the wall, then along the ridge to a ledge, under a negative ridge rise. The ridge is a "knife-edge" with an overhang to the left. Very tense climbing. The second climber traverses along the wall of the ridge with top-rope belay under the overhang under the ledge (3-meter cornice) and climbs up to the ledge on via ferrata. Backpacks pulled up. R36–R37 — movement along the left wall of the ridge up to the left. Small handholds. R37–R38 — ledge, approach under an internal angle. Water seeping. Overcoming a cornice. A bolt piton left by a previous group is used as artificial aid. Then along the wall under the next internal angle. Rocks are smooth, icy. No place to drive in pitons. For passage, a "toporic" is driven into a dead-end crack. Exit along the wall to a steep ledge. R38–R39 — along the wall, exit to the ridge, cutting through a cornice. R39–R40 — ridge, simultaneous movement. To the left, cornices are overhanging. Backpacks left here. Descent couloir begins. R40–R41 — movement along the right side of the ridge on snow. Outcrops of destroyed rocks. Difficult to set up belay. R41–R42 — along ledges on the right side of the ridge, exit under a 5-meter vertical ridge rise — "knife-edge". Belay from ridge projections. R42–R43 — on virgin terrain on the right wall of the ridge, using "Zalsug" technique, exit to the ridge. Then along the ridge on its right side. R43–R44 — ridge, movement along its right side. R44–R45 — ridge. Exit to the summit along snow-covered rocks on the right side of the ridge.
Descent
- along the ascent route to section R39–R40, where backpacks are left — 3 sports descents;
- then descent into a couloir with a western orientation, leading to glacier №3 (see orographic scheme) — 6 sports descents.