St. Petersburg Championship 2024
Technical Climbing Category
Report
on the ascent to the summit of Tsey-Loam via the center of the East wall (Syshchikov's route) by the St. Petersburg team from 8:00 on February 8, 2024, to 17:00 on February 10, 2024.
I. Ascent Passport
| 1. General Information | ||
|---|---|---|
| 1.1 | Full name, sports rank of the leader | Kirill Aleksandrovich Kozhukhov, CMS |
| 1.2 | Full name, sports rank of participants | Aleksey Igorevich Solovey, MS; Nikolay Vyacheslavovich Yakuba, 1st sports rank |
| 1.3 | Full name of the coach | T.I. Timoshenko, S.A. Semiletkin |
| 1.4 | Organization | Alpinism Federation of St. Petersburg |
| 2. Characteristics of the Climbing Object | ||
| 2.1 | Region | Caucasus |
| 2.3 | Number of the section according to the classification table | 2.9 From the Krestovy Pass to the Shaviklde summit |
| 2.4 | Name and height of the summit | Tsey-Loam (Gaykomd, Kyazi) |
| 2.5 | Coordinates of the summit | 42°50′08.8″ N 44°51′00.4″ E |
| 3. Characteristics of the Route | ||
| 3.1 | Name of the route | Center of the East wall |
| 3.2 | Difficulty category | 5B |
| 3.3 | Degree of route development | 4 passages (known to us) |
| 3.4 | Nature of the route terrain | rock |
| 3.5 | Height difference of the route | 685 m |
| 3.6 | Length of the route | 900 m |
| 3.7 | Technical elements of the route | II–IV cat. diff. rocks — 300 m, V–VI cat. diff. rocks — 600 m |
| 3.8 | Average steepness of the route | 70 degrees |
| 3.9 | Average steepness of the main part of the route | 80 degrees |
| 3.10 | Descent from the summit | Via route 2A, down the right couloir of the 3rd ridge |
| 3.11 | Additional characteristics of the route | Water absent in summer |
| 4. Characteristics of the Team's Actions | ||
| 4.1 | Time of movement | 17 h 5 min (including processing) |
| 4.2 | Overnight stays | February 9, on a snow shelf, lying down |
| 4.3 | Time spent on route processing | 4 h, on February 8, 2024, from 13:13 to 16:58 |
| 4.4 | Start of the route | February 9, 2024, at 7:00 |
| 4.5 | Reach the summit | February 10, 2024, at 10:18 |
| 4.6 | Return to the base camp | February 10, 2024, at 13:00 |
| 5. Characteristics of Weather Conditions | ||
| 5.1 | Temperature | around –5 °C during the day, –15 °C at night |
| 5.2 | Wind speed | 1–4 m/s |
| 5.3 | Precipitation | no precipitation |
| 5.4 | Visibility | clear, excellent visibility |
| 6. Person Responsible for the Report | ||
| 6.1 | Full name, e-mail | Nikolay Yakuba, nick.yakuba@gmail.com |
II. Ascent Description
1. Characteristics of the Climbing Object
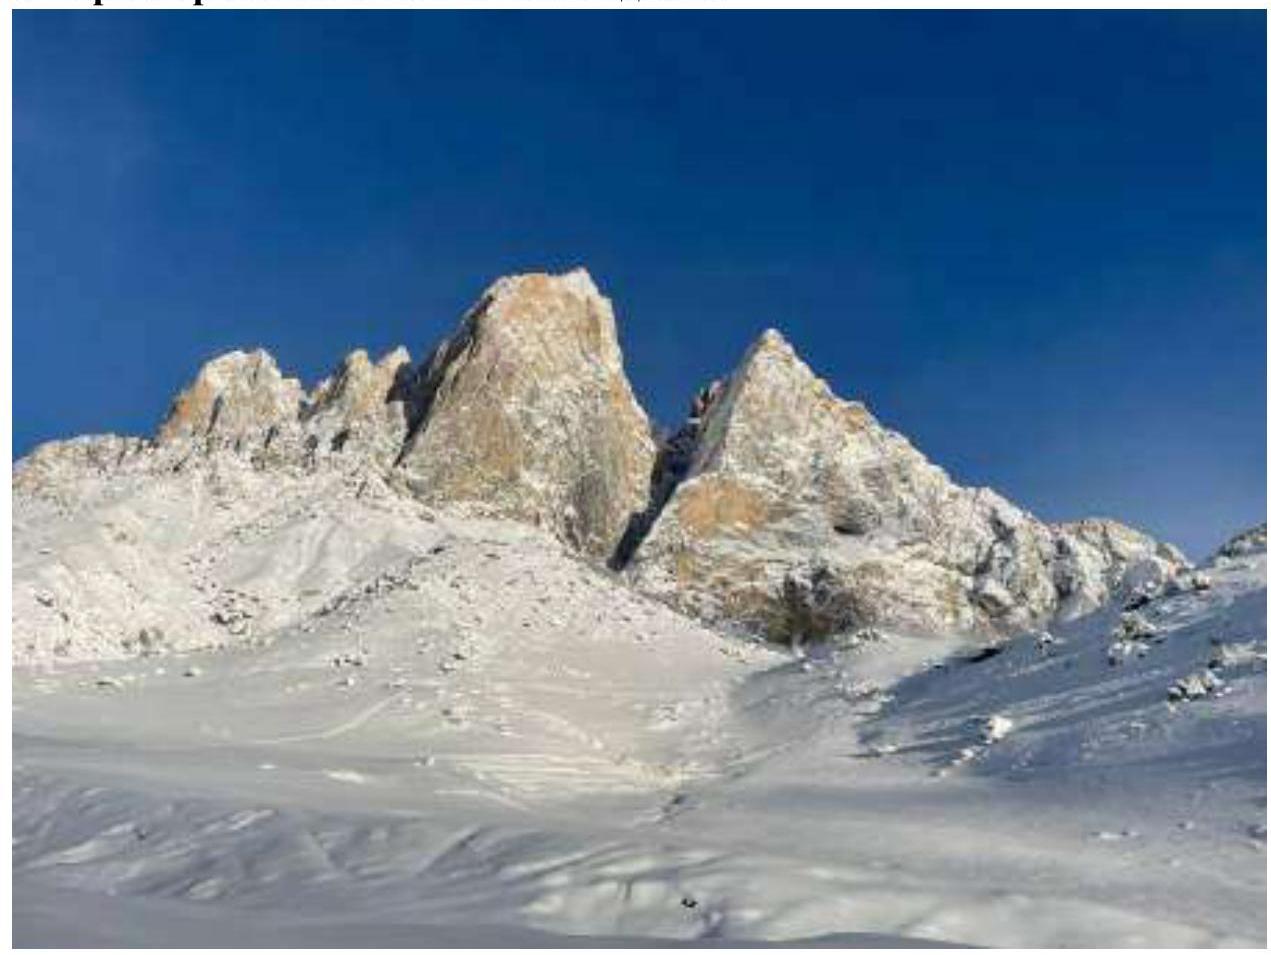
Fig. 1: Summits of Tsey-Loam (right) and Koazoy-Loam (left). Photo from the Kyazi camp
The summits of Tsey-Loam and Koazoy-Loam are located in the Rocky Range of the Greater Caucasus, in the section of the range between the Terek (to the west) and Assa rivers. The Tsey-Loam summit (3171 m) is the highest in the massif, towering over Koazoy-Loam (3100 m) and neighboring peaks. Previously, the massif was known as Girech, then as Gaykomd, and later as Kyazi.
The Kyazi alpine camp is located at the foot of the massif; the approach to the southern wall of the massif takes approximately 1–1.5 hours. There are no glaciers in the area of the massif; water is absent on the wall during hot weather.
Complex technical routes pass along the following walls of the massif:
- Southern wall
- Eastern wall
2. Characteristics of the Route
The Syshchikov route to the summit of Tsey-Loam passes through the center of the eastern wall from the couloir between the Tsey-Loam and Koazoy-Loam massifs. The wall section begins in the middle of the couloir, and the route leads directly to the summit. In Fig. 2, the route is marked with the number 10, and in Fig. 3, you can see a panorama of the eastern wall with the route line taken from the opposite wall of Koazoy-Loam.
The eastern wall is illuminated by the sun primarily in the morning; by 13:00, the route is in the shade. In winter, snow remains on the wall for a long time (compared to routes on the southern wall), which can significantly complicate climbing.
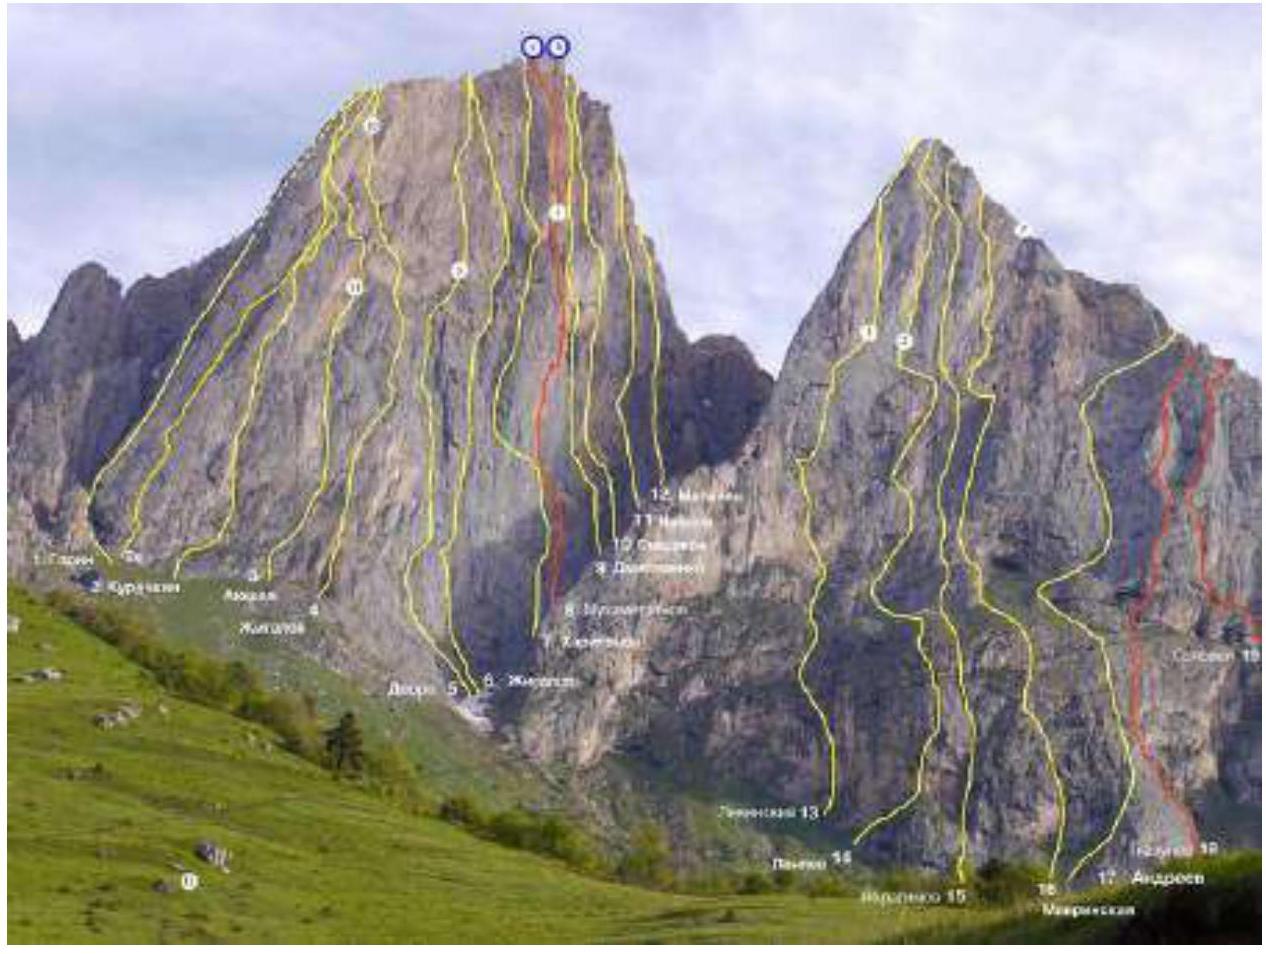
Fig. 2: Panorama of the massif with marked route lines
In Fig. 4, you can see the beginning of the wall section of the route. To the left of the route line, a huge internal angle is visible, ending in a cornice, where the Mukhametzyanov route passes. To the right, behind the angle, the Ivanov route passes (not classified).

Fig. 3: Route line (photo from the Syshchikov team's report)
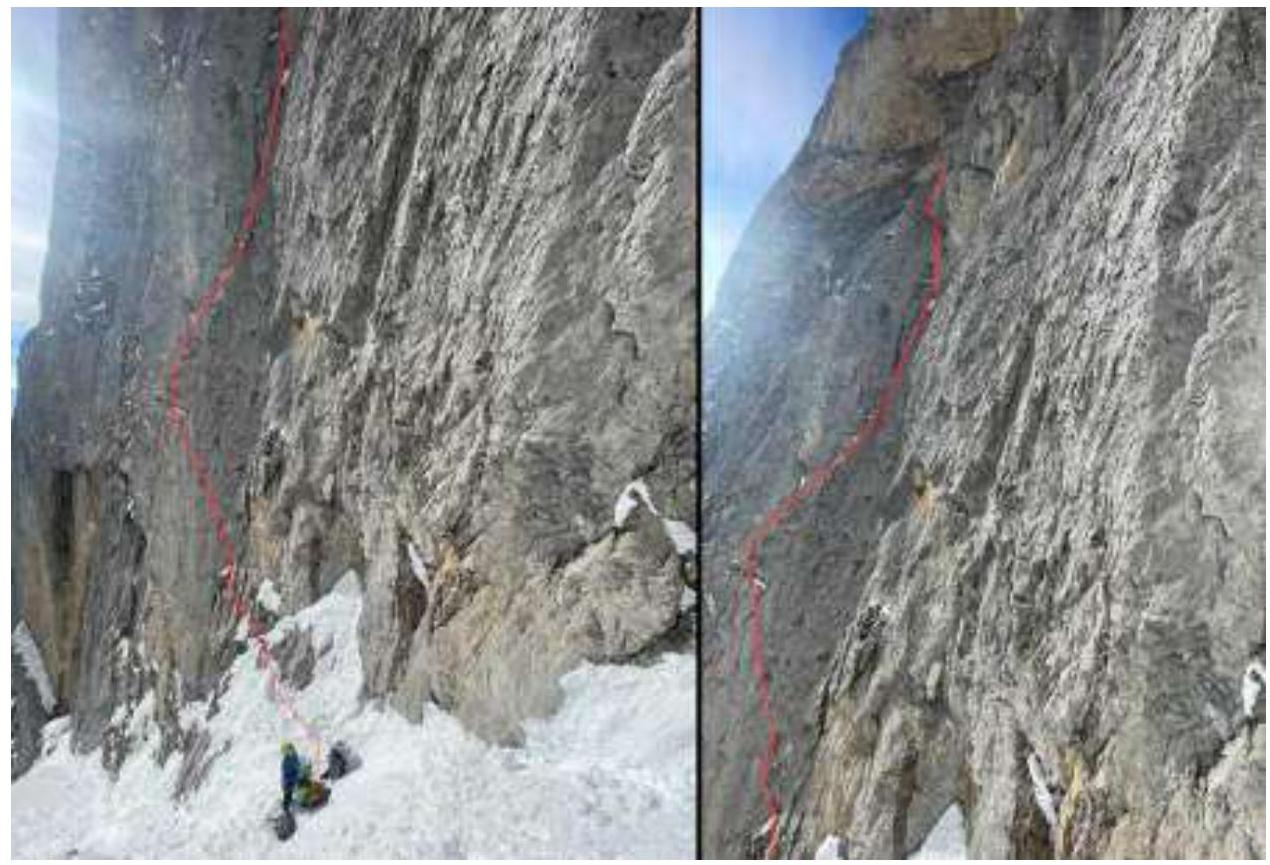
Fig. 4: Beginning of the wall section of the route
| Friends | Anchor Bolts | Bolt Hangers | Nuts | R | Length | Steepness | Difficulty |
|---|---|---|---|---|---|---|---|
| 1 | 0 | 0 | 0 | R16 | 60 m | 50° | III |
| 8 | 2 | 0 | 0 | R15 | 40 m | 75° | V |
| 6 | 5 | 0 | 0 | R14 | 50 m | 75° | V |
| 4 | 5 | 0 | 0 | R13 | 50 m | 75° | V |
| 4 | 4 | 0 | 0 | R12 | 50 m | 70° | V |
| 5 | 5 | 0 | 0 | R11 | 10 m, 90°, VI; 20 m, 80°, V | ||
| 8/5 | 8 | 0 | 2 | R10 | 30 m | 95° | A3 |
| 5 | 8 | 0 | 0 | R9 | 30 m, 80°, V; 10 m, 90°, V1 | ||
| 8 | 5 | 0 | 0 | R8 | 60 m | 70° | V |
| 9 | 1 | 0 | 0 | R7 | 30 m, 90°, VI; 10 m, 95°, A2 | ||
| 7/5 | 5/2 | 0 | 0 | R6 | 50 m, 80°, V1; A2 | ||
| 5 | 0 | 0 | 0 | R4–R5 | 40 m, 70°, V; 80 m, 20°, I | ||
| 5 | 8 | 1 | 0 | R3 | 20 m, 70°, V1; 30 m, 70°, V | ||
| 6 | 3 | 0 | 0 | R2 | 30 m | 75° | VI |
| 6/2 | 3 | 0 | 1 | R1 | 20 m, 75°, VI; 10 m, 90°, A2 |
3. Characteristics of the Team's Actions
Just before the ascent (February 6), there was a significant snowfall (about 40–45 cm of snow fell, see Fig. 1). The following days were sunny, but a large amount of snow remained on the ledges.
After waiting a day after the snowfall, we began working on the route on February 8.
The initial plan did not involve processing. We wanted to:
- Start working on the route around 12:00;
- Climb up to a large ledge in the area of R5 within 5 hours (where it's possible to organize an excellent lying-down overnight stay);
- Then hang the next complex ropes.
The plan was to reach the summit on February 9.
The large amount of snow in the couloir allowed us to approach the start of the wall section of the route without being tied up (section R0–R1 according to the Syshchikov team's description).
However, we underestimated the time required to approach the route (complicated by deep snow) and the difficulty of the lower sections. The approach to the route through deep snow and finding the start of the route took about 2.5 hours, shifting the start time by more than an hour. At the same time, the lower part of the wall turned out to be quite steep and destroyed. In the remaining time, we managed to reach R4, where only a sitting overnight stay is possible. It was decided to descend to the camp.
The next day, we started working at 7:00 from R4 and by 17:00 had overcome the key ropes and climbed onto a sloping snow shelf, where we trampled a site for a lying-down overnight stay. On February 10, at 10:18, we reached the summit. We descended to the camp without incidents.
Movement was carried out simultaneously. All three participants were tied with a 60 m rope. The leader set up stations every 25–30 m; the second provided insurance for the leader from the top. The third participant climbed with a cow's tail along the top rope with insurance on the team rope.
| Section # | Description | Photo |
|---|---|---|
| R0–R1 | The approach to the route is made through a narrow couloir between the Gaykomd (Main) and Gaykomd (East Love) summits. You need to climb up about 300 m along the couloir, slightly above the overhanging internal angle with a cornice at the end. | Fig. 4, 5 |
| R1–R2 | The wall becomes steep from the first meters and turns into a small overhang, but with good relief for ITO and insurance. After that, it eases to about 70°, the relief for insurance is good. The station is on friends. | Fig. 4 |
| R2–R3 | A slightly positive internal angle, slightly deviating to the left. Friends and anchors are used for insurance (anchors fit well into the shell-shaped formations where moss grows). | |
| R3–R4 | Further, the wall eases even more. You need to climb, veering slightly to the right, to exit onto a fairly large grassy ledge. There is a station on the ledge (a sitting overnight stay is possible). | |
| R4–R5 | From the ledge, up the 5th category rocks, veering slightly to the left. Friends and anchors go well. The station is on the next large ledge (exactly 60 m from station to station). There is a very good place for a lying-down overnight stay on the ledge. Further, along the ledge, traverse left to the base of a large monolithic internal angle. | Fig. 6 |
| R5–R6 | Up the system of internal angles. Most of the section is done by free climbing. Good, reliable relief. Insurance is on medium-sized friends and anchors. | |
| R6–R7 | Along the internal angles, we approach the base of the cornice. The cornice is passed on ITO (large friends), from left to right along a large crack. Behind the cornice, the crack turns into a vertical internal angle; we climb up it. Further, after 15 m, the wall eases, and you can switch to free climbing. | Fig. 7 |
| R7–R8 | Along positive rocks, we climb up, veering slightly to the right, to the base of the next large internal angle. In the middle of the section, there is a small wall; ITO is used. | Fig. 8 |
| R8–R9 | Along the internal angles, we approach the cornice. The lower part is climbed; closer to the cornice, ITO is used along the crack on large friends (№4). The station is on friends. There is a втулка ( втулка is not translated as it's a technical term) from the first ascenders under a spit, but we didn't need it. | Fig. 9 |
| R9–R10 | The cornice is passed on friends. | Fig. 9 |
| R10–R11 | Further, there is a vertical internal angle with a good crack for friends; ITO is used. The exit is onto a gentle slope, in our case, with snow. We trampled a small ledge slightly below the route line and set up an overnight stay in a tent. | Fig. 10 |
| R11–R12 | A gentle, partially grass-covered slope. A small wall is located slightly to the right, and then, along positive rocks, you need to veer to the right, under a small cornice. The station is on a ledge under the cornice (a lying-down overnight stay is possible). | |
| R12–R13 | The cornice is passed along the crack on ITO (about 10 m). Further, there are rocks of the 5th category. Along them, to the base of the couloir. | |
| R13–R14 | Up the couloir to the beginning of the internal angles leading to the right. | |
| R14–R15 | Along the internal angles to the right; exit onto a saddle. | |
| R15–R16 | From the saddle, to the left, up the 3rd category rocks. |

Fig. 5: Section R0–R1. Approach through deep snow
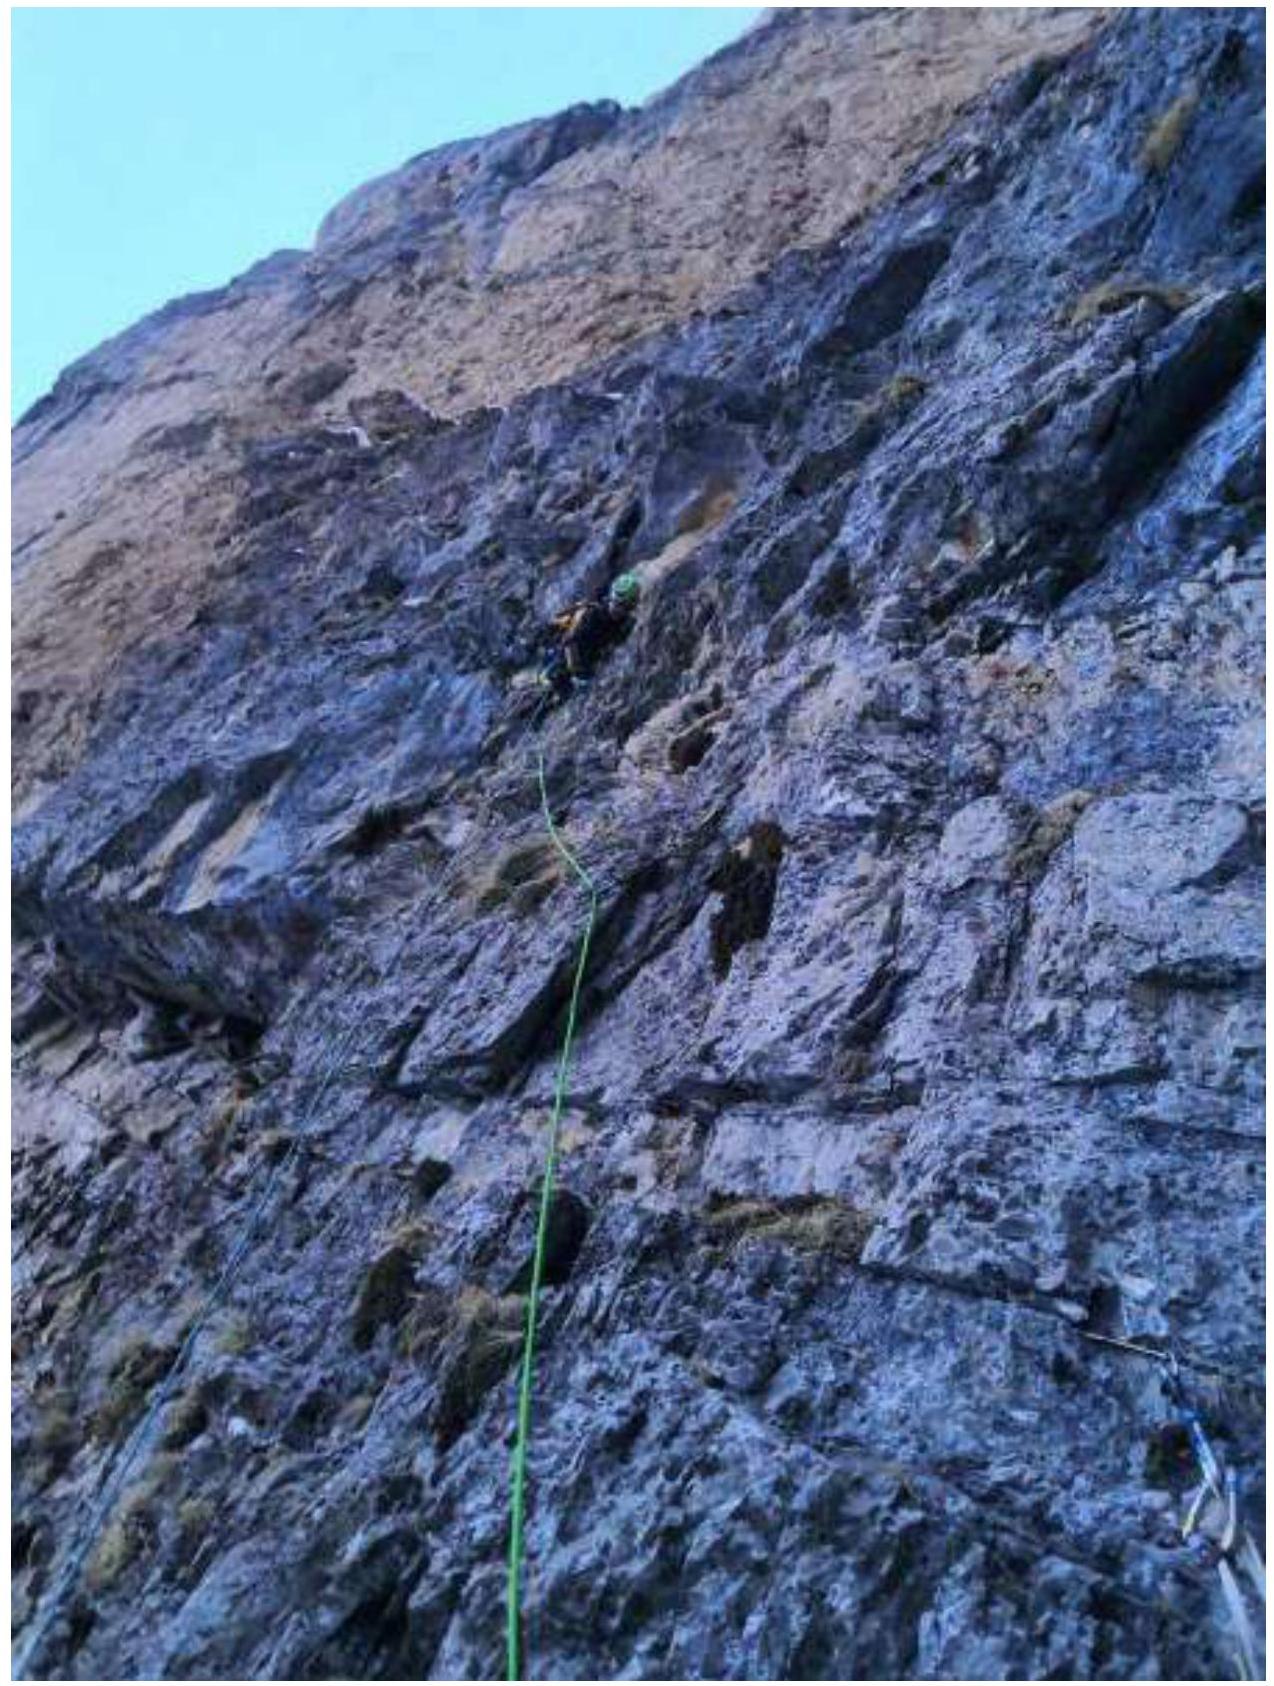
Fig. 6: Section R4–R5. Climbing on destroyed rocks
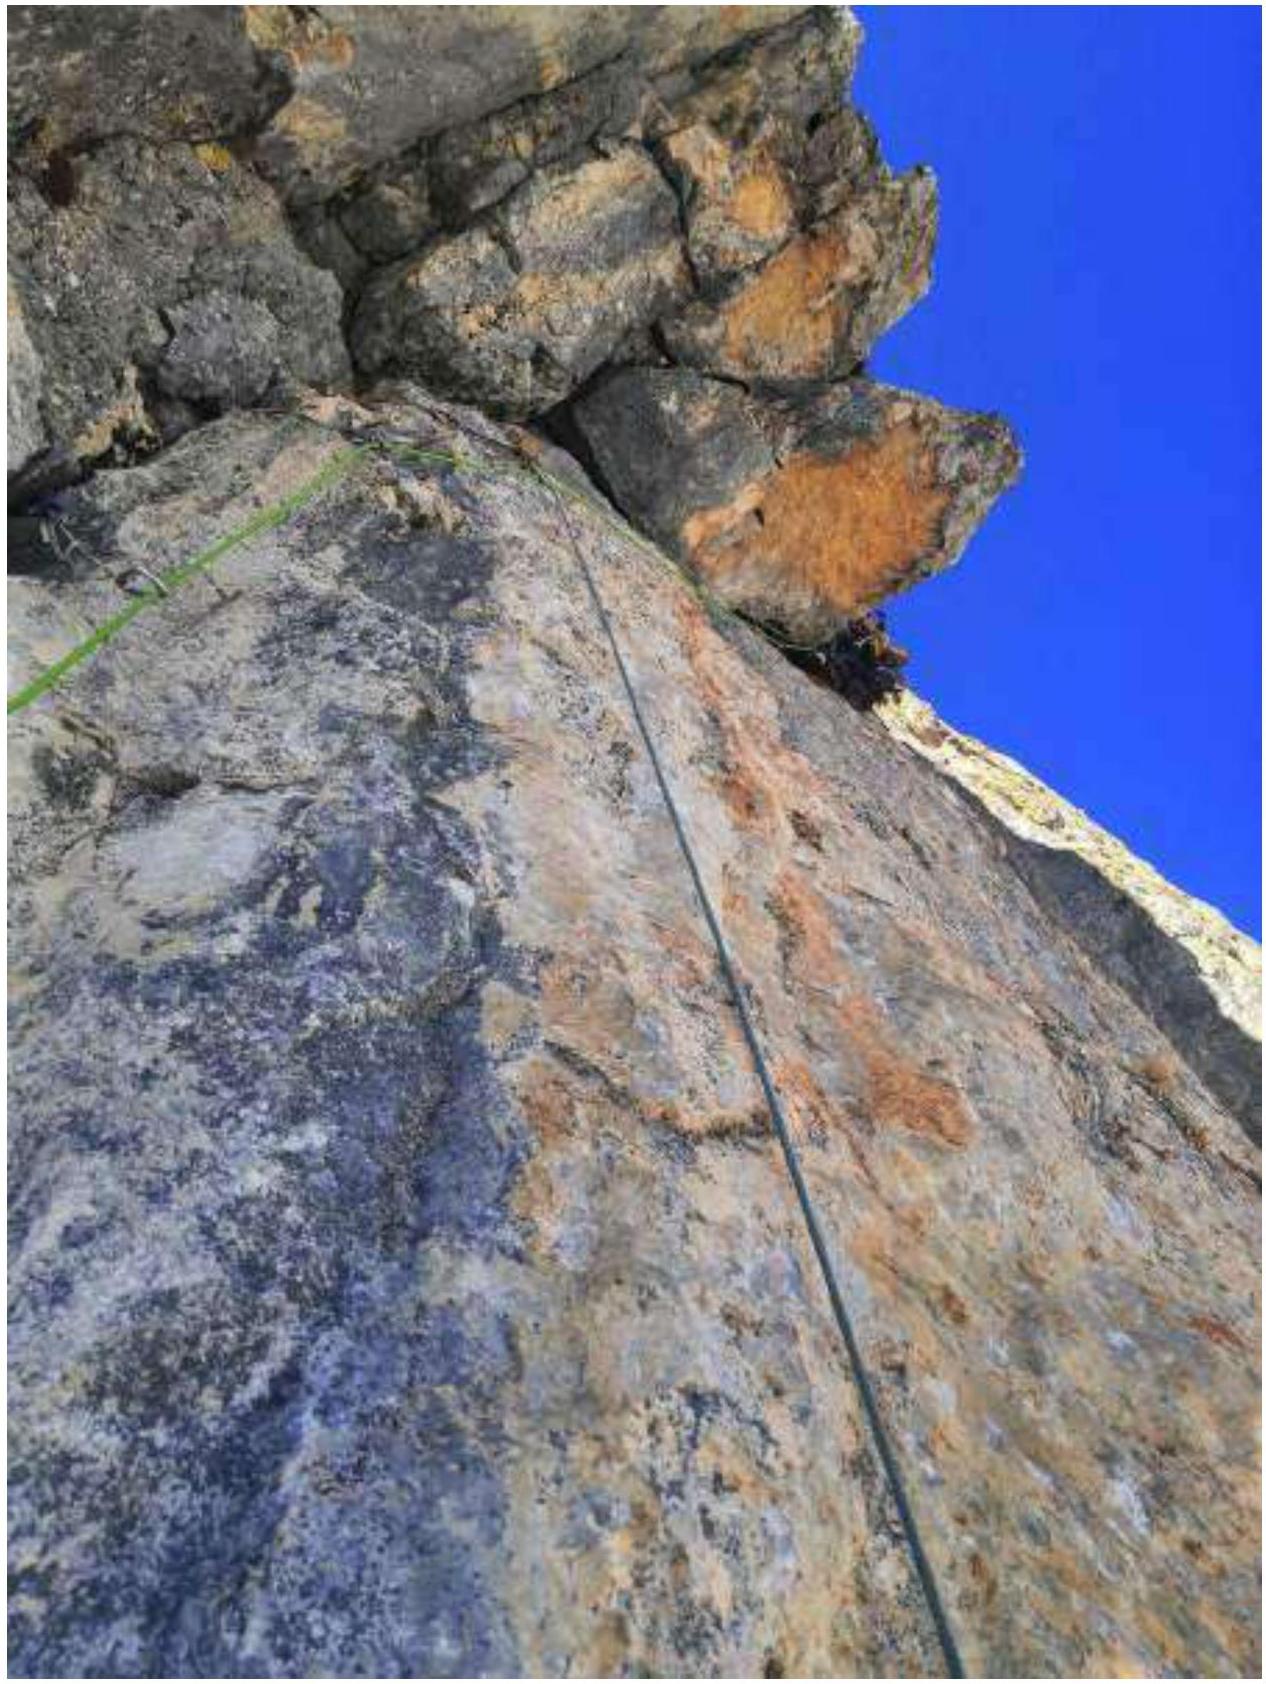
Fig. 7: Section R6–R7. Passing the cornice
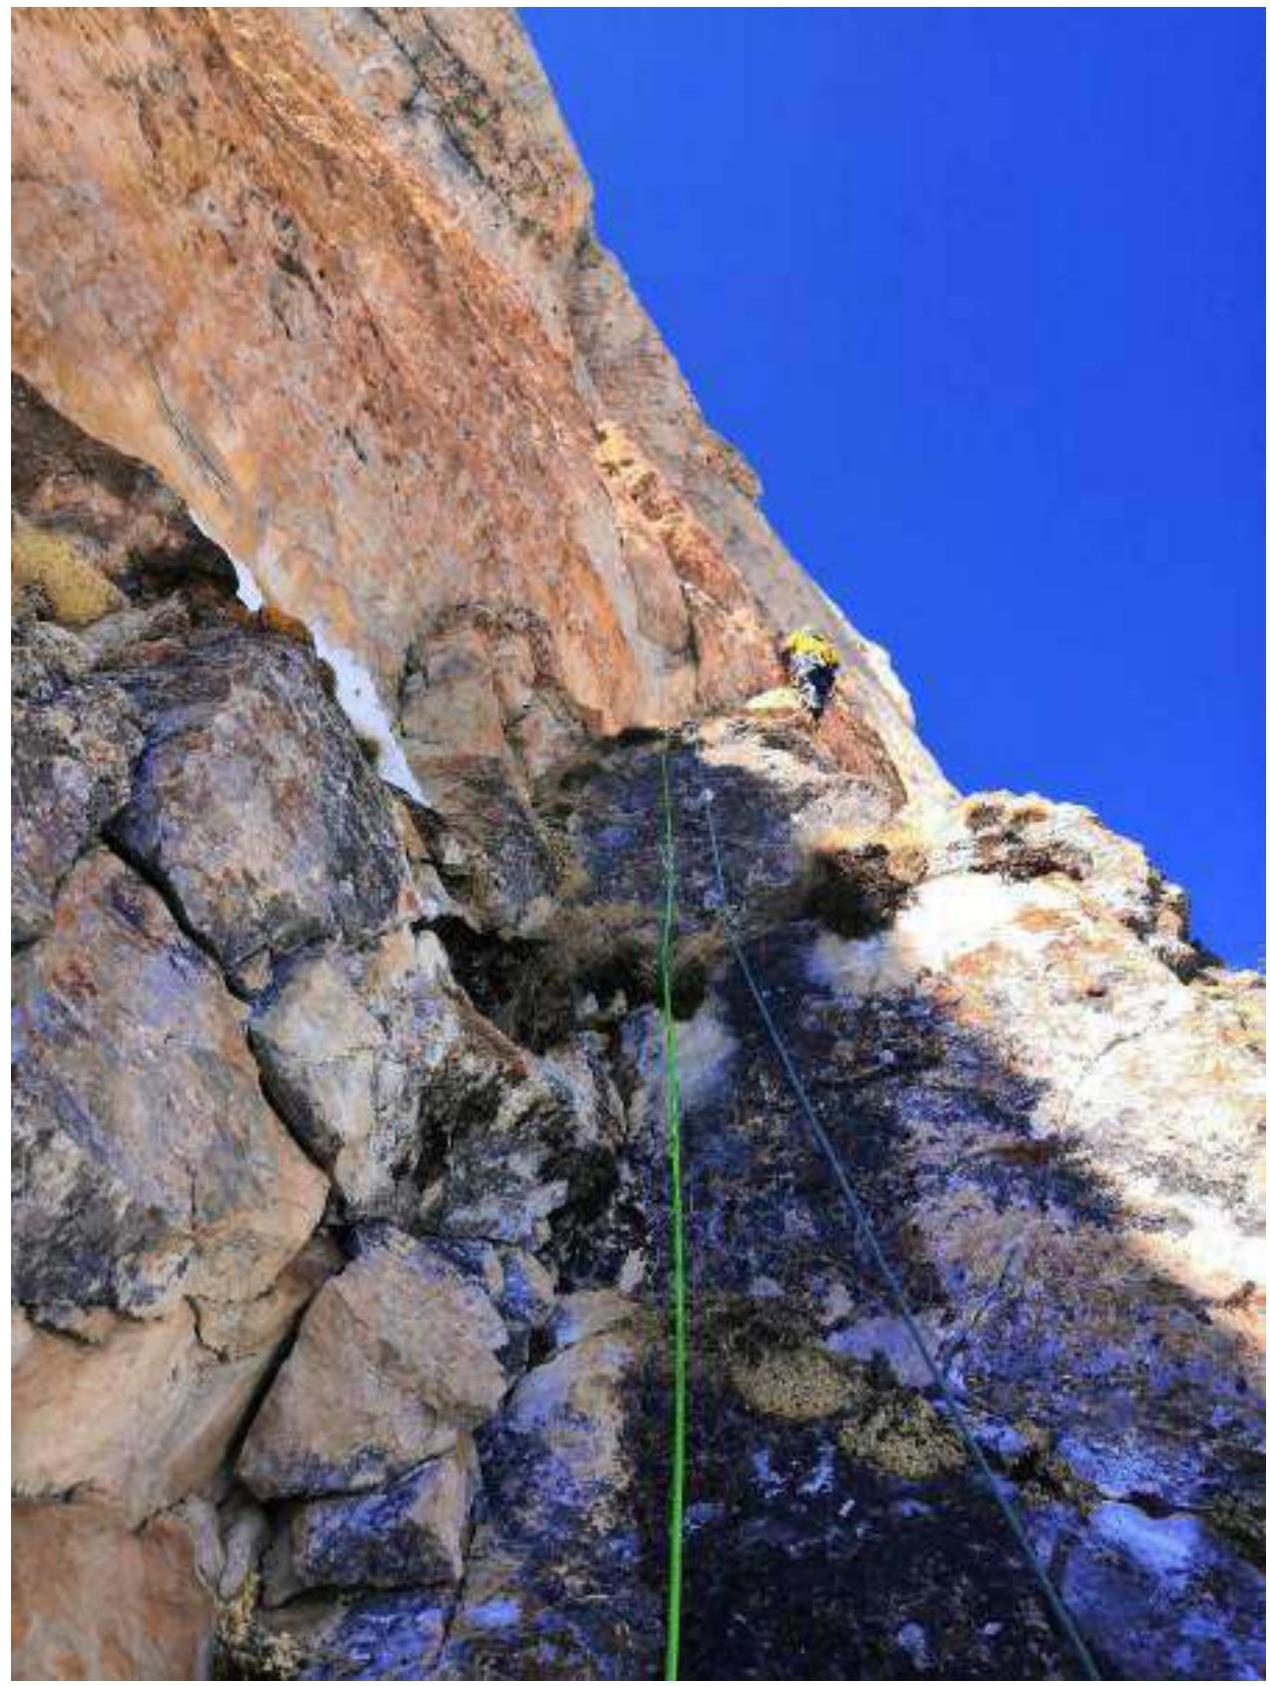
Fig. 8: Section R7–R8. Passing a small wall on ITO after positive rocks
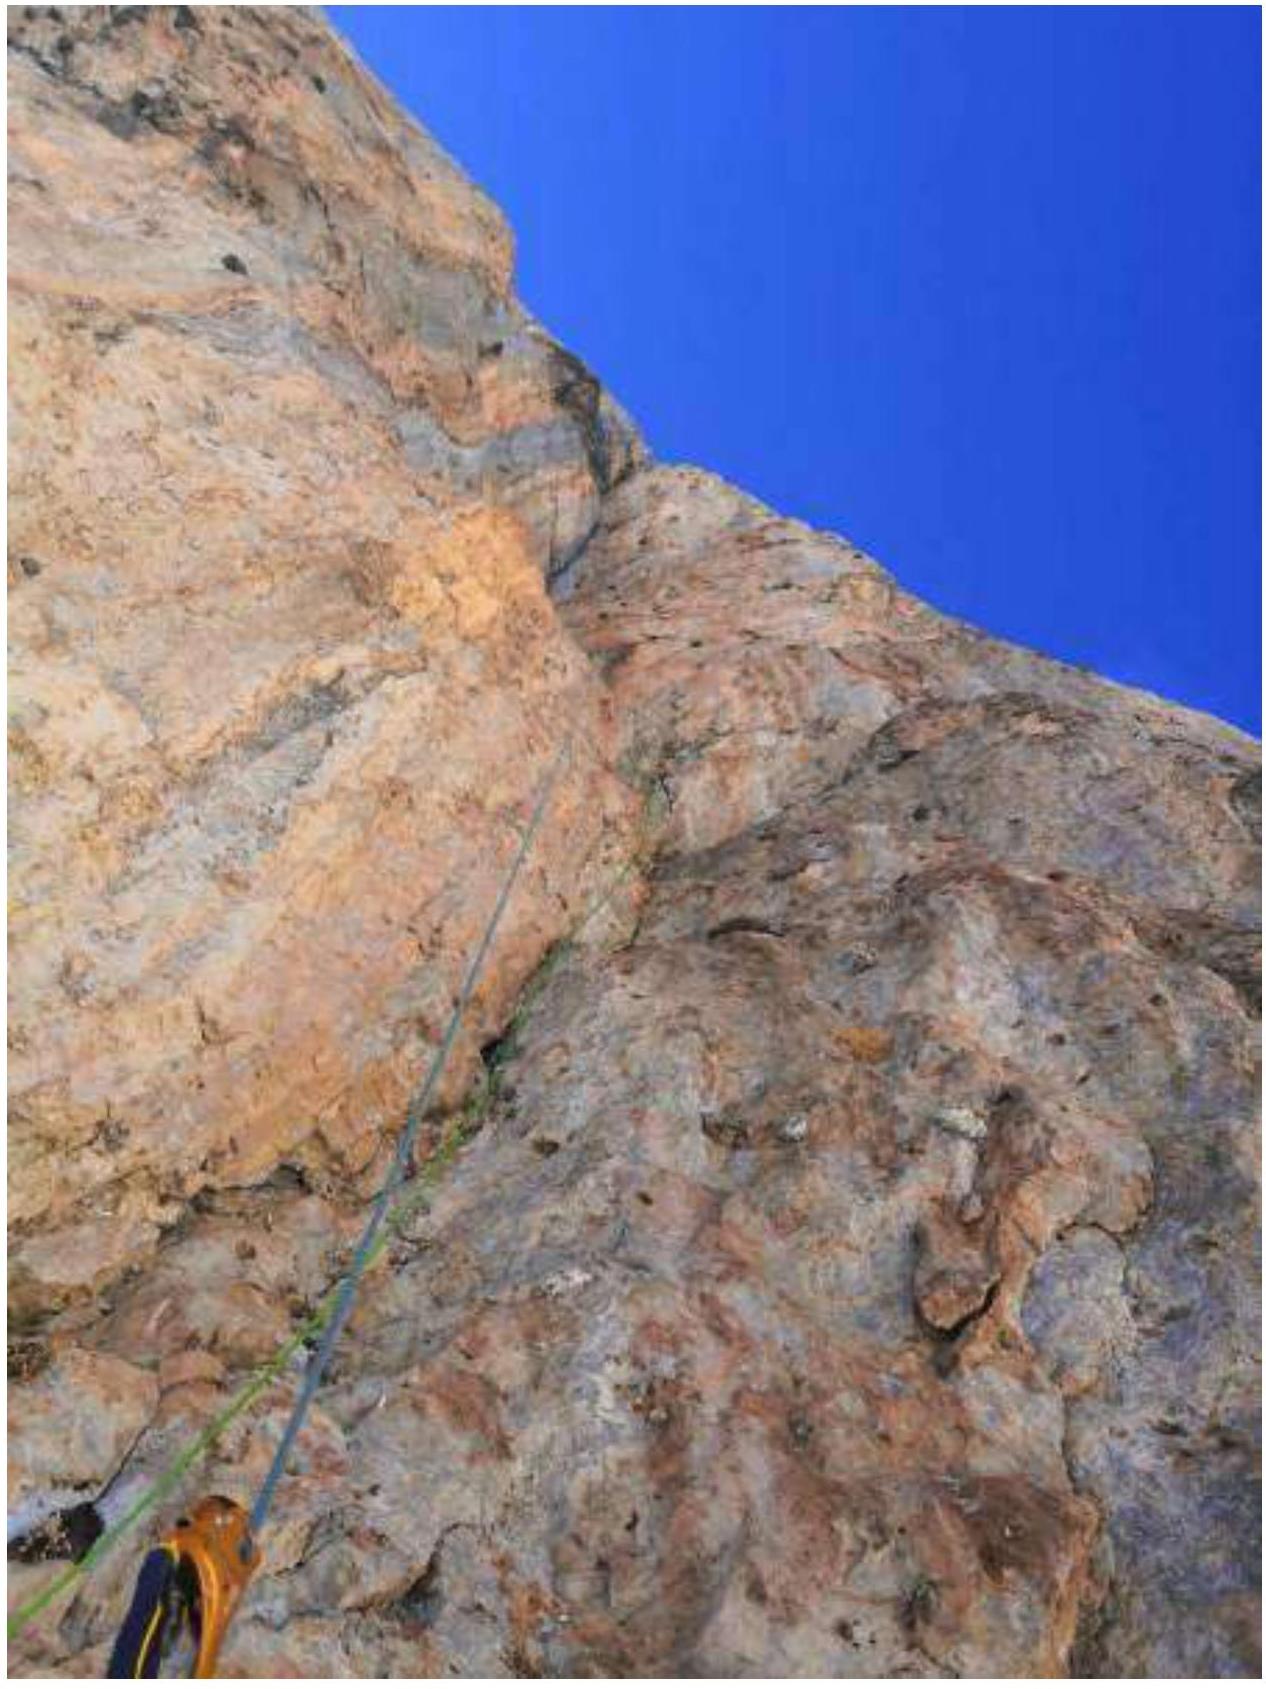
Fig. 9: View of R8–R9–R10. Along the internal angles, we approach the overhang

Fig. 10: Section R10–R11. The internal angle continues beyond the bend
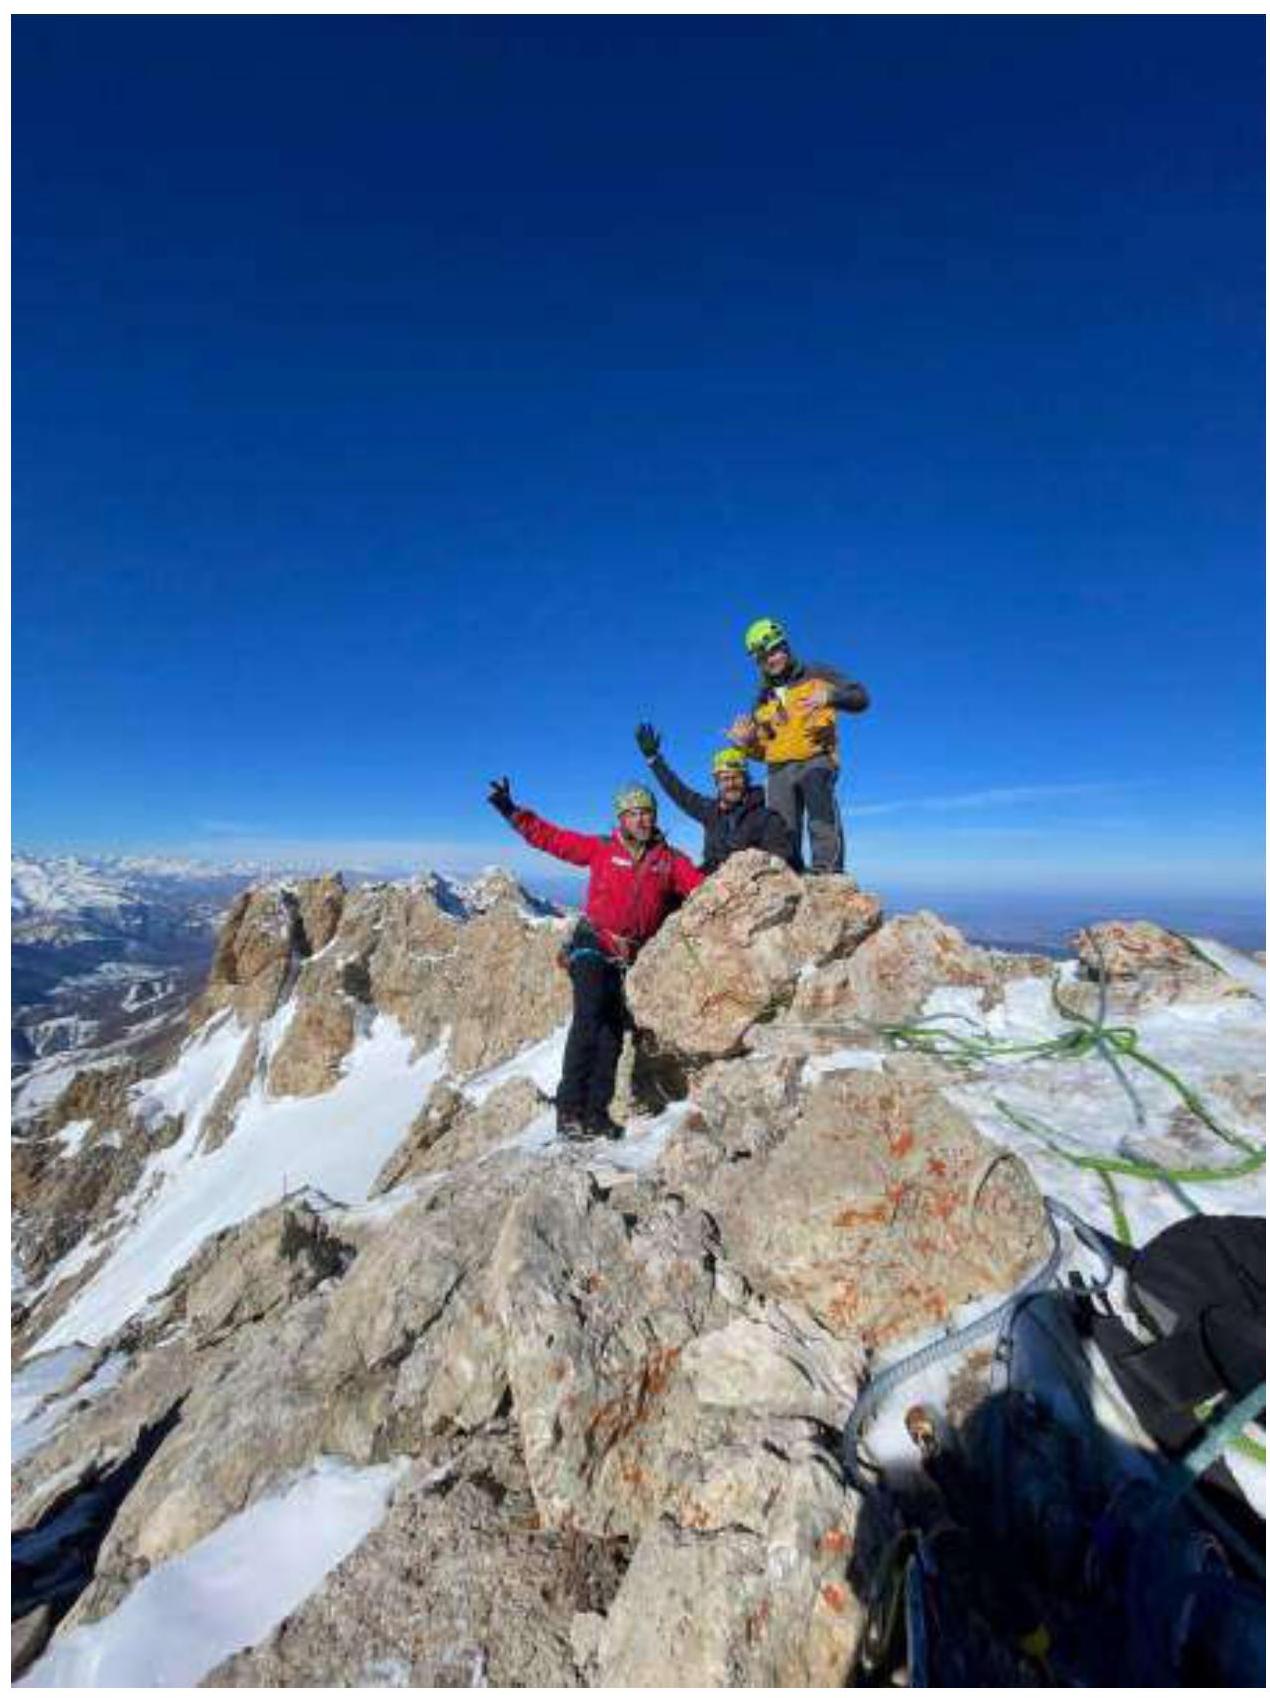
Fig. 11: At the summit
4. List of Equipment
- Dynamic rope 60 m — 1 piece
- Static rope 60 m — 2 pieces
- Quickdraws with carabiners 40 cm — 17 pieces
- Carabiners — 10 pieces
- Station loops — 4 pieces
- Black Diamond friends — several up to №4
- Totem friends — set
- Nuts (stoppers) — set
- Extraction tool — 2 pieces
- Rock hammers — 3 pieces
- Anchor bolts — 15 pieces
- Hole skyhooks — 2 pieces
- Relief skyhooks — 1 piece
- Crampons — 1 pair
- Crampon aids — 2 pairs
- Crampon aid ladders — 3 pieces
- Harness + 2 self-insurance systems — 3 sets
- Helmets — 3 pieces
- Grigri belay device — 1 piece
- ATC belay device — 2 pieces
- Jumars — 4 pieces
- Jumar pedals — 4 pieces
- Headlamps — 3 pieces
- Thermoses — 1 piece
- First aid kit — 1 piece
- Radio station — 2 pieces
- Sleeping bags — 2 pieces (twin set)
- Tent — 1 piece