Report
On the ascent to the summit of Misses via the right spur on the Wall, category 5B, by the team from KAiS MEI from August 9, 2019, to August 13, 2019.
I. Climbing Report
| 1. General Information | ||
|---|---|---|
| 1.1 | Full name, sports rank of the leader | Leonkin Sergey Sergeevich, 1st sports rank |
| 1.2 | Full name, sports rank of participants | Zadvorný Andrey Vladimirovich, 1st sports rank, Lazarev Nikolay Andreevich, 2nd sports rank |
| 1.3 | Full name of coach | Kutkin Sergey Anatolyevich |
| 1.4 | Organization | KAiS MEI |
| 2. Characteristics of the Climbing Object | ||
| 2.1 | Region | Central Caucasus |
| 2.2 | Valley | Mizhirgi |
| 2.3 | Classification table section number for 2013 | |
| 2.4 | Name and height of the summit | Misses, 4425 m |
| 2.5 | Geographical coordinates of the summit (latitude/longitude), GPS coordinates | |
| 3. Route Characteristics | ||
| 3.1 | Route name | Along the right spur on the Wall |
| 3.2 | Proposed difficulty category | 5B |
| 3.3 | Degree of route exploration | - |
| 3.4 | Route terrain type | Combined |
| 3.5 | Route elevation gain (altimeter or GPS data) | 1132 m by GPS |
| 3.6 | Route length (in meters) | 1585 m |
| 3.7 | Technical elements of the route (total length of sections with different difficulty categories, terrain type (ice-snow, rock)) | Category I ice — 30 m. Category II ice — 120 m. Category III rock — 280 m, ice — 40 m. Category IV rock — 600 m, ice — 90 m. Category V rock — 230 m. Category VI rock — 195 m. |
| :--: | :--: | :--: |
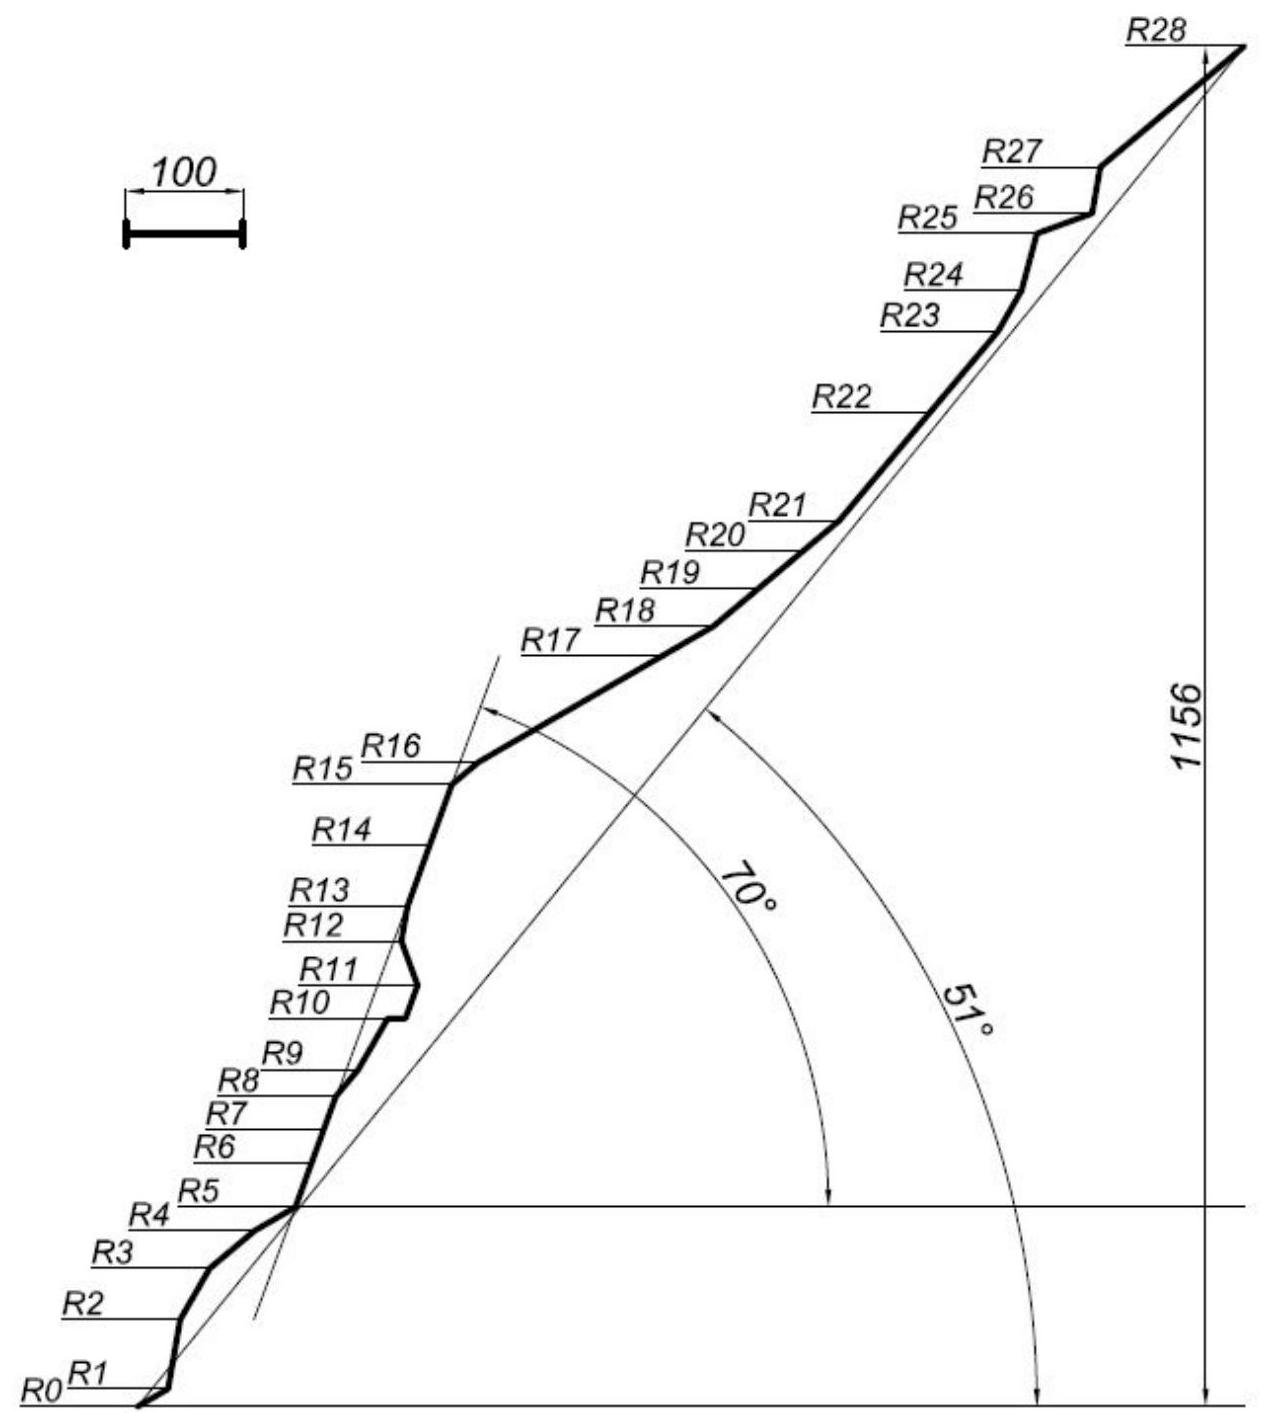
| 3.8 | Average route slope, ° | 51 |
| 3.9 | Average slope of the main route section, ° | 70 |
| 3.10 | Descent from the summit | Via the 4B category route to Mizhirgi valley |
| 3.11 | Additional route characteristics | Absence of snow and water up to the "shoulder" of Misses |
| 4. Team Actions Characteristics | ||
| 4.1 | Time in motion (team hours, in hours and days) | 36 hours, 3 days |
| 4.2 | Overnight stays | Site under the route, ledge on the first overnight stay, site on the second overnight stay, site on the third overnight stay |
| 4.3 | Route preparation time | - |
| 4.4 | Departure on the route | 05:00, August 9, 2019 |
| 4.5 | Arrival at the summit | 11:00, August 12, 2019 |
| 4.6 | Return to the base camp | 07:00, August 13, 2019 |
| 6. Person responsible for the report | ||
| 6.1 | Full name, e-mail | Lazarev Nikolay Andreevich, nlazarev87@gmail.com |
II. Climbing Description
1. Characteristics of the Climbing Object
General Summit Photograph
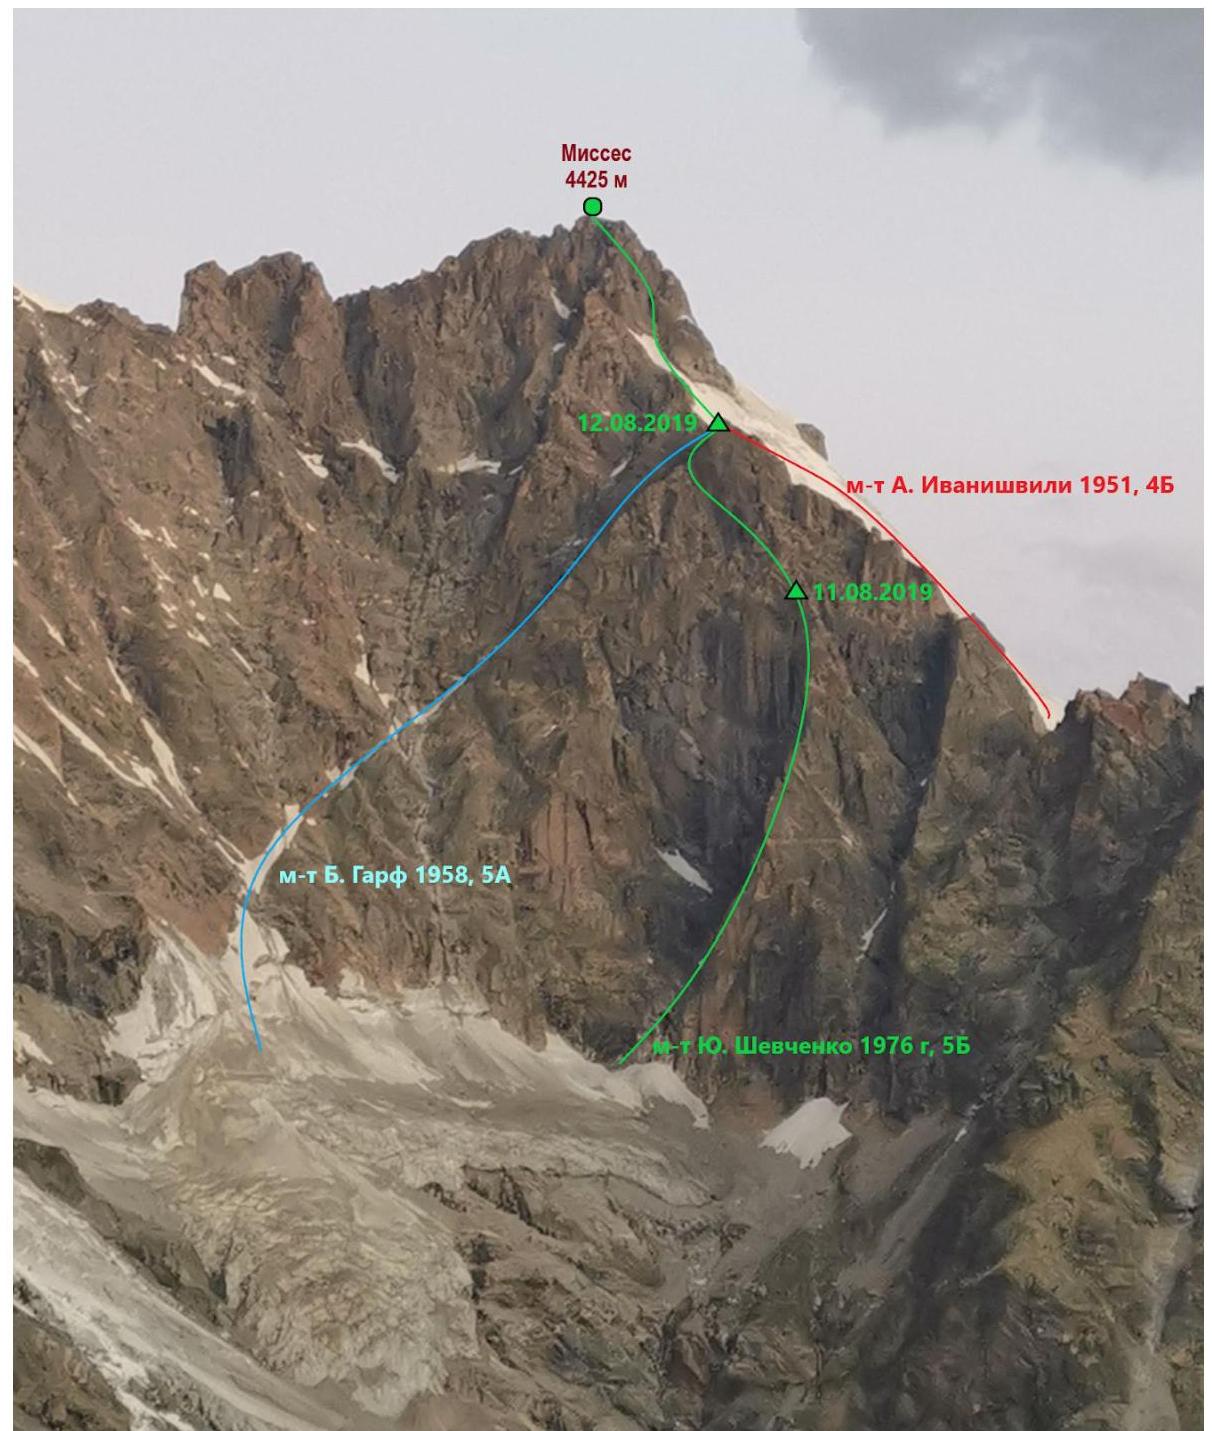
The route thread of category 5B by Yu. Shevchenko (1976) is marked in green. Approximate overnight stay locations are denoted by green triangles.
The approximate thread of the 4B category route by A. Ivanishvili (1951) used for descent is marked in red.
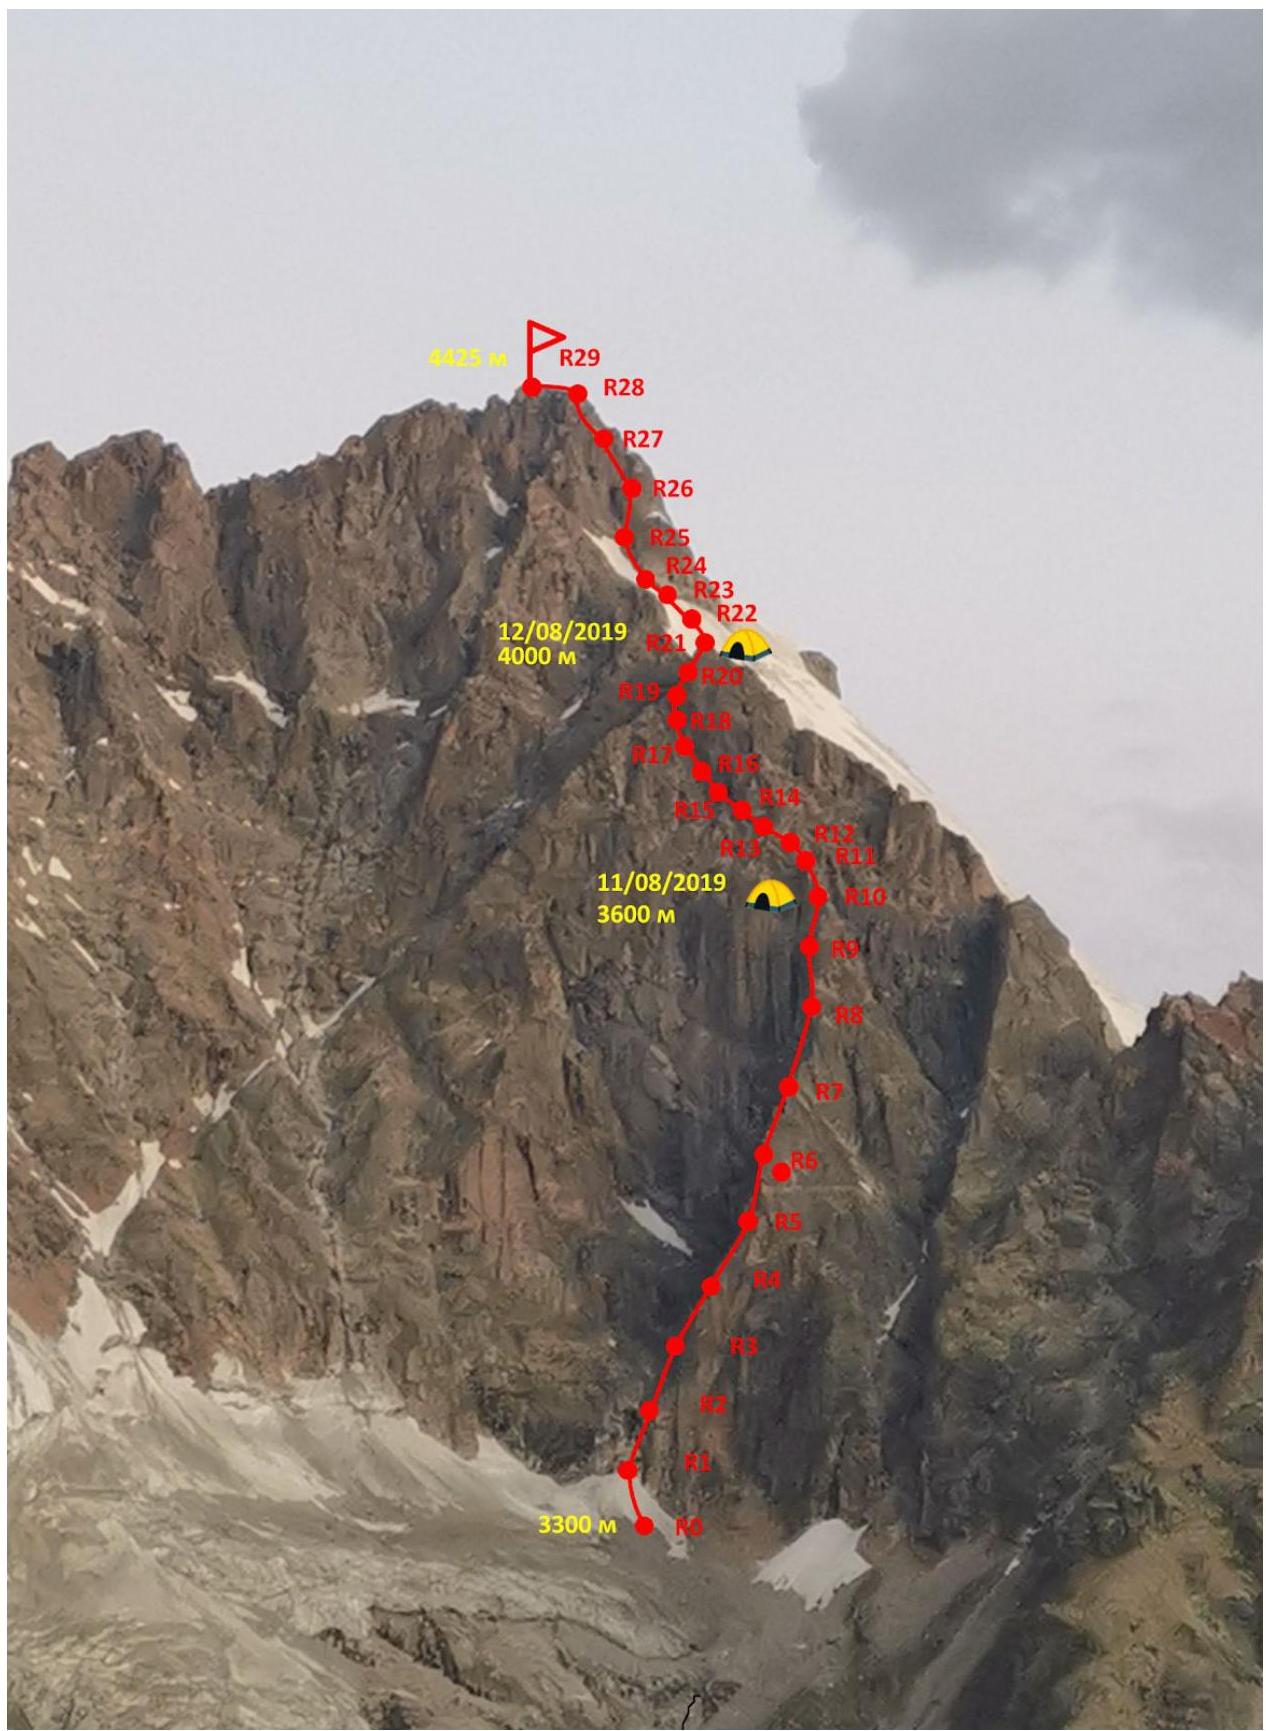
Technical Route Photo
Route Profile
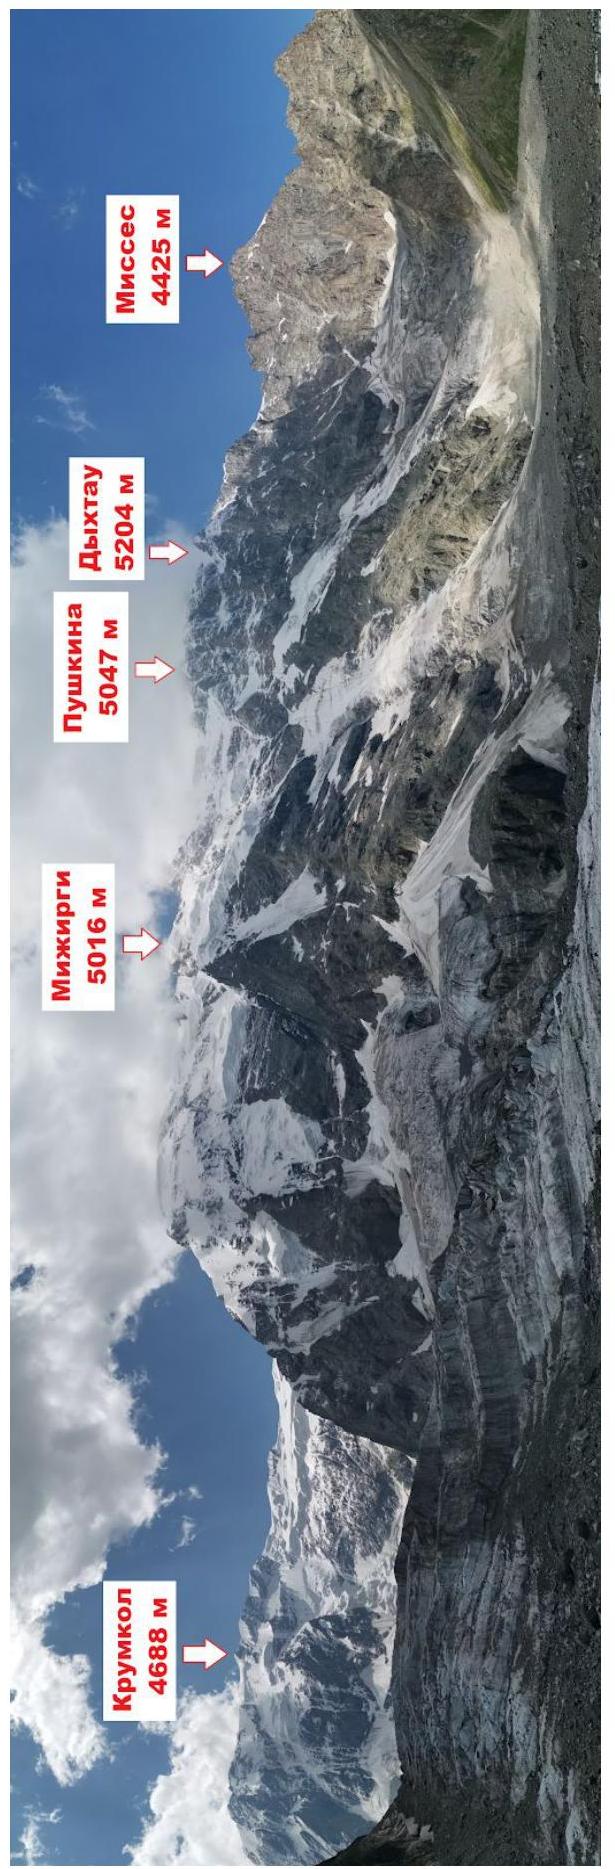
Area Photopanorama
Climbing Area Map
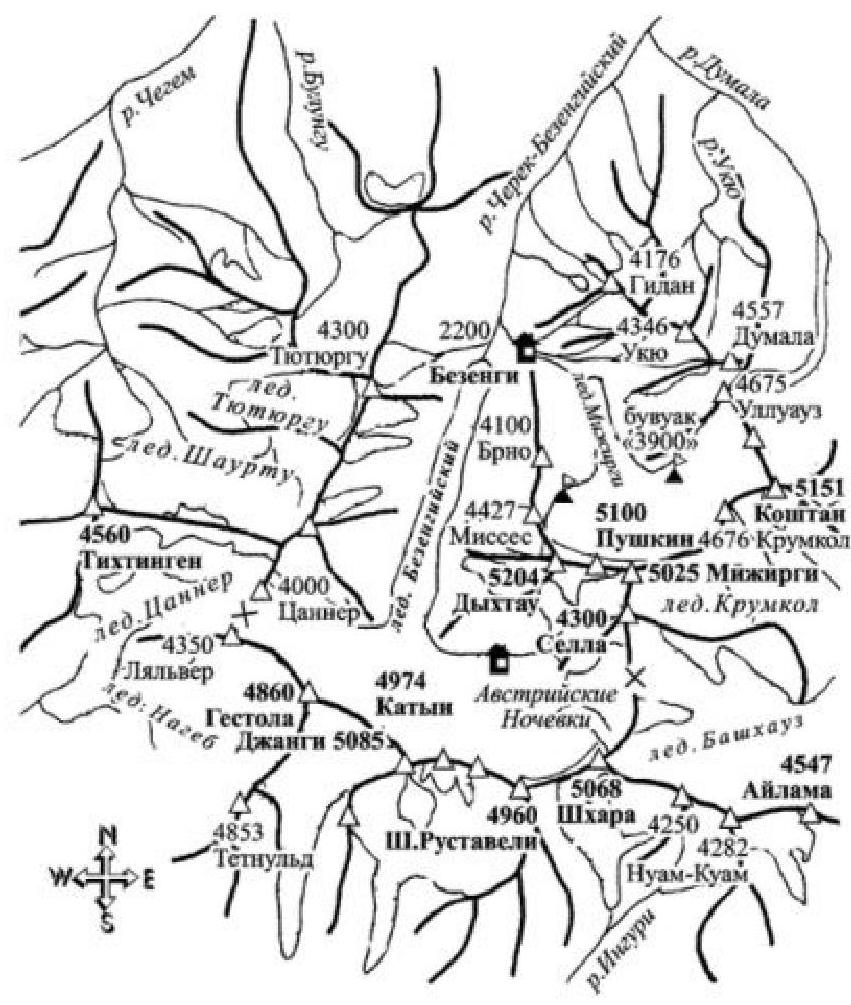
Approach
The initial bivouac is located on a moraine ridge (with space for two tents) 15 minutes' walk from the spur. The approach to the bivouac from the "Sudeyskiye nochyovki" in the "Bezengi" alpine camp takes 4 hours.
UIAA Route Diagram
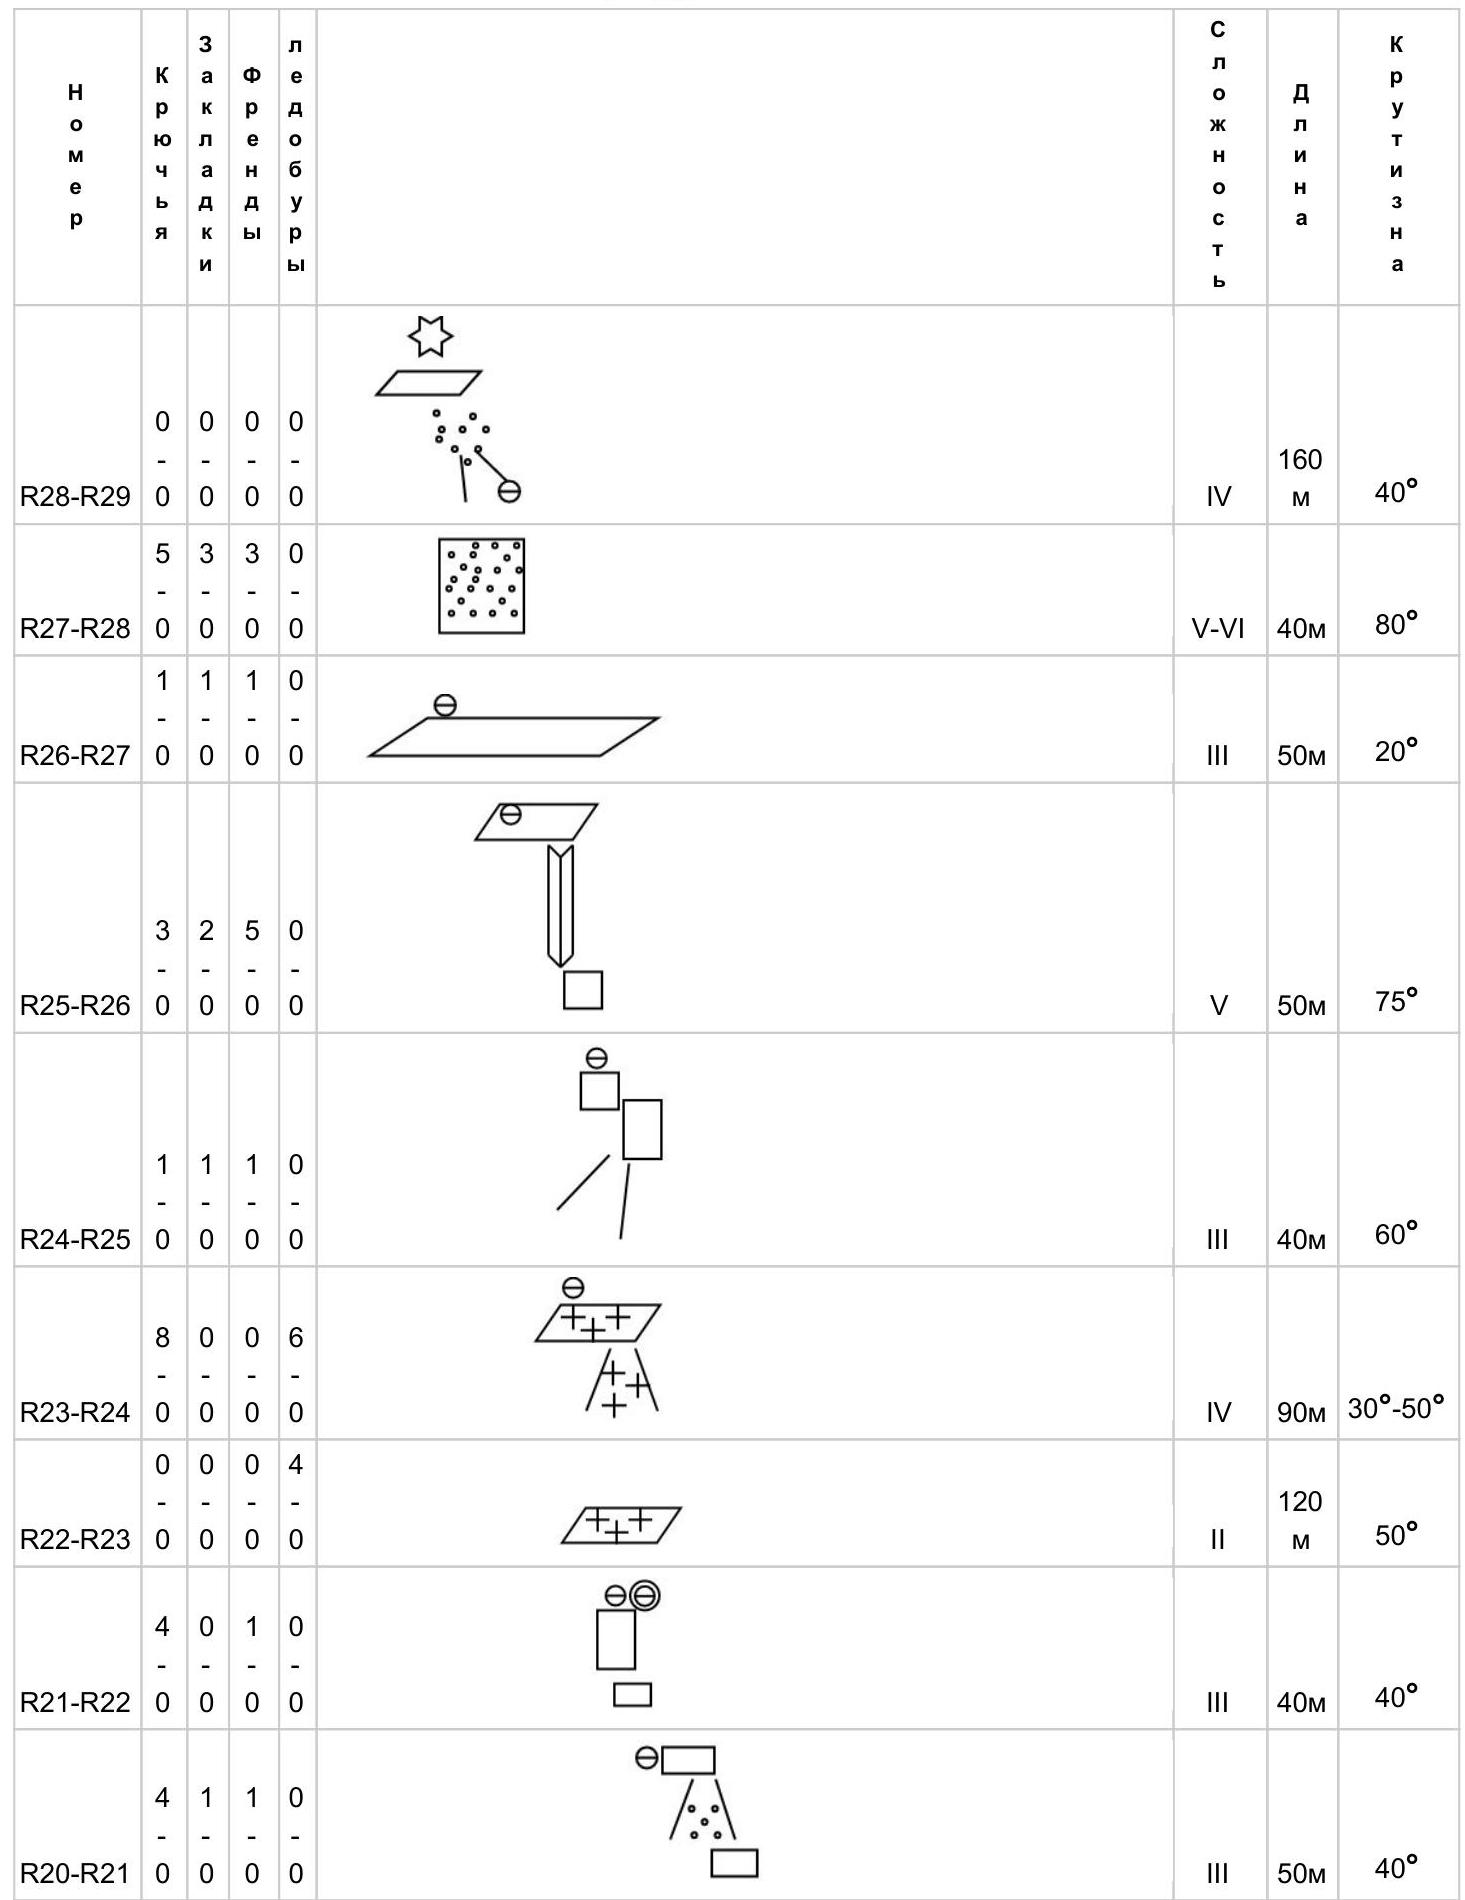
| Section | Difficulty (UIAA) | Length, m | Slope, ° |
|---|---|---|---|
| R28–R29 | IV | 160 | 40 |
| R27–R28 | V–VI | 40 | 80 |
| R26–R27 | III | 50 | 20 |
| R25–R26 | V | 50 | 75 |
| R24–R25 | III | 40 | 60 |
| R23–R24 | IV | 90 | 30–50 |
| R22–R23 | II | 120 | 50 |
| R21–R22 | III | 40 | 40 |
| R20–R21 | III | 50 | 40 |
| R19–R20 | III | 50 | 40 |
| R18–R19 | III | 50 | 30 |
| R17–R18 | III–IV | 180 | 30 |
| R16–R17 | V–VI | 30 | 40 |
| R15–R16 | V–VI | 55 | 70 |
| R14–R15 | IV | 55 | 70 |
| R13–R14 | VI | 30 | 80 |
| R12–R13 | VI | 40 | 85–110 |
| R11–R12 | V | 30 | 70 |
| R10–R11 | IV | 15 | 0 |
| R9–R10 | IV | 50 | 60 |
| R8–R9 | IV | 30 | 50 |
| R7–R8 | V | 30 | 70 |
| R6–R7 | V | 30 | 70 |
| R5–R6 | V | 40 | 70 |
| R4–R5 | III | 40 | 30 |
| R3–R4 | IV | 50 | 40 |
| R2–R3 | V | 50 | 60 |
| R1–R2 | IV | 60 | B |
Description by Sections
| R0–R1 | Ascend a snow slope to the base of the spur. Crampons may be required early in the morning. |
|---|---|
| R1–R2 | Up and right along "ram's foreheads." Protection with anchor pitons. Climbing is moderately difficult. |
| R2–R3 | Left and up along "ram's foreheads" overgrown with grass. Climbing is challenging. Protection is mainly with anchor pitons. |
| R3–R4 | Up through a system of ledges and walls. Climbing is moderately difficult. Protection is mainly with anchor pitons. |
| R4–R5 | Up an inside corner to the base of a ledge. Traverse right along the ledge. Climbing is easy; protection is mainly with anchor pitons. |
| R5–R6 | Right and up a steep, pronounced inside corner. Hanging belay station under an overhang. Climbing is challenging. There are many places for belay anchors. |
| R6–R7 | Bypass the overhang on the right and climb up an inside corner to a ledge about 50 cm wide. Very difficult climbing, especially at the start. Many belay anchor opportunities. |
| R7–R8 | Climb left and up a crack in the wall. Challenging climbing. Then move right and climb up through a system of ledges and walls to the base of an inside corner. |
| R8–R9 | Up an inside corner, then through a system of ledges and walls. Climbing is moderately difficult. |
| R9–R10 | Left and up, over a small wall. Then down into a scree couloir. Cross it and continue up and right along the couloir. Belay station on a convenient ledge on the spur. Climbing is moderately difficult. Terrain is heavily broken. |
| R10–R11 | Traverse 15 m right to the base of a wide crack. Climbing is moderately difficult. |
| R11–R12 | Up the crack to a horizontal slab 2x2 meters. There's an old piton. Climbing is challenging. Belay setup is easy. |
| R12–R13 | Right and up an inside corner. Climbing is very challenging. Terrain is heavily broken in places. At the end, there's an overhang that needs to be climbed face-on to reach a large jammed rock forming a "plug." |
| R13–R14 | Squeeze under the "plug" and continue up the wall. Key section. Climbing is very challenging. |
| R14–R15 | Traverse right, then left and up through a system of ledges and walls. Climbing is moderately difficult. Terrain is heavily broken. |
| R15–R16 | Up through ledges. In the upper part, the terrain consists of steep slabs where it's very difficult to set up protection. Climbing is challenging. The ridge spur ends here. |
| R16–R17 | Bypass the wall with a rightward traverse and climb up along a scree couloir (moving along the left wall of the couloir). The first 15 m have limited protection. Climbing is challenging. Belay station at the base of the Garf ledge. Here, we encountered the first small snow patch (about 1 m by 1 m). |
| R17–R19 | Move left and up along the Garf ledge, through a series of ledges, to the base of the bastion forming the Misses–Tau shoulder. There are challenging sections up to 10 m. Terrain is heavily broken. |
| R19–R22 | Climb up the left wall of the bastion on easy rock to reach the Misses shoulder. |
| R22–R24 | From the Misses–Tau shoulder, move up the ice, bypassing a rock outcrop on the left. |
| R24–R25 | Climb up easy rock to reach the top of the rock outcrop. |
| R25–R26 | Up through a series of inside corners to a sloping ledge. Climbing is challenging. |
| R26–R27 | Traverse left along easy scree ledges under a steep wall. |
| R27–R28 | Up the wall to the summit ridge. Rock is heavily broken. |
| R28–R29 | Continue up easy rock on the ridge to the Misses–Tau summit. |
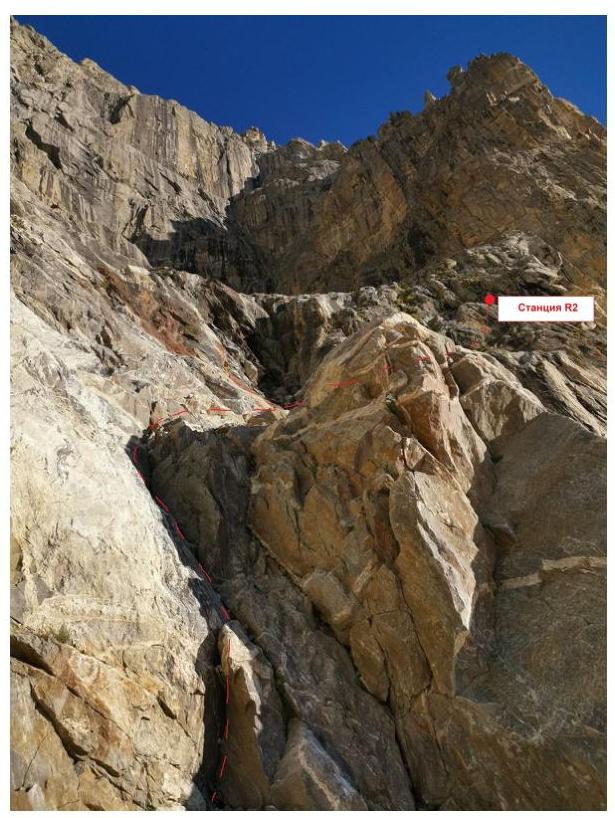
Fig. 1. Section R1–R2.
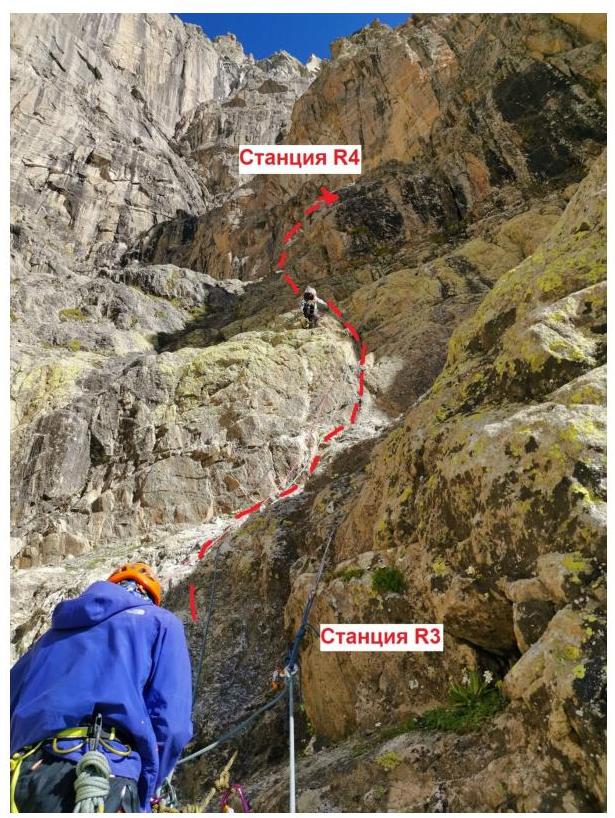
Fig. 3. Section R3–R4.
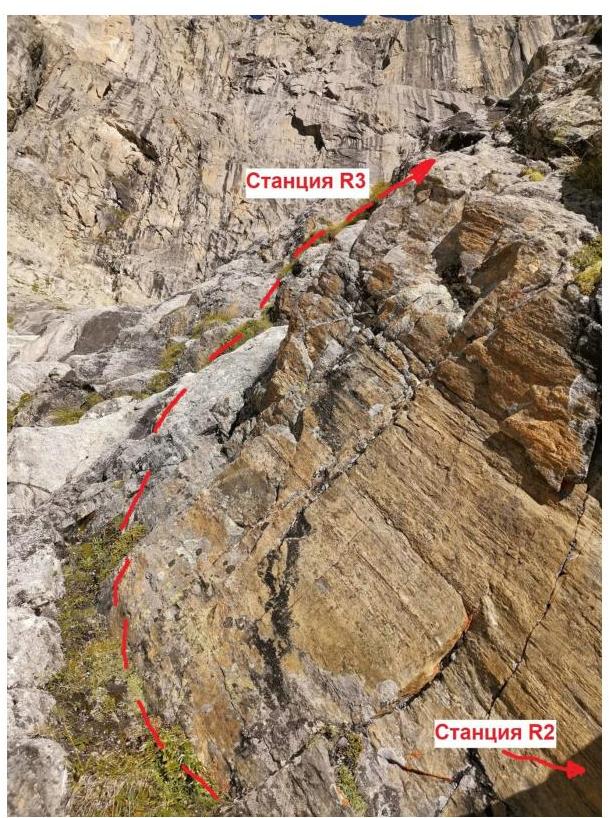
Fig. 2. Start of section R2–R3.
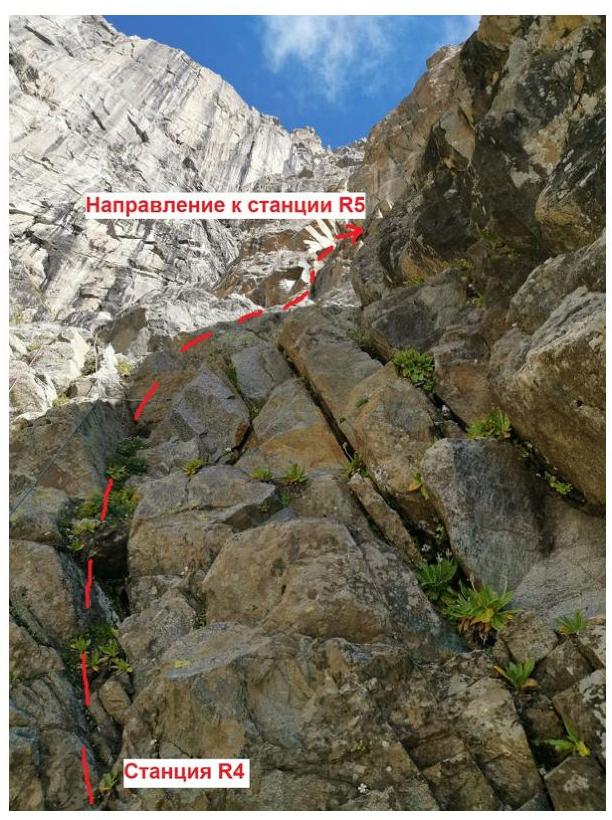
Fig. 4. Section R4–R5.
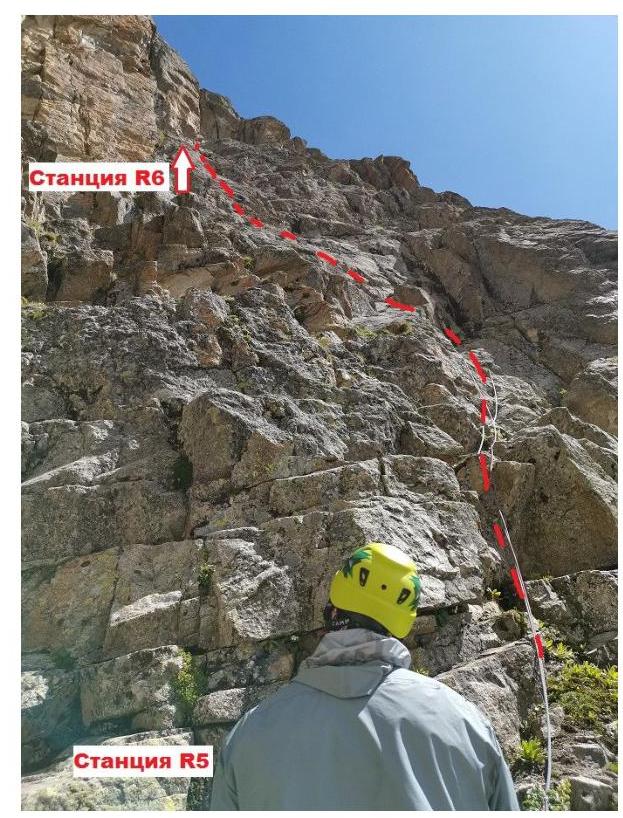
Fig. 5. Section R5–R6
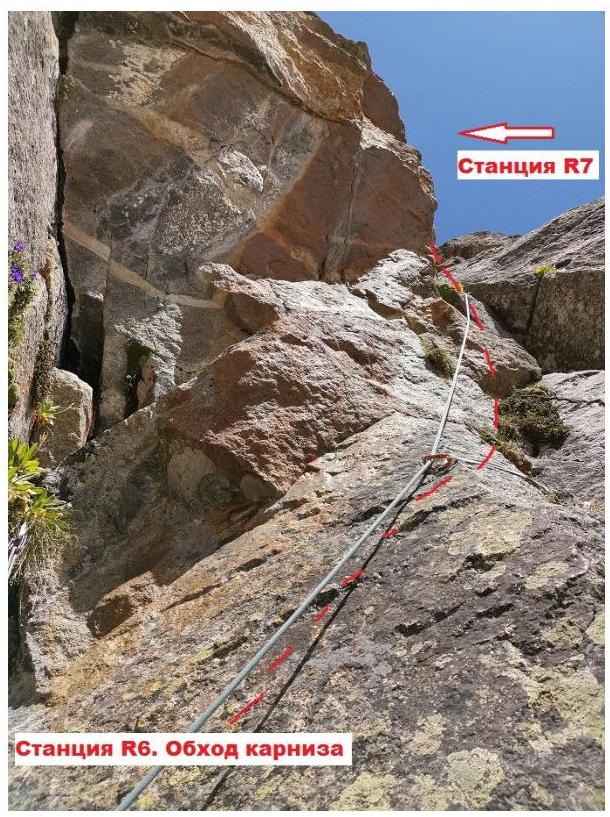
Fig. 7. Section R6–R7
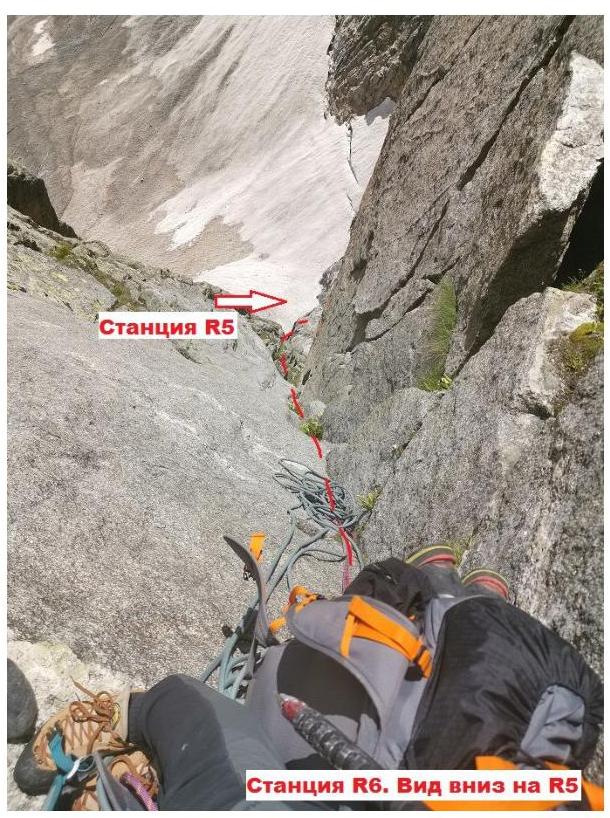
Fig. 6. R6 station. View down
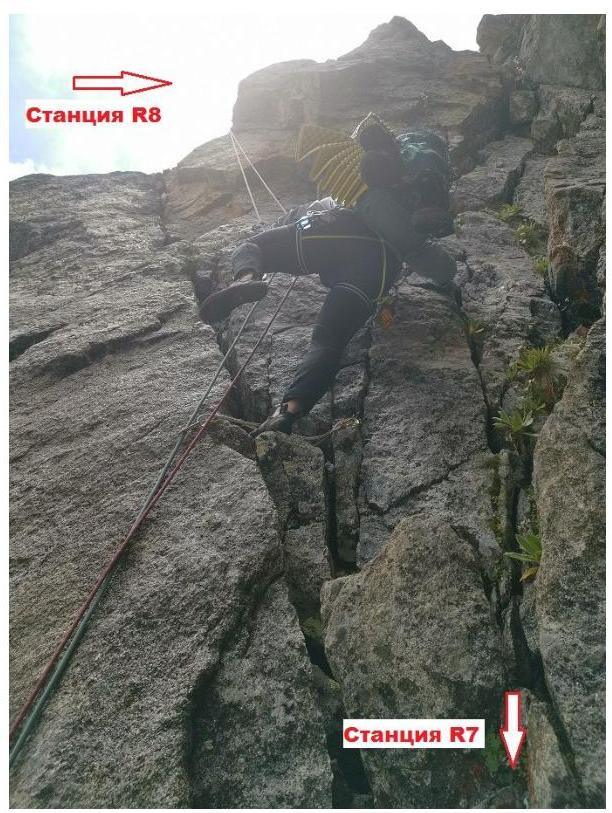
Fig. 8. Section R7–R8
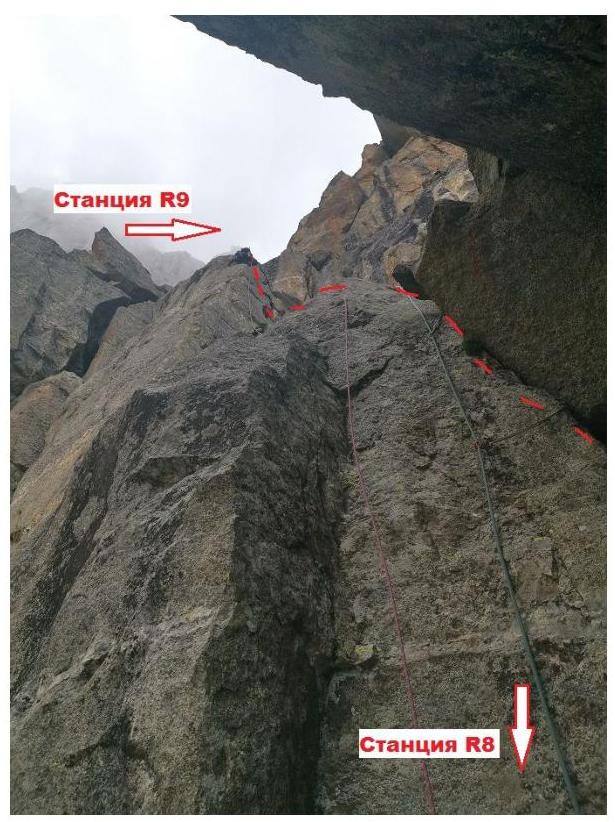
Fig. 9. Section R8–R9
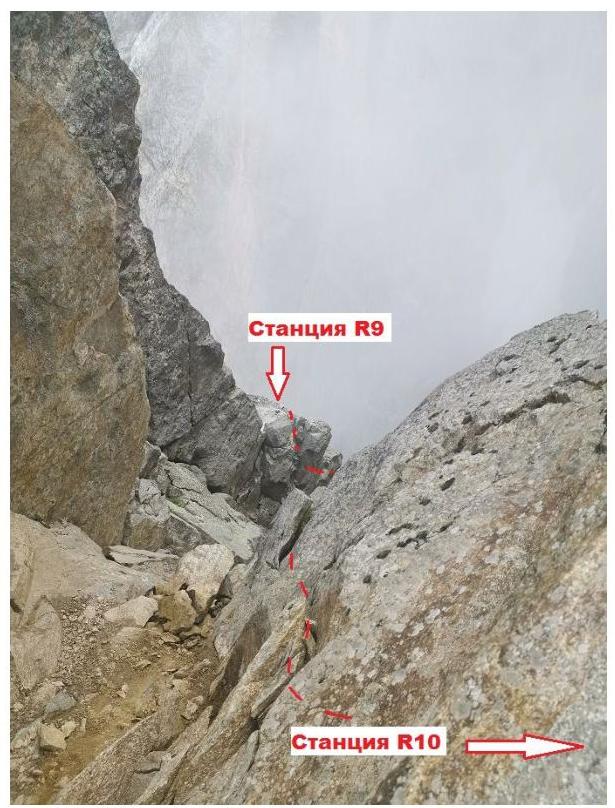
Fig. 11. Section R9–R10. View down
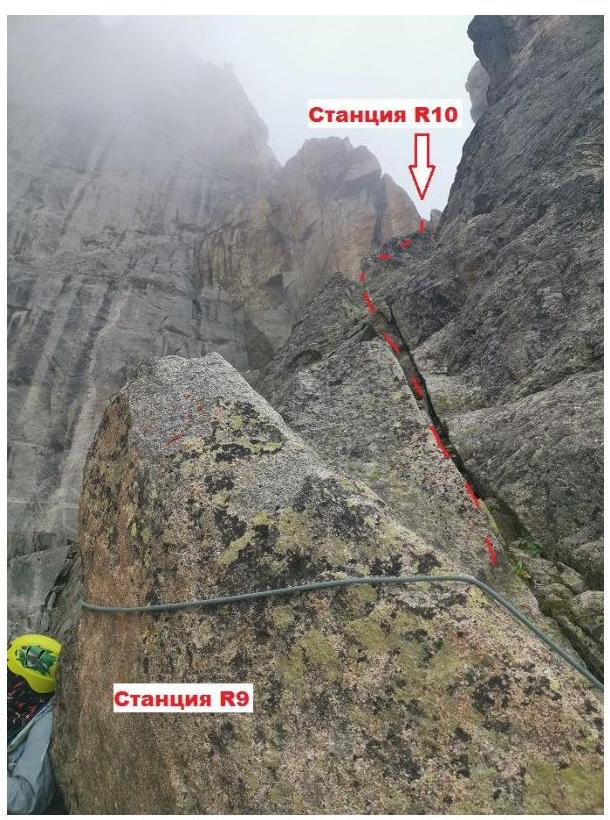
Fig. 10. Section R9–R10
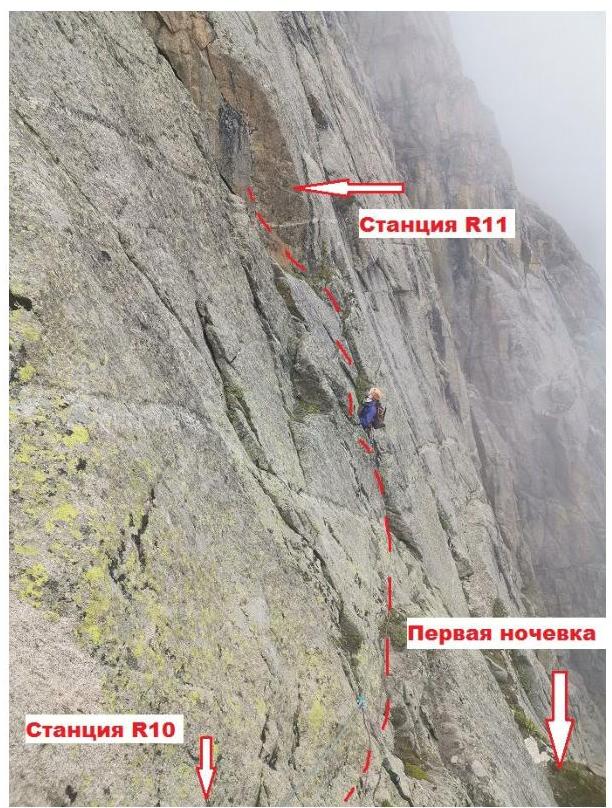
Fig. 12. Section R10–R11
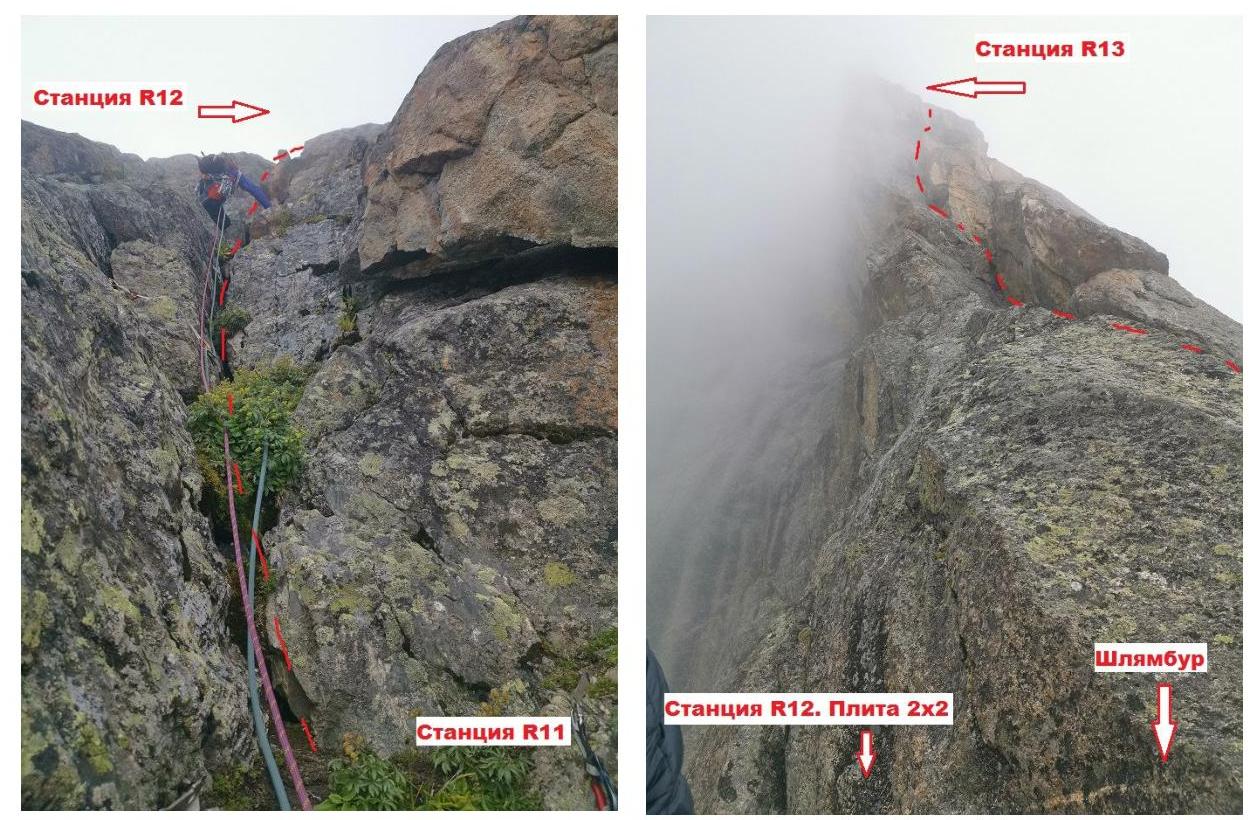
Fig. 13. Section R11–R12.
Fig. 14. Section R12–R13
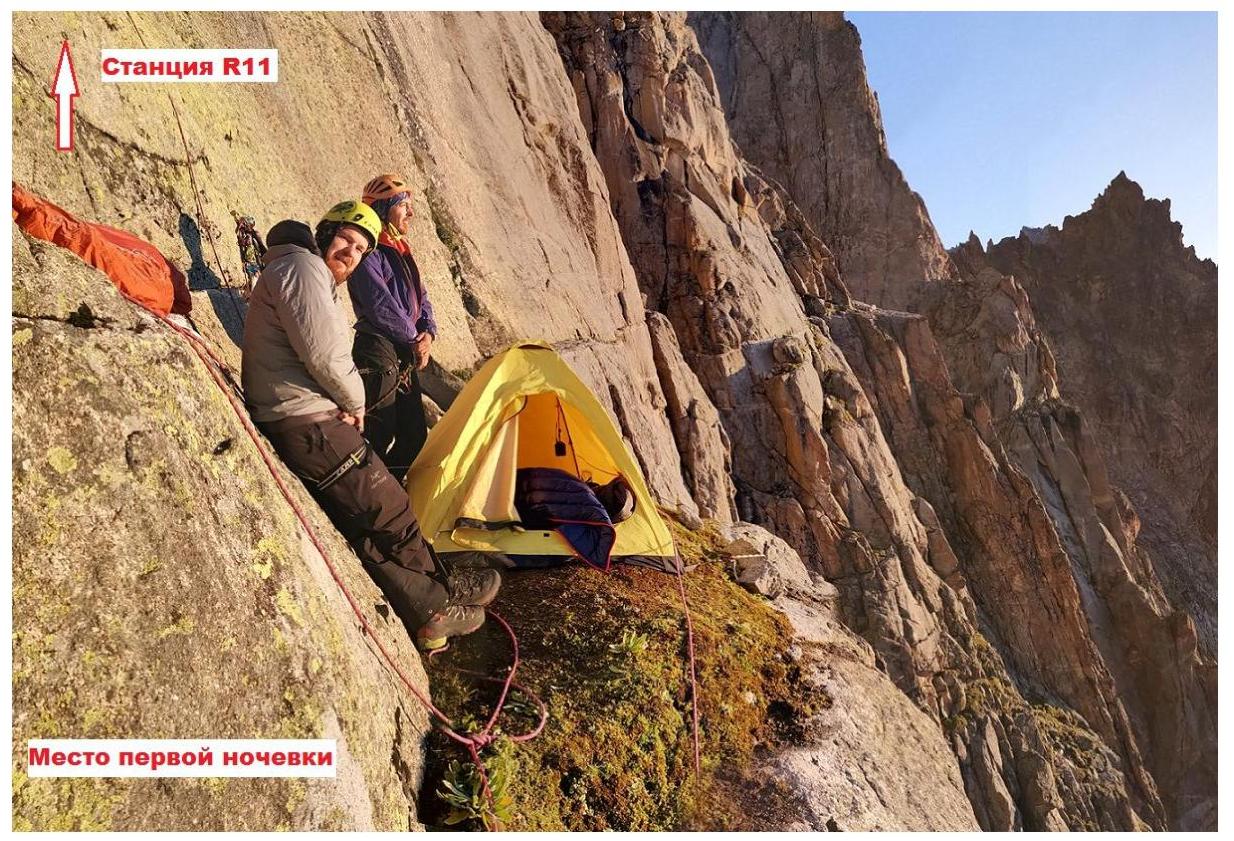
Fig. 15. First overnight stay location
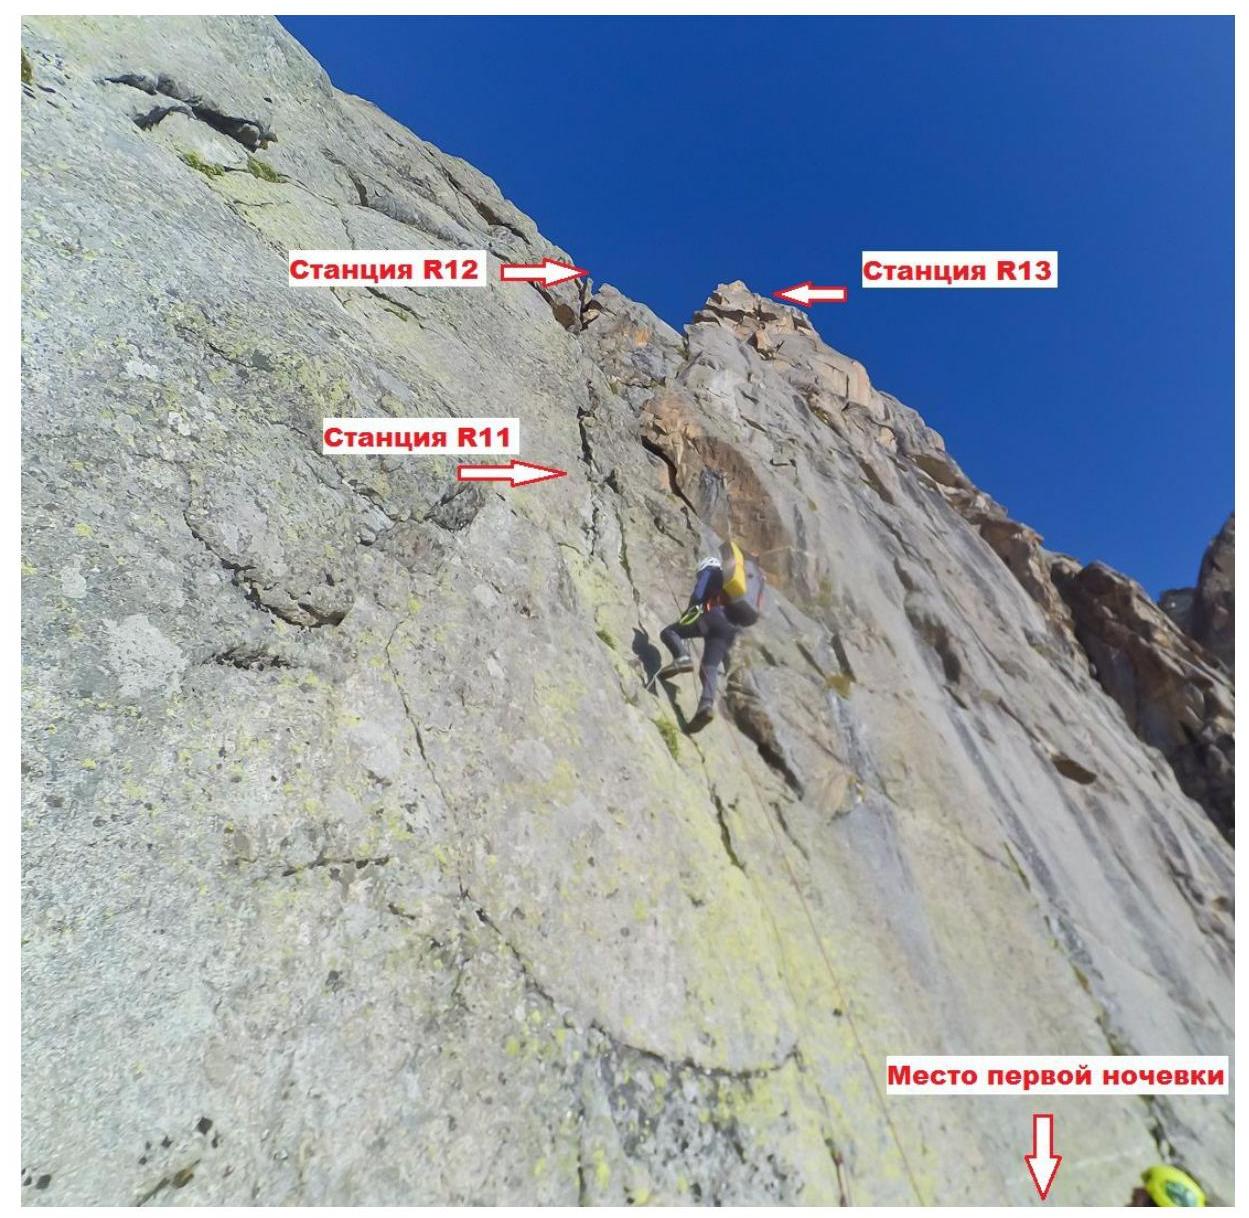
Fig. 16. Ascending via fixed ropes from the first overnight stay to R13
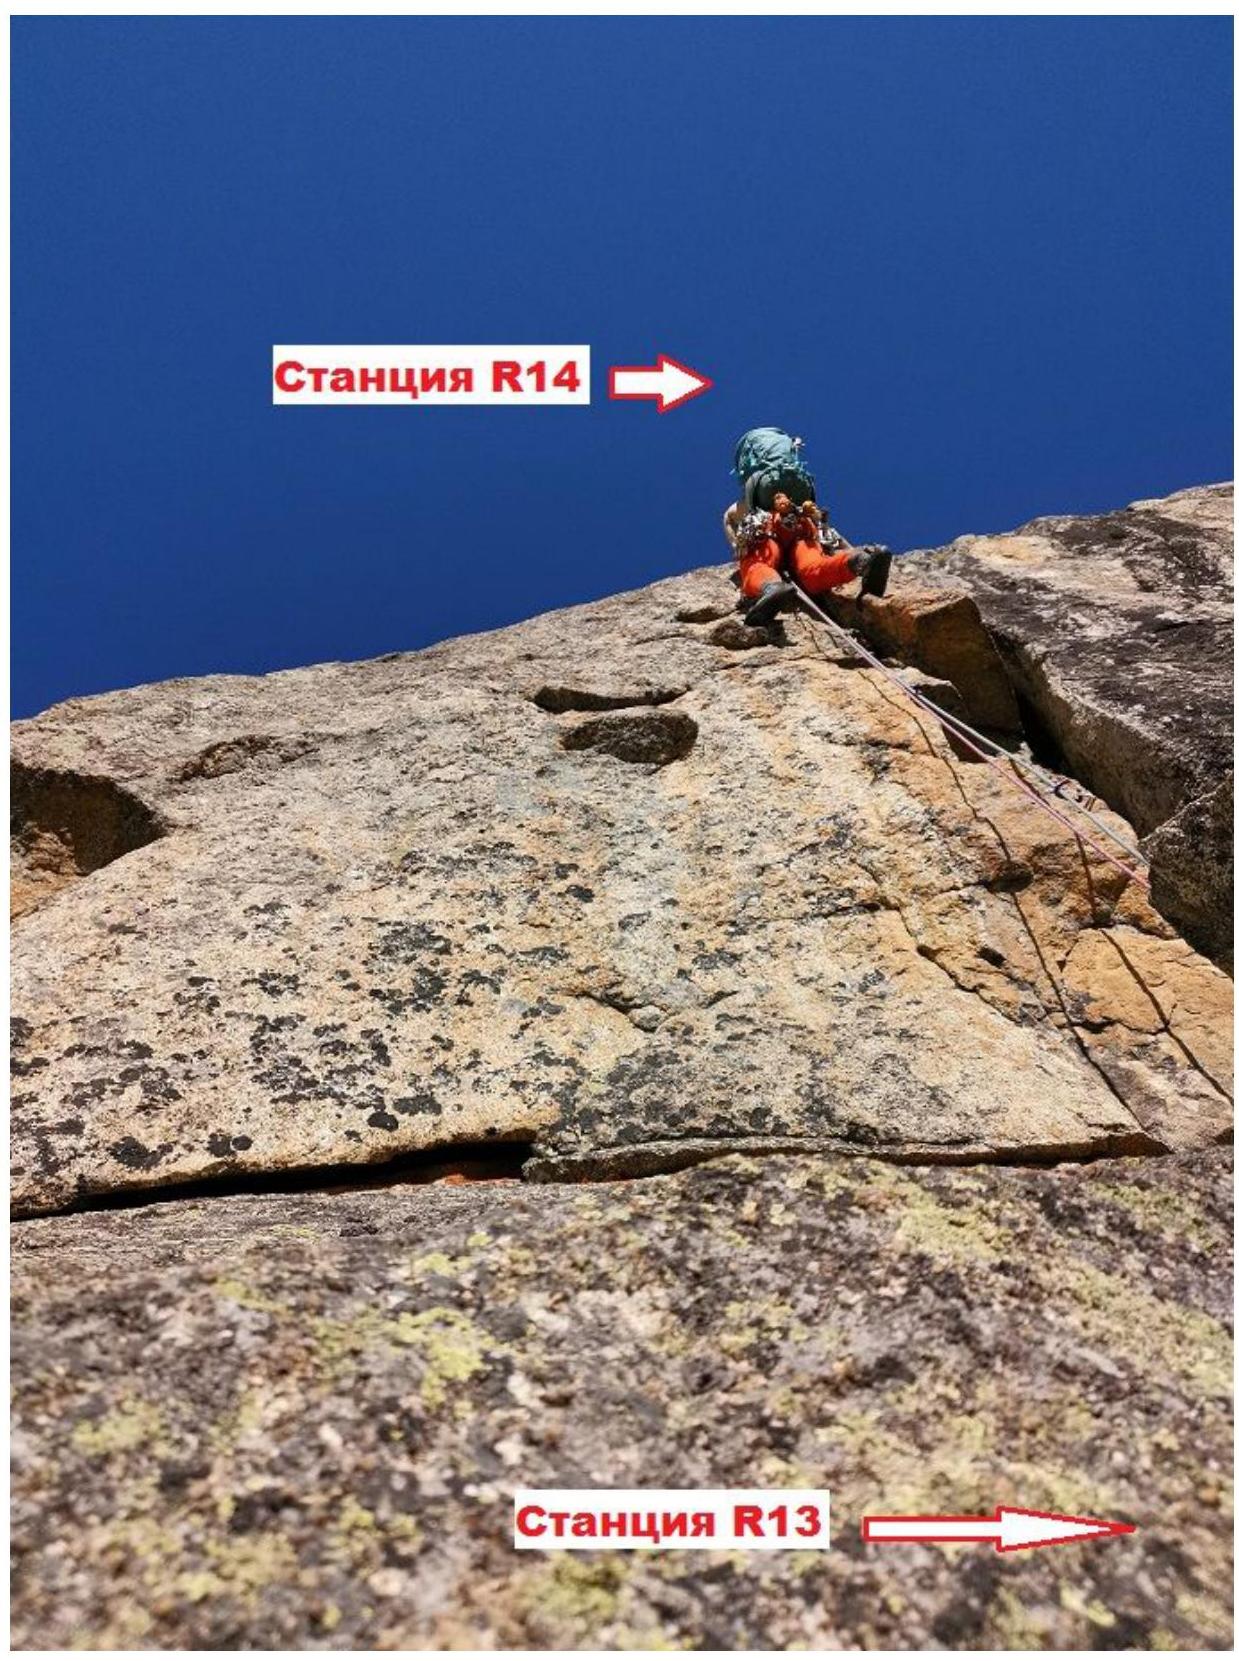
Fig. 17. Section R13–R14. Key section.
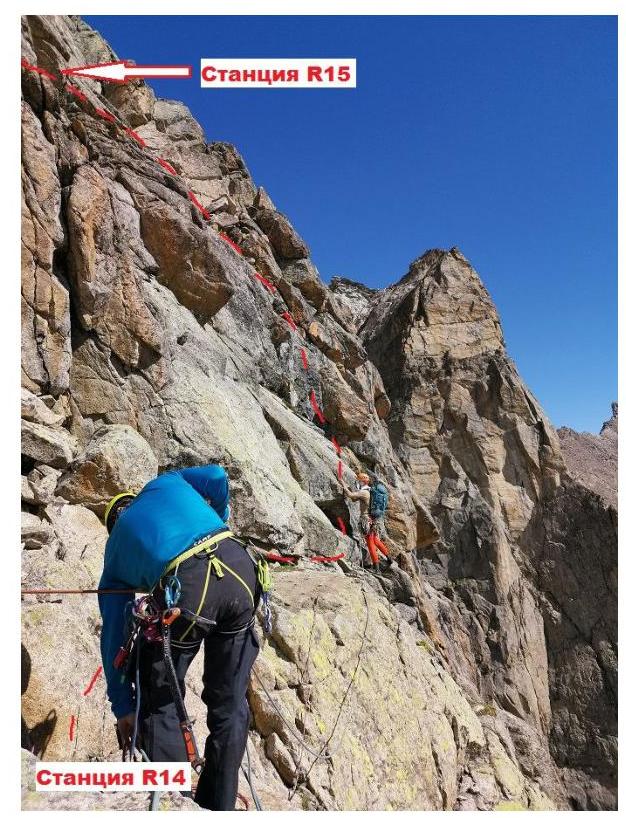
Fig. 18. Section R14–R15
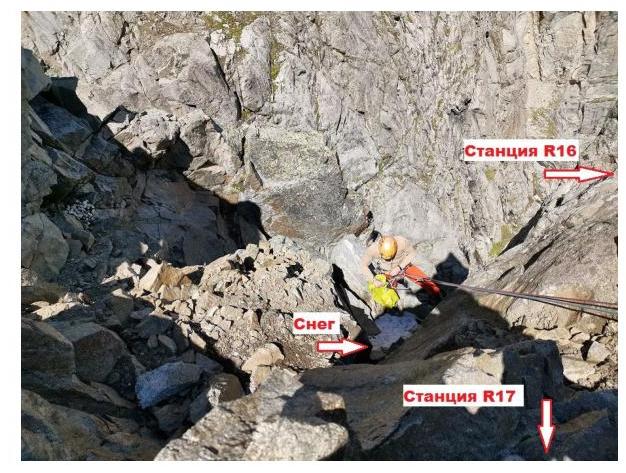
Fig. 20. R17 station. First snow patch
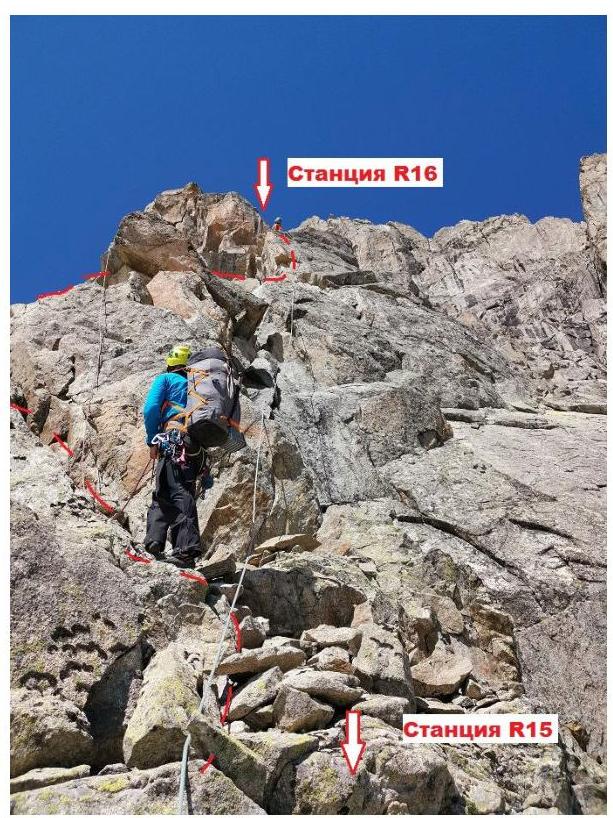
Fig. 19. Section R15–R16
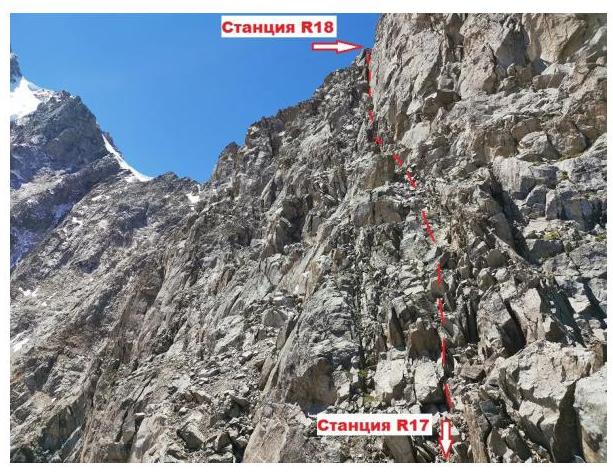
Fig. 21. Section R17–R18
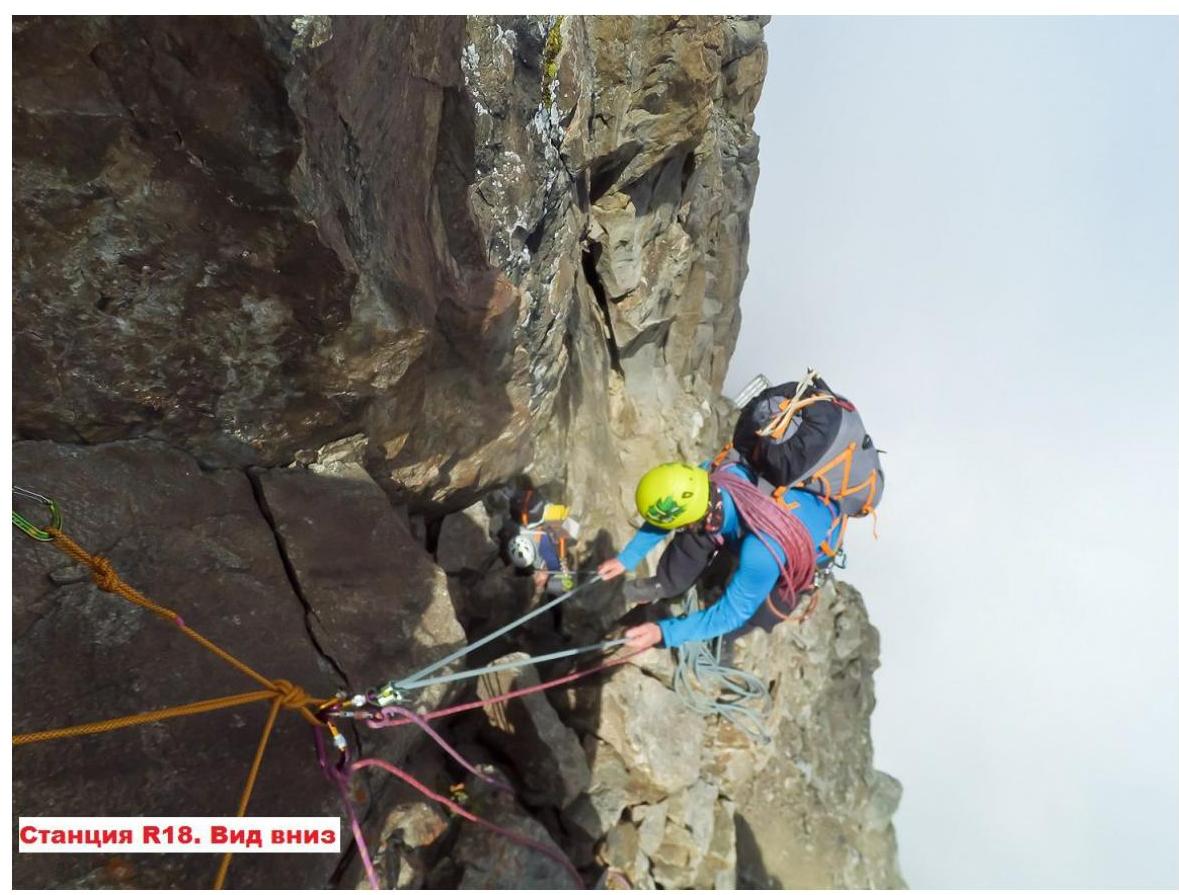
Fig. 22. R18 station. View down
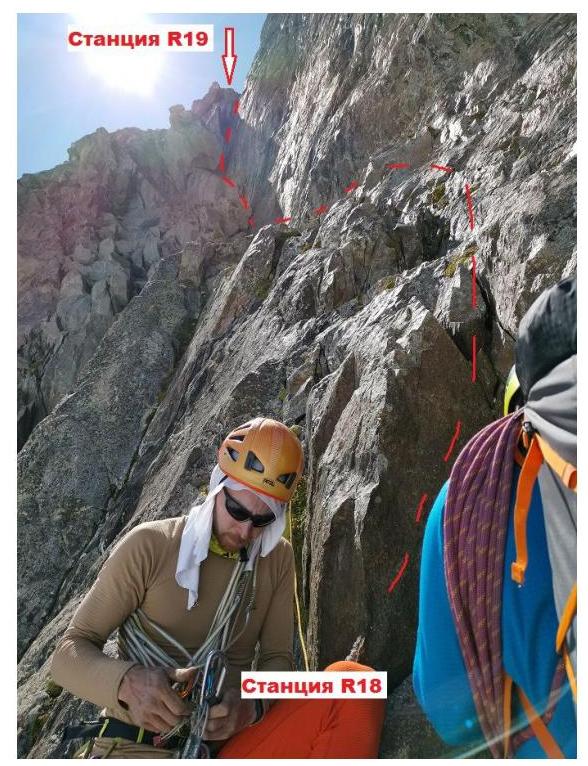
Fig. 23. Section R18–R19

Fig. 24. Sections R19–R21
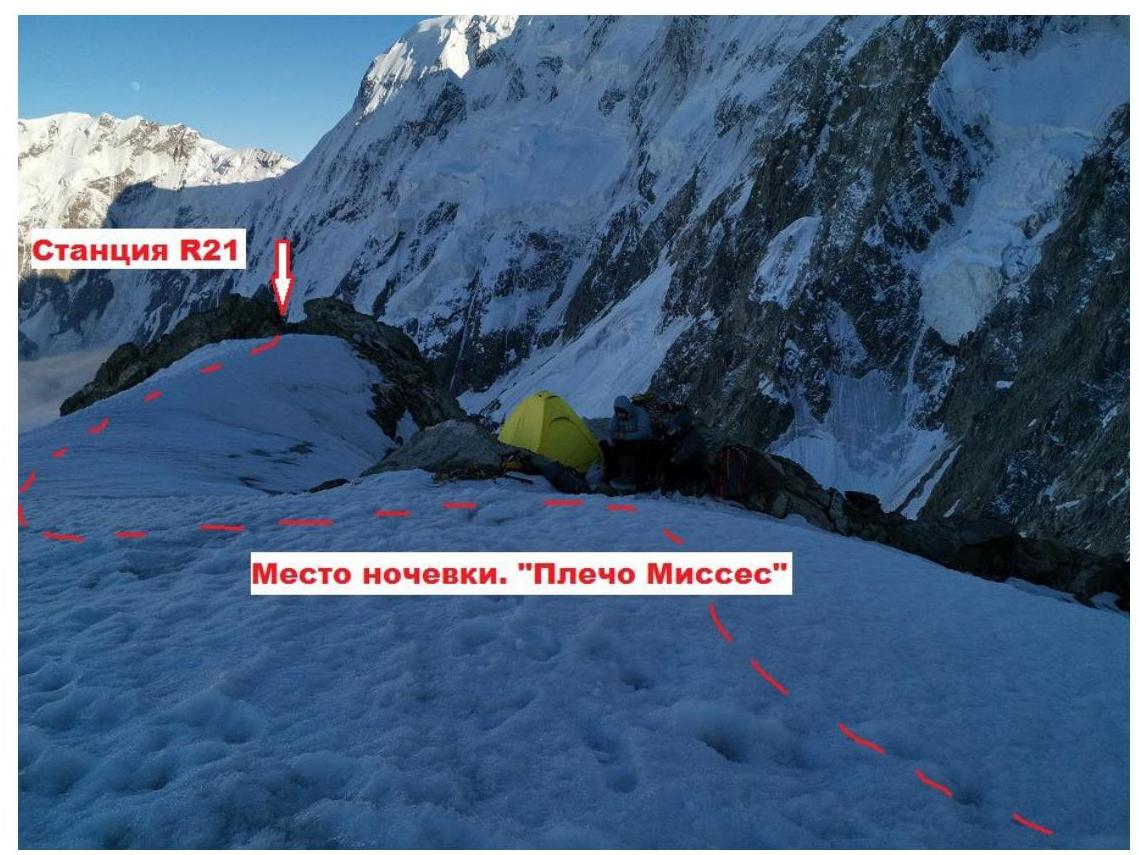
Fig. 25. Second overnight stay location
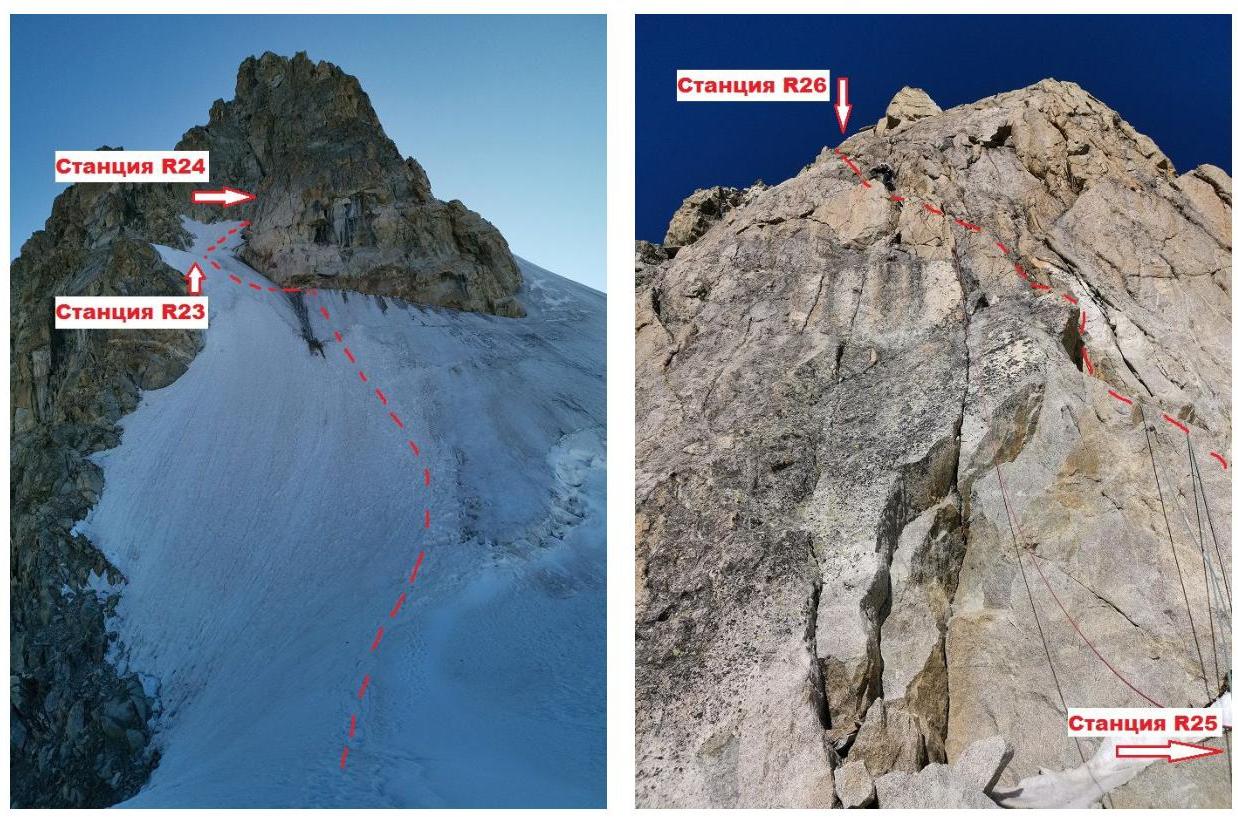
Fig. 26. Section R23–R24
Fig. 27. Section R25–R26
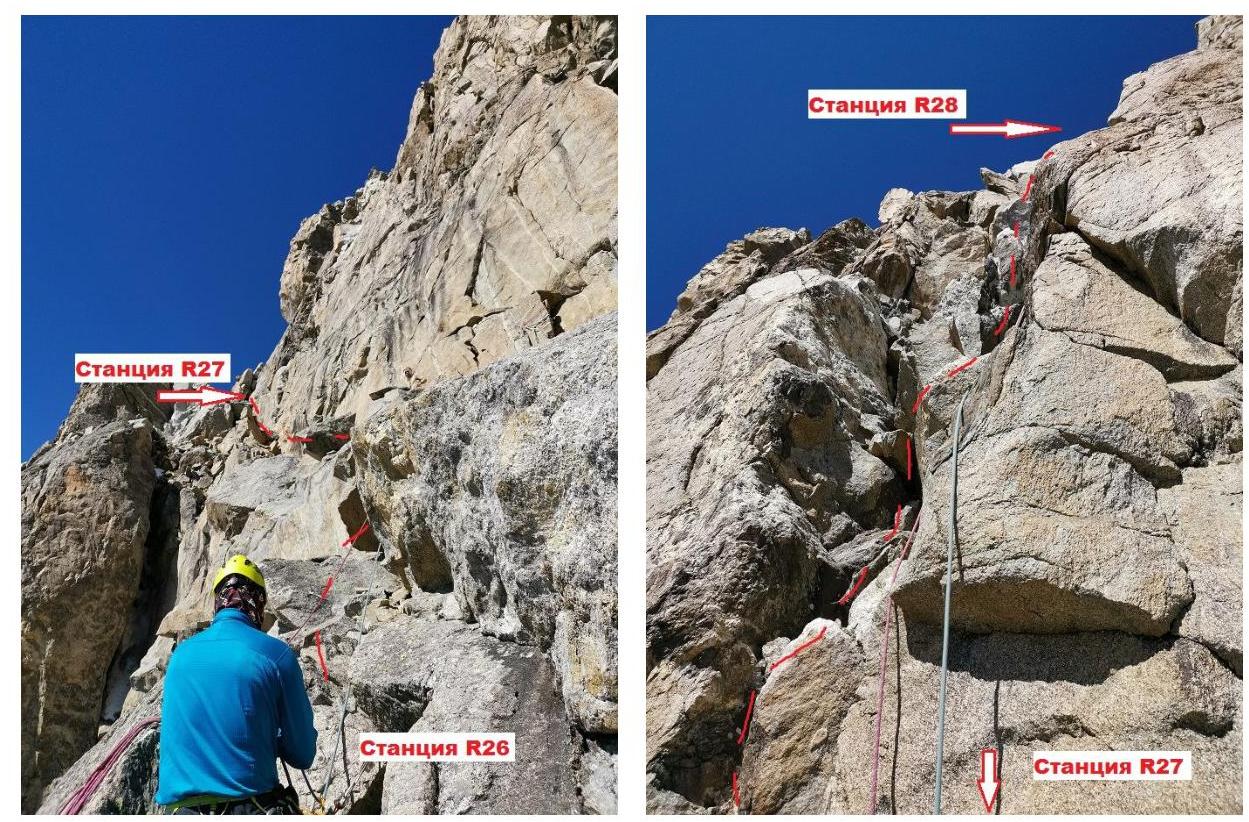
Fig. 28. Section R26–R27
Fig. 29. Section R27–R28
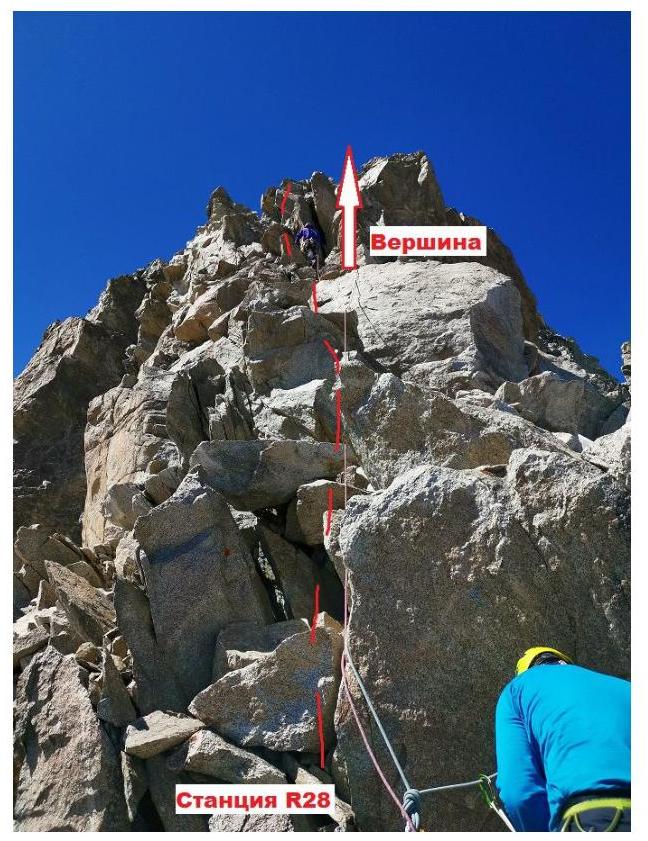
Fig. 30. Section R28–R29 Summit
Summit
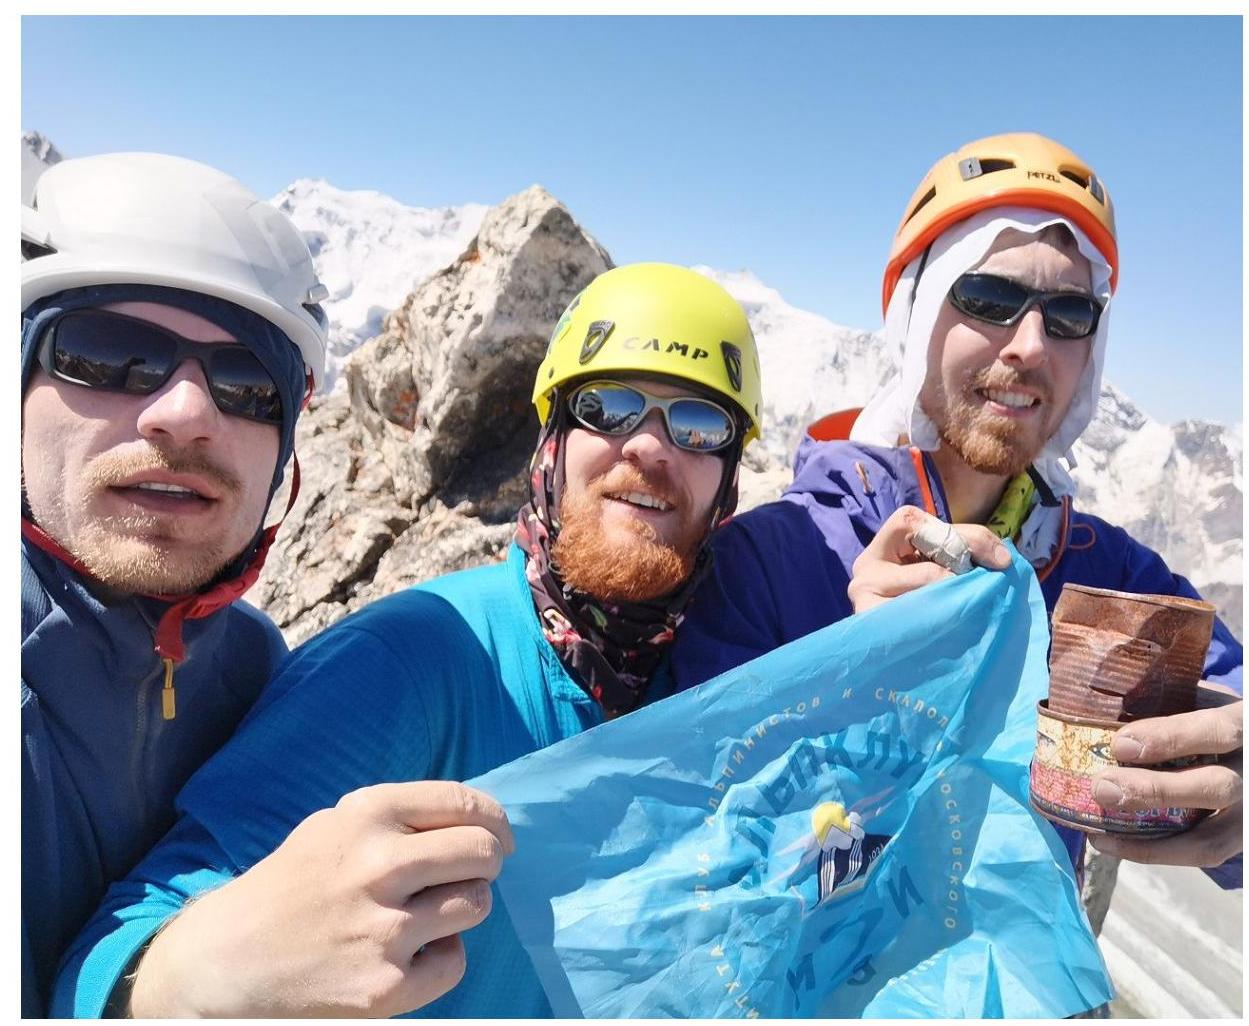
Fig. 31. Team photo at the summit
Tactical Team Actions
The team used one main rope and one double dynamic rope. In preparation for the climb, bivouac and personal gear, food, gas, and other supplies were optimized for weight so that all three team members could climb the route without hanging on the ropes. The leader climbed the route entirely via free climbing with a backpack. The second and third team members also climbed with backpacks and in rock shoes, except for section R13–R14.
On the first day, the team completed sections R0–R13. By 17:00, the leader was at station R13. As the weather was deteriorating, it was getting late, and it was unclear where the nearest suitable spot for a tent was after R13, the team decided to secure the ropes from R13 to a previously identified ledge below R11 (see photo of the first overnight stay).
On the second day, the team climbed back up to R13 via the secured ropes and continued along the route. They reached the Misses–Tau shoulder, where a second overnight stay was organized.
On the third day, the team summited and descended to the "Kursantskiye nochyovki."
The difficulty categories of the climbs were determined subjectively; the slope and length of the sections were measured using GPS and are considered highly accurate.