Moscow Alpine Championship 2014 High-altitude Technical Class
Report
On the first ascent of Svarog peak (4960 m) "Along the center of the Big Cornice" approximately 6B category of difficulty. "SKA Zelenograd" team from August 6 to 15, 2014.
Moscow 2014
Ascent Passport
-
Class — technical.
-
Pamir-Alay, Turkestan Range, Ashat gorge.
-
Svarog peak, 4960 m, "Along the Center of the Big Cornice".
-
Proposed 6B category of difficulty. First ascent.
-
Route character — combined.
-
Route characteristics:
- Route height difference (glacier — summit) — 1250 m
- Route length (bergschrund — summit) — 1500 m
- Main wall section length (R9–R29) — 700 m
- Sections with 5–6 category of difficulty length — 650 m
- Average route steepness (bergschrund — ridge) — 75°
- Average wall section steepness (R9–R29) — 84°
- Average steepness of R12–R29 section — 87°
-
Used protection points:
| For belay | For ITO | Left on the route*1 | |
|---|---|---|---|
| - Ice screws | - 57 | - 0 | - 0 |
| - Pitons, Angles, Fifes | - 163 | - 91 | - 12 |
| - Nuts, Friends | - 135 | - 75 | - 0 |
| - Bolts, Spits*2 | - 65 | - 47 | - 15 |
| - Micro-axes | - 3 | - 13 | - 0 |
| - Skyhooks | - 0 | - 22 | - 0 |
| - Total | - 423 | - 248 | - 27 |
*1 – For rappelling stations equipment *2 – Including 25 bolts by Bashkirov's team
-
Team's climbing hours – 110 h; 10 days.
-
Route entry – August 6 at 5:00
- Ridge entry — August 14 at 14:00
- Summit entry – August 14, 2014 at 16:00
- Descent to R15 platforms – August 14, 2014 at 24:00
- Descent to the camp under the wall – August 15, 2014 at 17:00
-
Overnights: 9 — in platforms on the wall (2 on R9 and 7 on R15)
-
Team leader:
Markevich Konstantin Georgievich (CMS)
Team members:
- Skotnikov Dmitry Alekseevich (CMS)
- Dubrovin Vladislav Pavlovich (1st sports category)
- Kalikin Vadim Eduardovich (1st sports category)
Brief Overview of the Climbing Area
The three main areas of the Turkestan Range: Karavshin, Aksu, and Sabakh — are located close to each other and are accessible from the same point — Uzguirush village. Karavshin is the easternmost area, and it takes 2.5 days to reach it on horseback. The approach from Uzguirush, rather than Vorukh, is advantageous because it passes through passes with beautiful views and combines acclimatization. The journey to the base camp in Aksu takes around 5–6 hours by car over a distance of about 20 km. Sabakh (Ashat gorge) is the westernmost area; the path to it initially follows the main Laylyak (Layle-Mazar) gorge and then the Ashat gorge. With pack animals, it takes 12–15 hours (one and a half days) to reach the base camp by the glacier, which is approximately 40 km, twice as far as to Aksu. Sometimes, spring floods can wash away the bridge over Laylyak in its lower reaches. Therefore, there is an alternative approach via the Aksu gorge and then through the "Uryam" 3770 m pass (marked on the map as "Dalniy") and the "Ashat" 4200 m pass (marked on the map as "Parus"), leading to the upper terrace of the Ashat gorge. We approached the area through the "Uryam" and "Ashat" passes in 2.5 hours with pack animals.
The main peaks in the area include four peaks of the Ashat wall: Sabakh (5300 m), Svarog (4960 m), Argo (4750 m), and Dioscuri (4700 m), as well as Parus peak with three summits – Western (4850 m), Eastern (4800 m), and Main (5053 m). The heights of the Ashat wall peaks require clarification. For example, the 4700 peak is clearly higher than the neighboring 4750 peak... Below Parus, on the right and left sides of the Ashat gorge, there are numerous limestone peaks (Eureka, Prometheus, Ashat, and others), including Sabakh (5300 m).
Five successful ascents have been made to the main peak of the area: four via the north face (Plotnikov 1985, 6A; Bashkirov 1985, 6A; Moshnikov 1986, 6A; and Vasiliev 2013, 6B) and one as part of a traverse of the Ashat wall (Petrov 1990, 6A). The north face of Sabakh is the longest in the area — about 25–30 ropes.
Svarog peak (4960 m) The north face of Svarog is the most sheer in the area, with a height difference from the bergschrund to the summit of over 1000 m. In the left part of the face, there is a huge cornice that has been the subject of legend since the early 90s. Until our ascent, the face remained unclimbed: in 1990, Vladimir Bashkirov's team attempted the same route as us but reached only the base of the cornice; there was also an attempt by a team of Krasnoyarsk climbers in the winter of 2014. There have been no other attempts on the face. The peak's height on maps and in old reports is 4810 m; according to our altimeter, it is 4960 m.
Argo peak (4750 m) Two routes pass along the north face of Argo peak: (Petrova 1989, "along the bastion in the right part of the N. face", 6A) and Koshlenko's 2013 route along the left part of the face ("Alkorot", 5B). The face is very sheer after the foot, with many cracks filled with ice in the upper part. The central part of the face remains unclimbed.
Dioscuri (4700 m) closes the Ashat wall to the east (Pollux — eastern and Castor — western). The peak's height on maps is 4700 m, but it is clearly higher than the neighboring Argo. There is only one route along the cracks and couloirs of the N. face — the beginning of Petrov's 1990 traverse, 6A. The main face remains unclimbed.
Parus East (4800 m) Four routes have been laid to Parus East from the Uryam gorge: Shorokhov's ("along the northern ridge with a bridge", 4B — first ascent), Korsuna ("along the N. ridge", 1990, 4A — likely a repeat of Shorokhov's route), Mityukhin's ("along the bastion of the NE face", 1989, 5B), and Zagirnyak's ("along the right part of the NE face", 1990, 6A), as well as a route by an Italian team in the 90s.
Parus Main (5053 m). There is one route to Parus Main: Moskvets E. ("along the southern edge", 4A). The NW face remains unclimbed.
Parus West (4850 m). Four routes have been laid to Parus West: Korolev A. ("along the 'spade' of the N. face", 5B), Egorova ("along the SW edge", 1989, 5B), Koshlenko ("along the SSW counterfort", 2008, 5A), and a route by a Krasnoyarsk team ("along the 'spade' of the N. face", 2014, 5B — possibly a repeat or variation of Korolev's route). The NE face — one of the most monolithic in the area with a height difference of about 900 m and very poor relief — remains unclimbed.
Many routes have been laid on peaks like Ashat, Eureka, and Prometheus, ranging from 2B to 5A category of difficulty.
In Sabakh, it is possible to achieve around 20–30 interesting first ascents of higher categories of difficulty, and there are also opportunities for new, less challenging routes or repeating and classifying those made in the 80–90s that have not been classified. There are possibilities for purely rock, as well as combined and ice routes, ranging from several ropes to 25–30 ropes in length. Winter first ascents are also possible.
Ashat is compact, with many walls and close approaches: from the base camp (at the source of the Ashat river, near a huge granite block) — a few hours' approach to all peaks of the Ashat wall and the western circus of Parus Main and West. The drawbacks of the Ashat gorge include, perhaps, only the foot of most peaks of the Ashat wall, which consists of destroyed slate; they spoil the lower part, although they can be bypassed on snow and ice.
Uzgurush village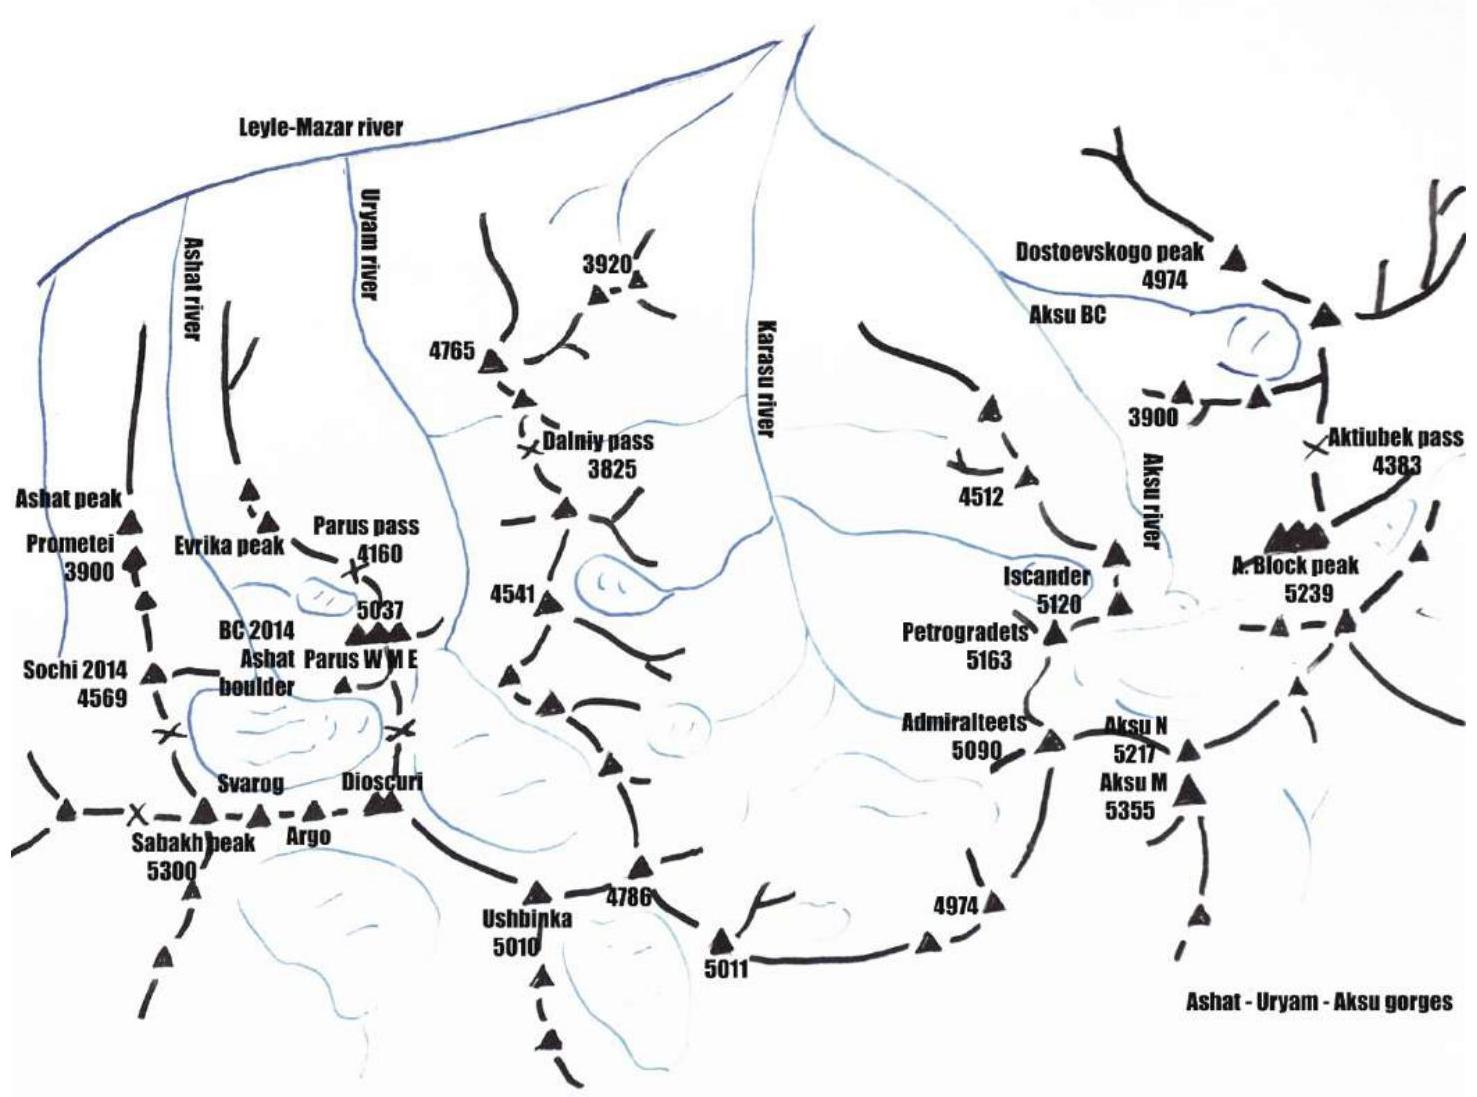
Area map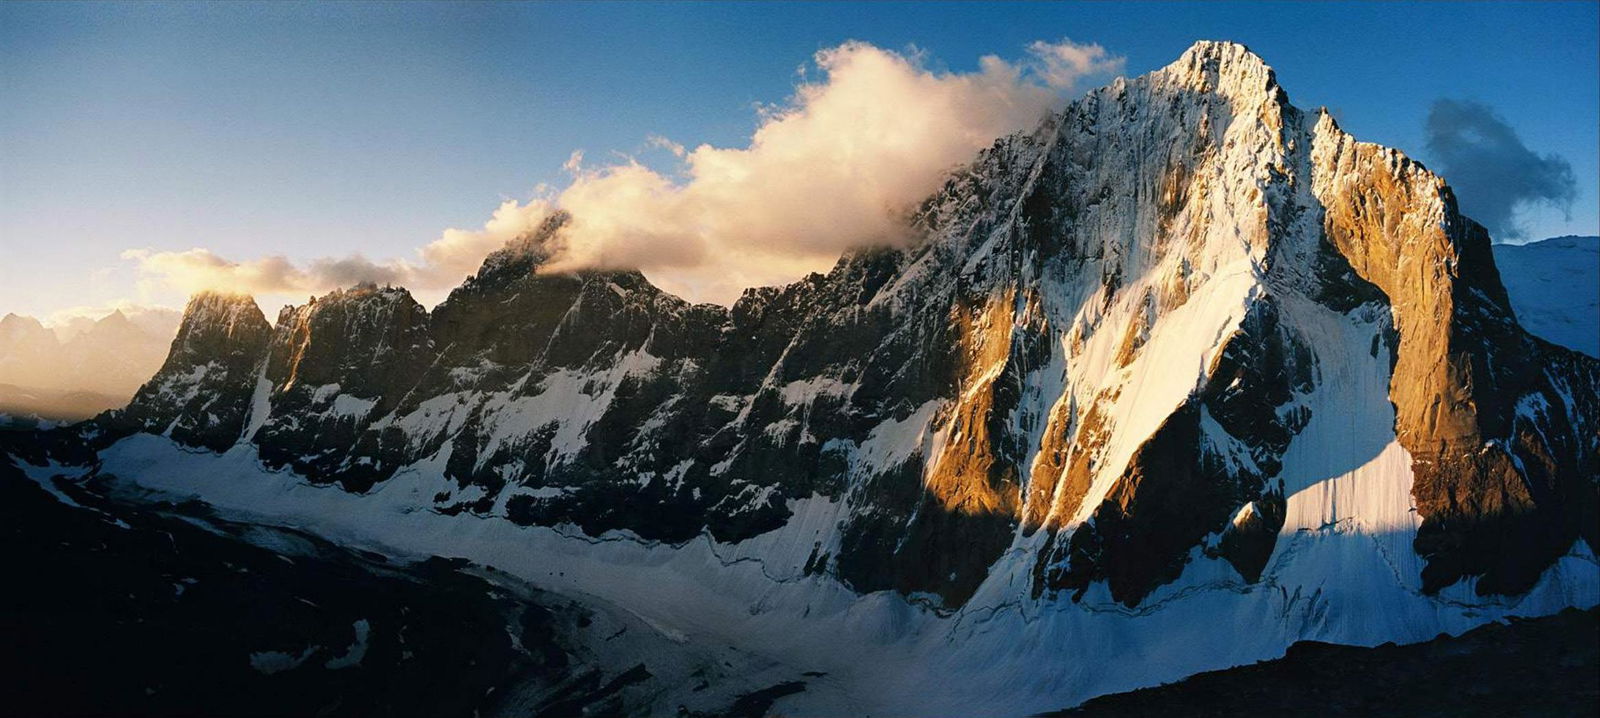
Aшатская стена с вершины п. Сочи. Справа налево:
- п. Сабах
- п. Сварог
- п. Арго
- Диоскуры
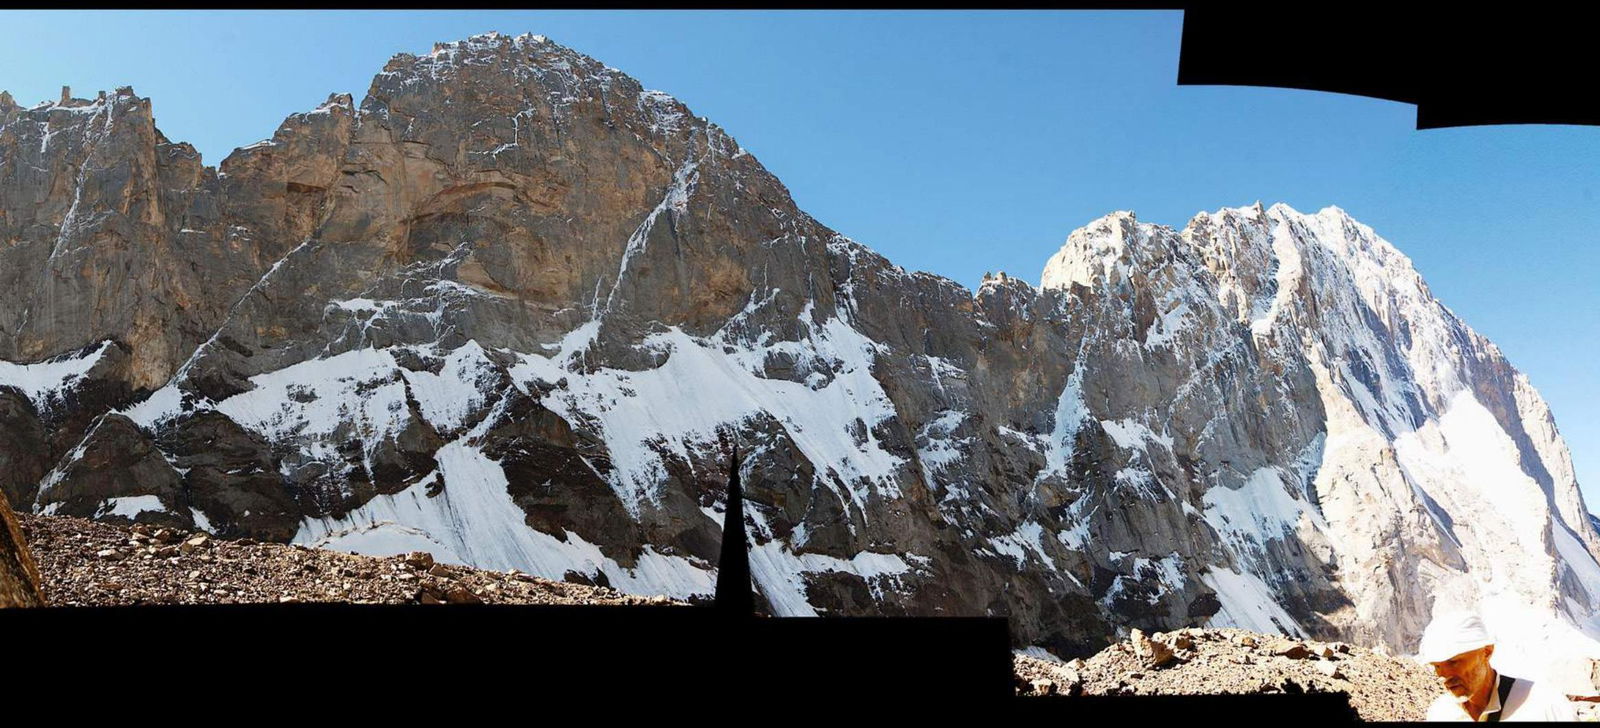
Ашатская стена. п. Сварог и п. Сабах
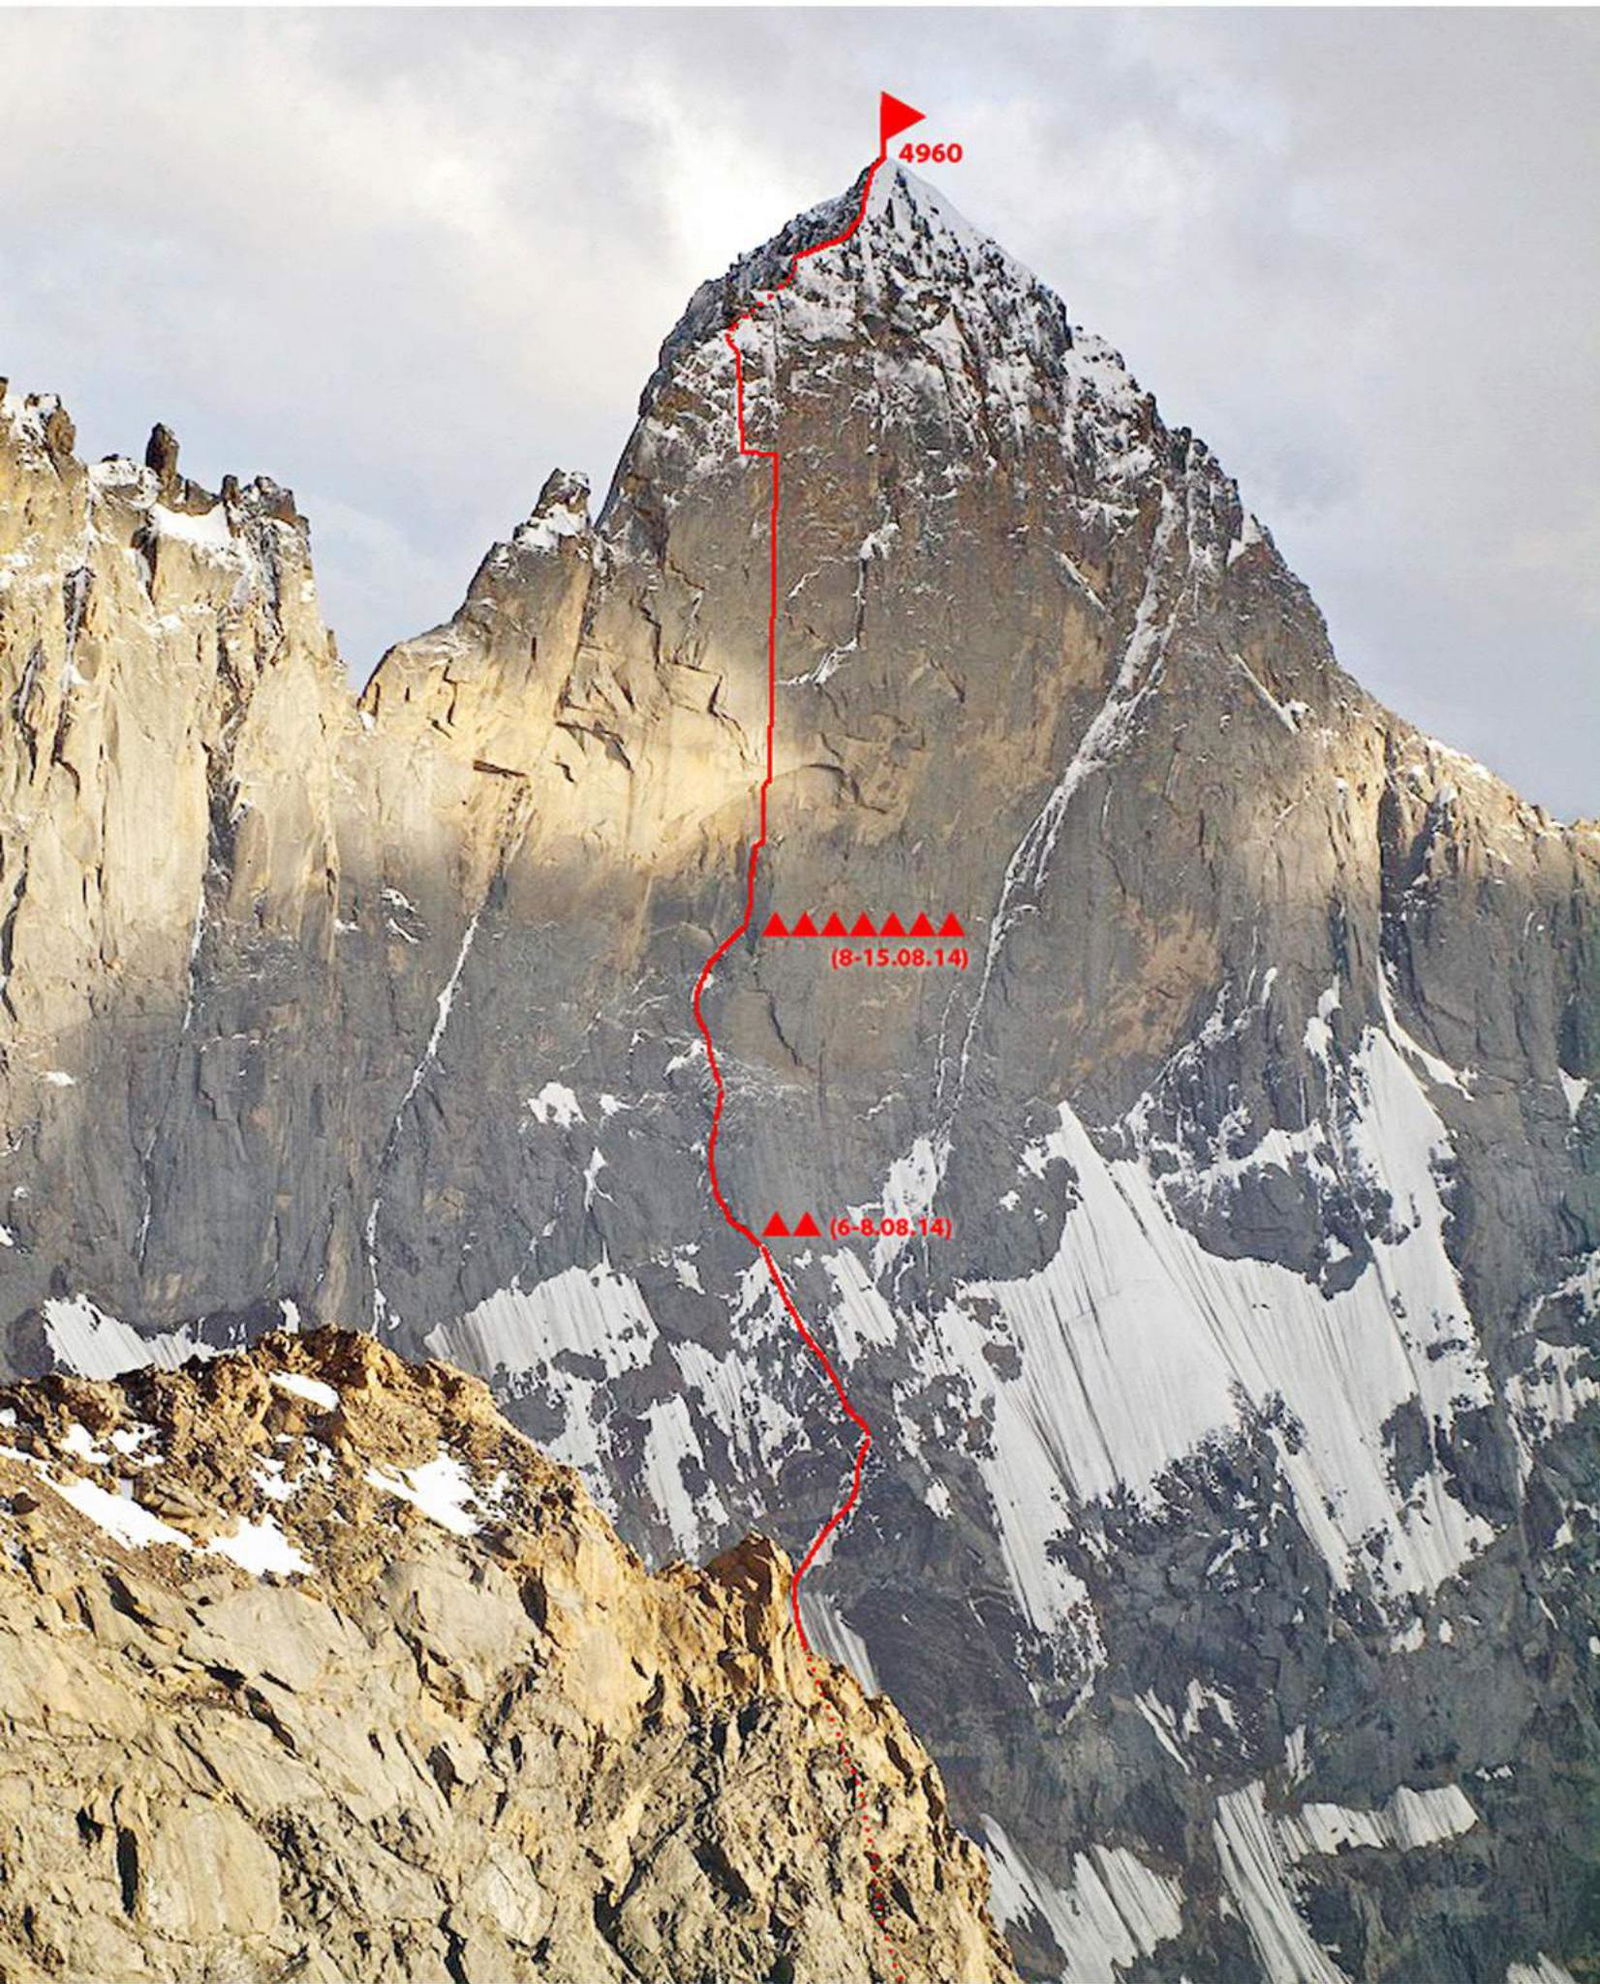
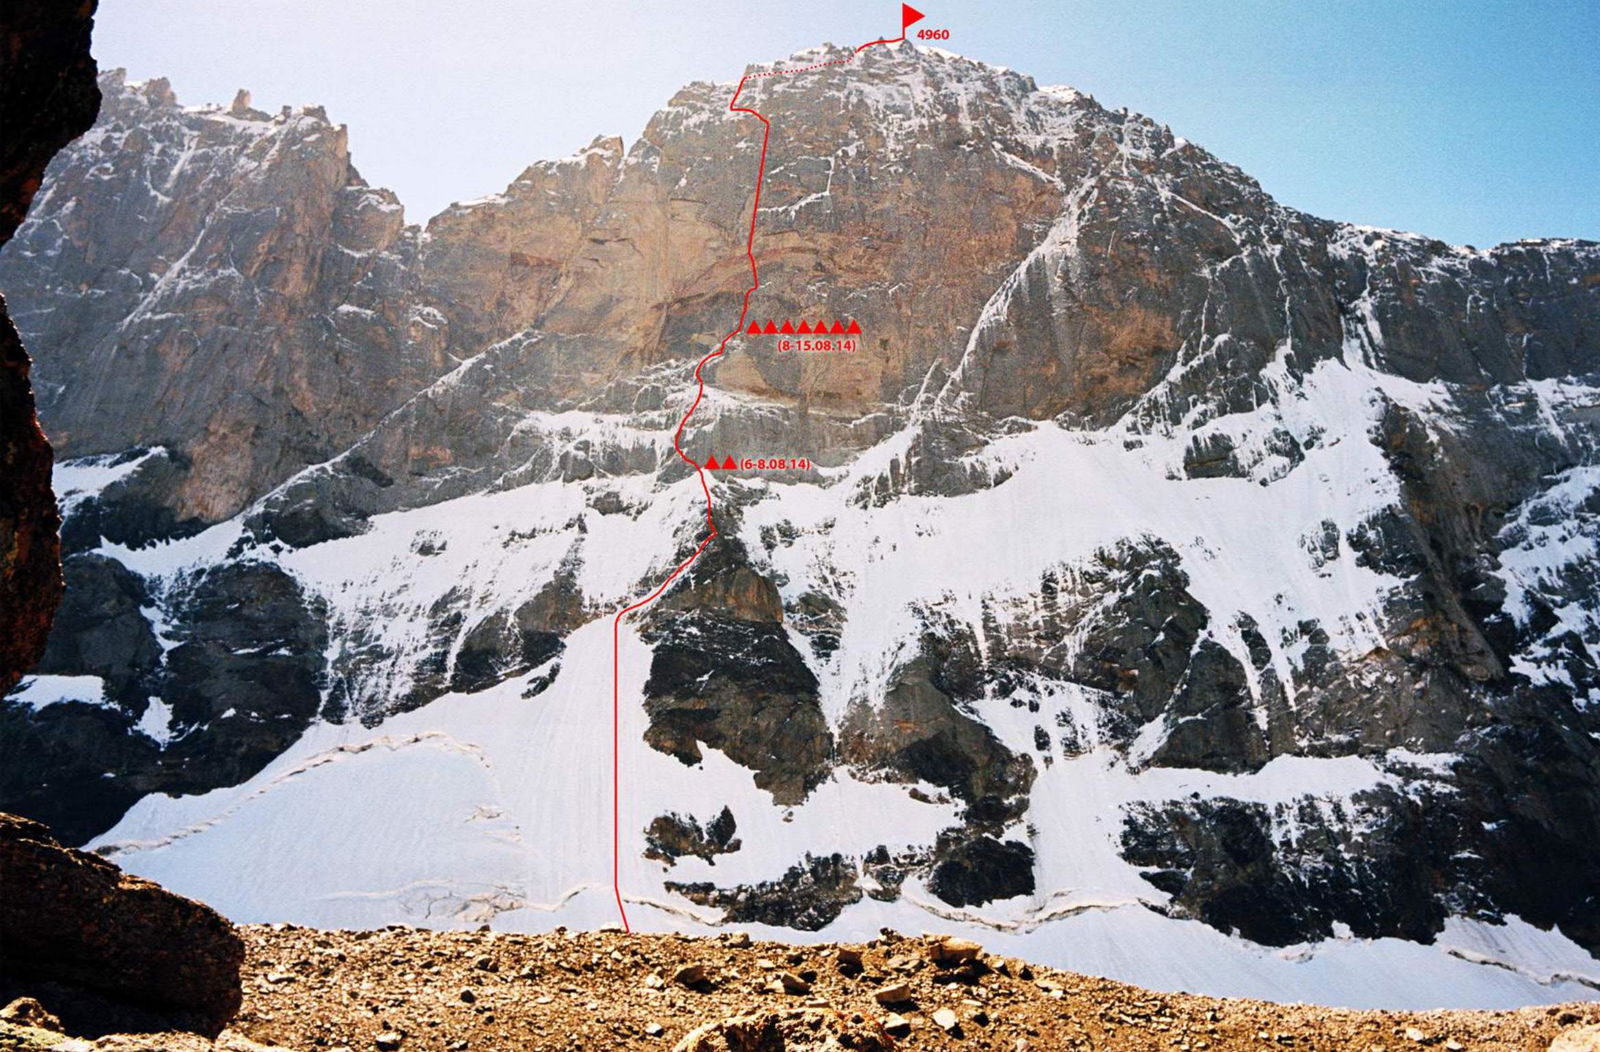
п. Сварог с ниткой маршрута. Фото Ю. Кошеленко со склонов п. Парус
п. Сварог с ниткой маршрута. Фото из штурмового лагеря под стеной
п. Сварог с ниткой маршрута. Фото из-под стены
Верхняя часть стены. Фото Ю. Кошеленко со склонов п. Парус
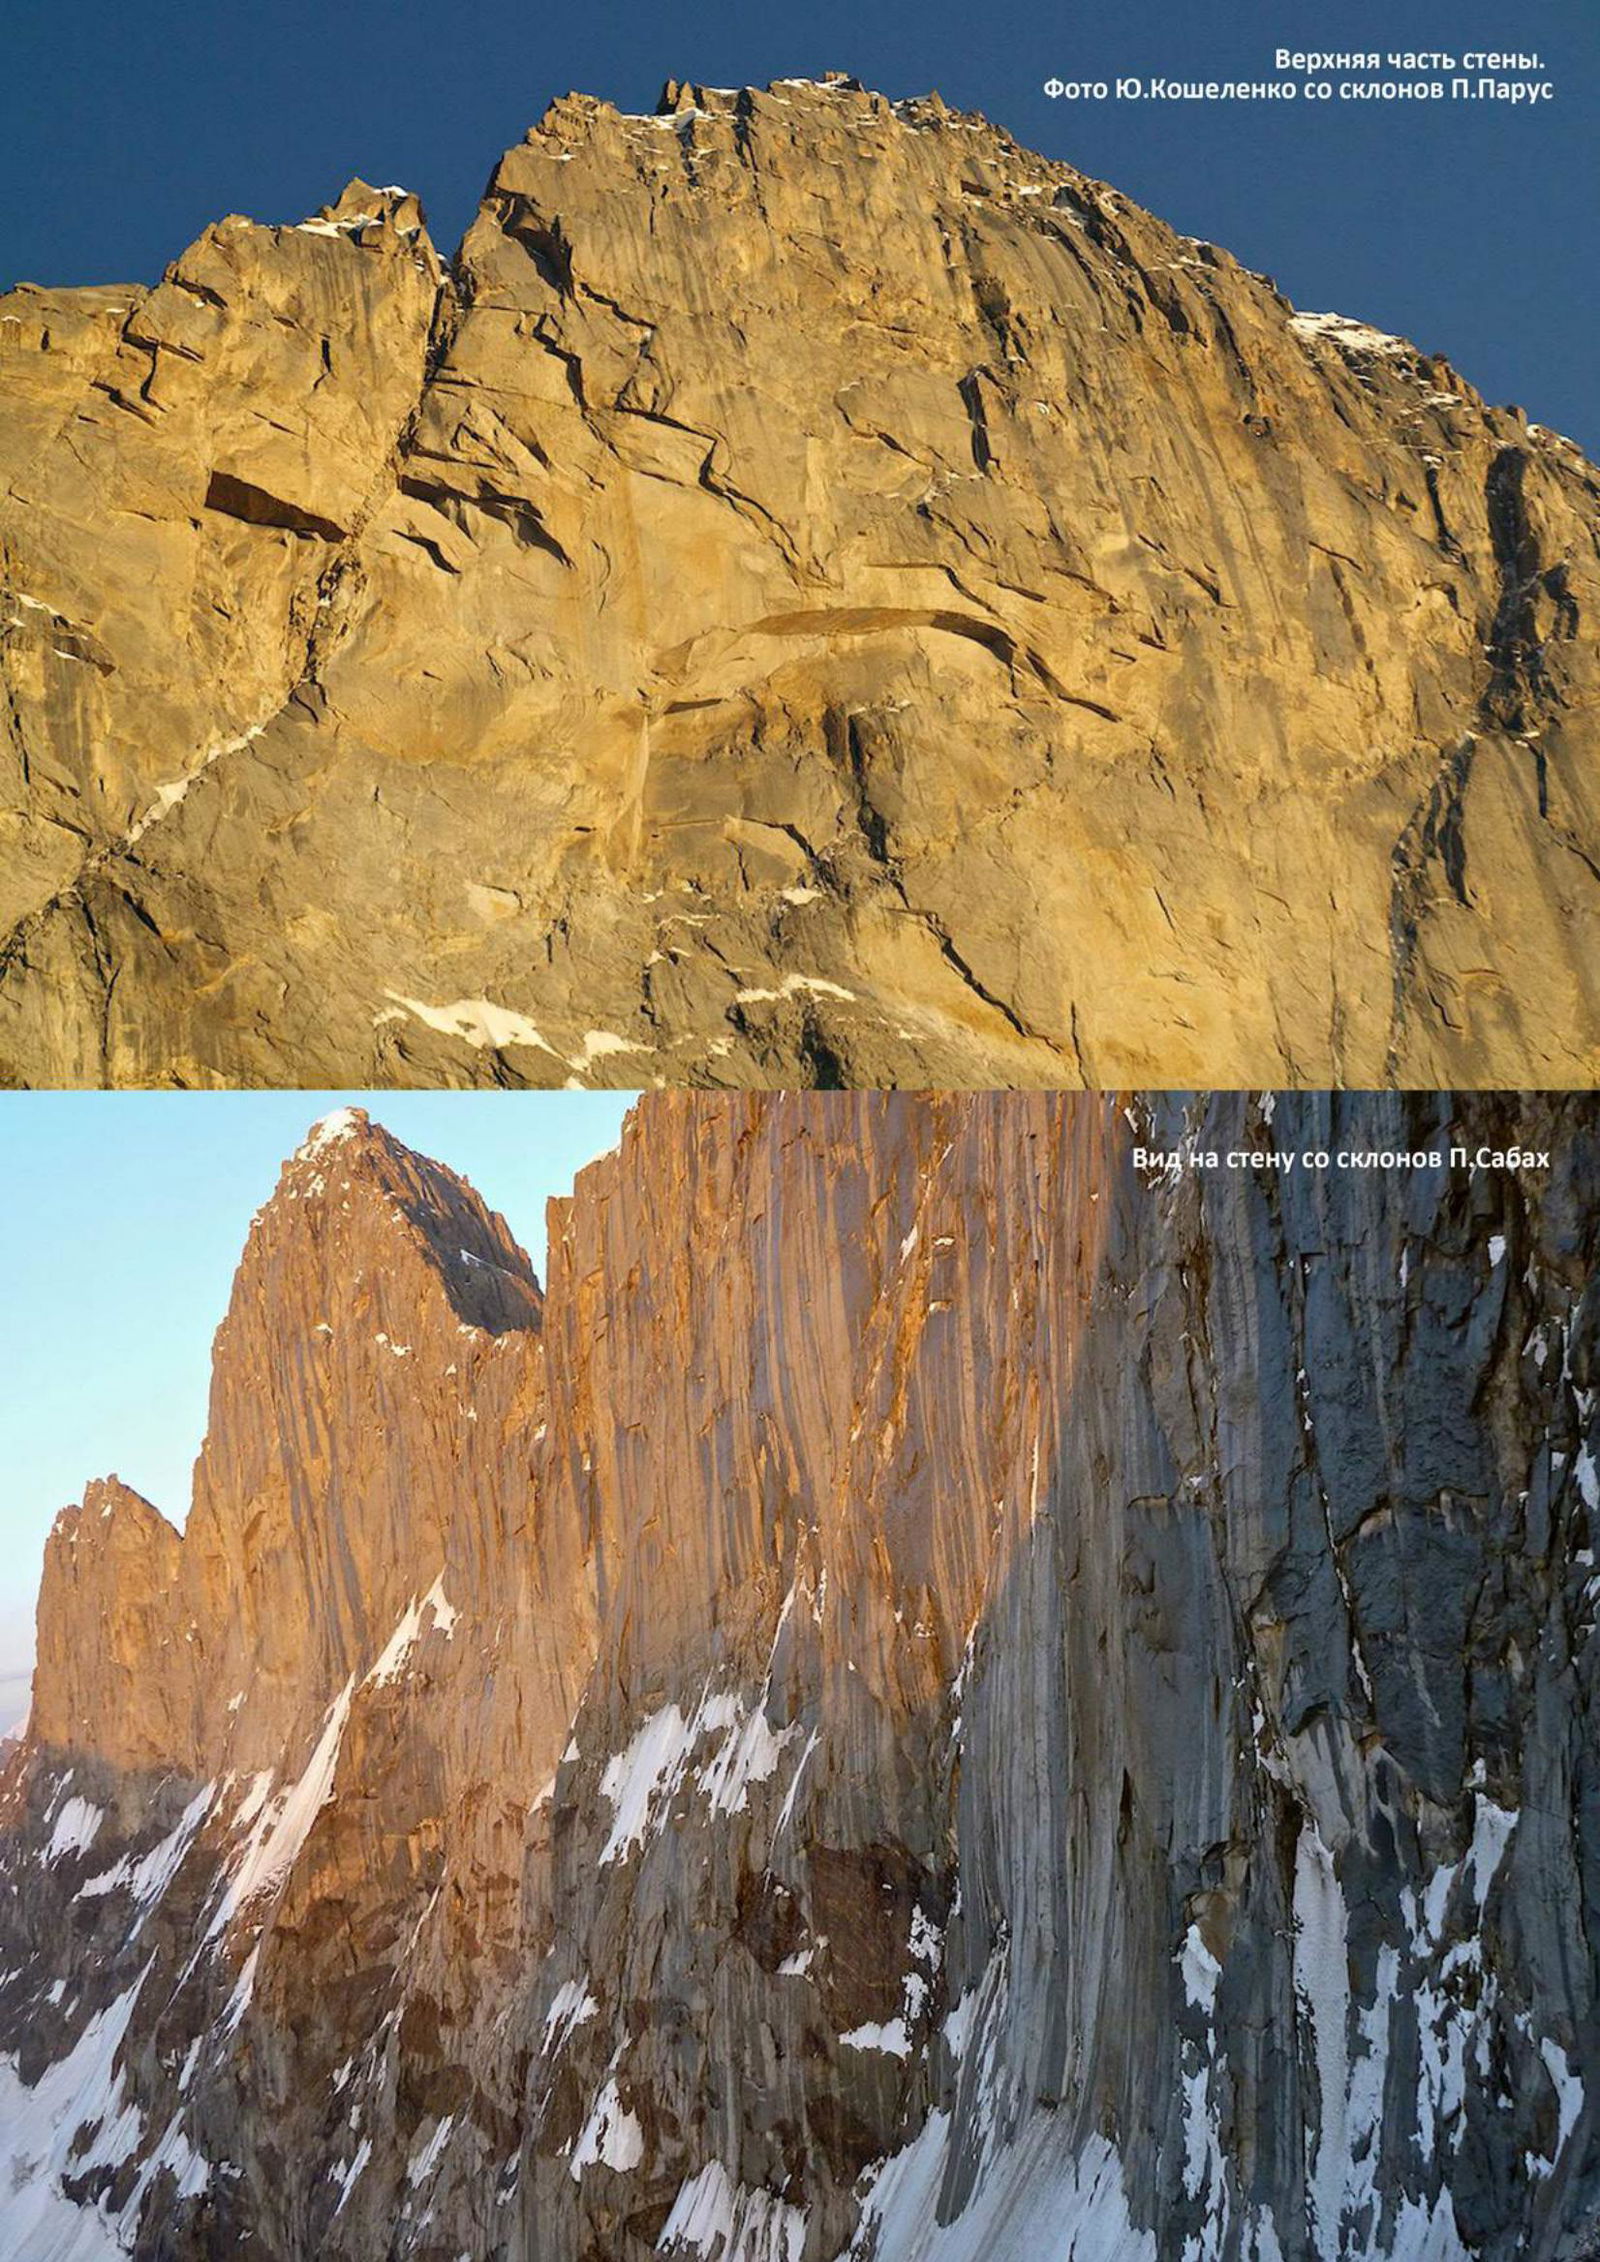
Фото стены из штурмового лагеря с ниткой маршрута, синим показан путь спуска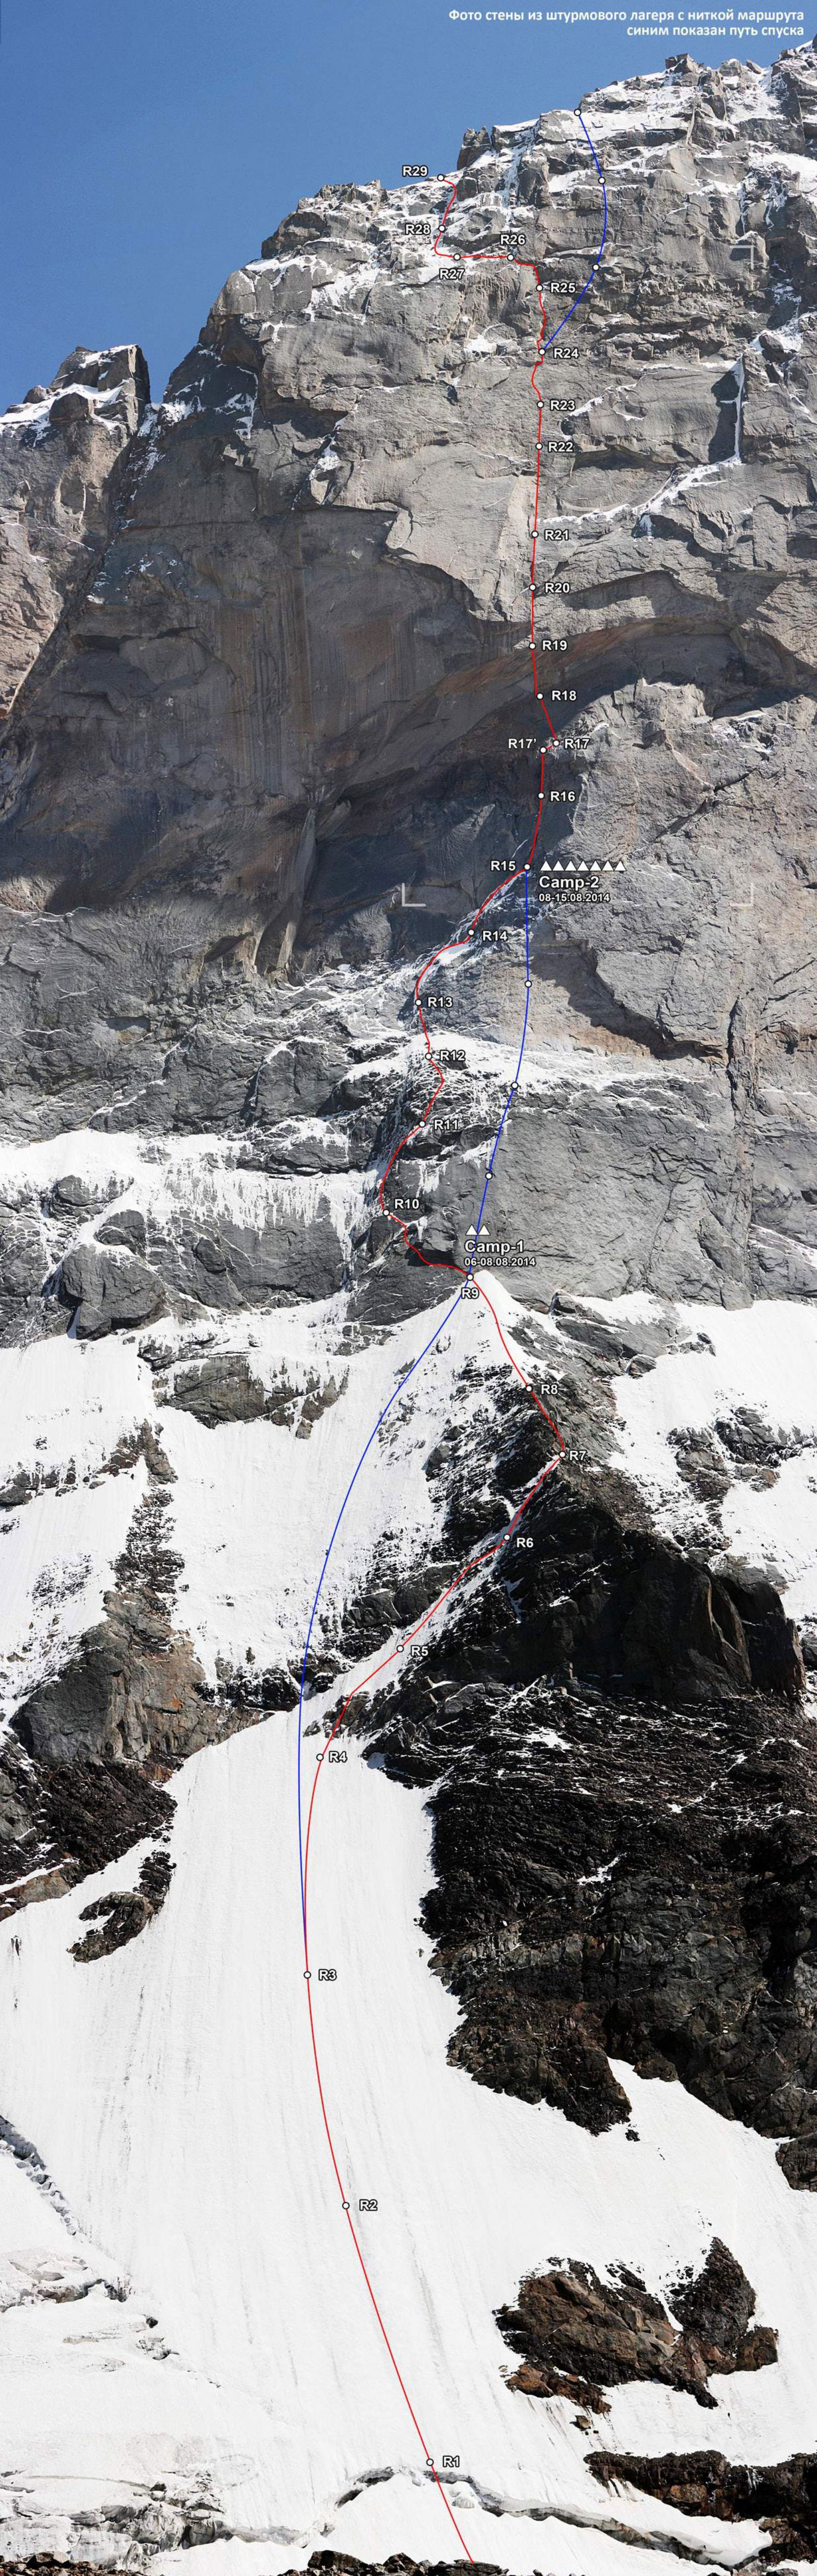
15-метровый карниз в центральной части стены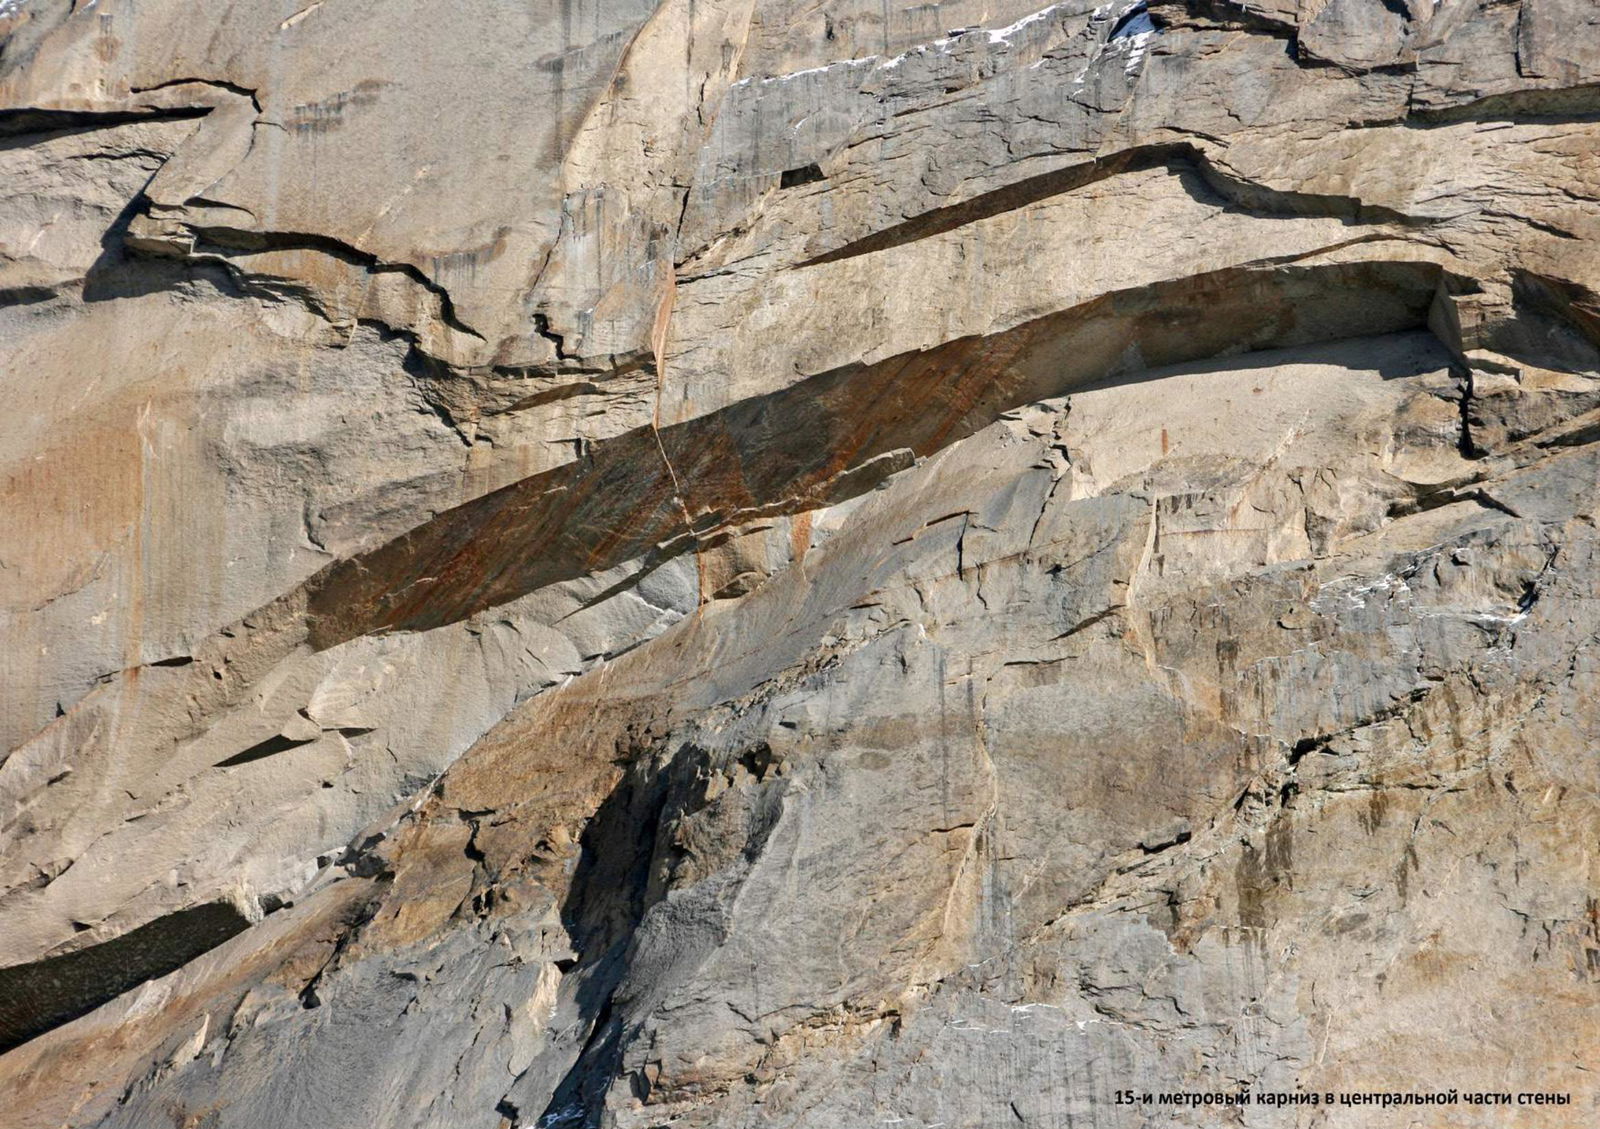
Brief Description of the Route
The lower part of the route is an ice slope of moderate steepness, leading to a destroyed rock belt made of slate (R0–R4). To bypass the destroyed rocks, follow a diagonal snow-ice ledge with rock outcrops and then a couloir upwards and to the right towards the ridge (R4–R7). Along the ridge upwards to the base of the main wall section (R7–R9), where the first camp is located (on platforms at R9).
Along the wall, traverse left under the cornice, bypassing slabs, and then upwards along fifth-category rocks to a snow field (R9–R12). Through the snow field to the wall, then along a system of internal angles and diagonal ledges to the right and upwards towards a chimney (R12–R15), where the second camp is located (on platforms at R15).
Along cracks, then through an internal angle — a chimney upwards to a slab, along the slab upwards and slightly left to the base of the cornice (R15–R18). Starting from the base of the cornice at R18 and up to station R25, a thin, slightly right-leaning crack runs along the wall; our route follows it (see the large photo of the main wall section and photos of the sections). However, on the cornice and further in the internal angle, it is completely blind, making it impossible to piton or nut it, although from below, it initially seems possible...
To pass the cornice, 22 spits were hammered! (The cornice overhang is about 15 m). The overhanging internal angle after the cornice is passed:
- along the right and left edges,
- and starting from R20, the route follows a crack.
Sometimes the crack turns into a small internal angle with a left edge up to 70 cm, which gradually disappears. On the R23–R24 section, the crack disappears, and by the second half of the R24–R25 section, it becomes slightly wider and more pronounced. Photos №31, №32, №33 clearly show the relief character.
Most cracks on this section:
- are blind,
- or very shallow.
For passage and belay, anchors are mainly used, many of which can only be hammered with the very tips. Micro-axes work well, sometimes small friends are used, and sometimes it is necessary to make transitions on skyhooks...
In general:
- there are many unreliable points,
- all stations have to be equipped with spits.
The wall's steepness on the R20–R25 section:
- ranges from 80 to 95°,
- averages around 90°.
From R25, slightly upwards, then traverse left along a ledge under the cornice, bypassing slabs, to an ice couloir leading to the ridge. Along the ridge to the summit.
Route Description by Sections
R0–R1 Snow slope up to 45°. Bergschrund. [Station R1 above the bergschrund on 3 ice screws]
R1–R2 Ice slope 50 m 60°, IV. [6 ice screws. Station R2 on 3 ice screws]
R2–R3 Ice slope 50 m 60°, IV. [6 ice screws. Station R3 on 3 ice screws]
R3–R4 Ice slope 50 m 60°, IV. [6 ice screws. Station R4 on 3 ice screws]
R4–R5 From the station:
- Upwards to the right along ice 15 m 60°,
- then along a rocky, iced ledge 15 m 60°, V category,
- exit to a diagonal ice ledge,
- further along it 20 m to the station on ice.
[4 ice screws, 2 anchors, 2 friends, station R5 on 3 ice screws]
R5–R6 Moving right towards a gap in the counterfort:
- First along ice 65° — 15 m
- Then along destroyed rocks — 35 m, 60°, IV
Exit to the start of the couloir leading to the counterfort. Total 50 m.
[2 ice screws, 3 anchor pitons, 2 stoppers, station R6 on 2 anchors and 2 friends]
R6–R7 Along the ice 60°, IV couloir, ascent to the counterfort 30 m. Station on a rock. Good platform for a tent. [3 ice screws, station R7 on a loop through a rock]
R7–R8 Along steep, destroyed large-block rocks directly above the ledge 10 m 80°, V, then along the ridge (destroyed rock steps) 40 m 50°.
[2 friends, 2 stoppers, 1 anchor, station R8 on 3 anchors in destroyed rocks]
R8–R9 Along the snow-ice ridge 60 m 60°, ascent under a rock slab, then 5 m left — 2 bolts under platforms. [3 ice screws, station R9 on a bolt]
R9–R10 Traverse left under the cornice along a slab 17 m 70°, VI, then through a small cornice, exit to a slab, along the slab left and upwards ITO on skyhooks 5 m (A3), further climbing through another cornice made of large destroyed blocks (VI+) exit to a diagonal snow ledge, along the ledge left and upwards. Total 40 m. Station on the ledge. [3 anchors, channel, 5 friends, 4 skyhooks. Station R10 on Bashkirov's team 1990 bolt, 1 anchor, and channel]
R10–R11 Along the edge upwards and slightly to the right. Rocks are heavily snowed and iced. Climbing V+ and ITO A1+ (on anchors and fifes), total 50 m 80°. [10 anchors, 3 friends, 4 fifes. Station R11 on 3 anchors]
R11–R12 Along heavily snowed, destroyed rocks to a large snow field. 45 m 70°, IV–V. Station before exiting onto the snow field. [5 anchors, 4 friends. Station R12 on 4 anchors]
R12–R13 Across the snow field with rock outcrops to the wall 20–25 m 45°, III. Upwards and left along the wall through a system of cracks under the cornice 90°, 20 m, VI+ A2–A3 (skyhooks, micro-axes). Station in an iced internal angle under the cornice. [7 anchors, 2 skyhooks, 4 micro-axes, 2 fifes. Station R13 on 2 friends and 2 anchors]
R13–R14 10 m along the iced angle 85°, VI, to a flattening on a ledge. Diagonal snow-ice ledge to the right upwards (belay on the wall) 65° + ledge inclination 65°. Further traverse 20 m along the ice ledge and upwards 10 m to the station in a destroyed internal angle. Station on the transition from ledge to ledge. Total 45 m V–V+. [3 anchors, 3 friends, nut. Station R14 on 2 anchors, friend]
R14–R15 From the internal angle (5 m) exit to a diagonal snow ledge (belay on rock). Inclined ledge — same as the previous section, 25 m V. Station — 2 bolts under platforms at the base of a rock internal angle. This rope is more challenging than the previous one. [2 anchors, 6 friends. Station R15 on 2 bolts]
R15–R16 15 m VI along cracks to a small cornice. Further along a slab left upwards, along an internal angle 15 m to a small ledge before the base of a larger internal angle — a chimney (with a piton from Bashkirov's team on it). Along the chimney upwards 15 m VI to a crack on the left side of the angle. Station in the internal angle. Total 30 m 85°. [6 friends, 4 nuts, 5 anchors. Station R16 on 3 friends]
R16–R17 VI A1 Along the internal angle-chimney 20 m 90° to exit onto a large ledge, before exiting onto the ledge — a cornice. On the ledge, there is snow, and it is possible to organize an overnight stay for a bivouac tent. Along the ledge to the right 7 m. An old bolt is hammered. [10 friends, 3 stoppers, 1 channel. Station R17 on an old bolt, reinforced with an anchor from below and a friend from the side]
R17–R18 Absolutely smooth slab 25 m 80°. Bashkirov's team hammered a bolt route (about 20 bolts, into which most modern carabiners do not fit. Irbis or stoppers are needed). From the ledge 2 m climbing, then ITO along bolts, from the top 2 transitions on skyhooks. Station at the base of the cornice. From the station upwards, 2 old bolts are hammered, with a rappel ring on the upper one. [20 bolts, 2 skyhooks. Station R18 on an old bolt, 2 friends, and a box]
R18–R19 From the station, one and a half meters traverse left, then upwards along the cornice 6 m 120° and 15 m along the ceiling 170°, A2. [2 old bolts, box, anchor, 22 spits. Station R19 completely hanging on the edge of the cornice on 2 bolts]
R19–R20 Overhanging monolithic internal angle. From the station 2 m upwards along the left side of the angle, then along the right side 13 m 95°, A3+ (skyhooks, micro-axes), then transition to the left side of the angle to a system of cracks, along it 10 m 100°, A2 (ITO on anchors). At the exit from the angle, the cornice is passed on friends. Total 25 m. Station immediately behind the cornice on a small ledge. [Channel, 4 skyhooks, 4 micro-axes, 2 spits, 8 anchors, 4 friends. Station R20 on a spit and 2 friends]
R20–R21 From the station upwards along the slab:
- 15 m along the crack under medium and small friends 80–85°, A1–A2, to a ledge;
- after the ledge, the crack becomes blind;
- another 10 m along the crack, 85–90°, A2+.
Passage is mainly on anchors, although most can only be hammered with the very tips; sometimes small friends are used.
Total 25 m.
Station on a small ledge. [9 friends, 7 anchors, 2 micro-axes. Station R21 on a spit and 2 anchors]
R21–R22 Immediately from the station, the crack turns into a small internal angle, passed along the left edge of the angle to a ledge (the angle itself is blind) 12–15 m 95° (due to the left edge's inclination to the right, the wall is about 85–90°), A2 (anchors, micro-axes, skyhooks). On the ledge, there is snow, and it is possible to organize a sitting overnight stay.
After the ledge, the angle turns into a crack, along the crack 35 m 95°, A2–A3. Mainly the crack is blind, passed on unreliable anchors, micro-axes, and sometimes small friends are used.
Equipment:
- 6 friends
- 15 anchors
- channel
- 3 micro-axes
- 2 skyhooks
Station R22 on a spit and 2 anchors.
R22–R23 Along the crack just under 25 m, 85°, A2. The crack becomes better than on previous sections; anchors and small friends go well. Station before exiting onto a slab (see photo №33). [8 anchors, 6 friends, channel. Station R23 on 3 anchors and channel]
R23–R24 From the station, another 2 m along the crack to exit onto a slab, along the slab left upwards on skyhooks (relief and hole) to cracks. Along the cracks (thin, peeling rock layers) upwards and slightly to the right towards the left part of the cornice ITO on anchors hammered parallel to the wall and skyhooks A3+. Total along the slab 20 m 85–90°.
Under the cornice upwards and to the right, then traverse to the right to the end of the cornice ITO A2 on friends and channels, then upwards along a destroyed internal angle 5 m 90° to a ledge; station on the ledge. Total about 30 m. [6 anchors, 4 friends, 2 channels, 7 skyhooks. Station R24 on a bolt and 2 friends]
R24–R25 From the ledge left upwards along the crack 3 m 80°, then traverse to the right along the slab to the crack (1 transition on a channel and 1 on a skyhook) along the crack upwards to the base of the cornice 35 m 95–70°, A2–A1. Station under the cornice. Total 40 m. Medium and large friends go well. [13 friends, 5 anchors, skyhook. Station R25 on 4 anchors]
(At the start of the section, it is possible not to traverse to the right but to go left along a large crack climbing (see photo №34(2)) to the cornice, after the cornice along a ledge 2 m left to the crack leading to station R26. This variant is likely to be more logical).
R25–R26 From the station upwards along the cornice (anchors and friends) 12 m 90° under an overhang, then traverse left 13 m, slightly upwards, to a ledge (before the ledge, a transition through a wide, iced crack), along the ledge 2 m left to a large rock-crack. VI+ ITO A2. [Equipment: 8 friends, 4 channels, 2 anchors. Station R26 on 3 friends in a rock-crack]
R26–R27 By pendulum or by descending lower through a crack onto a snow-ice ledge, along the ledge left through a series of small couloirs and traverses to destroyed rock slabs to the start of a large couloir (the ridge is visible). 20 m III. Station in a rock slab. [4 friends. Station R27 on 3 friends]
R27–R28 Along mixed rock slabs first left, then along an ice ledge to the right to the start of an ice "river". Mixed, 25 m 80°, V. Station on a rock to the right of the "river". [2 friends, 1 anchor, 1 ice screw. Station R28 on 3 anchors]
R28–R29 Along the ice "river", holding to the right rocks, exit to a firn ledge turning left. Crossing the ledge upwards to exit onto the ridge. Exit through a rock belt 2 m. Exit onto the ridge left of a large rock — a "Ushi" gendarme. 50 m 85°, V. Station on the ridge. [10 ice screws. Station R29 on a loop through a rock]
R29–R30 Bypass the gendarme on the left, exit to the southern side of the mountain. Moving along scree ledges and crossing 2 rock couloirs exiting onto the ridge, reach the start of a snow couloir. 150 m, II.
Simultaneous movement. Along the couloir, ascend about 30 m to a convenient gap in the rock on the left. Along the gap, through a series of small ledges and walls along large-block scree, exit to the ridge, 80 m, IV. Station on a boulder before a 15-meter snow slope leading to an edge.
Further along the edge and snow ledges, exit to the summit (150 m, II).
The summit — a snow plateau with large rock outcrops.
Control point: a broken friend with a film canister in a rock on the left (first rock after exiting onto the summit).
Total about 400 m.
Descent from the Route
The start of the descent is to the right of the exit to the ridge (see the large photo of the wall with the route line). We planned to descend directly to R24 in several rappels, from R24 to R15 platforms, all stations were equipped for descent, and from R22 to R15, there were pre-hung rappel lines.
Due to complete lack of visibility on the first two rappels, we mistakenly moved too far to the right, but on the third rappel, with a large pendulum, we managed to reach R24 (the first station equipped for descent). Further descent was along the ascent route to R15.
We recommend:
- Leaving pre-hung rappel lines on sections R20–R17', as due to significant overhanging and a large cornice overhang, it may be very difficult to reach the wall on descent.
Descent from R15 to R9 — directly across slabs, 4 rappels.
From R9 — descent along ice to the glacier on self-arrest and one station on anchors in destroyed rocks.
When passing through the destroyed slate rock belt, be very cautious, as it is very (!) rockfall-prone. It makes sense to:
- Gather the whole team under the protection of rocks;
- Only then continue the descent.
All descent stations are set up on at least two points, one of which is a bolt or spit. (3 stations from the ridge to R24, R24, R22, R21, R19, R17', R15, 3 stations between R15 and R9, R9).
Wall profile (Bergschrund – Ridge)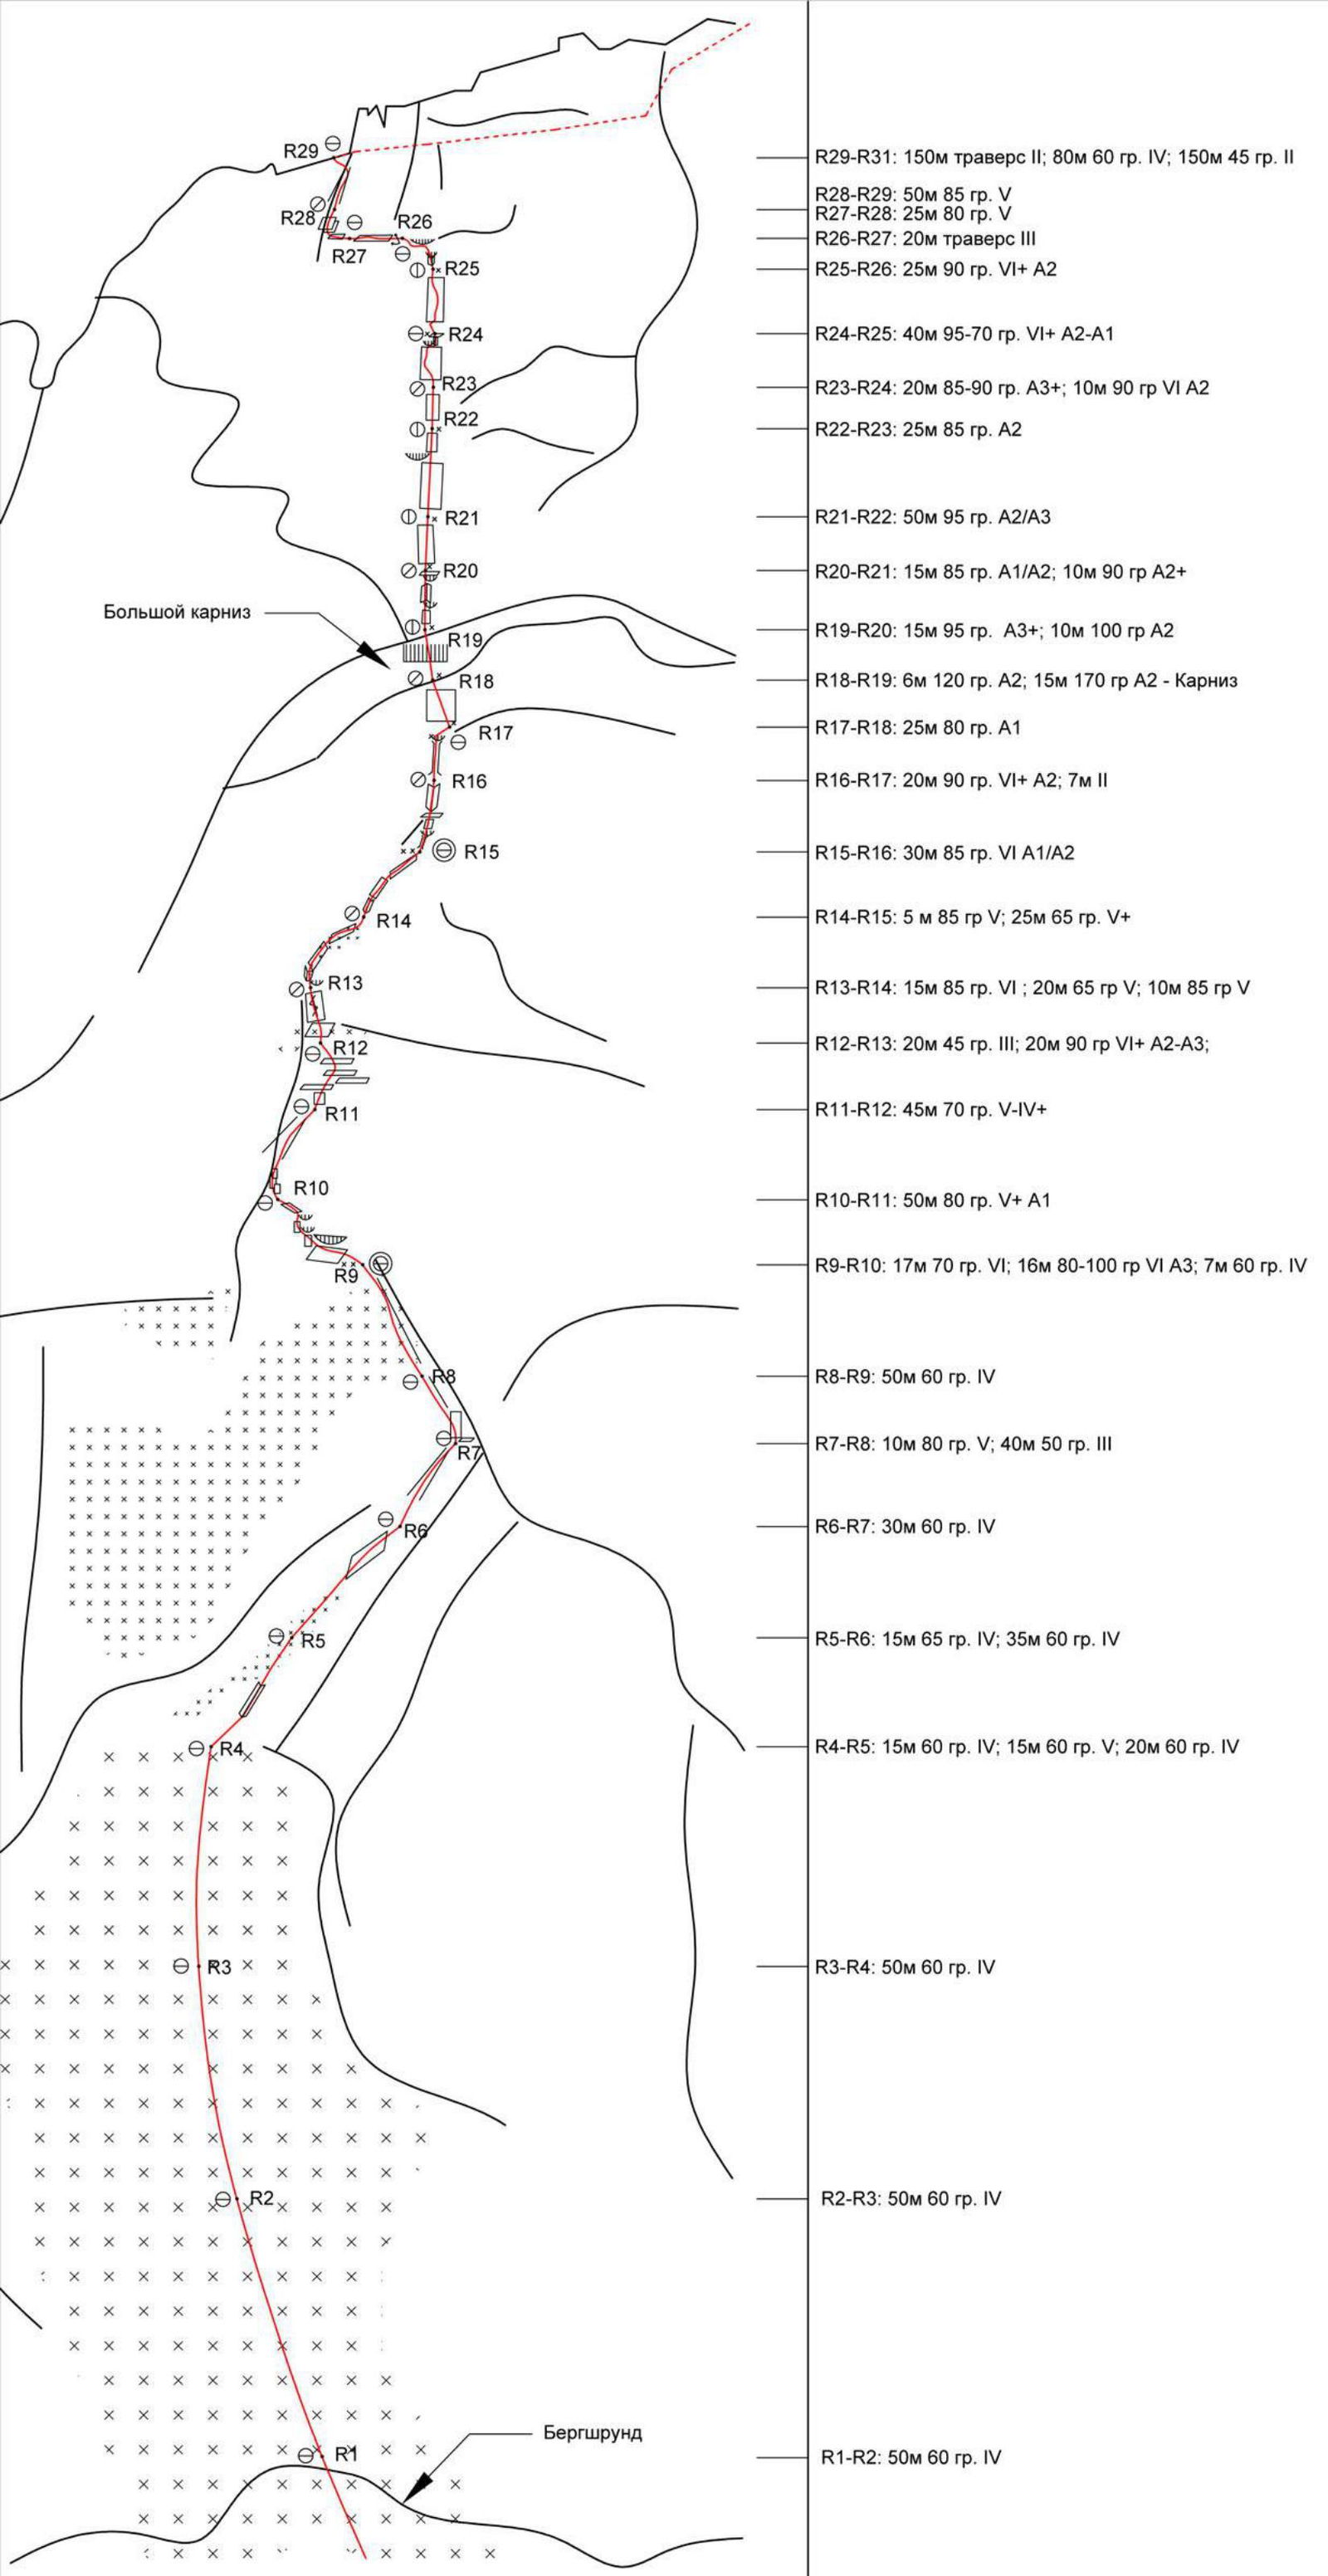
Wall profile (Bergschrund – Ridge)
R29–R31: 150 m traverse II; 80 m 60°, IV; 150 m 45°, II R28–R29: 50 m 85°, V R27–R28: 25 m 80°, V R26–R27: 20 m traverse III R25–R26: 25 m 90°, VI+ A2 R24–R25: 40 m 95–70°, VI+ A2–A1 R23–R24: 20 m 85–90°, A3+; 10 m 90°, VI A2 R22–R23: 25 m 85°, A2 R21–R22: 50 m 95°, A2/А3 R20–R21: 15 m 85°, A1/А2; 10 m 90°, А2+ R19–R20: 15 m 95°, А3+; 10 m 100°, А2 R18–R19: 6 m 120°, А2; 15 m 170°, А2 — Cornice R17–R18: 25 m 80°, А1 R16–R17: 20 m 90°, VI+ А1/А2; 7 m II R15–R16: 30 m 85°, VI А1/А2 R14–R15: 5 m 85°, V; 25 m 65°, V+ R13–R14: 15 m 85°, VI; 20 m 65°, V; 10 m 85°, V R12–R13: 20 m 45°, III; 20 m 90°, VI+ А2–А3 R11–R12: 45 m 70°, V–IV+ R10–R11: 50 m 80°, V+ А1 R9–R10: 17 m 70°, VI; 16 m 80–100°, VI А3; 7 m 60°, IV R8–R9: 50 m 60°, IV R7–R8: 10 m 80°, V; 40 m 50°, III R6–R7: 30 m 60°, IV R5–R6: 15 m 65°, IV; 35 m 60°, IV R4–R5: 15 m 60°, IV; 15 m 60°, V; 20 m 60°, IV
| Section № | Ice screws | Pitons, Anchors, Fifes | Friends, Nuts | Bolts, Spits | Micro-axes | Skyhooks | Brief Description of the Section | Length, m | Steepness | Category of Difficulty | Photo № |
|---|---|---|---|---|---|---|---|---|---|---|---|
| For belay*1 | For ITO*3 | Rappel stations*2 | |||||||||
| R29–R30 | 1 | 5 | Ridge | 400 | 0–60° | II–IV | 37 | ||||
| R28–R29 | 10 | Ice "river" | 50 | 85° | V | ||||||
| R27–R28 | 1 | 4 | 2 | Mixed slabs | 25 | 80° | V | 36 | |||
| R26–R27 | 7 | Ledge | 20 | III | 35 | ||||||
| R25–R26 | 6/6 | 11/8 | Cornice, traverse under cornice | 25 | 90° | VI+ A2 | |||||
| R24–R25 | 9/5 | 13/13 | 0/1 | Crack | 40 | 95–70° | A2–A1, VI+ | 34 | |||
| R23–R24 | 8/8 | 6/4 | 1 | 0/7 | Cornice, internal angle | 10 | 90° | A2, VI | 33 | ||
| Slab | 20 | 85–90° | A3+/A3+ | ||||||||
| R22–R23 | 13/9 | 6/6 | Slab with crack | 25 | 85° | A2 | 32 | ||||
| R21–R22 | 18/17 | 6/6 | 1 | 0/3 | 0/2 | Slab with crack | 50 | 90–95° | A2–A3 | ||
| R20–R21 | 9/7 | 9/9 | 1 | 0/2 | Slab with crack | 10 | 85–90° | A2+ | 31 | ||
| Slab with crack | 15 | 80–85° | A1–A2 | ||||||||
| R19–R20 | 9/9 | 6/4 | 3/2 | 1/4 | 0/4 | Overhanging internal angle | 10 | 100° | A2 | 29,30 | |
| Overhanging internal angle | 15 | 95° | A3+ |