Ascent Passport
-
Ascent class — winter
-
Region — Pamir-Alay, Turkestan Ridge, Ak-Su gorge
-
Object — Ak-Su peak
-
Complexity category — 6B (Chaplygin's '88)
-
Elevation gain — 1500 m, length — 1930 m. Length of sections with 6th category of difficulty — 455 m. Average steepness of the route — 68°
-
Pitons driven:
| Rock | Bolt | Cams | Ice |
|---|---|---|---|
| 269 | 5 | 223 | 83 |
| 203 | 2 | 197 | 3 |
- Team's man-hours — 112
- Overnights — on a platform
- Team members: Pershin Mikhail Valerievich — Master of Sports Nefyodov Igor Viktorovich — Master of Sports
Photo #1. General photo of the summit on December 9, 1998. 1 — Shabalina route, 2 — Chaplygin's route, 3 — Klyonov's route.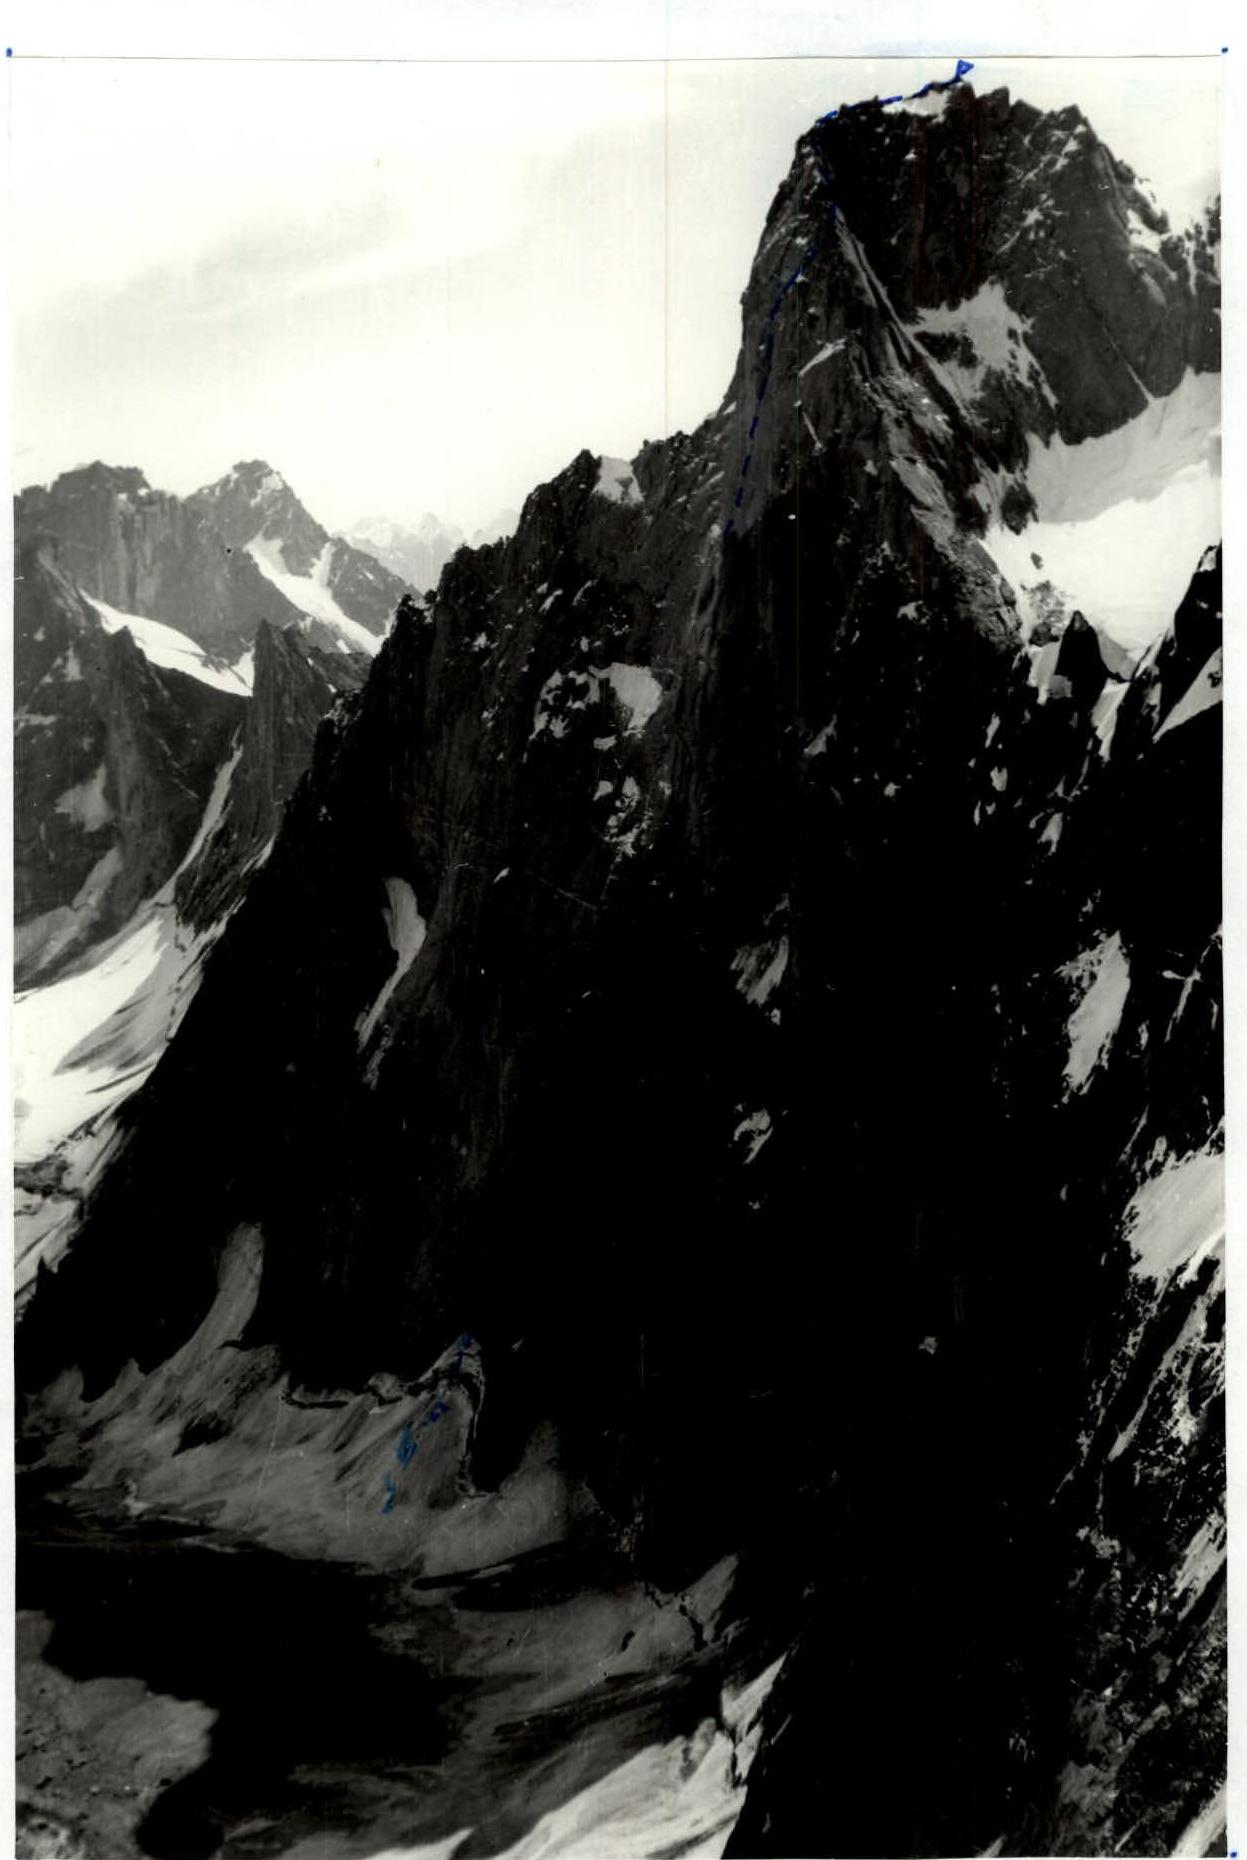
-
Coach: Pershin Valery Nikolayevich — Honored Master of Sports
-
Departure to the route: December 10, 1998. Summit: December 31, 1998, return: January 4, 1999.
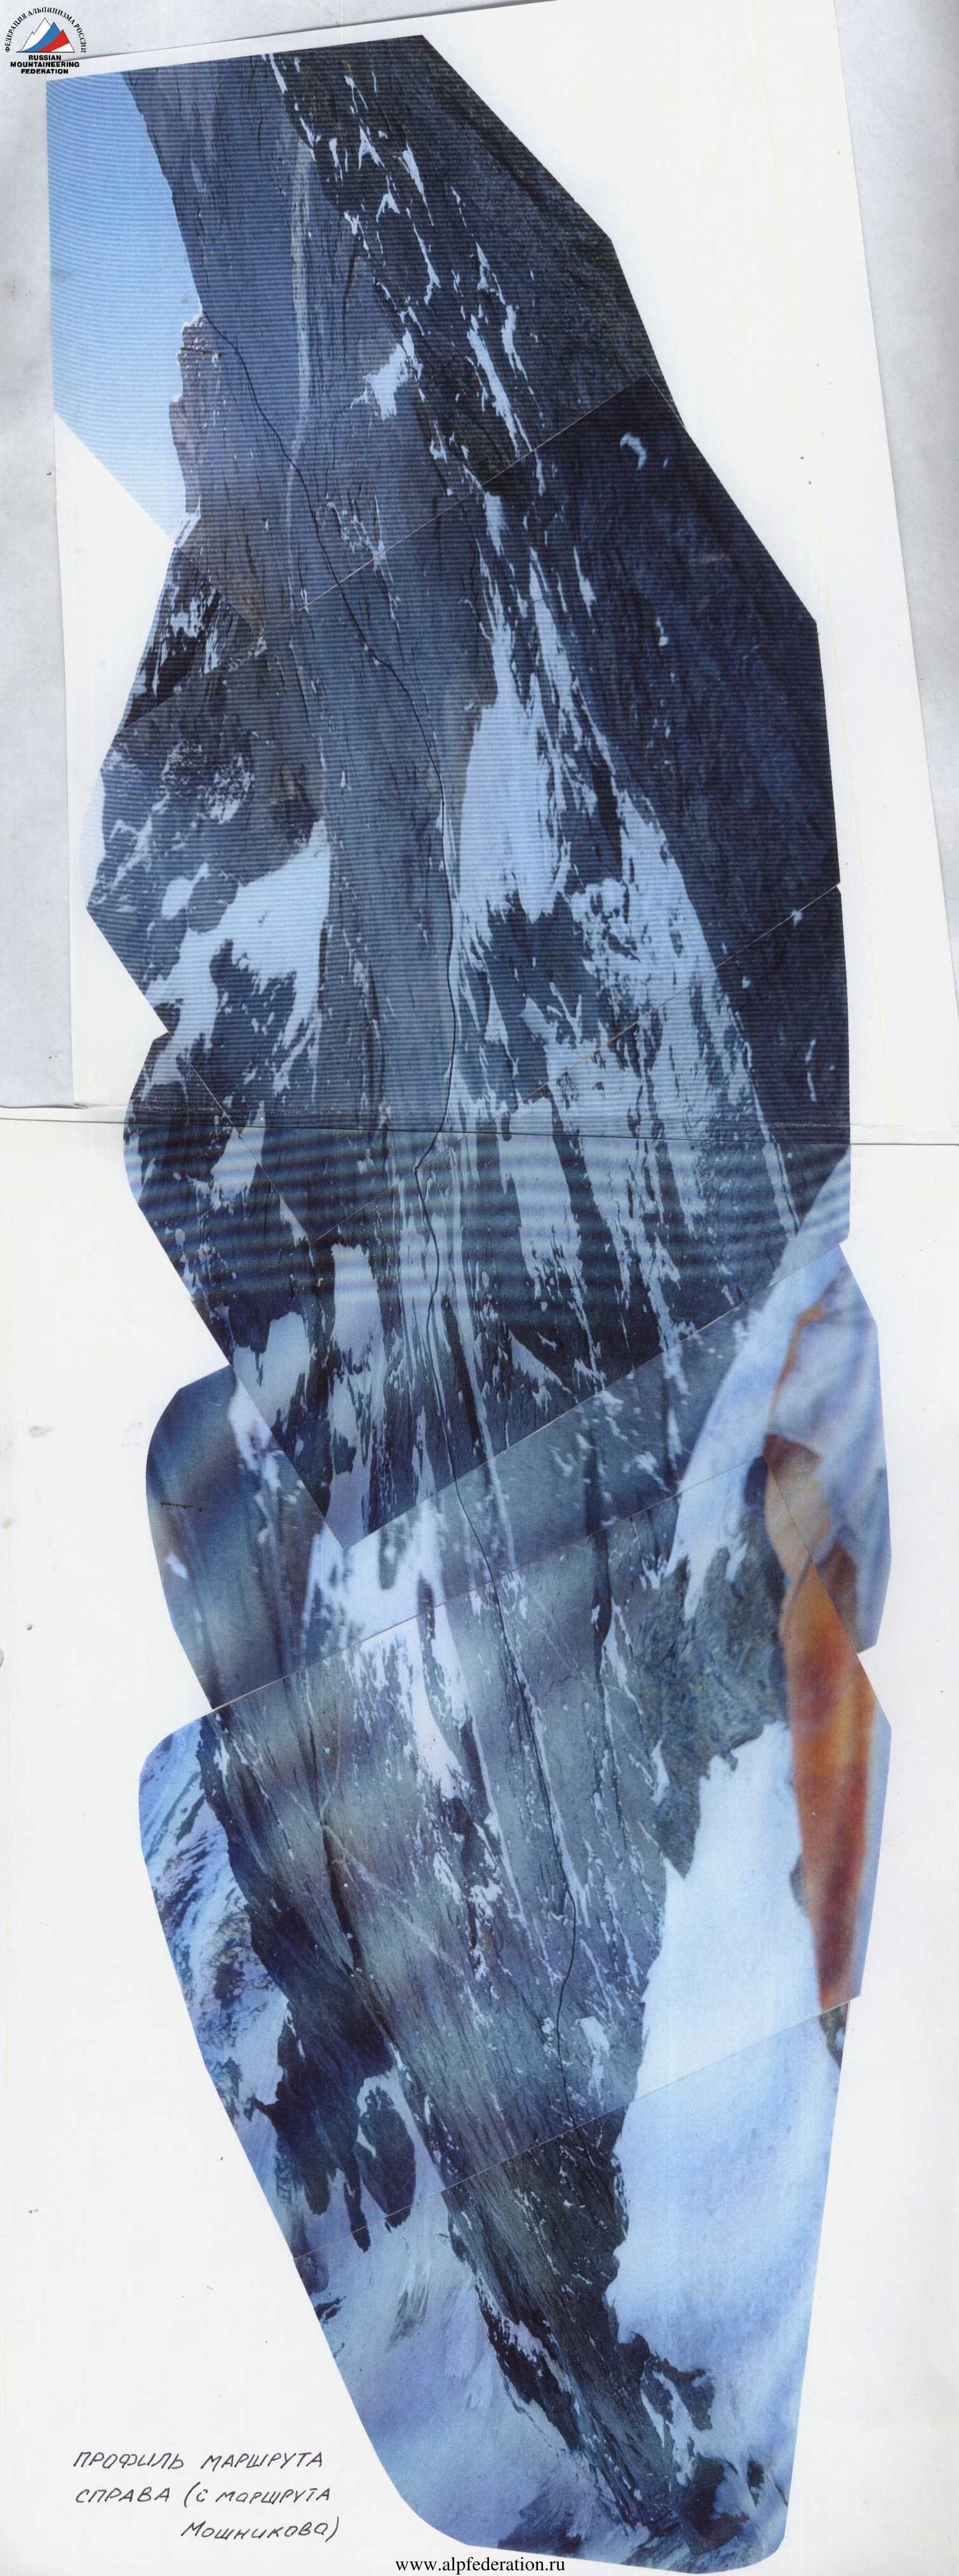
Wall Profile
Team's Tactical Actions
It is generally recognized that the North wall of Ak-Su peak is one of the most challenging walls in the technical class of ascents in the mountain regions of Russia and neighboring countries. However, there had been no winter ascents, let alone traversing the North wall.
Taking into account the experience of the failed attempt in February 1998, it was decided to make the ascent in December when the weather is most stable.
Assessing the state of the routes on the wall, we decided to follow Chaplygin's route (6B category), as it is the most feasible for traversing the center of the wall in winter.
Knowing that all routes on the central part of Ak-Su peak's wall are combined, the team, during the preparatory season, alongside maintaining a high level of "free climbing" and rock-technical training, paid significant attention to ice training and selecting quality equipment. This also contributed to the successful ascent, as ice equipment was frequently used on the rocky sections of the wall where cracks and crevices were filled with snow and covered in ice.
Clothing made from modern high-quality synthetic materials — replacements for down — was purchased.
For the route, we used:
- modern titanium pitons
- flexible cams
- removable bolt pitons
- self-made piton hammers
The route lacks characteristic places for overnight stays throughout its length, so a special platform for a team of two (with a tent installed on it) was manufactured, significantly simplifying the organization of overnight stays and facilitating the passage of the route.
For the team's movement, a "capsuled" ascent tactic was employed:
- first, a section of the route is processed (the lead climber moves on a double rope, one or both — UIAA, with fixed belays)
- then the load is transferred with the platform
Diet regimen:
- hot meals in the morning and evening
- individual snacks during the day
Communication with the base was maintained through radio and light signals. The team had a first-aid kit for providing pre-medical assistance.
The route was left clean; all trash was burned, and metal cans were brought back to the base camp; all pitons were extracted.
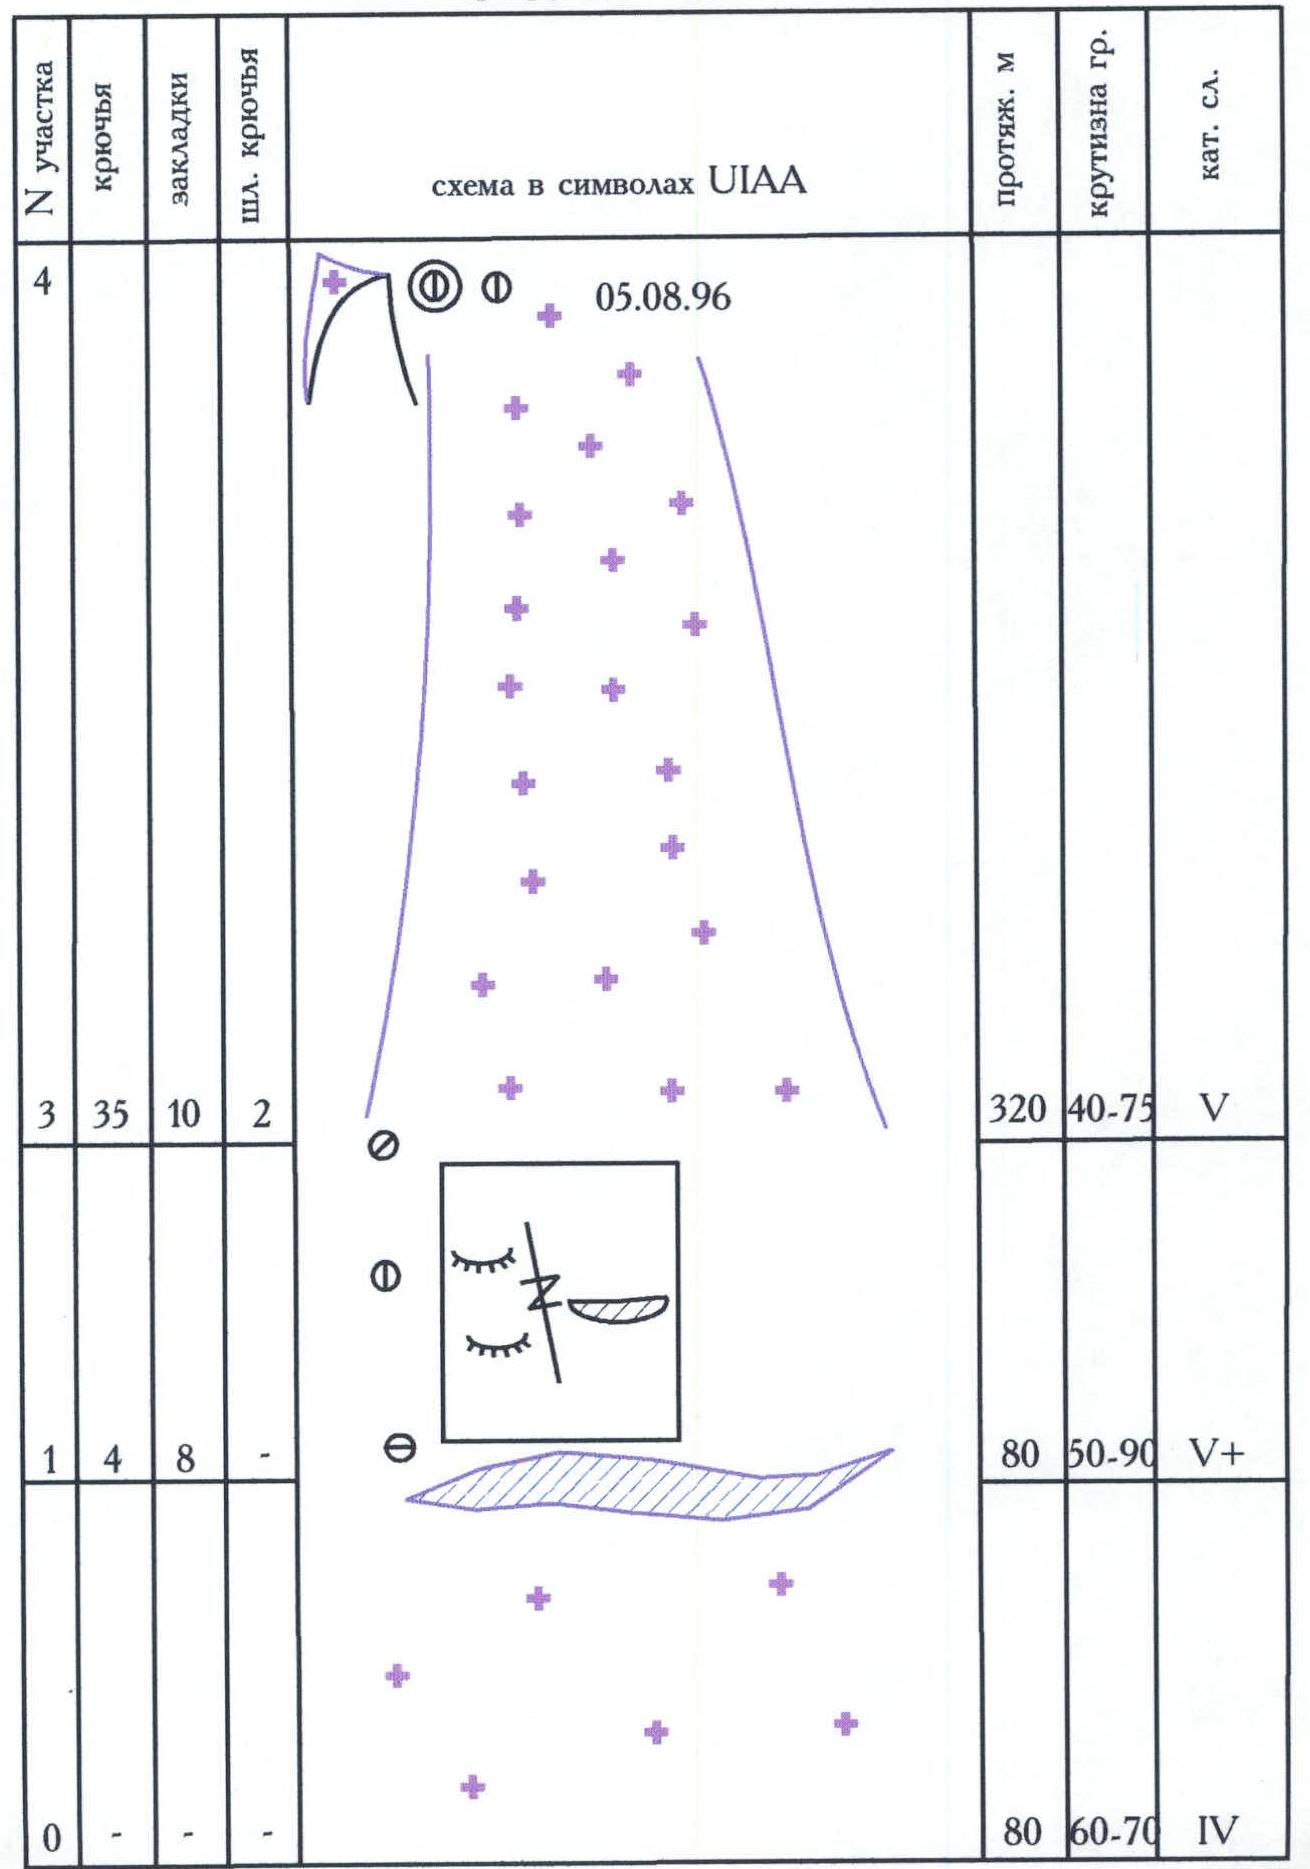
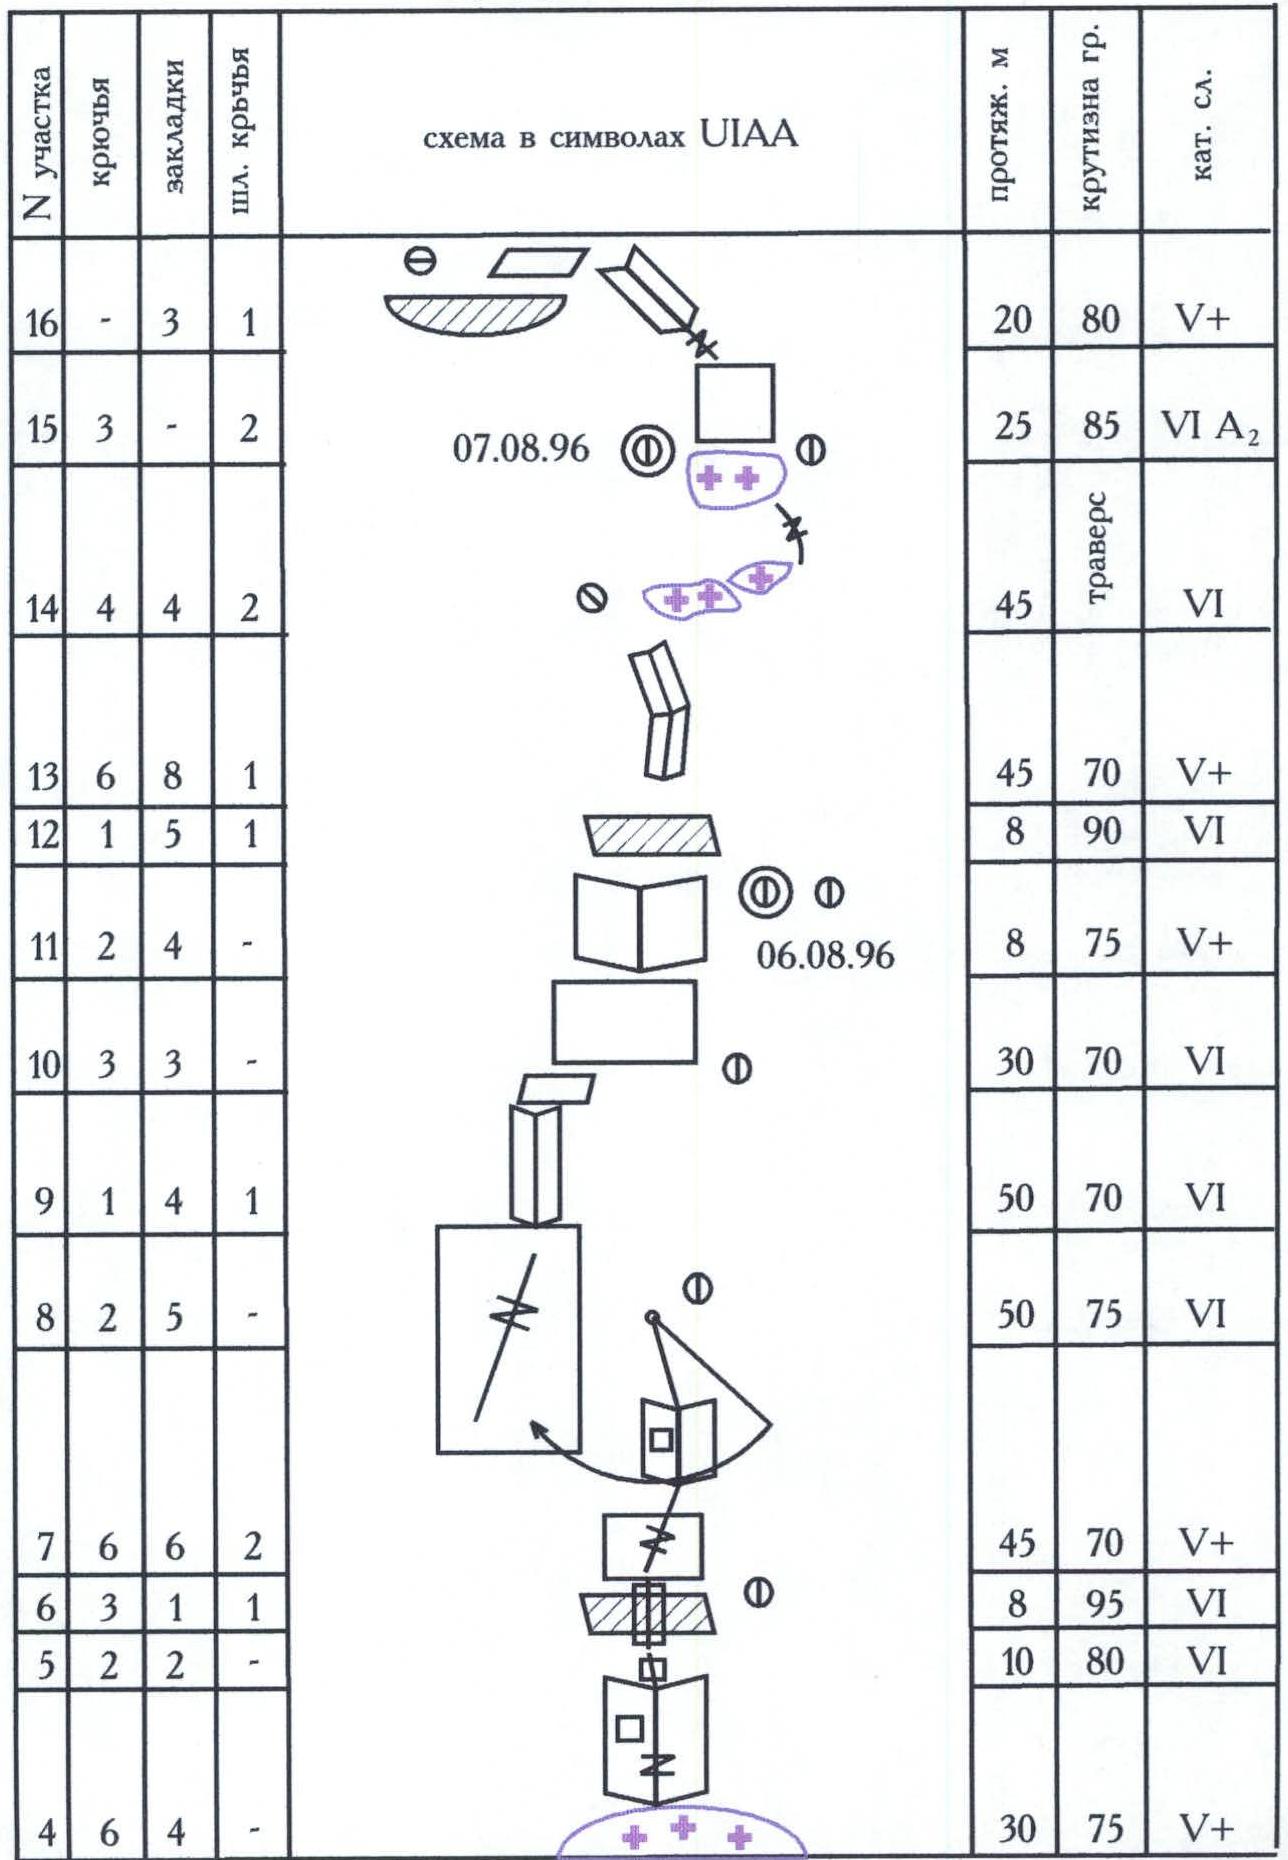
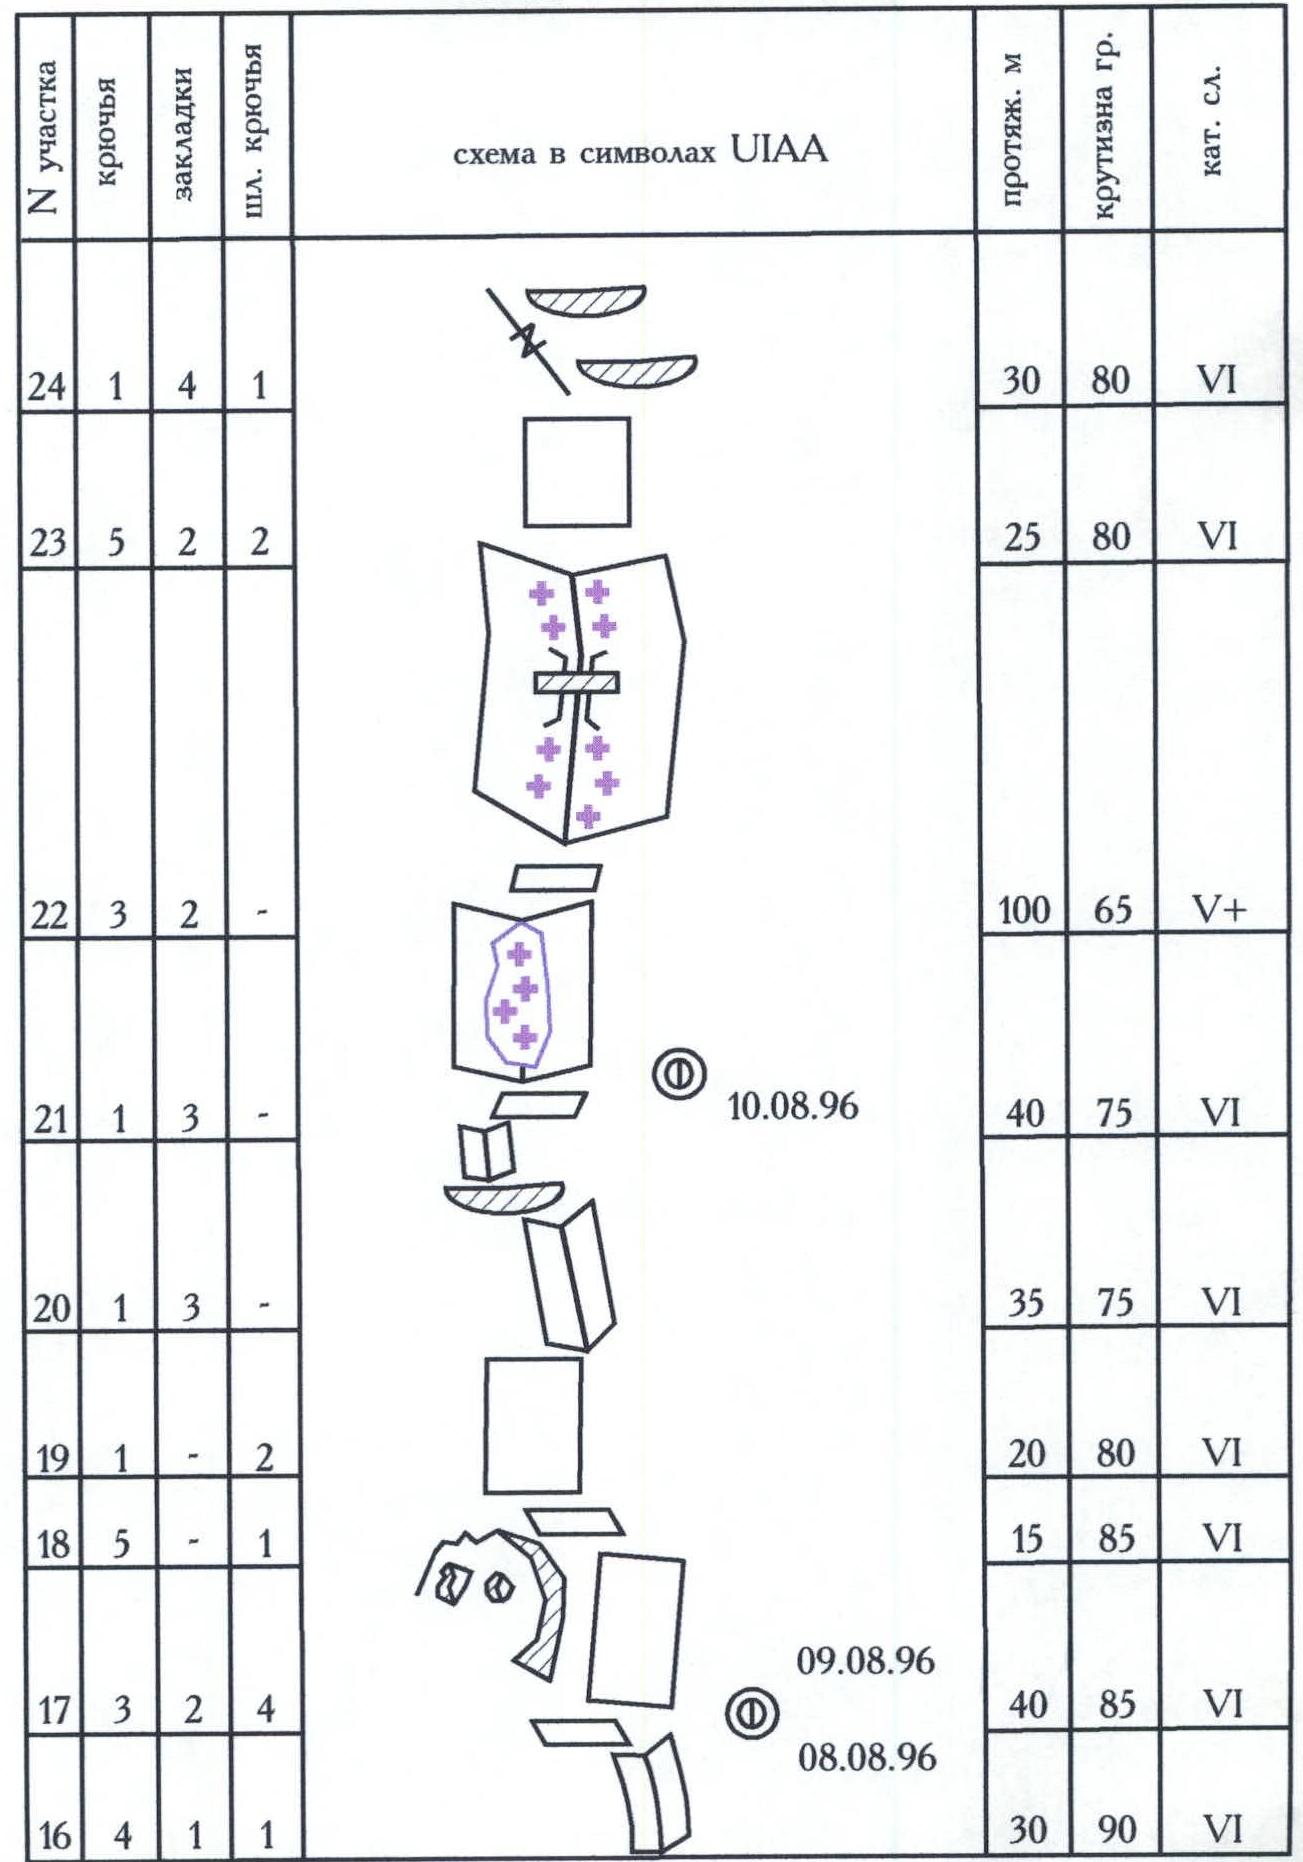
Route scheme in UIAA symbols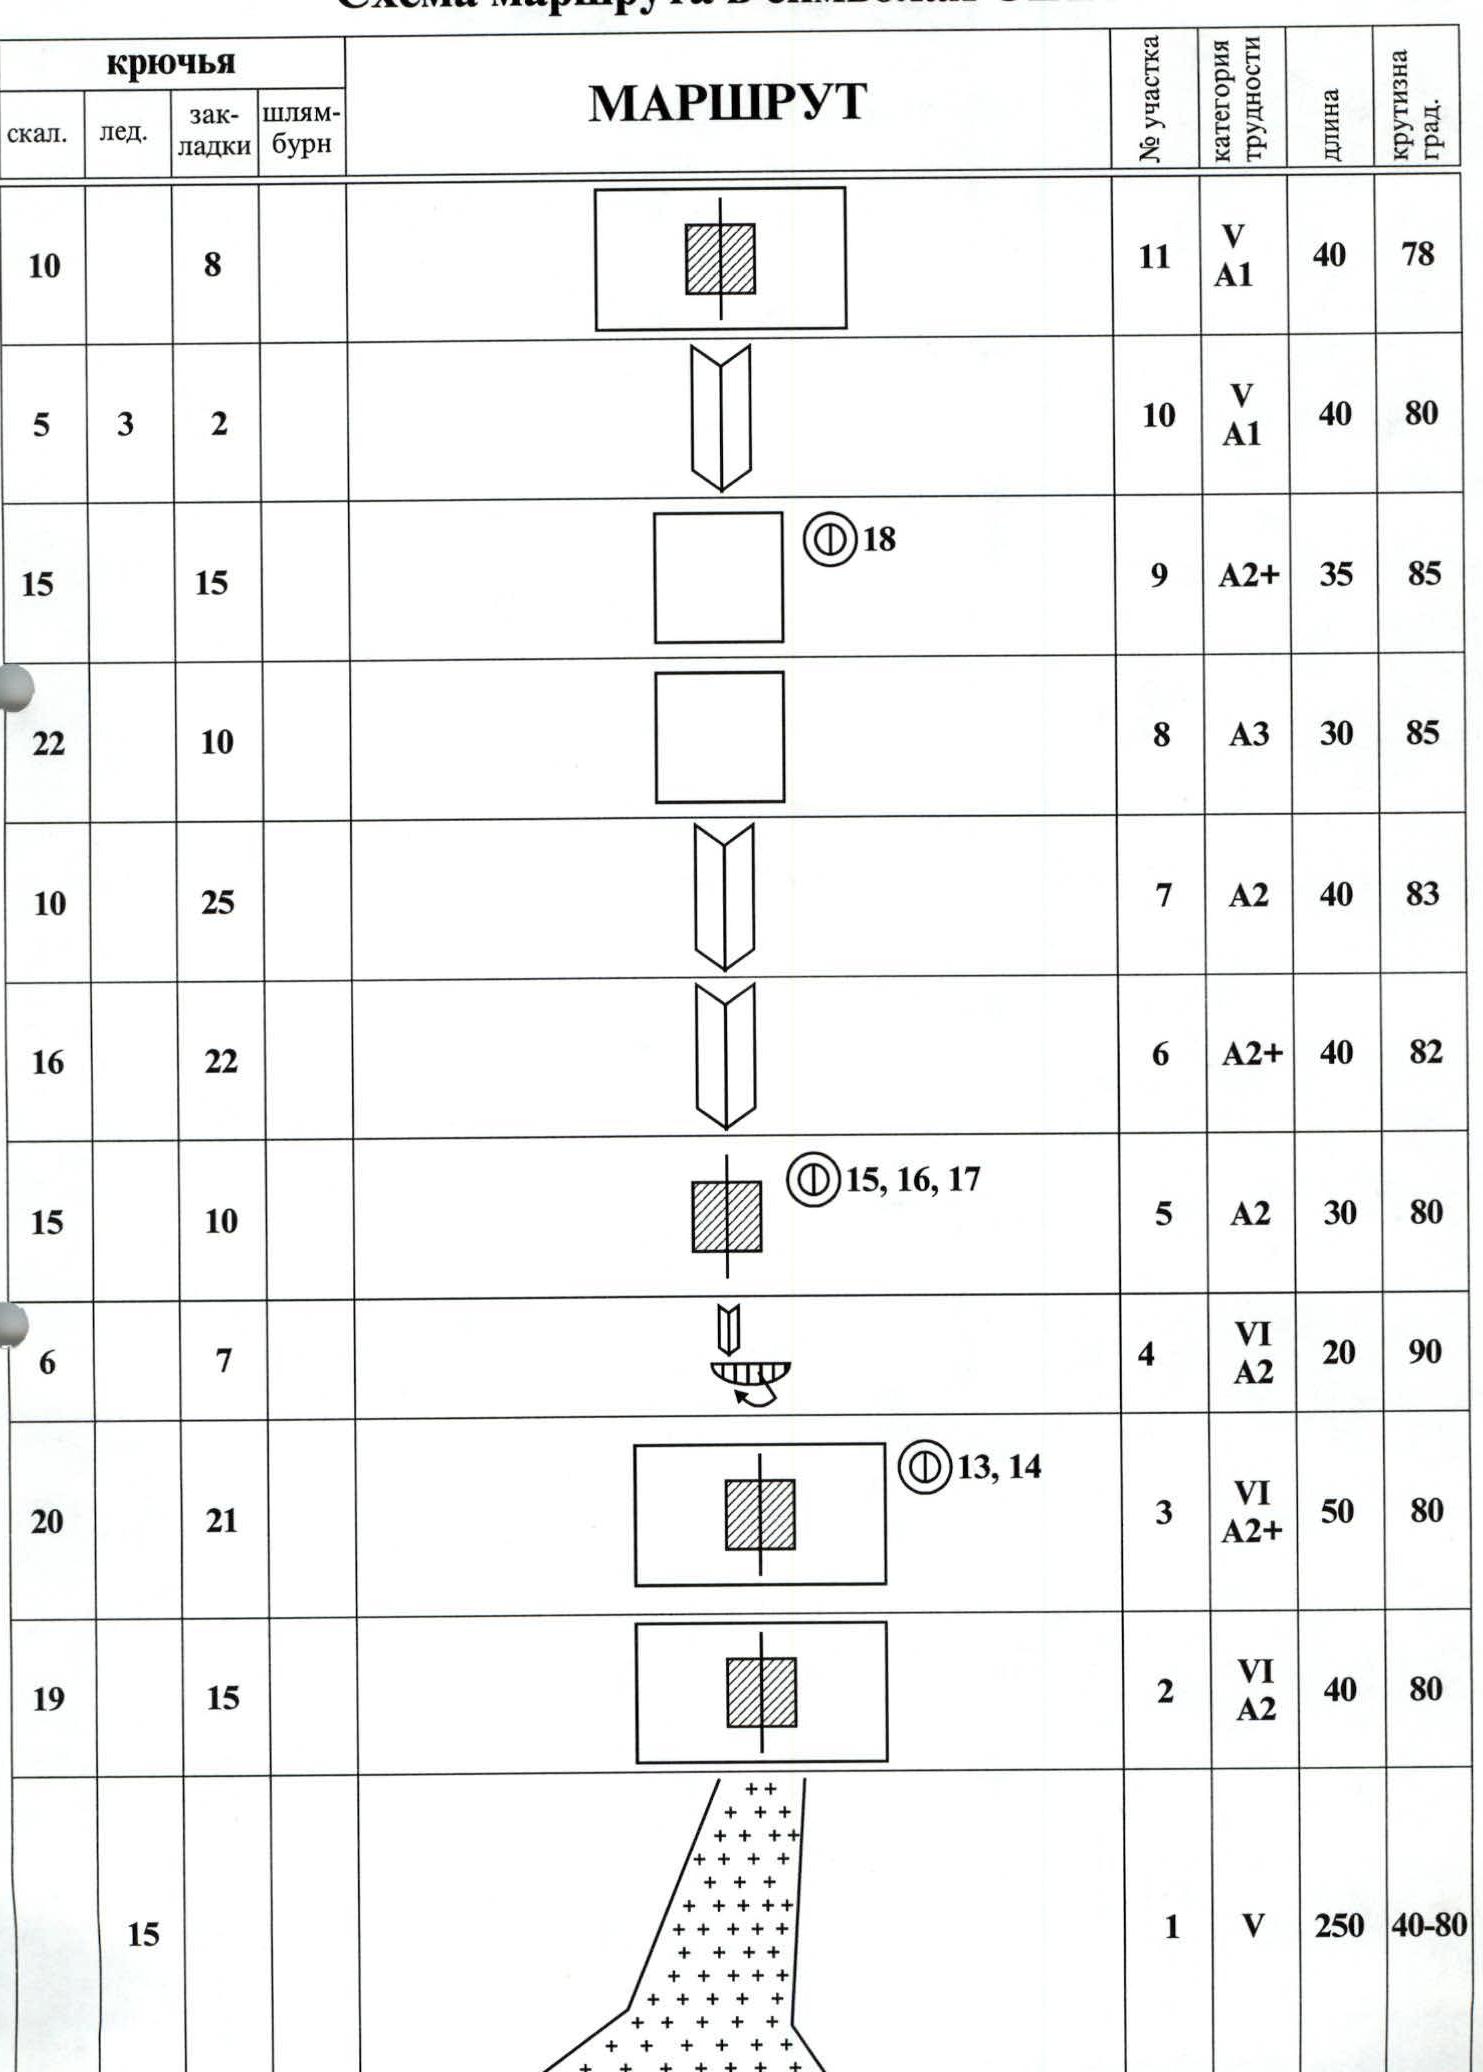
| Rock | Ice | Cams | Bolt | Section # | Difficulty category | Length, m | Steepness, ° |
|---|---|---|---|---|---|---|---|
| 15 | 1 | V | 250 | 40–80 | |||
| 19 | 15 | 2 | VI A2 | 40 | 80 | ||
| 20 | 21 | 3 | VI A2+ | 50 | 80 | ||
| 6 | 7 | 4 | VI A2 | 20 | 90 | ||
| 15 | 10 | 5 | A2 | 30 | 80 | ||
| 16 | 22 | 6 | A2+ | 40 | 82 | ||
| 10 | 25 | 7 | A2 | 40 | 83 | ||
| 22 | 10 | 8 | A3 | 30 | 85 | ||
| 15 | 15 | 9 | A2+ | 35 | 85 | ||
| 5 | 3 | 2 | 10 | V A1 | 40 | 80 | |
| 10 | 8 | 11 | V A1 | 40 | 78 | ||
| 5 | 4 | 12 | V | 45 | 75 | ||
| 2 | 3 | 4 | 1 | 13 | V | 40 | 75 |
| 5 | 14 | V | 50 | 70 | |||
| 4 | 15 | V | 50 | 65 | |||
| 4 | 16 | V | 50 | 65 | |||
| 7 | 5 | 4 | 17 | V A2 | 50 | 75 | |
| 10 | 10 | 18 | V A2 | 20 | 75 | ||
| 20 | 19 | 2 | 19 | A3 | 40 | 85 | |
| 15 | 16 | 2 | 20 | A2+ | 30 | 85 | |
| 12 | 6 | 21 | A2 | 20 | 80 | ||
| 20 | 22 | V | 200 | 60–80 | |||
| 4 | 2 | 2 | 23 | V A1 | 50 | 75 | |
| 5 | 2 | 1 | 24 | V A1 | 50 | 75 | |
| 10 | 15 | 2 | 25 | A2+ | 30 | 90 | |
| 15 | 6 | 26 | A3 | 20 | 90 | ||
| 2 | 5 | 2 | 27 | V | 50 | 75 | |
| 1 | 3 | 3 | 28 | V | 30 | 65 | |
| 4 | 29 | V | 50 | 60 | |||
| 4 | 30 | V | 30 | 75 | |||
| 10 | 3 | 3 | 31 | V A2 | 200 | 40 |
Route Description by Sections
R1 — Snow-ice couloir with varying steepness R2 — Beginning of the crack on Popov-Chaplygin route R3 — Crevice in the slab R4 — Approach to the cornice, pendulum left, exit upwards R5 — Climbing on ITO up the crevice R6 — Movement up the internal corner R7 — Internal corner turning into a slab R8 — Difficult climbing on the slab R9 — Continuing the slab passage R10–R13 — Internal corner filled with ice R14–R17 — Narrow ice couloir turning into a slab at the top R18 — Chimney leading under the slab R19 — Difficult climbing on the slab right-upwards R20 — Continuing movement towards the "cross" R21 — Bypassing the "sticking slab" on the left and exiting right of the cornice into Chaplygin's couloir R22 — Ice couloir with varying steepness. R23–R24 — Internal corner filled with ice R25–R26 — Passing a series of overhanging walls R27 — Movement right-upwards on the internal corner R28–R30 — Ice couloir narrowing into a chimney and leading to the ridge R31 — Ridge, occasionally with walls featuring difficult climbing R32 — Ascending to the summit along the ridge, bypassing gendarmes
Photo #2. Technical photo of the summit. Route scheme in UIAA symbols
 Route scheme in UIAA symbols
 Route scheme in UIAA symbols
 Route scheme in UIAA symbols
 Route scheme in UIAA symbols
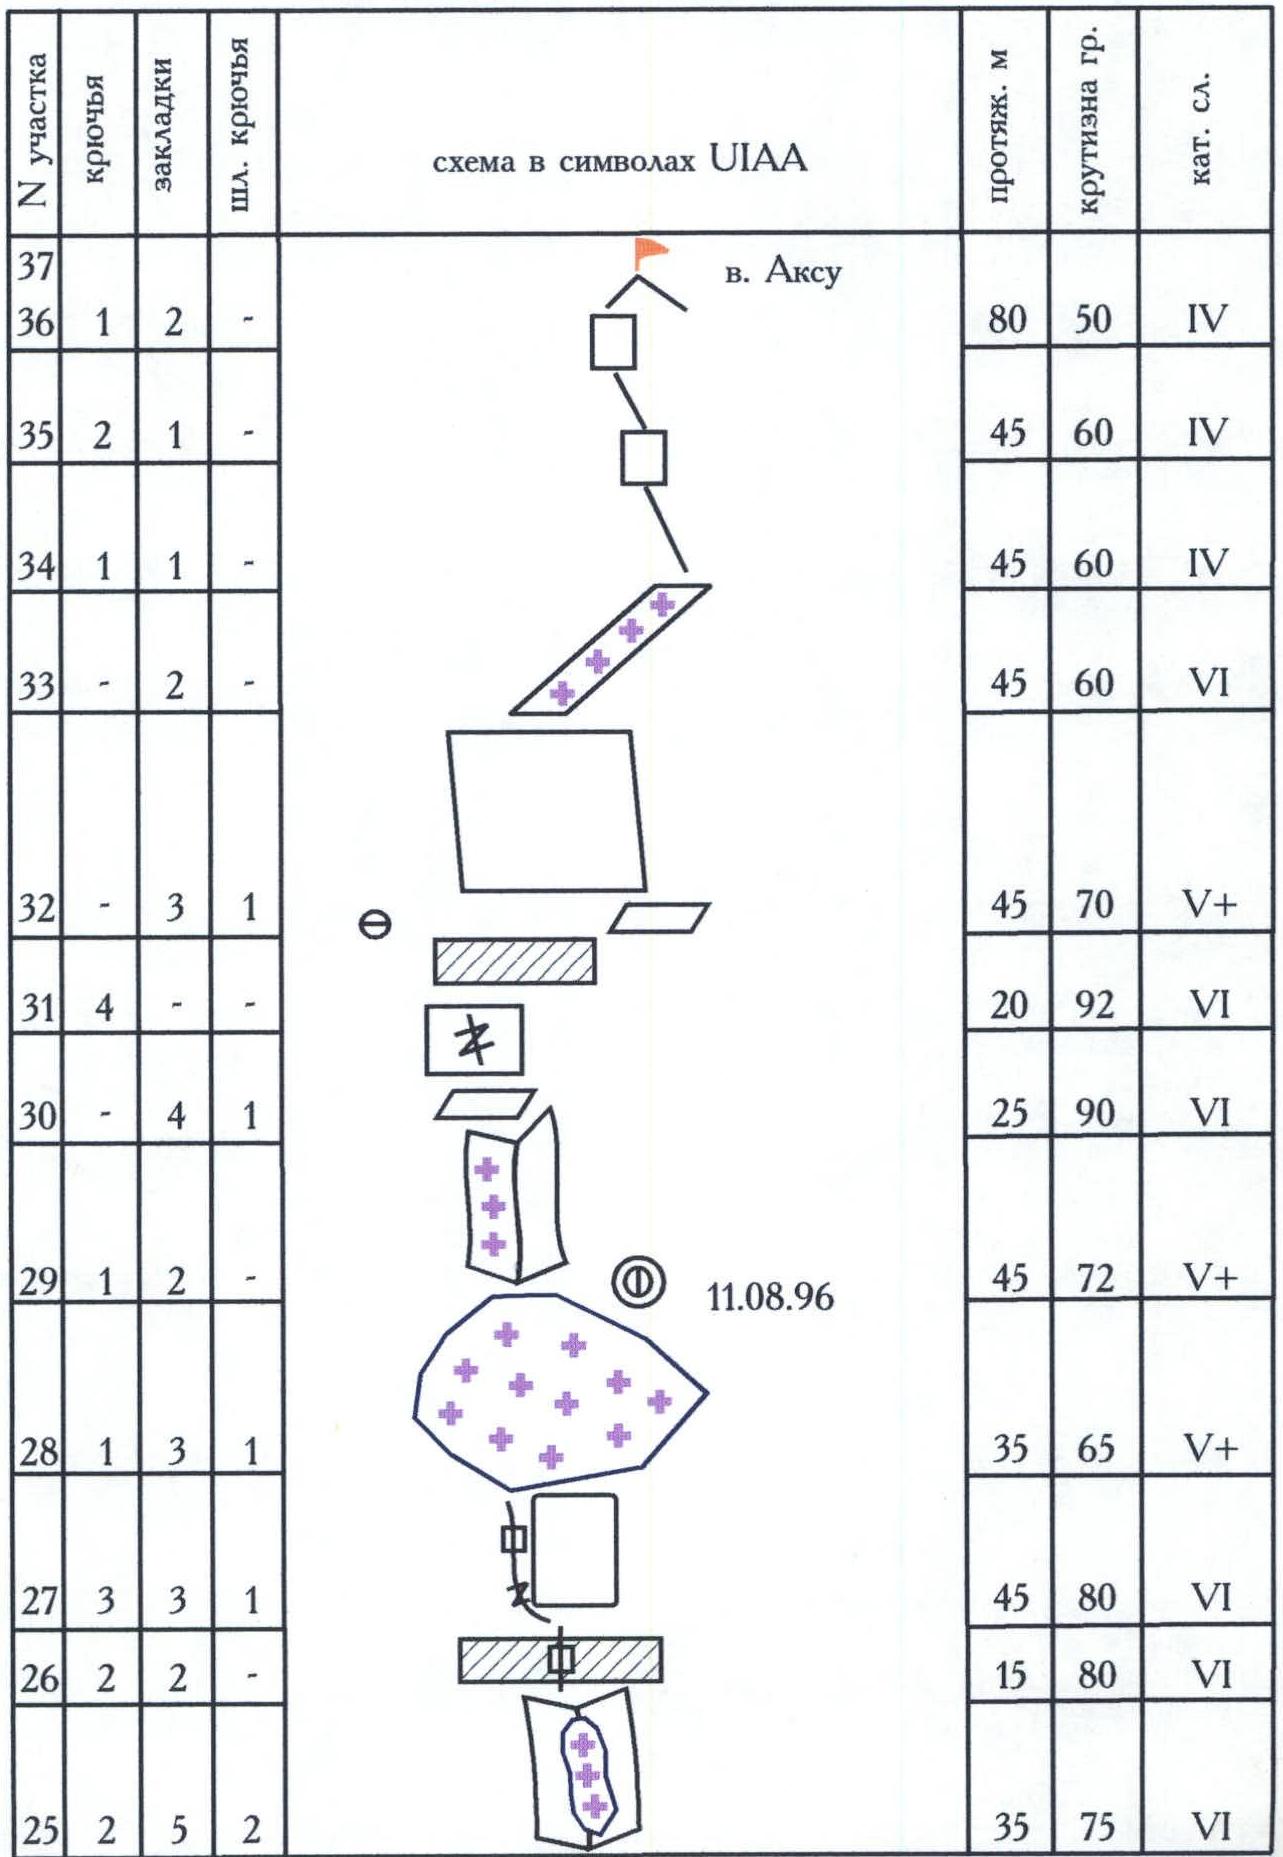
Route Description by Sections
| Section | Description |
|---|---|
| 0–1 | Steep firn slope. Ice visible in places. |
| 1–2 | Crossing the bergschrund. Beyond the bergschrund — a monolithic rock wall. |
| 2–3 | Difficult climbing on wet "ram's horns". |
| 3–4 | Ice couloir with steepness from 40° to 70°. |
| 4–5 | Internal corner with "deaf" cracks. Piton protection. |
| 5–6 | Crevice deep in the internal corner. |
| 6–7 | Cornice with a crevice, 1 m outcrop. |
| 7–8 | Approach to the crevice via the right wall. The crevice is climbed. |
| 8–9 | From the crevice — a pendulum swing to the left wall. 15 m up to the crevice along it. |
| 9–10 | Along the piton-studded outcrop until it tapers out. |
| 10–11 | Climbing vertically up the wall via outcrops using free climbing. |
| 11–12 | Wide internal corner with wet, smoothed rocks; tense climbing. |
| 12–13 | Overhanging wall. Cracks are "deaf". |
| 13–14 | Vertical wall turning into an internal corner. Rocks are icy. |
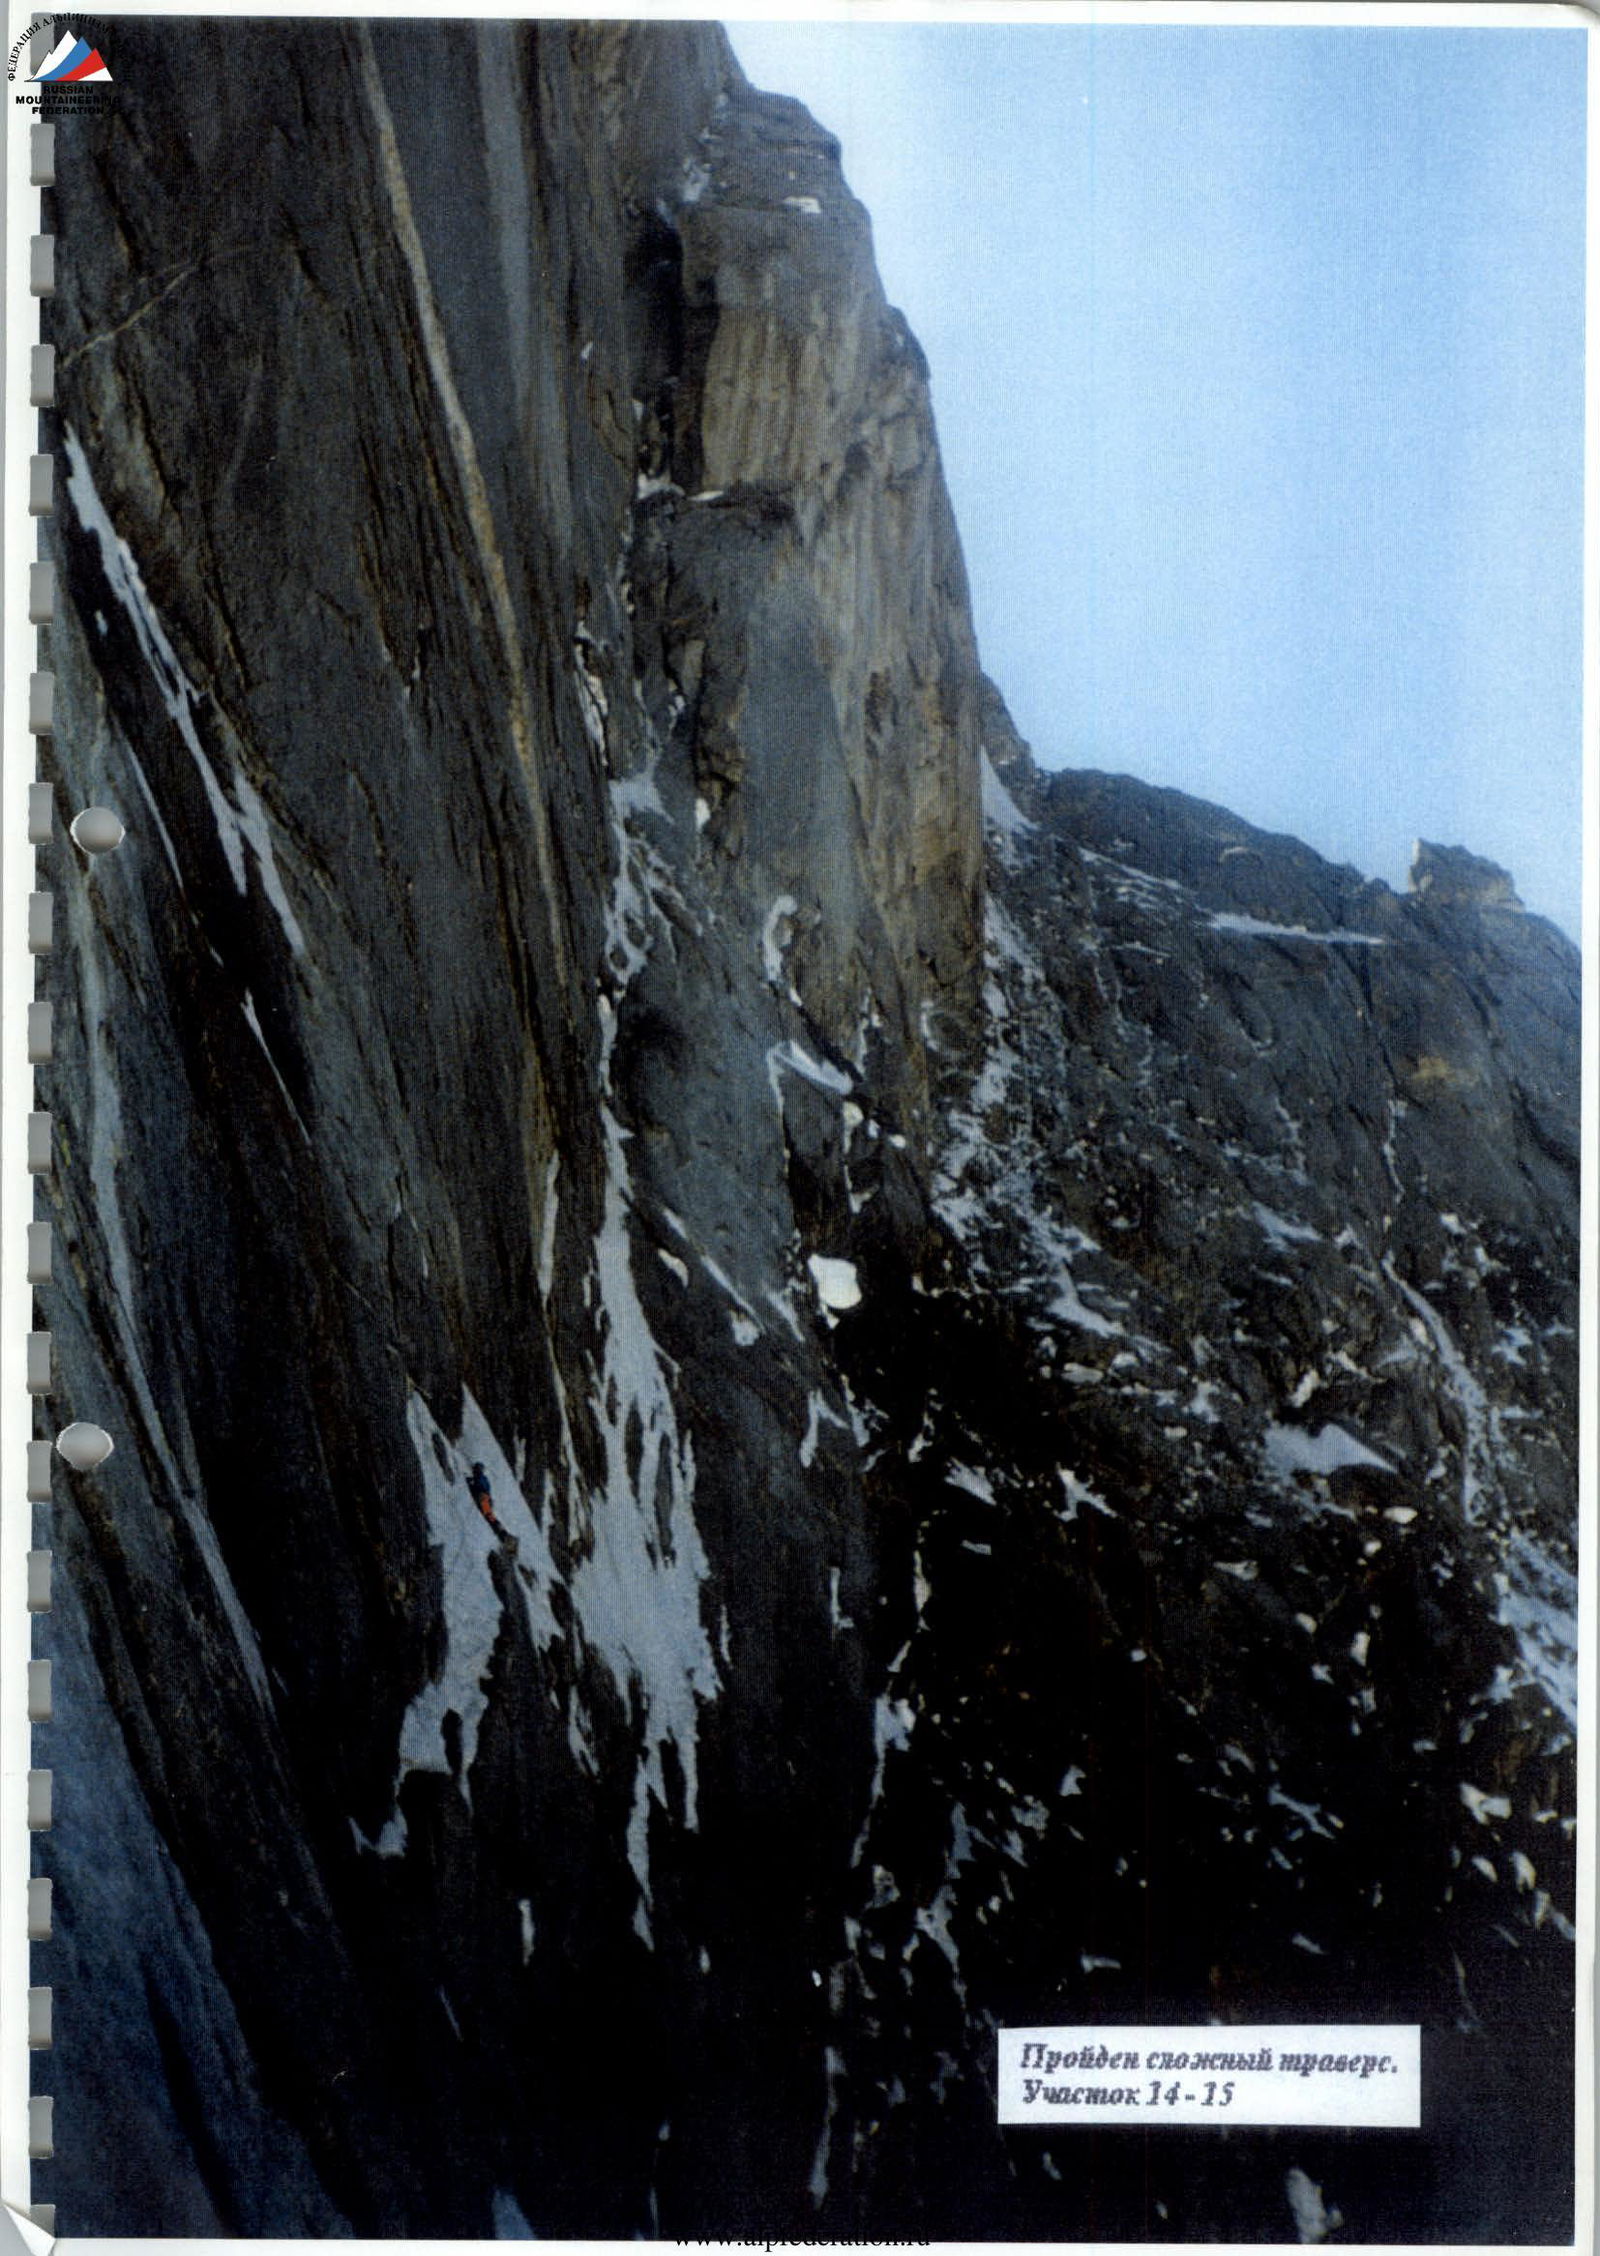
| 14–15 | Difficult 40 m traverse to the right on ice spots and smoothed rocks. |
| 15–16 | Steep wall with a small number of holds. "Sky-hooks". |
| 16–17 | Internal corner with good monolithic holds, movement left-upwards to a ledge. |
| 17–18 | Monolithic wall, 30 m. "Sky-hooks". Movement towards huge hanging "sticking slabs". |
| 18–19 | Climbing the upper part of the "sticking slab". |
| 19–20 | Monolithic wall, 15 m. "Sky-hooks". |
| 20–21 | Climbing a sloping, left-upwards smooth ledge. |
| 21–22 | Internal corner with an icicle inside; walls are monolithic and without cracks. Leads to Chaplygin's route. |
| 22–23 | 100 m internal corner filled with ice. (Chaplygin's route). |
| 23–24 | Departure left from Chaplygin's route via a monolithic wall. |
| 24–25 | 20 m traverse left on outcrops under an overhang. |
| 25–26 | Internal corner filled with ice. |
| 26–27 | Large cornice with a crevice. I.T.O. |
| 27–28 | Monolithic slab bypassed on the left via a crevice. |
| 28–29 | Ice slab leading to a destroyed, icy internal corner. |
| 29–30 | Internal corner with icy rocks, leads to a ledge. |
| 30–31 | Steep wall with destroyed outcrops. |
| 32–33 | Large cornice with an overhanging chimney. I.T.O. |
| 33–34 | Monolithic slab with good friction. Free climbing. |
| 34–35 | Sloping smooth ledge with an ice slab, leading to the ridge. |
| 35–36 | Monolithic gendarme on the ridge, bypassed on the right. 5 m rappel. |
| 36–37 | Climbing the ridge of medium difficulty with alternating and simultaneous protection. |
| 37–38 | Reaching the summit. |
A difficult traverse was completed. Section 14–15
Route profile from the right (from Moshnikov's route)
Section 15–16. Movement on the monolithic wall.
