Ascent Report
Team of the Odessa Alpine Club on the ascent of Parandas Peak (4250 m) via the right part of the North face (first ascent) Fann Mountains, August 2005
Odessa – 2005
Ascent Details
-
Pamir-Alay, Zeravshan Range, Fann Mountains (northern part), 5.3.1
-
Parandas Peak, via the right part of the North face.
-
Proposed – 6A category of difficulty, first ascent
-
Route type: rock climbing
-
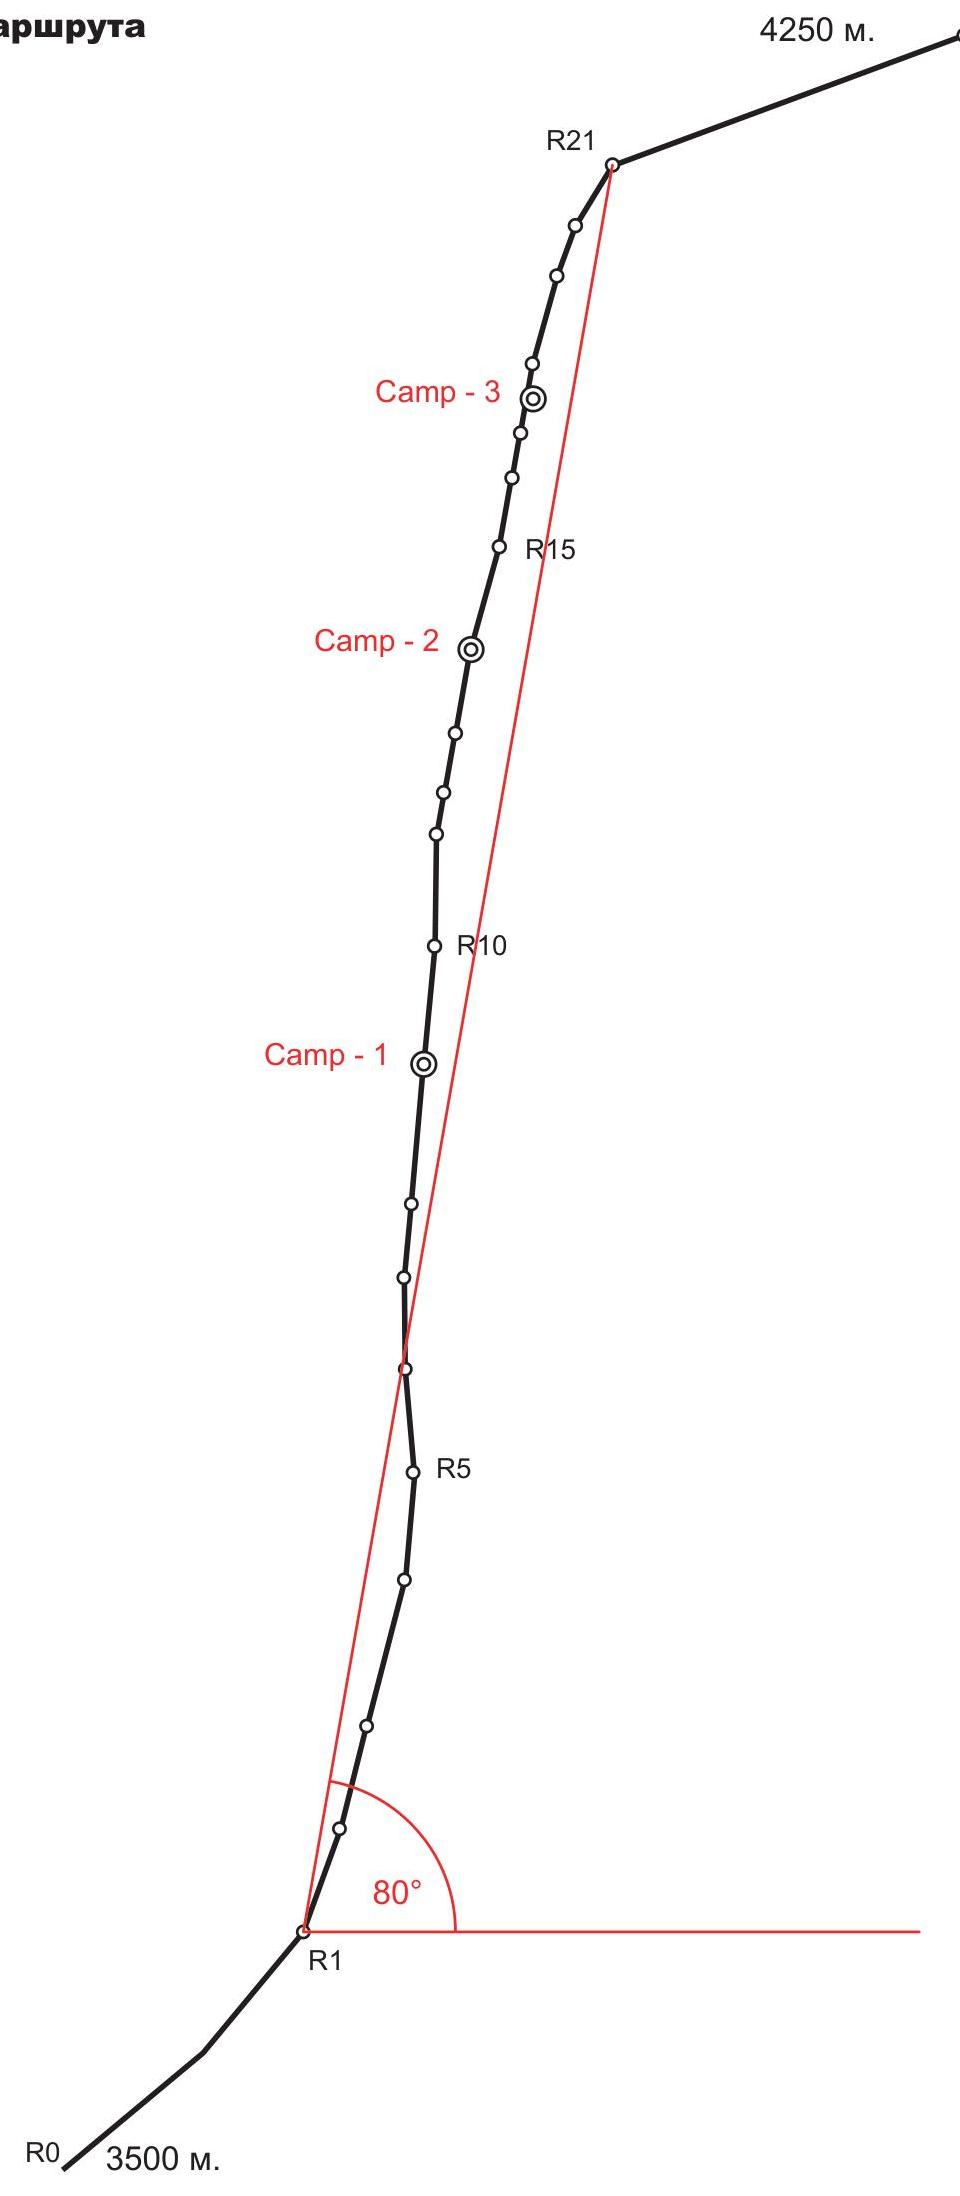
Route height difference: 750 m (3500–4250)
Route length: 1295 m (main part 875 m). Length of sections: V category of difficulty – 345 m, VI category of difficulty – 530 m. Average steepness: main part of the route – 80° total route – 67°
-
Pitons left on the route:
total – 25; including bolted pitons – 23
Pitons used on the route:
stationary bolted pitons – 23, including artificial aids – 11 removable bolted pitons – 0, including artificial aids – 0
Total artificial aids used – 189
-
Team's total climbing hours: 77.5 hours, 8 days
-
Team leader: Mogila Vladimir Fedorovich – Master of Sports
Team members:
Lavrinenko Alexander Vadimovich – Candidate for Master of Sports Tsushko Taras Viktorovich – 1st sports category Kopteva Marina Vladimirovna – 1st sports category
-
Coach: Gorbenko Mstislav Mstislavovich – Honored Master of Sports, Honored Coach
-
Departure for the route: 7:30, August 5, 2005
Summit reached: 15:30, August 12, 2005
Return to Base Camp: 20:00, August 12, 2005

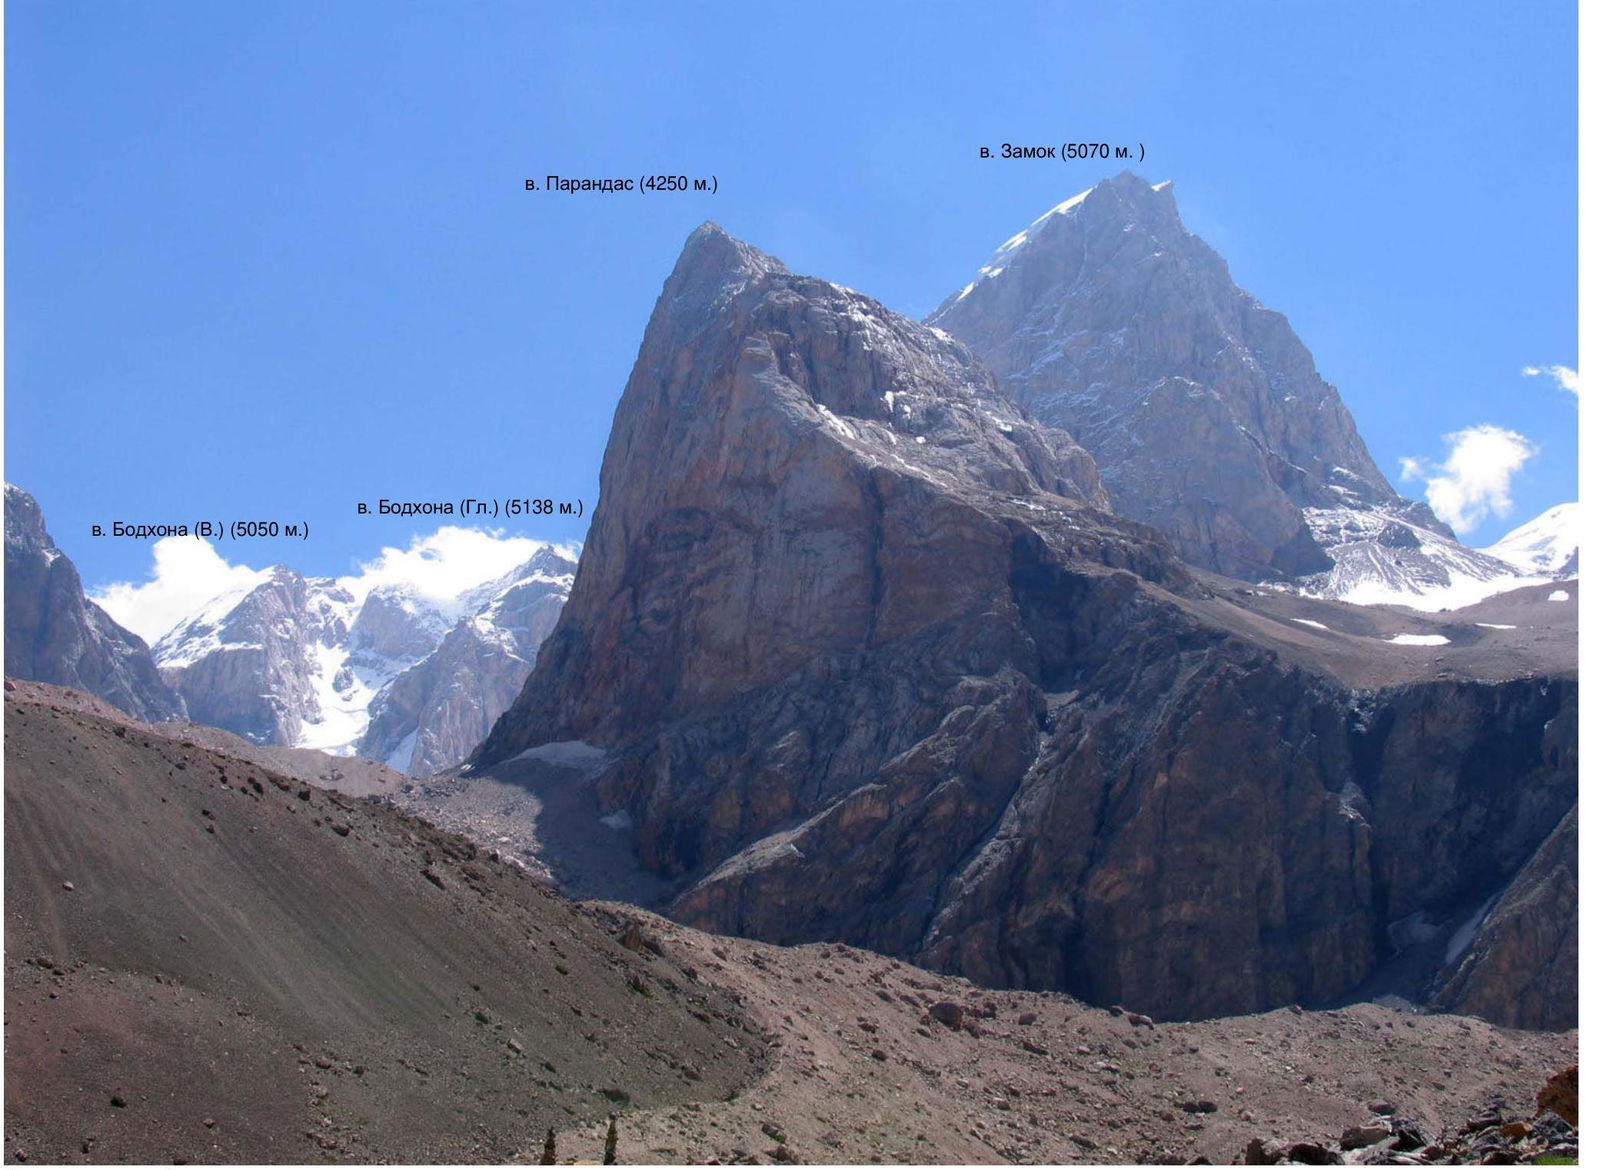
General photo of the summit. To the left is Arkhipov's route (1987), to the right is the team's route.

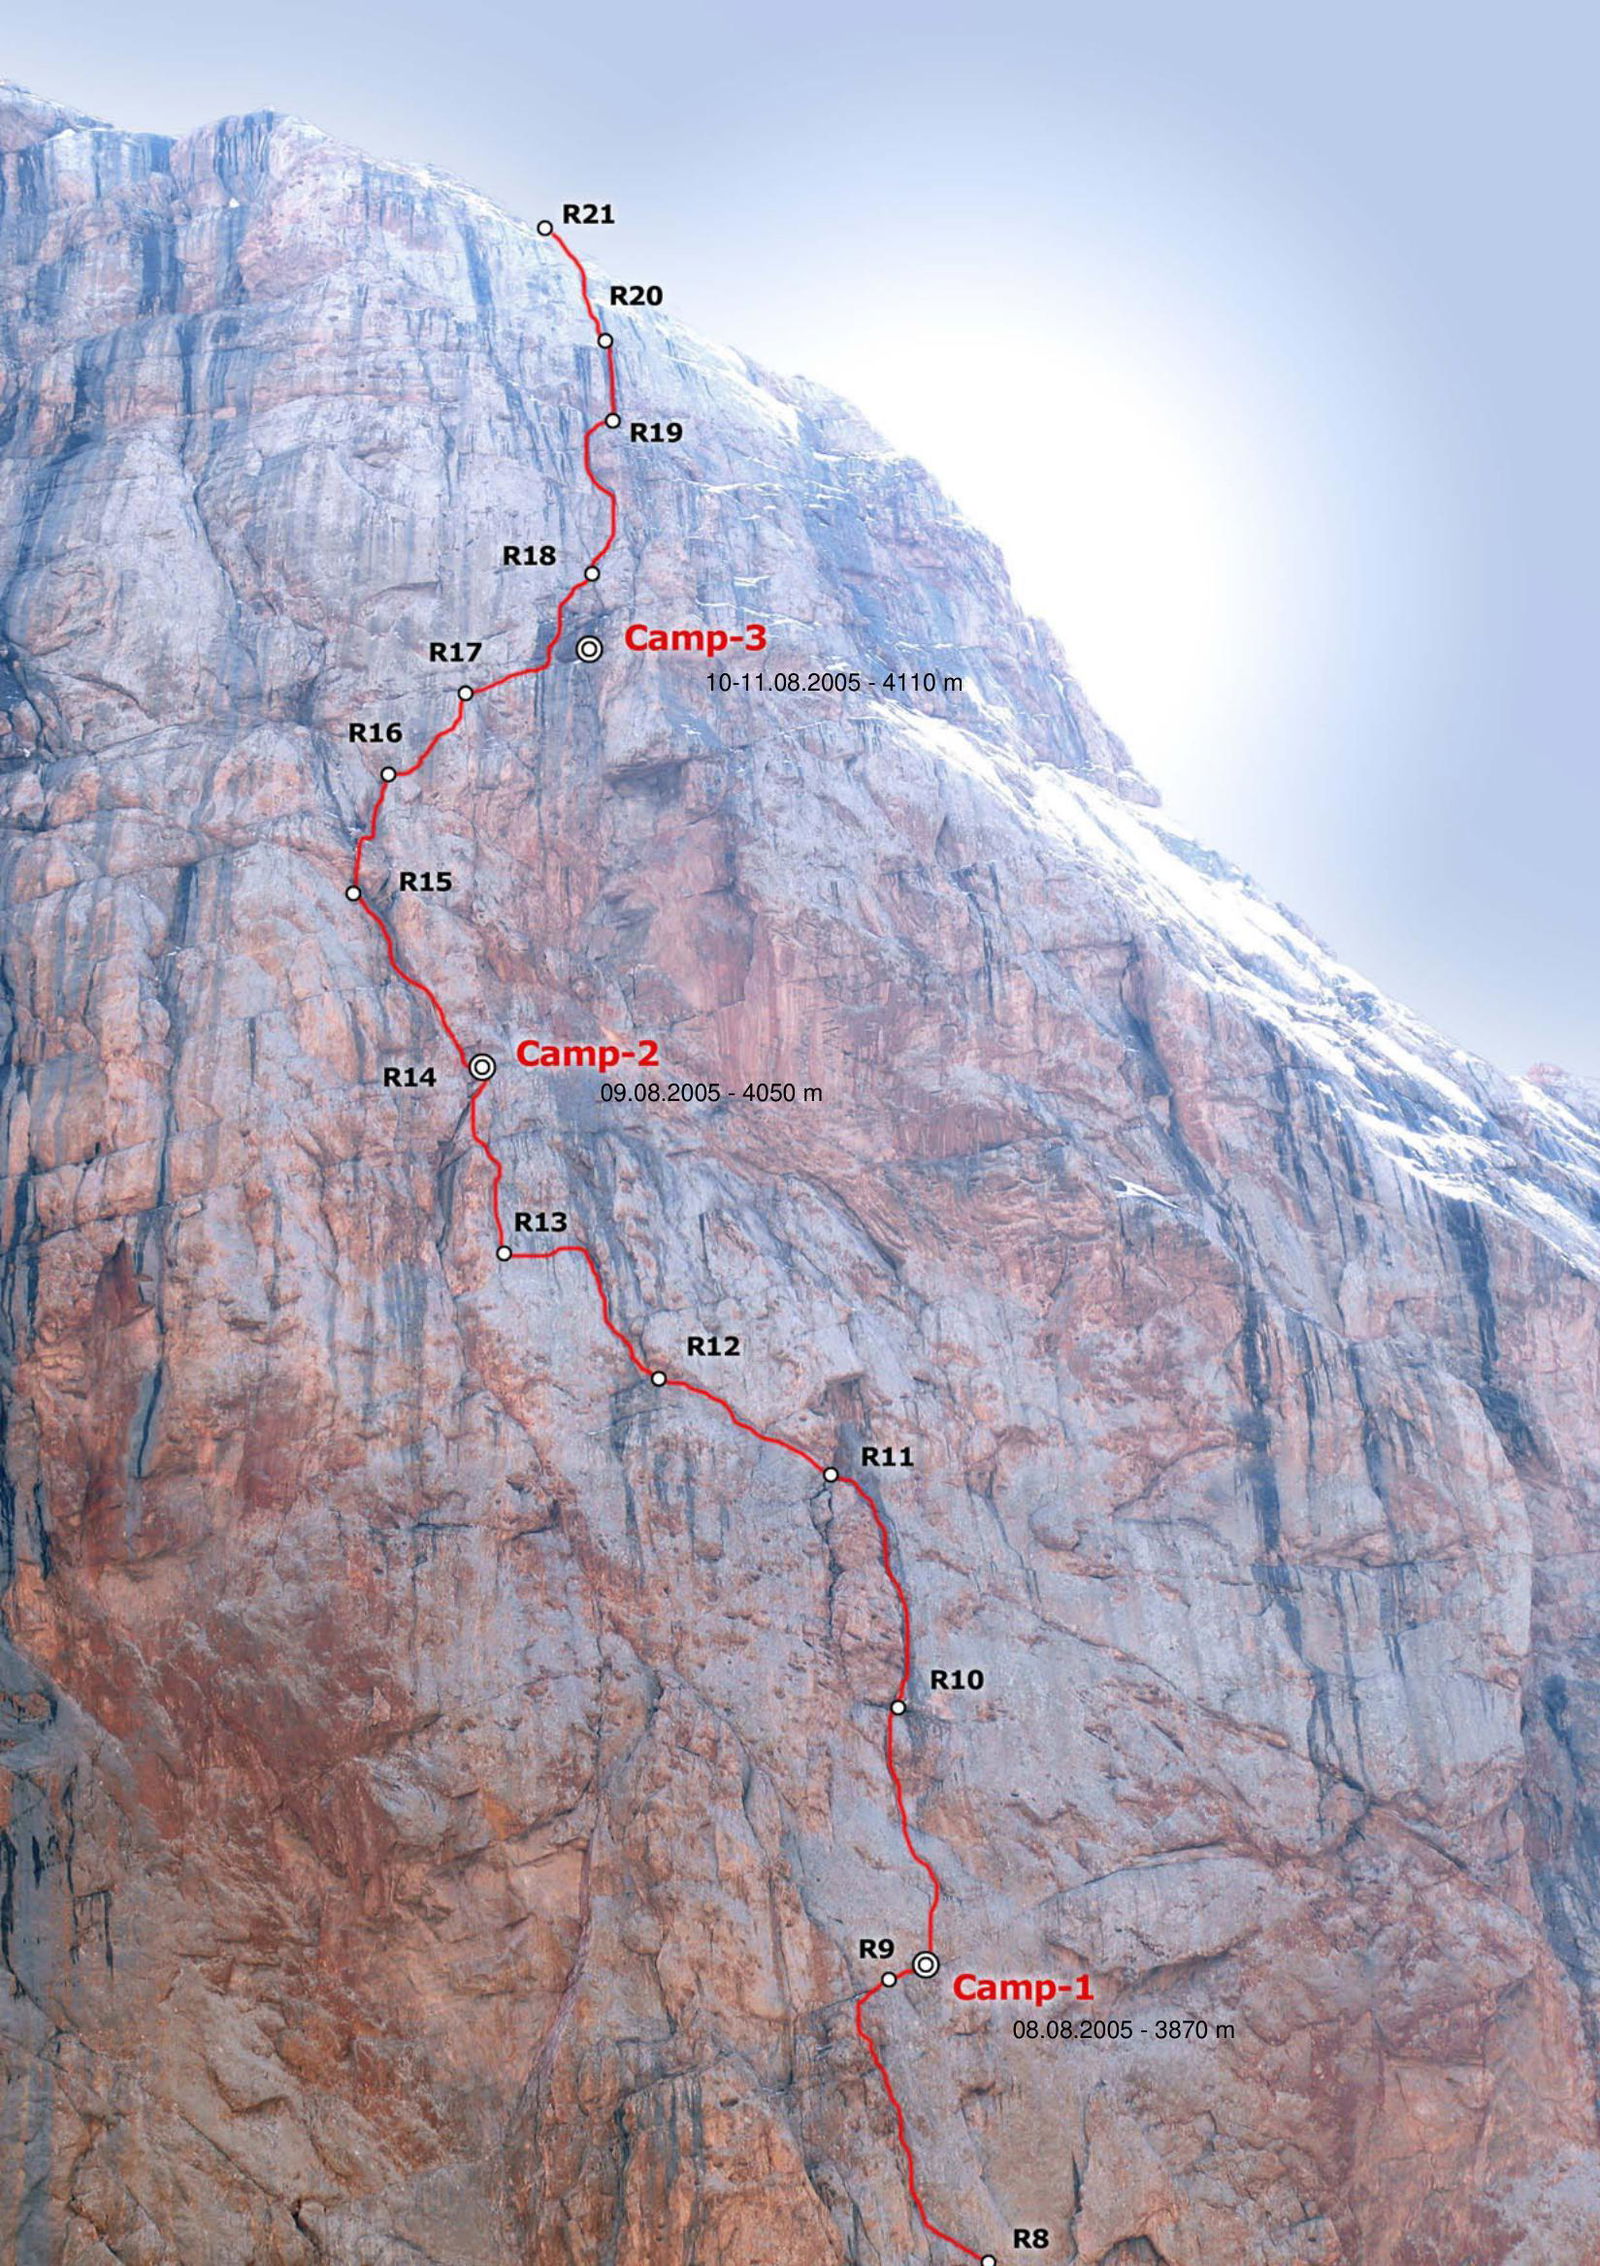
Route profile. View from the right.
Zamok Peak (5070 m), Parandas Peak (4250 m), Bodhona Peak (East) (5050 m), Bodhona Peak (Main) (5138 m).
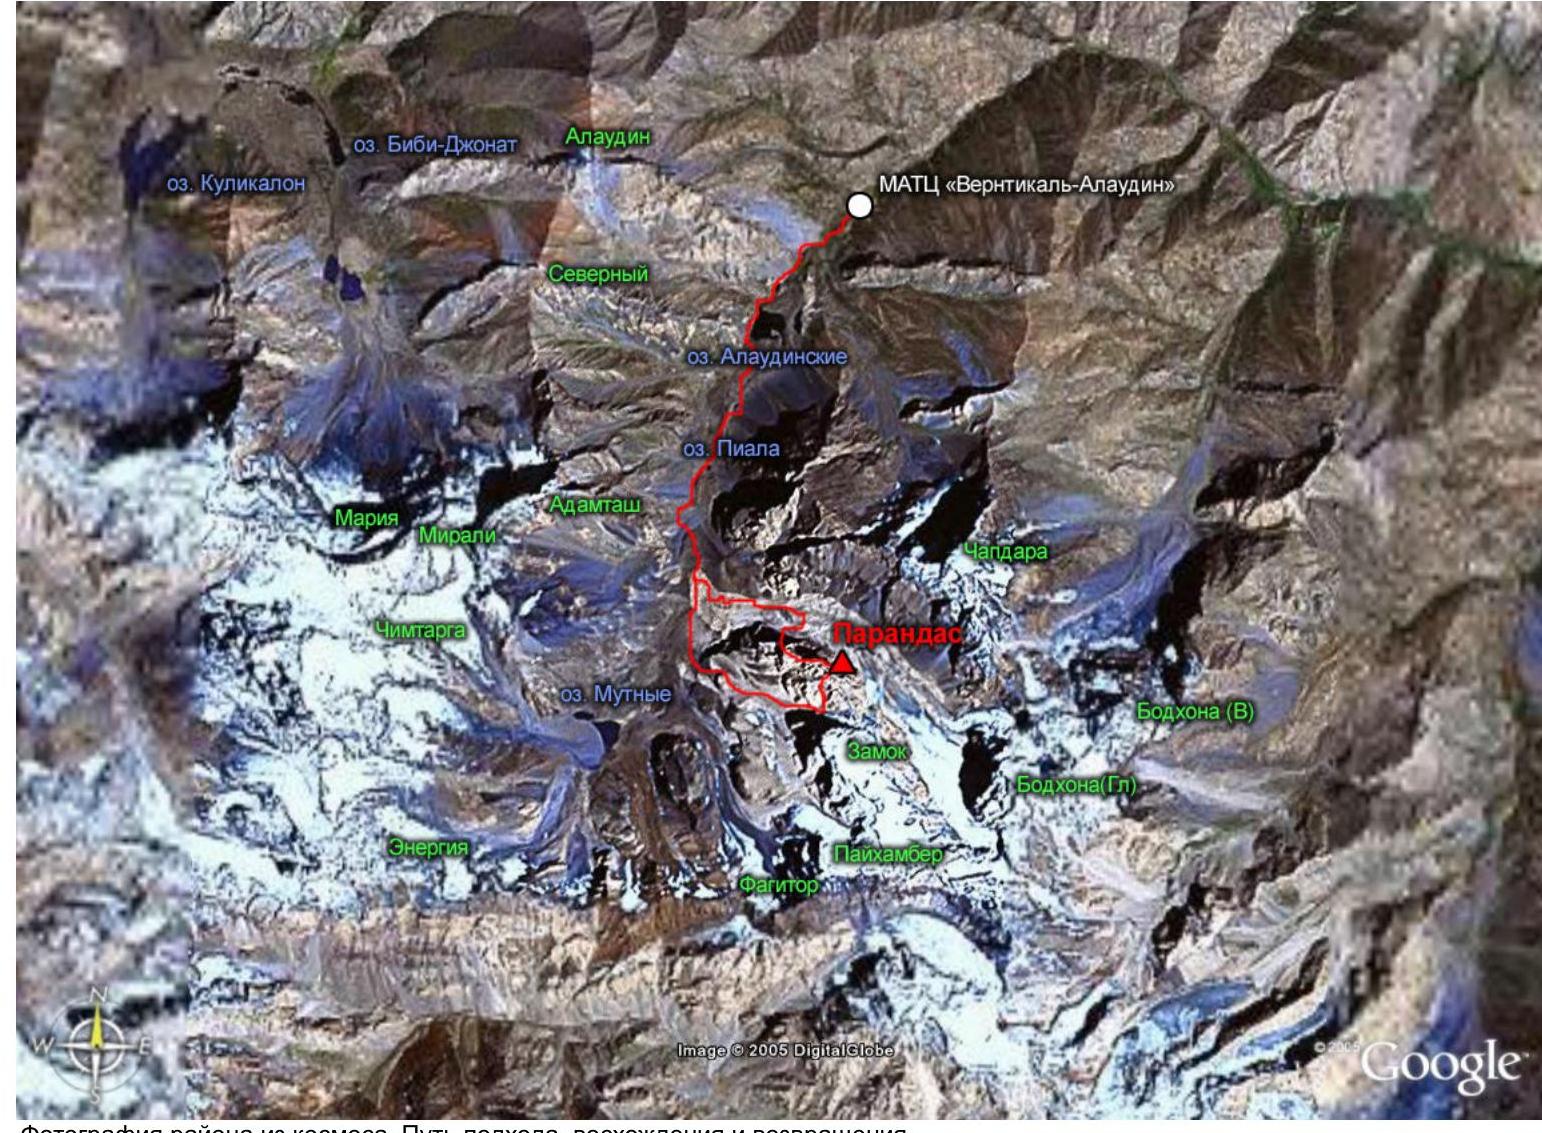
Satellite image of the area. Approach route, ascent, and descent.
UIAA Route Diagram, upper part
| R22 | 15/0 | II | 350 m | 20° | |
|---|---|---|---|---|---|
| R21 | 12/9 | VI A2 | 55 m | 60° | |
| R20 | 12/11 | VI A3 | 30 m | 70° | |
| R19 | 20/15 | VI A2 | 60 m | 75° | |
| R18 | 18/10 | V+ A2 | 55 m | 80° | |
| R17 | 15/15 | VI A3 | 40 m | 80° | |
| R16 | 15/5 | V+ A1 | 30 m | 80° | |
| R15 | 8/0 | V | 40 m | 75° | |
| R14 | 12/5 | V+ A1 | 35 m | 80° | |
| R13 | 11/5 | V+ A1 | 45 m | 80° | |
| R12 | 10/5 | VI A1 | 50 m | 80° | |
| R11 | 12/0 | V+ | 50 m | 85° | |
| R10 | 22/17 | VI+A3 | 50 m | 85° | |
| R9 | 15/10 | VI A1 | 50 m | 85° | |
| R8 | 16/9 | VI A3 | 40 m | 85° |
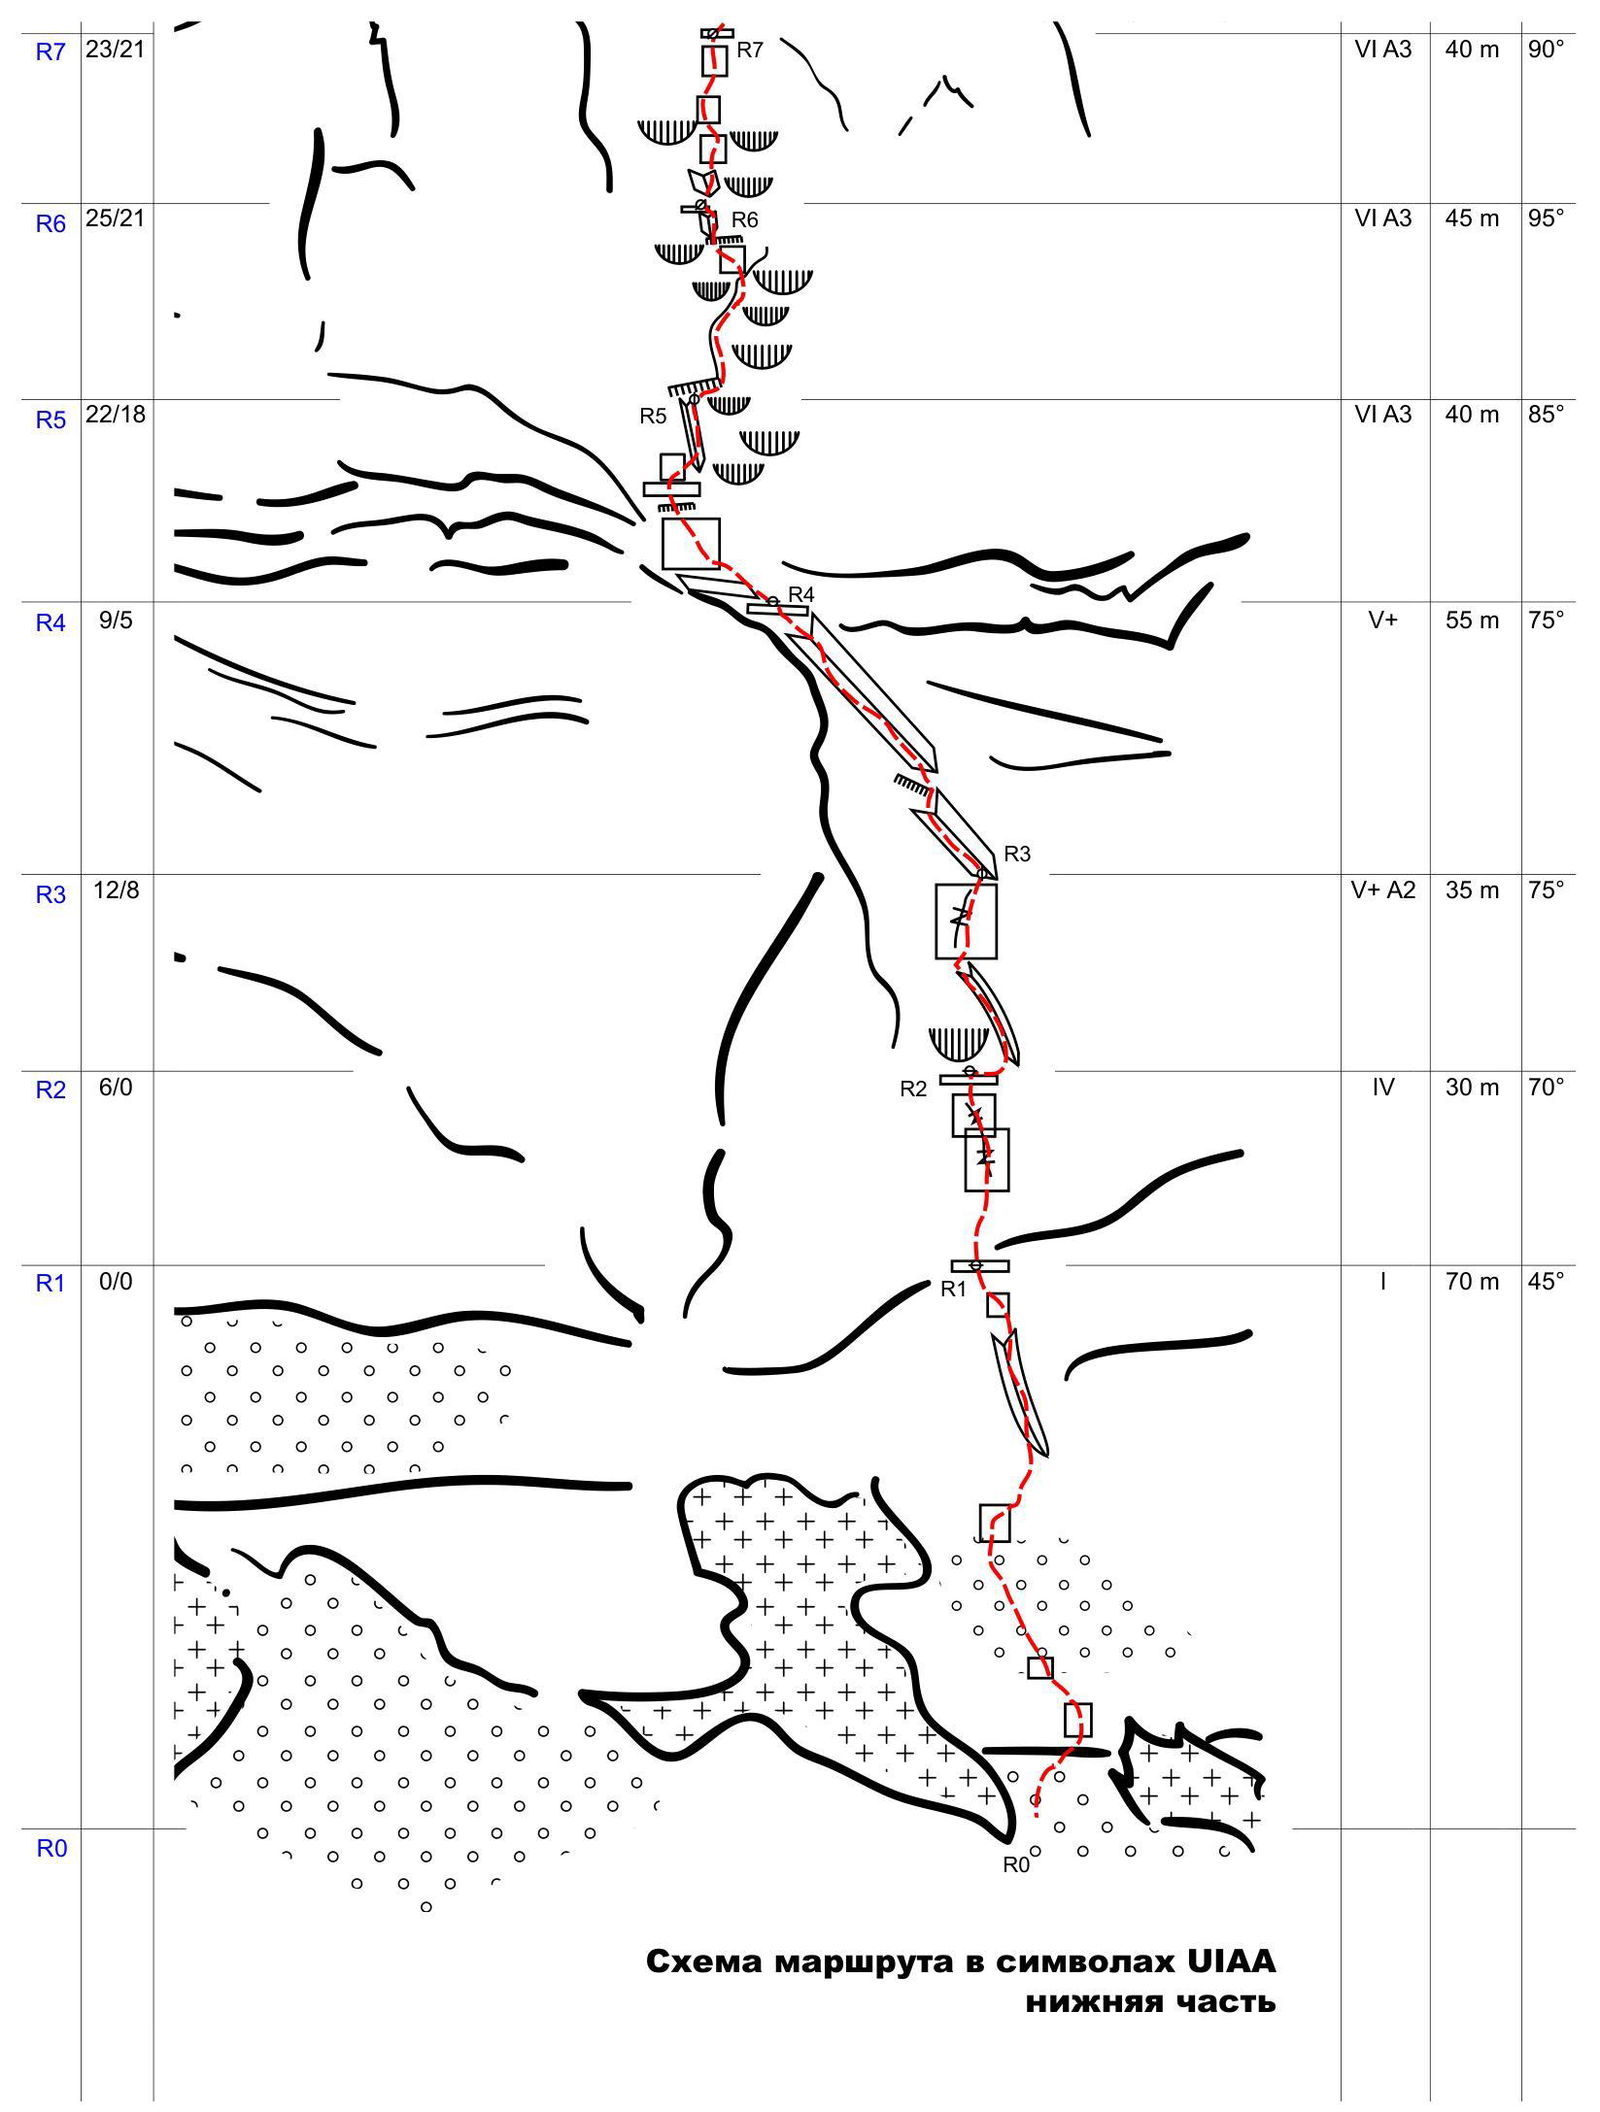
UIAA Route Diagram, lower part
| R7 | 23/21 | VI A3 | 40 m | 90° | |
|---|---|---|---|---|---|
| R6 | 25/21 | VI A3 | 45 m | 95° | |
| R5 | 22/18 | VI A3 | 40 m | 85° | |
| R4 | 9/5 | V+ | 55 m | 75° | |
| R3 | 12/8 | V+ A2 | 35 m | 75° | |
| R2 | 6/0 | IV | 30 m | 70° | |
| R1 | 0/0 | I | 70 m | 45° | |
| R0 |
R17–R16–R15–R20–R19–R18–R11–R10–R14–R13–R12–R8–R11–R10–R15–R14–R13–R12–R11–R8 R10–R8–R11–R8

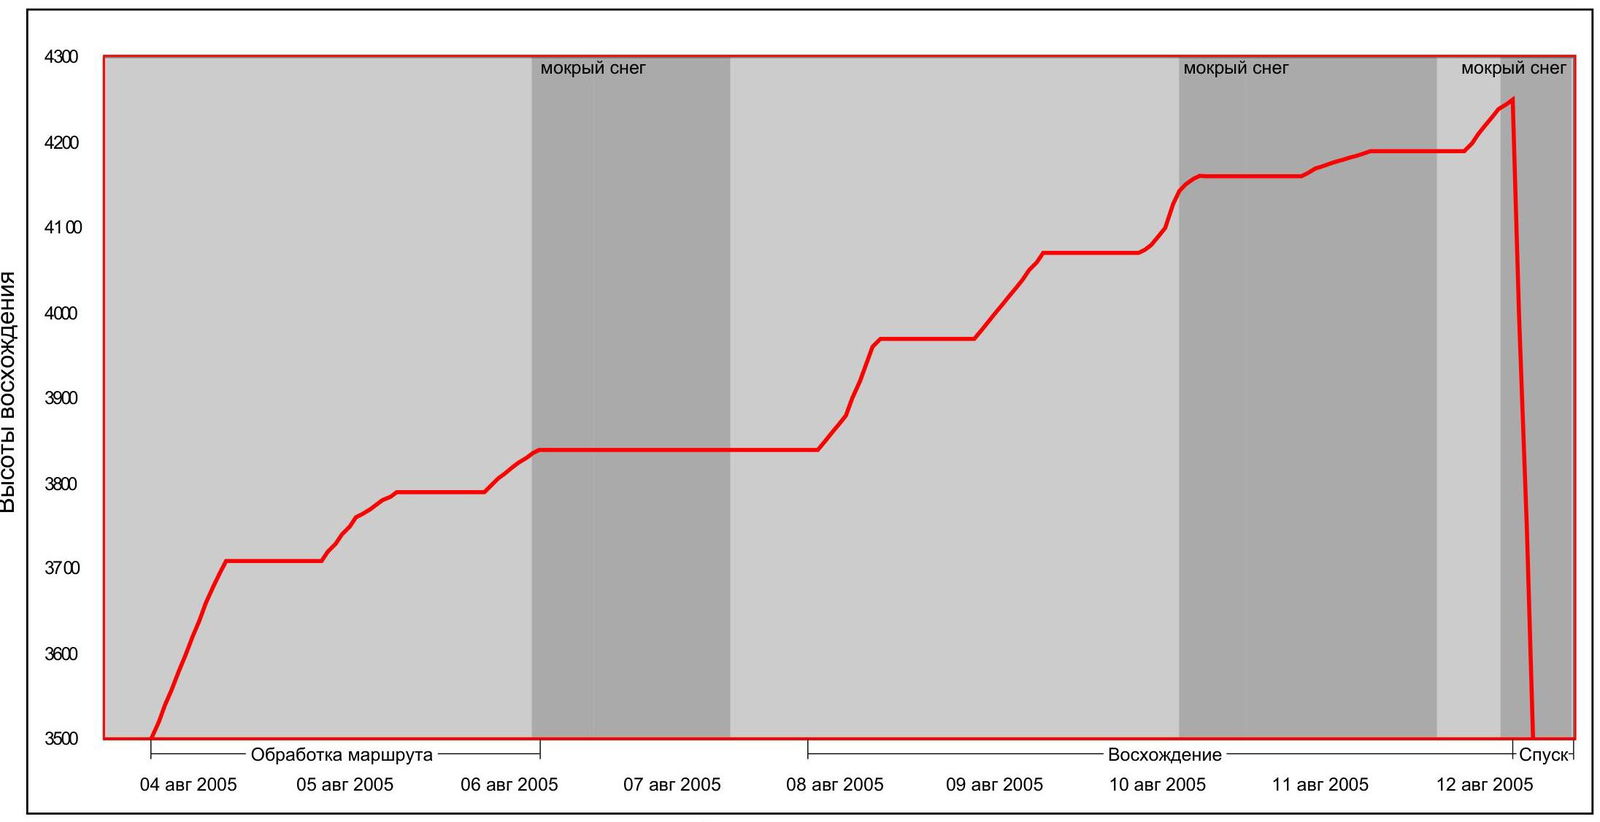
Ascent Graph
Team Movement Graph by Sections
August 4, 2005, from 7:30 to 18:00 — beginning of route processing (sections R0–R4) August 5, 2005, from 8:00 to 19:00 — processing (R4–R6) August 6, 2005, from 8:00 to 16:00 — processing (R6–R8) from 15:00 — wet snow August 7, 2005 — wet snow throughout the day (rest) August 8, 2005, from 7:30 to 9:00 — cargo lift via fixed ropes from 9:00 to 18:00 sections R8–R11 passed, overnight stay in Camp 1 August 9, 2005, from 8:30 to 18:00 — sections R11–R15 passed, overnight stay in Camp 2 (R14) August 10, 2005, from 8:00 to 18:30 — sections R15–R19 passed, overnight stay in Camp 3 from 14:00 to evening — wet snow August 11, 2005, from 8:00 to 18:00 — sections R19–R21 passed, overnight stay in Camp 3 wet snow throughout the day August 12, 2005, from 8:00 to 15:30 — section R21–R22 passed from 14:00 to evening — wet snow at 15:30 — summit reached from 16:00 — start of descent August 12, 2005, at 20:00 — return to Base Camp.
Brief Description of the Route and Team Actions
The route taken by the team is located in the right part of the north face of Parandas Peak. Due to its exposure, this face is the most monolithic and steepest in the area. Therefore, the route is objectively safe, but for the same reason, it rarely receives sunlight, making it colder compared to the adjacent west face of Bodhona Peak. The route can be conditionally divided into 4 parts:
- R1–R4 — gray-black rock belt, average steepness 75°, with occasional small ledges. The lower part of the belt is heavily damaged. Cracks are often filled with rocks (need to be cleaned), making it challenging to set up protection.
- R4–R16 — main part of the face. Steep, mostly monolithic rocks, with overhangs and ledges. Average steepness is around 85°. During the ascent, it was often necessary to switch between free climbing and artificial aids. A wide range of equipment was used, including Camalots, small anchor pitons — "toporiki" (Iron Hook), sky-hooks, a wide range of rock pitons, and chocks.
- R16–R21 — more gentle, but no less difficult upper part of the face. Mainly very monolithic rocks with poor relief. The entire arsenal of the aforementioned equipment was also necessary for this part of the route.
- R21–R22 — pre-summit ridge, gentle slabby rocks leading to the summit.
Three bivouacs were set up on the route. The first bivouac (Camp 1) — a two-person "BLACK DIAMOND" platform and two hammocks with "bivvy sacks". The second bivouac (Camp 2) — a platform and two sleeping places on a ledge (niche) in "bivvy sacks". The third bivouac (Camp 3) — a platform and two sleeping places on a ledge in "bivvy sacks". Due to severe bad weather, the team spent the fourth night huddled together in the platform.
As evident from the ascent graph, a significant part of the route was climbed in bad weather. Work in the upper part of the face was particularly challenging under such conditions.
23 pitons were hammered into the route, 14 of which ("SPIT" Ø 12 mm, L300 mm) were used to set up stations.
The style of the ascent was capsule-style, using five 60-meter ropes (2 "Mammut" ropes Ø 10 mm and 9.2 mm, 3 Kolomenskoye-made ropes Ø 10 mm). The entire male team members took turns leading.
Verbal Description of the Route by Sections.
(Not for the official report, but for subsequent climbers, so the style and terms are "folk".)
From Alauddin Lakes to the turning stone with the blue inscription "BODHONA" takes about 2 hours. From the stone to the campsite takes about 1.5 hours.
It is convenient to camp before the route on the middle of the Bodhona Glacier near a cluster of small muddy puddles. At night, the streams feeding the puddles subside, and the water becomes almost clear.
R0–R1 — I; 70 m; 45°. A section of unpleasant, heavily damaged, layered black rocks. It makes sense to secure the rope only for descent and re-ascent if doing preliminary processing.
R1–R2 — IV; 30 m; 70°. The rocks are already significantly stronger, but there is still a lot of "loose rock". A station is located at the base of an internal corner. There is a piton (Ø 8 mm).
R2–R3 — V+, A2; 35 m; 75°. Up the internal corner, then right and up under a small ledge, with piton protection. The station is in the corner under an overhang (bolted piton).
R3–R4 — V+; 55 m; 75°. First up the internal corner left — up, then up through a small ledge, into a more gentle, damaged internal corner that leads to a ledge, which is the upper edge of the black rock belt.
R4–R5 — VI, A3; 40 m; 85°. From the ledge left — up, through a small ledge onto a small shelf. From it, right and up through a bolted piton around the corner into an internal corner, which is "covered" by a large ledge "roof" in its upper part. At the start of the corner, there is a piton. Up the corner on relief sky-hooks and "toporiki" under the ledge. The station is on two bolted pitons.
R5–R6 — VI, A3; 45 m; 95°. From the station, traverse under the large ledge to the right until the end of the ledge. Exit onto a protrusion starting from the right edge of the ledge (see photo of section R5–R6). Then 15 m up the protruding section to a bolted piton (large friends). Then another 7–8 m up the protruding section until it becomes heavily damaged and turns right. From here, move left and up through the protruding section towards a small, slightly overhanging internal corner (bolted piton Ø 8 mm on the transition). Through a small ledge, up the internal corner 10 m to a small, convenient shelf (piton protection). Station. There is a bolted piton.
R6–R7 — VI, A3; 40 m; 90°. From the station — up through a vaguely defined internal corner with a deep crack 5 m to a large "shell" hole. From it, slightly right — up to the next similar hole. Between the "shells", there are two holes for a sky-hook and a bolted piton. Further up, 10–15 m until it becomes more gentle. Sky-hooks in the holes, pitons. There are 2 bolted pitons. Further, several meters of climbing to a crack (intermittent, deep crack), then up the crack on artificial aids (pitons, toporiki), exit onto an oblique ledge. Station, there is a bolted piton.
R7–R8 — VI, A3; 40 m; 85°. From the ledge up through a thin crack (pitons, toporiki) exit onto an inclined plane, along it left and up, 15 m to a station, there is a bolted piton.
R8–R9 — VI, A1; 50 m; 85°. From the left part of the ledge up a chimney. At the end of the chimney — a small shelf. From it up through a damaged wall exit onto the left edge of a narrow, long ledge. Along it, traverse right, after 3 m, a bolted piton. From the piton right along the ledge 6–7 m. Here — a station. Above, slightly to the right, 50 m away, the start of a chimney is visible, passing along the right side of a large "Crocodile" overhang.
R9–R10 — VI+, A3; 50 m; 85°. From the ledge straight up a monolithic vertical slab 2–2.5 m to a small "patch". From it right — up (hole and relief sky-hooks) onto a small overhang (internal corner). Up the corner until its end. Then, first slightly left — up (sky-hooks and small anchor pitons "toporiki") to a bolted piton, then right and up onto a ledge. Station on the ledge before the chimney at the base of the "Crocodile".
R10–R11 — V+; 50 m; 85°. Up the chimney, in the upper part along its left wall. At the end of the chimney, a wall with a 5 m crack. Through it left onto a convenient ledge on top of the "Crocodile". A good place for an overnight stay.
R11–R12 — VI, A1; 50 m; 80°. From the station on top of the "Crocodile", traverse left — slightly up along a crack under a ledge (loose rock). After the end of the ledge, the crack becomes significantly easier. Station on a sloping ledge under an overhang.
R12–R13 — V+, A1; 45 m; 80°. From the station left — up along an oblique crack into an internal corner/overhang (5–7 m). Up the corner until its end 20 m. From here, traverse 15 m left along slabs and ledges to the base of a vertical internal corner. Here, a hanging station, there is a bolted piton. To the left, behind the corner, Arkhipov's route passes.
R13–R14 — V+, A1; 35 m; 80°. Up the corner 15–17 m to a ledge. Under the ledge, exit from the corner left onto a small counterfort. From here up to a convenient niche — "balcony". Here, a station and a control cairn of Arkhipov's route. A good place for an overnight stay.
R14–R15 — V; 40 m; 75°. The next one and a half ropes coincide with Arkhipov's route. From the "balcony" left — up along an oblique overhang (internal corner) 20 m to a ledge. From the ledge up a wide, slightly overhanging crack 8 m to a gentle, wet slab (there is an old bolted piton Ø 8 mm). Along the slab left — up under a strongly overhanging "belly" 10 m. Station under the overhang.
R15–R16 — V+, A1; 30 m; 80°. From the station straight up along a crack, through an overhanging "belly" into a wide internal corner. Up the corner, a station under a small ledge (Arkhipov's route bypasses the ledge on the left).
R16–R17 — VI, A3; 40 m; 80°. From the station, move right, around the corner, then move right and up along a slab, with a focus on bolted pitons (2 pcs) and artificial aids on pitons, holes, and relief sky-hooks. In the upper part, climb to a small ledge. Station. There is a bolted piton.
R17–R18 — V+, A2; 55 m; 80°. From the station, traverse along a fold in the relief to the right, to a ledge protected by an overhang, a good place for an overnight stay, there is snow (see photo of Camp 3). From the left part of the ledge up along an oblique, damaged crack. Then the rocks become monolithic. Up through internal corners, a station on a convenient ledge.
R18–R19 — VI, A2; 60 m; 75°. From the station right and up, move towards an internal corner formed by an overhang with a "club" and the main wall. Up the corner (large friends) exit onto a ledge. Station.
R19–R20 — VI, A3; 30 m; 70°. From the ledge up through a thin, deep crack (pitons, toporiki, small stoppers) exit onto a small ledge. Here, it is convenient to set up a station.
R20–R21 — VI, A2; 55 m; 60°. Further up the crack, in the lower part, there is a lot of "loose rock", on the left on a monolith, there is a hole for a sky-hook, then up the crack (pitons, chocks, toporiki, there is a bolted piton) exit onto a ridge. Station on a bolted piton.
R21–R22 — II; 350 m; 20°. Then left — up along the ridge 350 m to the summit (see photo of section R21–R22).
Descent
From the summit, return to a wide depression in the ridge. From here, down, on foot along a wide, gentle scree slope directed south (opposite side to the Bodhona Glacier). About 300 m, almost to the end of the slope. At the end of the slope, turn left (in the direction of Zamok Peak) into a couloir. Along the "goat tracks" 50 m to the first rappel point. This couloir "flows" into a large couloir separating the Zamok and Parandas massifs in its lower part. Rappel — 25 m. Further, again on foot 50 m along the left (by direction) side of the couloir, then along ledges left towards the large couloir about 200 m. At the end of the ledges, a rappel point. Descent 30 m into the large couloir. Further down the large couloir, first "walking" along ledges, then along coarse scree, exit the couloir onto large scree fields. Along the fields straight down towards the trail leading to the Mутные Lakes (Muddy Lakes). The fields end in rock scarps, so in the lower part of the fields, it's necessary to veer left to bypass the scarps.
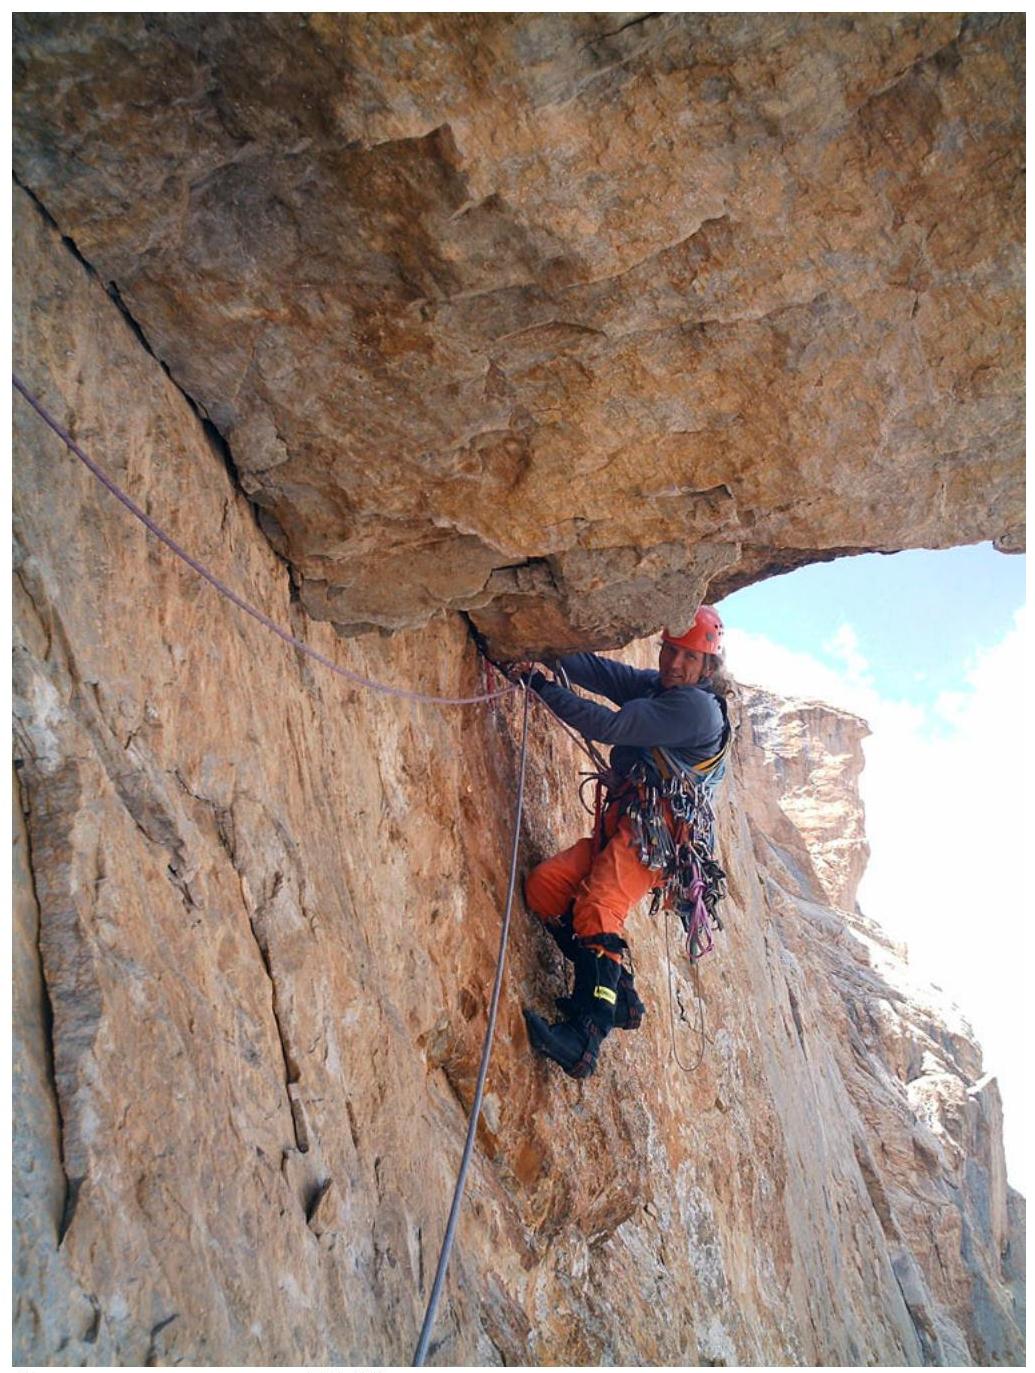
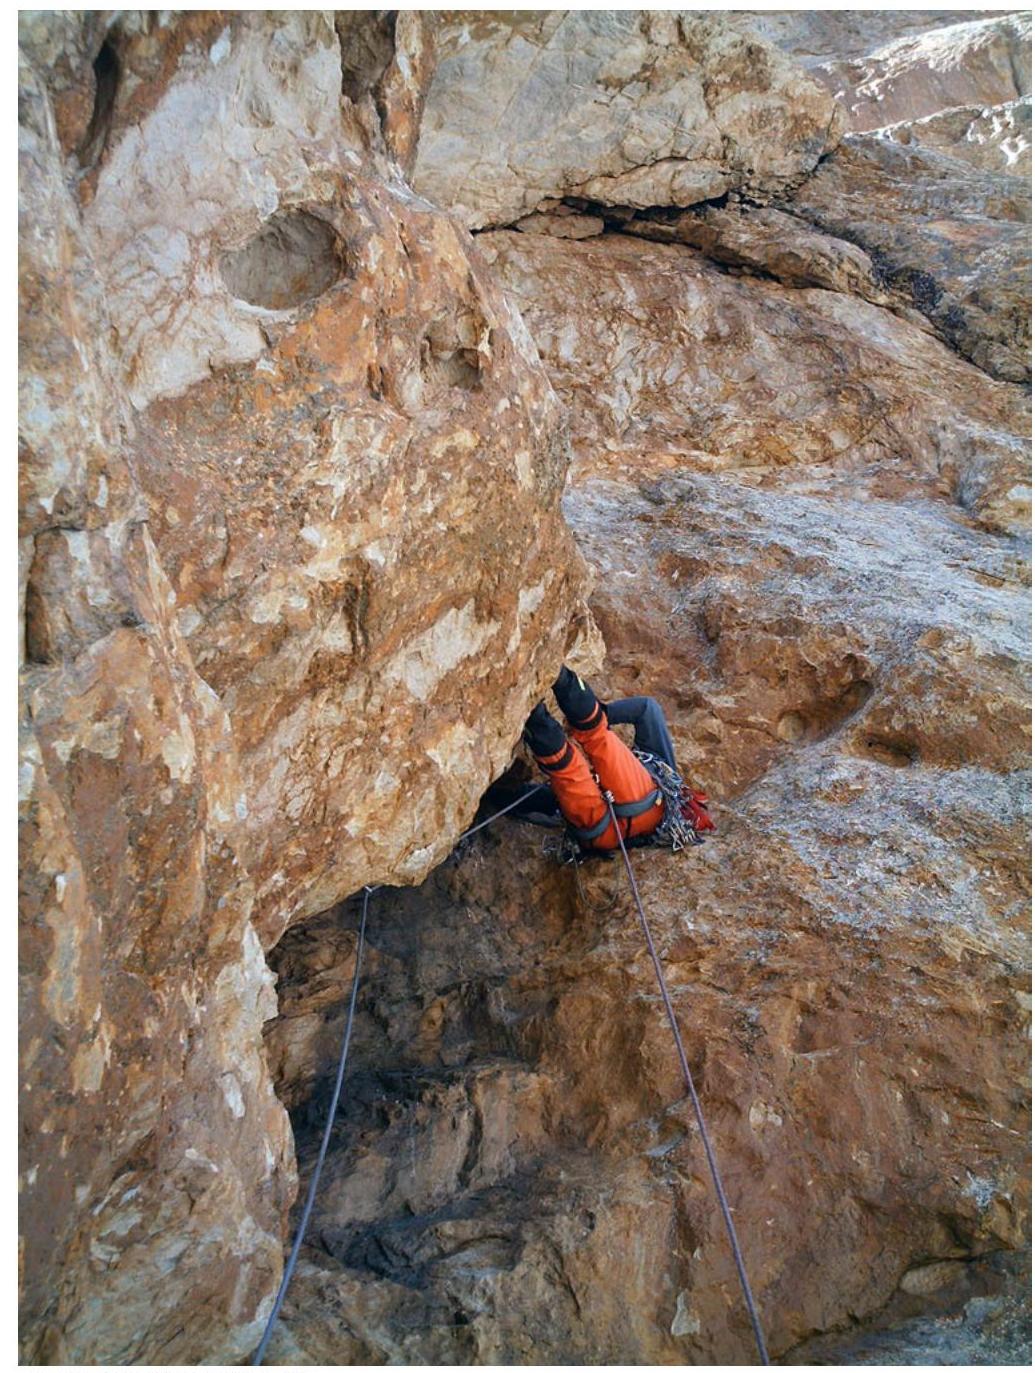
Passage of section R5–R6.
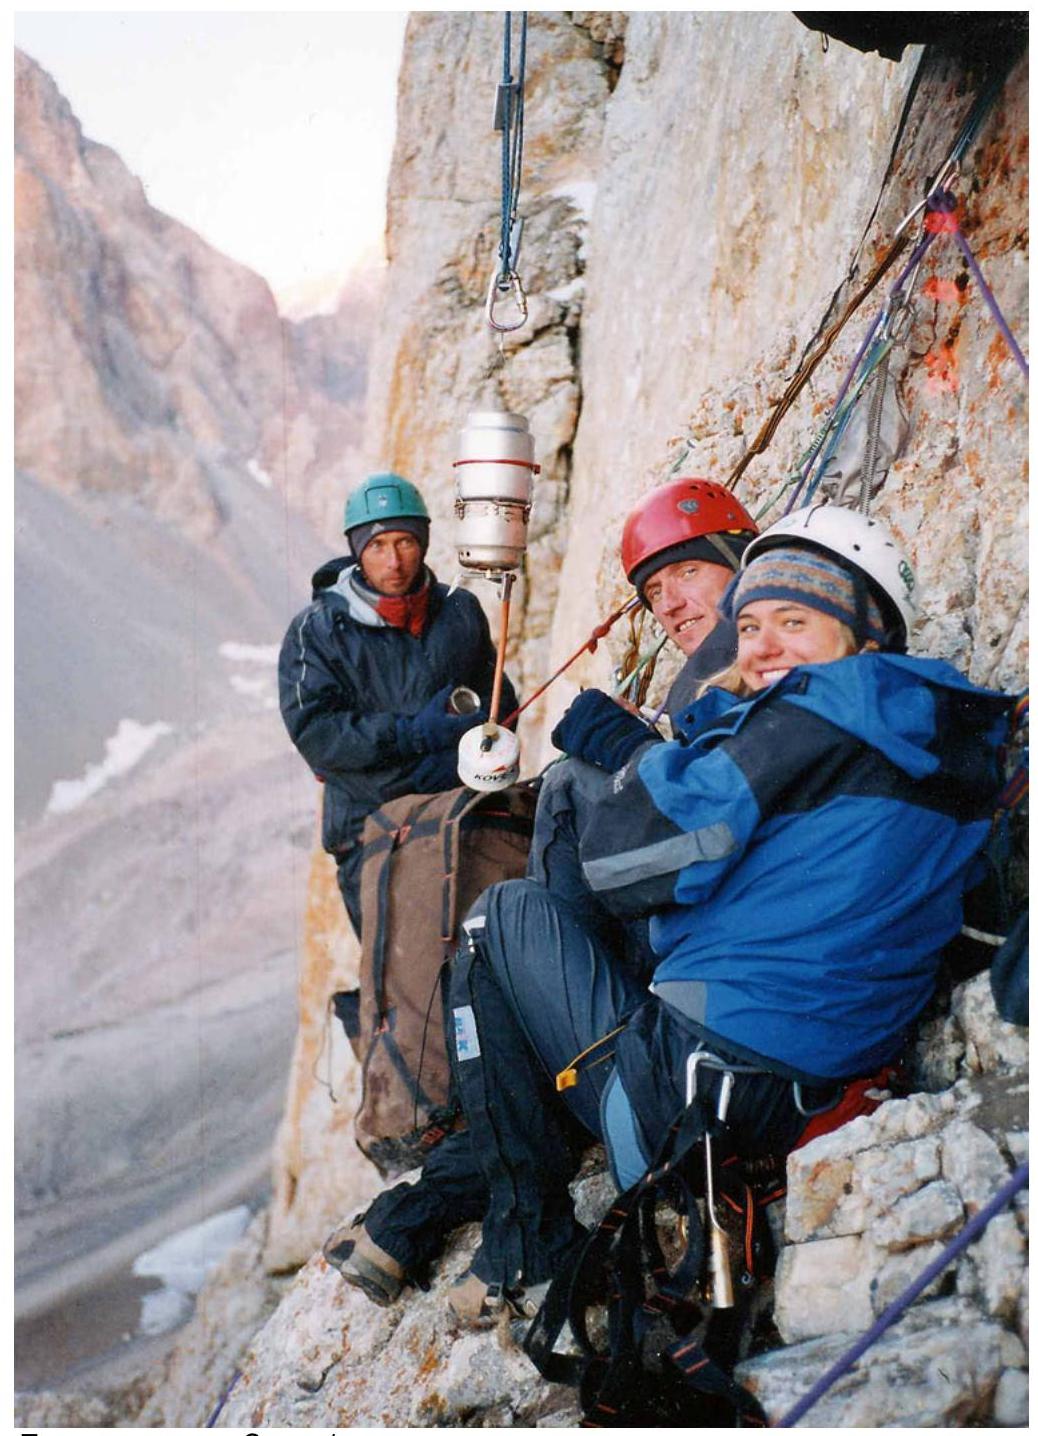
First overnight stay. Camp 1.
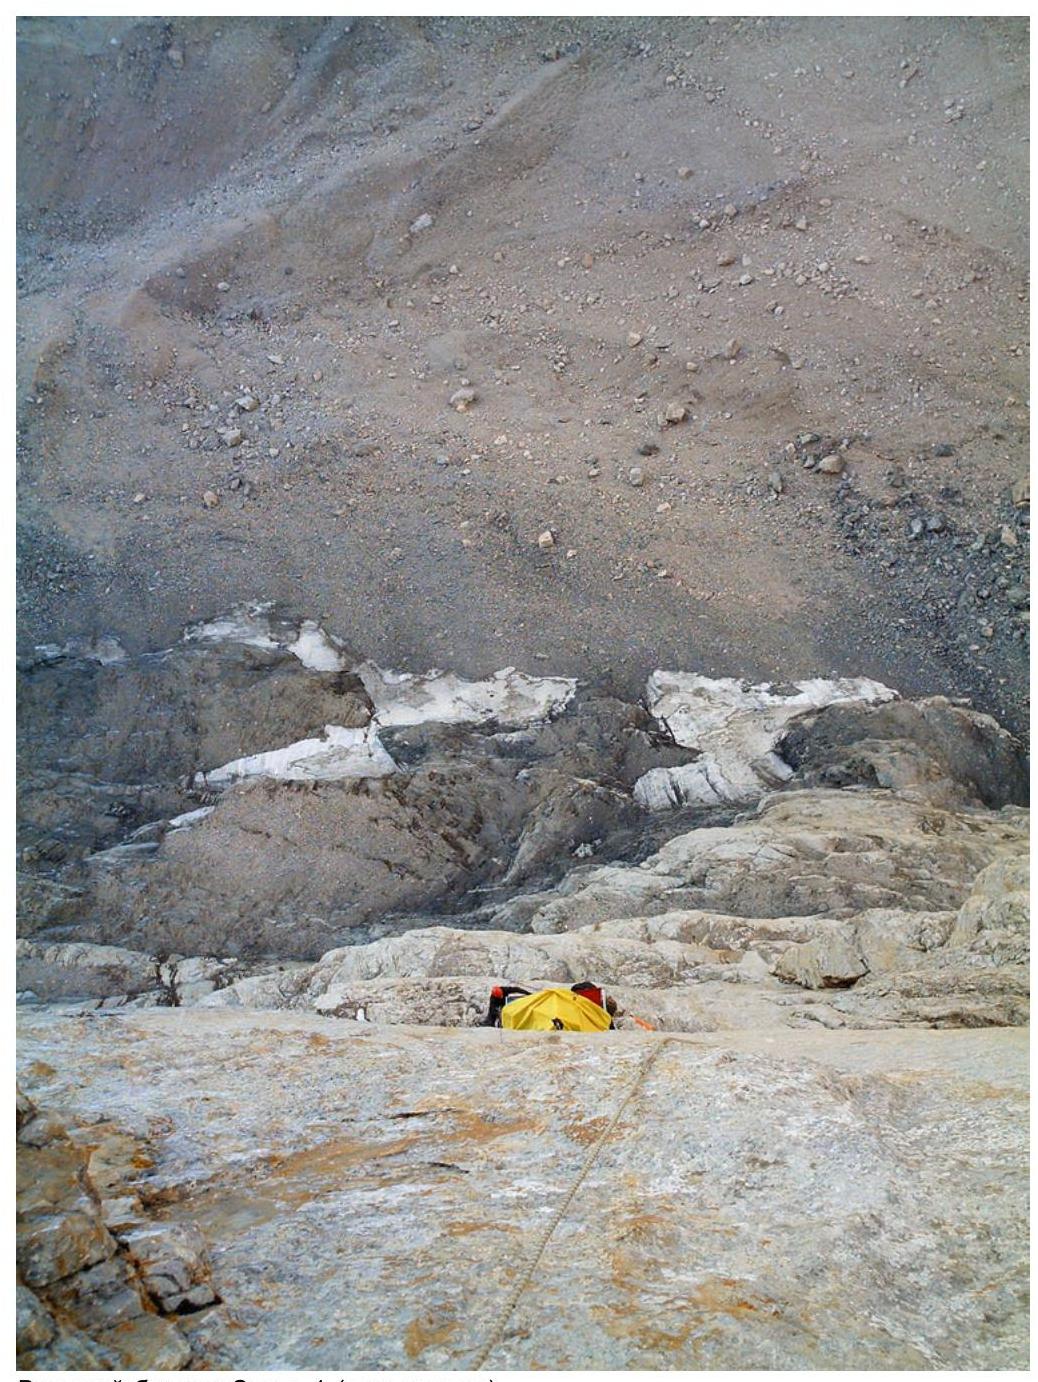
Hanging bivouac Camp 1 (view from above).
Passage of R11–R12.
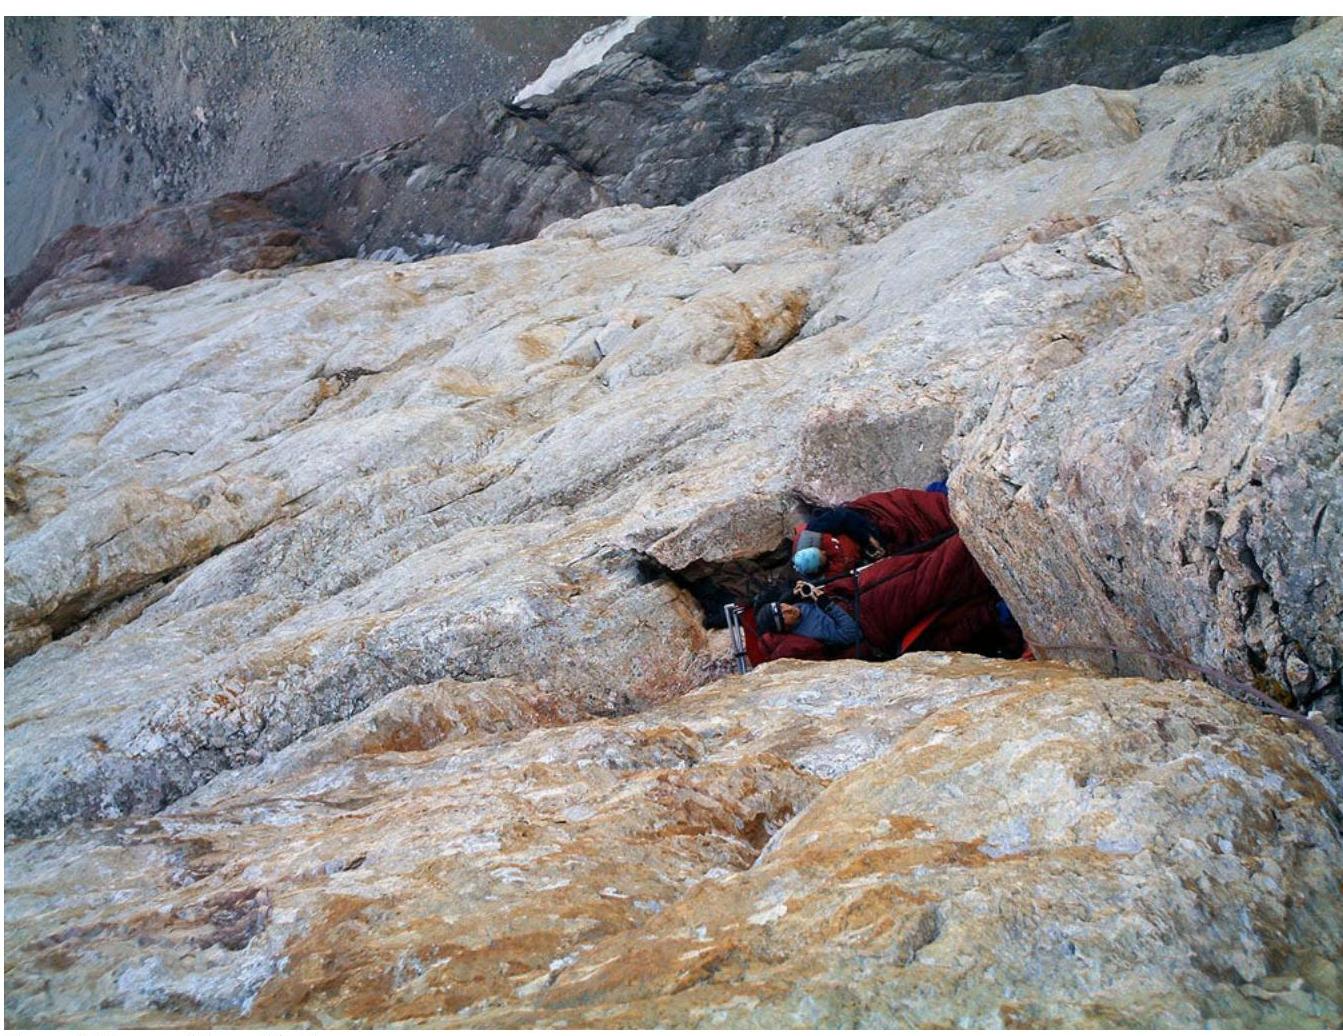
Second bivouac (Camp 2). View from above.
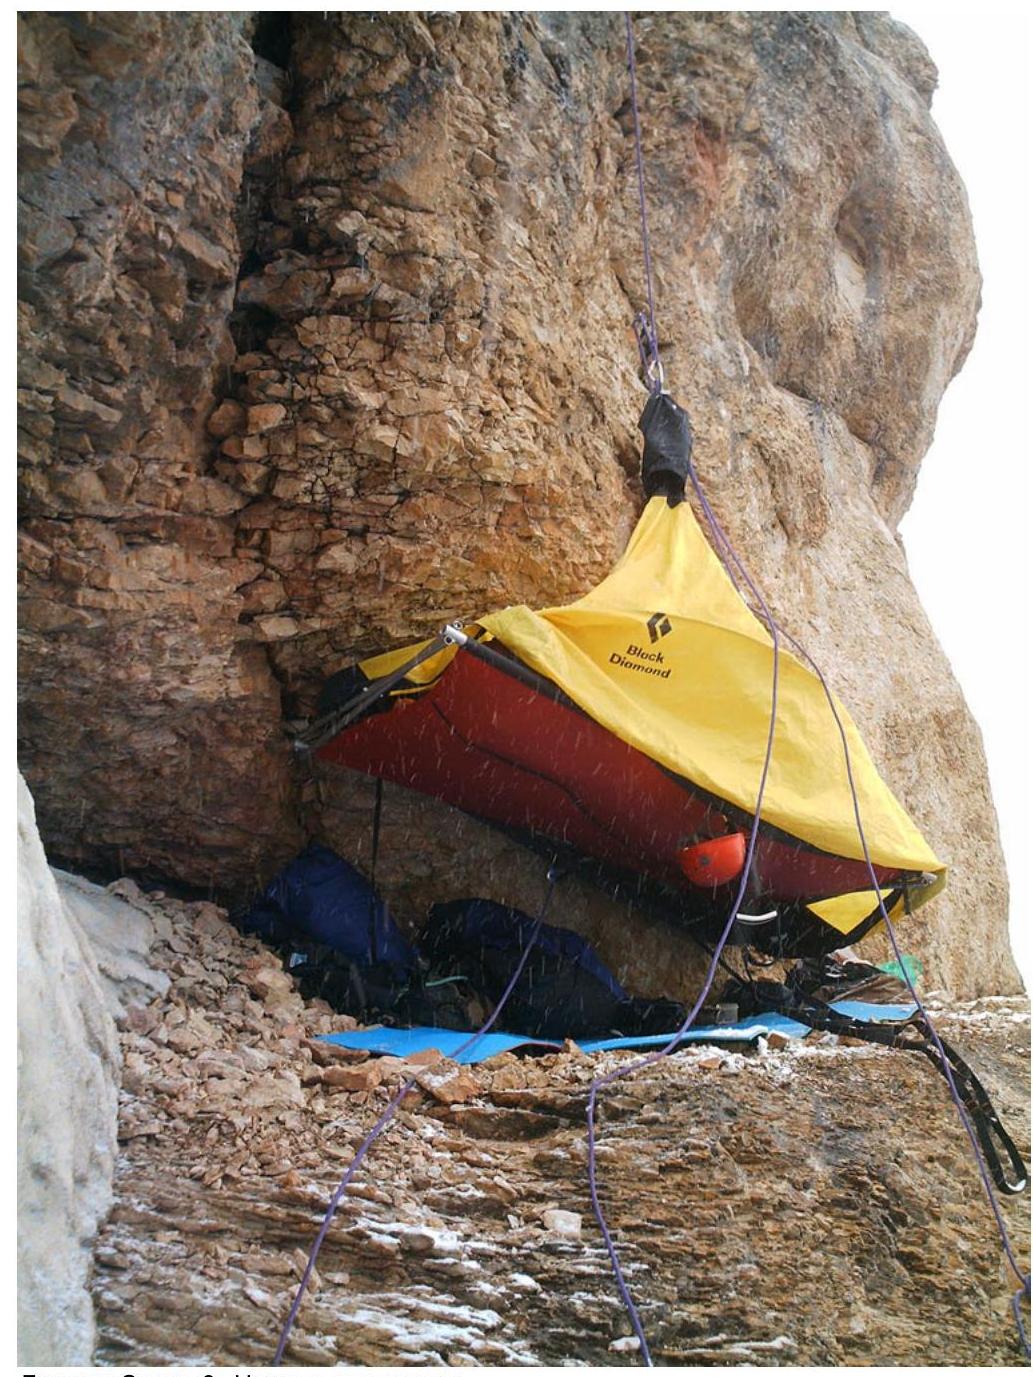
Bivouac Camp 3. Beginning of bad weather.

Ropes on section R17–R18. Morning after bad weather.
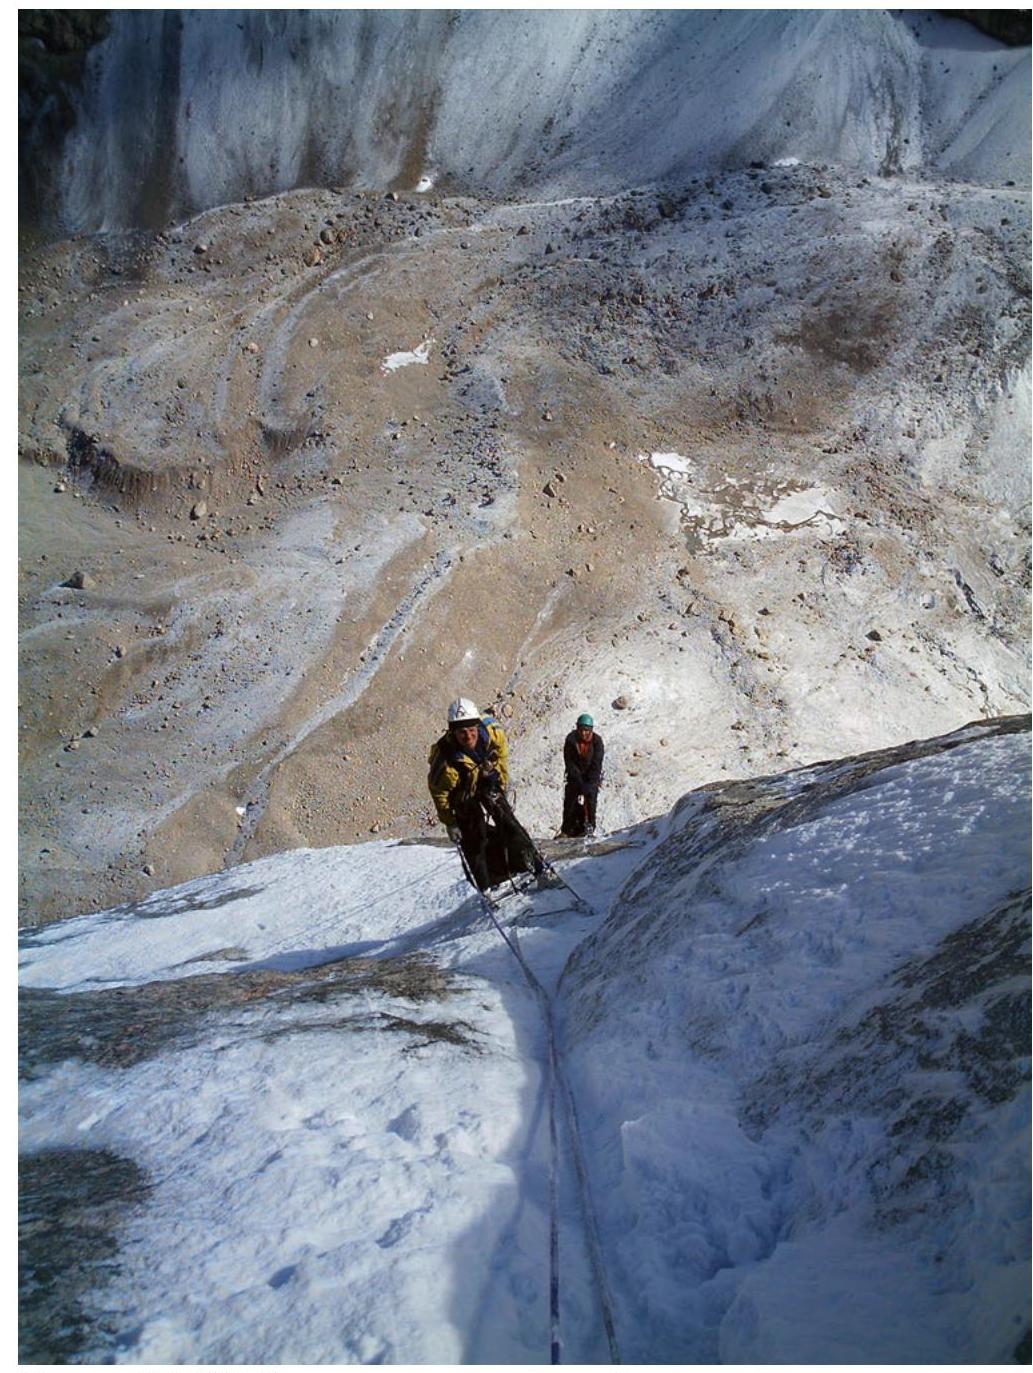
Section R20–R21. End of the wall — exit onto the ridge.
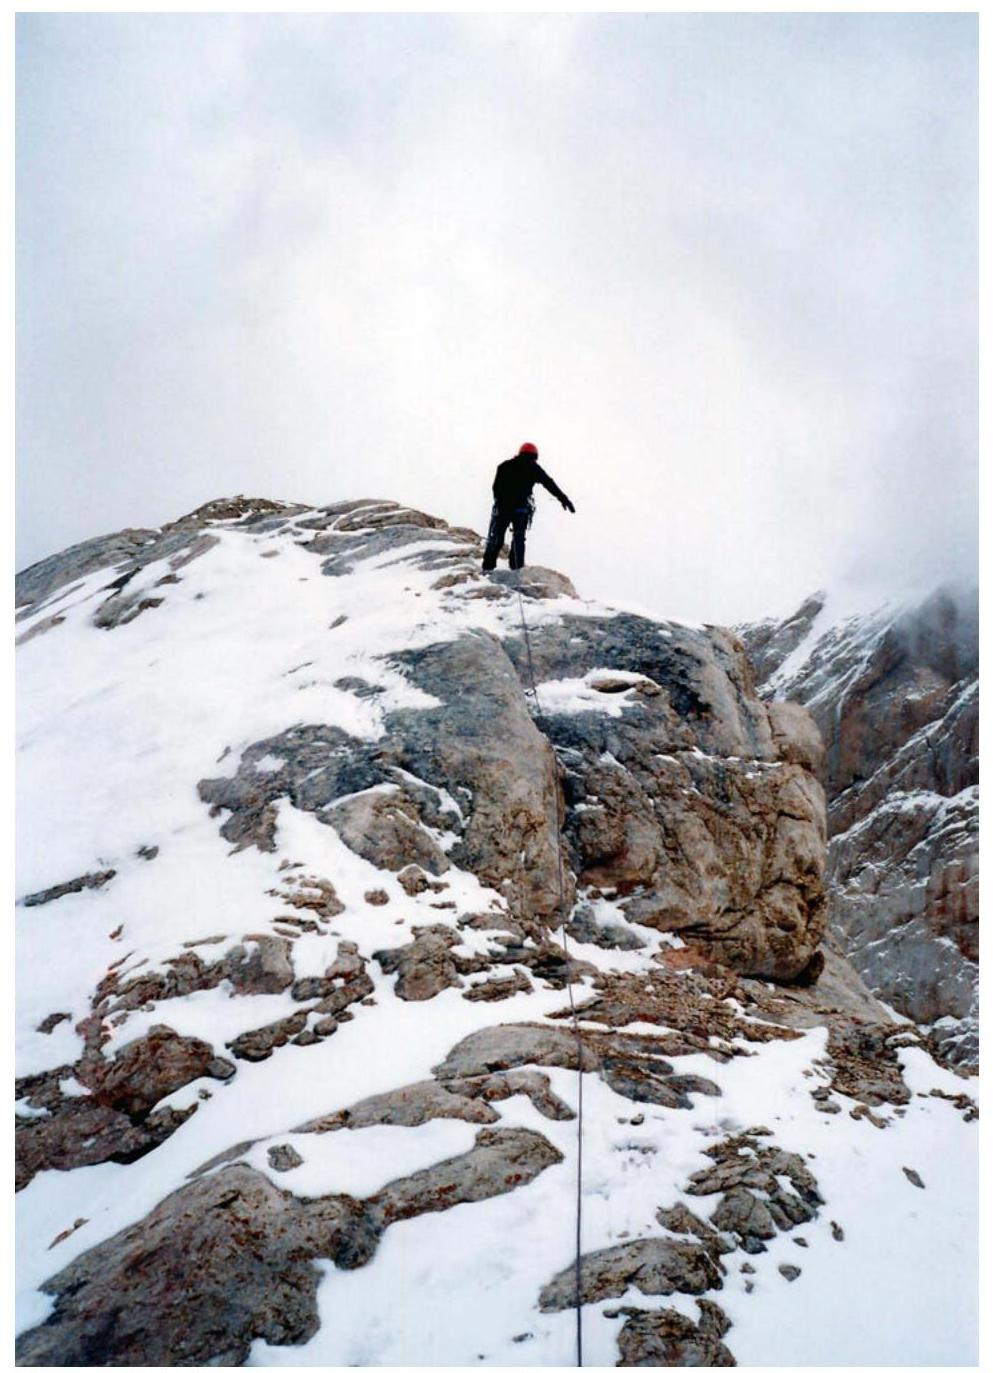
Section R21–R22. Pre-summit ridge.

Note retrieved on August 9, 2005, at 17:00 from the control cairn on Arkhipov's route (Camp 2).
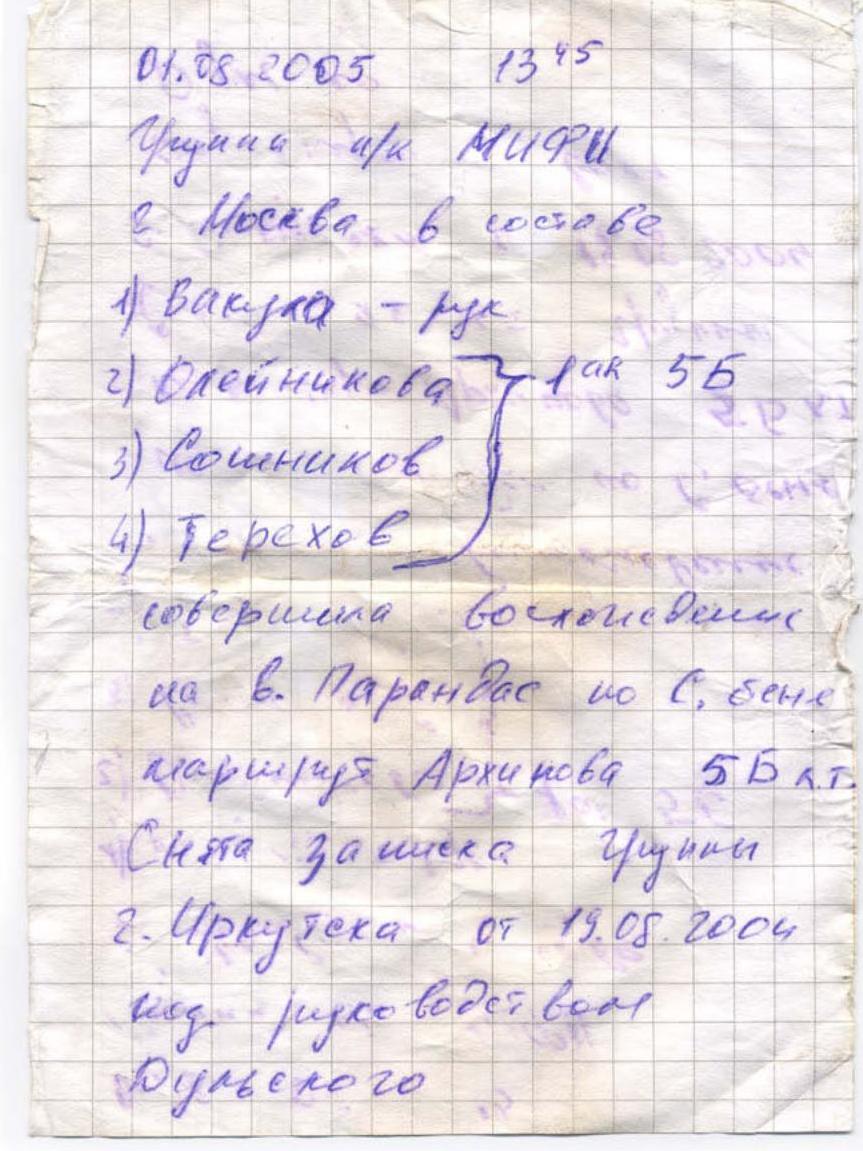
Note retrieved on August 12, 2005, at 15:30 from the cairn on the summit of Parandas.