Climbing Report on v. Dvuzubka (4430 m)
via the "Pillar" and the western wall
Team:
- Yu. A. Logachev CMS
- O. I. Shumilov CMS
- V. N. Bocharov MS
- A. A. Potekhin CMS
- G. G. Andreev CMS
- Yu. S. Emelyanenko CMS
- V. P. Veiko CMS
The route was completed from the "Dugoba" alpine camp, July 30 – August 4, 1969.
Table of Contents:
- General description and route assessment . . . . . . . . . . . . . . . . . . . . . . . . . . . . . . . I
- Slope steepness graph by sections . . . . . . . . . . . . . . . . . . . . . . . . . . . . . . . . . . . . 6
- Map of the area . . . . . . . . . . . . . . . . . . . . . . . . . . . . . . . . . . . . . . . . . . . . . . . . . II
- Detailed route description by sections . . . . . . . . . . . . . . . . . . . . . . . . . . . . . . . 12
- Photographs of specific route sections . . . . . . . . . . . . . . . . . . . . . . . . . . . . . . . 20
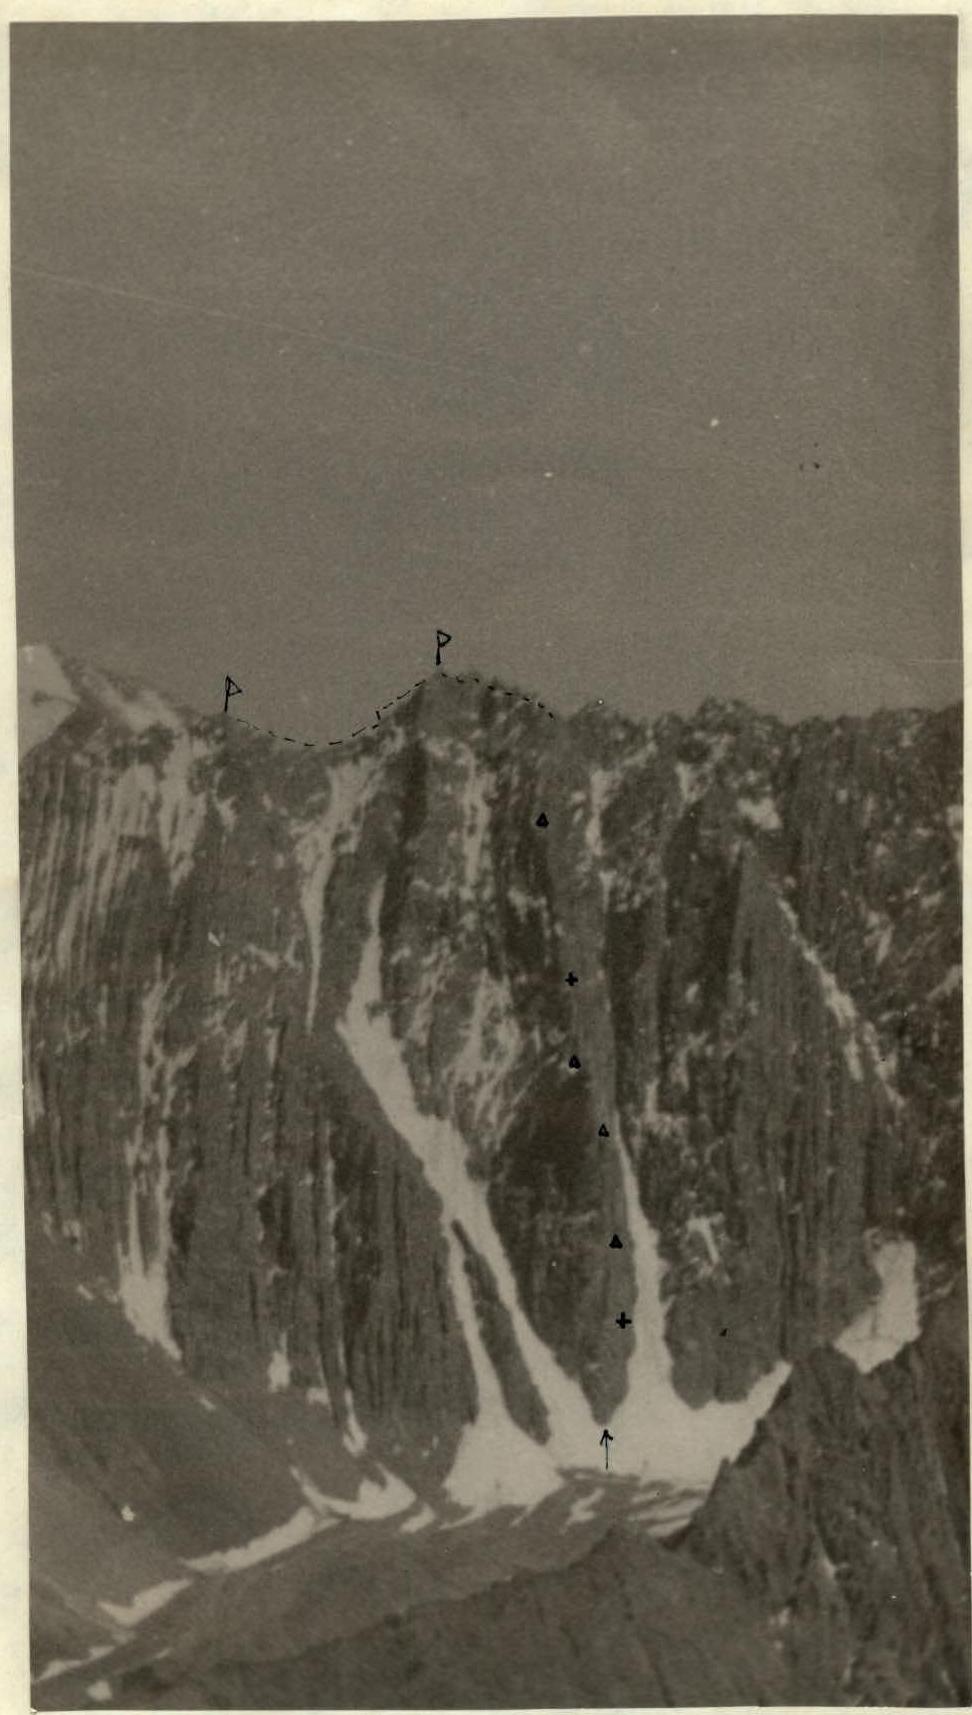
Fig.1. General view of the western wall of v. Dvuzubka. Taken from v. Kalkush.

Fig.2. Lower part of the western wall — the "pillar". Taken from the Urtalik glacier from the camp under the wall.
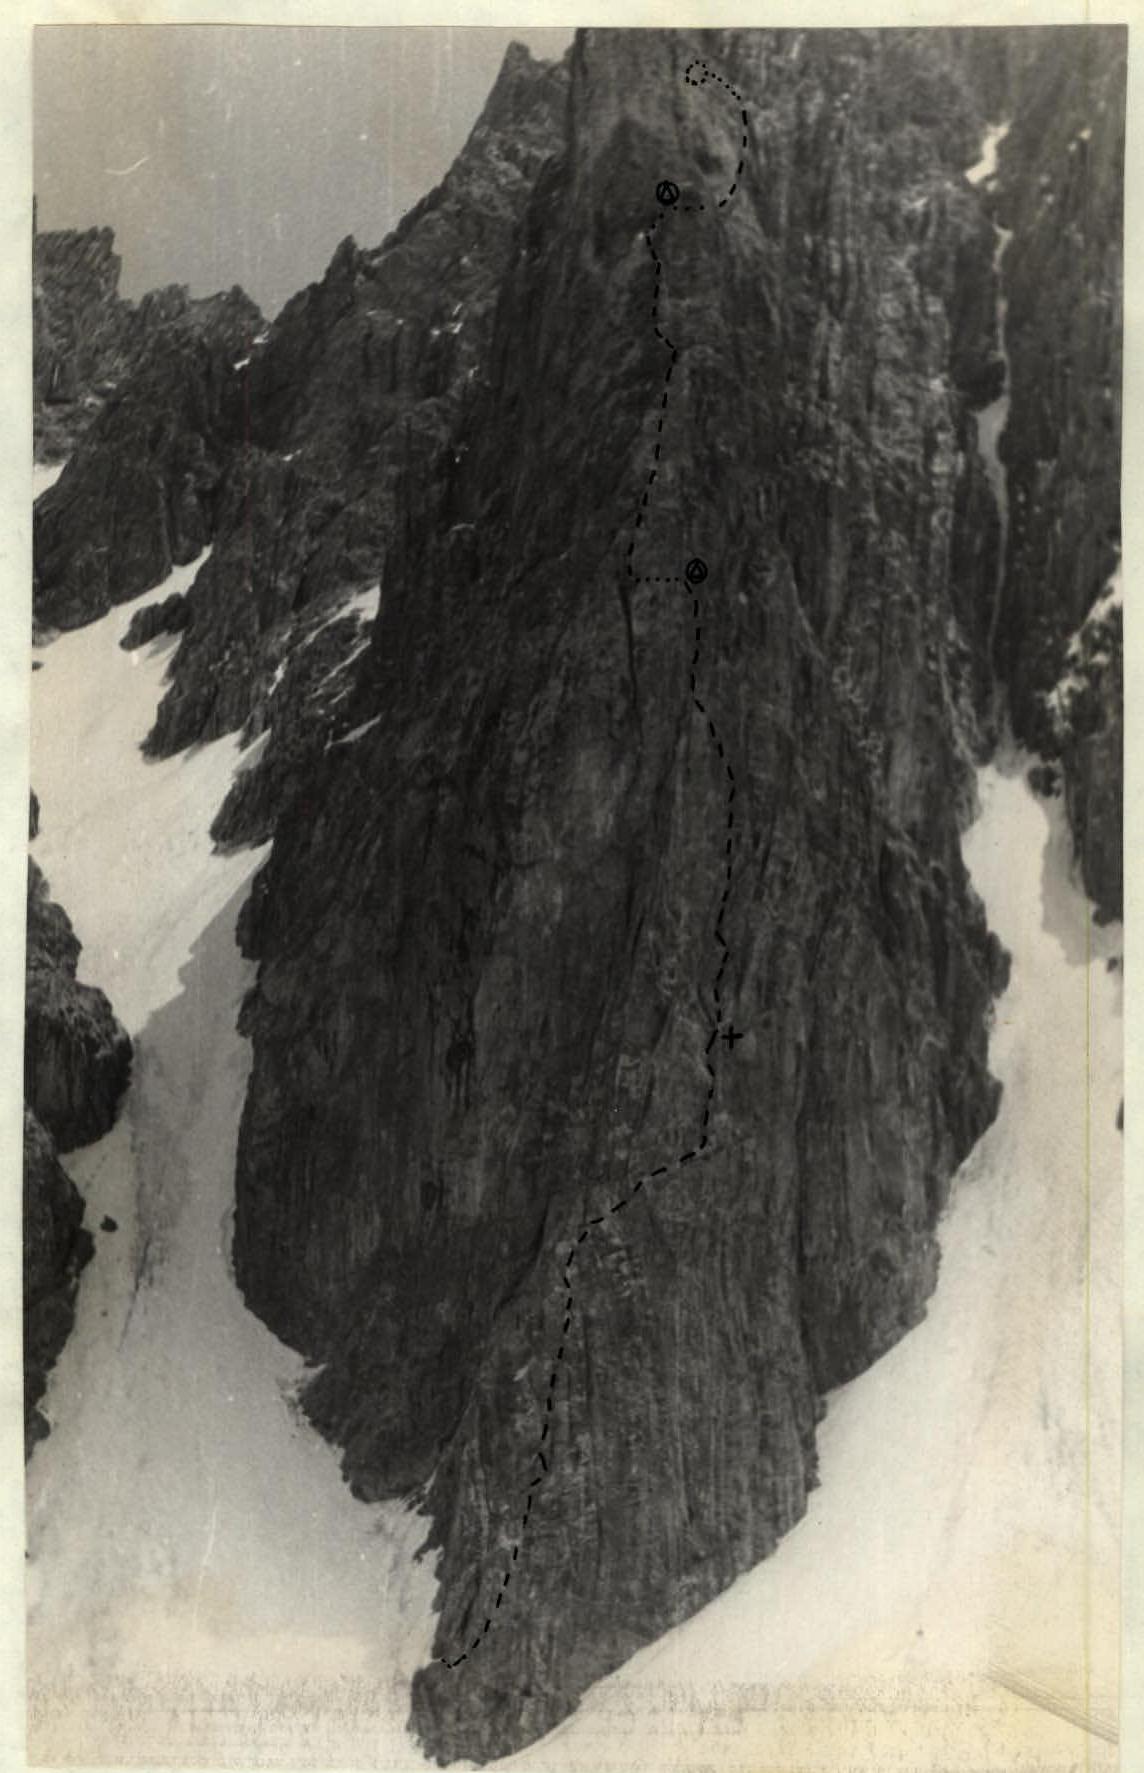
Fig.3. The "pillar" wall, photograph taken directly from under the route. (4) — overnight stops, + — the point up to which the wall was processed on July 30.
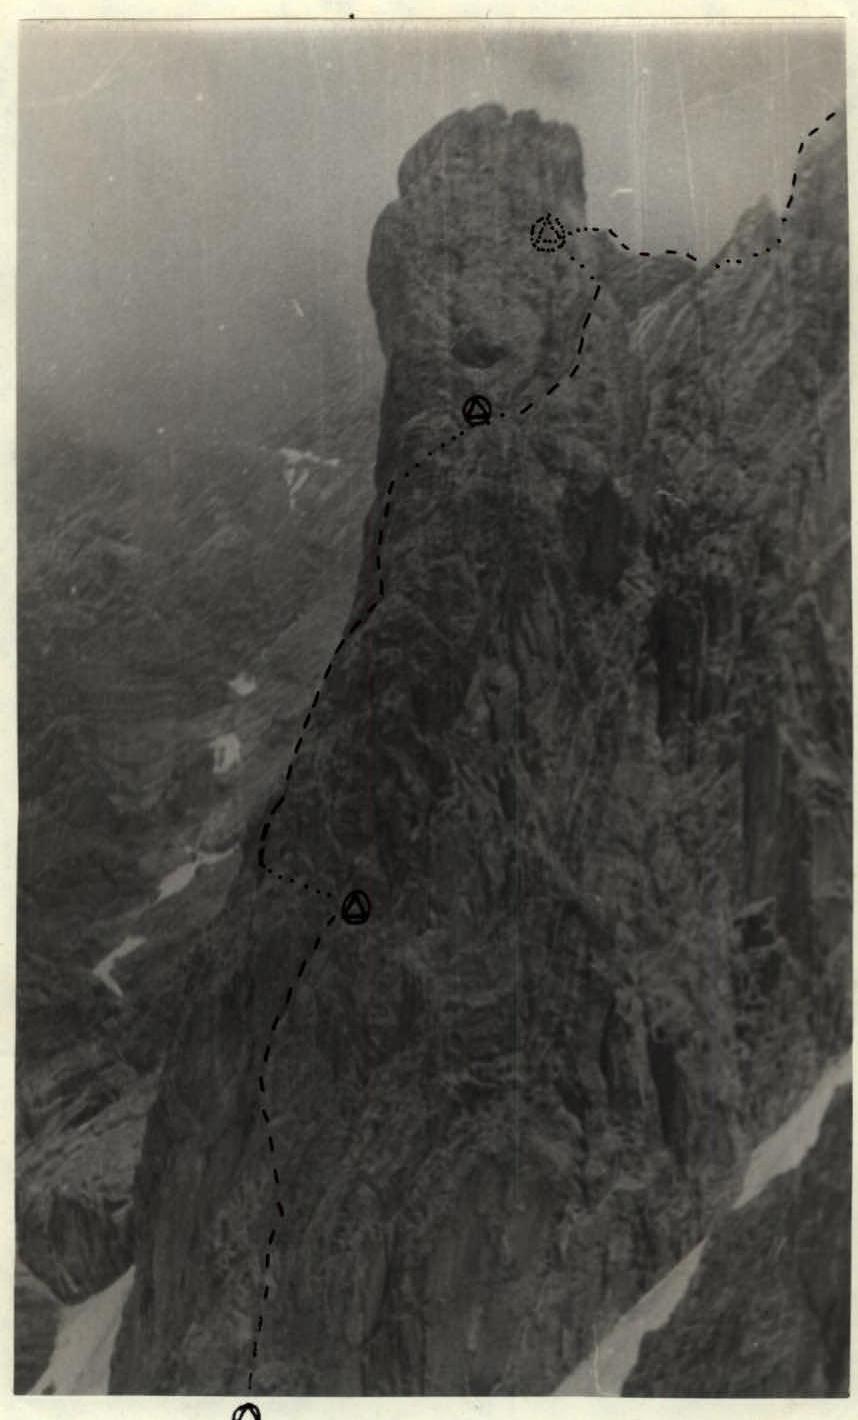
Fig.4. Upper part of the "pillar" from the SA GU wall (from the 5B route on the northwest wall).
The peak Dvuzubka is located in the Pamir-Alay range, in the area of the "Dugoba" alpine camp. The peak is situated on a ridge branching off to the north from one of the highest peaks in the area — SA GU (4670 m); this ridge separates the Ak-Tash and Ulitor valleys. The height of v. Dvuzubka is 4430 m. The western walls of the SA GU — Dvuzubka ridge are of great interest from an alpinist's point of view — the steepness of the walls varies from 60° on SA GU to 80° on Dvuzubka. On SA GU, a 5B category route has been completed from the west.
Under the right "tooth" of Dvuzubka lies a giant outlier — the "pillar" — over 500 m high with an average steepness of 80°. The lower part of the pillar is replete with overhanging sections, not to mention the sheer ones; in the middle part, the steepness is around 80°, and in the upper part, sheer sections alternate with extremely complex bypasses along areas that can only conditionally be called ledges.
Unlike the entire western wall, the rock of the pillar is strong — it stands out against the wall with its red color. The pillar is connected to the wall by a narrow ridge about 40 m long. Above the pillar, the western wall is more destroyed; the height of the upper part of the wall is about 600 m, with an average steepness of 60°. The steepest part is the lower one — at least 70°; the upper part is a series of ascents leading to the ridge 100 m from the summit tower. A detailed description is given below.
The first attempt to ascend the pillar and the western wall was made by a team from the "Spartak" Sports Society of Tashkent in 1969. However, after ascending about 100 m, the group abandoned the continuation of the ascent.
It should be noted that the lower part of the pillar requires a large amount of specialized equipment:
- wooden wedges,
- drill-in anchors, etc.
Preparation for the ascent began in 1968 with reconnaissance trips under the route and continued throughout July — observing the route. It was established that the route is not very prone to rockfall, except for the destroyed 250 m wall in the middle of the upper part of the western wall (see graph and description). There are no places for overnight stays, except for the saddle after the pillar.
The ascent was made from July 30 to August 4, 1969, by a group led by Yu. A. Logachev CMS.
The team consisted of: Bocharov V. N. MS, Shumilov O. I. CMS, Potekhin A. A. CMS, Andreev G. G. CMS, Emelyanenko Yu. S. CMS, Veiko V. P. CMS.
Upon approaching the route, the group had the following specialized equipment:
Universal titanium pitons — 20 pcs., vertical 5 mm — 10 pcs., channel pitons — 10 pcs., petal pitons — 10 pcs., drill-in anchors — 15 pcs., removable anchors — 6 pcs., drill bits — 2 custom-made, 1 standard. Wooden wedges 10–40 mm — 10 pcs. 3-step ladders — 3 pcs. Climbing jammers — 7 pcs. Block for pulling up backpacks — 1 pc. "Vibram" boots — 7 pairs. The rest of the equipment was standard.
Using relatively little time to approach the route from the alpine camp, on July 30, the beginning of the wall was processed — 150 m. Climbing is complex, sometimes extremely complex; although the rock is not destroyed, there are far from everywhere cracks for pitons. Often, pitons have to be doubled, as besides crevices filled with loose rock, there are not many suitable places for piton placement. At the same time, the wall is monolithic — that is, the combination of the wall relief with places for piton placement is extremely unfavorable. Working hours on July 30 — 6 hours (on the wall).
On July 31, ascent via the previously fixed ropes with jammers and pulling up backpacks on the most complex section (see description). For the entire day (13 working hours), it was only possible to advance 140 m. This is due to both extremely complex climbing (using drill-in anchors) and the difficulties of pulling up backpacks — pulling was done not along the route's path but along sheer walls with preliminary release of backpacks on a pendulum.
Overnight stay on a sloping scree ledge, sitting, no water or snow — water lifted from the glacier was used.
On August 1, 130 m were covered (9 working hours). This is mainly determined by the extremely complex section before the exit under the summit tower of the pillar (see description, sections R18–R21). Wooden wedges and drill-in anchors are used. Practically along the entire segment, backpacks are pulled up.
Overnight stay on a fairly flat but narrow saddle — it is impossible to set up a tent. On the saddle, there is a small patch of snow, which practically saved the situation — the walls of the pillar are so steep that there is no snow anywhere — ledges are generally absent, and where they are present, unfortunately, we did not encounter snow.
August 2. The "screw" bypass of the summit tower of the pillar is very inconvenient, as it goes along a crevice-ledge of the form

and at least 100 m long. This crevice seemed to us the only possible path when observed from below. After 6 hours of work — and here pulling up backpacks is extremely difficult (all the time, backpacks have to be released on a pendulum to the right and only then pulled up) — we reached the saddle between the pillar and the western wall. The upper part of the wall looks quite complex, so it was decided to stop and process the beginning of the wall. The saddle is narrow but very convenient for a sitting overnight stay. About 100 m of the wall was processed in 3 hours. Climbing is very complex.
August 3.
- Passage along fixed ropes and overcoming two ascents with complex technical work.
- We approach the destroyed wall 250 m, which, when observed, seemed to us a particularly hazardous part of the wall.
- However, in reality, only the lower part (100 m) is hazardous — it requires very careful passage.
- A fast pace is simply impossible here — many loose rocks on steep slabs.
- Covered from the overnight stay (including the previously processed section) 450 m in 8 working hours.
- Overnight stay on a sloping scree ledge.
August 4.
- The upper part of the western wall becomes less steep, down to 50°, with several steeper ascents (see detailed description by sections).
- In 4 hours, we managed to reach the level of the SA GU — Dvuzubka ridge, having ascended 150 m.
- Further, a not very high, not clearly pronounced counterfort leads to the ridge.
- Ascent to the first tooth of Dvuzubka is via a 40 m wall, climbing with piton protection.
- Descent into the saddle between the 1st and 2nd tooth via a rope and ascent along the ridge with several short walls.
- From the exit to the ridge level — 2 hours.
- Descent towards v. Khamza and along scree to the overnight stays under the wall.
Thus, a total of 51 working hours was spent on ascending the pillar and the wall — this does not include the time for organizing overnight stays.
The total height of the wall — vertically — is 1100 m. The height is indicated vertically everywhere above, not the length of the sections. Further, in the detailed description, the length of the covered sections is indicated. The height can be determined from the steepness graph (see).
On the route, the following number of pitons were hammered: (see detailed description)
- For protection and climbing — 185 regular and channel pitons (130 on the pillar), 18 drill-in anchors, 10 wooden wedges.
- For self-protection and organization of backpack pulling points and overnight stays — 41.
That is, a total of 254.
During the ascent, the group was monitored by a team from the "Dugoba" alpine camp, which had the ability to quickly contact the rescue team of the camp.
When assessing the complexity, the group relied on comparisons with known high wall routes of 5B category, which the participants had previously completed (including, for example, the north wall of p. Uzbekistan — the El'chiebekov route, the wall of p. Vol'naya Ispaniya).
The group believes that in terms of complexity:
- technical work,
- physical load,
- psychological load
even the first part of the route, i.e., the pillar, significantly exceeds the complexity of 5B category routes; thus, in the group's opinion, the ascent to Dvuzubka via the pillar and the western wall should be classified as a route of the sixth category of difficulty.
The description was compiled by Yu. A. Logachev.
DETAILED ROUTE DESCRIPTION BY SECTIONS
From the "Dugoba" alpine camp, follow the path along the Dugoba river to the "second confluence" (see map), then to the left side of the Ak-Tash river through the canyon and through the second canyon to the Urtalik glacier. Along the glacier on the left lateral moraine to the overnight stays under the pillar. Approximately 7 hours from the alpine camp. On the same day, the beginning of the route was processed.
R1
The route begins almost from the lower point of the pillar — we pass along the left ice-filled couloir 30 m to a ledge to the right of the crevice. On the ledge is a cairn. Directly above the ledge is a 5 m sheer wall, passed on the right side with an exit to a not very pronounced ridge about 20 m (3rd class), transitioning into slabs.
R2
Slabs with a steepness of 60–70°, forming a dull inner angle 15 m, 4 pitons. The slabs approach under a cornice (overhanging rusty-colored rocks).
R3
Under the cornice to the right and up 6 m along a slab — small holds, 3 pitons, to a rusty inner angle at the end of the cornice. The left side of the angle is formed by an overhanging wall with almost no holds. Pitons are used as additional points of support, climbing is extreme, especially difficult is the transition from the angle to the wall. Here 4 pitons/5 m. Further along a groove under a slightly overhanging wall in the groove 3 pitons.
R4
Up the wall (loose rocks!) to a triangular rusty wall (15 m), to the left of which are smooth slabs (the first slab is white). The wall is bypassed along the slabs — 10 m, 60° — 5 pitons.
R5
The slabs lead to a scree area — from it to the right and up, crossing two grooves 30 m, climbing is slightly above average, 2 pitons, 1 channel piton. Exit to a strongly inclined area — a cairn.
R6
The area to the right transitions into a narrow ledge over the right wall of the pillar; the ledge turns around the bend of the wall. Immediately after the turn, to the left and up along slabs 10 m, 4 pitons, then an inner angle 90° 6 m, leading to a 1×2 m² slab, 50°. The cracks are small; in some places, pitons have to be doubled: 4 pitons.
R7
From the slab, an overhanging dull inner angle 10 m, holds are small, not very convenient, 5 pitons. Climbing is extremely complex. Up to this point, the route was processed.
XXX
Ascent via fixed ropes with jammers and pulling up backpacks on sheer sections (since the route does not go strictly vertically, it is strongly deflected on sections R3, R7).
R8
After the dull inner angle — a sloping, strongly overhanging narrow chimney 7–8 m, 6 pitons, ladders. The left wall of the chimney deflects to the right. Backpacks have to be pulled up along the sheer right wall of the pillar.
R9
The chimney transitions into something between a groove and a chimney — two steps, total 20 m, pitons are sometimes doubled, as in the depth of the groove, the rocks are loose. The groove leads to a gray slab 1×1.5 m² in a corner.
R10
From here, a traverse to the right and up along inclined 70° slabs over a 200 m sheer drop about 5 m. The slabs are smooth, without holds, but with cracks 3 pitons as points of support.
R11
Here is a point for pulling up backpacks (2 pitons); it is extremely inconvenient to operate, as there is only enough space for one person. The second person can only be positioned on a ledge 10–15 cm above the right wall of the pillar. Up the right wall 15 m, 90°, 4 pitons, then along a vertical crevice transitioning into a groove to a niche with grass, closed from above (20 m, 3 pitons, 2 wedges).
R12
To the right 2 m, then up 4 m — an overhanging wall, holds with a reverse inclination, 3 petal pitons. The wall transitions into a sheer one — directly up 10 m — to a ledge and another 2 m up. 5 drill-in pitons, 3 regular pitons.
R13
With a slight traverse to the right in the direction of a ledge under the red wall — 4 drill-in pitons, 2 regular pitons.
R14
A steep inner angle 20 m leads to an inclined ledge, 5 pitons, 2 wedges. Here is a sitting overnight stay. Control cairn.
R15
From the ledge to the left into a horizontal crevice 0.7–1 m wide and 10 m deep. Along the upper part of it in a camming position to the left wall of the pillar.
R16
Sheer wall 5 m, 2 pitons, transitioning into an inclined inner angle 10 m with smooth walls, 3 pitons.
R17
Traverse to the left along inclined ledges on the wall 70°, 15 m, 4 pitons, then up 40 m to the pre-summit tower of the pillar. Climbing is very complex, but significantly easier due to the presence of holds throughout the section, 9 pitons.
R18
The pre-summit tower is passed to the left in a "screw" manner. First, a traverse to the left into an inner angle 4 m, 1 piton, then 10 m sheer red inner angle, blocked at the top by a plug, 3 pitons.
R19
Exit to the plug using ladders, 2 pitons, and directly up a little more than 10 m along a smooth wall to a sloping crevice — 3 drill-in pitons, 3 regular pitons.
R20
The crevice goes up to the left; to the right is an inclined cornice, strongly deflecting to the left. Passage with a backpack even along fixed ropes is unthinkable. Steepness ranges from 70 to 90°, there are no cracks, holds are smoothed. The only reliable climbing element is wedging the right part in the crevice. Sometimes wide wooden wedges can be used; where it is possible to secure oneself due to the expansion of the crevice, drill-in pitons are used for protection. The length of the section is 25 m, 2 wedges, 1 channel piton, 2 drill-in pitons.
R21
Exit under the summit tower of the pillar along an inclined inner angle 8–10 m, 2 pitons. Pulling up backpacks with a change of belay station above the plug is about 60 m in total. On the saddle along the summit tower of the pillar — a control cairn.
R22
The summit tower is passed on the right side. Along a ledge to the right 15 m, 2 pitons, then the ledge transitions into an inclined crevice, along which movement is like crawling about 10 m.
R23
Up a narrow, overhanging in the lower part chimney 10–12 m, 3 pitons.
R24
A steep, sloping crevice-ledge closed from above by a cornice. Steepness (or rather, inclination in a sheer wall) ranges from 60 to 80°, i.e., in places it turns into a chimney. The length of the section to the top of the pillar is 100 m. 18 pitons, 5 wedges were hammered. A significant problem was pulling up backpacks — it was necessary to first release the backpack on a pendulum to the right up to 40 m and then pull it up vertically. Pulling the rope for the next backpack also took a lot of time, but passing narrow places with a backpack is quite problematic.
R25
On top of the pillar — overnight stay (comfortable but sitting). From the overnight stay, 40 m of a narrow ridge to a steep ascent. First, slabs 70°, 30 m, 6 pitons, then a cornice, which is passed with a substitution along a strongly overhanging inner angle 4 m, 2 pitons. Exit to a steep ridge 5 m, 1 piton.
R26
After 10–15 m of a more gentle ridge, a steep ascent of the wall 40 m, 60–70°, 9 pitons. An attempt to bypass the cornice (section R25) significantly to the left was unsuccessful.
R27
After pulling up backpacks along the left wall, we approach an ascent about 50 m, which is passed on the right side with a turn into a chimney at the top — 7 pitons.
R28
Rocks of medium difficulty (45°), 60 m, 2 pitons on short walls; the section leads to a destroyed wall.
R29
Destroyed wall 250 m. First — a groove with steepness from 40° at the beginning to 80° at the end, 100 m, 8 pitons, then a vertical chimney 15 m. The upper part — slabs about 50° and a wall 40 m, composed of blocks. Passed on the left side, climbing is complex. Further transition much more to the right — 60°, 80 m, 7 pitons. The section is prone to rockfall!!!
R30
About 2.5 rope lengths to a sloping groove filled with ice. Approach to it along a narrow ledge over a sheer drop, then 30 m along the right side along rocks, 3 pitons.
R31
From the groove up, slabs 40 m.
R32
Ascent towards v. Dvuzubka 60°, 30 m, 2 pitons, and further along the ridge with small walls to v. Dvuzubka.
R33
In the ridge, several saddles 5–10 m.
R34
Ascent to the first tooth of Dvuzubka along a 40 m wall with a ledge at the top. Descent to the saddle — at the end is a wall — and from the saddle to the second tooth of Dvuzubka — a 15 m wall. Total 6 pitons.
Descent from the summit in the direction of v. Khamza to the saddle and along scree to the overnight stays under the wall.
The time taken for the sections and the volume of technical work are indicated in the general description above.


