RUSSIAN MOUNTAINEERING FEDERATION
ASCENT DOCUMENT
ASCENT DOCUMENT
Category: Rock
Region: TIAN-SHAN, Ugam Range (7.II) Peak: ALTUS Height according to "KMGV-99": 3200 m BARS-I 3800 m First ascent routes and proposed complexity categories:
- Via Sofia's shelf to the eastern ridge 3A combined
- Via Sofia's shelf to the western ridge 3B combined Height difference: 600 m Length: 1000 m approx. (415 m wall) 1200 m, 2240 m (472 m wall section) Average steepness of wall section: 47°, 55° BELAYING:
- in the couloir 10×40 m via ice axes + 10 pitons and 13 chocks
- on the wall: 7 pitons
- on the ridge section: 4 pitons + 25 chocks (1 ITO) Quantity: A)
- Climbing hours: 8.5, 12.0
- Days: one — May 31, 1999 — one Leader: LEVIN Mikhail Semen. (MS, 1st category) Signature: (signature) Participants:
- Bryantsev Vladislav Vladim. (2nd sports category)
- SHUSTOV Konstantin Vladim. (2nd sports category)
- Agafonov Anatoly Kondr. (1st sports category)
- Muslimov Enver Izet. (3rd sports category) Coach: LEVIN Mikhail Semen. (MS, 1st category) X) from the bivouac "2320" below the NW ridge of v. SOLIDARNOST and to the corresponding peak
NOTE: Both rope teams ascended together to the 3090 m pass, then proceeded in different directions along their respective routes.
Photo # 2: View from the north towards v. BARS-I, its western ridge; v. SOFIA; eastern and central peaks of ALTUS. Taken on June 4, 1999, while passing the SW slope of v. SOLIDARNOST 3B category. The described routes via Sofia's shelf:
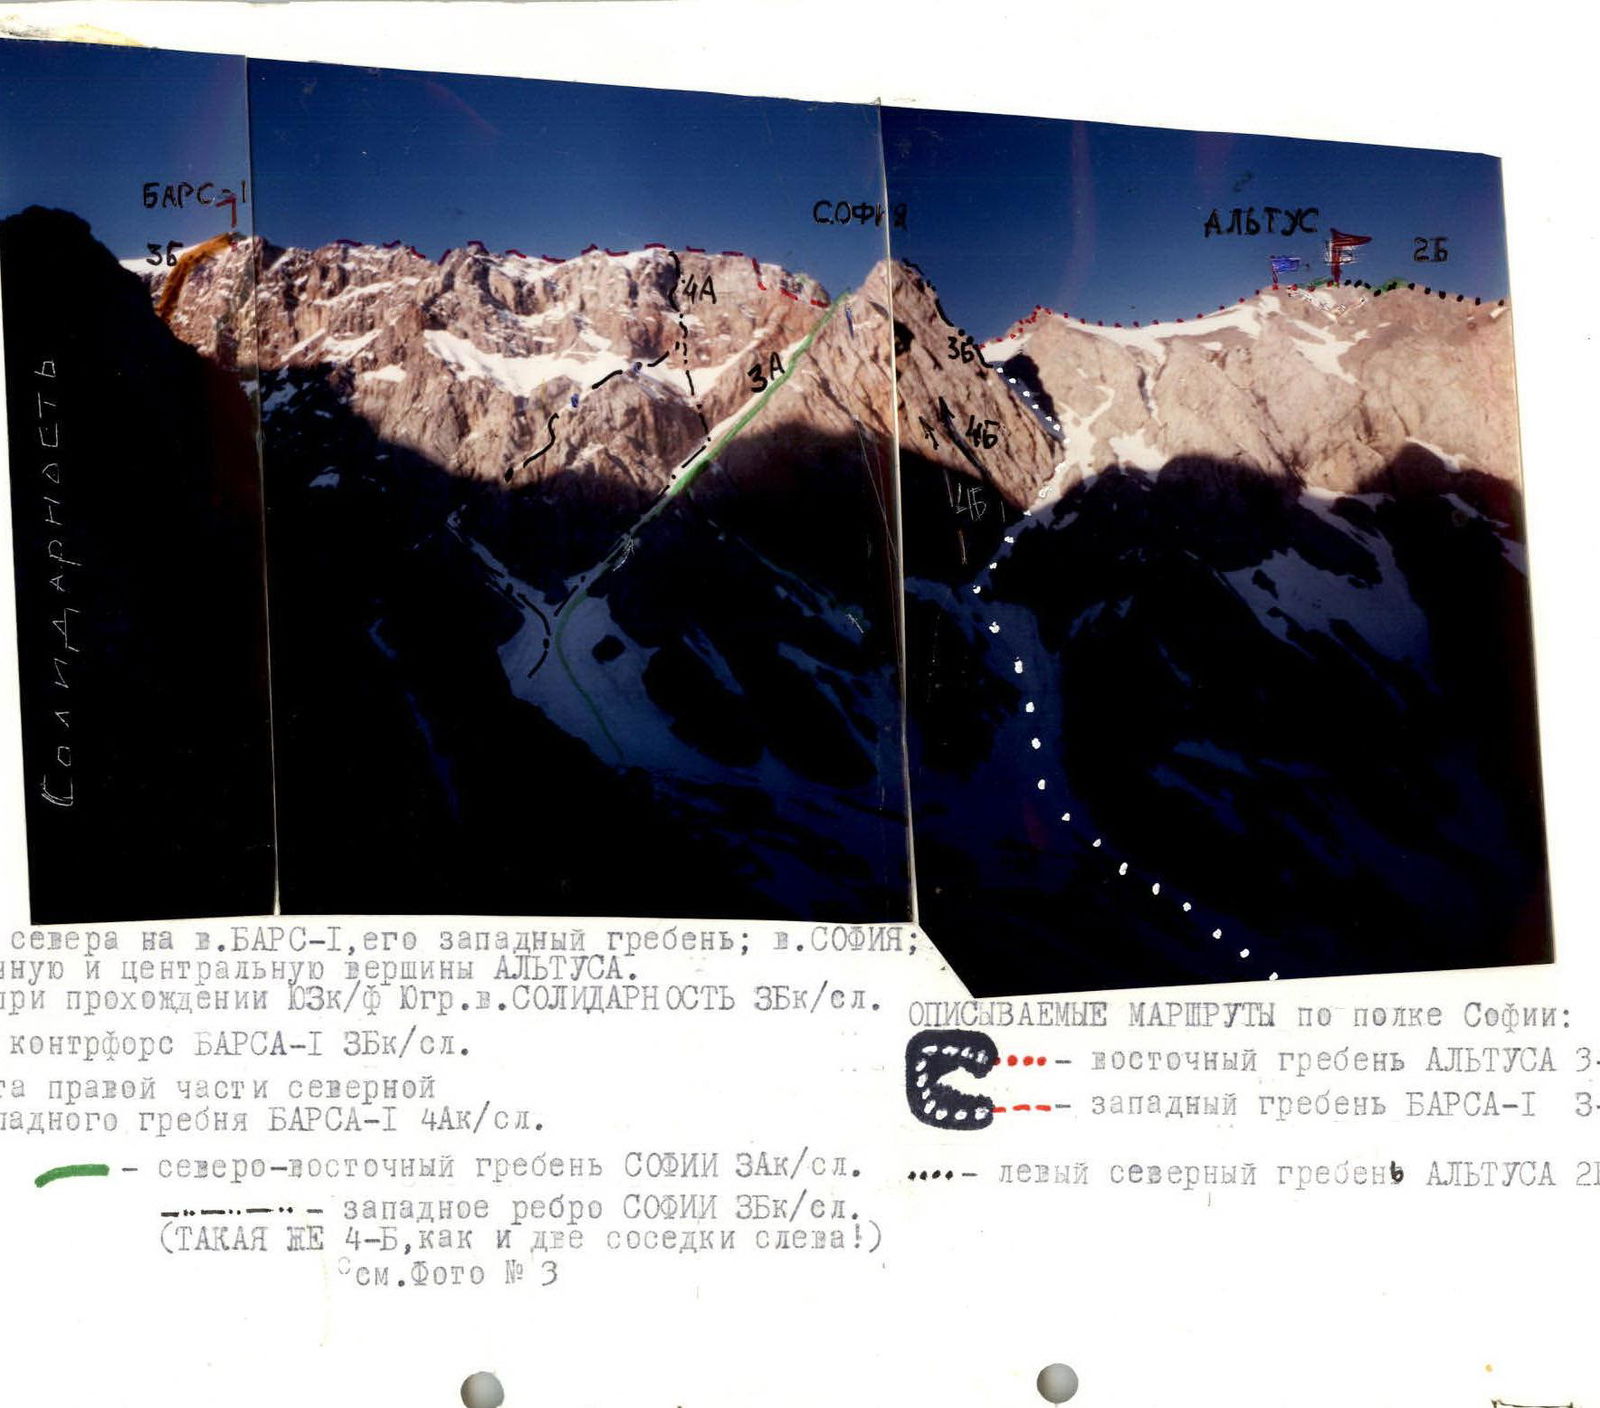
- northern buttress of BARS-I 3B category
- 2 variations of the right part of the northern wall of the western ridge of BARS-I 4A category
- north-eastern ridge of SOFIA 3A category
- western edge of SOFIA 3B category (AS DIFFICULT AS 4B, like the two neighboring routes!) see Photo # 3.
- eastern ridge of ALTUS 3A category
- western ridge of BARS-I 3B category
- left northern ridge of ALTUS 2B category
Since both described routes coincide on the initial sections (490 m in height), and then diverge in different directions along the same ridge, the initial description is common.
From the unnamed peak "4000", separating the Ugam four-thousanders ARSEN and AKTOR, a long, descending spur extends westward. The second peak from the "unnamed" was named by the first ascenders from KazClub in 1977 as "1st TOWER OF ARSENAL" or "BARS-I": from below, an alternation of horizontal rock belts and snow terraces is visible.
The northern buttress descending from the peak BARS-I is very attractive (3B category, M. Skrekhin — 77); the western ridge is also interesting, the left part of which has been repeatedly traversed as a continuation of the wall route by A. Denisenko — 77 (4A category): starting from the right part of the northern wall of the western ridge, groups made their way to the ridge approximately 300 m east of the saddle.
Intending to traverse the western ridge of BARS-I completely, we chose a path from the north, bypassing the northwestern wall of SOFIA to the right, below.
This path coincides with the first ropes of two 4B routes on SOFIA (Sh. Rafikov — 89, I. Rezaev — 90).
Now about ALTUS: the "long, descending spur" mentioned at the beginning ends in a dissected massif with 3 peaks, 5 ridges, and numerous buttresses. It is the first panoramic viewpoint and training site in the area.
The leader of the first ascent, V.N. Shataev, named it after the Karaganda club "ALTUS" (Alpinists, Tourists, Speleologists) in 1974. Besides the right northern ridge 1B category traversed at that time (to the western peak 2932 m, then a turn to the east towards the central peak 3200 m), the following routes were traversed in subsequent years:
- 1977 — Eastern edge of the right northern ridge (3B category)
- 1996 — Southwestern "barrier" (1B category)
- 1998 — Western ridge (2A category)
- 1998 — Left northern ridge (2B category)
Routes # 2 and 4 also lead to the western peak; # 5 — to the central peak; # 3 — to the eastern peak of Altus from the south. There were no routes to the eastern peak from the north before us.
X) here and further, we do not aim to indicate the actual orientation — NW, etc.
Photo # 3: View from the eastern ridge of ALTUS to the east (VIII–98).
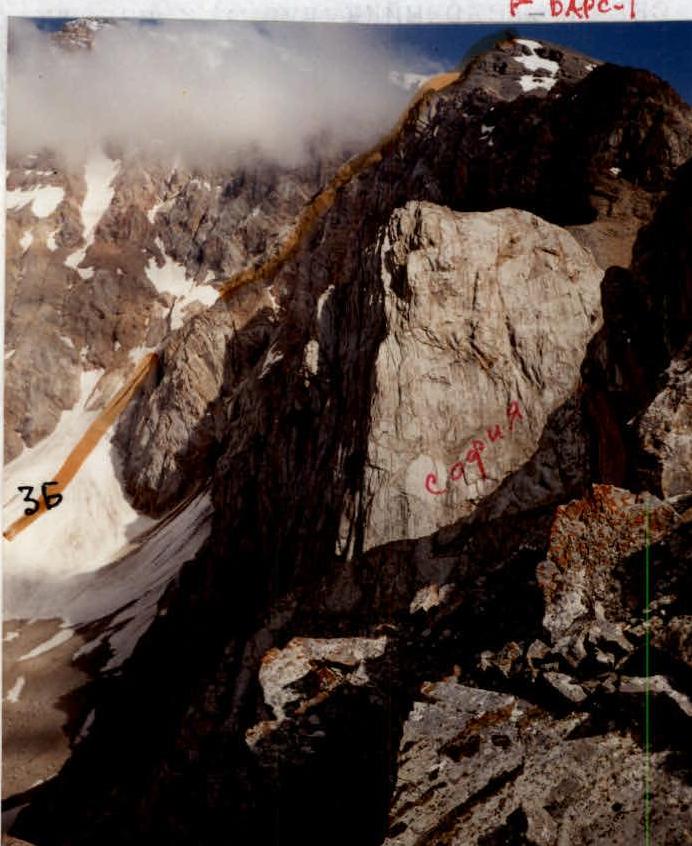
The profile of the northern buttress of BARS-I 3B category is clearly visible; the upper parts of the right part of the northern wall of BARS-I are hard to distinguish in the shade.
However, it is very clear that the so-called "3B" via the western edge of SOFIA is very difficult, although short (about 200 m), and is not much easier than the neighboring routes on the northwestern wall.
And they are classified as winter 4B!
Approaches
Via a known path to the campsite before the 1998 mudflows, vehicles can cross the river at the confluence of the Sayram-su and Kergely rivers (1800 m).
From the campsite, 30 minutes along the trail, crossing (slippery log!) to the right to (here and further — orogr.) bank of Sayram-su, and further through a large meadow (1830 m) to bypass the northern slopes of ALTUS.
It is possible to bypass them along the left bank of Sayram-su, but it is easier to make one's way with backpacks by ascending the northern slopes of Altus and crossing them towards the horizontal treeless saddle of the left northern ridge of Altus.
Descending to the water, the trail is lost in 30–40 minutes from the confluence of the Sayram-su tributaries (2300 m). Above the confluence, a bivouac is possible on the "Green Hill", from where routes 4A and 4B category on v. SOLIDARNOST start (2–2.5 hours from the 1800 m confluence).
Photo # 4: View from the "Green Hill" to the South (VII–99). ![img-6.jpeg]{"width":1232,"height":820,"format":"Jpeg","uri":"https://summitx.info/media/1/DLtx5l3s0tB77AKc10XJS4YoQi4ztxDr/img-6.jpeg","id":64783445}↗)
To the right — eastern slopes of the left northern ridge of ALTUS, to the left — the western edge of v. SOLIDARNOST.
The Sofia shelf is obscured, but the 3090 m pass on the approaches is visible immediately after bypassing the ALTUS massif.
From here, 1 hour to the terminal moraine 2750 m, connecting the southern spurs of SOLIDARNOST and the foot of SOFIA.
The beginning of the route will be visible after ascending to the moraine 2750 m. The oblique lower part of the SOFIA wall ends in a steep northern snow-ice couloir, and from afar, it seems that the snow where the couloir meets the limestone cliffs slightly eases, forming a "Sloping Shelf". In reality, only the randkluft and the possibility of organizing reliable stations on the rocks help to overcome this "double-slope shelf" — but the path is unambiguous!
Photo # 5: Behind the 2750 m moraine, the route "hides". ![img-7.jpeg]{"width":729,"height":803,"format":"Jpeg","uri":"https://summitx.info/media/1/UaWqQ28YR0TQcLmHHeV56AXLNaNBKDQY/img-7.jpeg","id":64783446}↗)
Photo # 6: View from the 2750 m moraine — reconnaissance of the "shelf" (V–99). ![img-8.jpeg]{"width":704,"height":803,"format":"Jpeg","uri":"https://summitx.info/media/1/ZZbjMdBx7L7QC81gVRNWJwAPW1JJMGDh/img-8.jpeg","id":64783447}↗)
Route Description: ALTUS 3A category combined via Sofia's shelf to the eastern ridge
From the 2750 m moraine, in the dark, towards the SOFIA wall and along it on crampons until the wall turns. Here, one has to move from the safe zone to the right, towards the axis of the couloir, which is exposed to fire from two sides (fortunately, the acceleration is not great). On the bypass of the rib, there is little snow; by July, the upper part of the couloir will be ice- and debris-covered.
The slopes of the couloir's mouth gradually ease as one approaches the ridge. The path from the pass saddle to the west is blocked by a rock ascent with two vertical internal corners, separated by an inclined slab. Above the second internal corner is a narrow ridge to the eastern peak (it is composed of dark rocks and is 10 m lower than the central one). After descending and a long traverse, there is a simple ascent to the control cairn on the central, "light" peak.
Route Sections via Sofia's shelf to the eastern ridge of ALTUS
| Section | Angle | Length | Category | Description | Belaying |
|---|---|---|---|---|---|
| R0–R1 | 0–35° | 250 m | 1 | Snow on scree. The right part of the moraine is exposed to fire. | Simultaneous |
| R1–R2 | 40° | 80 m | P | Along the snow in the couloir under the SOFIA wall. | Safe only under the cliffs. Alternating via ice axes |
| R2–R3 | 45° | 160 m | P | Ascent along the lower part of the wall. | Very dense snow. Alternating: 5 pitons, 6 chocks, via ice axes |
| R3–R4 | 50° | 120 m | III+ | Bypass of the western rib of the wall — KEY! | Alternating: 5 pitons, 7 chocks, via ice axes |
| R4–R5 | 30° | 120 m | P | Exit from the couloir's mouth to the pass. | Rocks may fall from 2 sides. Alternating via ice axes |
| R5–R6 | 30–50° | 50 m | P | Ascent to the ledges below the 1st internal corner. Do not miss the 2nd corner! | Simultaneous |
| R6–R7 | 80° | 25 m | IV | 1st internal corner. Few and smooth holds. | Alternating: 4 pitons, ledges |
| R7–R8 | 45° | 10 m | P | Monolithic slab. Traverse rightwards under the 2nd corner. | Alternating via ledges |
| R8–R9 | 80° | 20 m | IV | 2nd internal corner. Small holds, loose rocks. | Alternating: 3 pitons, ledges |
| R9–R10 | 40° | 40 m | P | Crumbled ascent to the eastern peak. | Simultaneous |
| R10–R11 | up to 20° | 120 m | 1 | Rocky-scree ridge. | Simultaneous |
| R11–R12 | 20° | 30 m | 1 | Crumbled peak ascent. | Simultaneous |
Descent Options:
a) To the north From the cairn, along the ridge to the west, then right and down into the so-called "big couloir". Descent via this couloir is recommended at the beginning of the season or if one needs to return to the "Green Hill" bivouac.
b) To the south One does not have to return to the 3090 m pass — directly from the cairn, head left and down onto the "live scree" of the wide couloir between the southwestern "barrier" of Altus and the buttress of the western ridge of BARS-I (this couloir is the path to the 3090 m pass from the south).
After losing about 800 m in height and reaching the right bank of the Kop-Dzhailau river, follow the trails down to the confluence of the Kop-Dzhailau and Kergely rivers (2000 m), then to the confluence of the Kergely and Sayram-su rivers (1800 m).
Photo # 7: View of the ALTUS massif from the northeast (VIII–98). ![img-9.jpeg]{"width":1423,"height":724,"format":"Jpeg","uri":"https://summitx.info/media/1/jrBxgX48Q0tdUOcCgfAB2CpbzoejYXih/img-9.jpeg","id":64783448}↗)
To the right — slopes of the "big couloir" behind the left northern ridge; to the left — the 3090 m pass.
Photo # 8: Visible part of the described 3A category route on ALTUS (from the SW slope of v. SOLIDARNOST, VII–99). ![img-10.jpeg]{"width":2312,"height":1462,"format":"Jpeg","uri":"https://summitx.info/media/1/XKxGP4YZoVDjBSzu1qcj1onFA2fyti0B/img-10.jpeg","id":64783449}↗)
Photo # 9: Beginning of the path along the NW wall of SOFIA. ![img-11.jpeg]{"width":1654,"height":2032,"format":"Jpeg","uri":"https://summitx.info/media/1/cj7aX6e8VBVeL9ScNEjChpwRUsnTmeua/img-11.jpeg","id":64783450}↗)
Photo # 10: The second rope along the foot of the wall ends in a randkluft. ![img-12.jpeg]{"width":716,"height":1046,"format":"Jpeg","uri":"https://summitx.info/media/1/D1QXo7DJZ4NwE5BQlmjg9iSv8rnMaeo0/img-12.jpeg","id":64783451}↗)
Photo # 11: Third rope. ![img-13.jpeg]{"width":1458,"height":1320,"format":"Jpeg","uri":"https://summitx.info/media/1/MSPJlJZgTvMcuJ2IN6raVuoJ2dTg4L9q/img-13.jpeg","id":64783452}↗)
Photo # 12: At the start of the fourth rope. ![img-14.jpeg]{"width":2333,"height":1651,"format":"Jpeg","uri":"https://summitx.info/media/1/0oeG76JYaCi9gO9dyvYEWWAy4lWg3bfI/img-14.jpeg","id":64783453}↗)
Photo # 13: Bypass of the western rib of the wall (end of the fifth rope). ![img-15.jpeg]{"width":1028,"height":729,"format":"Jpeg","uri":"https://summitx.info/media/1/zjqNFxrvJomWN9mDk3pralY7SFXiLlNZ/img-15.jpeg","id":64783454}↗)
Photo # 14: Sixth rope. ![img-16.jpeg]{"width":1029,"height":713,"format":"Jpeg","uri":"https://summitx.info/media/1/MALBKvjOH0h4ODTMGh12Wlrc4E1oRjxM/img-16.jpeg","id":64783455}↗)
Photo # 15: Finally in the couloir's mouth! ![img-17.jpeg]{"width":1029,"height":747,"format":"Jpeg","uri":"https://summitx.info/media/1/55XWaSYIrmM0IA8NCdDUUD4EhVyTVLpv/img-17.jpeg","id":64783456}↗)
Photo # 18: Profile of the western spur of the Unnamed peak (see p. 4) from v. KOPTau (VIII–98). ![img-18.jpeg]{"width":1430,"height":710,"format":"Jpeg","uri":"https://summitx.info/media/1/TTts4kHmcbDeFeuozU0UUNz7y5Bv7no6/img-18.jpeg","id":64783457}↗)
Flags mark:
- ALTUS (left)
- BARS-I
Other labels:
- C — Sayram
- KT — Karatau
- B — Unnamed
- G — Gnom
- A — Ayutor
- GS — ridge of Syputchaya
- TT — Teketoru
- O — slopes of Obmanchivaya
Photo # 19: Profile of the wall section of the route on BARS-I (view from the eastern ridge of Altus on May 31, 1999). Arrows indicate the participants of the first ascent. ![img-19.jpeg]{"width":1430,"height":1004,"format":"Jpeg","uri":"https://summitx.info/media/1/7ZnlHK1H5B8E8fYA7UZJd3cI3yHWvy3H/img-19.jpeg","id":64783458}↗)
Photo # 16: Line of movement on the visible part of the route along the western ridge of Bars-I (shown not everywhere to avoid obstruction, from v. Solidarnost, VIII–97). ![img-20.jpeg]{"width":3110,"height":1420,"format":"Jpeg","uri":"https://summitx.info/media/1/PqUMplWSQ4pyIAGdyfJ8tBGCQijIHWVX/img-20.jpeg","id":64783459}↗)
Labels of peaks:
- DG — Druzhba Glavnaya
- S — Slovakia
- TT — Teke-tau
- O — Obmanchivaya
- G — Gnom
- St — Students
- A.S. — A. Snesareva
- I.R. — I. Roshchina
- K — Kergely
- Ku — Kergely Uzlovaya
Photo # 17: View from the SW slopes of v. Solidarnost (VI–99).
NOTE: The path from the 2750 m moraine to the 3090 m pass saddle, see p. 6.
Route Description: BARS-I 3B category combined via Sofia's shelf to the western ridge
NOTE: The path from the 2750 m moraine to the 3090 m pass saddle, see p. 6.
- From the pass to the east, there is no easy path. The optimal section is the northern wall, where the ridge of the saddle abuts (there are logical paths to the right, but they are longer and exposed to rockfall).
Effective belaying for the first climber is ensured on the left side of the sheer internal corner, where, after ascending 40 m, a series of ledges and difficult wall sections begin, leading to the western ridge.
Further along the jagged ridge — ascents, descents, bypasses — enjoyable climbing under the lower rock belt of the peak tower. There are two belts, and both are traversed alternately and with care.
Almost immediately after the second rock belt — the summit cairn.
Route Sections via Sofia's shelf to the western ridge of BARS-I
| Section | Angle | Length | Category | Description | Belaying |
|---|---|---|---|---|---|
| R0–R1 | 0–35° | 250 m | 1 | Moraine ascent. The right part of the slope is exposed to fire. | Simultaneous |
| R1–R2 | 40° | 80 m | P | Along the snow in the couloir towards the SOFIA wall. | Safe only under the cliffs. Alternating via ice axes |
| R2–R3 | 45° | 160 m | P | Ascent along the lower part of the wall. | Very dense snow. Alternating: 8 pitons, 6 chocks, via ice axes |
| R3–R4 | 50° | 120 m | III+ | Bypass of the western rib. | Last 40 m — ice! Alternating: 5 pitons, 7 chocks, via ice axes |
| R4–R5 | 30° | 120 m | P | Exit from the couloir's mouth to the pass. | Rocks may fall from 2 sides. Alternating via ice axes |
| R5–R6 | 30–35° | 150 m | 1 | Western part of the saddle. Ridge: rocks, snow, scree. | Simultaneous |
| R6–R7 | 70° | 40 m | IV | Left side of the internal crack. | Good cracks. Alternating: 2 pitons and 9 chocks |
| R7–R8 | up to 70° | 30 m | IV | Series of walls and ledges. | Loose blocks. Alternating: 9 chocks |
| R8–R9 | 80° | 10 m | V– | Wall exit to the ridge. | Few holds. Alternating: 2 pitons (1 ITO) |
| R9–R10 | up to 60° | 300 m | P+ | "New" part of the ridge. | Walls with loose rocks. Simultaneous via ledges |
| R10–R11 | up to 60° | 900 m | P+ | "Old" part of the ridge. | Low walls. Simultaneous via ledges |
| R11–R12 | 80° | 20 m | IV | Wall of the 1st rock belt. | Small holds. Alternating: 4 chocks |
| R12–R13 | 20° | 30 m | 1 | Scree slope. | Simultaneous |
| R13–R14 | 70° | 12 m | IV | Wall of the 2nd rock belt. | Small holds. Alternating: 3 chocks |
| R14–R15 | 10° | 15 m | 1 | Scree slope. | Simultaneous |
Photo # 20: Beginning of the second key rope on the northern wall of the western ridge. ![img-21.jpeg]{"width":958,"height":726,"format":"Jpeg","uri":"https://summitx.info/media/1/2hVcmVpB8gw9fFYzz68gKdKlucGgUmYg/img-21.jpeg","id":64783460}↗)
DESCENT VIA THE ASCENT ROUTE TO: a) a convenient couloir that goes left and is visible all the way down; several rope descents will lead to a wide scree couloir (see p. 6: "To the south").
b) or the 2×40 m internal corners processed during the ascent; return to the 3090 m pass, then head south again.
Photo # 21: View from the summit of Altus on the described route (X–95: that's when it first "beckoned"...). ![img-22.jpeg]{"width":885,"height":1240,"format":"Jpeg","uri":"https://summitx.info/media/1/UzocEvpRqcAIjGQrGzYjXo6JJhnZ6h32/img-22.jpeg","id":64783461}↗)
Photo # 22: On the western ridge (R9–R10). ![img-23.jpeg]{"width":780,"height":745,"format":"Jpeg","uri":"https://summitx.info/media/1/g0d80olWnUgh742btryZuVjgx6xuCwJW/img-23.jpeg","id":64783462}↗)
Photo # 23: Long-awaited end of the western ridge and the tower of Bars-I. ![img-24.jpeg]{"width":1358,"height":1623,"format":"Jpeg","uri":"https://summitx.info/media/1/wR6NEA21xE7DsocfPRDXvmux1YEnrnS0/img-24.jpeg","id":64783463}↗)
Photo # 24: Second rock belt of the peak tower BARS-I.