Full Traverse Route Diagram
from the southwest to the northeast of the Peak Kommunizm massif.
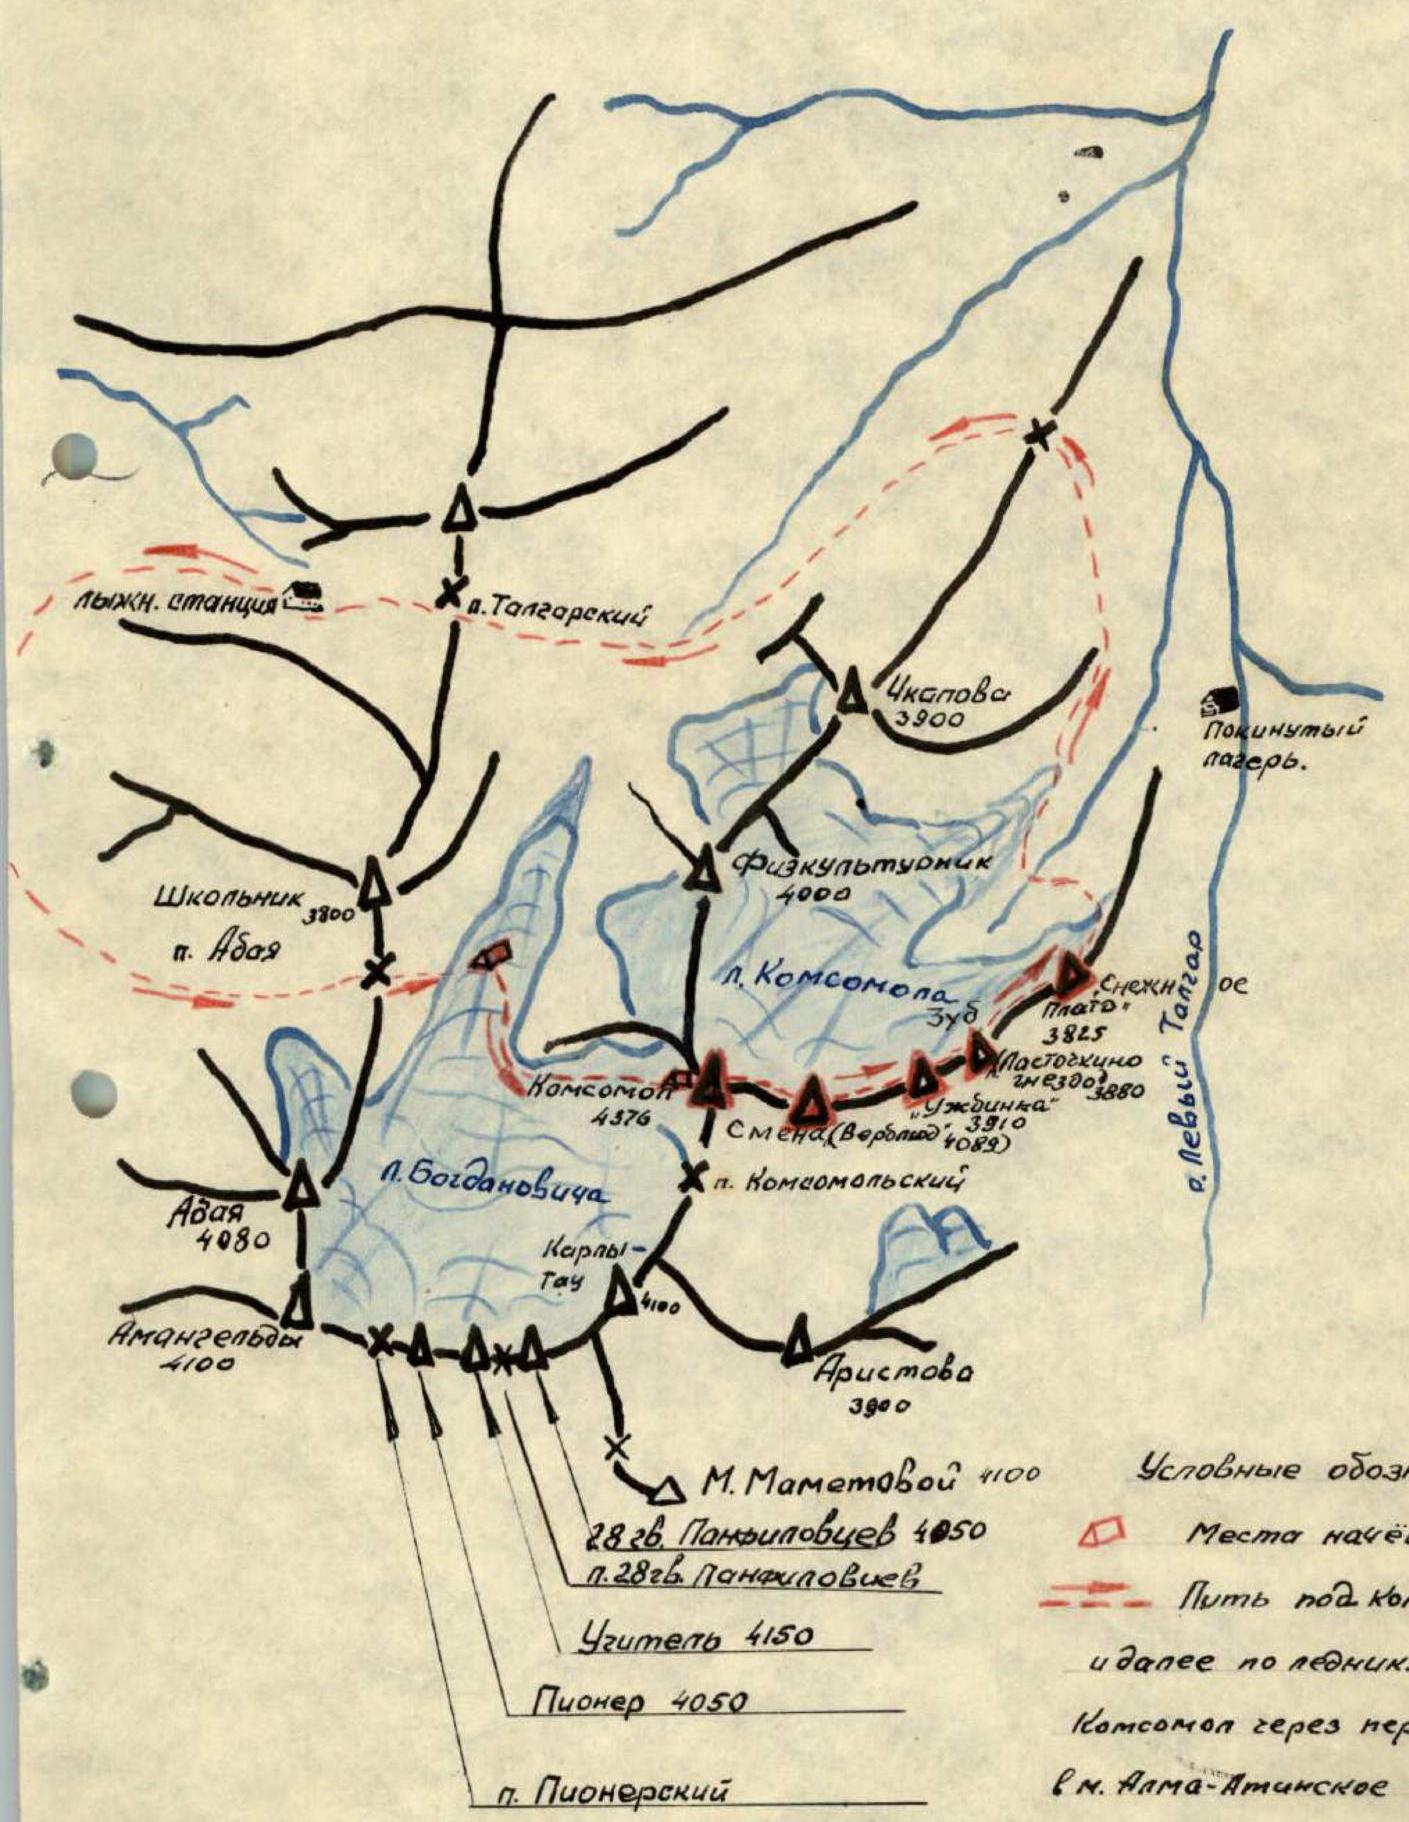 The Peak Kommunizm massif is located in the Malo-Almatinsky spur of the Trans-Ili Alatau, in the Tian Shan mountains, in the upper reaches of the Komosomolka river, a tributary of the Left Talgar river.
The absolute height of the Kommunizm massif is 4376 meters above sea level. There are six climbed routes to Peak Kommunizm, two of which are category 4B.
The approach path to the Kommunizm massif is through the Abay pass along the moraine and the Bogdanovich glacier to the overnight stay at the southwest wall of Peak Kommunizm, category 4B.
General Characteristics
of the full traverse of the Kommunizm massif (from southwest to northeast). The route begins on the southwest wall of Peak Kommunizm, which has an elevation of 3770 m. The relative height of the southwest wall is 606 m. The overall steepness is 65–70°. On the right, the wall is bounded by a very steep, narrow snow-ice couloir starting from the very summit. On the left, there are a series of isolated buttresses dissected by narrow couloirs.
The upper part features very steep, in places vertical, sections of great length.
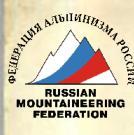
In the center of the wall, there is a steeply falling, weakly expressed buttress. (via peaks: Smena (4080), Uzhbinka (3910), Zub (3880), Snow Plateau (3825))
The further path along the northeast ridge is a combination of sections with ice, snow, and complex rock formations with significant height differences, averaging 150–180 m.
 The nature of the entire route allows for the effective use of all types of advanced rock climbing techniques.
Group Composition
No.: Full Name: Rank: Notable Ascents
- Garshin V.S. 1st sports rank Metallurg 5A, Petrovsky 5B + 1 / Central Tian Shan /
- Aitbaev A.A. 1st sports rank Semenov-Tian-Shansky-Skryabin-4B
- Lyashenko V.V. 2nd rank Kommunizm-4B, Mayakovsky 4A
- Gerken V.V. 2nd rank Kommunizm 4B, Mayakovsky 4A
- Kolokolnikov Yu.E. 2nd rank Kommunizm 4B, Mayakovsky 4A
- Dyachenko N.N. 2nd rank Kommunizm 4B.
Ascent Description
On August 29, 1964, at 7:00, the group left the bivouac located on the moraine of the Bogdanovich glacier and began moving along the route at 8:00.
Section I. A narrow couloir is traversed on the left. The terrain is smooth, with rocks having flow ice. The couloir is 60 m long, with a steepness of 55–60°. Two rock pitons were hammered in for belay.
 In the upper part of the couloir, one ice piton was hammered into the flow ice. The route then exits into a shallow depression at the base of the wall — the "iron" — where the first control cairn is located. See photo #1.
Section II
After the depression, the route goes up to a 15-meter wall with horizontal cracks and small holds. One rock belay piton was hammered in. The wall's steepness is 60–65°. The route then exits to the right onto a wall 35 m long, with a steepness of 75–80°. Climbing is done with piton belay, with two rock pitons hammered in. Traverse of a triangular massif to the left, with rocks having very small holds, and a steepness of up to 80°. Two rock pitons were hammered in on this section.
Section III
The summit of the triangular massif leads into an internal corner; one rock piton was hammered in at the transition. We pass through the internal corner and traverse to the left across difficult rocks with a steepness of 85–90°. Then we enter a narrow chimney 1.5–2 m wide with flow ice, 30 m long. The chimney leads to smooth slabs with a minimal number of holds. The slabs are climbed to the right, with a steepness reaching 80°. Six rock pitons were hammered in to create additional belay points. The section is 40–45 m long; the second control cairn is located on the bend. From the platform after the second cairn, we exit to the right across rocks with good holds. Alternate belay is organized through ledges. The steepness of the rocks is 45–50°.
Then we approach a small inclined shelf 10–12 cm wide and move left along it for another 20 m. Two rock belay pitons were hammered in while passing the shelf. The shelf ends with a protruding "finger." See photo #2.
Section IV-V
The route then passes along a wall with difficult and very difficult rocks, reaching a steepness of 80–85°. Artificial belay points were organized. Five rock pitons were hammered in. The wall is 70 m long. The wall ends with a square platform 40 by 40 cm. The wall is a key section when ascending to the summit. The rocks are heavily smoothed, with no convenient belay locations. See photo #3.
Section VI
In the upper part, the wall becomes less steep, transitioning into a 60° destroyed ridge. Here, belay can be organized using ledges; there are enough holds, but passing this section requires extreme caution as dislodged stones can hit the route. In the upper part, the ridge becomes significantly less steep and ends with a shallow depression 5–7 m deep, where the third control cairn is located.
Section VII
From the depression, a narrow rocky ridge — the "ridge crest" — begins. It is traversed on top with alternate belay through ledges. The ridge is 40 m long, with sheer walls on both sides. See photo #4.
Section VIII
After the "ridge crest," we approach a heavily dissected ridge with smooth, sheer walls of gendarmerie. Moving left and up across rocks of medium difficulty with a steepness of 50–60°, we approach smooth slabs 15 m long with a minimal number of holds. One rock belay piton was hammered into the slabs.
Section IX
The smooth slabs end with a narrow chimney 45 m long, with sheer walls and a plug at the top. The chimney is climbed without backpacks. Pitons were used as additional belay points. Four rock pitons were hammered in. See photos #5 and #6.
Section X
The chimney ends with an absolutely smooth, overhanging wall. The rocks are smoothed, without holds. The wall is climbed with assistance. See photo #7.
Section XI
After the wall, we exit onto medium and easy rocks, which are climbed with simultaneous belay. After 300–350 m, we reach the summit. Passing the southwest wall takes 10 to 12 hours of work in good weather. The time is given without considering the approach to the overnight stay. After completing the wall route, the first overnight stay is organized on the summit — there are two good platforms. See photos #8, #9, #10.

Section XII
Descent from the summit after the overnight stay towards the ridge route — category 3B, approximately 40–50 m. Then 5 m down and sharply to the right across 2- and 3-meter walls. Difficult climbing for 20 m with passage through an internal corner, and we exit onto the ridge of category 4B. Along the sharp snow ridge, we approach the first snow ascent. We ascend along the snow with a steepness of 45–50°. Descent down from under the rocks, barely visible from the snow. The steepness reaches 50–60°. Under a thin layer of firn-ice. One ice piton is hammered in at the top. Descent is done in a sports manner under the ("camel"). The length is 75–80 meters. See photos #11, #12.
Section XIII
Then a steep ascent onto the ("camel"). The length is 80 m. The "camel" represents two steep snow ascents with a long descent. Descent from the ("camel") at the top through a snow drift along a deep snow slope. In the middle part, the snow cover decreases, and ice becomes visible through the thin layer of snow. The slope's steepness at the top reaches 70–75°, and in the middle part, it begins to become less steep and transitions into a gully. It is overcome with belay through an ice axe in a three-step manner. Steps are cut at the bottom. 44 notes were taken from the ("camel"). See photo #13.
Section XIV
Then, overcoming snow-covered, heavily destroyed rocks, we exit to a 40-meter wall with a steepness of 80°. At the top, the wall is traversed to the left for 6–8 meters across medium rocks. Here, there is a rock ledge in the form of a massive pillar. A sling is hung on the pillar, and the main rope 40 m long, tied to the auxiliary rope, is thrown over. At the bottom, the wall is climbed using a pendulum 4–6 m. The wall ends with an overhanging ledge. Passing under the ledge along the sharp snow ridge with belay through an ice axe — we exit onto heavily destroyed, snow-covered rocks 55–60 m long and exit to the saddle before "Uzhbinka". The passage to "Uzhbinka" takes 3–4 hours. See photo #14.
Section XV
Then, ascending along easy, not steep rocks covered with small scree, we approach "Uzhbinka". Descending and traversing to the right, we begin to bypass the "Uzhbinka" massif from the south.
Along rocks of medium difficulty, we exit into the gap between the two towers of "Uzhbinka". Then, along terraces with a small number of holds and a steepness of 50–55°, we ascend to the upper part of "Uzhbinka". Rocks are of medium difficulty, becoming difficult at the top, with a steepness of up to 70°. Two rock pitons were hammered in for belay; the rest of the distance was traversed with alternate belay through ledges. The entire ascent to "Uzhbinka" takes 1.5–2 hours. On "Uzhbinka," there is a control cairn. Then, to the northeast, begins See photo #15.
Section XVI
Then, to the northeast, begins the descent from "Uzhbinka". Descent is along difficult, snow-covered rocks. One rope length is climbed with piton belay. After bypassing the upper tower, we exit to a sharp ridge 12–15 m long. From the ridge, a descent begins to the west towards the "Komosomolets" glacier. Traversing down a sheer wall with piton belay, we exit onto the north wall of "Uzhbinka". The distance is 45–50 m.
At a separately standing gendarme 1.5–2 m high, a descent is organized along the north wall of "Uzhbinka". A sling is hung on a rock piton. 45 m of the main rope, tied to the auxiliary rope, is passed through. In the middle part, a piton is hammered in, a carabiner is hung, and a 3–4 m section is traversed. Here, another piton is hammered in, and a carabiner is hung. After this, the descent continues to the foot of "Uzhbinka". After passing the section, the last person pulls the rope through.
On the descent, 5 rock pitons were hammered in for belay and 4 for hanging the rope. The entire descent takes 2–2.5 hours. The wall's length is 80 m.
Section XVII
From a narrow gorge, an ascent begins to ("Swallow's Nest") along difficult rocks. The steepness of the rocks is 65–70°. The route goes in a northeast direction, straight into the face. The rocks are difficult, with a small number of holds. The ascent takes 1–1.5 hours. Four rock pitons were hammered in. The distance from the gorge to the summit of ("Swallow's Nest") is 65–70 m. On the summit, there is a control cairn. The descent is along medium, heavily dissected rocks with height differences from 15 to 35 m in the direction of the "Snow Plateau" peak. The descent takes 50 minutes to 1 hour.
Section XVIII
Further, not reaching the "plateau," there is a clearly expressed buttress with a flat upper part. Here, the second overnight stay is organized. Two platforms are prepared. There is no water. Snow was melted.
Section XIX
The next day, departure is at 9 am. Along medium and easy rocks, we exit onto the "Plateau". The distance from the overnight stay to the plateau is traversed in 40 minutes. It is possible to set up a bivouac on the plateau, but strong winds are observed there at night. On the "plateau," there is a control cairn. After the "plateau," descent is into the couloir along heavily snow-covered rocks with a steepness from 30 to 50°. The entire path to the couloir takes 2 hours. The upper part of the couloir has a steepness of 30–35°; the snow is dense, traversed simultaneously. Further, the couloir goes with increasing steepness of 35–45°. Here, ice appears. On the right, on the rocks, there are good ledges. Through them, a descent is organized in a sports manner. In the middle part, the couloir turns north and reaches a steepness of 45–60°. The rocks are absolutely smooth, with a small number of cracks. Six pitons were hammered in, and 6 rappel ropes were hung. After the turn, the couloir becomes less steep, down to 30–35°. It is stone-hazardous and avalanche-hazardous in the second half of the day. The descent through the couloir took 3 hours.
After passing the couloir, we move down the gorge on the left side along the path to the clearing. Then, an ascent is made to the Maly Talgar pass and further to the Bolshoi Talgar pass in the Malo-Almatinskoye gorge. The path from the last overnight stay to the Tuyuk-Su camp takes 9–10 hours. The entire traverse takes 3.5 days in summer and 5–6 days in winter.
The full traverse route of Kommunizm corresponds to category 5A. For the first time, the route was completed by a group consisting of instructors from the Tuyuk-Su alpine camp.
- Garshin V.S. — leader
- Lyashenko V.V. — participant
- Aitbaev A.A. — "-"
- Kolokolnikov E. — "-"
- Gerken V. — "-"
- Dyachenko N. — "-"
The ascent was made from August 29 to September 2, 1964.
Group Conclusions
on traversing five peaks
The participants of the full traverse of the Kommunizm massif from southwest to northeast believe that this combined route fully corresponds to category 5A, including two category 4B routes.
This route requires traverse participants to have good physical and technical preparation, as well as excellent mastery of advanced rock climbing techniques.
Group leader V. GARSHIN Group participant Alpinism instructor V. LYASHENKO.