Ascent Passport
- ASCENT CLASS TECHNICAL
- ASCENT AREA, RANGE SAUDARA VALLEY, VANCH RANGE PAMIR
- PEAK, ITS HEIGHT, ASCENT ROUTE 4983 m, eastern wall
- EXPECTED DIFFICULTY CATEGORY 5B
- ROUTE CHARACTERISTICS: HEIGHT DIFFERENCE 1183 m LENGTH OF 5–6 diff. sections 430 m AVERAGE STEEPNESS 70°
- PITONS DRIVEN: FOR PROTECTION ROCK — 172 ICE — 17 BOLTS — – FOR AIDs — 4
- TOTAL CLIMBING TIME 33 hours
- NUMBER AND TYPE OF NIGHTS SPENT 2 bivouacs with platform preparation on complex terrain
- NAMES, SURNAMES, AND QUALIFICATIONS OF THE TEAM LEADER AND MEMBERS:
- BELousov VITALY MIKHAILOVICH — CMS
- SHILONOSOV GENNADIY VASILYEVICH — CMS
- AGAFONOV GLEB VLADIMIROVICH — CMS
- TARAN NIKOLAY STAKHOVICH — 1st sports category
- TEAM COACH: BELOUSOV V.M.
- DATE OF DEPARTURE AND RETURN: August 13, 1979 — August 15, 1979
TEAM CAPTAIN:
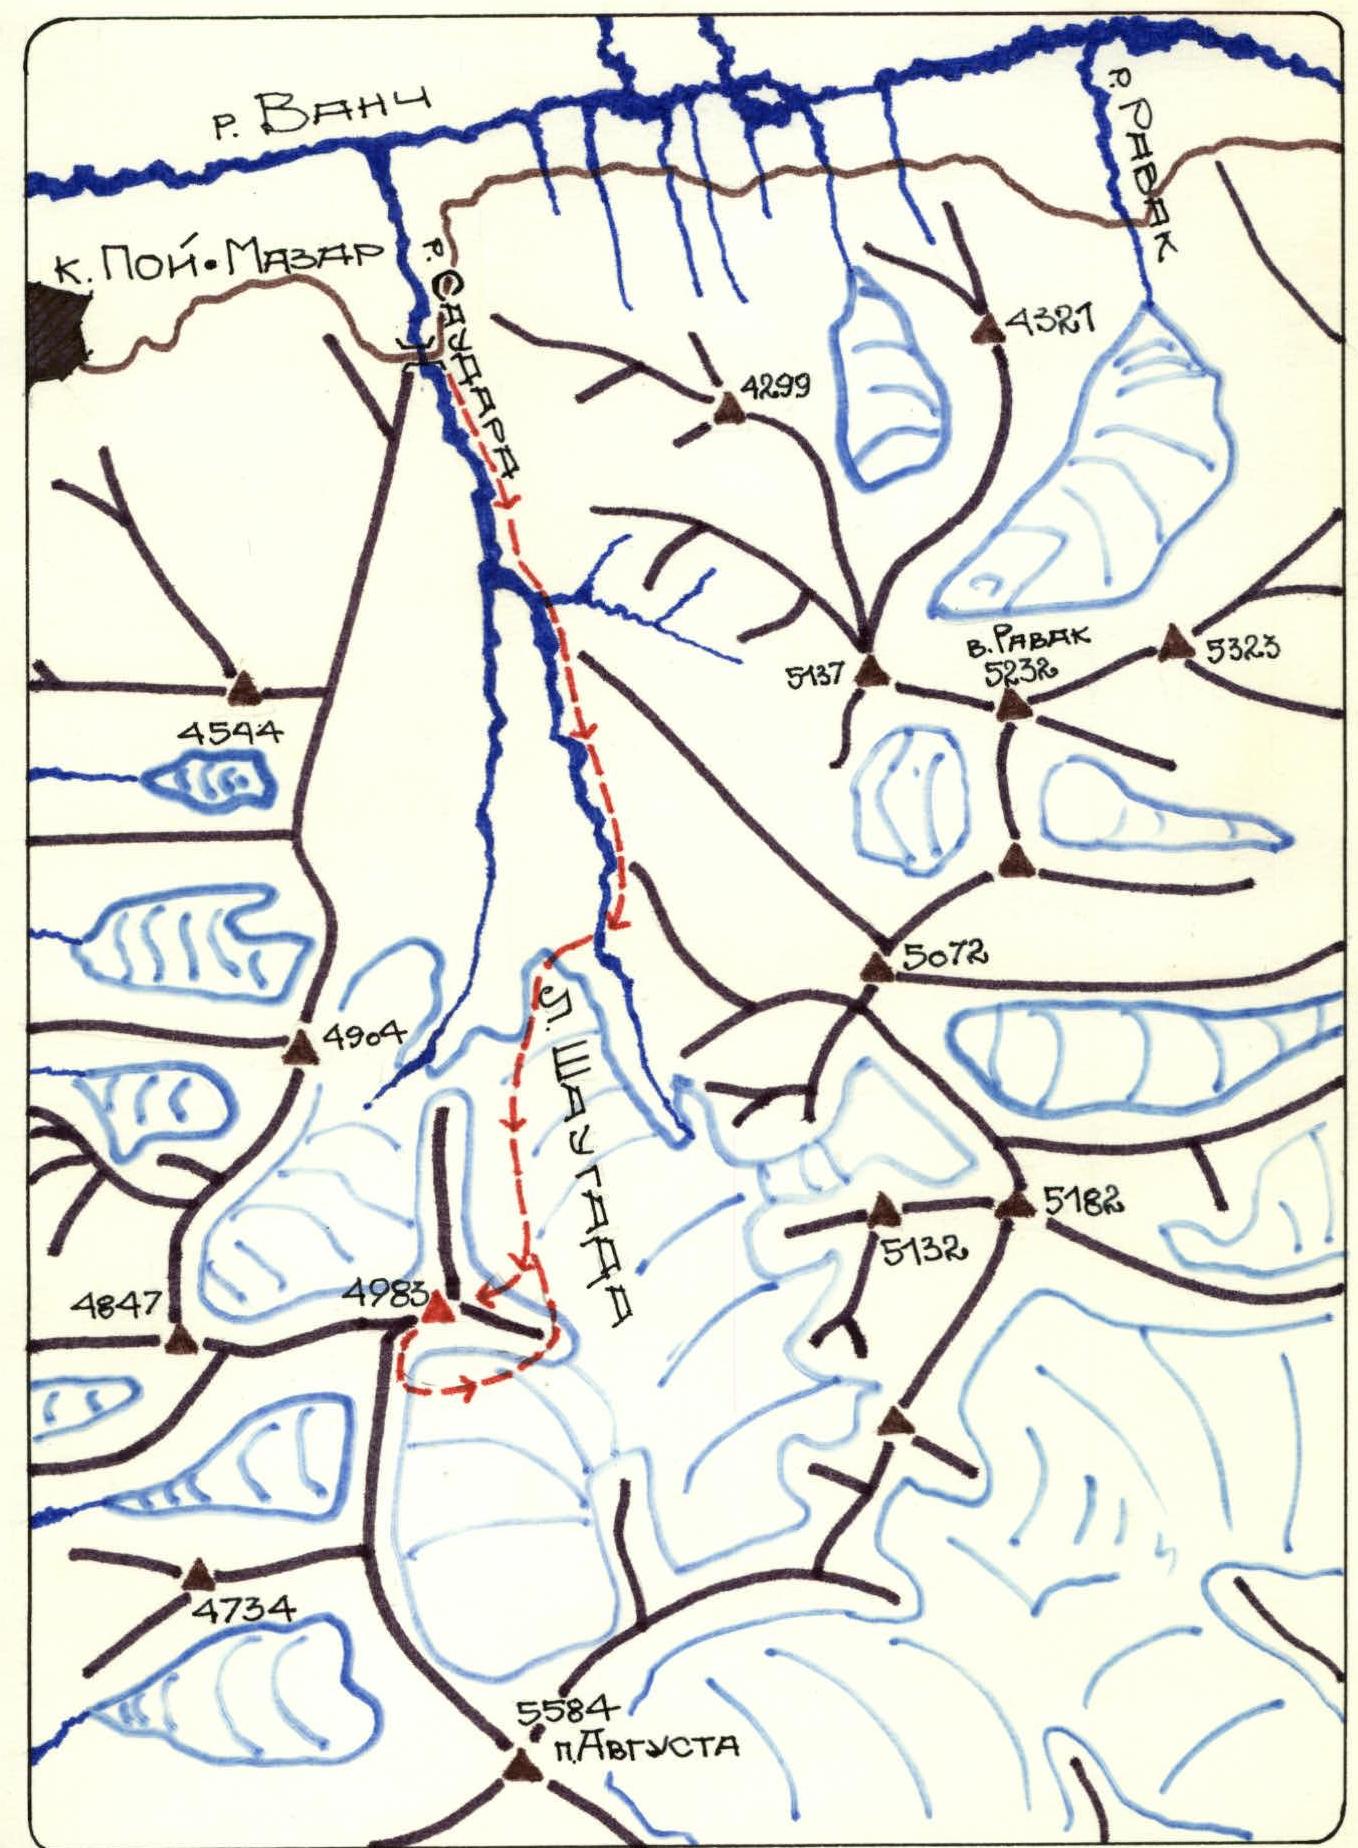
Map of the 4983 Peak Area
Brief Geographical Description of the Ascent Area
The Vanch Range, where the 4983 m peak is located, is part of the Pamir mountain system. It is situated in the northwest and stretches in a latitudinal direction between the ranges:
- Darvaz to the north;
- Yazgulem to the south, connecting to the meridional range of the Academy of Sciences to the east.
The Saudar valley and river originate from the Shaugada glacier, flowing north from the slopes of the dominant peak, August (5584 m), and empty into the Vanch River from the south, above the last village, Poi-Mazar.
The road approaches the Saudar River, makes a large loop, and crosses to the other bank via a concrete bridge. This is a key landmark for finding the Saudar valley.
The trail is good for the area but initially not visible, requiring an immediate ascent up the right slope via a steep scree. After gaining 100 m in height, the trail becomes apparent, allowing a caravan with packs to proceed safely to the glacier's beginning.
Brief Description of the Route by Sections
August 13, 1979
Section R0–R1
From the mid-morraine, the group approached the central rock massif resembling a rhombus. The wall of the rhombus is vertical and dry, with no observed rockfall.
The path to the right via a snow-ice couloir to the saddle between peak 4983 and a peak to the northeast (around 4750 m) is fully visible from under the rhombus wall.
The ascent is done under the cover of the rhombus wall via a snow slope mixed with scree, kicking steps. The passage is self-belayed with ice axes until the right angle of the rhombus wall, where a large couloir begins. See photo 1.
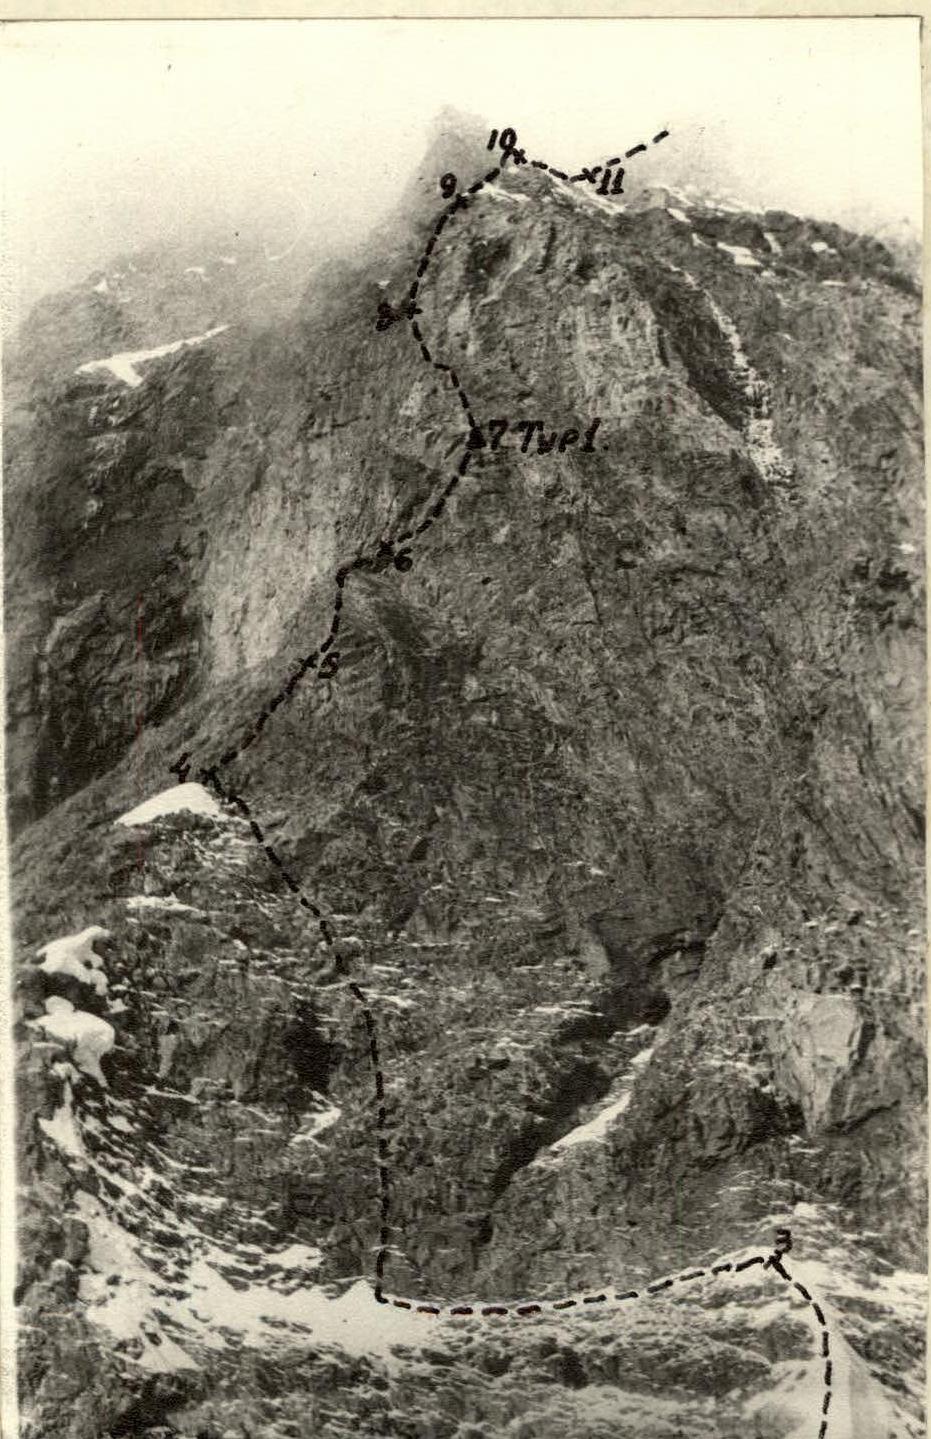
Section R1–R2
From the right angle of the rhombus wall, the snow slope transitions into a snow-ice slope, and after 60–70 m, into pure ice consisting of porous ice. The rock walls on the left are covered with a crust of rime ice. The central wall regularly sheds rocks, especially in warm weather, which roll into the central ice gully.
The first climber proceeds on crampons, establishing a belay through pitons driven into the rock and ice screws. Other participants sometimes need to chop steps, remove rime ice, and ice crust.
Passing through the snow-ice couloir is the most hazardous part due to:
- partial snow cover on the eastern wall;
- water flowing from the wall in clear weather;
- falling rocks after thawing.
The right side of the couloir is vertical, and rocks falling from the left wall reach it. Thus, it's safer to pass on the left, where there are protected spots.
The upper part of the couloir becomes steeper, requiring the last 30 m to be climbed via iced and snow-covered rocks on the left wall.
The saddle is an acute snow ridge with overhanging cornices on both sides. On the other side, there's a very steep wall couloir, which would be technically challenging to traverse.
The snow saddle allows for a safe platform, protected from rockfall and avalanches. The group decides to bivouac here but continues to process the wall and hang ropes.
Section R2–R3
Along the acute snow ridge, which approaches the eastern wall steeply, the group kicks and treads steps. In some places, they need to chop through a small cornice and proceed directly on the knife-edge ridge. The ridge is windy, requiring careful belaying:
- through an ice axe;
- through rock pitons driven into the wall at the end of the ridge.
Other participants follow via the belay ropes with self-belaying using ice axes and ice picks.
From the saddle, the further path up the wall is visible — via a buttress to the left of the snow saddle, approaching the center of the large red wall. See photo 2.
Section R3–R4
From under the wall where the snow ridge ends, the group must traverse left along a sloping ledge for 20 m, then ascend the wall, slightly deviating left onto the edge of the buttress. Here, the rocks are step-like with sloping slabs, sprinkled with snow. See photo 3.
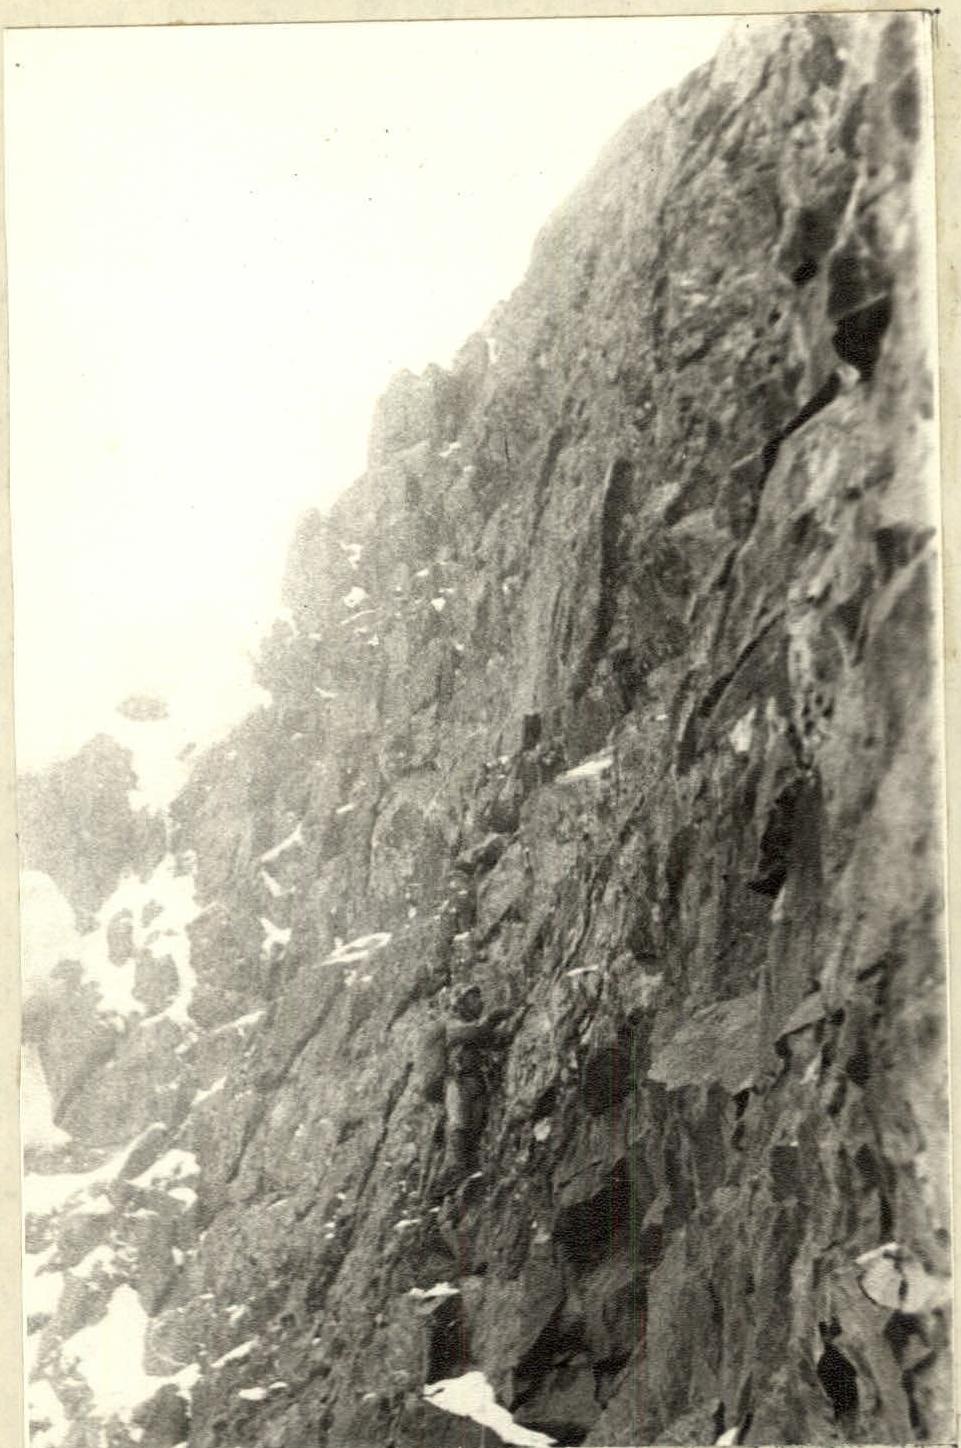
Some slabs and pockets are filled with rime ice. Climbing is hindered by:
- vertical walls of 3–4 m;
- snow presence;
- ice presence.
The passage is via belay ropes with upper or lower protection.
Before reaching the buttress edge, there are destroyed rocks. There's a risk of dislodging loose rocks onto the climber below via rope or by a participant.
After hanging ropes on this section, the group descends to the snow saddle for the night.
August 14, 1979
Section R4–R5
In the morning, after proceeding along the hung belay ropes to the buttress crest, the group continues upward. The route is logical. The rocks are monolithic, composed of large blocks. See photo 4. Handholds are scarce but strong. The buttress periodically gives way to walls of 12–14 m, overcome by difficult climbing.
The lead climber goes without a backpack, in Vibram shoes, on a double rope. The overall steepness of the buttress edge is around 70°.
When climbing vertical belay ropes with a backpack, participants sometimes experience being thrown off. See photo 5.
It's beneficial to have a light pendulum system for such belays, where the main load is borne by the legs.
From the rock arsenal, combined pitrous, thin channels, and wedges are effective.
Section R5–R6
The buttress approaches a gray vertical rock rib. Along it, to the left and upward, via a slightly pronounced outer angle for 40 m. The steepness is 70°. The rocks are monolithic with few handholds and cracks. In this place, the lead climber wears rock shoes, as climbing smooth monoliths is more reliable and faster. The right side of the rib is more snow-covered, and cracks are filled with rime ice. See photo 6.
The group passes it via belay ropes with lower or upper protection for each participant. Climbing is difficult. Rare loose rocks fall right and left of the angle, safe for the group moving along the buttress. The protection is exclusively via pitons. The route is logical, and deviation is not possible.
Section R6–R7
The gray rib has a noticeable bend and continues as an even steeper rib, directed at a bastion with a red wall below. The steepness is 75°. The width of the outer vertical angle becomes minimal. Climbing becomes more difficult and partly very difficult. There's a 0.7 m overhang, overcome using ladders. See photo 7.
The rocks remain monolithic with minimal handholds and cracks. When overcoming the overhang, rucksacks were pulled up using the belay rope.
At the top of the angle, where three could stand, a cairn (Tur 1) was built. This spot protrudes from the wall like a headland of the outer angle and marks the beginning of the large red wall, visible from the snow saddle.
Section R7–R8
From the top of the outer angle, where one can stand and establish a belay, the group moves left-upward onto the red wall via cracks, handholds, and small quartz niches. The red wall is characterized by quartz and rock crystal outcrops in small niches and holes. The wall is entirely monolithic with an uneven micro-relief. See photo 8.
After 15–17 m, the group must:
- traverse left for 4 m;
- then ascend with a slight leftward deviation.
The rocks are red, monolithic, with few cracks. Climbing is very difficult; rucksacks are pulled up. The route is chosen via upward-sloping gaps and handholds. Ladders were used in places to overcome the wall.
Climbing features:
- pitons hold weakly due to the lack of deep cracks;
- pitons were driven more frequently.
The weather was good, and the rocks were dry during this section.
The red wall is the main challenging section. The rocks are of 5th and 6th difficulty. In other conditions, such as icing or bad weather, passing this wall would be problematic or time-consuming. This should be considered for future ascents.
Section R8–R9
The wall transitions into a buttress of dark gray gneiss, reaching black in color. Similar to the lower buttress, the upper one is serious and challenging. Climbing is difficult along steep rocks, further complicated by destruction. Careful placement of pitons is necessary. Cracks are filled with ice, and driving pitons often results in rock blocks breaking off. Ledges on the right side of the buttress:
- are filled with snow;
- are iced over.
The group proceeded with maximum caution due to the risk of:
- rocks falling from underfoot;
- rocks being dislodged by the rope directly onto the route.
Section R9–R10
The buttress becomes gentler, with a 65° overall inclination. It consists of blocks and slabs covered with rime ice and snow. Vertical walls of 3–5 m are encountered, overcome by difficult climbing. See photo 9. Elsewhere, there's medium climbing.
The passage is hindered by ice and snow, which need to be cleared to find footholds and drive pitons.
The buttress proceeds evenly without large walls or sharp drops. The left side is steeper, and it's technically easier to climb the right side, 5 m from the buttress edge.
Throughout:
- belay ropes are hung;
- upper or lower protection is provided for the climber.
Box and channel pitons performed well on this section.
The section is not rockfall-dangerous as rare loose rocks fall toward the north wall of the peak, to the right of the route.
The buttress ends in a horizontal rock-snow ridge with a small cornice, where a small platform for a semi-reclining bivouac was made, as the ridge consists of large, frozen stones.
On this day, the group spent 15 hours climbing. The wall lacks suitable platforms even for a group sitting bivouac, and it was planned to reach this ridge.
The ridge, initially horizontal, transitions into another buttress. It first consists of:
- large stones, snow-covered;
- then pure snow with a small cornice;
- and approaches rocks.
Belay ropes were established for its passage, anchored to large stones on one side and pitons driven into rocks on the other.
The narrow ridge is traversed cautiously, with stepped footprints and self-belaying using an ice axe. The ridge offers a view of a tower to the right of the peak. See photo 1.
Section R10–R11
The ridge, initially horizontal, transitions into another buttress. It first consists of:
- large stones, snow-covered;
- then pure snow with a small cornice;
- and approaches rocks.
Belay ropes were established for its passage, anchored to large stones on one side and pitons driven into rocks on the other. The narrow ridge is traversed cautiously, with stepped footprints and self-belaying using an ice axe.
The ridge offers a view of a tower to the right of the peak. See photo 1.
Section R11–R12
After the ridge, the route follows a gray buttress toward the visible tower. The rocks are monolithic, block-like, half-covered with snow. After gaining 80 m in height from the ridge, the direction changes left, aiming for the lower part of the ridge connecting the tower and the peak.
This section features step-like rocks in a wide, bowl-shaped gully. See photo 1. The rocks are monolithic, requiring the overcoming of:
- small steep walls;
- large vertical slabs.
Protection is via pitons and rock features.
For safety from potential rockfall, it's necessary to proceed on the right, drier side of the gully, exiting onto the narrow pre-summit ridge connecting the right tower to the peak.
Section R12–R13
The narrow pre-summit ridge is also composed of large stones and blocks. Sharp rock outcrops are monolithic. Snow lies on ledges and steps. When traversing the 80 m long ridge, two walls of 3 and 4 m are encountered, climbed with piton protection. Otherwise, the ridge is traversed with alternate and simultaneous protection using rock features and pitons. On sections oriented east-west, snow cornices of up to 0.5 m are encountered, which are fully removed or chopped away due to the ridge's narrowness.
There was no cairn on the summit, nor signs of previous ascents, confirming the group's first ascent. The view from the summit revealed peak August to the south, peak 4748 nearby to the west, and the surrounding panorama. The group verified their location using a map, finding the peak and range layout correctly marked but heights requiring adjustment.
Section R13–R14. Descent.
After a brief reconnaissance, the descent was made southward toward peak August (5584 m), known for its extensive glaciation. The descent follows a destroyed ridge with numerous loose rocks, approximately category 2A difficulty.
After descending from the summit, the group reached a broad ridge-like plateau connecting peaks 4983 and August.
From the ridge, the descent continues via a stony scree and ice ledges along the slope of peak 4983. The ledges pose a challenge, especially in poor visibility.
It's necessary to stay along the slopes of peak 4983 until reaching the main Shaugada glacier.
The Shaugada glacier is easier to traverse via a single bend with gaps in its center, where the glacier has a slight incline.
Further movement along the glacier can be done on either side. Here, the glacier has a drop only at its end, easily bypassed on the moraines, returning to the trail on the right side of the Saudar River.
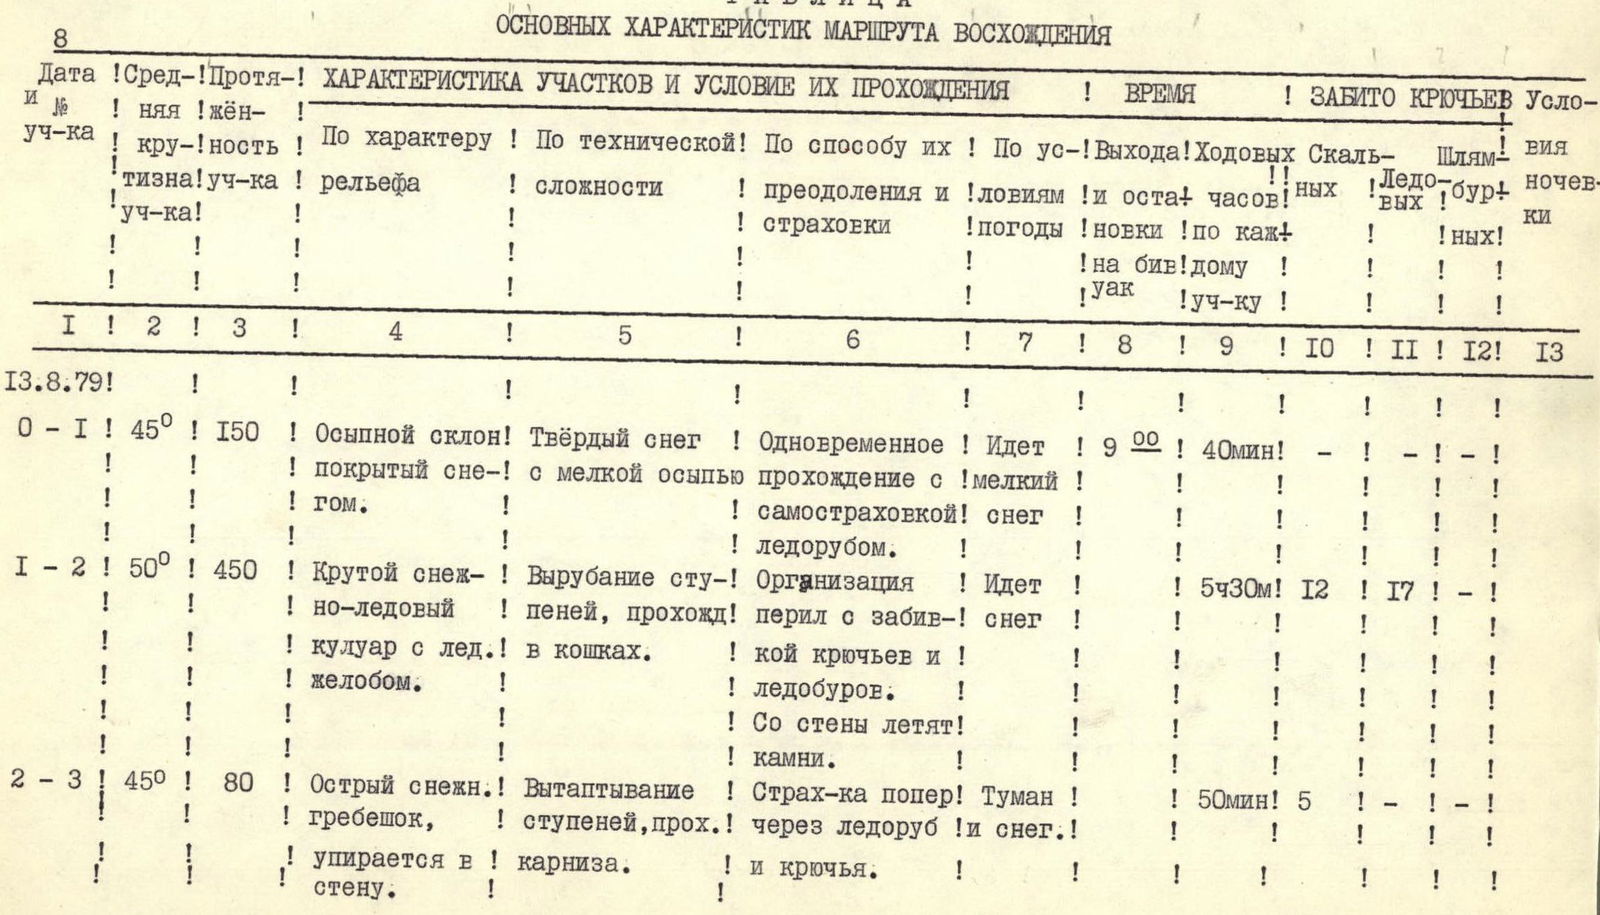
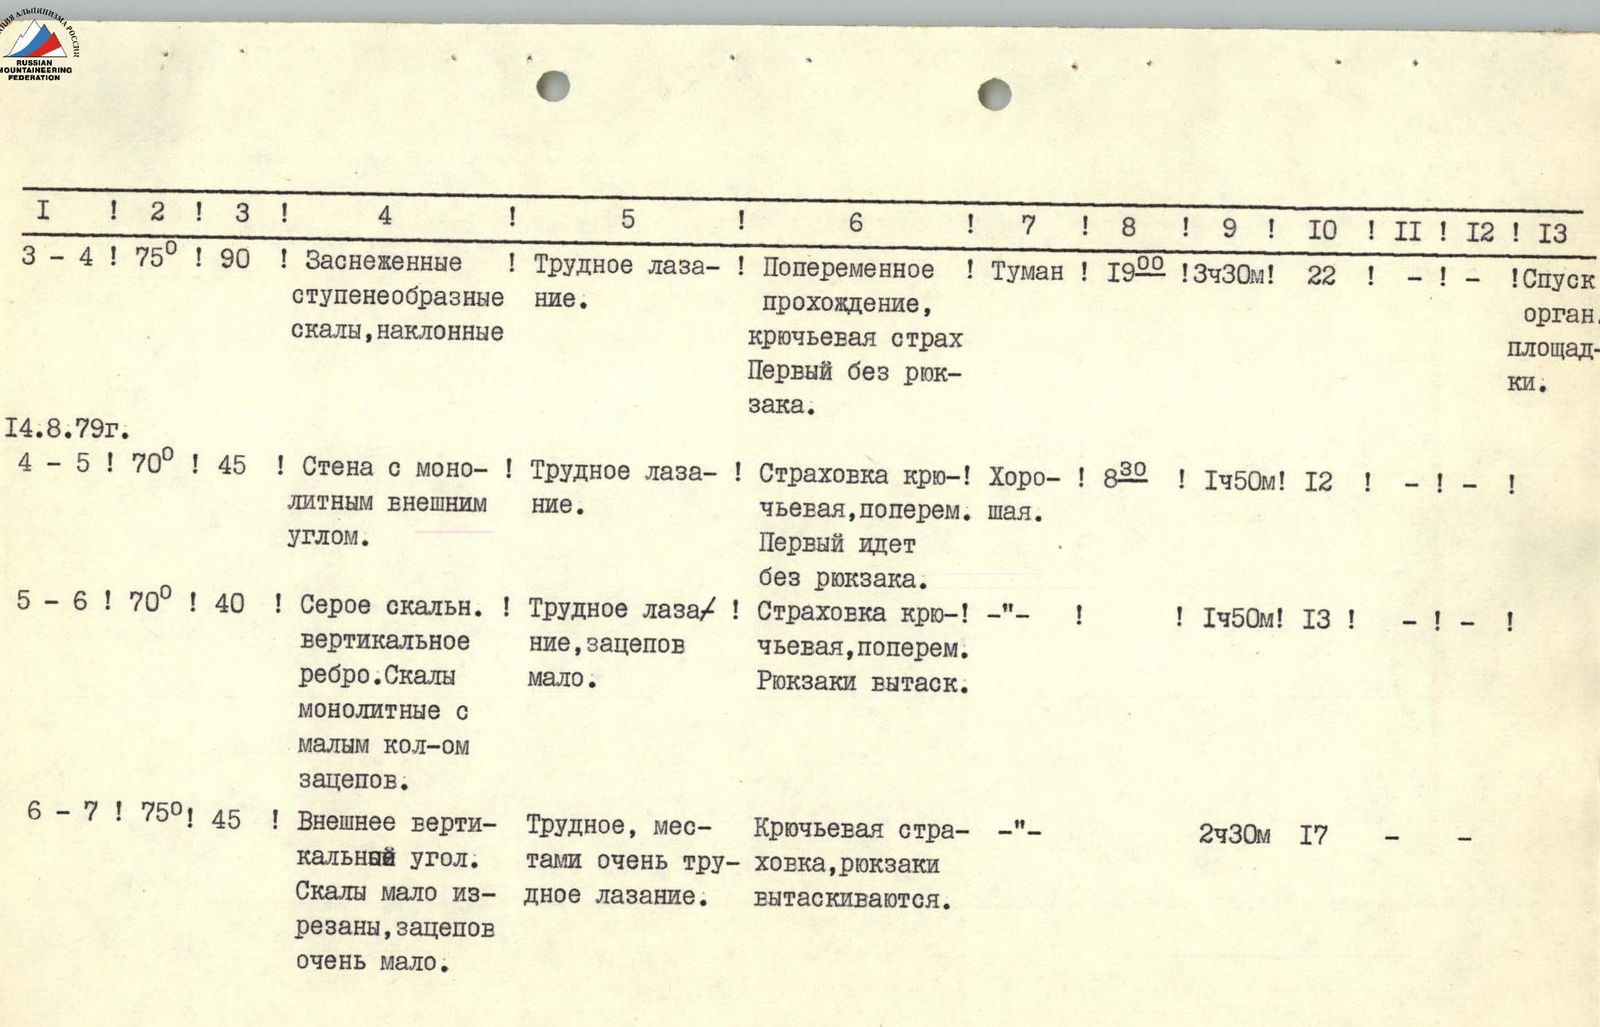
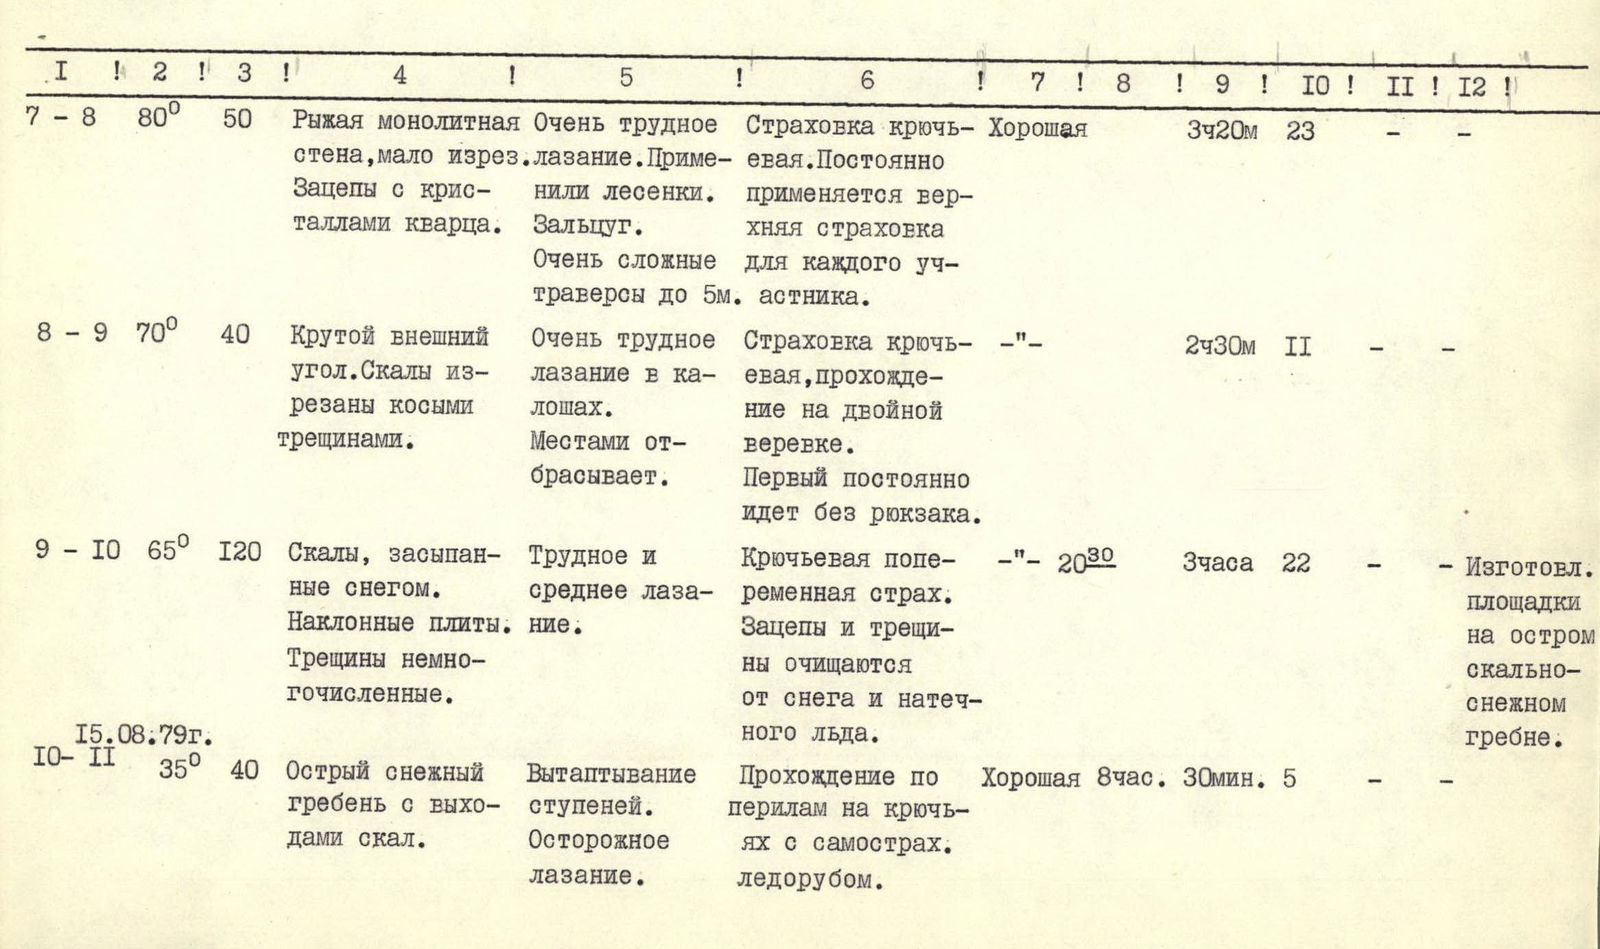
Table of Main Route Characteristics
| Date and Section | Average Steepness | Length of Section | Characteristics and Climbing Conditions | Time: Departure and Stop | Time: Climbing Hours per Section | Pitons: Rock | Pitons: Ice | Pitons: Bolts | Bivouac Conditions |
|---|---|---|---|---|---|---|---|---|---|
| August 13, 1979 | |||||||||
| R0–R1 | 45° | 150 m | Scree slope covered with snow. Firm snow with small scree. Self-belay with ice axe. | Started 9:00 | 40 min | – | – | – | |
| R1–R2 | 50° | 450 m | Steep snow-ice couloir with ice and gully. Step cutting. Belay via pitons and ice screws. | Proceeding | 5 h 30 min | 12 | 17 | – | |
| R2–R3 | 45° | 80 m | Acute snow ridge, abutting the wall. Step treading. Climbing via ice axe and pitons. | Fog | 50 min | 5 | – | – | |
| R3–R4 | 75° | 90 m | Snow-covered step-like rocks, sloping. Difficult climbing. Alternate passage, piton protection. First without backpack. | Fog, 19:00 | 3 h 30 min | 22 | – | – | Descent, platform preparation |
| August 14, 1979 | |||||||||
| R4–R5 | 70° | 45 m | Wall with monolithic outer angle. Difficult climbing. Piton protection, alternate. First without backpack. | Good weather 8:30 | 1 h 50 min | 12 | – | – | |
| R5–R6 | 70° | 40 m | Gray rock vertical rib. Monolithic rocks with few handholds. Difficult climbing. Piton protection, alternate. Rucksacks pulled up. | – | 1 h 50 min | 13 | – | – | |
| R6–R7 | 75° | 45 m | Outer vertical angle. Rocks little fissured, few handholds. Difficult, partly very difficult climbing. Piton protection, rucksacks pulled up. | – | 2 h 30 min | 17 | – | – | |
| R7–R8 | 80° | 50 m | Red monolithic wall, little fissured. Handholds with quartz crystals. Very difficult climbing. Ladders used. | Good weather | 3 h 20 min | 23 | – | – | |
| R8–R9 | 70° | 40 m | Steep outer angle. Rocks fissured with diagonal cracks. Very difficult climbing in rock shoes. Piton protection, double rope. First always without backpack. | – | 2 h 30 min | 11 | – | – | |
| R9–R10 | 65° | 120 m | Rocks covered with snow. Sloping slabs. Few cracks. Difficult and medium climbing. Piton protection, alternate. Handholds and cracks cleared of snow and rime ice. | 20:30 | 3 h | 22 | – | – | Platforms made on acute rock-snow ridge. |
| August 15, 1979 | |||||||||
| R10–R11 | 35° | 40 m | Acute snow ridge with rock outcrops. Step treading. Cautious climbing. Belay via pitons with self-belay using ice axe. | Good weather 8:00 | 30 min | 5 | – | – | |
| R11–R12 | 60° | 180 m | Step-like wall left of the tower. Monolithic rocks, block-like. Medium and difficult climbing. Alternate passage with piton protection and via features. | Good weather | 4 h 30 min | 18 | – | – | |
| R12–R13 | 25° | 80 m | Acute rock ridge with snow and walls of 3–5 m. Easy and medium climbing. Alternate passage with protection via features and pitons. | – | 1 h | 4 | – | – |
View of the original table: