Ascent Passport
- North Caucasus, Digor gorge.
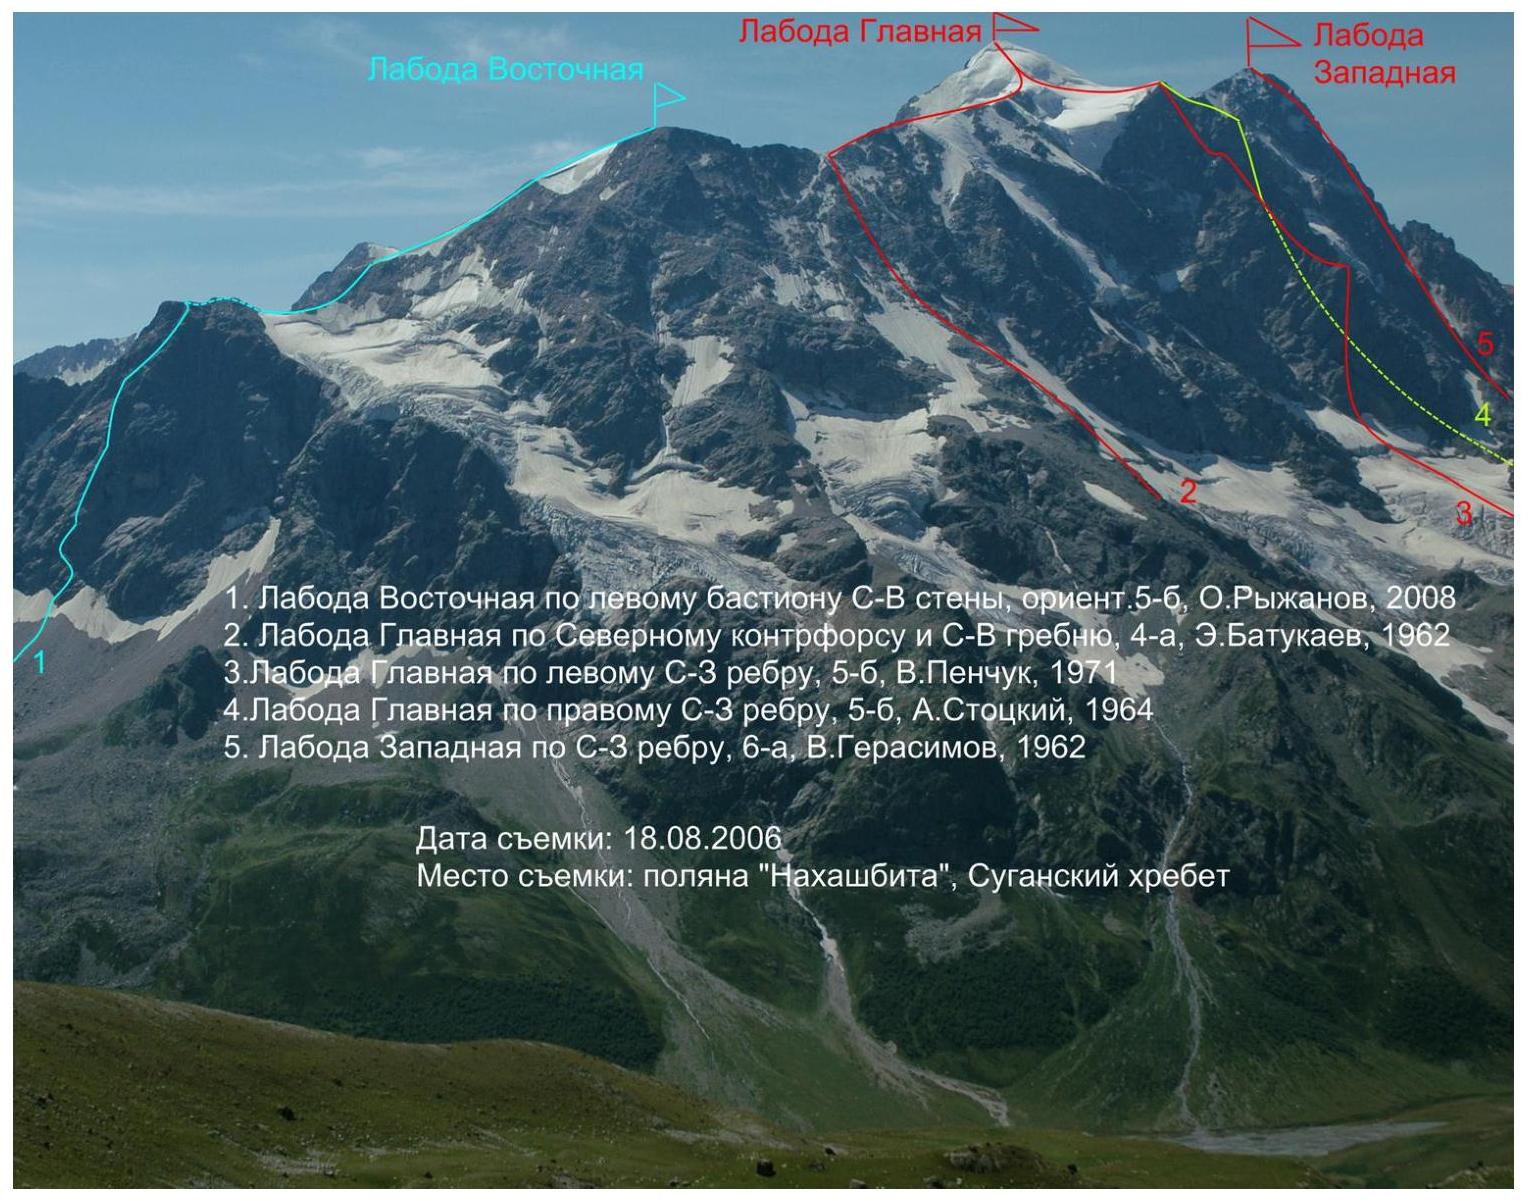
- Peak name: Laboda East, route: via the left bastion of the north-eastern wall
- Proposed - 5B category of difficulty, first ascent (since no route descriptions were found for peak Laboda East)
- Route type: combined
- Route elevation gain: 1184 m (according to the map)
Route length: 2460 m. Rocky section length: 895 m. Section lengths:
- V category of difficulty – 260 m.
Average steepness:
- main part of the route – 65°
- entire route – 50°
- "Hooks" left on the route: total 7; including 3 piton hooks
Hooks used on the route:
- stationary piton hooks 3, including artificial climbing aids (ITO) – 0
- rock hooks 45, including ITO – 0
- chock stones 78, including ITO – 2 Total artificial climbing aids (ITO) used – 2
- Team's climbing hours: 38 hours, 4 days (including approach and descent)
- Team leader: Ryzhanov Oleg Nikolaevich, Candidate Master of Sports
Team members:
- Makarkina Olga Lvovna
- 1st sports category
- Coach: Ryzhanov O.N.
- Departure for the route: 7:00, August 10, 2008.
Reached the summit: 12:00, August 12, 2008. Returned to base camp: 17:00, August 13, 2008.
General Photo
Introduction
Until now, no routes had been established to the summit of Laboda East. Preliminary reconnaissance, photography, and route observation were conducted in 2006. In August 2007, we attempted to traverse the route with a group of three. The group reached the bivouac site on the bastion. Due to a lack of equipment and deteriorating weather, we were forced to descend.
The route was successfully traversed from August 9 to 12, 2008, by a team of two:
- Ryzhanov O.N. (team leader) – Candidate Master of Sports
- Makarkina O.L. – 1st sports category
The route follows a steep ridge of a pronounced bastion on the north-eastern wall of Laboda East peak. It is bounded on both sides by rockfall-prone couloirs, limiting deviations from the route. A safe passage zone of 50–100 m remains. The rocks are granite, clean, with few holds. There are few loose rocks. The route features:
- steep, complex walls ranging from 10 to 40 m, alternating with ledges and inclined slabs;
- The route is abundant in cornices, mostly circumvented by strenuous climbing.
The route took three days to complete for the two climbers. Weather was favorable during the bastion ascent.
On the second day, after reaching the ridge:
- the weather began to deteriorate;
- a thunderstorm started during the descent from the summit, delaying the descent to the camp until the next day;
- the descent was complicated due to the "descent canyon" being washed out by mudflows following the thunderstorm.
Approach to the Route
From the base camp (Digoria alpine camp) along the right bank of the Khares River, move upstream along the old road, cutting through the hairpin turns via a trail starting from the camp gate. Reach the waterfall (1 hour). From the waterfall, proceed to a small stream with a small waterfall flowing into Khares from the right (0.5 hours). Along the right bank of the stream, descend into the Khares canyon and cross to the left bank via a stone plug-bridge. Moving upstream along the gorge, reach a stream flowing into Khares through multiple branches. From the bridge to the stream – 1 hour via an old abandoned trail.
Along the left bank, through an overgrown slope, reach a gentle valley leading under the bastion. Ascend the valley to a green pocket on the right under the talus slopes. From the turn – 1.5 hours. Bivouac in the pocket.
From the bivouac:
- Approach the route via talus and then a snowfield (1 hour).
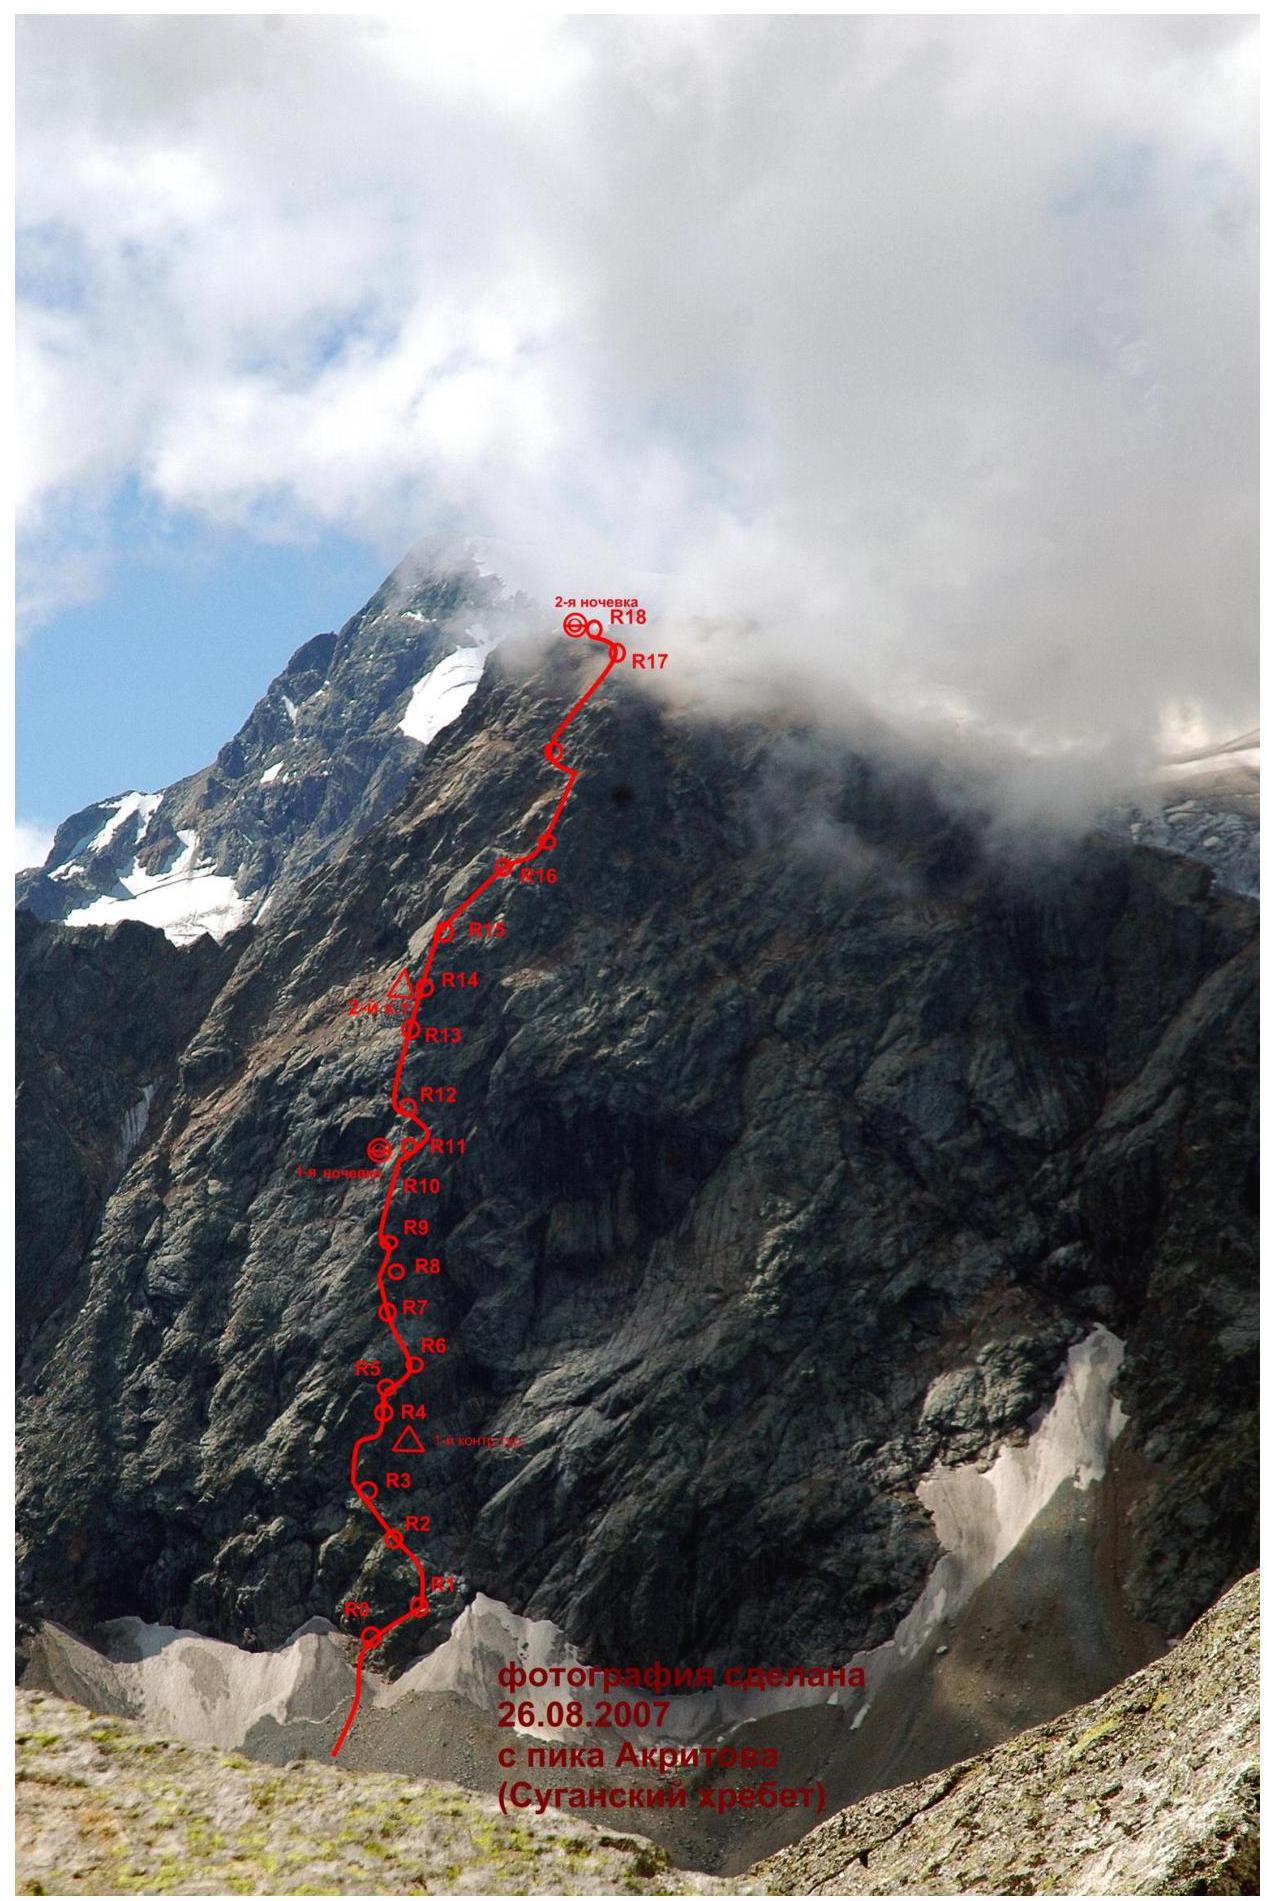
Route Profile (Photo)
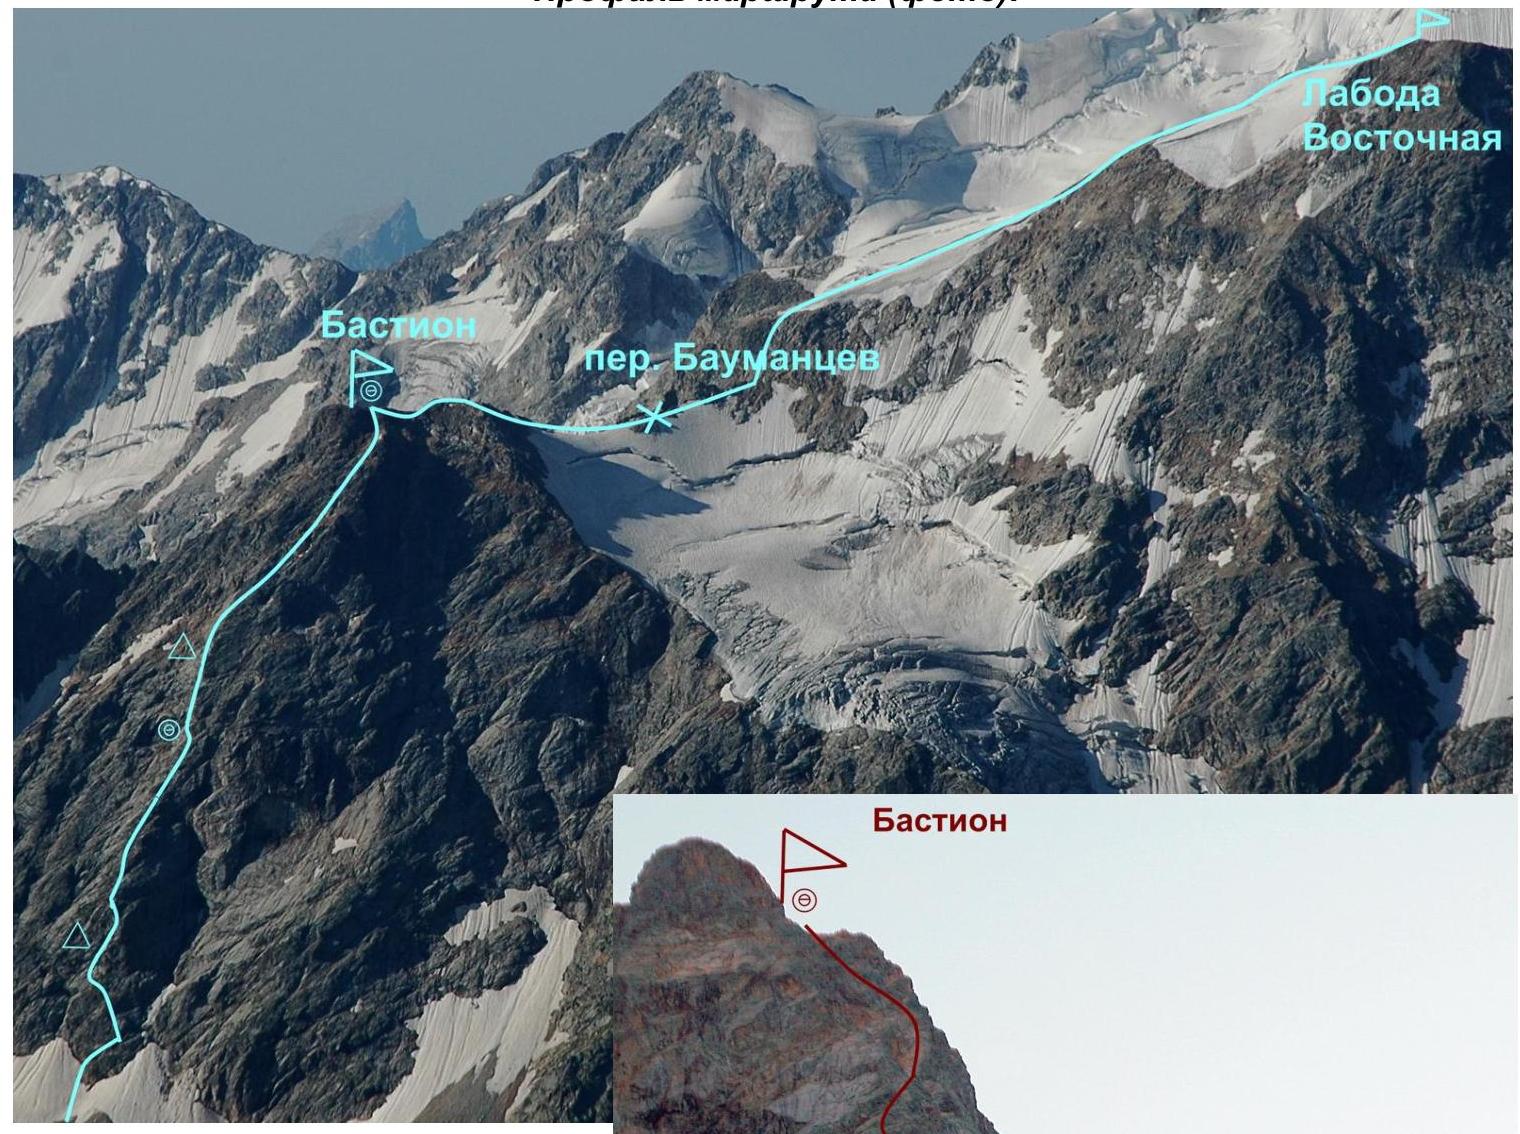
Photographing the bastion's profile is challenging due to its location and exposure. Apart from early morning, it is either overly sunlit or shaded. Attempts to capture its profile were unsuccessful.
Top photo:
- Left profile (taken from Nakhashbita meadow on August 28, 2007)
Right:
- Right profile photo (taken on August 26, 2007, from the slopes of the north-eastern wall of Laboda peak)

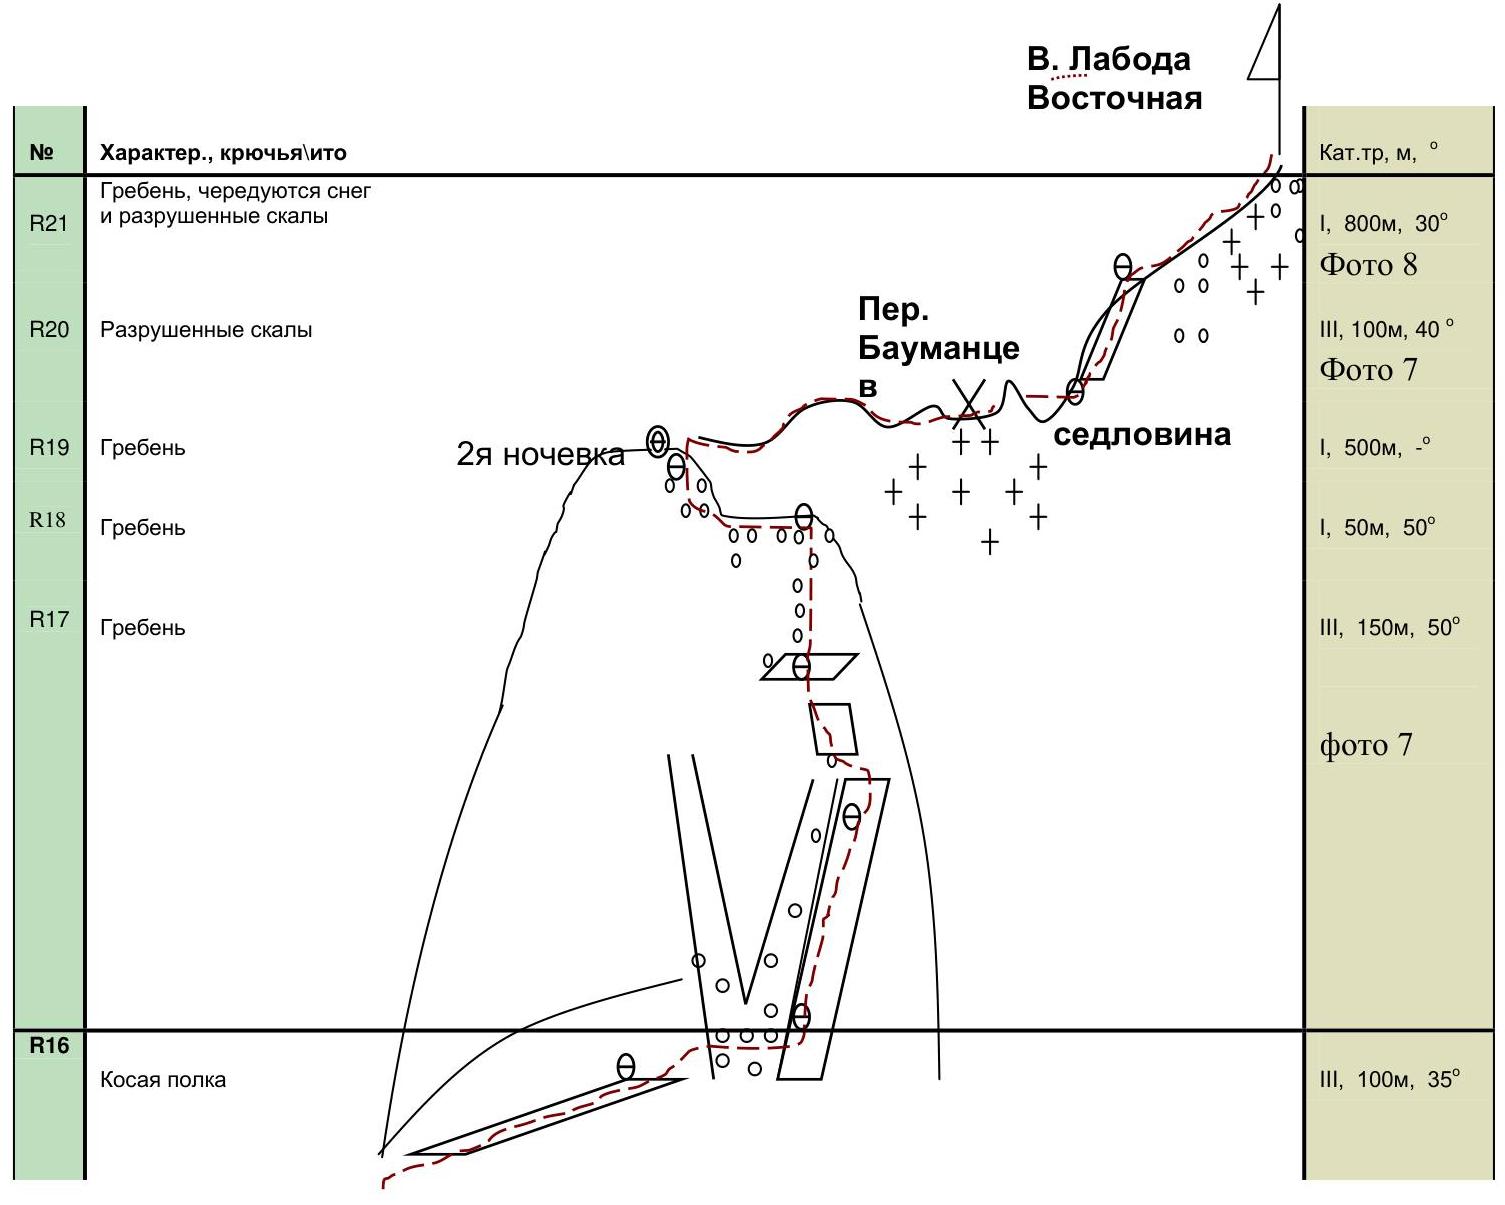
Route Profile (Drawn)

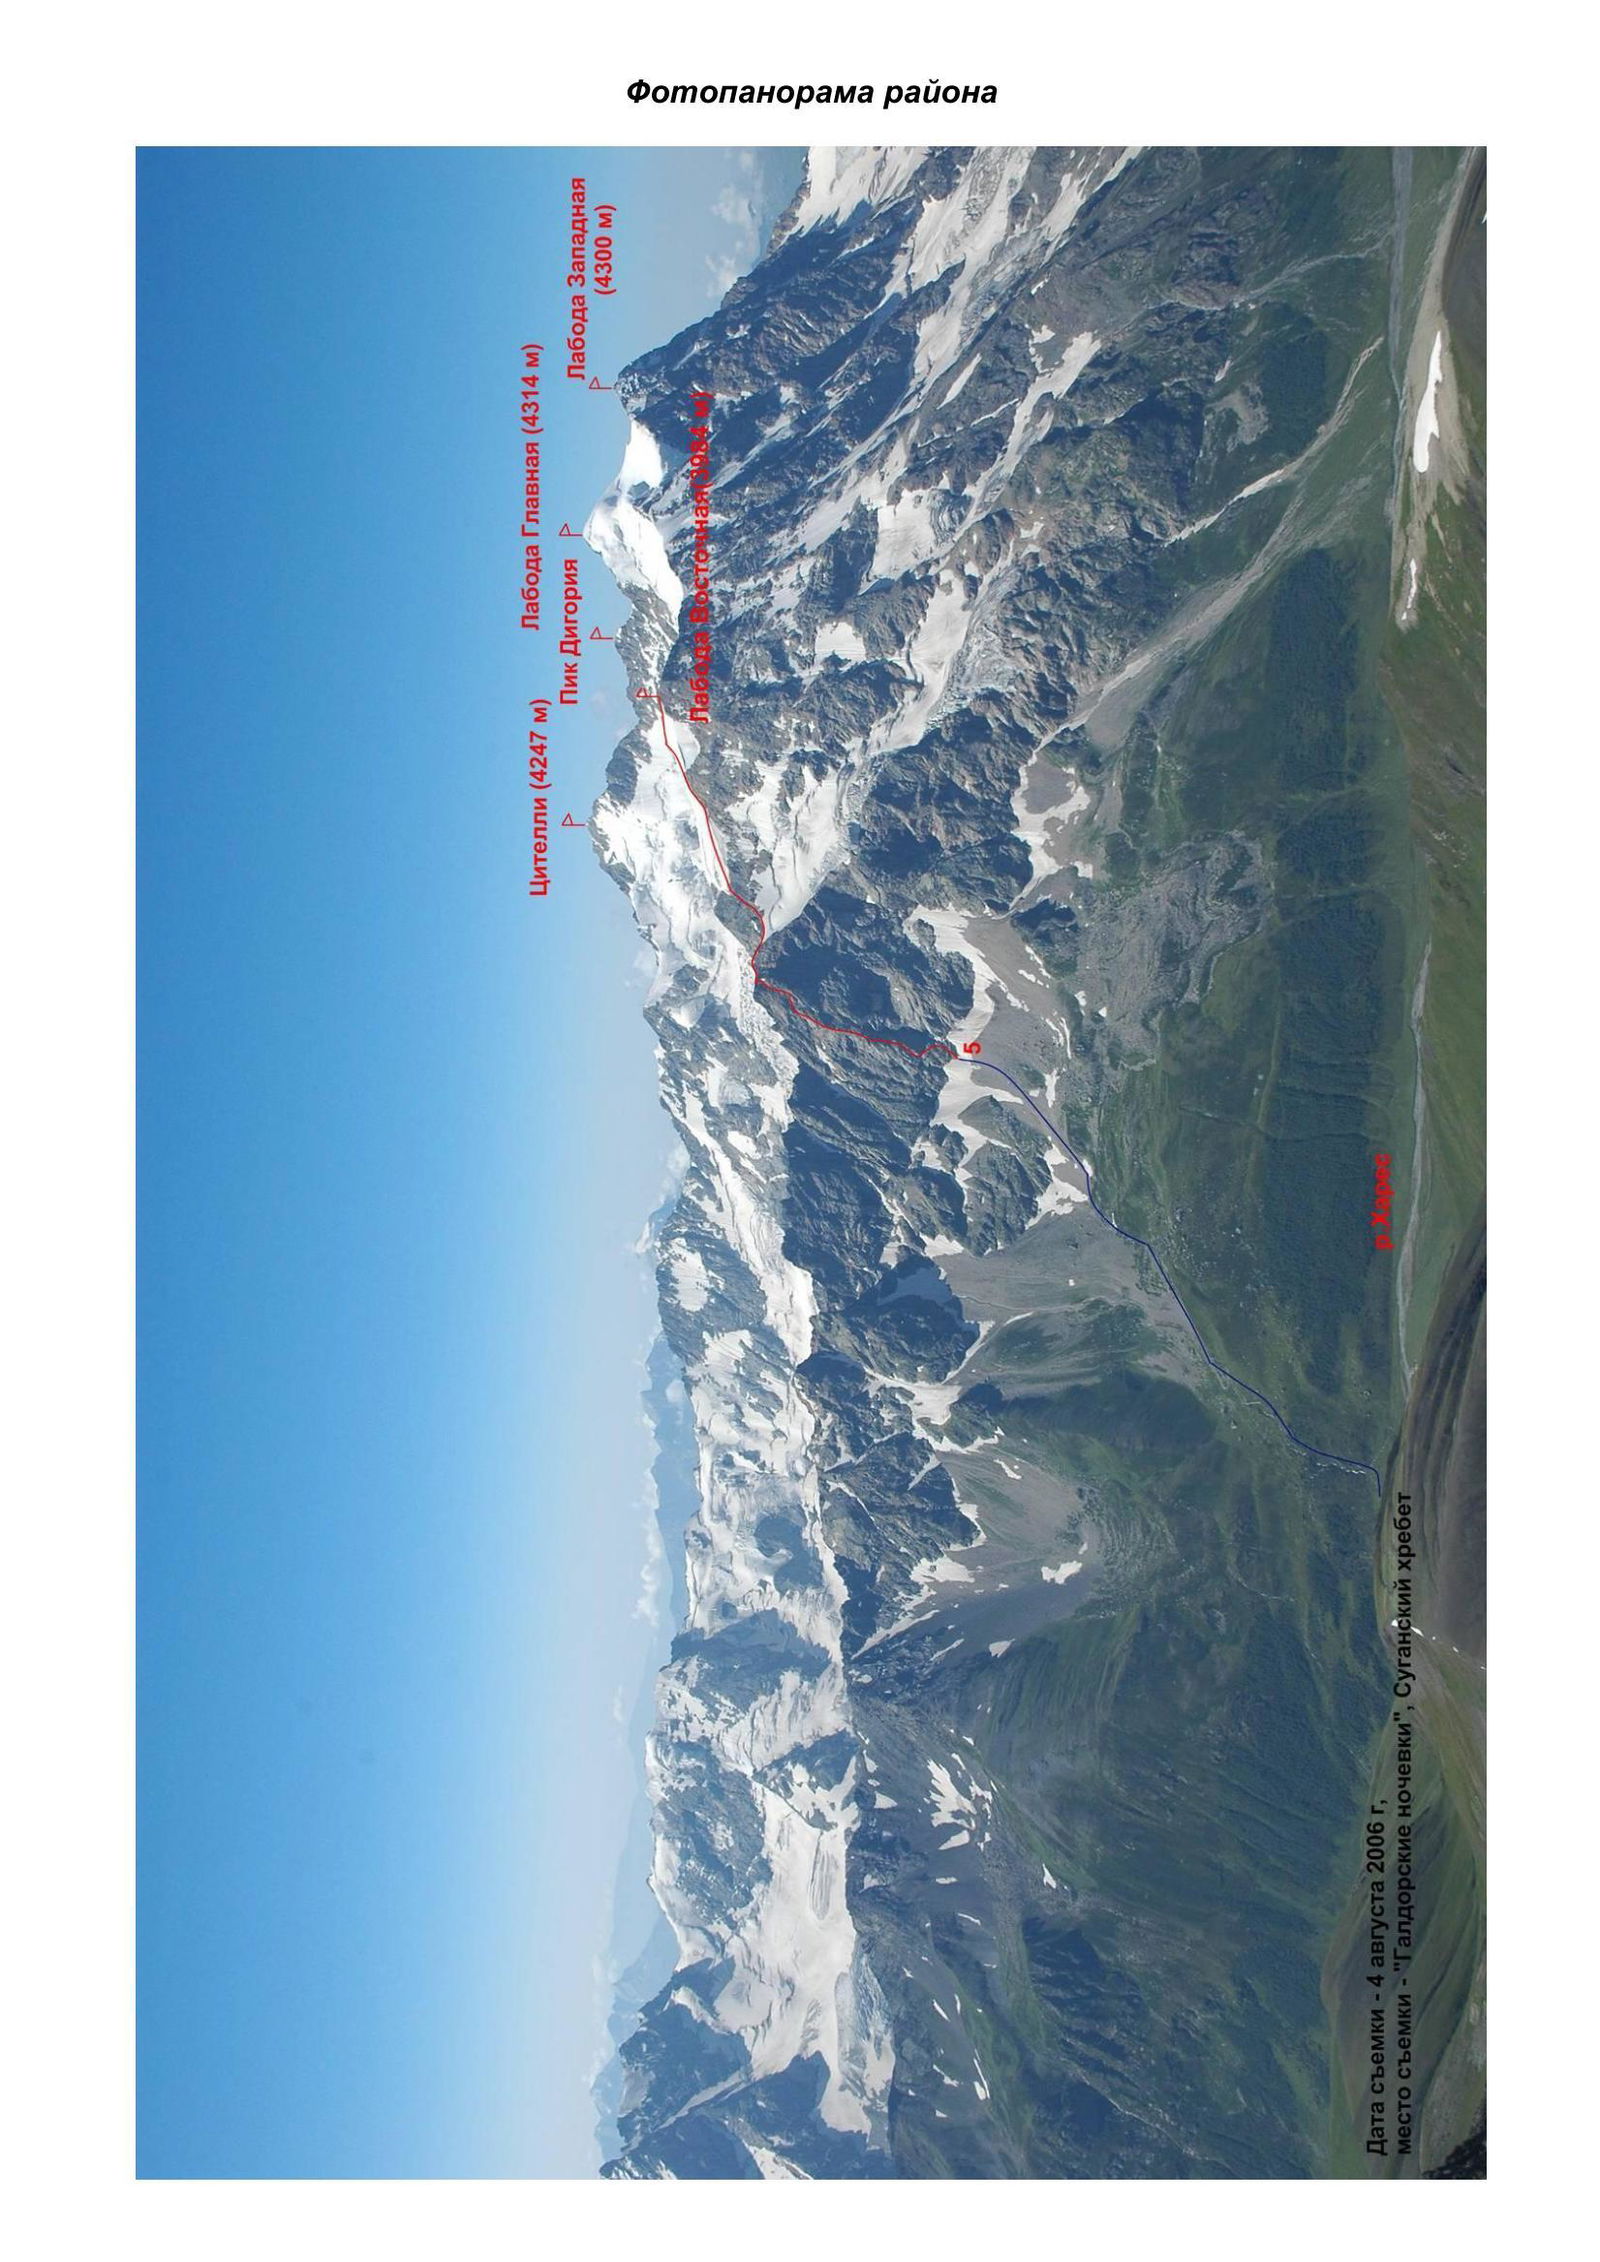
Photopanorama of the Area
Map Diagram, Area Overview
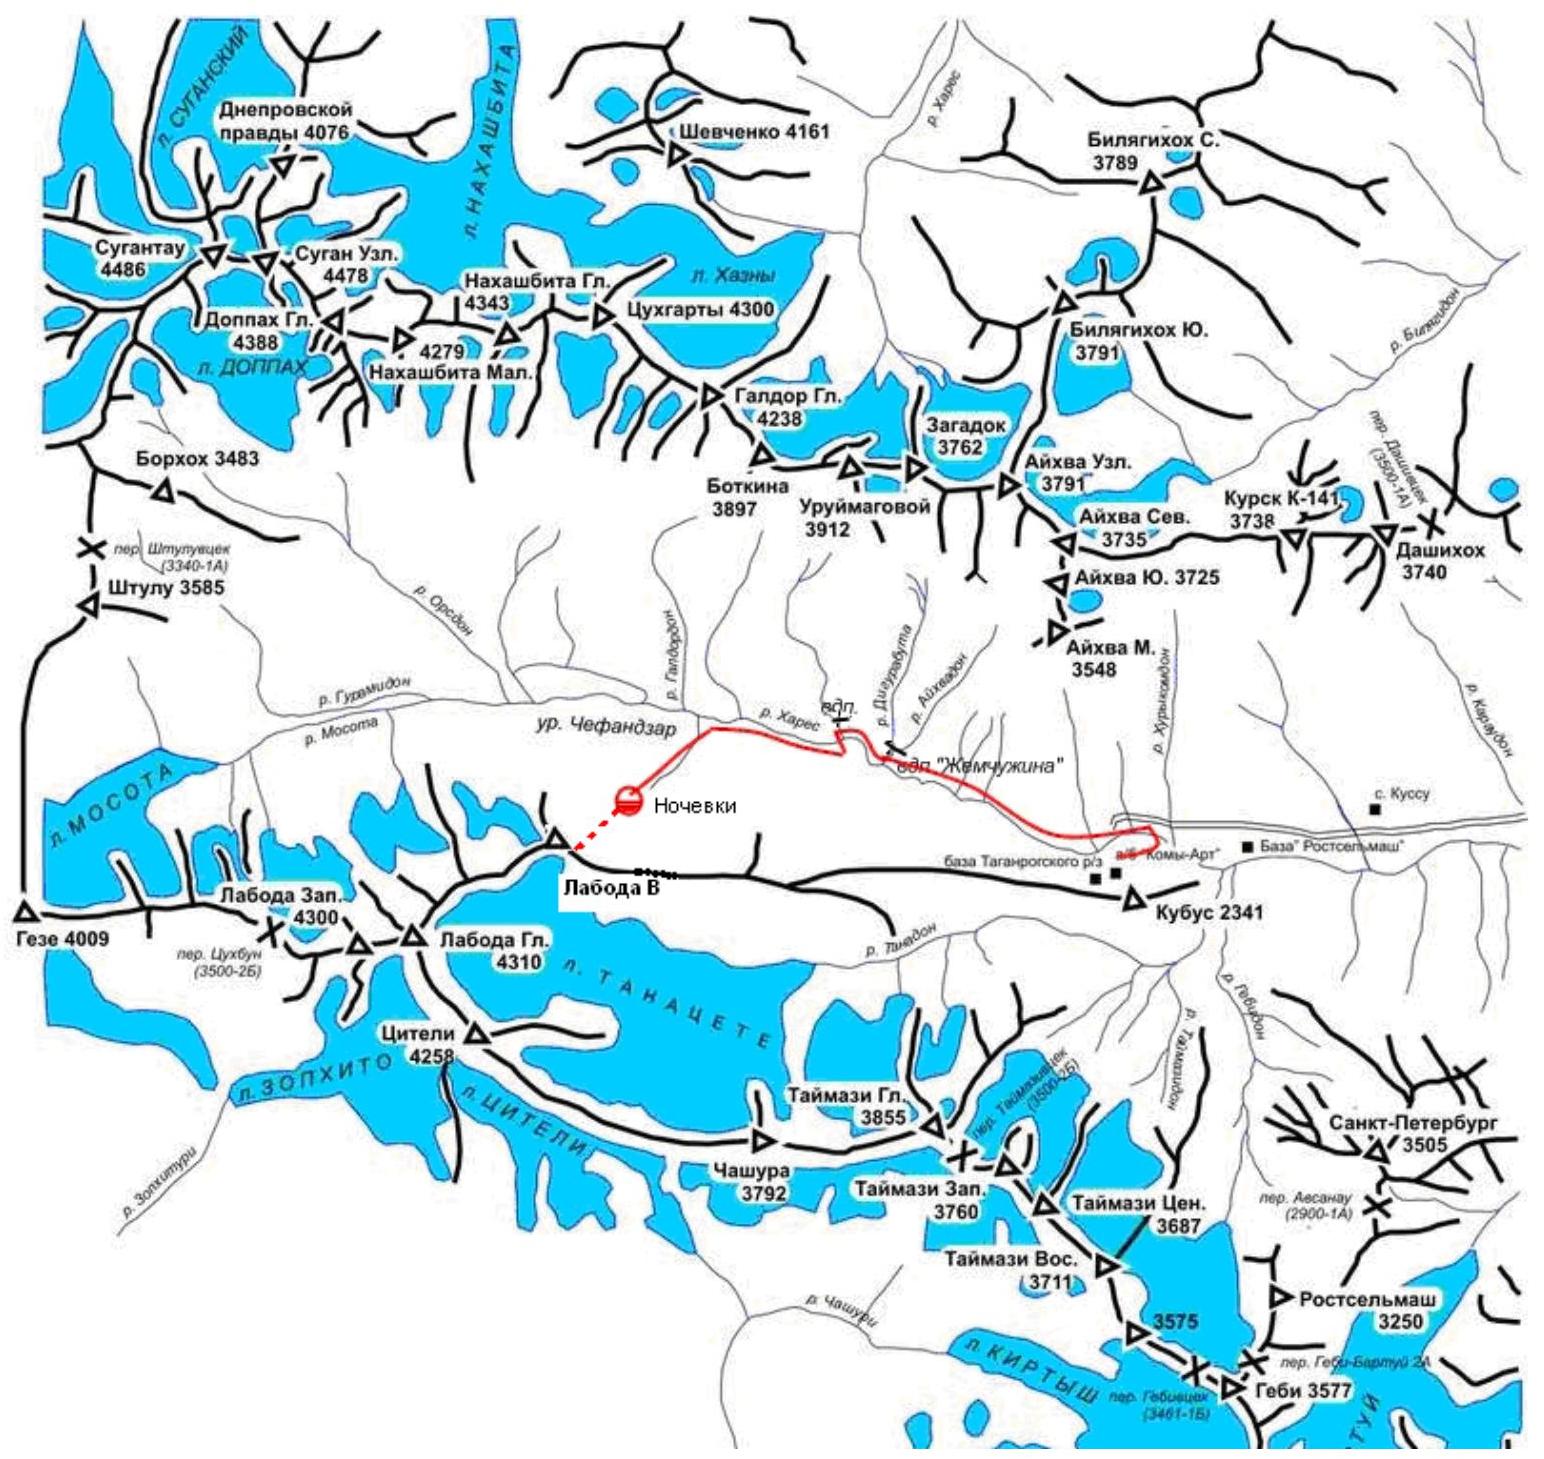
The area is located in North Ossetia, in the eastern part of the Central Caucasus. The nearest settlement is Stur-Digora. The camp is 6 km away. To reach the camp, public transport can be used: a bus from Vladikavkaz to Stur-Digora (departs from Vladikavkaz around 16:00). For a group, it is advisable to hire a car or bus directly to the camp.
Ascent Schedule
| Elevation (day) | August 9, 2008 | August 10, 2008 | August 11, 2008 | August 12, 2008 | August 13, 2008 |
|---|---|---|---|---|---|
| 3984 m | Ascend to summit R18–R22, cloudy | ||||
| 3631 m | |||||
| 3300 m | Traverse 2nd key, reach bastion summit, bivouac on bastion, R11–R18, clear, cloudy by evening | Return to tent, R22–R18, thunderstorm after noon | Descend to camp via Tana gorge, rain at night until 11:00 | ||
| 3050 m | Reach 2nd key, prepare bivouac R3–R11, clear | ||||
| 2800 m | Set up fixed ropes under 1st key, lift cargo (water, gear) R0–R3 | Move along fixed ropes R0–R3, clear | |||
| Approach route, cloudy |
UIAA Scheme
| № | Character, hooks (ITO) | Category, m, ° | ||
|---|---|---|---|---|
| R16 | Diagonal ledge | III, 100 m, 35° | ||
| R15 | Ridge, wall | IV, 50 m, 60° | ||
| R14 | Smoothened slabs | V+, 45 m, 60°, Photo 5 | ||
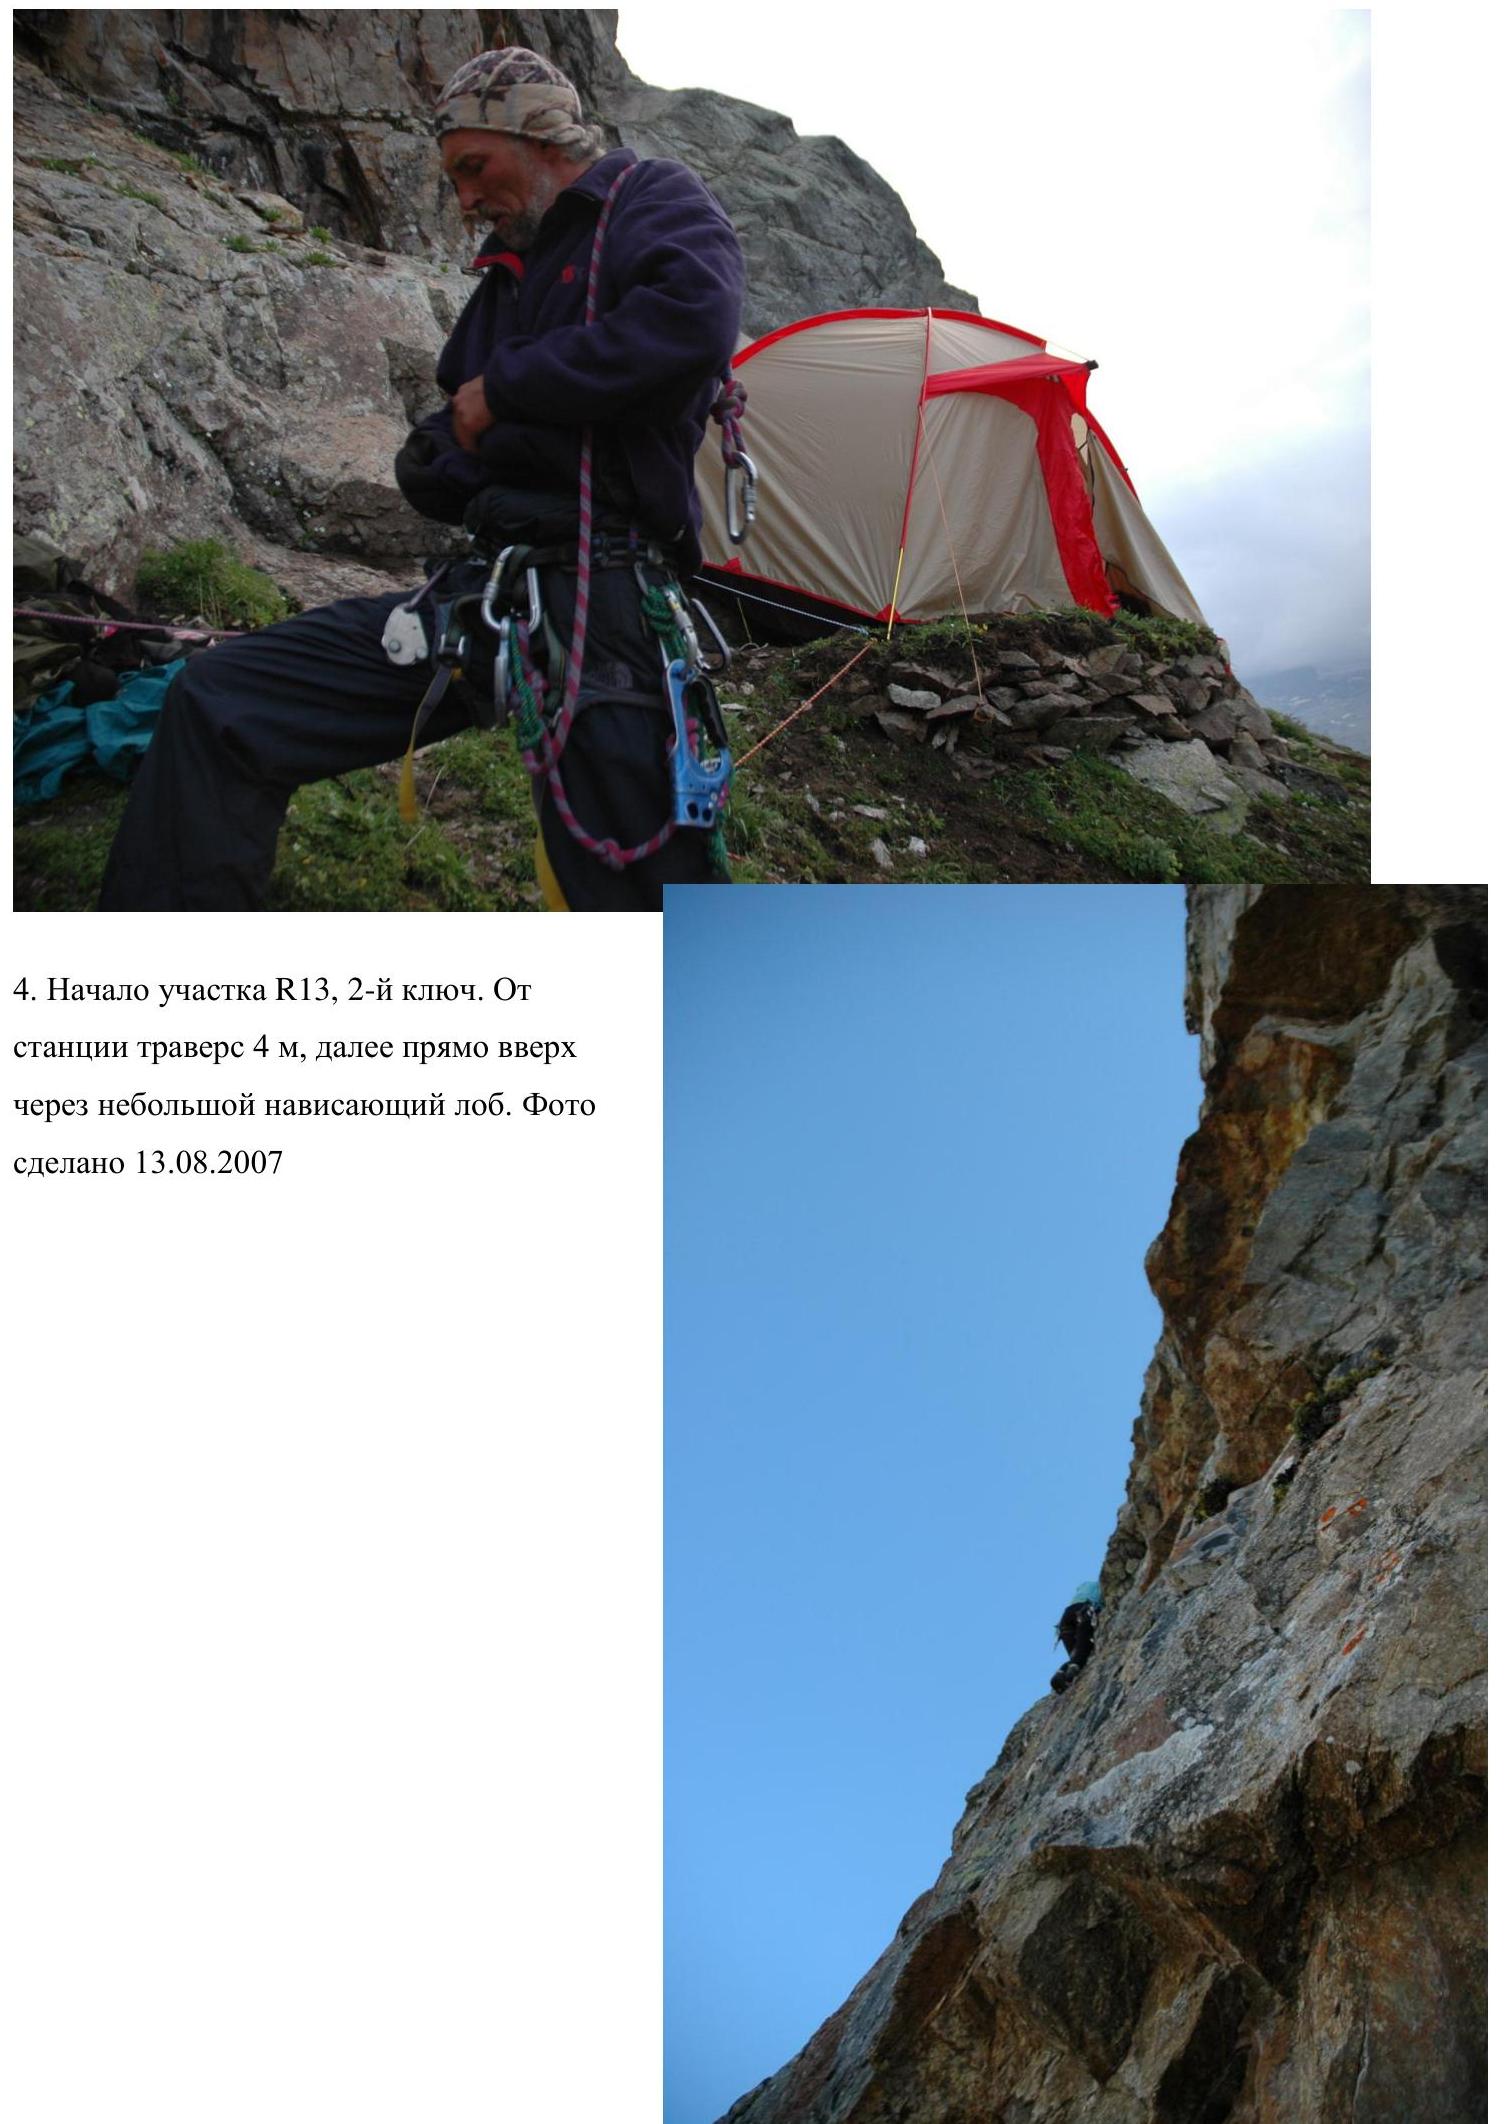
| R13 | 2nd key, inner corner with overhang | V+A1, 50 m, 80°, Photo 4 | ||
| R12 | Ledge, smoothened slab | V, 50 m, 60° | ||
| R11 | Complex wall | VA1, 50 m, 70° | ||
| R10 | Wall with cornice | VA1, 15 m, 80° | ||
| R9 | Varied terrain | III, 50 m, 50° | ||
| R8 | Gentle ledge | II, 20 m, 20° | ||
| R7 | Smoothened slab | Red chimney | V, 50 m, 50° | |
| R6 | Diagonal ledge | II, 40 m, 25° | ||
| R5 | Vertical wall with cornice | V, 10 m, 80°, Photo 2 | ||
| R4 | Wall with cleft, 1st key | V+, 50 m, 70° | ||
| R3 | Rocky ledges | II, 60 m, 25° | ||
| R2 | Smoothened rocks | IV, 50 m, 60° | ||
| R1 | Smoothened rocks | II, 70 m, 25°, Photo 1 | ||
| R0 | Snow slope | ~100 m, 30° |
Brief Route Description
R1–R2. Traverse 70 m along a diagonal, rightward ascending ledge under an indistinct inner corner. Smoothened rocks. (Station)
R2–R3. Ascend via the inner corner to a ledge under a wall with a cleft (few holds, rocks are smoothened and wet). Traverse the cleft to reach the next ledge. Station. A hook is left at the start of the cleft.
R3–R4. Traverse along ledges:
- initially 20 m rightward,
- then 40 m leftward – to bypass the overhanging wall
- and approach the breaks under the cornice. (Station)
R4–R5. From the far left break, ascend via a crack under the cornice. Then, a complex traverse rightward and upward to a vertical cleft. At the end of the traverse – a pendulum into the cleft. Ascend 3–4 m via the cleft to the station (piton hook, 1st control point). This is the first key rope.
Passage features:
- Few small handholds
- Feet work mostly on friction (requires rock shoes)
- In the middle of the traverse, a hook is left for the pendulum of the last climber
R5–R6. From the station, 10 m of complex climbing. Through the cornice (overhanging rock) exit to a ledge. On exiting, a hook is left.
R6–R7. From the hook, ascend via a long diagonal ledge to the entire rope length. (Station)
R7–R8. Traverse leftward and upward via a strongly smoothened slab under the red chimney. Issues with intermediate protection, very few holds.
R8–R9. Ascend via simple rocks to a ledge under the inner corner.
R9–R10. Ascend via the inner corner to a narrow ledge slanting leftward. Then:
- via a 20-meter wall, exit to a ledge slanting rightward;
- along the ledge, approach under a small cornice with two clefts.
R10–R11. Traverse the cornice via the left cleft (ITO), then exit to a ledge. After the wall (15 m), exit to a ledge.
R11–R12. From the ledge, ascend directly upward via smoothened rocks for 20 m (ITO). Then, via a steep, overgrown cleft rightward and upward, exit to a ledge (station, piton hook, bivouac site).
R12–R13. From the bivouac, traverse 25 m along a diagonal ledge, then ascend via an inclined wall (20 m) under a huge overhanging cornice to an inclined ledge.
The wall is a slab with few holds. Traverse the ledge to under the left part of the cornice.
- At the top of the slab, a hook with an orange sling is left.
- Under the left part of the cornice on the inclined ledge – station.
R13–R14. 2nd key site. From under the cornice, initially traverse rightward for 4 m, then directly upward via a steep, complex wall for 50 m – to exit under smooth slabs. On a small ledge – station. A red sling serves as an orientation mark.
Section features:
- At the start of the wall – a small inner corner with an overhang
- Under the overhang, a chock stone is left
- This rope should be climbed directly upward, avoiding ledges to the right and left
R14–R15. From the station, under a small angle leftward and upward via smoothened rocks and slabs, exit to the ridge.
On the ridge:
- a small inclined ledge
- under a small cornice
2nd control point.
R15–R16. Ascend via an inclined wall to a narrow, long diagonal ledge slanting rightward.
R16–R17. Traverse along the ledge to a "V"-shaped couloir. Cross it. On the right side – station.
R17–R18. Ascend via the right wall of the couloir to the ridge trending toward the bastion summit. Then, along the left side of the ridge, exit to an osypnaya saddle under the bastion summit – 100 m.
R18–R19. From the saddle, reach the bastion summit (bivouac site).
R19–R20. From the bivouac, traverse along a simple ridge toward the main summit, simultaneously crossing the Baumanets pass to a narrow saddle before the ascent to the main ridge (500 m). After the pass, proceed rightward along the ridge to a red chimney. Bypass the chimney on the left.
R20–R21. From the saddle behind the chimney, ascend a 100-meter slope to the main ridge trending toward the summit. The ascent to the ridge is heavily destroyed.
R21–R22. After reaching the ridge – 1.5 hours to the summit.
Descent to Tana gorge. Descent possible:
- via the summit along the southern ridge
- via Baumanets pass.
Tactical Actions
According to the tactical plan, on the approach day, set up a tent under the route. All gear, water, and food were lifted to under the 1st key (R0–R3), then descended to the tent.
On August 10, ascended via fixed ropes to the key with the remaining cargo, packed backpacks. Then:
- The first climber ascended without a backpack, carrying two ropes.
- Simultaneously, the first climber pulled their backpack using a rope.
- The second climber ascended the fixed ropes with their backpack and adjusted and helped pull the "free backpack" (R4, R5, R10, R11).
On simple sections, each climber carried their own backpack. Reached the bivouac site (under the 2nd key) by 17:00. Abandoned the plan to set up fixed ropes for the key, as preparing the site and recovering for the next day was prioritized.
On August 11, on the first rope (R12), due to a significant pendulum, the first climber returned for their backpack. Then, pulled the backpack using a rope (R13–R15).
On August 12:
- Left the tent and proceeded to the summit without backpacks.
- Climbed along the ridge via Baumanets pass simultaneously.
- On section R20, moved alternately (heavily destroyed rocks, rockfall hazard!).
Returned to the tent by 13:00. Due to a thunderstorm, delayed the descent to camp until the next day.
On August 13 – descended to camp. Descended into Tana gorge via Baumanets pass.
Notes
On the rocky part of the route, there is no water, thus requiring a supply for 1.5 days.
The first bivouac site accommodates a 2-person tent comfortably. It is possible to bivouac on a ledge on the first day and further process the second key rope. For small groups, it is advisable to plan a method for lifting backpacks.
For setting up stations and intermediate protection, mainly used are:
- piton hooks,
- anchor hooks,
- medium-sized friends.
In case of a second bivouac on the bastion summit, water can be fetched from Baumanets pass (snow) – 15–20 minutes along a simple ridge toward the summit.
Technical Photography of the Route
Route Photo Illustration
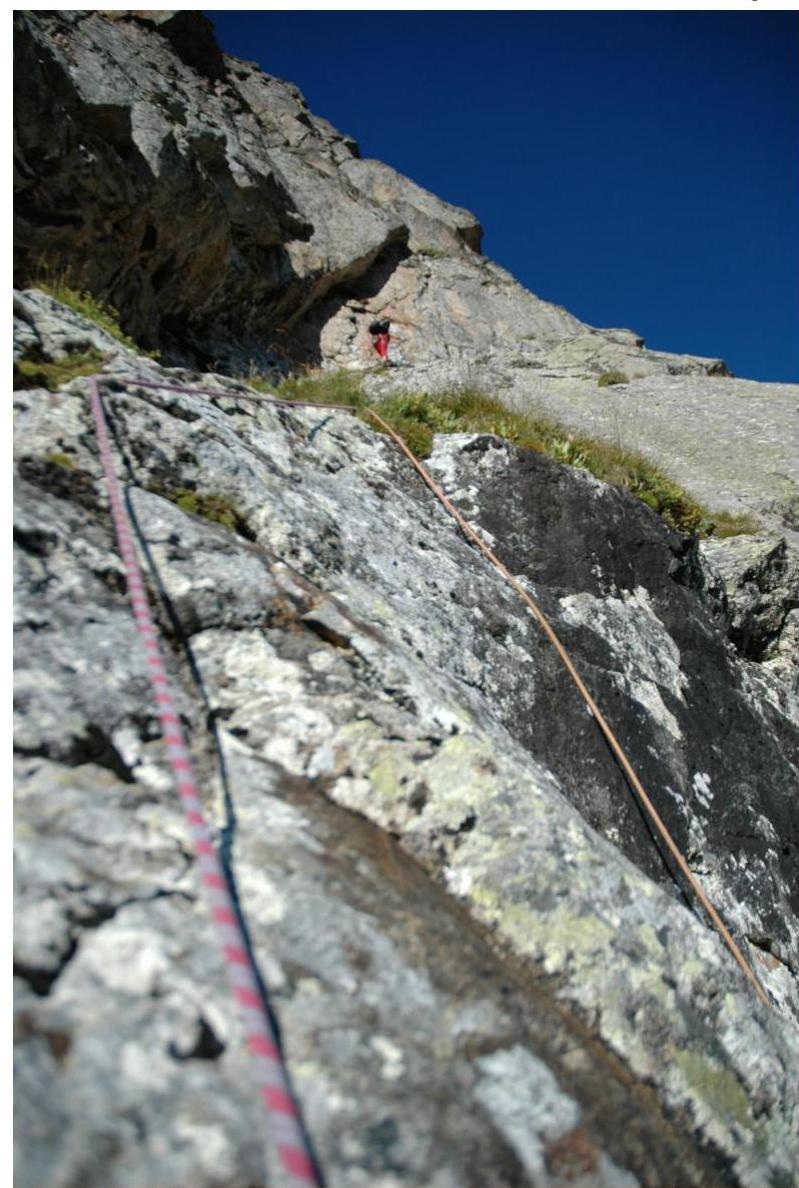
- Passing the 1st key via fixed ropes. From the cornice, traverse rightward to the end, then 3 m upward to a piton hook (1st control point). Photo taken on August 13, 2007.
- Section R7. Ascend via a smoothened slab to the red chimney. Photo taken on August 10, 2008.
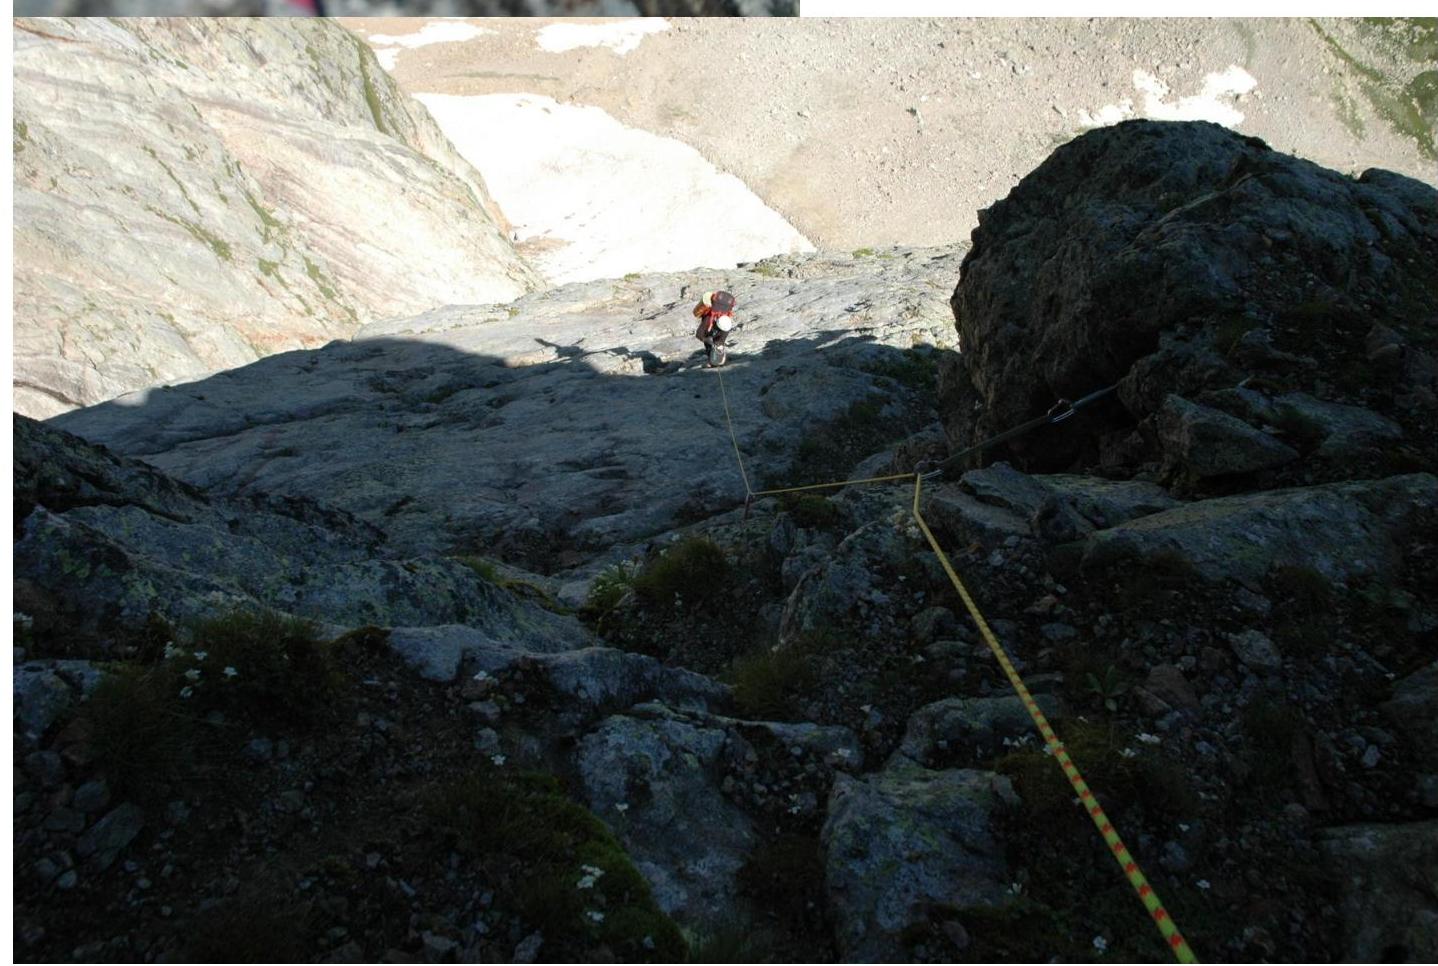
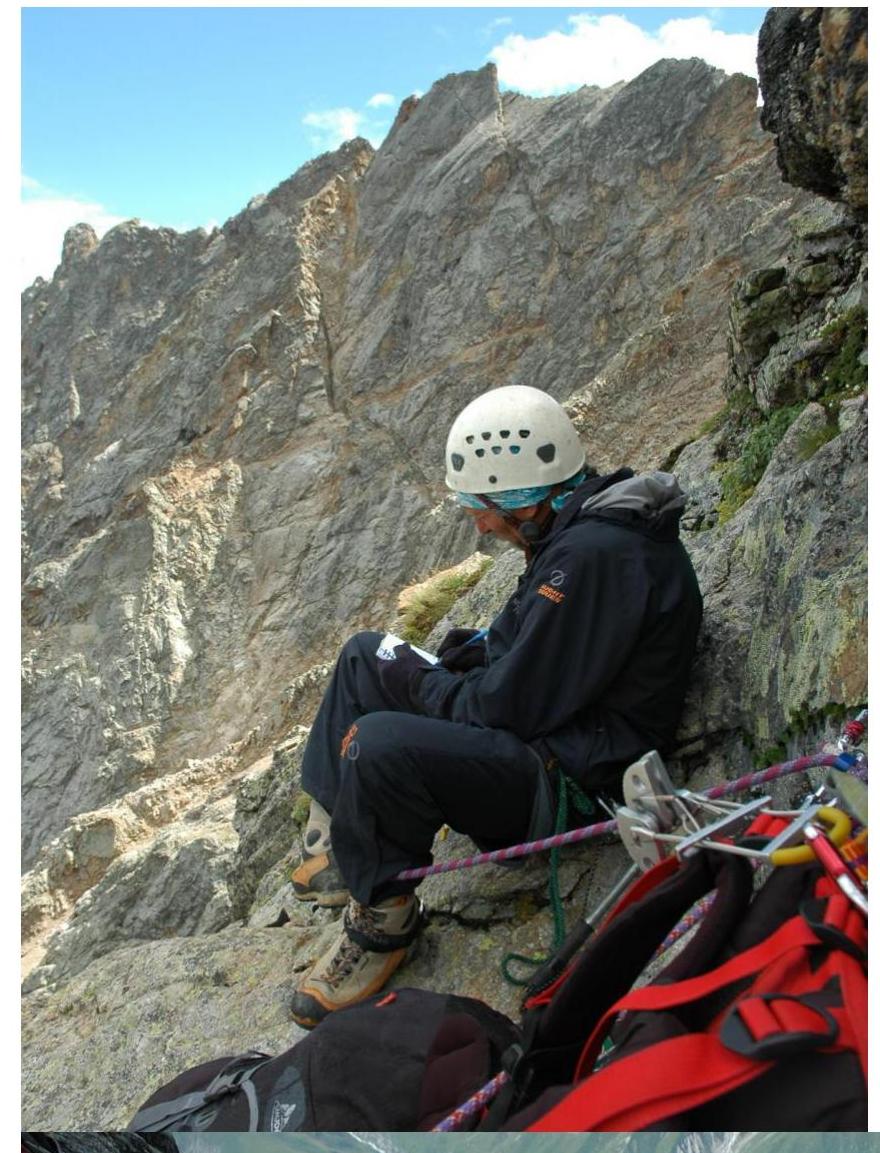
- First bivouac site, photo taken on August 10, 2008.
-
2nd control point. The overhanging cornice is bypassed on the left. Photo taken on August 11, 2008.
-
Station before the "diagonal ledge" (section R15, 1st rope after 2nd key). Photo taken on August 11, 2008.
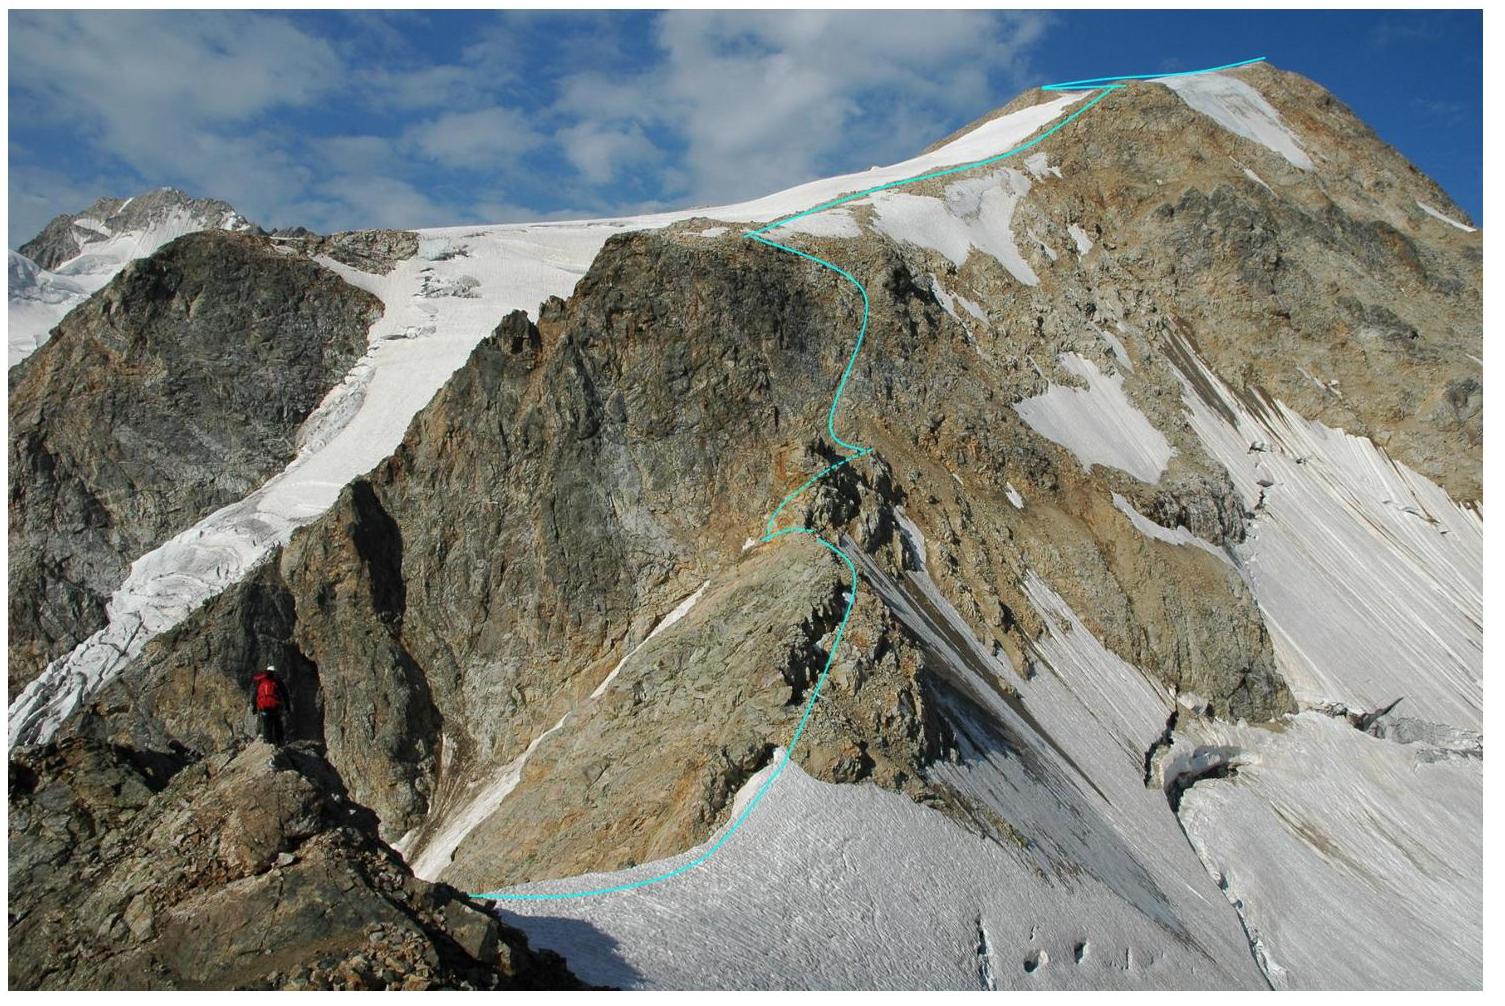
- Ridge from the bastion summit to the main summit. Photo taken on August 12, 2008.
- Summit photo. Taken on August 12, 2008, at 10:19.
