
The first ascent of the Western and Eastern peaks and the traverse of the Uralochka massif was made from July 14 to 18, 1961, by a group consisting of:
- Ryazanov V.V. - group leader, Master of Sports.
- Ryabukhin A.G. - 1st sports category.
- Samokhvalov V.V. - 1st sports category.
- Benkin V. - 1st sports category.
- Chernov V.I. - 1st sports category.
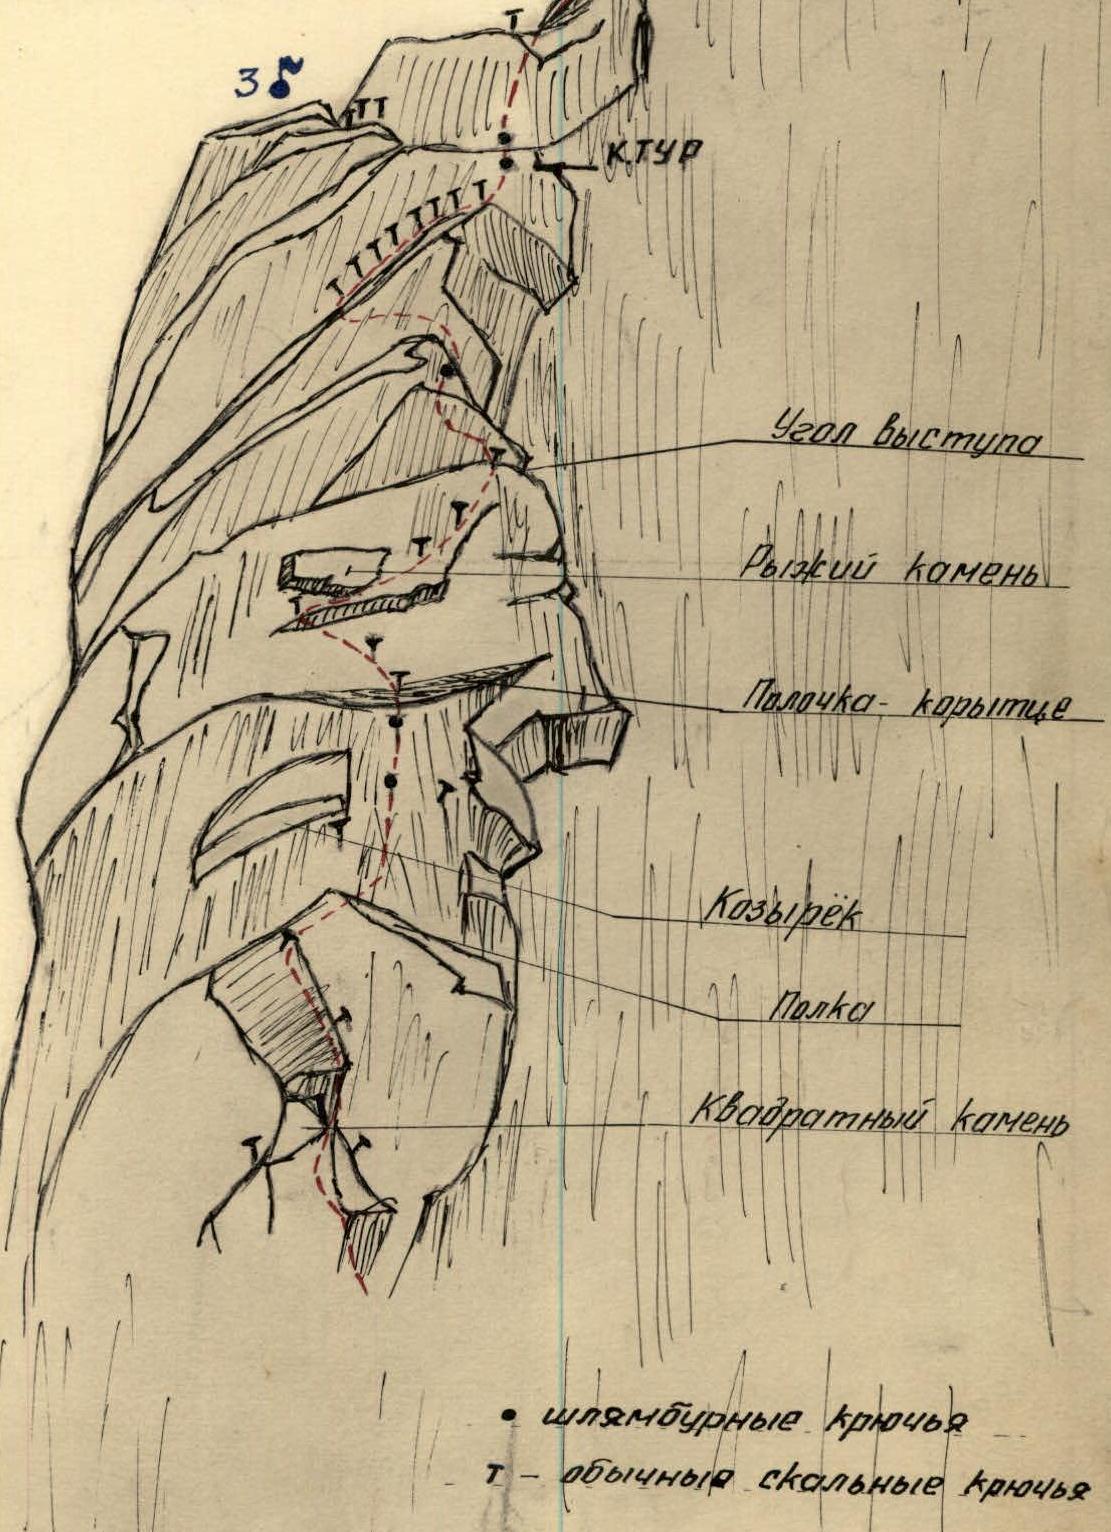
The Uralochka peak is located in the ridge separating the Ullu-Auz and M. Ukyu cirques, between the Archimedes (4100 m) and Dumala-Tau (4557 m) peaks.
The elevation above the M. Ukyu glacier is 700 m, and above the Ullu-Auz glacier is 800 m. The Uralochka peak is a double-headed peak: the Western peak (4270 m) is connected by a 200-meter saddle to the Eastern peak (4300 m).
To the north (into the M. Ukyu cirque) from the Western peak, there are tile-like slabs covered with ice and snow; to the south (into the Ullu-Auz cirque), there are walls.
The rocks forming the massif are granites with a high quartz content. The cracks are shallow and worn out. The surface of the rocks is rough and pockmarked, resembling the surface of syenites.
The path from the camp lies along the right (orographic) side of the Mizhirgi gorge to the second tributary of the Mizhirgi river (2570 m) and then along the right bank of this tributary up to the tongue of the M. Ukyu glacier (3250 m). Under the glacier tongue, there are good green areas where a bivouac can be set up. 3270 m. From the camp to the bivouac, it takes 4 walking hours.
The group leaves the bivouac at 3:00. After crossing the terminal moraine, the group moves along the glacial stream. The glacier is flat and safe to traverse. After 40 minutes of moving up the glacier (3550 m), the group turns right towards a clearly defined depression in the ridge - a pass from the M. Ukyu cirque to the Ullu-Auz cirque, with an elevation of 3900 m, between the Archimedes and Uralochka peaks.
The pass is accessed via a snow-ice slope (350 m vertical) with a steepness of 40-45° in the lower part and 45-50° in the upper part (see photo I). In the upper part, the ice slope is intersected by two crevasses, partially filled with snow. The slope is traversed with crampons and piton protection in the upper part (7 pitons).
Below the pass, on the slope, there are two hollows (with a small lake in the right one). The hollows are bypassed on the left.
From the pass, the ascent to the Western peak of Uralochka follows snow-covered rocks of moderate difficulty (photo I). On the ridge, 4 20-25-meter-high gendarmes stand out.
- The first two gendarmes are bypassed on the right via ledges.
- The last ones are ascended directly with a descent onto a short snow saddle (photos 1, 2, 3).
A gentle snow ridge (150 m) and easy snow-covered slabs (100 m) lead to a shallow (15 m) depression before the Western peak.
On the slabs before the depression, there is a bivouac site. Descent into the depression is done with protection via ledges.
From the depression, a ridge (100 m long) with sections of steep slabs (40°, photo 4, section 1) follows. 4 rock pitons are hammered in for protection.
A slab (45° steep, photo 4, section 1) leads to a rock face (12-15 m high). The group moves left.
During the traverse of the slab (section 2):
- 3 rock pitons are hammered in.
- Upon reaching the top of the face, 2 rock pitons are hammered in.
Backpacks are lifted to the top of the face (section 3) via rope. The group moves right with protection via 2 rock pitons along a crack and then along cracked slabs (80 m long, 40-45° steep) to a rhomb-shaped gendarme (photo 4, section 5).
Part of the rhomb-shaped gendarme is bypassed on the left along a crack at the base of the gendarme. 2 rock pitons are hammered in for protection. The exit to the depression behind the gendarme is via rocks resembling "sheep's foreheads," covered with ice (15 m long, 65-70° steep). 3 rock pitons are hammered in. Upon exiting the crack onto the rocks, there is a significant exposure - a psychologically challenging spot. Backpacks are lifted to the gendarme via rope from the start of the bypass.
Between the gendarme and the summit tower, there is a 5-meter-deep and 1.5-2-meter-wide depression.
On the right side of the depression, between the tower and a detached sharp rock, there is a 2-meter chimney, from which one can move onto a ledge that appears to lead to a bypass of the tower on the right.
The attempt to bypass was unsuccessful. After spending two hours, the group advanced 30 meters along a narrow ledge and complex rocks towards the inner corner on the tower, hammering in 7 rock pitons.
The monolithic, smooth, and vertical rocks forming the inner corner, the absence of cracks, and the нависающие in the upper part карнизы forced the group to return to the depression.
From the depression, very complex rocks lead upwards. This is the first critical section, 35 meters high (photo 5 and fragment "A").
1 meter to the left from the depression, there is an internal ledge 2 meters above, with a square rock protruding above it. To access the rock, 2 pitons are hammered in.
From the rock, via the outer corner, there is an exit onto an inclined rough ledge that goes right upwards with a break after 3 meters to the right and down. To access the ledge, 2 more pitons are hammered in.
Thus, on a 5-meter section, 4 rock pitons are hammered in as additional support points and for protection.
On the left above the ledge, a steep and overhanging eave protrudes. Under it, a piton is hammered in, and a ladder is hung. On the right, a piton is hammered into a thin crack for pulling up.
The rocks overhang (the ladder does not touch the wall). The person on the ladder is pulled towards the rock by the belayer via the right piton.
The lead climber:
- Hammers in two bolt pitons and transfers the ladders onto them;
- In the upper part of the small ledge-trough, he hammers in a piton, through which the first climber exits onto the ledge-trough;
- After hammering in another piton and hanging a ladder, the first climber exits onto a ledge under a characteristic protruding rusty rock;
- Hammering in 3 pitons, the first climber moves right upwards onto the corner of the protrusion;
- After ascending 2.5 meters onto the second and third corners-protrusions, the first climber hammers in a bolt piton and, hanging a ladder, exits onto a narrow inclined ledge, above which there is a characteristic wall with some negative inclination.
Parallel to the ledge, a crack runs, along which the first climber, hammering in 8 pitons for a Z-alp, moves to the right side of the wall.
After hammering in two bolt pitons into the upper part of the wall, the first climber ascends via ladders onto the top of the wall (photo 5 and fragment "A"). Here is a control point.
8 meters along rough, not very steep slabs lead to a ledge 60-70 cm wide, above which a 7-8-meter wall rises. Traversing the wall to the left (3 rock pitons), they exit onto another inclined ledge, up to 1 m wide and 2-2.5 m long. These ledges are the only place for a bivouac.
On the ledges, the following can be accommodated for a night's stay in a sitting position:
- On the lower and upper ledges, 3 people each;
- Above the second ledge, on a protrusion resembling a chair, another person;
- On top of the wall, another person.
In total, 8 people can be accommodated for a night's stay in a sitting position. The group spent the night in a sitting position on three spots.
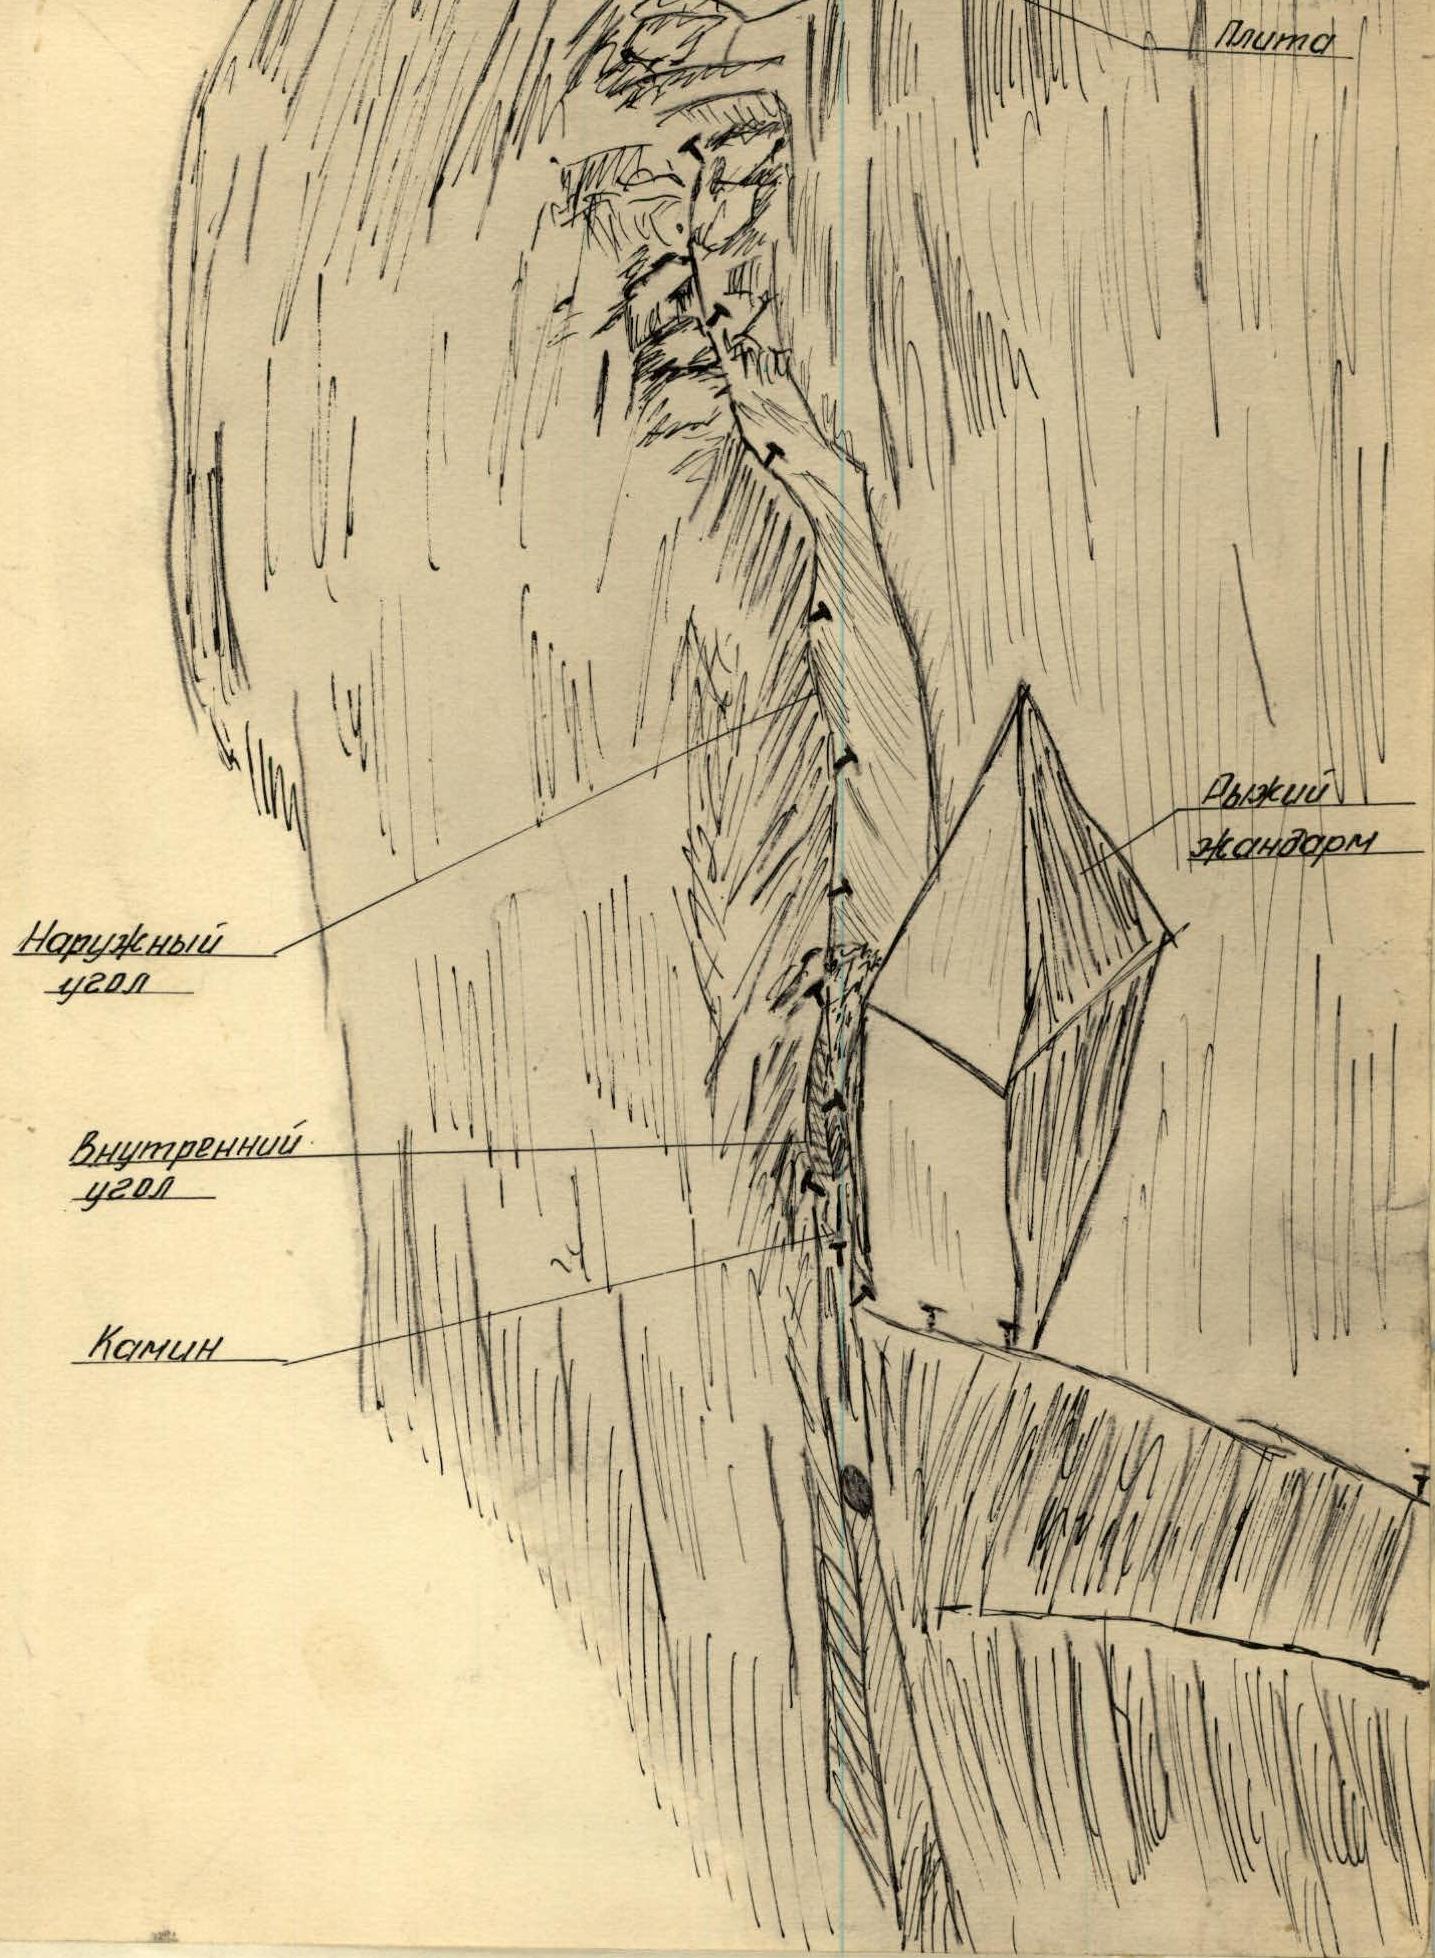
From this bivouac, movement proceeds along a sharp, almost horizontal ridge of black rocks (fragment "B"). The ridge overhangs towards the Ullu-Auz cirque; to the north, 70° slabs fall. Movement is along the northern side, holding onto the ridge and maximally deviating from the steep slope. 3 rock pitons are hammered in for protection.
Beyond the ridge, a yellow gendarme, 12 meters high, with smooth vertical walls, begins. The gendarme is bypassed on the left. The first 3 meters represent a shallow vertical chimney (3 rock pitons), transitioning into an inner corner, 4 meters high and 75° steep (2 rock pitons).
Then, movement proceeds towards the slabs of the ridge along an unclearly defined outer corner, 10 meters long and 65-70° steep (4 rock pitons). In the chimney and inner corner, there is snow and sections of ice, significantly hindering movement. A 7-meter section of smoothed rocks, covered with ice (2 rock pitons hammered in), leads to a slab, 40° steep and 15-17 meters long (fragment "V"). The slab is covered with ice and a thin layer of snow. The slab is traversed along a crack at the lower edge to the right, up to a vertical wall, 4 meters high, that limits it (5 rock pitons). Further movement goes up the slab along the wall, exiting left upwards beyond the inner corner. 8 rock pitons are hammered in to create artificial support points and for protection. The group exits right onto the ridge along monolithic rocks, 20 meters long and 70° steep. Climbing is very difficult - there are no footholds; 6 rock pitons are hammered in for protection.
To the summit (2 ropes), a torn ridge leads. The rocks are monolithic. The section is traversed with protection via crampons and pitons through ledges and 2 rock pitons.
The height of the Western peak is 4270 m. The wall is 370 m. A cairn is built on the summit.
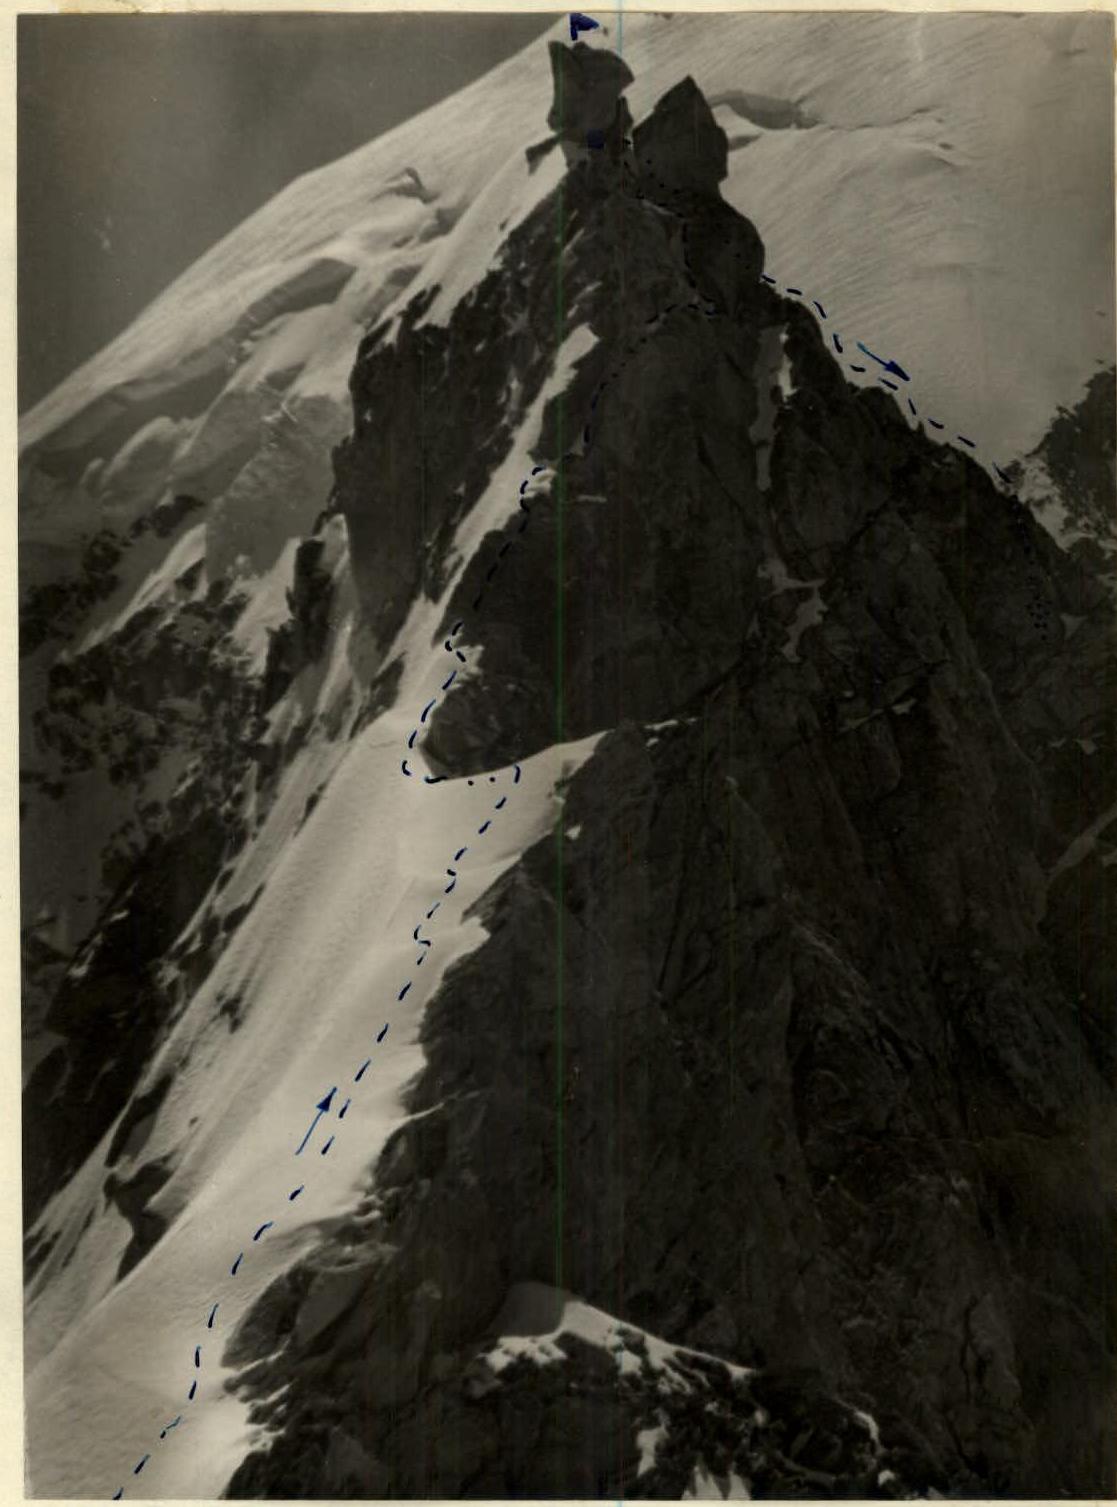
The descent to the saddle between the Western and Eastern peaks proceeds first along a crevice and then along a sharp rocky ridge to a snowfield (2 ropes, protection via ledges). After the snowfield, slabs follow (40 meters long, 40-45° steep), ending in a 20-meter wall above the saddle. Descent is via a carabiner rappel (photo 6).
On the saddle, a comfortable bivouac can be set up on the snow. The heavily broken rocks of the saddle are bypassed from the north along the snow (photo 7).
To the Eastern peak (4300 m), a steep, dissected ridge leads, with the peak's elevation above the saddle being 100 m.
A 25-meter narrow inclined chimney (4 rock pitons hammered in for protection) leads to a small snow shoulder. From the shoulder, a narrow (2-2.5 m) couloir, covered with ice, goes right upwards. The couloir is 20 meters long. It is traversed with step-cutting and protection via 4 rock pitons along the right side.
The group exits onto the ridge and, traversing right along ledges, moves into a couloir leading to the summit (40 m long). Protection is via ledges and 3 rock pitons.
A control point is located under a large summit rock.
The descent from the summit is along the southern rib into the Ullu-Auz cirque.
Through a crevice between the summit rock and a detached rock to the south, the group moves to the eastern side and bypasses the rock along ledges, traversing down onto the rib.
Further descent proceeds along the rib. To the right, snowfields remain; to the left, 20-30 meters above, the ridge crest continues, ending in walls to the east and south. The descent is steep, with walls alternating with steep bends.
Moving right is not advisable due to:
- Danger of rockfall;
- Presence of heavily iced steep rocks resembling "sheep's foreheads" near the snowfields.
Moving onto the rib itself is also not desirable, as it is heavily broken. The rib continually moves right downwards. The group moves accordingly. In the lower part, "sheep's foreheads" under the snowfields are traversed right downwards (along the path) with an exit onto the right side of this wide couloir.
After bypassing the summit rocks, descents are made via rappel (40 m).
- The first rappel is along the ridge crest into a depression.
- The second rappel is from the depression to the right, from the rib onto a snowfield.
- The third rappel is from the snowfield, moving left onto a wide inclined ledge.
- Along the ledges, the group moves 15 meters to the left.
The fourth and fifth rappels are from the ledge down towards the upper part of the couloir, moving onto a large snowfield.
The group crosses the upper reaches of the couloir along complex rocks (3 rock pitons hammered in for protection) and exits to the junction of the rib and a counterfort.
The sixth rappel is from the junction onto a snow ledge. Here, on the snow, there is a good bivouac site. On the rocks, a control point is built.
From the bivouac, the group descends down a wide couloir between the rib and the counterfort, adhering to the counterfort's side - 4 rappels. The tenth rappel leads to "sheep's foreheads" ending in a wall to the west. The group moves 100 meters to the right towards white rocks.
Two more rappels with a move to the right, and the group is on the scree. The descent along the scree to the Ullu-Auz glacier presents no difficulties, although the scree is often shot through by falling rocks from above. Along a trail beside the right bank of the Kundryum-Mizhirgi glacier, the group returns to the Bezengi camp.
Pitons hammered during the route:
- To access the pass - 7 ice pitons.
- Ascent to the first critical section - 16 rock pitons.
- First critical section - 22 ordinary rock pitons and 5 bolt pitons (not counting pitons hammered during the attempt to bypass).
- Ascent to the second critical section - 14 rock pitons.
- Second critical section - 19 rock pitons.
- Ascent to the Western peak - 2 rock pitons.
- Ascent to the Eastern peak - 11 rock pitons.
- Descent from the Eastern peak to the Ullu-Auz glacier - 12 rock pitons for rappels and 3 rock pitons for protection.
In total, for protection and as additional support points, 71 ordinary rock pitons, 5 bolt pitons, and 7 ice pitons were hammered. Additionally, 12 rock pitons were hammered for rappel descents.
Route progression by days:
1st day
- Departure from the Bezengi camp to a bivouac under the tongue of the M. Ukyu glacier - 4 walking hours.
- Departure after lunch.
2nd day
- Bivouac under the glacier tongue - bivouac under the tower of the Western peak (8 walking hours from 5:00 to 13:00).
- From 14:00 to 20:00 (6 hours), the pair Ryabukhin - Ryazanov processed the lower part of the route, advancing 35 meters on the first critical section and setting up ropes.
3rd day
- The pair Ryazanov - Chernov, without backpacks, exits onto the wall at 5:00.
- They traverse the first critical section, process the path to the second critical section, and part of the slab of the second critical section.
- After setting up some ropes (lacking more ropes), at 18:00, the pair descends to a bivouac above the first critical section.
- The trio, after dismantling the camp and packing everything into three backpacks, exits onto the wall at 6:00.
- Except for the lower part of the slabs, backpacks were lifted via rope to the bivouac on the wall.
- The first critical section is traversed on étriers (photo 5).
- At 18:00, the group gathers on three ledges for their bivouacs and organizes a sitting bivouac (clearing ledges, hammering in protection pitons, preparing food).
- At 20:00, lights out.
4th day
- The entire group departs at 5:00.
- Still, two climbers (Ryabukhin and Samokhvalov) go without backpacks.
- At 10:30, they reach the Western peak and, without delay, move towards the Eastern tower.
- At 13:00, they begin the descent from the Eastern peak via the Southwest rib.
- At 19:15, they stop for a bivouac on a snow ledge.
5th day
- Departure at 8:00.
- At 13:00, the group descends to the scree under the wall.
- At 16:00, they arrive at the Bezengi camp.
The group evaluates the route as category 5B.
Group Equipment
- Main rope: 1x60 m, 1x40 m, 1x30 m. Auxiliary rope: 1x60 m.
- Rock pitons: a) ordinary steel - 15 pieces; b) titanium universal (short) - 15 pieces; c) bolt pitons - 10 pieces.
- Ice pitons, duraluminum standard form - 5 pieces.
- Ladders - 3 pieces.
- Hammers - 3 pieces.
- Tents: "Pamirka" - 1 piece, "Zgarka" - 1 piece.
Recommendations
- For the group composition - it is more целесообразно (expedient) to go in a group of five rather than four, as a trio better handles transporting backpacks along the walls (a duo processes the route).
- For equipment - for a group of 5, it is necessary to have: a) main rope: 2x60 m, 1x40 m; b) auxiliary rope: 1x60 m; c) the assortment of rock pitons the group had is sufficient (presence of bolt pitons and shortened pitons is mandatory).
- For ascent tactics - the tactics applied by us are the most rational for this route.
The description was compiled by Ryabukhin A.G. Photos by Ryabukhin A.G.

Moved on étriers to the first critical section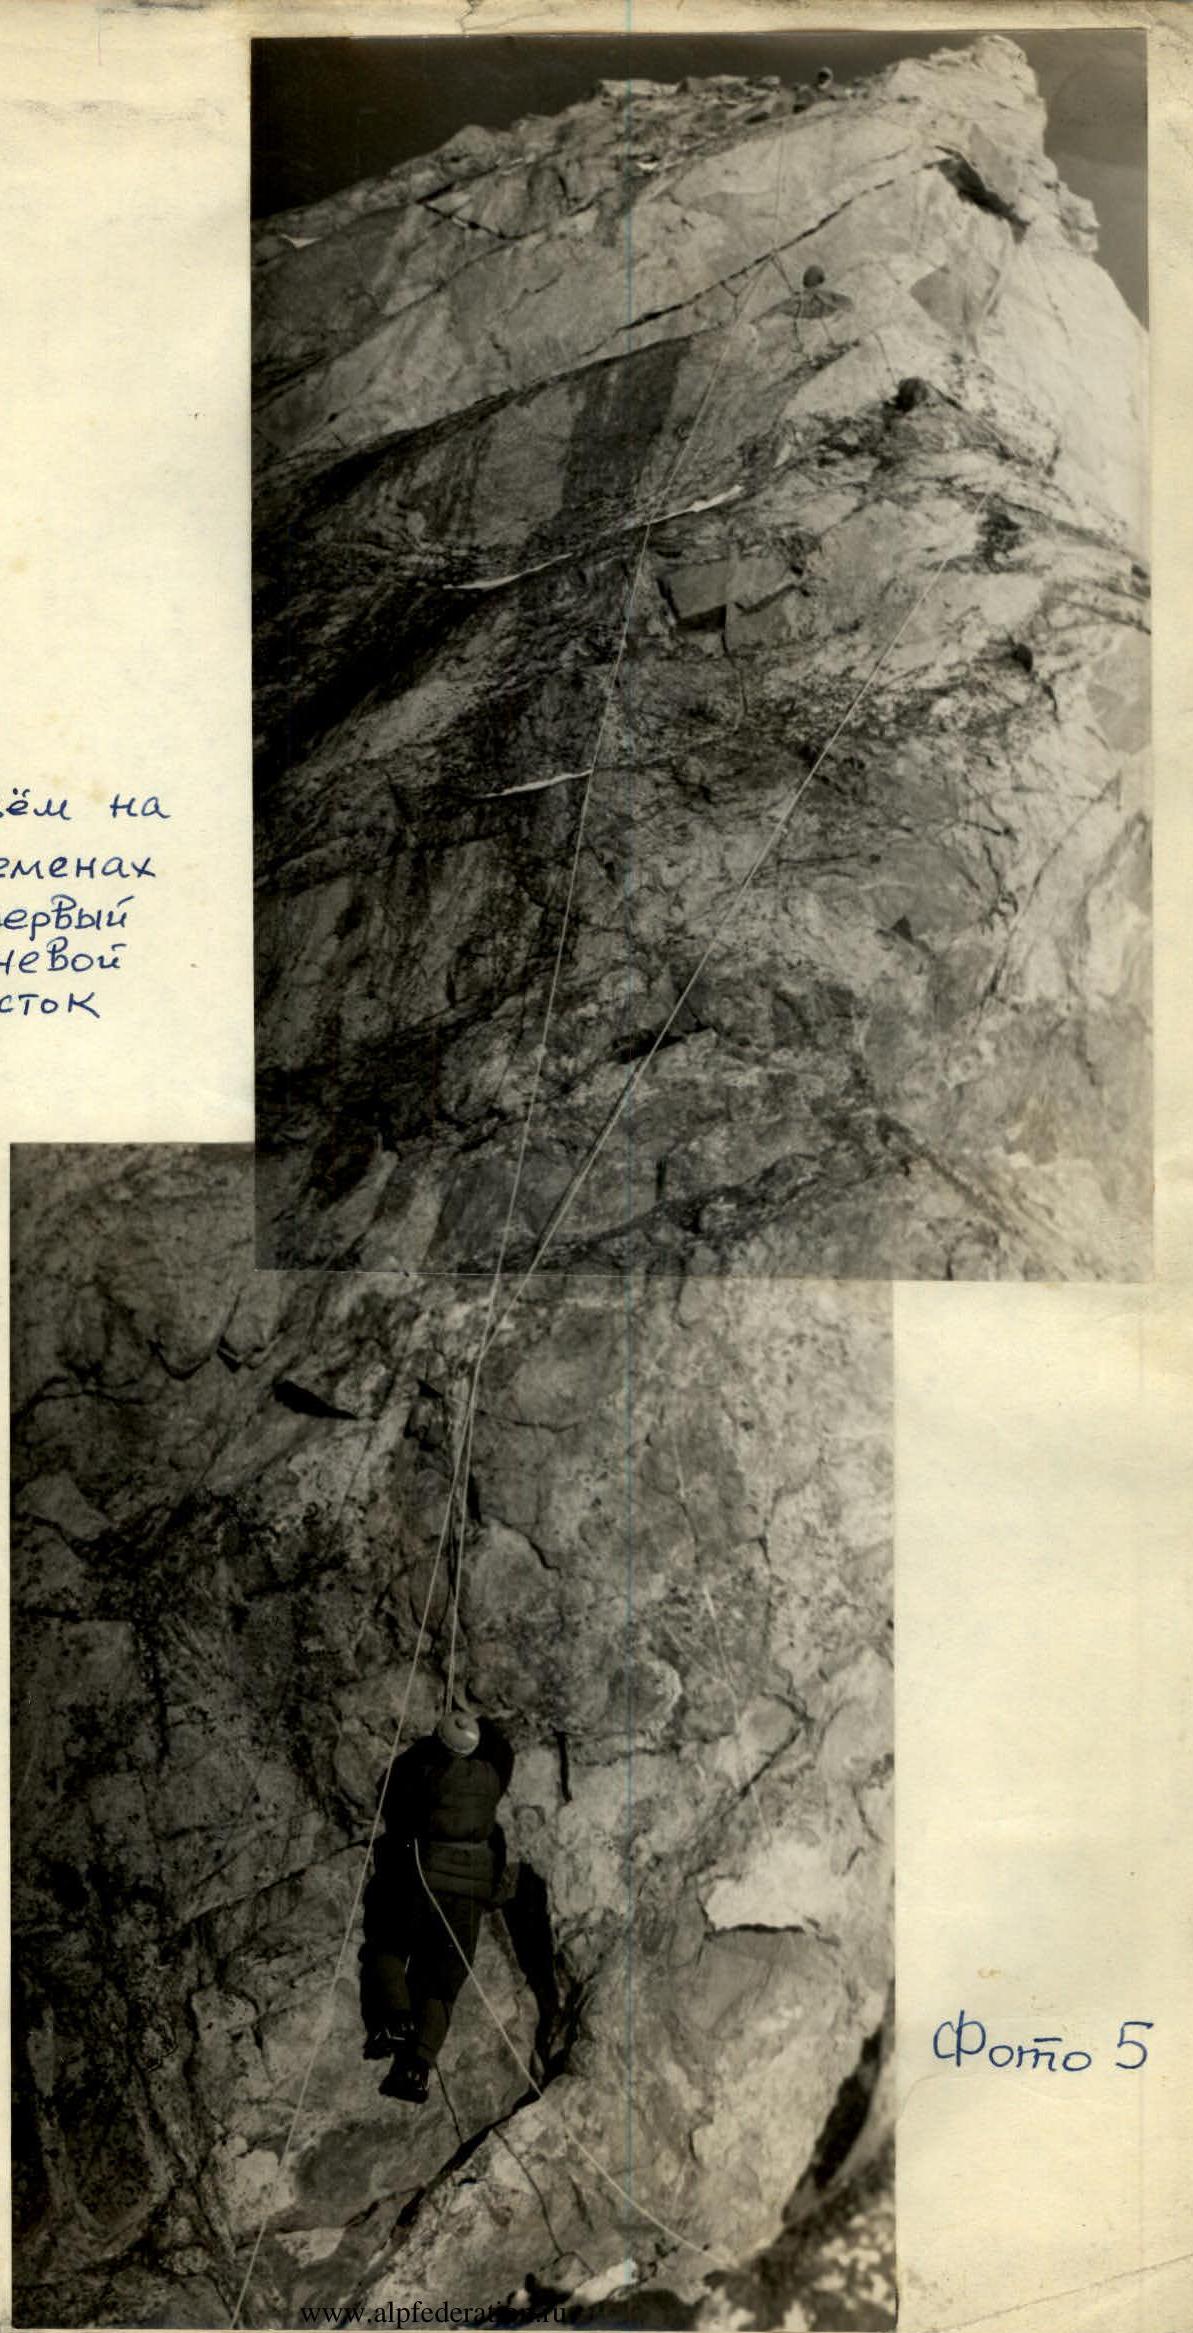
Opposite view 7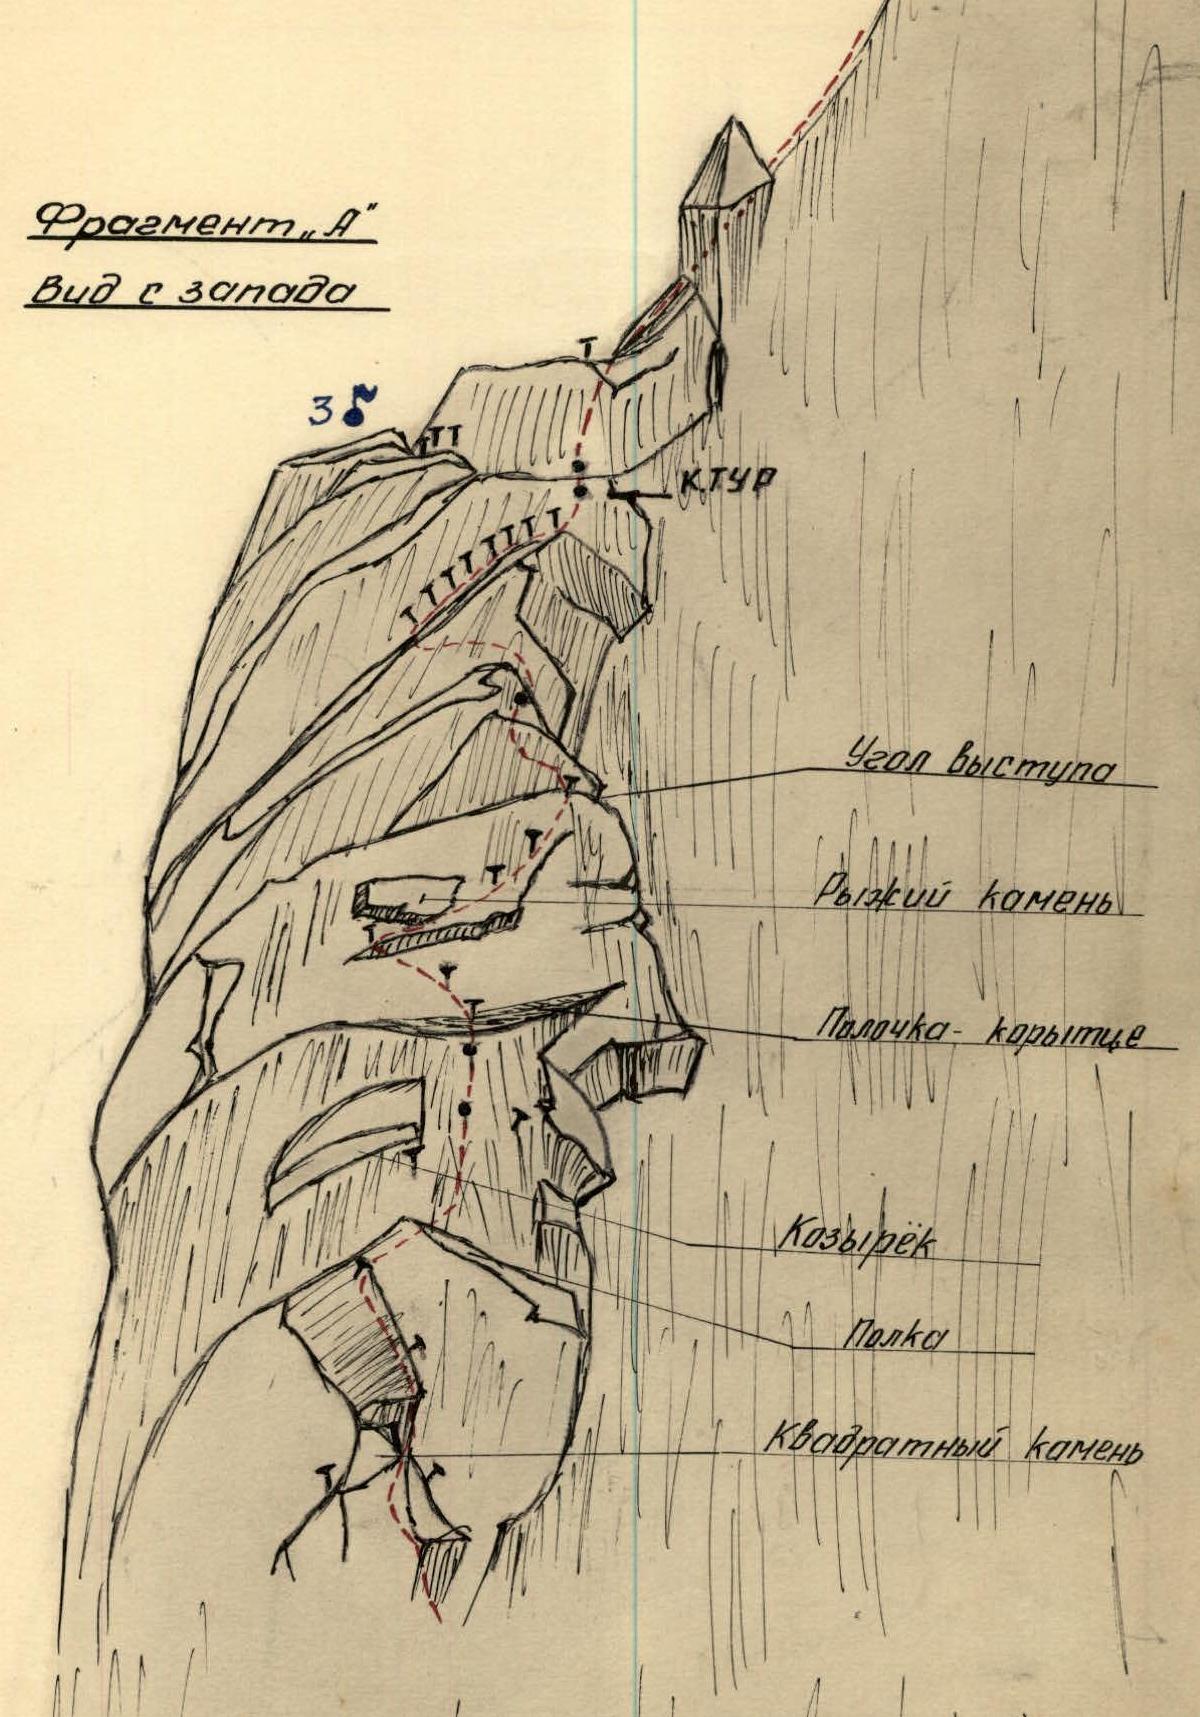

View from the north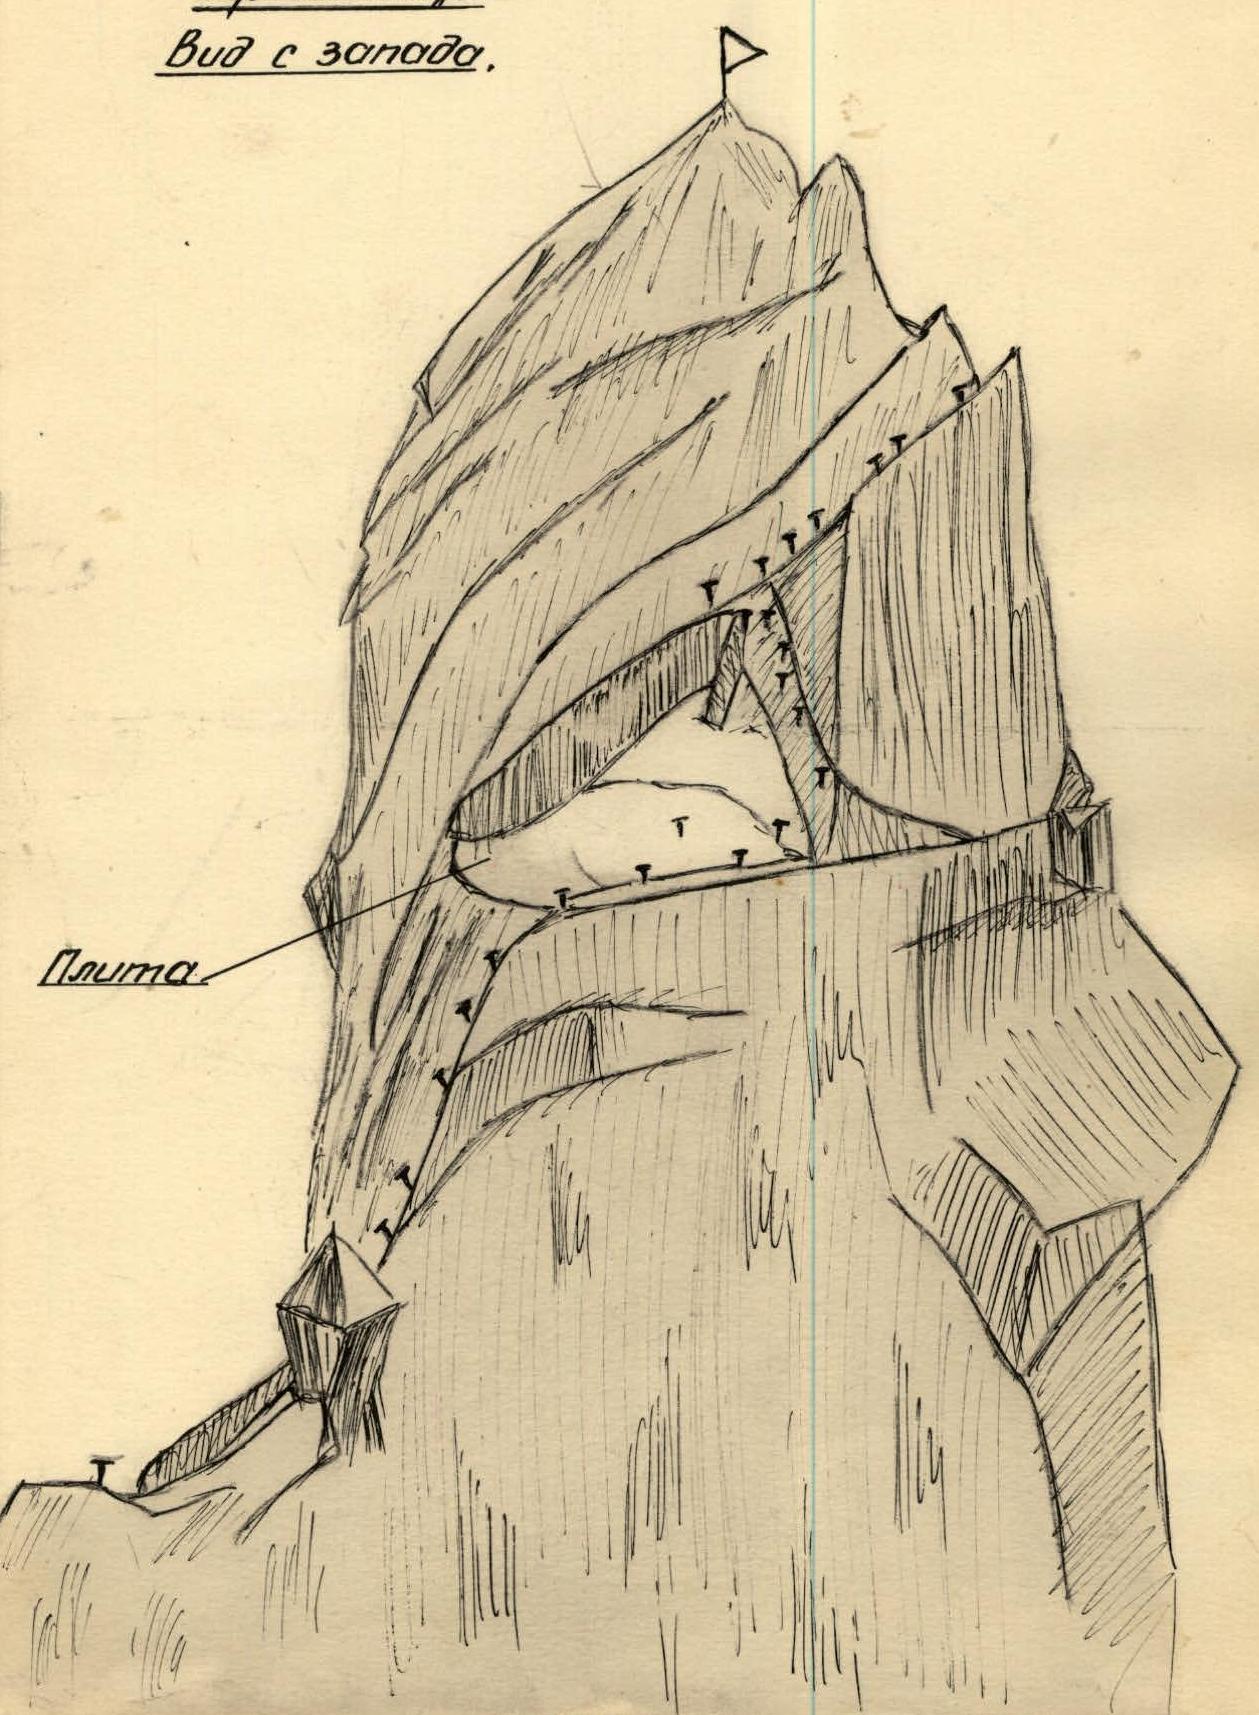
Comments
Sign in to leave a comment