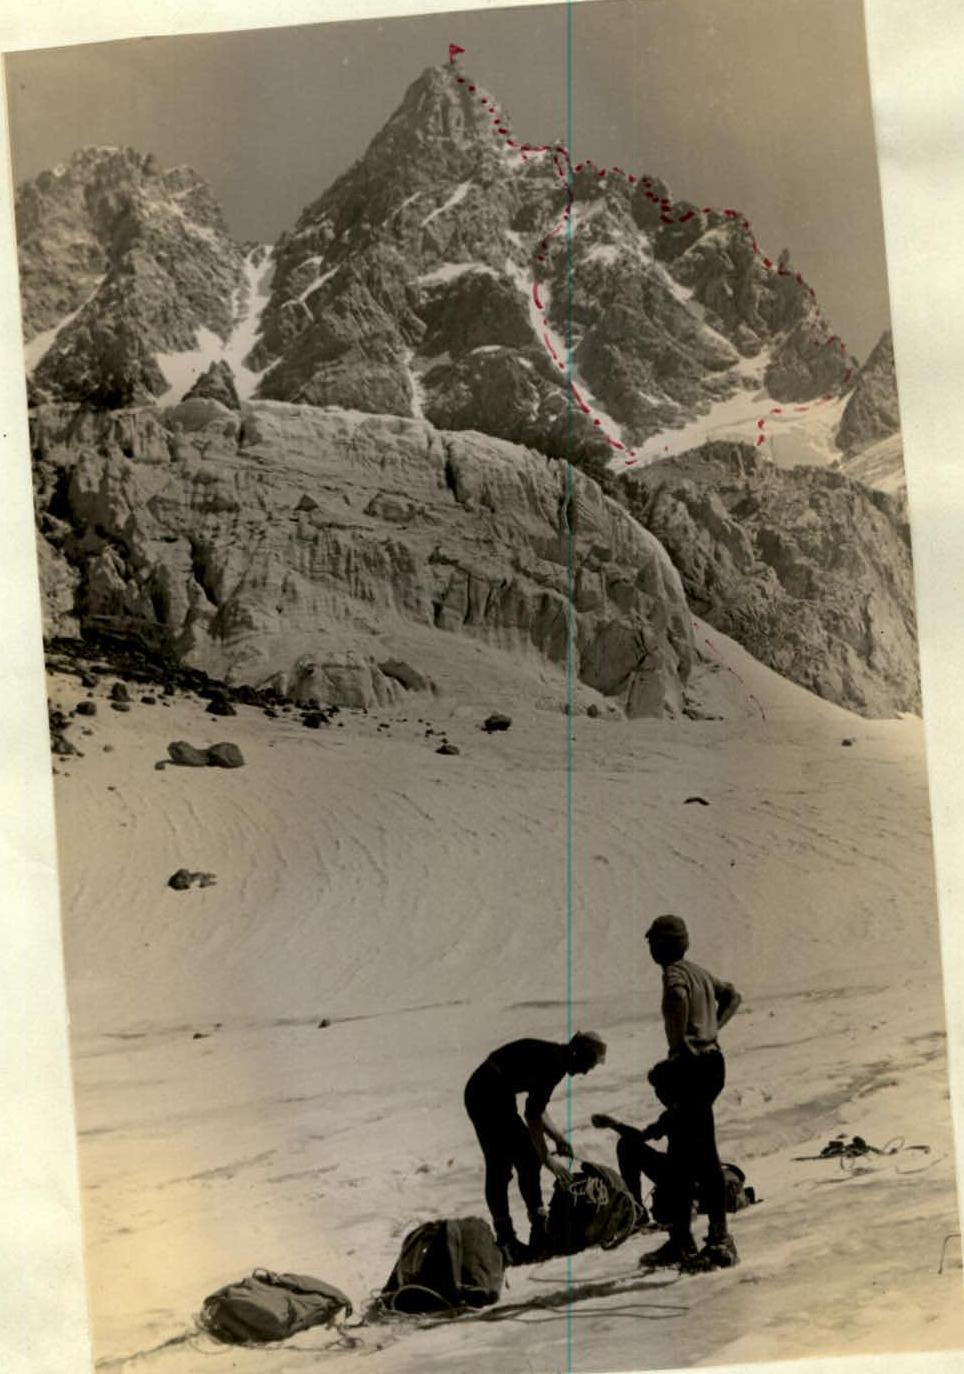
Photo. General view of the ridge of Mt. Mizhirgi, taken from the second terrace of the unnamed glacier.
1. Geographical Location and Ascent Routes
The summit of West Mizhirgi (4928 m) is located in the North Array between Pushkin Peak and East Mizhirgi, to which it is connected by ridges; in addition, a steep rocky ridge runs south from West Mizhirgi to Sella Pass and a spur runs north into Mizhirgi Gorge.
The ascent directly to the summit is possible via several routes:
- along the northern spur from Mizhirgi Gorge (5B);
- from the saddle between Pushkin Peak and West Mizhirgi (4B);
- from Sella Pass along the southern ridge.
The route from Sella Pass was traversed by Swiss mountaineers (Saladin's group) and in 1953 by a "Burevestnik" group led by Honored Master of Sports K.K. Kuzmin during the traverse of Bezengi Wall - Dykh-Tau, but until 1957 it was not classified as an independent route.
2. Approaches
From Misses-Kosh, the path goes along the left (in the direction of travel) part of the Bezengi Glacier to the turn of the glacier towards Dykhni-Aush Pass, then along the right (orographic) lateral moraine to the confluence of the Nameless Glacier, flowing from the Dykh-Tau-Mizhirgi-Bakhsha-Auz cirque, into the Bezengi Glacier, then along the right (orographic) moraine of the Nameless Glacier and the middle part of the flat glacier flow to a steep ascent (up to 30°, 400 m) to the first step of the icefall. The first step of the icefall is traversed on the right (in the direction of travel) (Photo 1); the inclined terrace is traversed to the left, and the second step is traversed on the left. The second terrace is crossed in the direction of a rocky outcrop, which is bypassed either on the left along a steep (45°) ice slope (100 m) between the seracs and the outcrop, or on the right along long snow slopes at the base of the Bakhsha-Auz ridge. Further along the broken snow fields
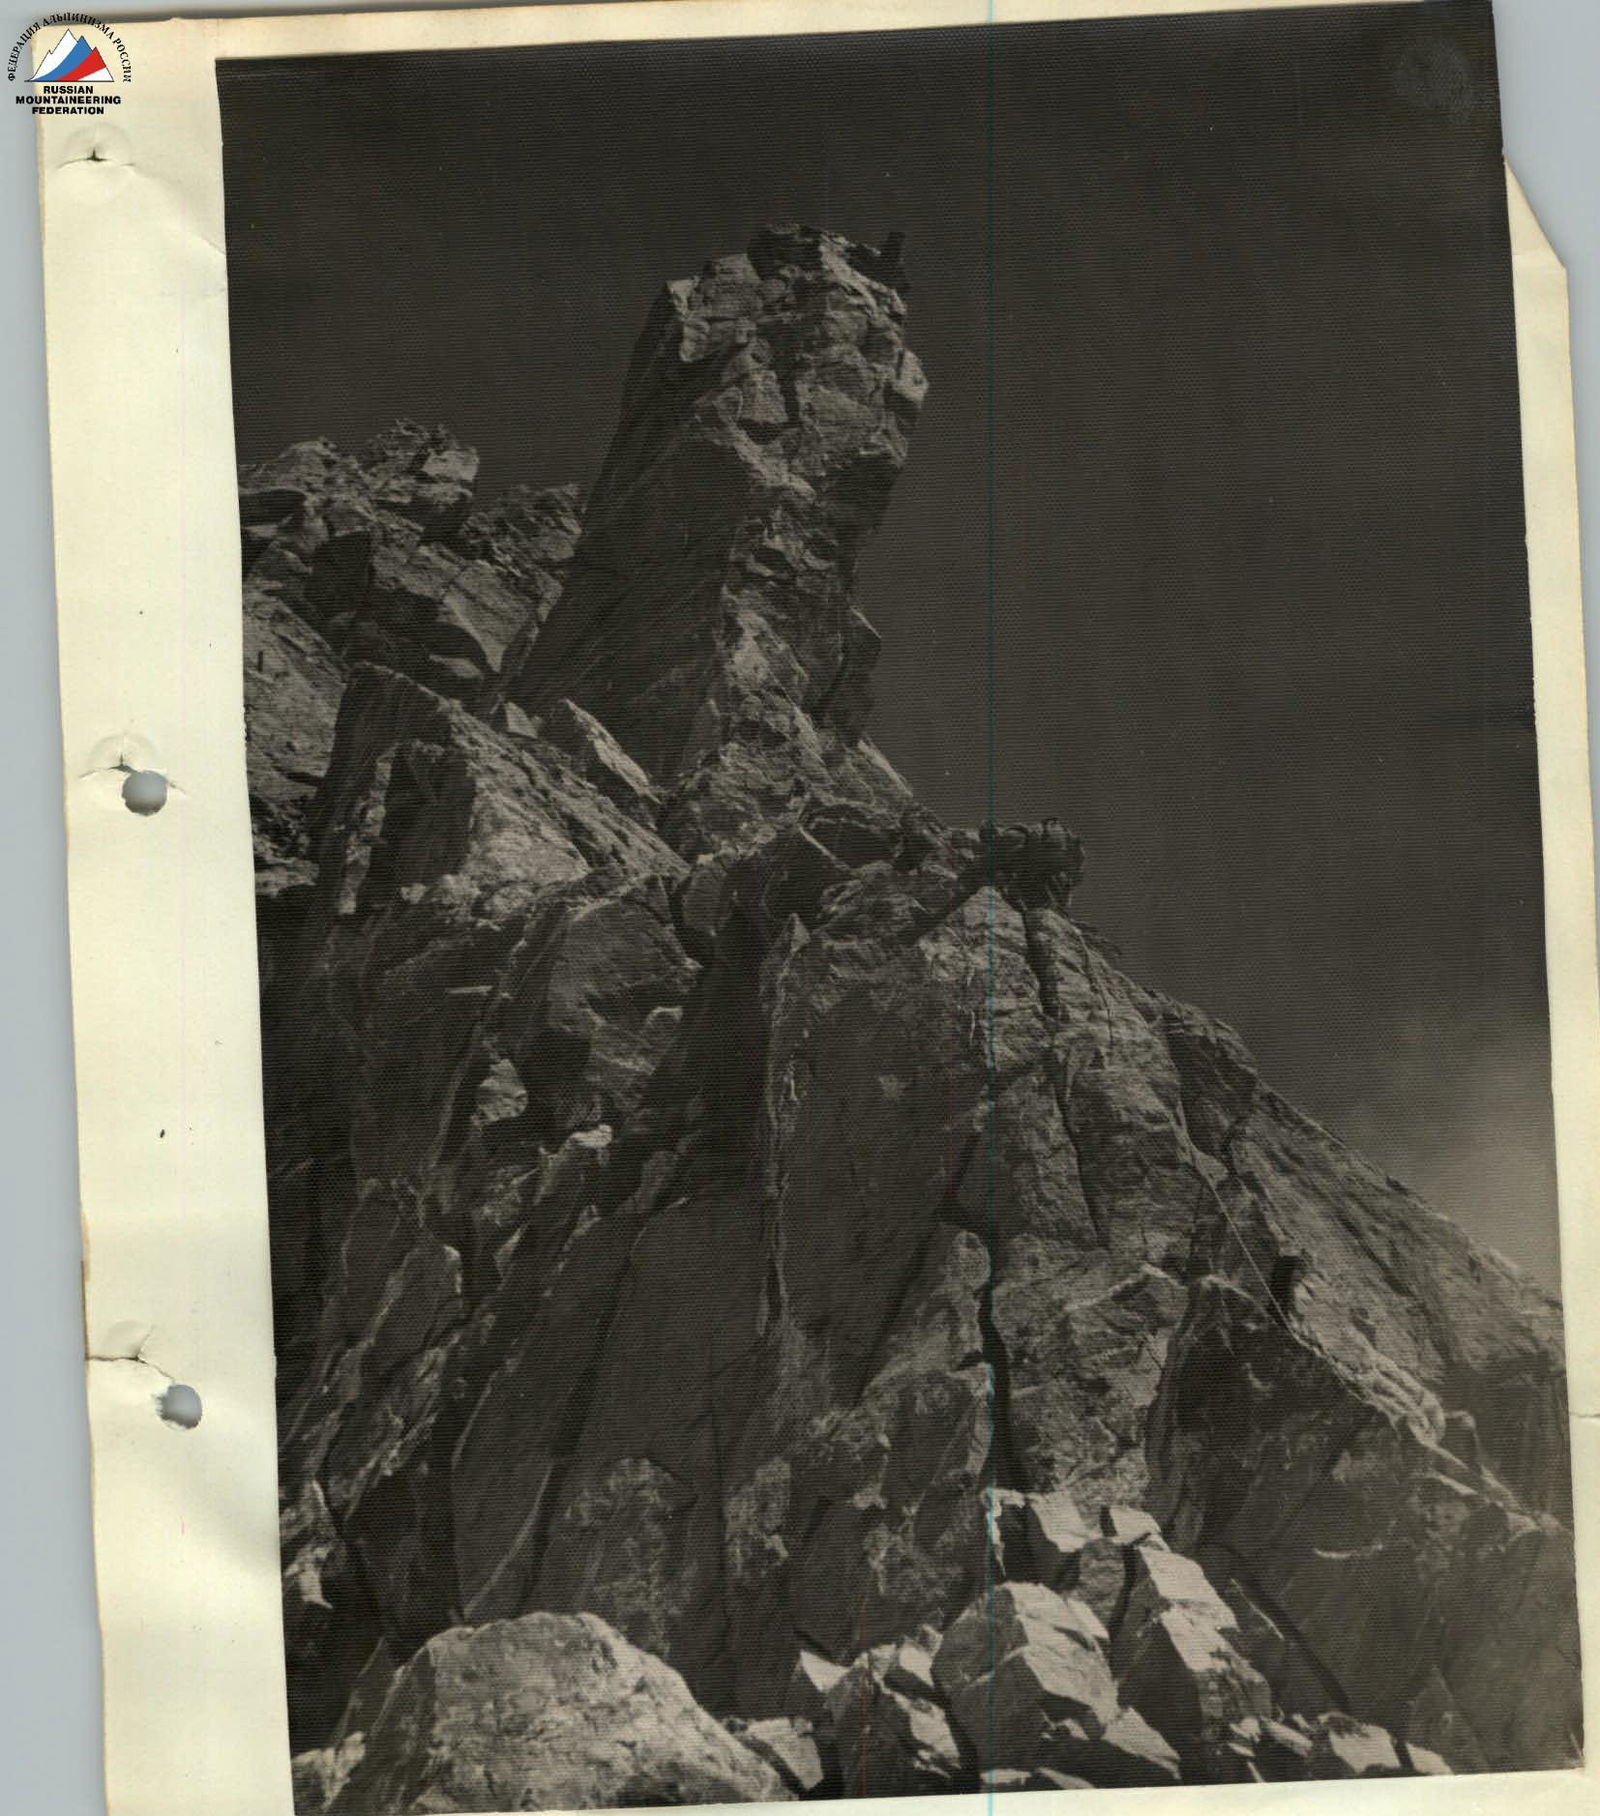
Photo 3. Start of the route. Taken from Sella Pass.
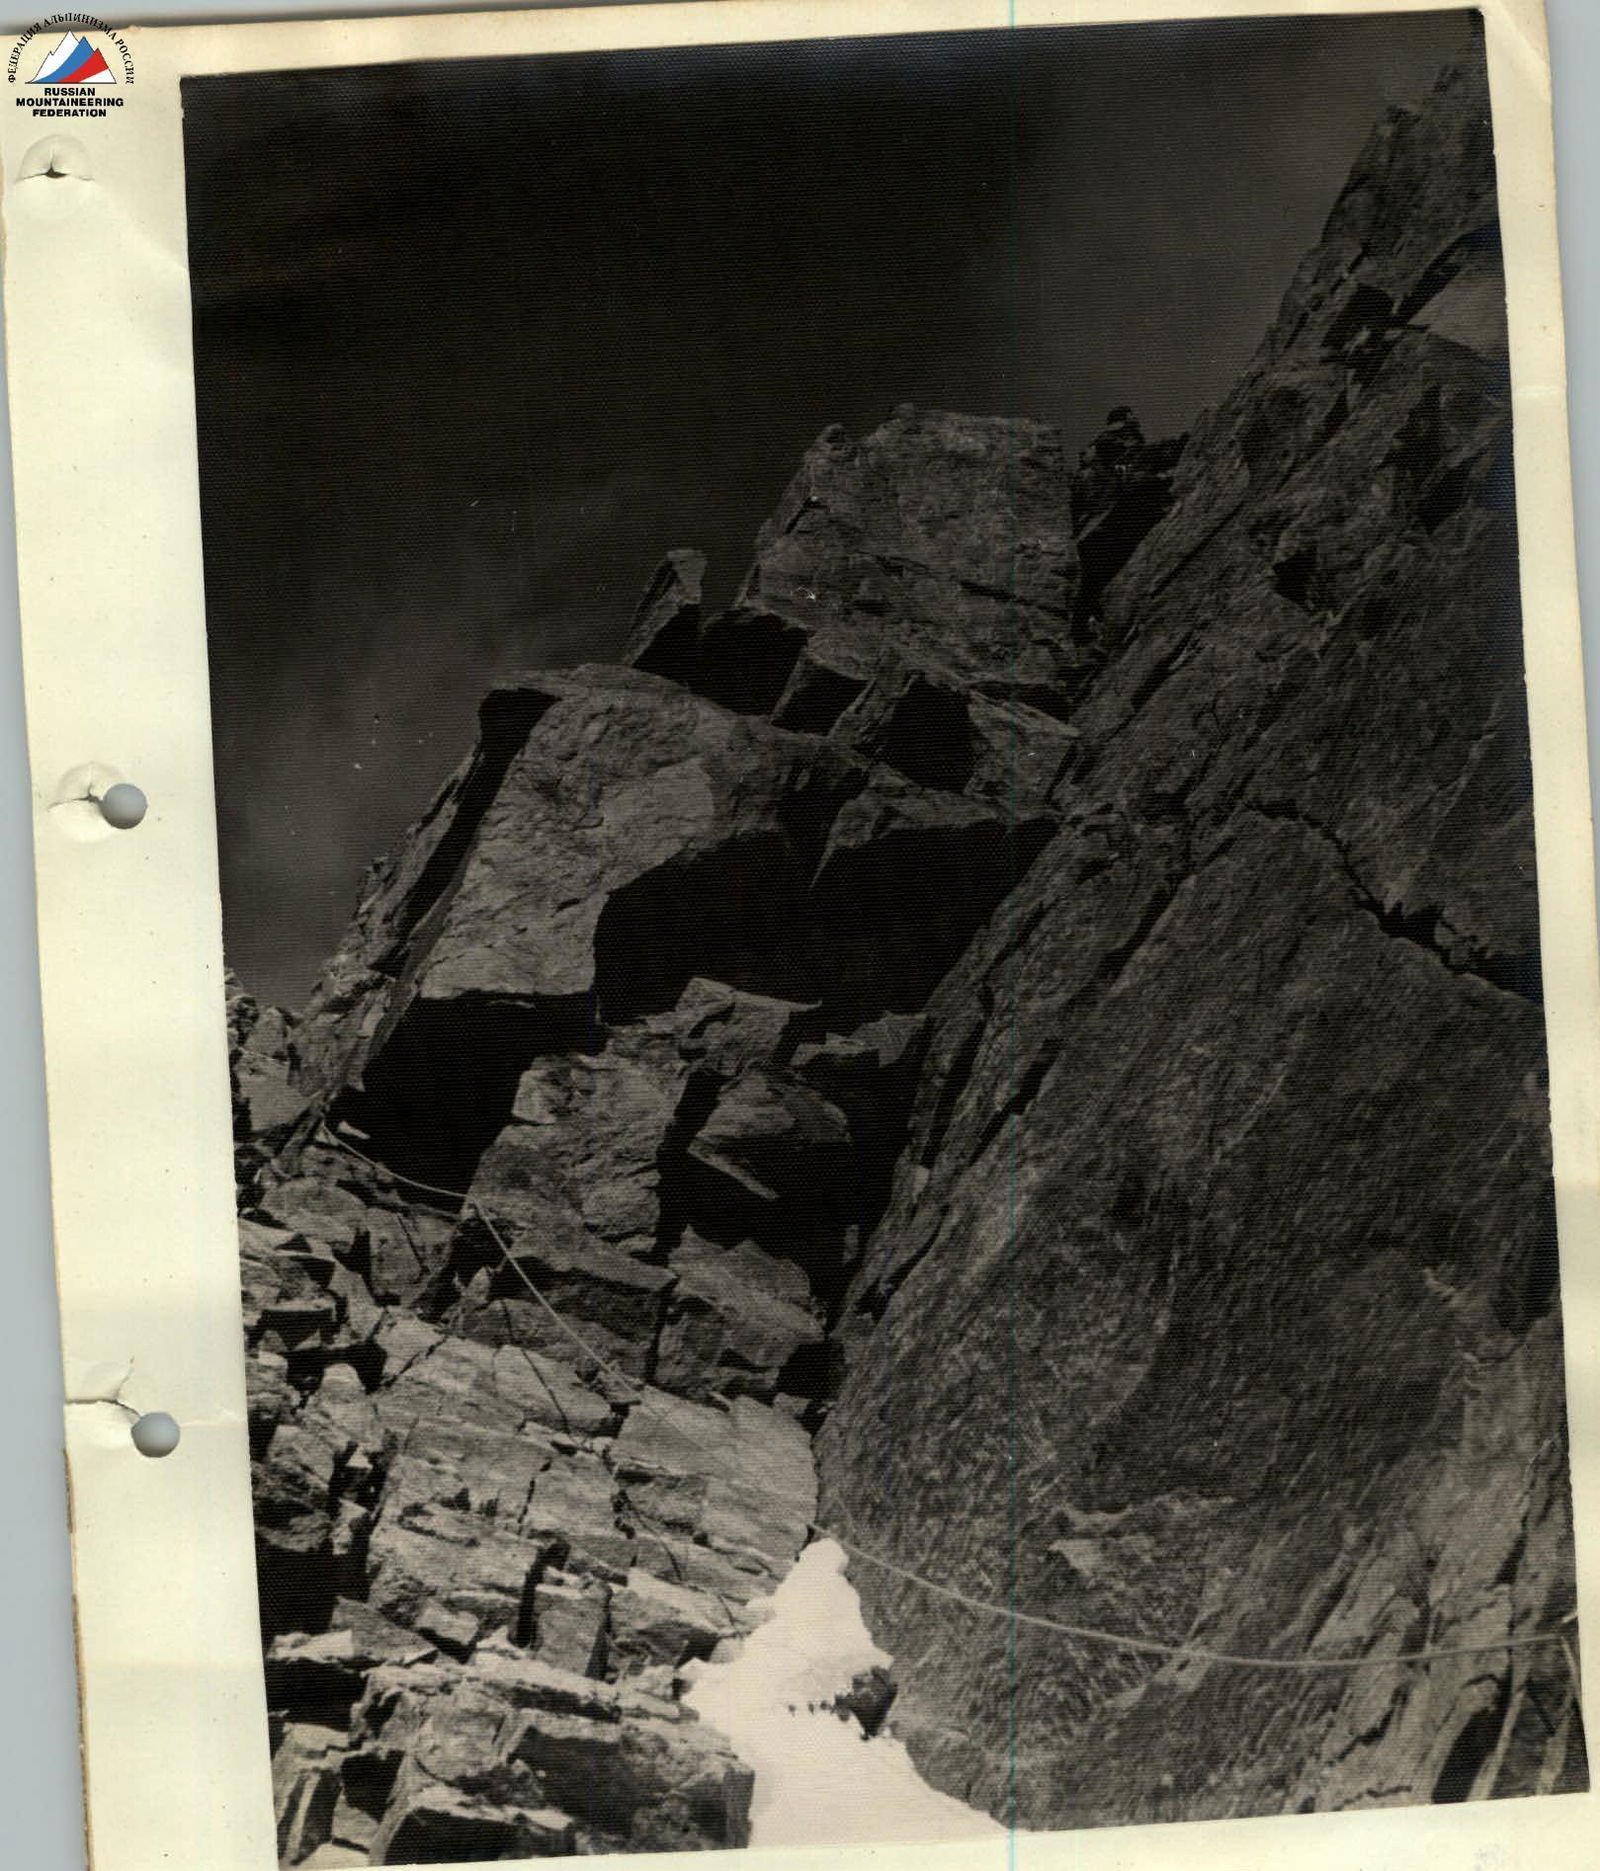
Photo 4. Start of the route. Easy rocks.
An easy rock path leads to a serac, which is overcome in its middle part. The group managed to overcome the serac through a vertical crevice in the middle part of the serac. With a different state of the icefall, overcoming the serac may require the use of a ladder. Careful piton belay is necessary (Photo 2).
After the serac, the path goes:
- bypassing several crevasses of the upper plateau;
- along a steep snow slope with a bergschrund, the upper edge of which is 2 m higher than the lower one;
- leads to Sella Pass (4100 m).
3. Ascent Route
From Sella Pass, the path goes straight up along destroyed rocks of medium difficulty (2 ropes) (Photos 3 and 4) to a rocky tower composed of slab-like "glacial erratics". Traversing left along a narrow shelf along the slab leads to a small (3 m) wall, which is overcome directly upwards with careful piton belay.
Further ascent goes:
- straight up along slabs, some of which are heavily destroyed (in the middle of the section there is a small difficult (5 m) wall);
- along steep, solid rocks of medium difficulty (100 m) to a slab, along which one traverses left upwards (Photo 5) for about 10 m.
After the slab follows:
- a chimney about 70 cm wide with vertical walls, closed at the top by a plug;
- a second chimney (about 20 m) leading to the ridge, along which movement is first on the right side, then on the left side;
- followed by a descent to the base of the "Finger" gendarme.
The "Finger" is bypassed on the left along a wall, followed by a short snow-ice couloir with embedded stones (Diagram 2), leading to a saddle behind the "Finger" (Photo 6).
From the saddle, traversing left upwards along slabs of gradually increasing steepness, one reaches an inclined shelf leading to the ridge, and, having traversed about one rope length along difficult rocks, approaches a smooth yellow slab (about 15 m). The passage of the yellow slab requires artificial footholds and a ladder (Photo 8).
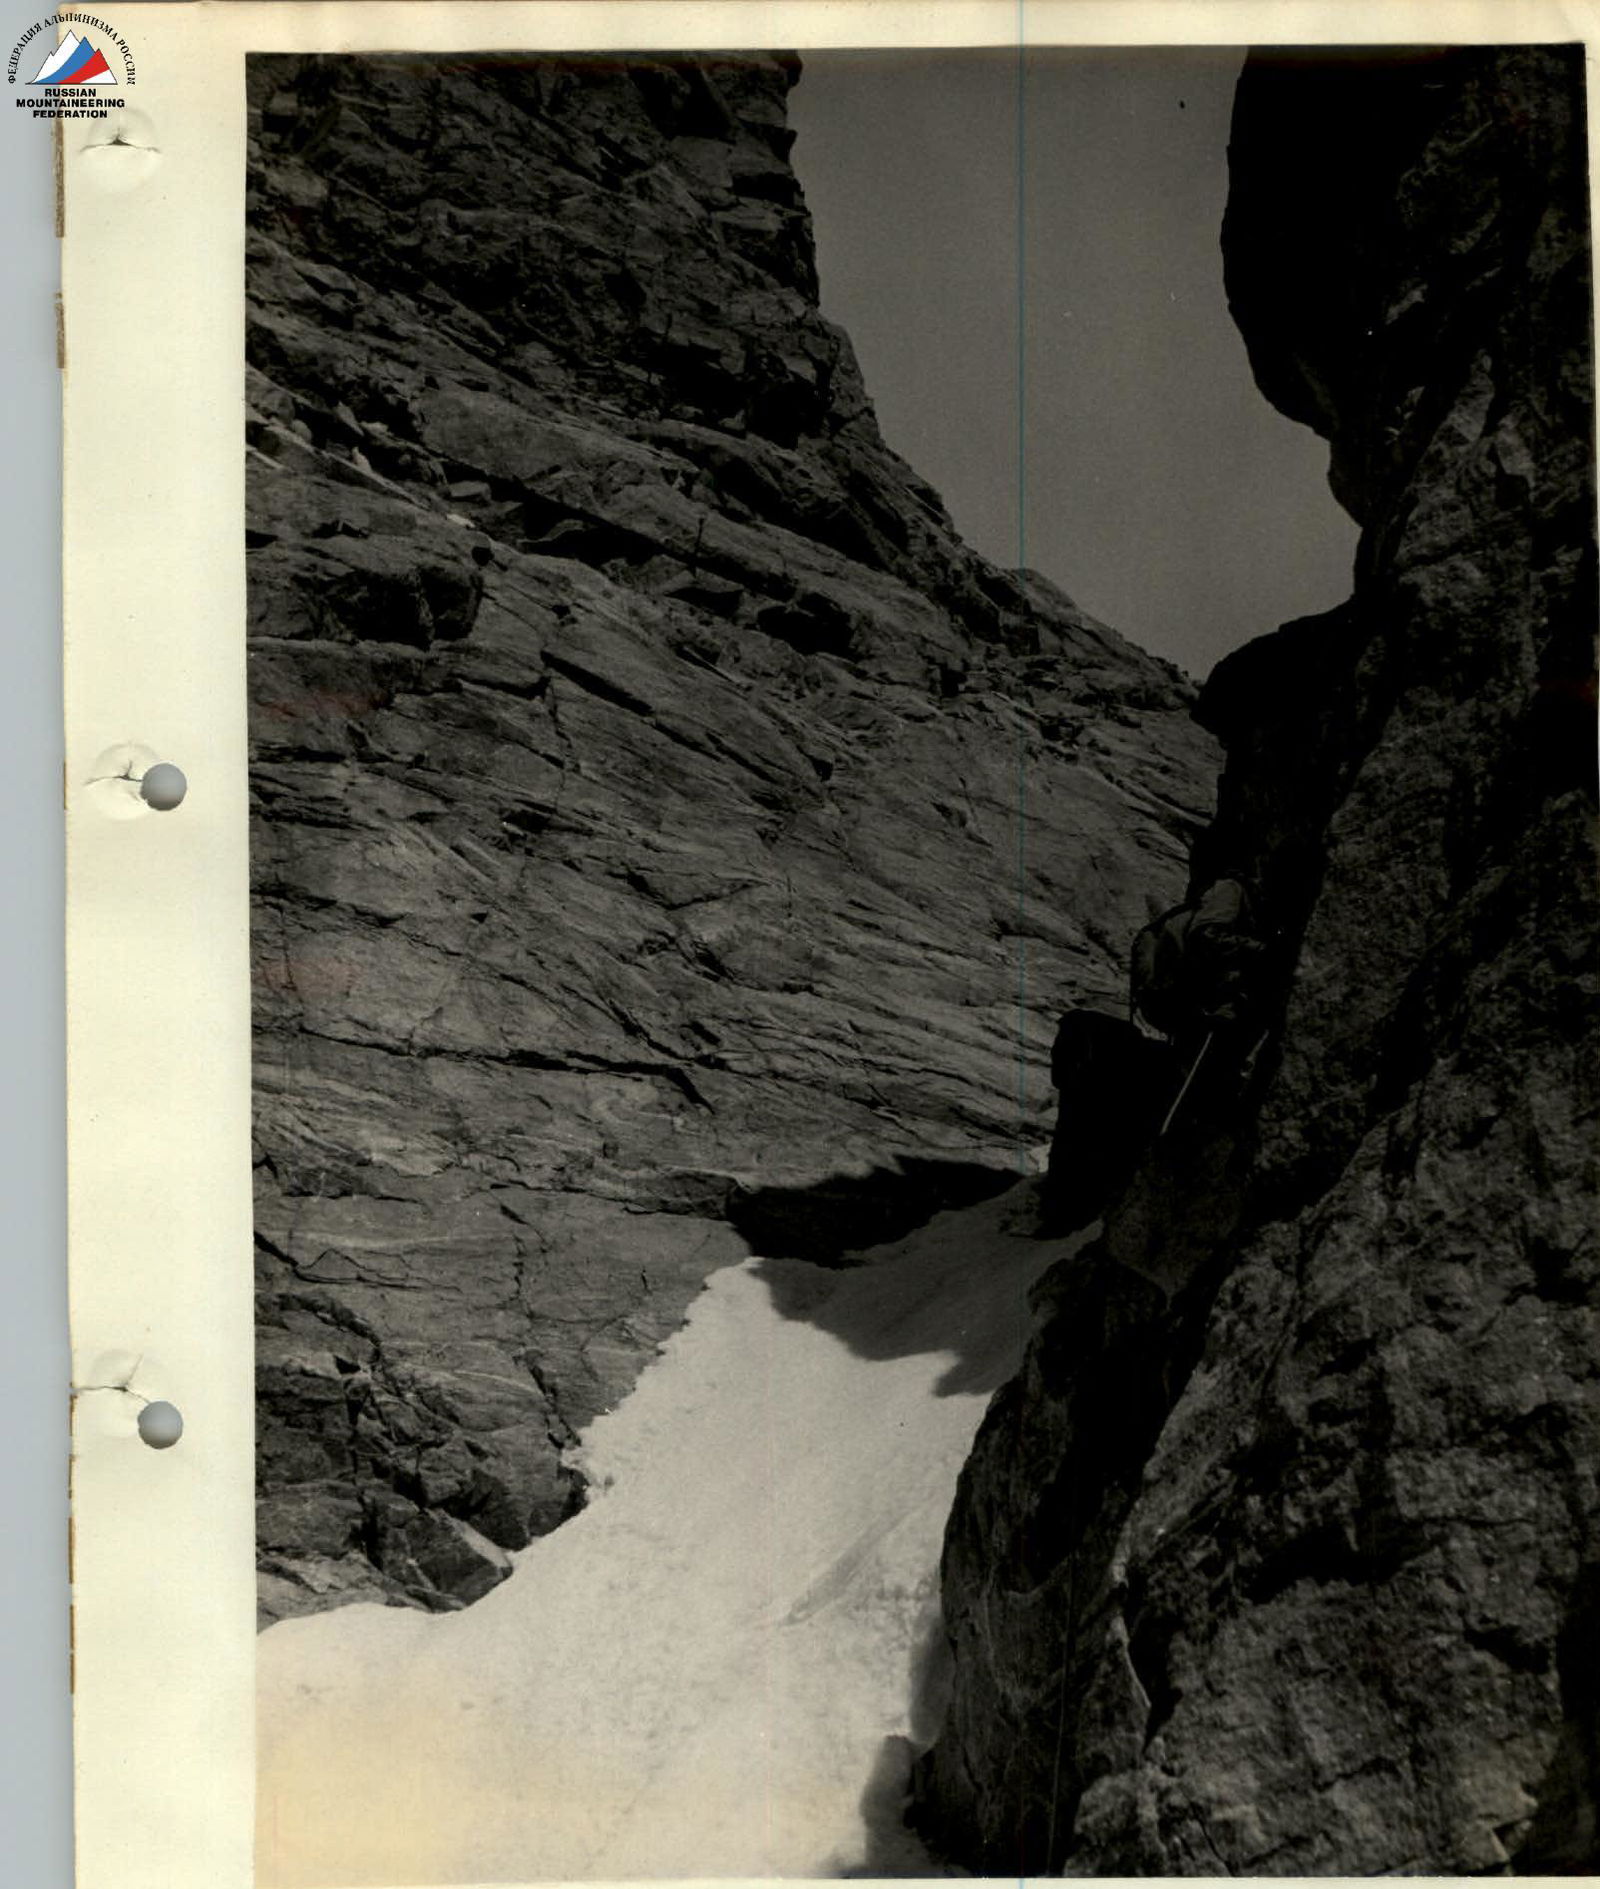
Photo. Bypass of the "Finger" gendarme.
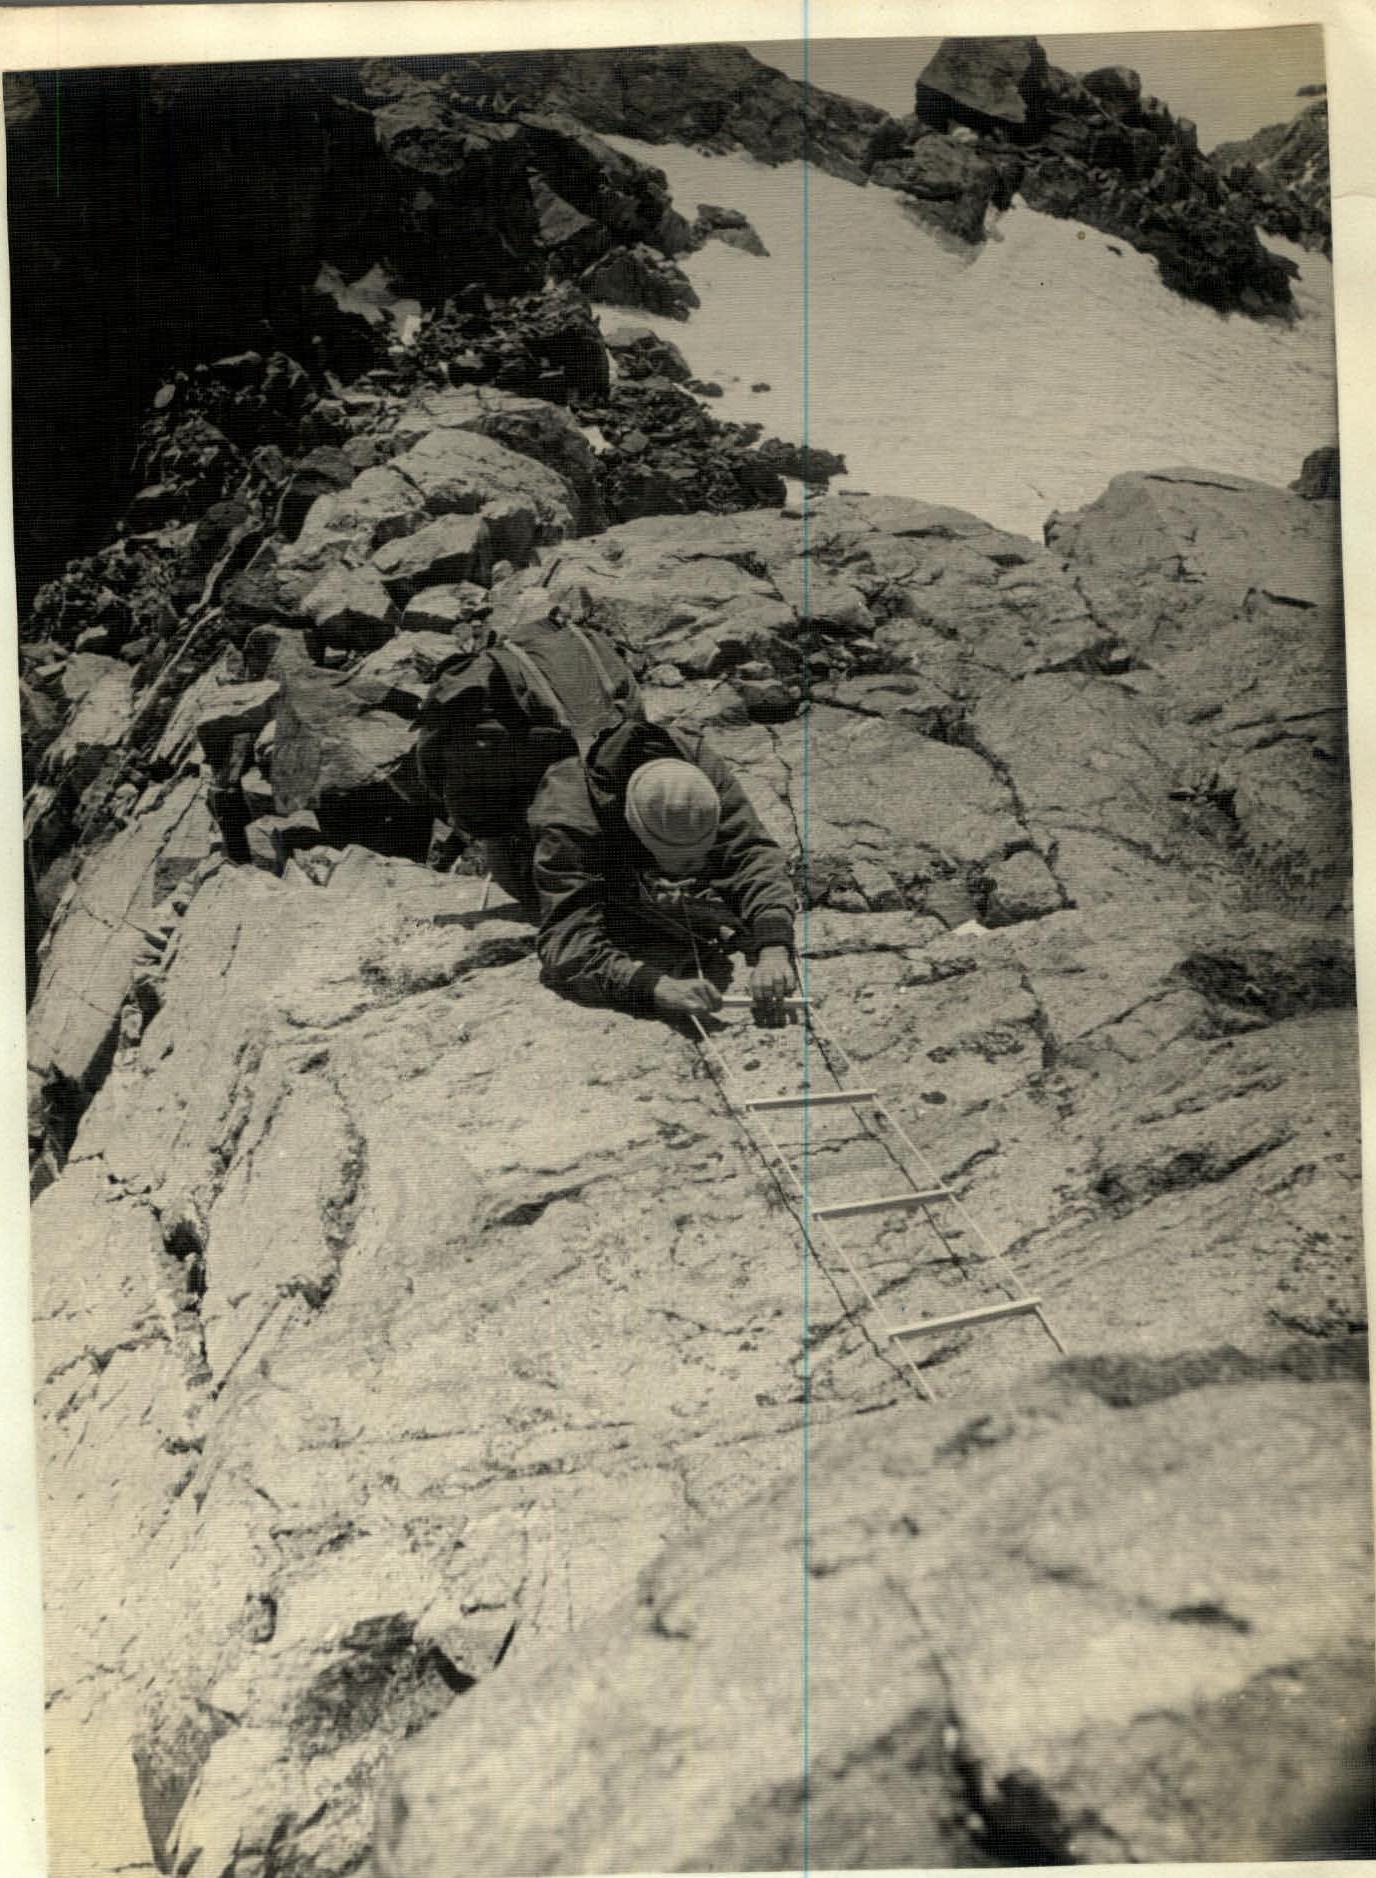
Photo. Start of ascent to the "yellow" wall. The second in the rope team is climbing. Photo taken from above, from a piton. The first was climbing on the right along overhanging rocks.
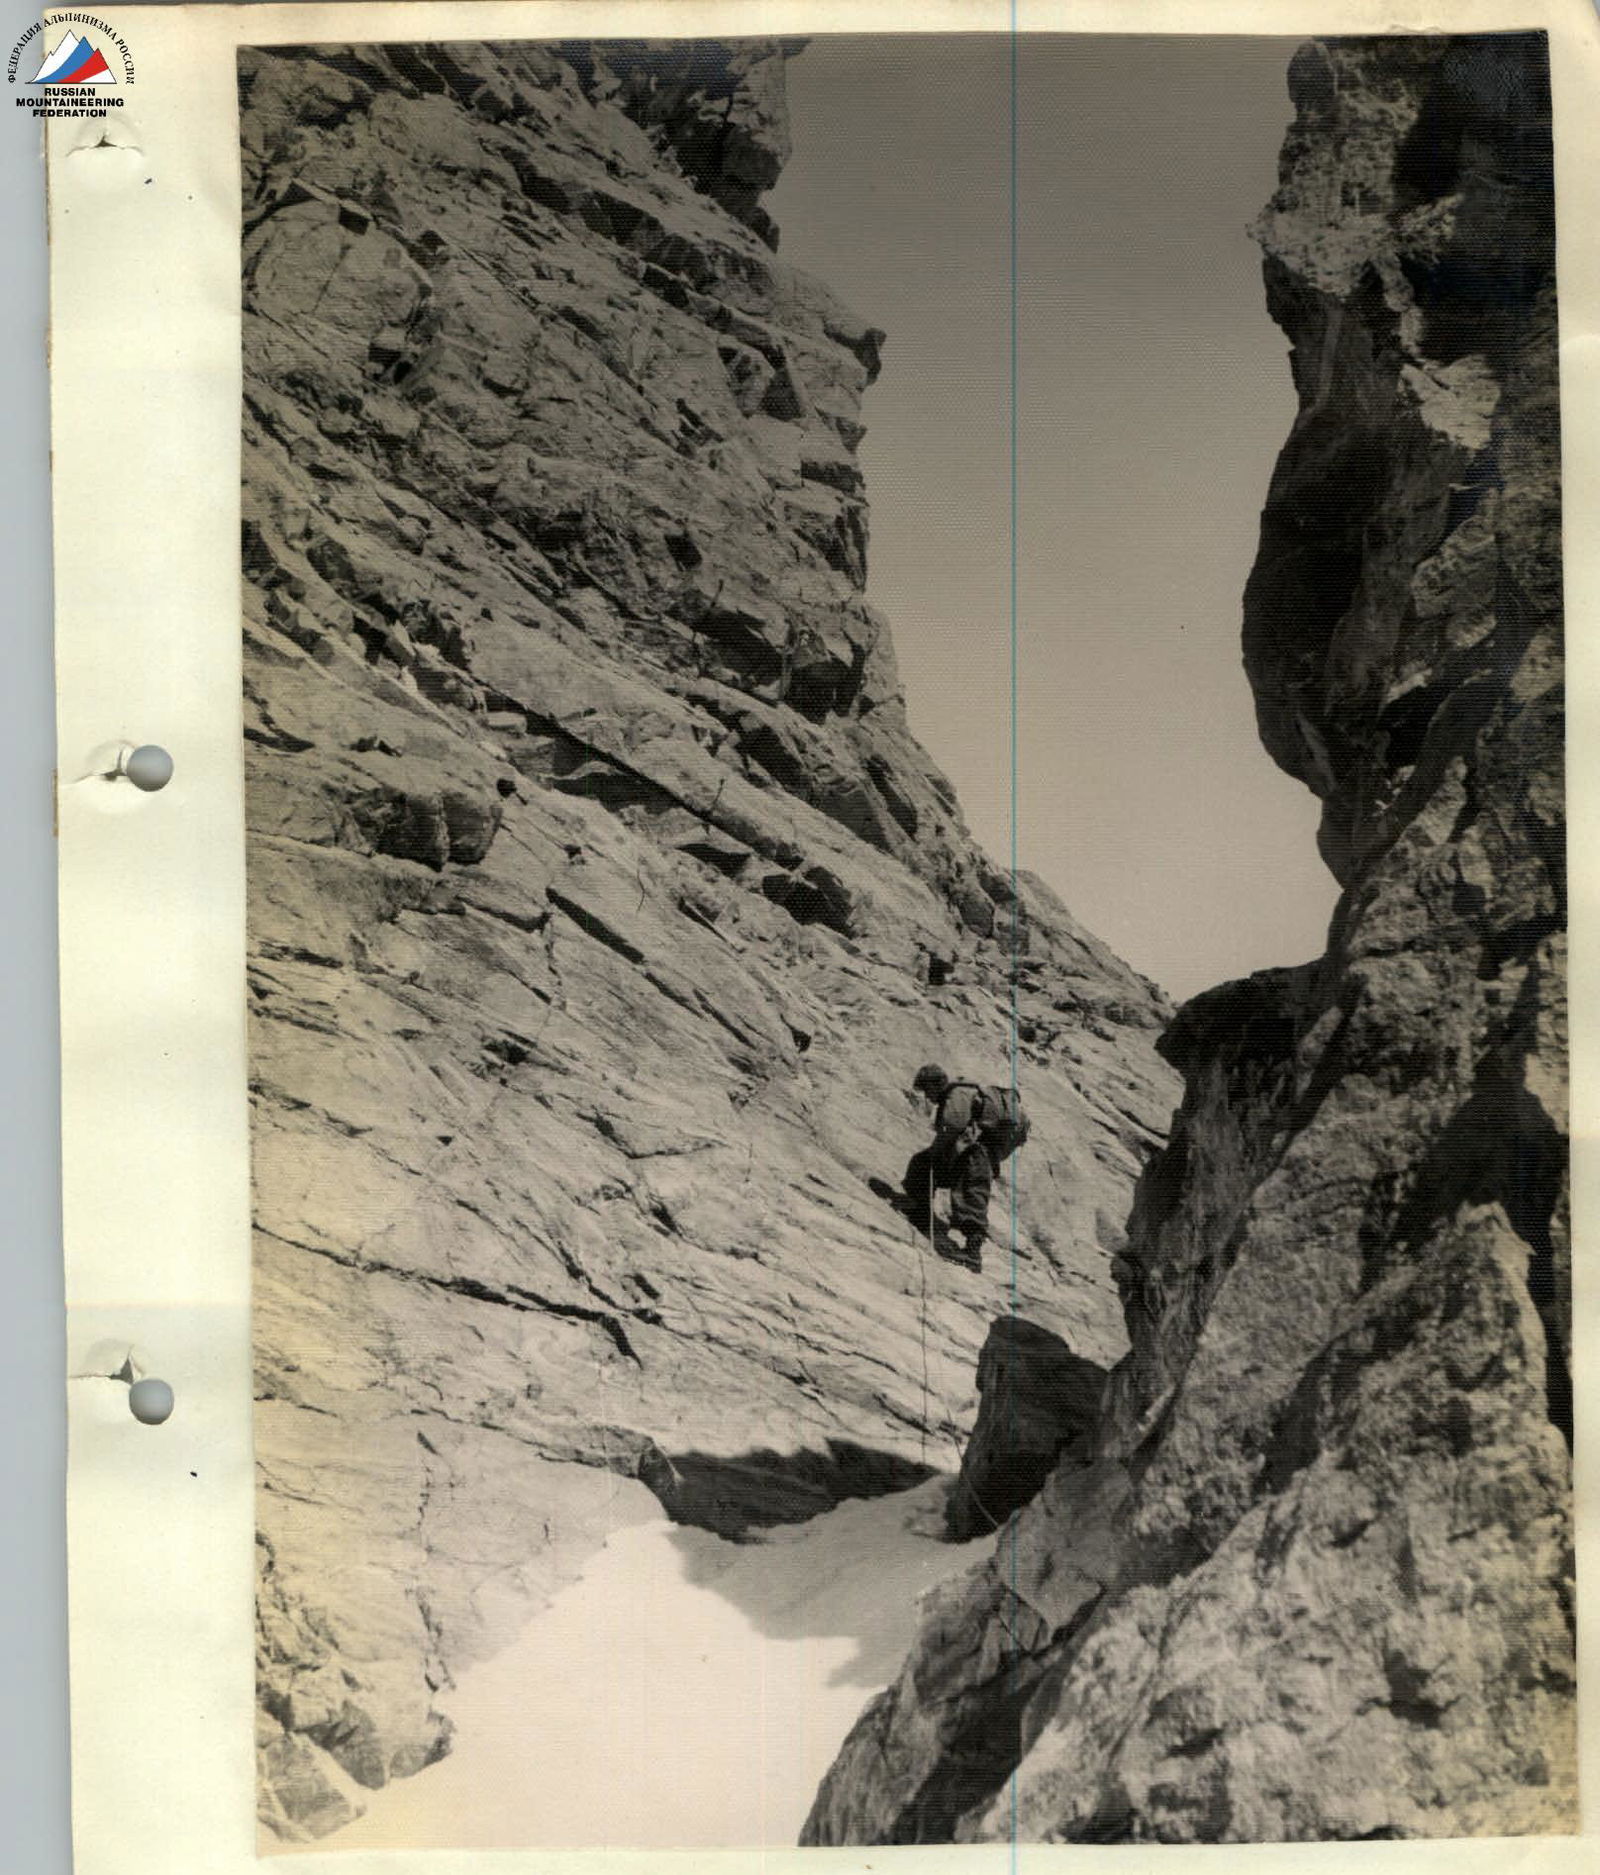
Photo 7. The "Finger" is bypassed. S. Morozov is exiting the slab. Further, the path goes along easier rocks of medium difficulty (about 2 rope lengths) to a small saddle in the ridge, followed by a small wall (3-4 m), divided in the middle by a vertical crack with an overhanging plug. The passage of the plug requires artificial footholds. Further follows a small (2 rope lengths) horizontal section of the ridge (characterized by slabs overhanging to the West), leading to a large gendarme. From the base of the gendarme, one descends to the right downwards along an inclined shelf and further, traversing difficult rocks, reaches the base of the eastern wall of the gendarme. The wall (150 m) has the character of steep (up to 70°), weakly dissected slabs; careful piton belay is required.
After the wall, the path goes again along the ridge, two small gendarmes of medium difficulty are overcome head-on. Further follows a 20-meter wall (up to 90°), the direct ascent of which is extremely difficult. Traversing a smooth steep slab with few footholds (Photo 20), one reaches a narrow ice-filled vertical crack, along which one ascends to the ridge. The bypass of the slab and the passage of the crack require artificial footholds (ladder, pitons).
Having traversed several meters along the ridge, one descends to a saddle before the main gendarme, the overcoming of which is the key point of the route. Overcoming the gendarme head-on is hardly possible (more than 60 m of sheer and overhanging monolith), a bypass to the right is no less difficult (sheer and overhanging monolith about 100 m high and up to 60 m wide), so the gendarme is bypassed on the left along difficult slabs (Diagram 3).
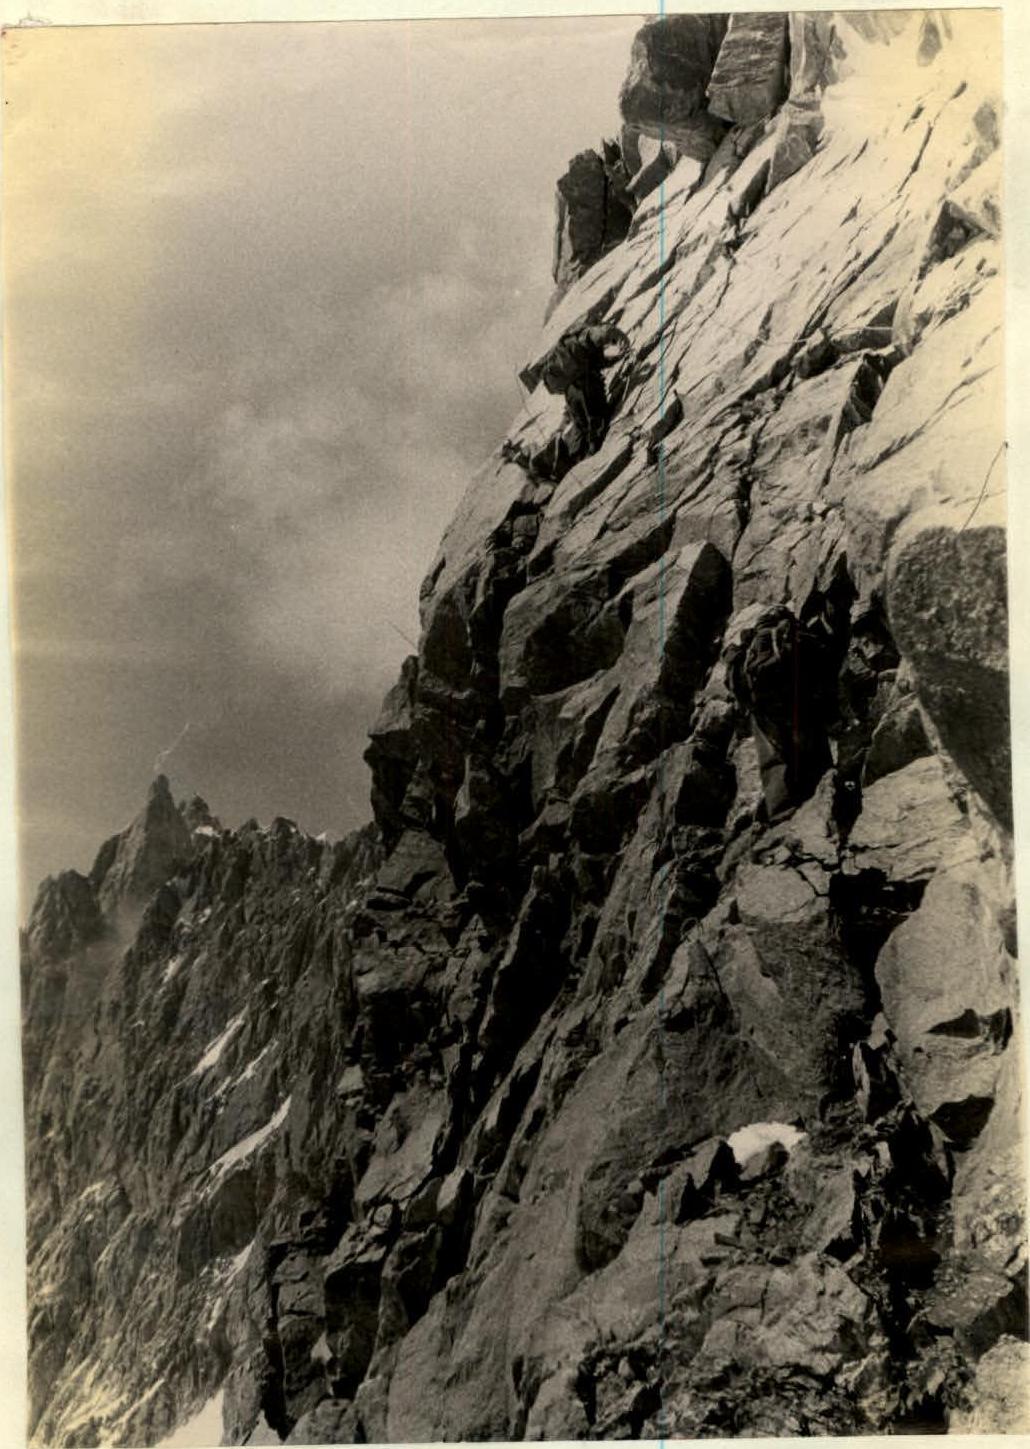
Photo. Large gendarme. On a steep slab. Having descended from the saddle to the left downwards for two rope lengths (going along the rope) along an ice gully, one reaches a narrow shelf under the southwestern wall of the gendarme and, having overcome (with artificial supports) a section of complex rocks (Photo 10), reaches a narrow inclined shelf leading left upwards to a steep (45°) dissected slab (40 m) under overhanging rocks (Photos 12 and 13), which are traversed along a crack with a plug. Throughout this section, there is a high risk of rockfall from the southwest wall of the gendarme.
After the slabs follows an inclined shelf of medium difficulty, rising left upwards. A snow-ice couloir is crossed in the direction of steep "glacial erratics", along which one ascends to it before the summit tower. Traversing left upwards along the base of the summit tower along rocks of medium difficulty, one reaches a steep ice gully with vertical walls. The path goes along rimaye ice and difficult rocks on the right (in the direction of travel) side of the gully. An overhanging wall (3 m) is overcome with pitons. Having traversed another about 20 m along rimaye ice and difficult rocks, one crosses the gully, moving to the rocks on the left side. Along these heavily destroyed rocks of medium difficulty, one reaches the summit (Diagram 4).
4. Possible Camping Sites on Approaches and Route
- On the right (orographic) moraine at the confluence of the Bezengi and Nameless Glaciers, opposite the north ridge of Shkhara.
- Rocky outcrop in the upper cirque of the Nameless Glacier.
- Sella Pass.
- In the area of the "Finger", a platform between the wall and the slab, separated from the wall.
- Shelf at the base of the eastern wall of the large gendarme.
- Inclined platform before the summit of the large gendarme.
- Shoulder before the summit tower (on the right side below the ridge line).
- Summit.
Camping sites 4-7 are inconvenient (semi-sitting).
5. Time Breakdown
- Misses-Kosh - confluence of the Bezengi and Nameless Glaciers - 4 hours.
- Confluence of glaciers - rocky outcrop - 4 hours.
- Rocky outcrop - Sella Pass - 3 hours.
- Sella Pass - saddle behind the "Finger" - 6 hours.
- Saddle behind the "Finger" - base of the large gendarme - 3 hours.
- Bypass of the gendarme and exit to camping site under its summit - 2 hours.
- Summit of the gendarme - shoulder - 12 hours.
- Shoulder - summit - 3-3.5 hours.
6. Descent Options
- Through the saddle between Pushkin Peak and West Mizhirgi.
- Along the ascent route to Sella Pass.
- Along the ascent route to the shelf under the southwest wall of the main gendarme, then to the right downwards along steep rocks (descending on a rope) to a wide ice couloir; further along the right side of the couloir with piton belay from the rocks (descending and sitting on a rope) to the "ossis" leading to the snow slopes under Sella Pass. The descent from the shoulder to these slopes takes 12 hours, and camping is possible on the "ossis".
7. General Characteristics of the Route
The route to West Mizhirgi summit from Sella Pass is predominantly rocky with snow-ice approaches. The rocks are difficult, with several very difficult sections. Belay is almost everywhere piton (the group hammered in 75 rock pitons during the ascent). The route requires high qualification and good physical preparation of the group.
Information about the Group
- Nelyidov Anatoly Borisovich. 1st sports category. Moscow, I-41, Malaya Pereyaslavskaya St., 24/8, apt. 6.
- Feshchenko Gennady Alexandrovich. 2nd sports category. Moscow, Shcherbakovskaya St., 52/54, apt. 45.
- Morozov Sergey Alexandrovich. 2nd sports category. Chelyabinsk 40, Mendeleeva St., 10.
- Muravyov Yevgeny Alexandrovich. 2nd sports category. Sverdlovsk, Radiщеva St., 10, apt. 23.
In 1956, the group in this composition traversed Ushba (5A) (leader - Nelyidov A.B.), traversed Bzhedukh - Volnaya Ispaniya (4B) (leader - Nelyidov A.B.), North wall of the North summit of MNR (4B) (leader Nelyidov A.B.), traversed Domбай-Ulgen (leader Sokolova I.V.). In 1957, the group traversed the Main and East summits of Dykh-Tau (5A) (leader Nazarenko V.V.). In 1958, the group participated in the MGU-MVTU expedition to Peak Pobeda. A.B. Nelyidov ascended to East Pobeda, and S.A. Morozov, E.A. Muravyov, and G.A. Feshchenko traversed the Pobeda massif.

Diagram. Route to West Mizhirgi summit (4928 m) from Sella Pass. To Diagram 1.
- R1–R2. Large blocks of rocks of medium difficulty (20 m). Belay through ledges.
- R2–R3. Difficult slab (60°). Traverse left-upwards to the base of the chimney. Piton belay (Photo 5).
- R3–R4. Vertical 20-m chimney 70 cm wide, closed at the top by a plug. To overcome the plug, one needs to exit the chimney to the right wall. Piton belay.
- R4–R5. Horizontal crack 70 cm wide and 20 m long.
- R5–R6. Shelf leading to the base of the second chimney. Rocks of medium difficulty.
- R6–R7. Chimney (15 m) of medium difficulty, leading to the ridge.
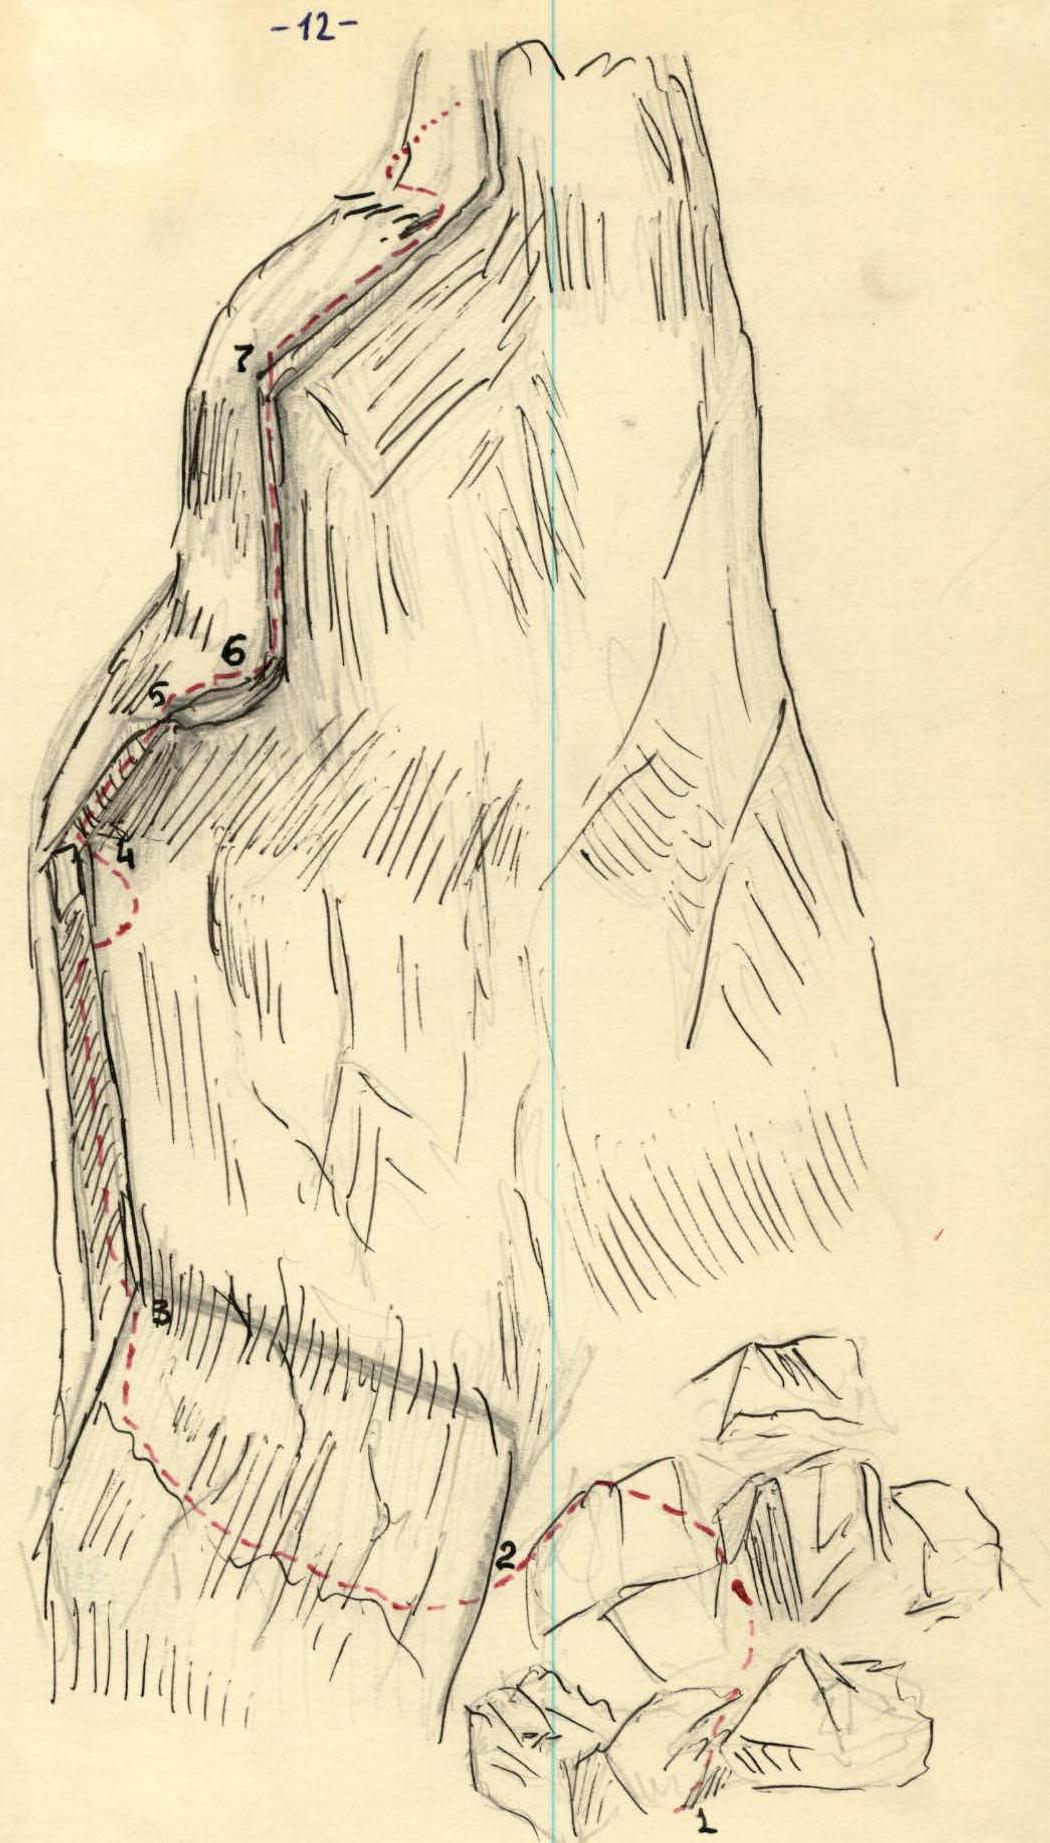
Diagram 1. Bypass of the "Finger" gendarme. To Diagram 2.
- R1–R2. Descent on 1/2 rope length (18 m) to the saddle.
- R2–R3. Chimney with a plug. The plug is bypassed along a (20 m) wall.
- R3–R4. Exit to a shelf (20 m).
- R4–R5. Shelf and slab with overhanging rocks (40 m).
- R5–R6. Narrow shelf leading to "glacial erratics" (120 m). 
Diagram 2. Ascent route to the large gendarme. Summit Tower of West Mizhirgi.
Sections (to Diagram 3)
- R1–R2. Rocks of medium difficulty, strongly dissected. Belay through ledges (80 m).
- R2–R3. Steep, strongly smoothed rocks covered with rimaye ice. Piton belay (20 m).
- R3–R4. Overhanging "glacial erratic" (3 m). No cracks for pitons.
- R4–R5. Rocks of "glacial erratic" type, strongly smoothed, covered with stone ice. Piton belay (20 m).
- R5–R6. Traverse of ice couloir (30 m). Piton belay.
- R6–R7. Heavily destroyed rocks of medium difficulty. Belay through ledges (40 m).
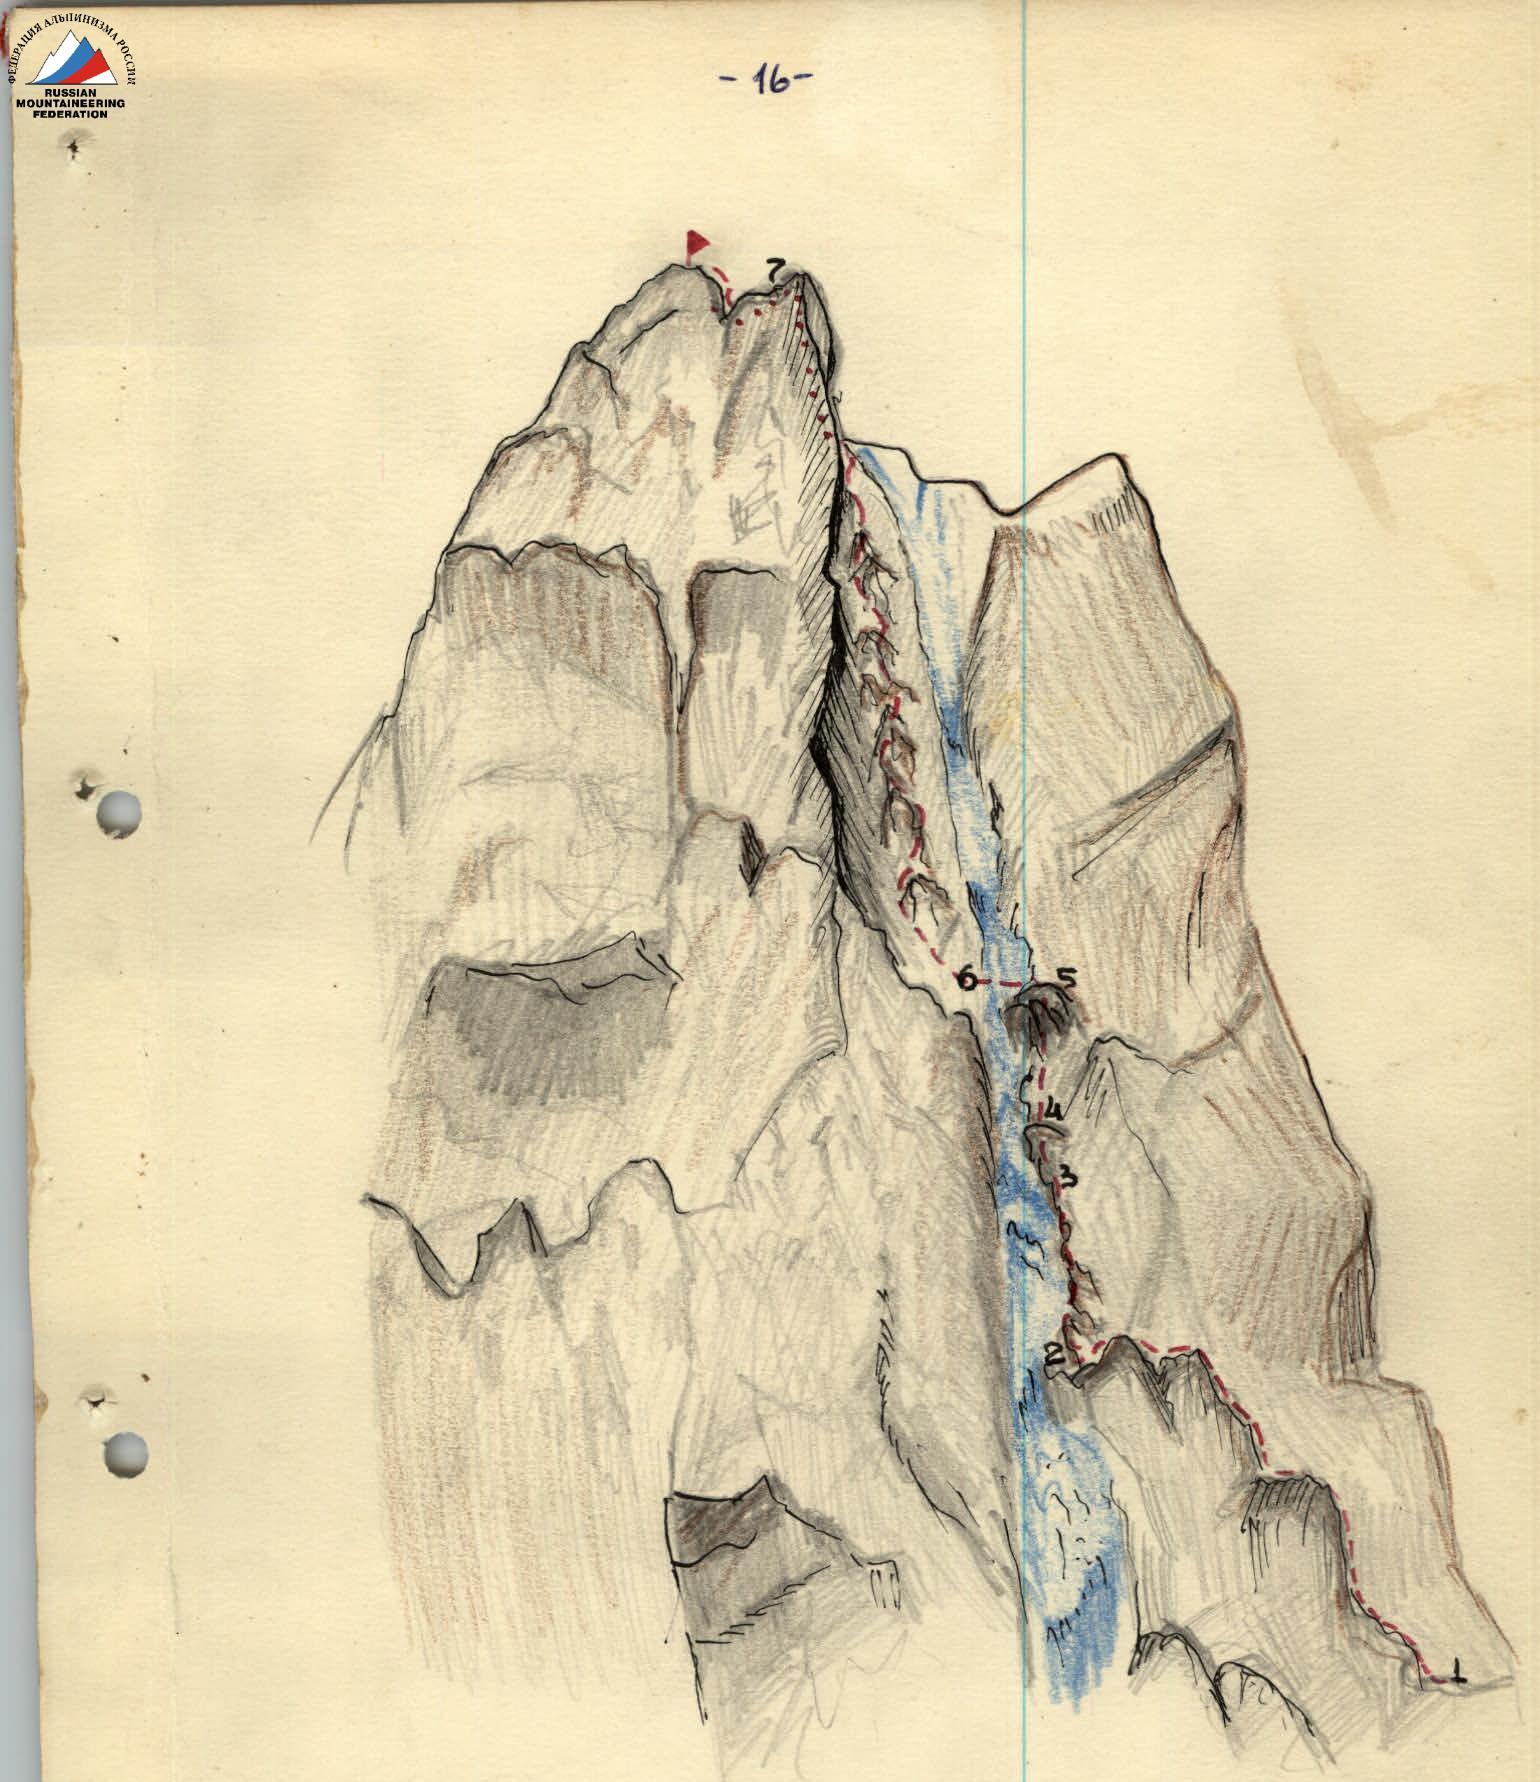
Diagram 3. Summit Tower.