Ascent Passport
- Ascent class: rock climbing.
- Ascent area: Caucasus from Nakhar Pass to Chipper-Azau Pass, spurs of the Main Caucasian Range.
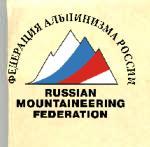
- Dvuzubka Peak 3600 m via the center of the southwest wall.
- Estimated difficulty category — 5B.
- Route characteristics: elevation gain: 780 m; average steepness: 71°; length of sections: II — 80 m, III — 170 m, IV — 290 m, V — 440 m (VБ — 320 m).
- Number of pitons driven:
| for belay | for creating intermediate belay points | |
|---|---|---|
| rock | 92 | 14 |
| ice, screw pitons | - | - |
- Number of climbing hours — 28 hours.
- Number of nights — 2 (one tent, one bivouac).
- Leader: Leonid Borisovich Volkov, Candidate Master of Sports.
Team members: Alexander Vladimirovich Babitsky, Candidate Master of Sports, Vladimir Mikhailovich Bondarev, 1st sports category, Alexey Vadimovich Moskaltcov, 1st sports category. Team coach: Yuri Petrovich Melnik, senior instructor, Master of Sports of the USSR.
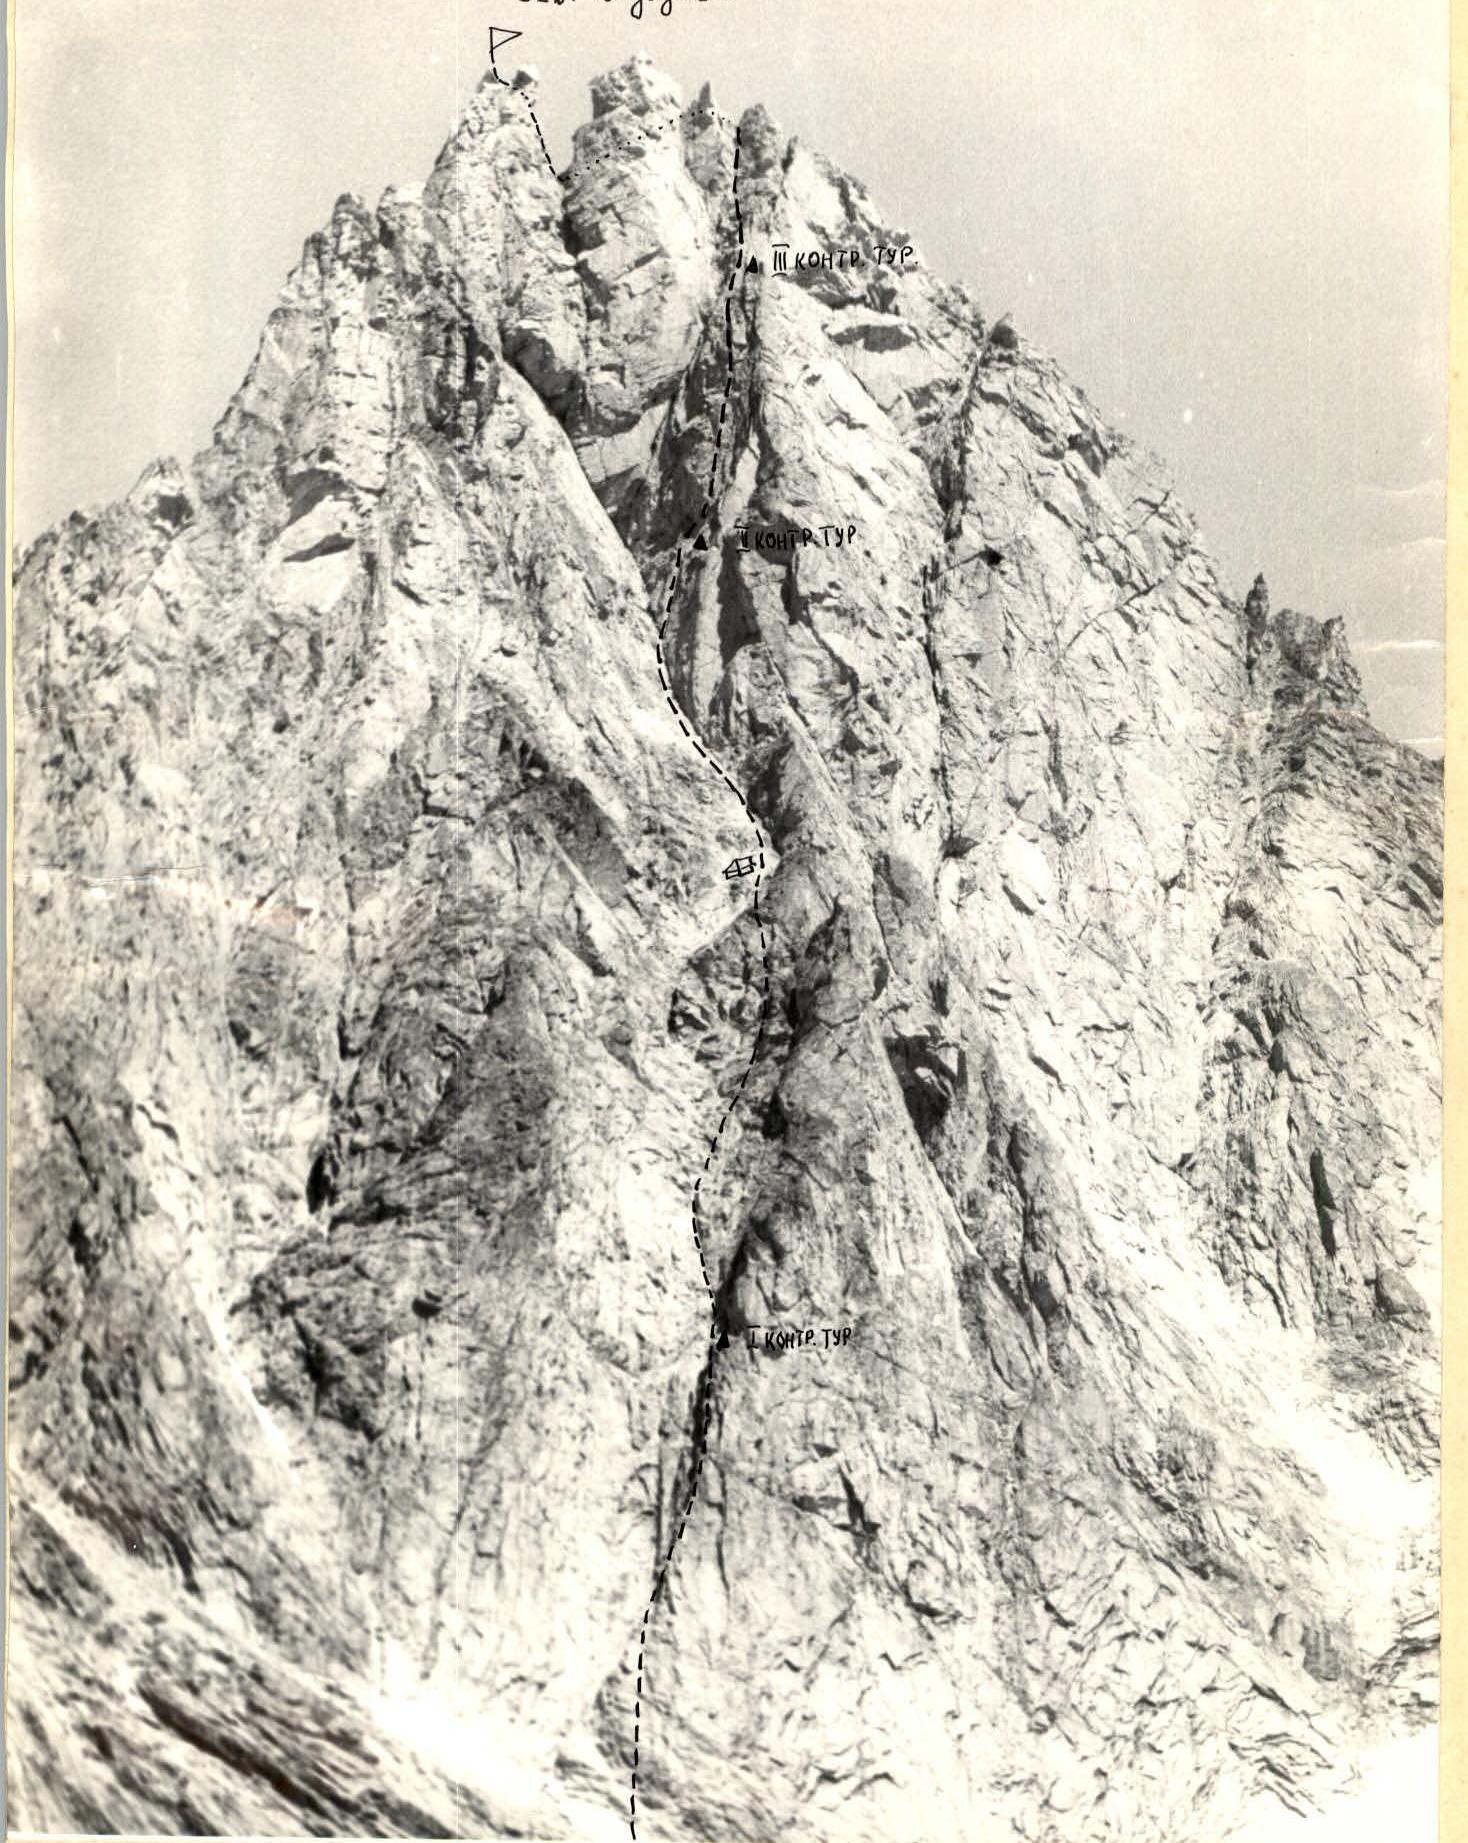
- Δ — peaks.
- X — ridges, passes.
- --- — base camp.
- --- — assault group route.
- Ф — photo points: Ф1 — photo #1, Ф2 — photo #2.
Explanations for the table
R0–R1. Snow ascent to the base plates of the peak. Across the plates (55–60°) approach to the base of the sheer chimney of the first ascent of the counterfort.
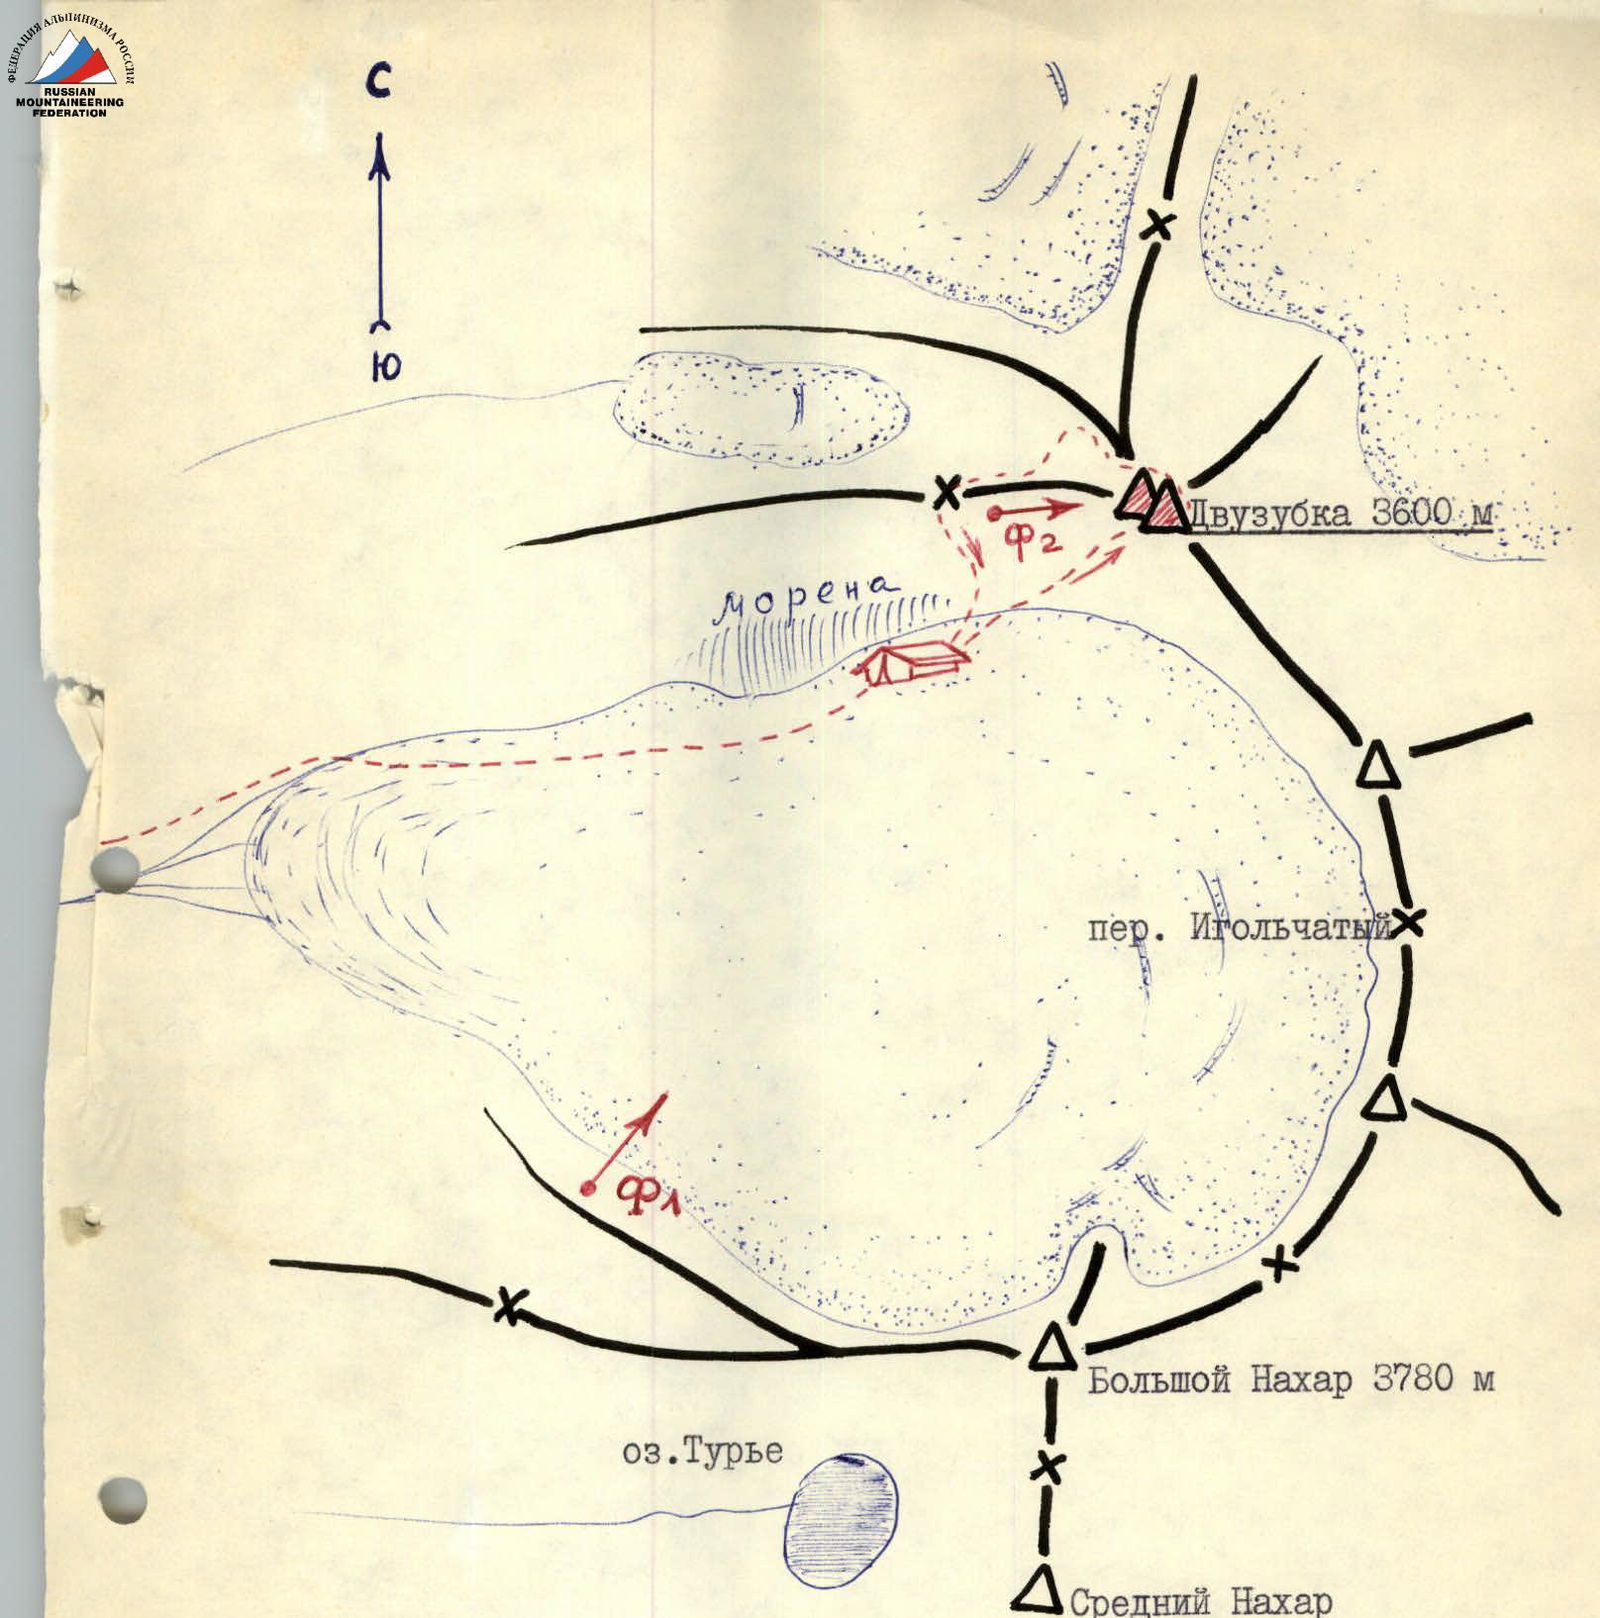
R1–R2. 20 m up the chimney, then transition to its left wall, moving straight up 15 m on steep (80–85°) smooth rocks, bypassing the overhanging section of the right wall of the chimney. Traverse right into the chimney and then 30–40 m of complex climbing in counterforce. Rocks are like "ram's foreheads"; there are few cracks for driving pitons. Further, the chimney widens for a short section, then its walls converge and overhang. The exit from the chimney is blocked by a "plug." Key point of the first ascent. Passing the plug on the left on ladders (photos 4, 5) and then on an 85° plate, moving up-right under the overhanging yellow rocks. Exit to a ledge. I control point.
R2–R3. From the ledge left-up on 75° plates along the chip 40 m (photo 6).
R3–R4. Then straight up, I rope of complex climbing to a small ledge with a chipped rock. There are practically no cracks.
R4–R5. Left-up on monolithic rocks, interspersed with sections of gray plates. Climbing becomes easier, the relief is dissected. 80 m to the flattening of the first ascent of the counterfort and then along its ridge 60 m of simultaneous movement to the summit of the ascent. To the right of the ridge of the second ascent is a small cave where you can organize an overnight stay for 3–4 people. Twenty meters higher under the overhanging rocks — a sitting bivouac for two people (photo 7). The group spent the night in both places in pairs.
R5–R6. 3.5 ropes on a steep couloir with smooth walls, exit under a powerful cornice closure. On the right (photo 8) and left, the cornices of the rocks of both peak towers overhang.
R6–R7. The main key section of the second ascent and the entire route. The exit to the right on the ridge of the counterfort is possible along the "black wall." This is a section of sheer, weakly dissected rocks covered with black lichens, which determined the color of the wall. Climbing is very difficult; there are few places to organize intermediate piton belays. The passage of the wall is facilitated by the fact that every 30–40 m there are small ledges with monolithic chips and good cracks for organizing belays and securing ropes. The path goes straight up 20 m to rocks covered with red lichens (photo 8). From here, traverse right (bypassing the overhang)
 along a chip on monolithic plates to a small ledge. Change of belay. Traverse right 10 m to a sheer inner corner (photo 9) and 30 m up it to a ledge. II control point. From it up to the second ledge and the overhanging section of black rocks (photo 10). From the ledge up 20 m of complex climbing and traverse 1–2 m to the right, bypassing the overhanging section. Then 20 m up a vertical inner corner to exit onto the ridge of the counterfort. The upper sections of the ridge overhang, and the further path is to the left of the overhang with an exit to the black wall. First 5–7 m along the ridge — approach under the overhanging sections (photo 11). Bypassing them on the left — complex climbing 30 m with an exit on an 80° plate, then 40 m straight up to the saddle of the counterfort where it abuts the wall of the peak tower. Two meters below the saddle on a ledge — III control point.
R7–R8. The counterfort abuts a steep 80° wall, dissected in the middle by a vertical crack. The crack is shallow, with rounded edges, allowing the toes of boots to be wedged. Climbing is difficult. After 20 m (one place for driving a piton) — traverse left onto the edge of a plate and then 20 m of simpler climbing on 60° plates — exit left-up onto a narrow ledge formed by a chipped plate with a sharp upper edge. Change of belay.
R8–R9. On the ledge — traverse left 4–5 m to a sheer chimney. The chimney is formed by the continuation of the black wall (right wall) and the overhanging rocks of the South Peak (left wall). Straight up the chimney 10 m and exit to its right wall — 30 m of medium-difficulty climbing lead to scree ledges. On them — to the saddle of the main ridge. Exit to the ridge on a 10-meter chimney with two "plugs."
R9–R10. Further from the main ridge along an inclined chimney 10 m. Bypassing the massif of the South Peak on the right, exit to the snowy saddle of the northeast ridge. Descent on snow 20 m into a steep crack and transition to its left wall. On the steep (80–85°) wall, one and a half ropes of horizontal traverse bypassing the South Peak onto the saddle between it and the North (Main) Peak. On the saddle — a bivouac site. One and a half ropes of uncomplicated climbing onto the South Peak and descent via the ascent route.
R10–R11. On rocks of medium difficulty 20 m on a monolithic chimney with a wedged "plug," then on steep plates — to the Main Peak (2 ropes).
along a chip on monolithic plates to a small ledge. Change of belay. Traverse right 10 m to a sheer inner corner (photo 9) and 30 m up it to a ledge. II control point. From it up to the second ledge and the overhanging section of black rocks (photo 10). From the ledge up 20 m of complex climbing and traverse 1–2 m to the right, bypassing the overhanging section. Then 20 m up a vertical inner corner to exit onto the ridge of the counterfort. The upper sections of the ridge overhang, and the further path is to the left of the overhang with an exit to the black wall. First 5–7 m along the ridge — approach under the overhanging sections (photo 11). Bypassing them on the left — complex climbing 30 m with an exit on an 80° plate, then 40 m straight up to the saddle of the counterfort where it abuts the wall of the peak tower. Two meters below the saddle on a ledge — III control point.
R7–R8. The counterfort abuts a steep 80° wall, dissected in the middle by a vertical crack. The crack is shallow, with rounded edges, allowing the toes of boots to be wedged. Climbing is difficult. After 20 m (one place for driving a piton) — traverse left onto the edge of a plate and then 20 m of simpler climbing on 60° plates — exit left-up onto a narrow ledge formed by a chipped plate with a sharp upper edge. Change of belay.
R8–R9. On the ledge — traverse left 4–5 m to a sheer chimney. The chimney is formed by the continuation of the black wall (right wall) and the overhanging rocks of the South Peak (left wall). Straight up the chimney 10 m and exit to its right wall — 30 m of medium-difficulty climbing lead to scree ledges. On them — to the saddle of the main ridge. Exit to the ridge on a 10-meter chimney with two "plugs."
R9–R10. Further from the main ridge along an inclined chimney 10 m. Bypassing the massif of the South Peak on the right, exit to the snowy saddle of the northeast ridge. Descent on snow 20 m into a steep crack and transition to its left wall. On the steep (80–85°) wall, one and a half ropes of horizontal traverse bypassing the South Peak onto the saddle between it and the North (Main) Peak. On the saddle — a bivouac site. One and a half ropes of uncomplicated climbing onto the South Peak and descent via the ascent route.
R10–R11. On rocks of medium difficulty 20 m on a monolithic chimney with a wedged "plug," then on steep plates — to the Main Peak (2 ropes).


