
Ascent Passport
- Main Caucasus Range, from Marukh pass to Nakhar pass, Ptysh river gorge, No. 2.2 according to KVGK.
- Dombay Western peak, via the northwest wall cleft. The ascent is dedicated to the memory of climber-warriors who perished in the Caucasus mountains during the Great Patriotic War.
- Proposed category of difficulty: 6B — first ascent.
- Route type: combined.
- Route height difference: 1104 m. Route length: 1240 m. Length of sections: category V — 350 m, category VI — 460 m. Average slope: 82 ° for the main part of the route, 72 ° for the entire route.
- Number of pitons left on the route: 25 total, including 21 bolts. Pitons used on the route: 235/126 rock pitons, 173/110 chocks, etc. Pitons used on the route: 20 stationary bolts, including 9 for ITO, 7/7 skyhooks, 229/162 fifths. Total artificial protection points used: 414.
- Team's total climbing hours: 122.5 hours (12 days).
- Team leader: Krivosheev Maxim Leonidovich, CMS.
Team members:
- Kolesov Pavel Olegovich, MS
- Sherstnev Igor Vladimirovich, MS
- Bystrov Sergey Pavlovich, MS
- Belous Vladimir Petrovich, 1st sports category
- Shaposhnikov Igor Gennadievich, 1st sports category
- Coach: Krivosheev Maxim Leonidovich.
- Departure to the route: 8:15 AM, February 6, 2005. Arrival at the summit: 7:30 AM, February 16, 2005. Return to base camp: 15:35, February 17, 2005.
- Organizing body: Irkutsk Region Alpine Federation.

Krivosheev M.L.
Krivosheev M.L.
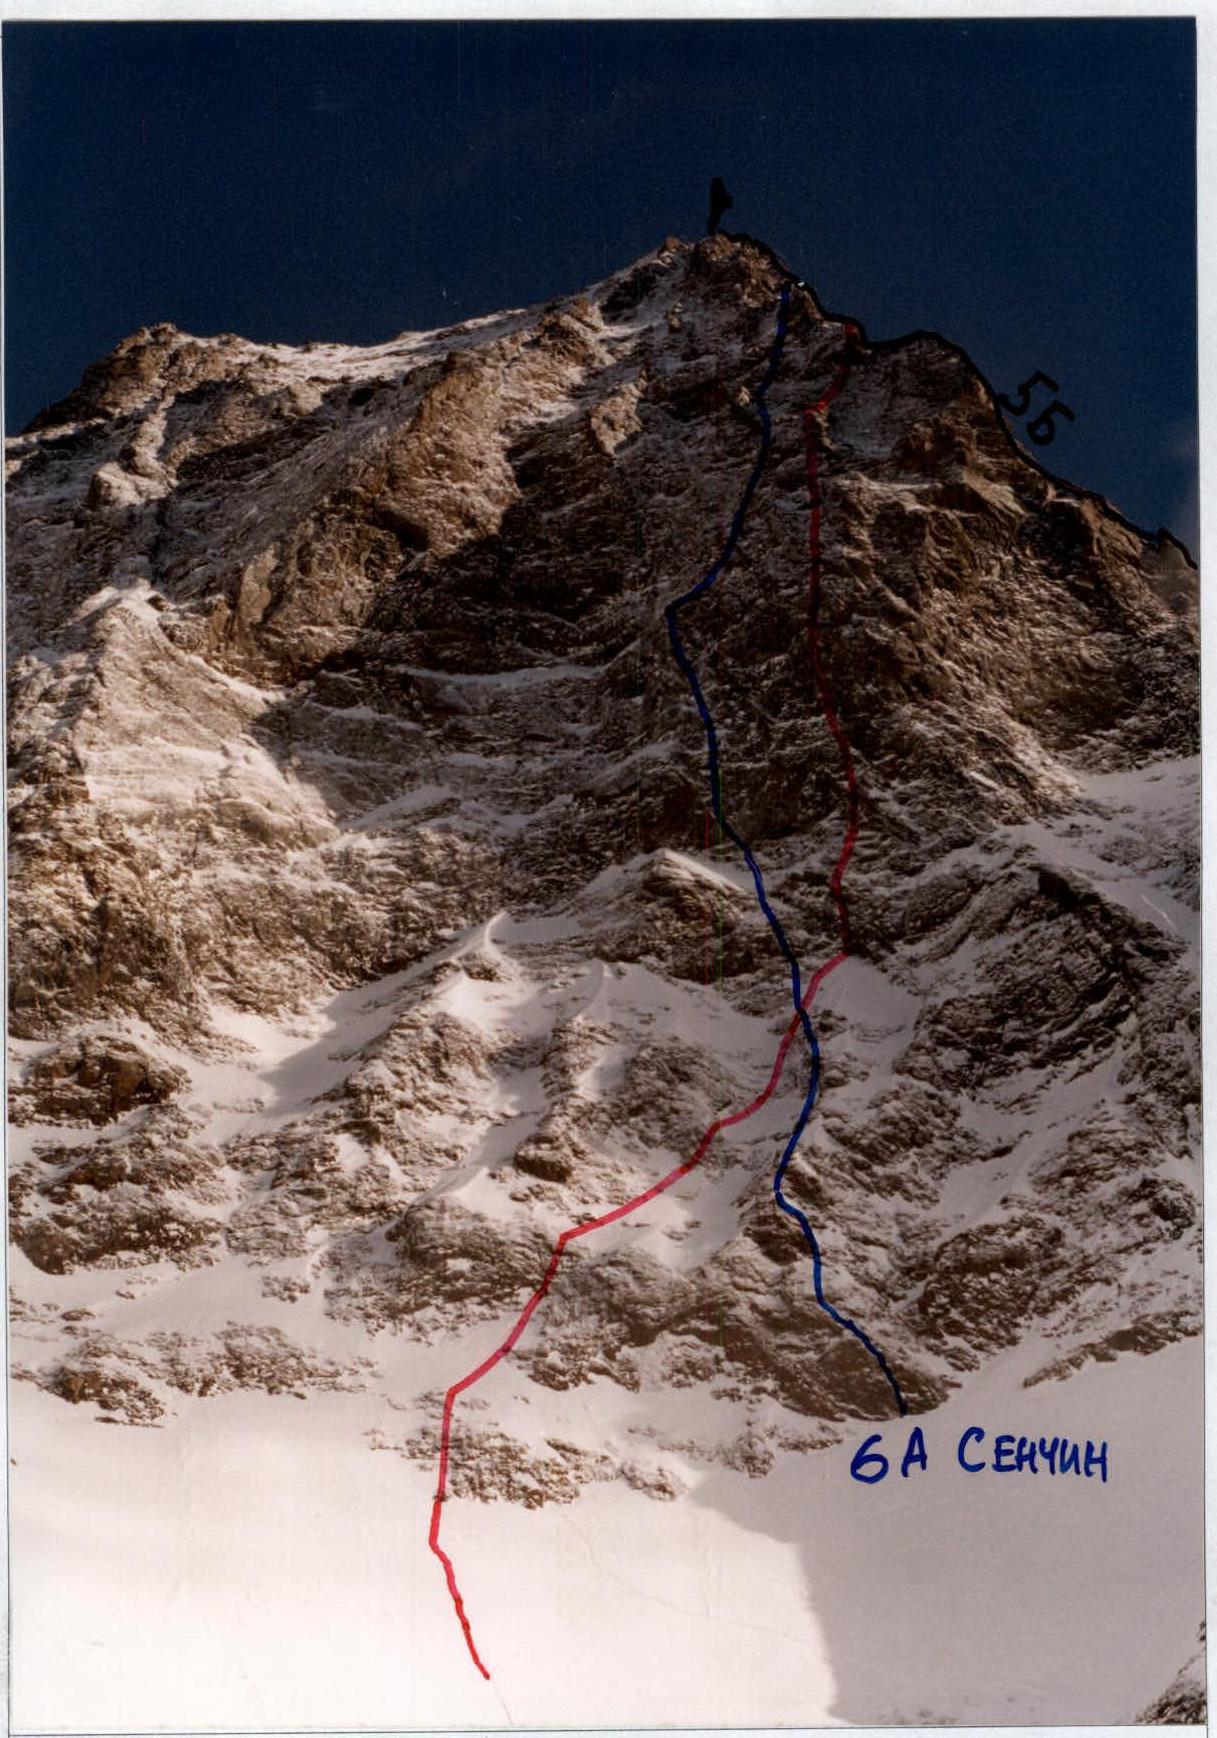
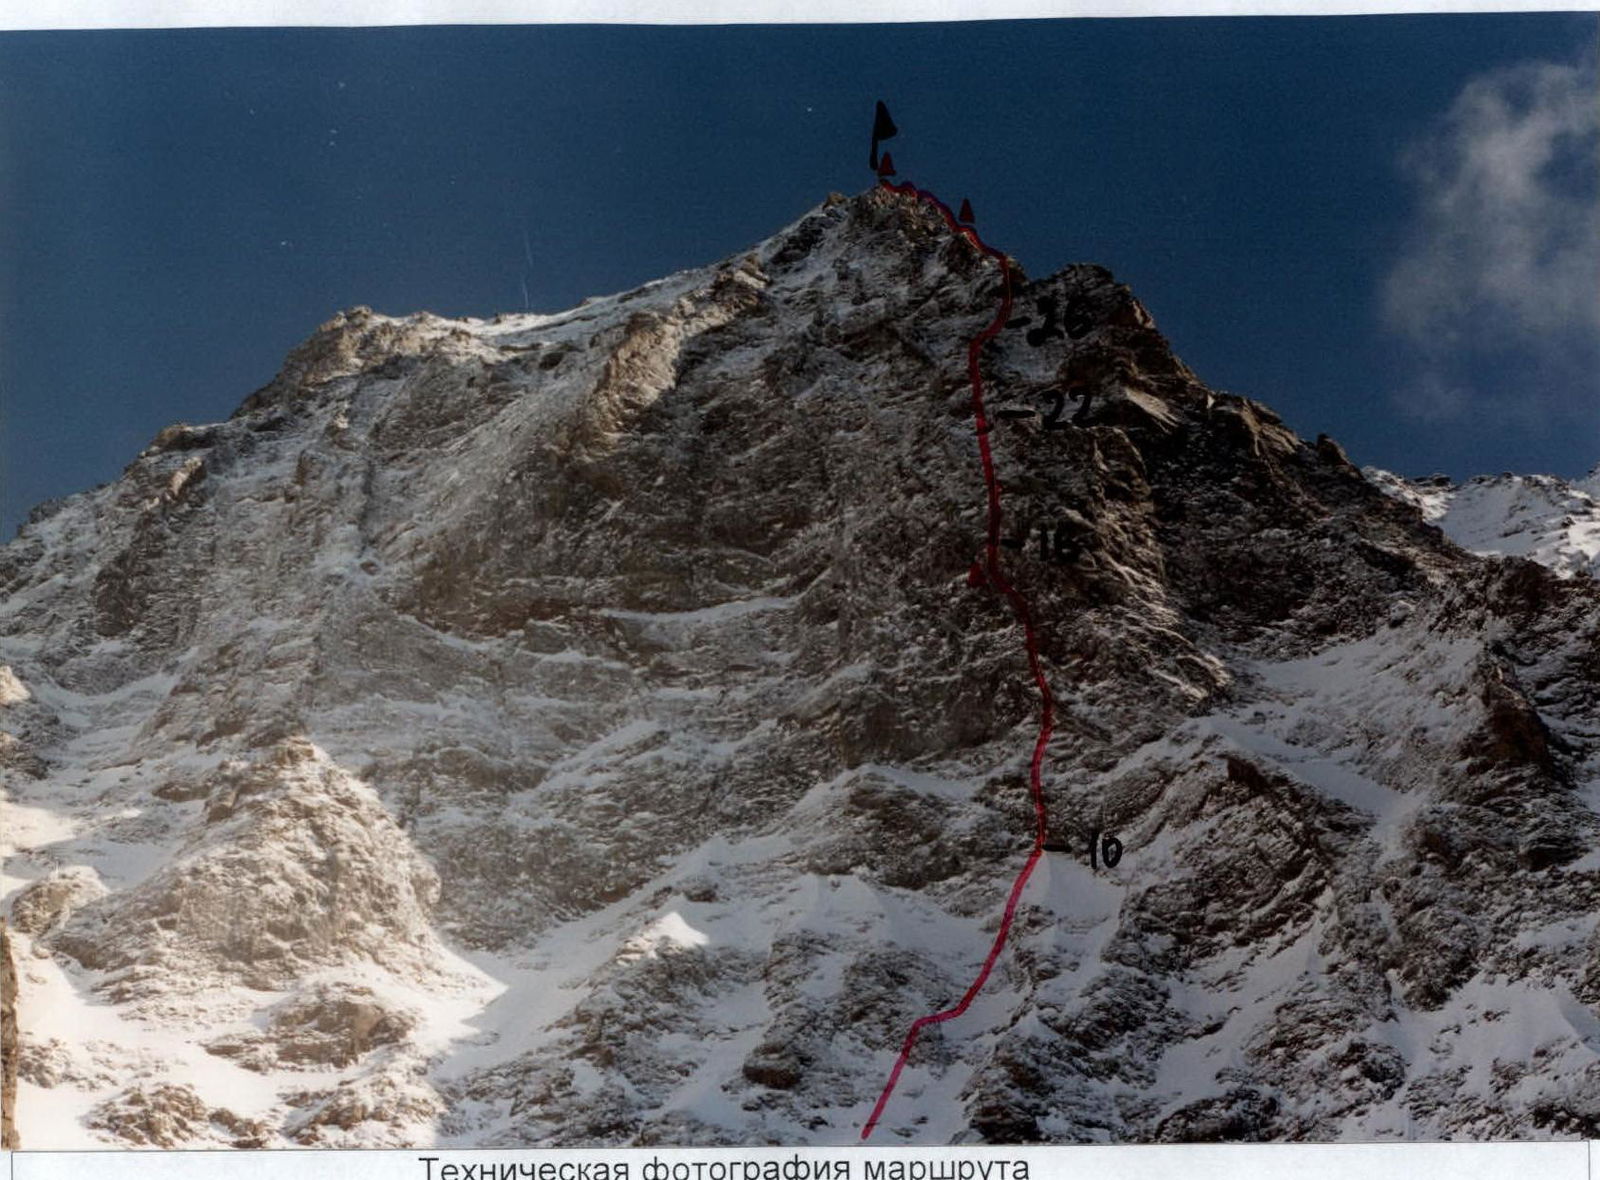
General photo of the summit.
- Black line: Neborago route 5B
- Blue line: Senchin route 6A
- Red line: Krivosheev M.L. route
Photo taken from "Dombay bivouacs" on February 6, 2005.
| 9 | - | 4/4 | 4/4 | 1 | R6–R7 40 m | 10 m 75 V+ | |
|---|---|---|---|---|---|---|---|
| 8 | - | 7 | 8 | - | 30 m 65 IV | ||
| 7 | 4 ice screws | 4 | 6 | 1 | R5–R6 40 m | 40 m 65 IV | |
| 6 | 3 ice screws | 6 | 5 | 1 | R4–R5 45 m | 45 m 65 IV | |
| 5 | - | 3 | 2 | 1 | R3–R4 45 m | 45 m 65 IV | |
| 4 | - | 7/7 | 8/8 | 1 | Photo №1 | R2–R3 55 m | 15 m 85 VIA2e |
| 3 | - | 4 | 4 | - | 40 m 60 IV | ||
| 2 | - | 3 | 2 | 1 | R1–R2 50 m | 50 m 60 IV | |
| 1 | - | 1 snow | hook | 1 | R0–R1 40 m | 40 m 60 II |
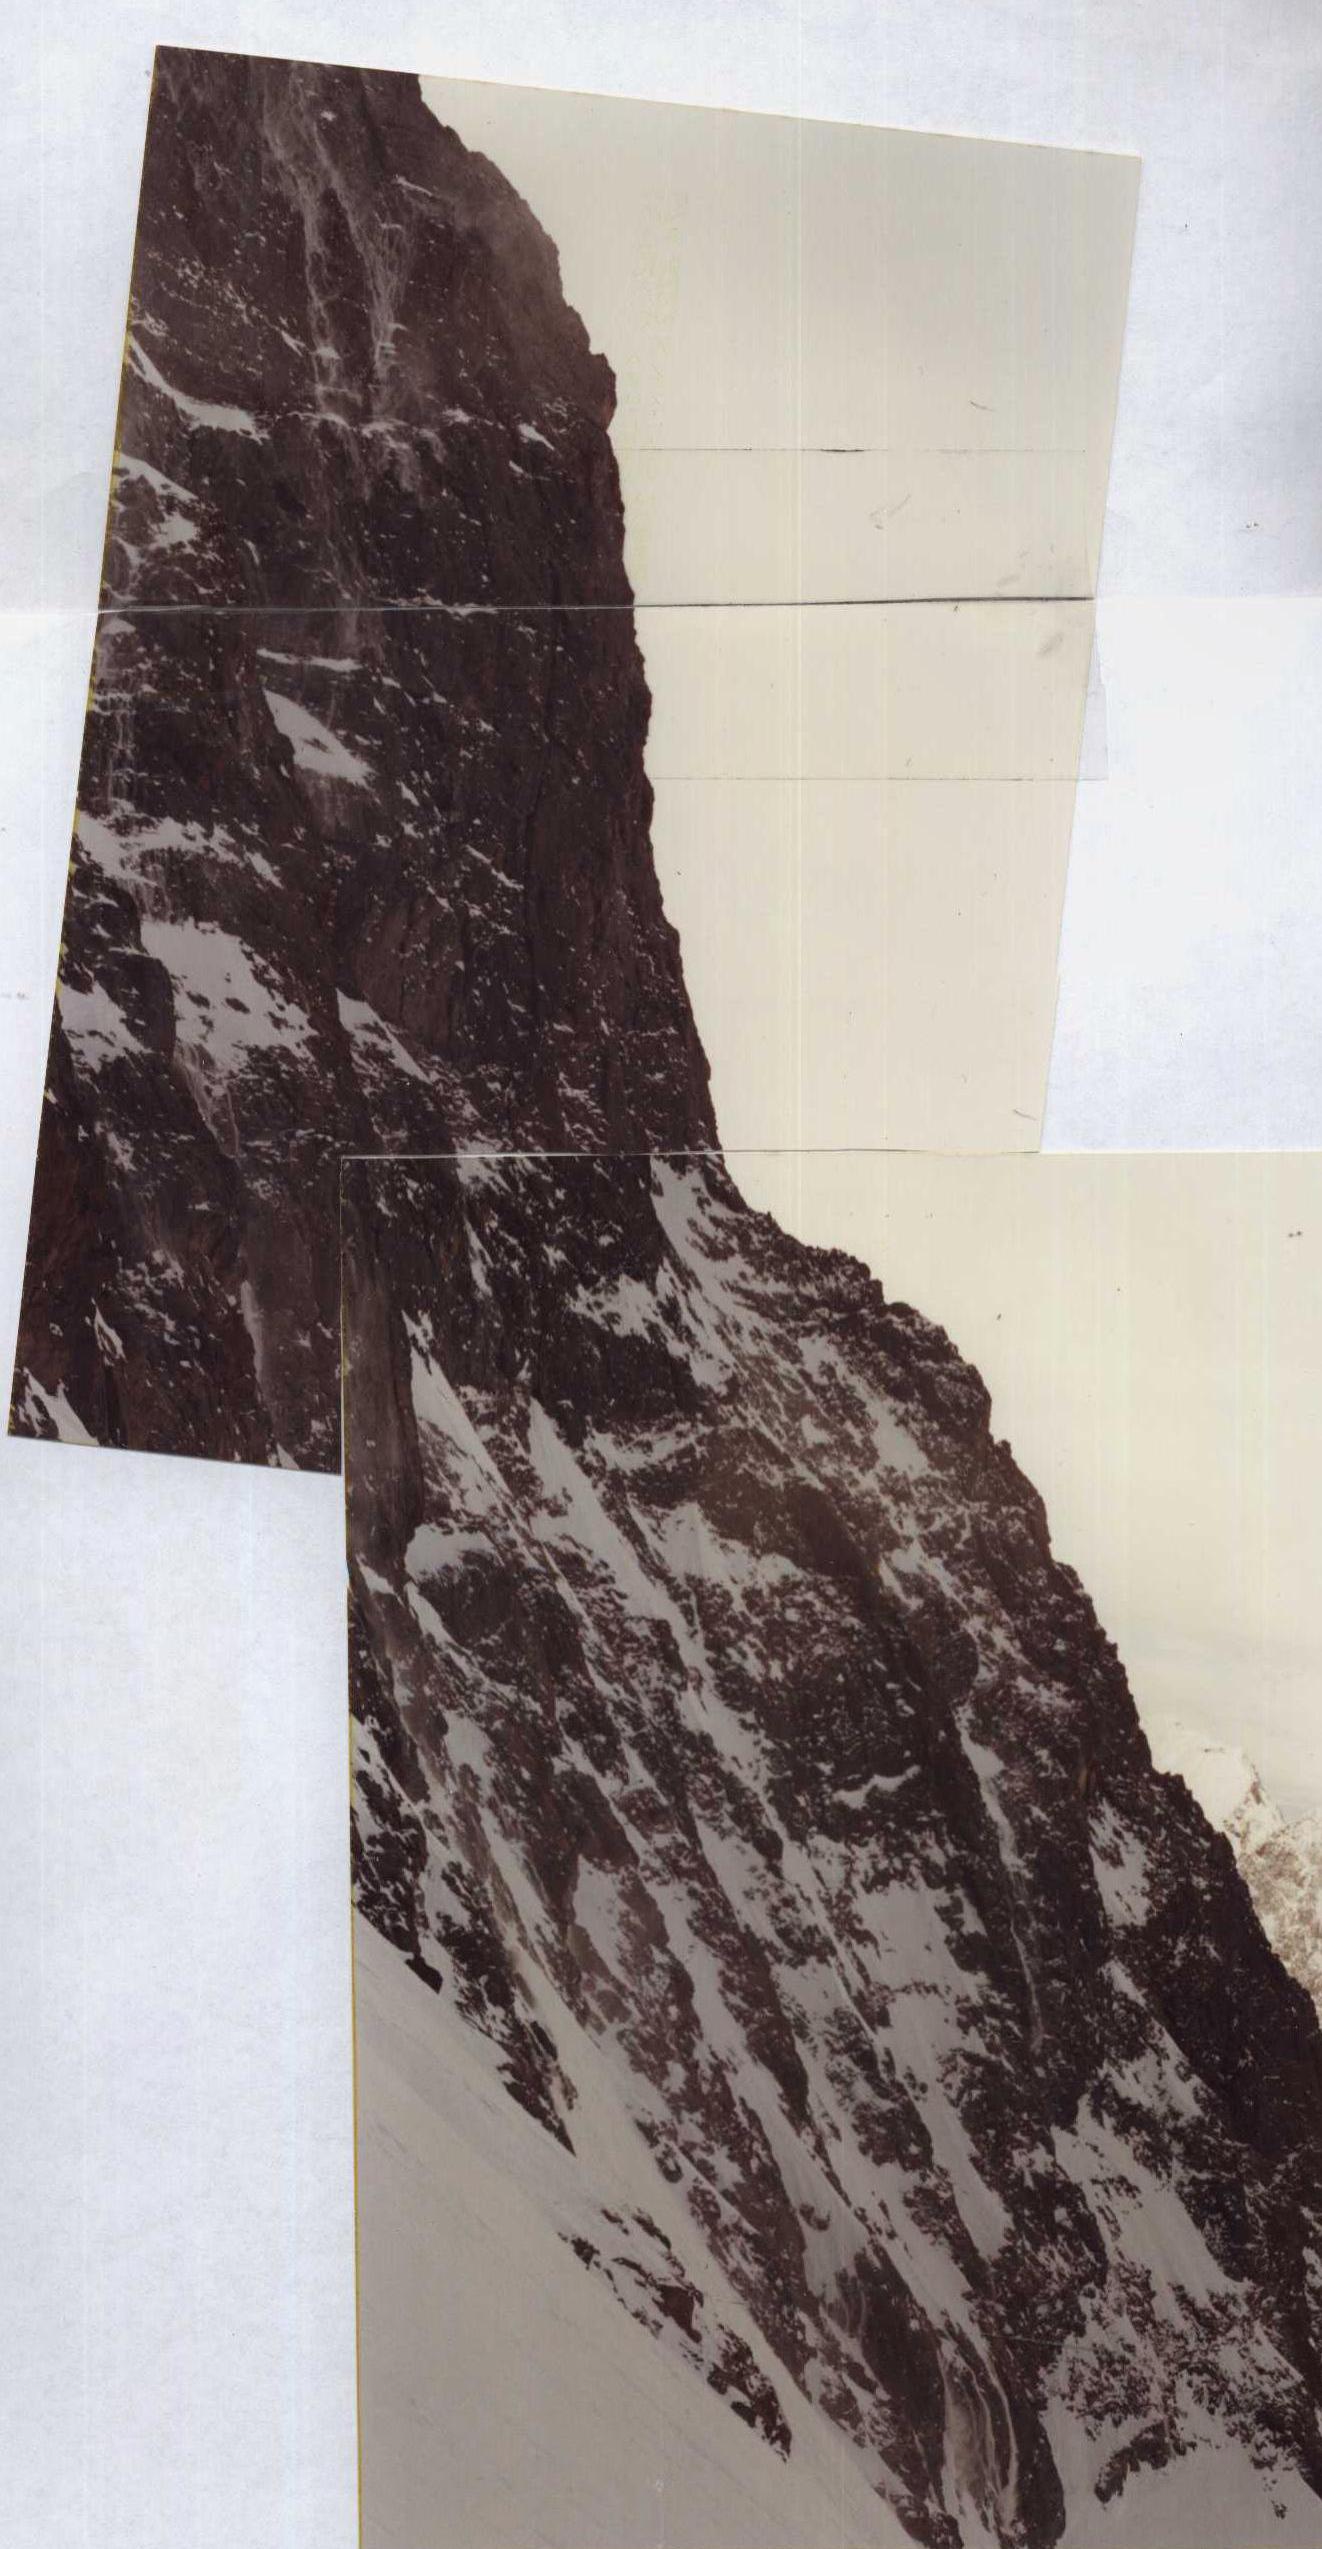
Photo № 11 Photo of the wall profile from the left. Photograph taken from the hanging glacier.
| 30 | 5 | 5 | 4 | - | 20 m 75 V | ||
|---|---|---|---|---|---|---|---|
| 29 | 1 | 1 | 4 | - | R16–R17 50 m | 10 m 70 V | |
| 28 | 22/22 | 6/6 | 12/12 | - | Photo №6 | 40 m 95 VIA3 | |
| 27 | 1 | 12 | 6 | 3 ice screws | R15–R16 50 m | 50 m 65 V | |
| 26 | 15/13 | 17/12 | 9/5 | 1 | R14–R15 45 m | 45 m 70 VIA1 | |
| 25 | 11/11 | 9/8 | 7/7 | - | R13–R14 50 m | 30 m 75 VI+A3 | |
| 24 | - | 4/4 | 10/10 | - | 15 m 75 VIA3 | ||
| 23 | 1 | 1 | - | - | 5 m 60 V | ||
| 22 | 3 | 2 | 2 | 1 | R12–R13 45 m | 10 m 75 VIA1 | |
| 21 | 1 | 1 | - | - | 5 m 70 V | ||
| 20 | 17/15 | 3/1 | 2/2 | ? | Photo №5 | 30 m 80 VIA2 | |
| 19 | 6/6 | 7/7 | 5/5 | 1/1 | R11–R12 50 m | 20 m 85 VIA3e | |
| 18 | - | 6/6 | 22/22 | 3 skyhooks | 30 m 90 VIA4 | ||
| 17 | - | 4/3 | 5/5 | 1/1 | R10–R11 50 m | 10 m 90 VIA4 | |
| 16 | 6/6 | 16/16 | 11/11 | 2/2 skyhooks 2/2 | Photo №4 | 40 m 95 VI+A5c | |
| 15 | - | 10/10 | 16/16 | 2/2 | Photo №3 | R9–R10 40 m | 25 m 90 VI+A3e |
| 14 | - | 5/5 | 15/15 | 1/1 | Photo №2 | 15 m 95 VI+A3c | |
| 13 | 10/10 | 2/2 | 7/7 | 1/1 2 skyhooks | R8–R9 40 m | 20 m 95 VI+A3e | |
| 12 | - | 13/12 | 8/8 | 1/1 | 20 m 75 VIA1c | ||
| 11 | 10/9 | 5/4 | 10/9 | 1/1 | R7–R8 45 m | 25 m 98 VI+A4e | |
| 10 | 3 ice screws | 3/1 | Photo №9 | 20 m 65 V |
Route Diagram
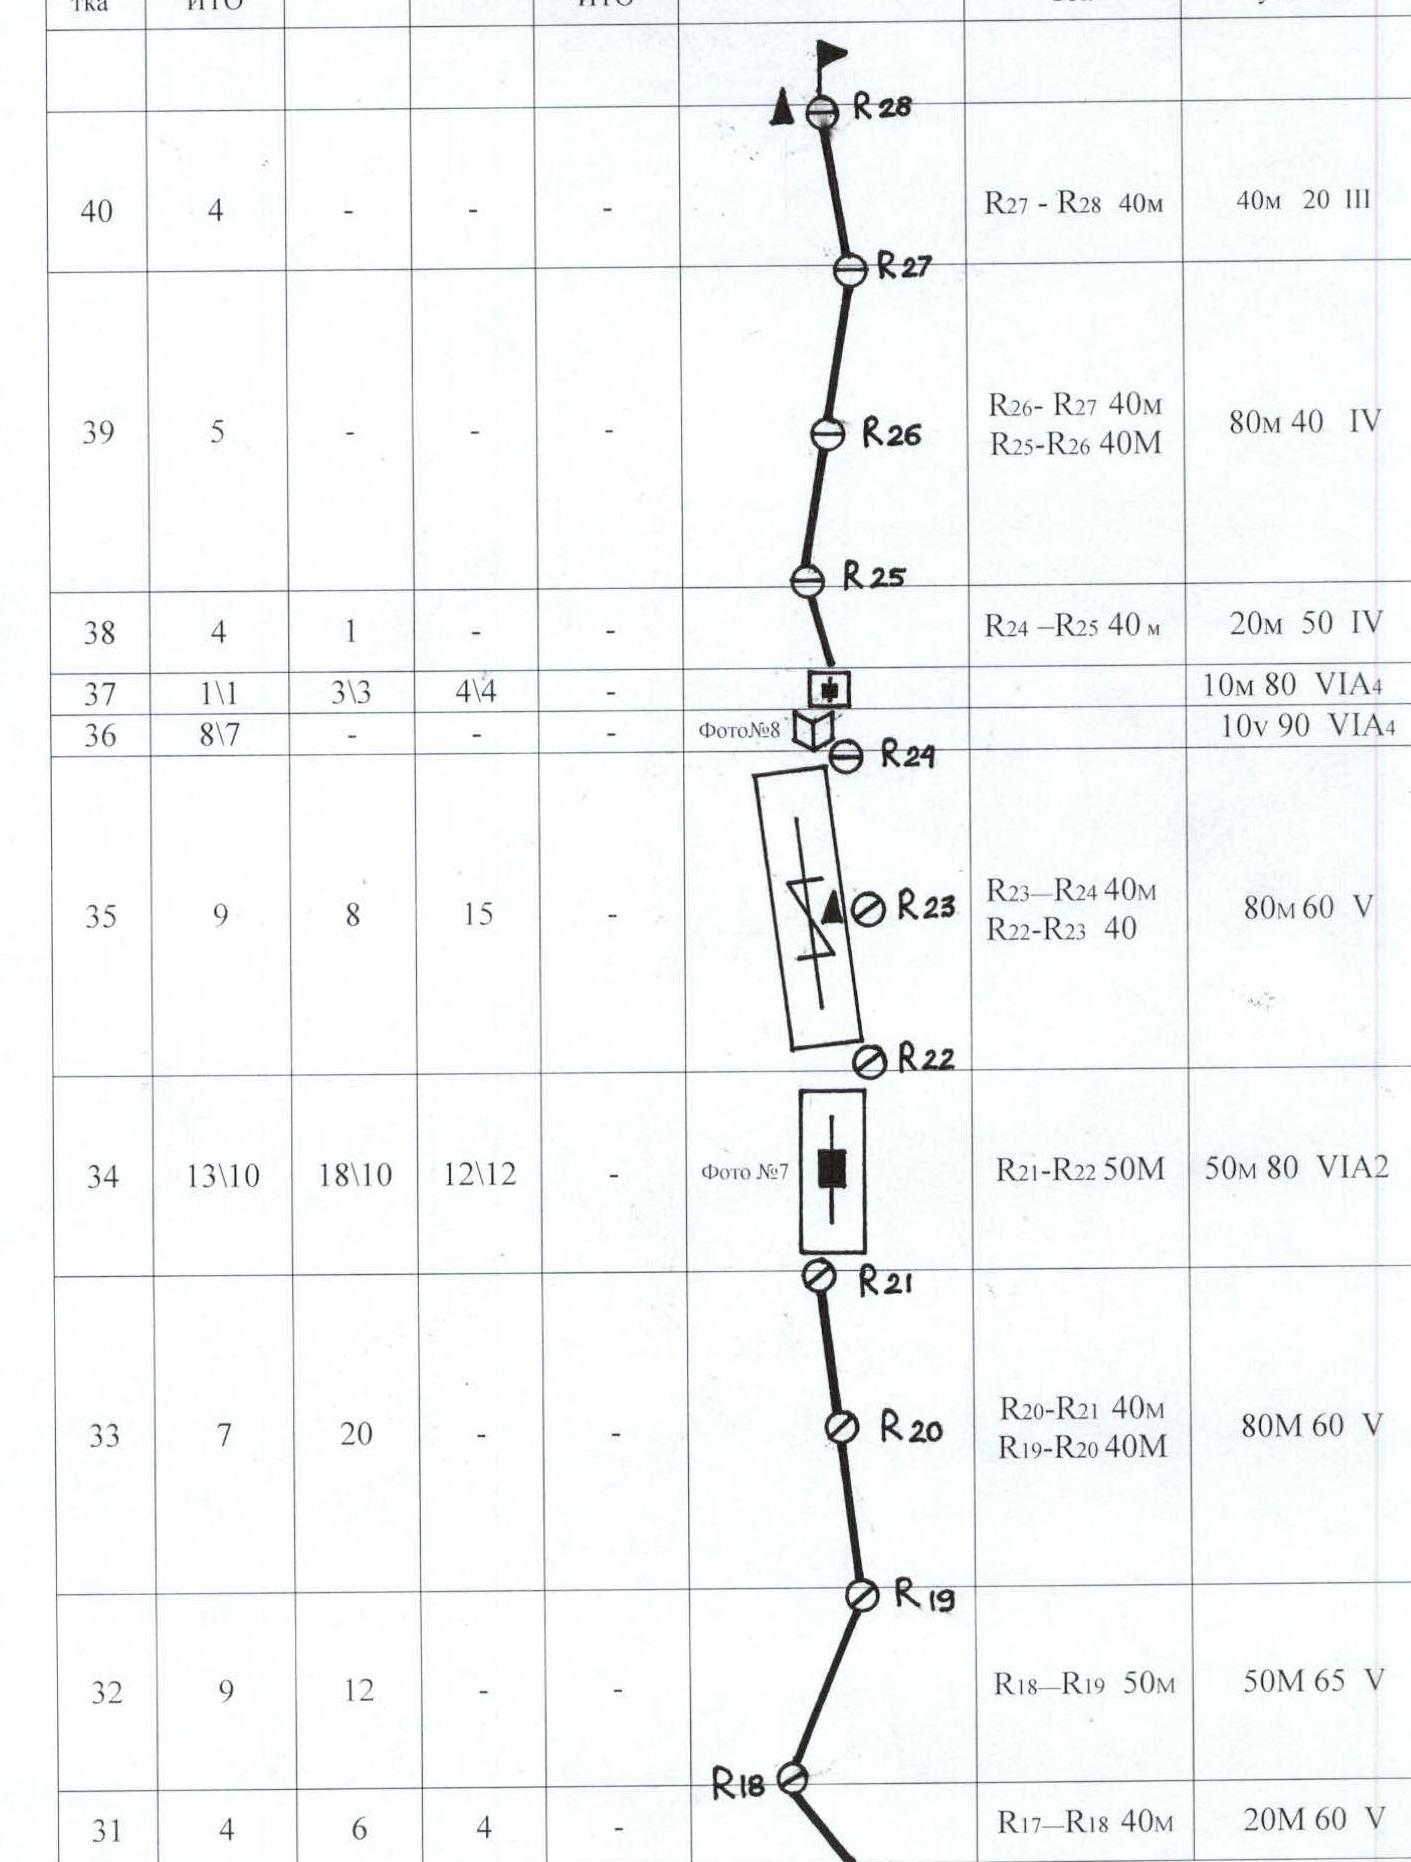
Route Description
Section № 1. Steep hard firn, avalanche danger is present. Belaying is done with snow anchors.
№ 2,3. We hammer in bolts at the belay stations. Organizing belay points at the stations using other methods is not safe. Steep "ram's foreheads" are iced over and covered with snow. Anchor pitons are used at intermediate belay points.
№ 4. Steep rock wall, passed using ITO (fifths, anchor pitons), cracks are iced over; for reliability, a bolt is hammered at the station; the rock is very hard. Difficult climbing.
№ 5,6. Steep "ram's foreheads" are iced over and covered with snow. Bolts are hammered at all stations.
№ 7,8. Snow-ice couloir; ice screws are used for belaying; rock pitons are used on the rocks.
№ 9. Steep rock wall is iced over. Fifths and pitons are used for intermediate belaying. At the end of the wall, we intersect with Senchin's route 6A.
№ 10. Snow-ice ridge, very steep; 3 ice screws are placed. At the beginning of the wall, there is a safe place for a bivouac, a niche; rocks overhang by about 2 meters. We hang 2 platforms. Organization of platform attachment points is done using bolts. As the further passage of the route showed, this is the safest place on the route. On February 8, 2005, everyone moved to the platforms.
№ 11. A fault starts here, going through the entire wall and leading to the western edge (5B). A very strong overhang begins. Extremely difficult climbing; belay points are unreliable. Rocks are heavily destroyed. Fifths and friends are mainly used for passage; rocks are dry. The station is organized on bolts.
№ 12. The fault goes through a slab, the cracks of which are iced over. Difficult climbing; there is always a risk of dropping a stone on the belayer. Thin blades, fifths are actively used; "skyhooks" help.
№ 13. The cleft goes through a cornice, which is not bypassed. After it, a steep and long overhang begins. Large-sized friends and chocks are used. Very difficult and dangerous climbing. Stones are constantly falling from the cleft; fifths and anchor pitons help. A bolt is hammered at the station for reliable beling.
№ 14. A strongly overhanging internal corner. Intermediate belay points are unreliable. The rock is very hard when hammering a bolt; we broke two 8mm drills. We move up using fifths and blades.
№ 15. The cleft goes left. We transition to a vertical wall. For safety, we hammered two bolts: one intermediate, the other at the station. Extremely difficult climbing. Control cairn is present at the station.
№ 16. Vertical slab; the fault goes on the left; very difficult climbing, practically on the verge of a fall; there is almost no relief; cracks are thin; "skyhook" helps; fifths; pitons don't go well. Two bolts are hammered at the intermediate belay points.
№ 17. Ahead is a cornice, which is bypassed on the left; climbing is extremely difficult. Many loose stones. Fifths are used for passage.
№ 18,19. When bypassing the cornice, you again enter the fault, which widens and turns into a vertical chimney. There are many loose stones in it. The second climber is saved by being on the wall. Very difficult and extremely dangerous climbing; stones are constantly falling from underfoot. Anchor pitons and fifths are used, which simply save on such relief.
№ 20. The chimney turns into an internal corner, which is very destroyed. Extremely difficult climbing. The belayer constantly hides from falling stones. The relief is destroyed. Large-sized friends are actively used.
№ 21. A snow shelf that leads to a destroyed cornice, a continuation of the internal corner.
№ 22. The cornice is bypassed on the left along steep "ram's foreheads" covered with snow. Climbing is problematic; rocks are like tiles, constantly breaking off. A bolt is hammered at the station.
№ 23. A new cornice is above. Everything is heavily destroyed; there is no point in climbing into this deadly trap. We move right along a ledge to a bastion.
№ 24,25. Internal corner turning into a wall; everything is done on ITO; crevices are iced over. Climbing is extremely difficult; fifths and blades are actively used.
№ 26. Internal corner filled with ice; it seems that water flows here in summer. The corner leads to a good snow shoulder; a tent is set up here. A bolt is hammered at the station. On February 15, 2005, the upper assault camp was established.
№ 27. Chimney filled with ice; 3 ice screws are placed. Bottled, winter, hard ice. The station is made on U-shaped pitons.
№ 28. The chimney becomes steeper; the overhanging part is passed on the right side. Climbing is very difficult on ITO, on the verge of a fall. Any protruding stone flies down when loaded. Fifths and chocks are used.
№ 29. After the chimney, a rock slab begins, which is iced over and covered with snow. We have to go very carefully because the crampons are already dull.
№ 30. Internal corner. Very difficult climbing, turning into ITO. Thin pitons and chocks are used. We reached the ridge.
№ 31,32,33. Steep destroyed ridge. The first climber goes using free climbing, but very difficult. It is helped by the fact that the first climber is a CMS in rock climbing. There are many loose stones on the ridge; belaying is unreliable. Friends and anchor pitons are used. When passing very difficult sections, gloves have to be removed.
№ 34. Bastion, extremely difficult mixed ITO climbing. Vertical slab located between two "jendarms." Ledges are iced over and covered with snow. Fifths, pitons, and friends are used. Thanks to the presence of ice, the rock is strong.
№ 35. Ridge, which is passed using free climbing. A cairn without a note is found. We write our own note.
№ 36. Movement along a vertical internal corner to the right of the chimney. Friends and hexes of the same size are used.
№ 37. The chimney leads to a "jendarm," from which we transition to a rock wall that is heavily destroyed. An old sling is found.
№ 38. The first climber goes using free climbing along the ridge; the second is on a "jumar." The ridge is heavily destroyed. Belaying is done through a ledge.
№ 39. The ridge becomes easier, but the first climber still goes using free climbing, hanging safety lines for the rest. The ridge is very sharp; it drops off to the right with a sheer wall. Sometimes we have to go on all fours. The summit is located at the junction of two ridges: western and southern, with the CDS peak. The summit cairn was destroyed; there was no note. We searched for a note but didn't find one. We built our own cairn, wrote a note, and took photos. Descent is done via the ascent route.
From section № 32, processing was done in a duo. On the same day, the duo reached the summit and descended to the assault camp. The rest of the group followed the established safety lines to the assault on February 16, 2005, at night, reached the summit at 7:10 AM. On the same day, everyone descended to the platforms, section № 10. On February 17, 2005, we woke up at 7 AM; at 9 AM, we started descending. The weather worsened significantly; a strong wind is blowing; it starts snowing. At 15:30, we descended to the base camp. Descent is done via the ascent route.
Recommendations for subsequent groups.
The safest passage of the route is recommended during winter months due to the high risk of rockfall. Not recommended as a first 6B route. There are very few safe places to set up a camp on the wall. Overnight stays are in platforms. When the lead team is working on the wall, other participants need to be in a shelter, which significantly complicates work on the route. The group should have experience in long winter ascents. The rock is extremely hard; it is necessary to have a sufficient supply of drills. The route is combined; the entire range of mountaineering equipment is used, from snow anchors and ice screws to "skyhooks." Subsequent groups working on safety lines should pay attention to rockfall danger.
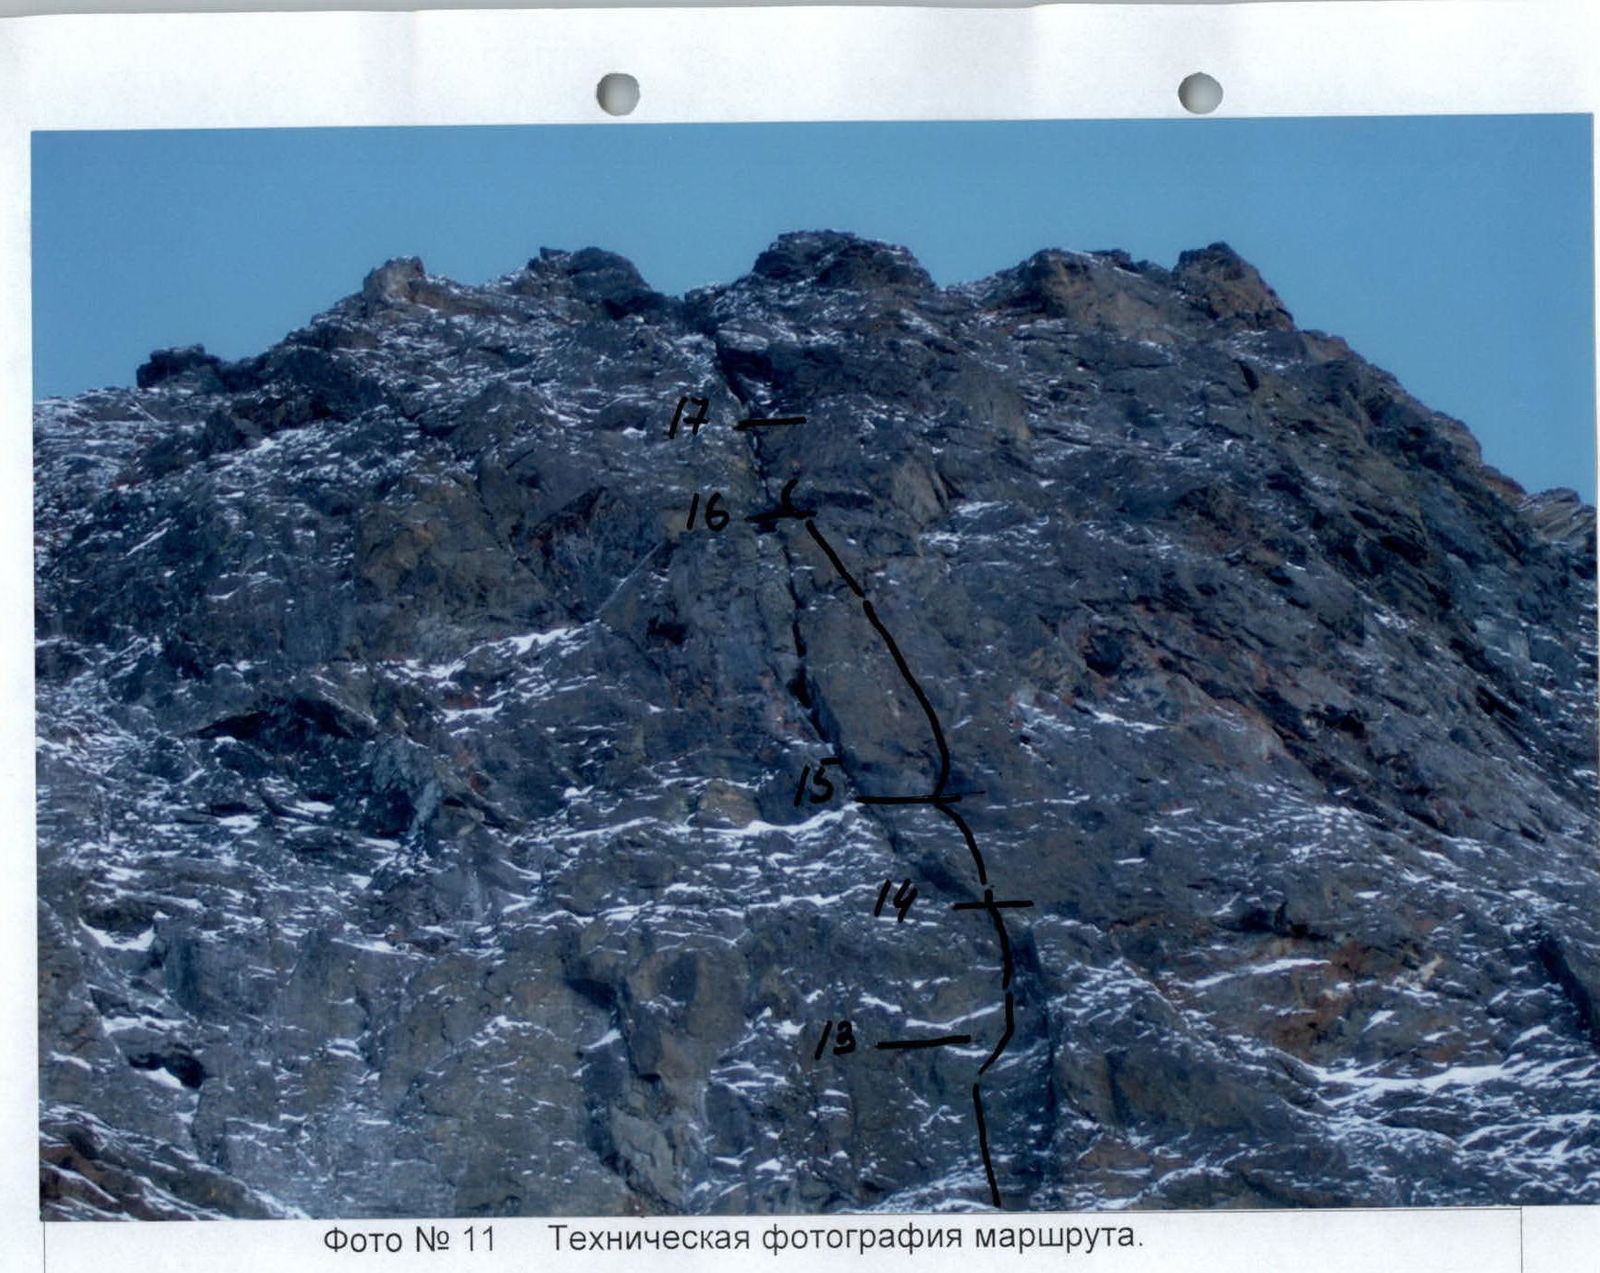
Photo № 11 — Technical photograph of the route.
Technical photograph of the route
| Section № 10 | height 3232 m | overnight stay | February 8, 9, 10, 11, 12, 13, 16, 2005 |
|---|---|---|---|
| Section № 26 | height 3580 m | overnight stay | February 14, 15, 2005 |
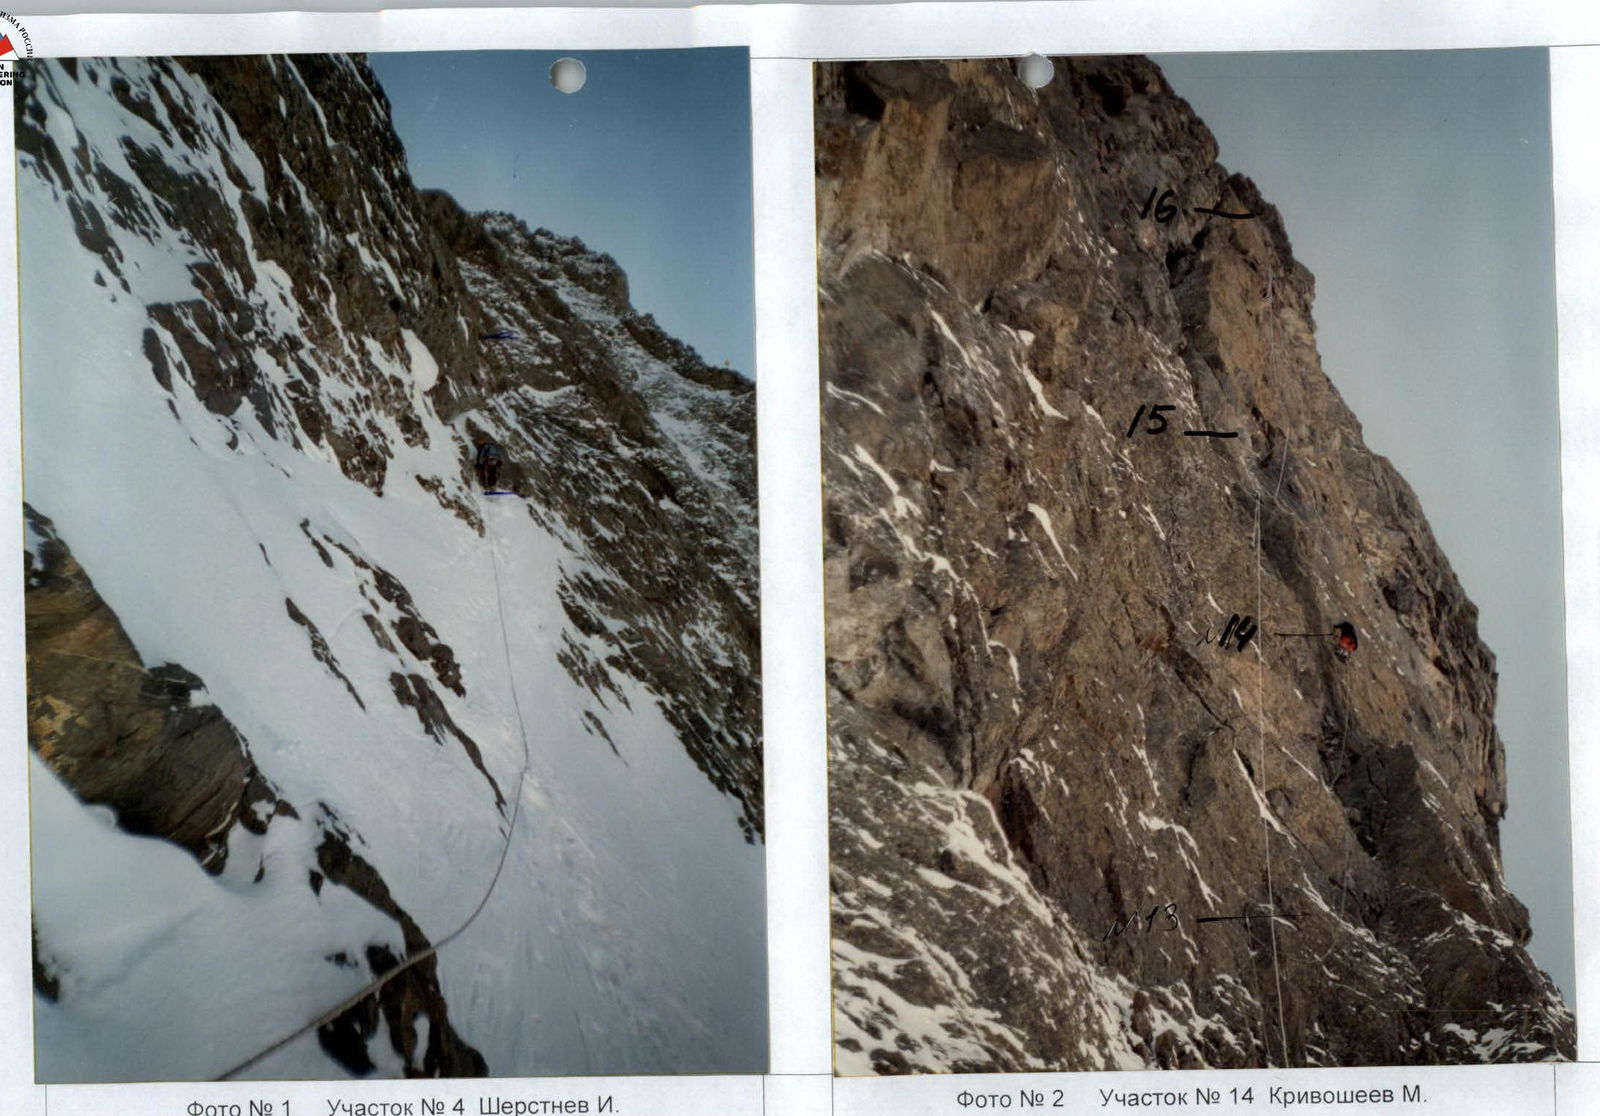
Photo № 2 — Section № 14 — Krivosheev M.
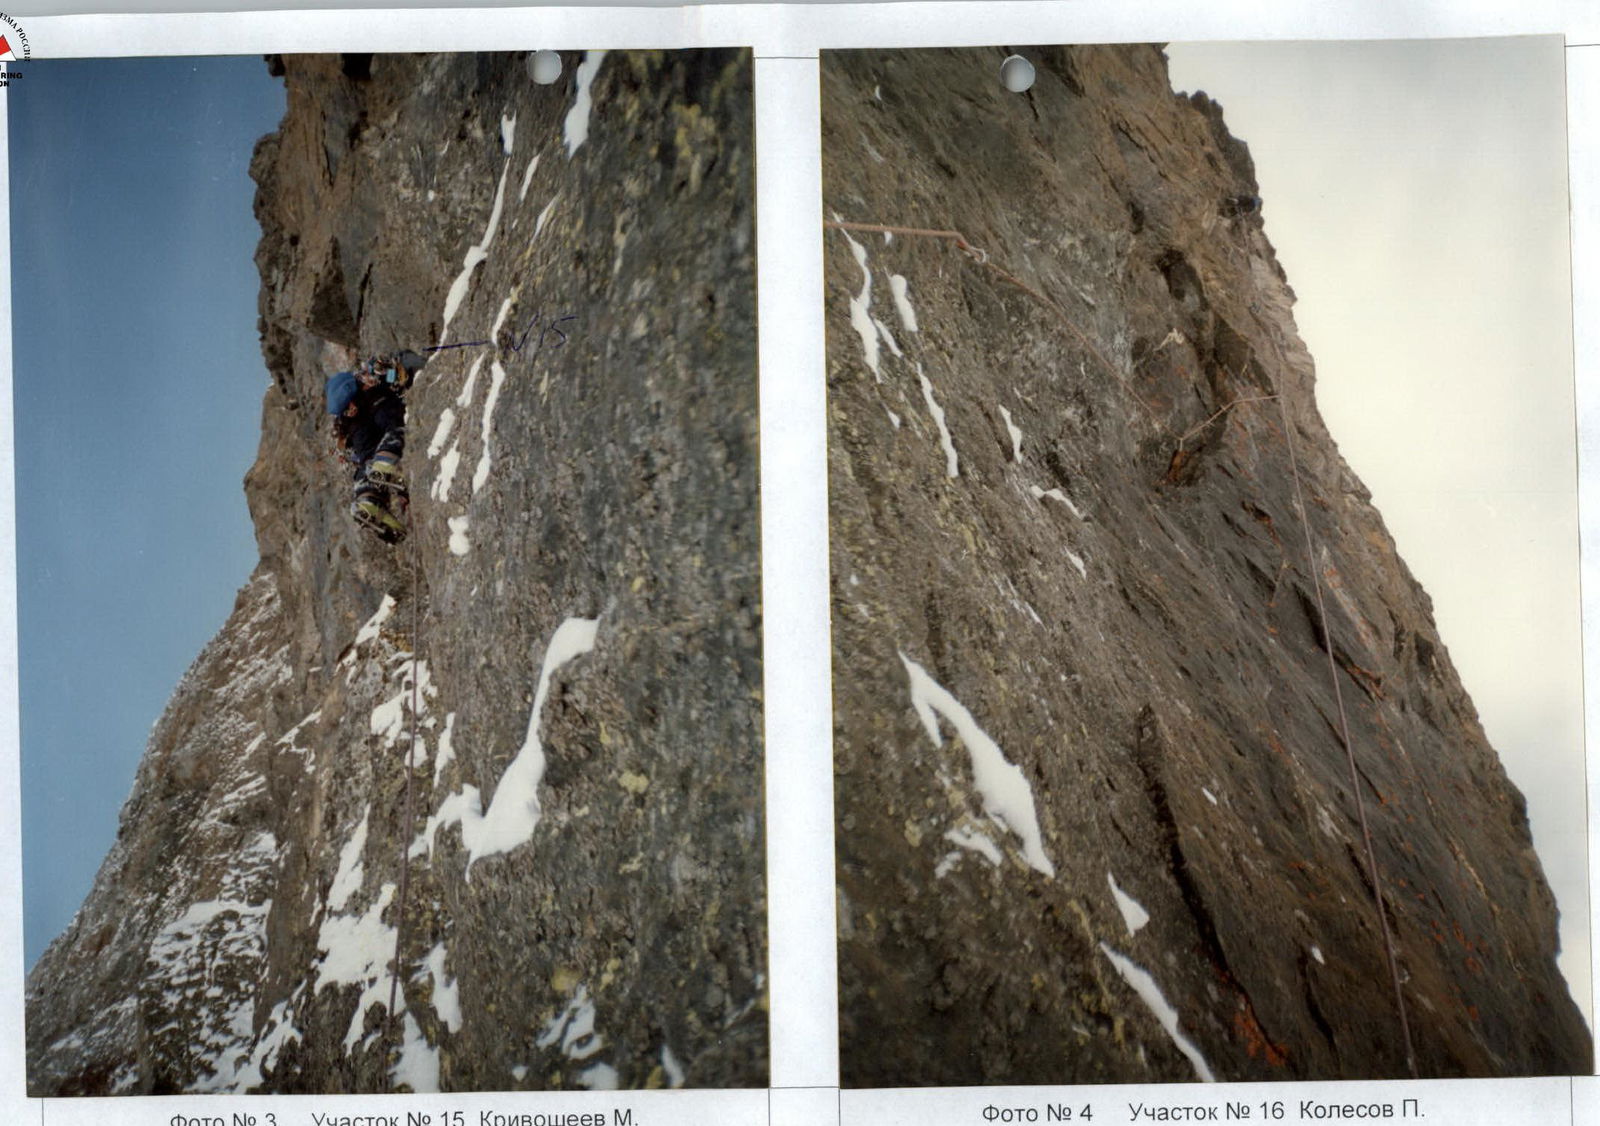
Photo № 3 — Section № 15 — Krivosheev M.
Photo № 4 — Section № 16 — Kolesov P.
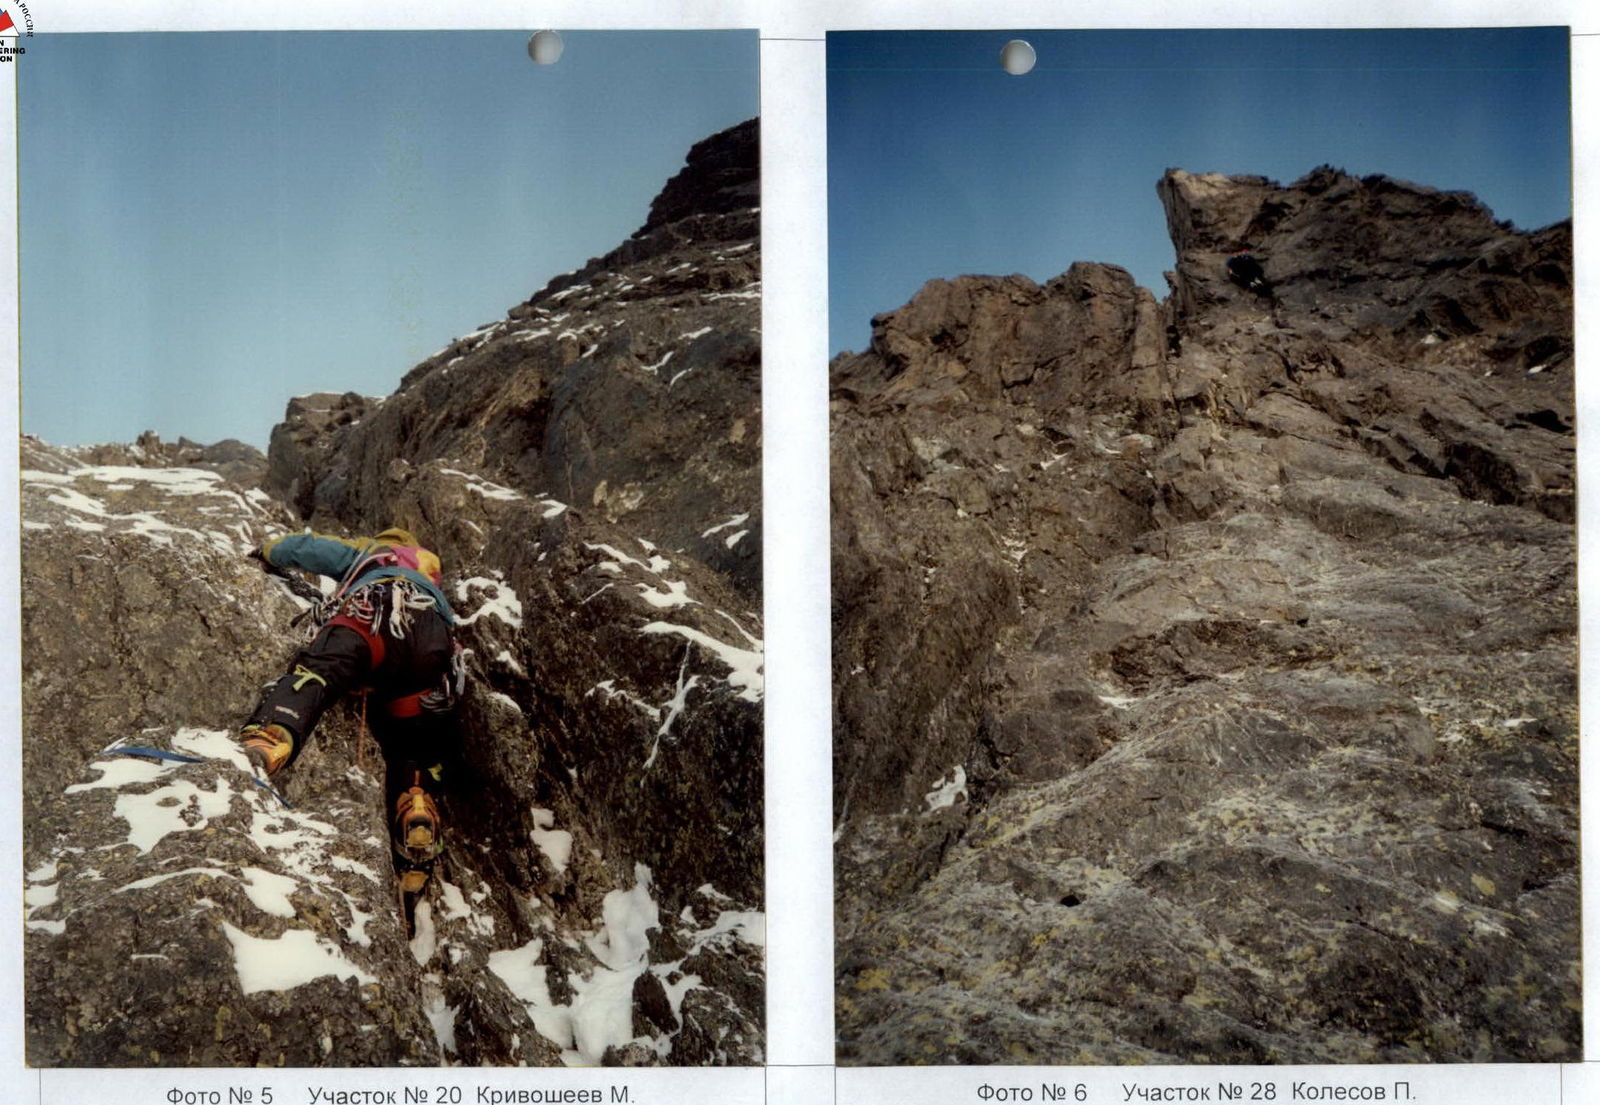
Photo № 5 — Section № 20 — Krivosheev M.
Photo № 6 — Section № 28 — Kolesov P.
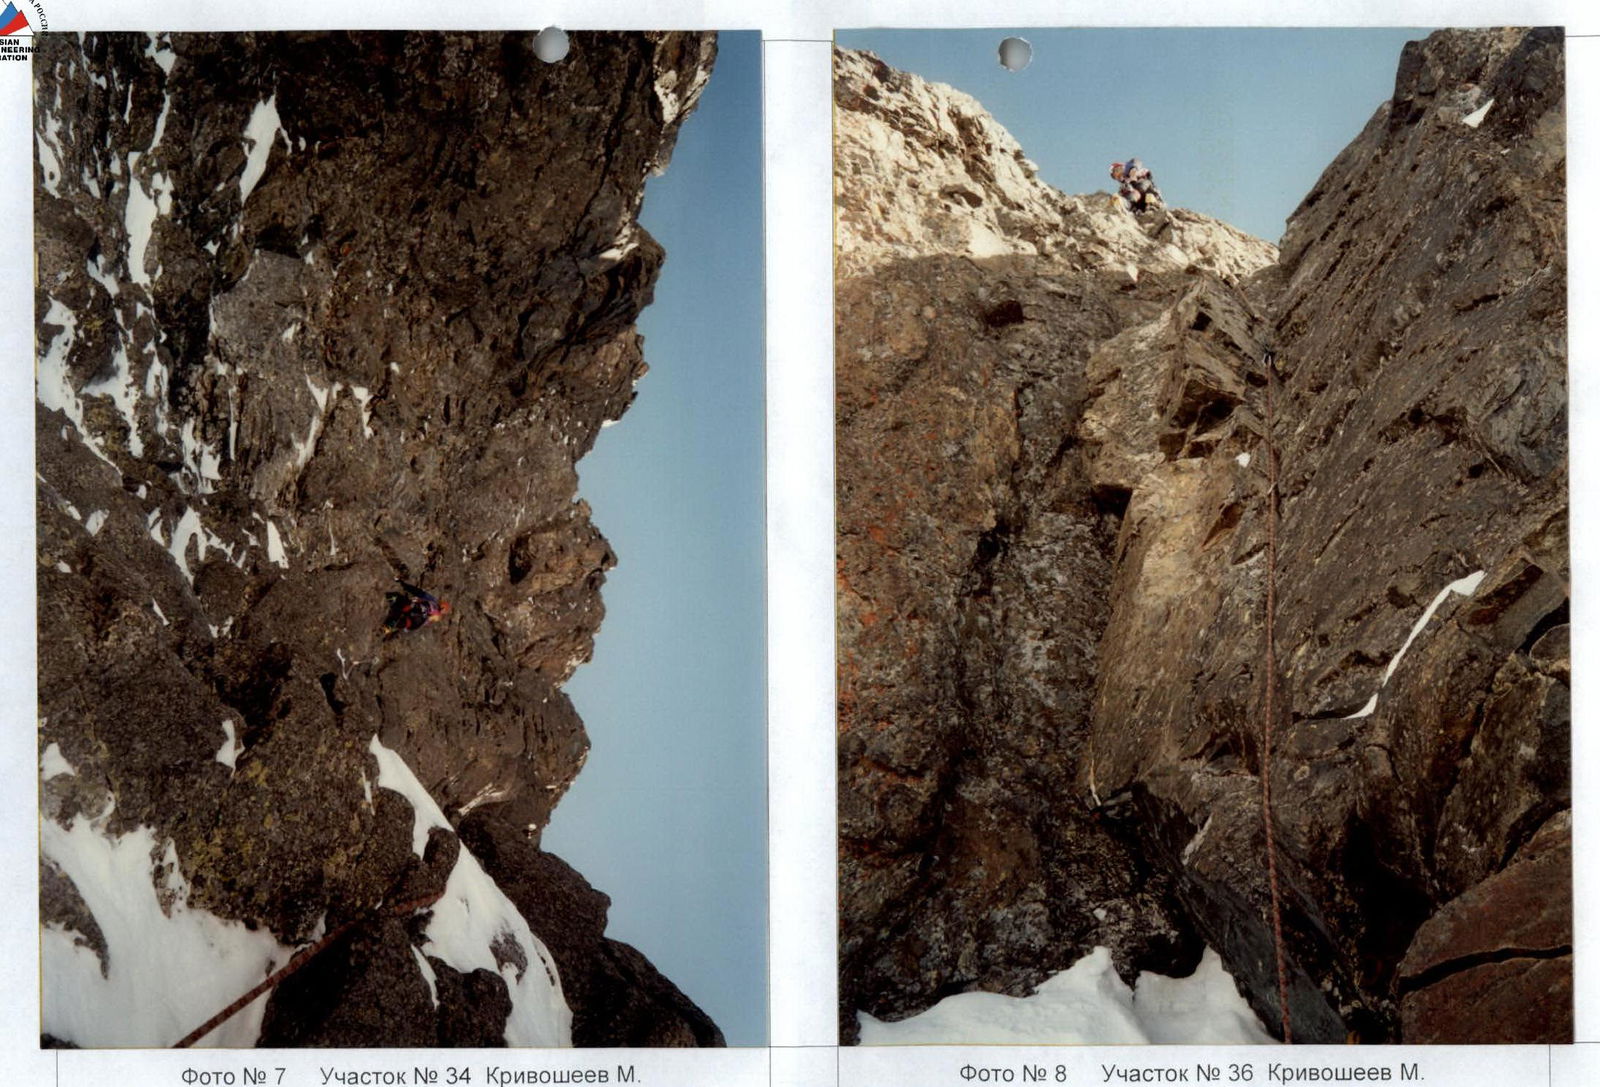
Photo № 7 — Section № 34 — Krivosheev M.
Comments
Sign in to leave a comment