Report
On the first ascent
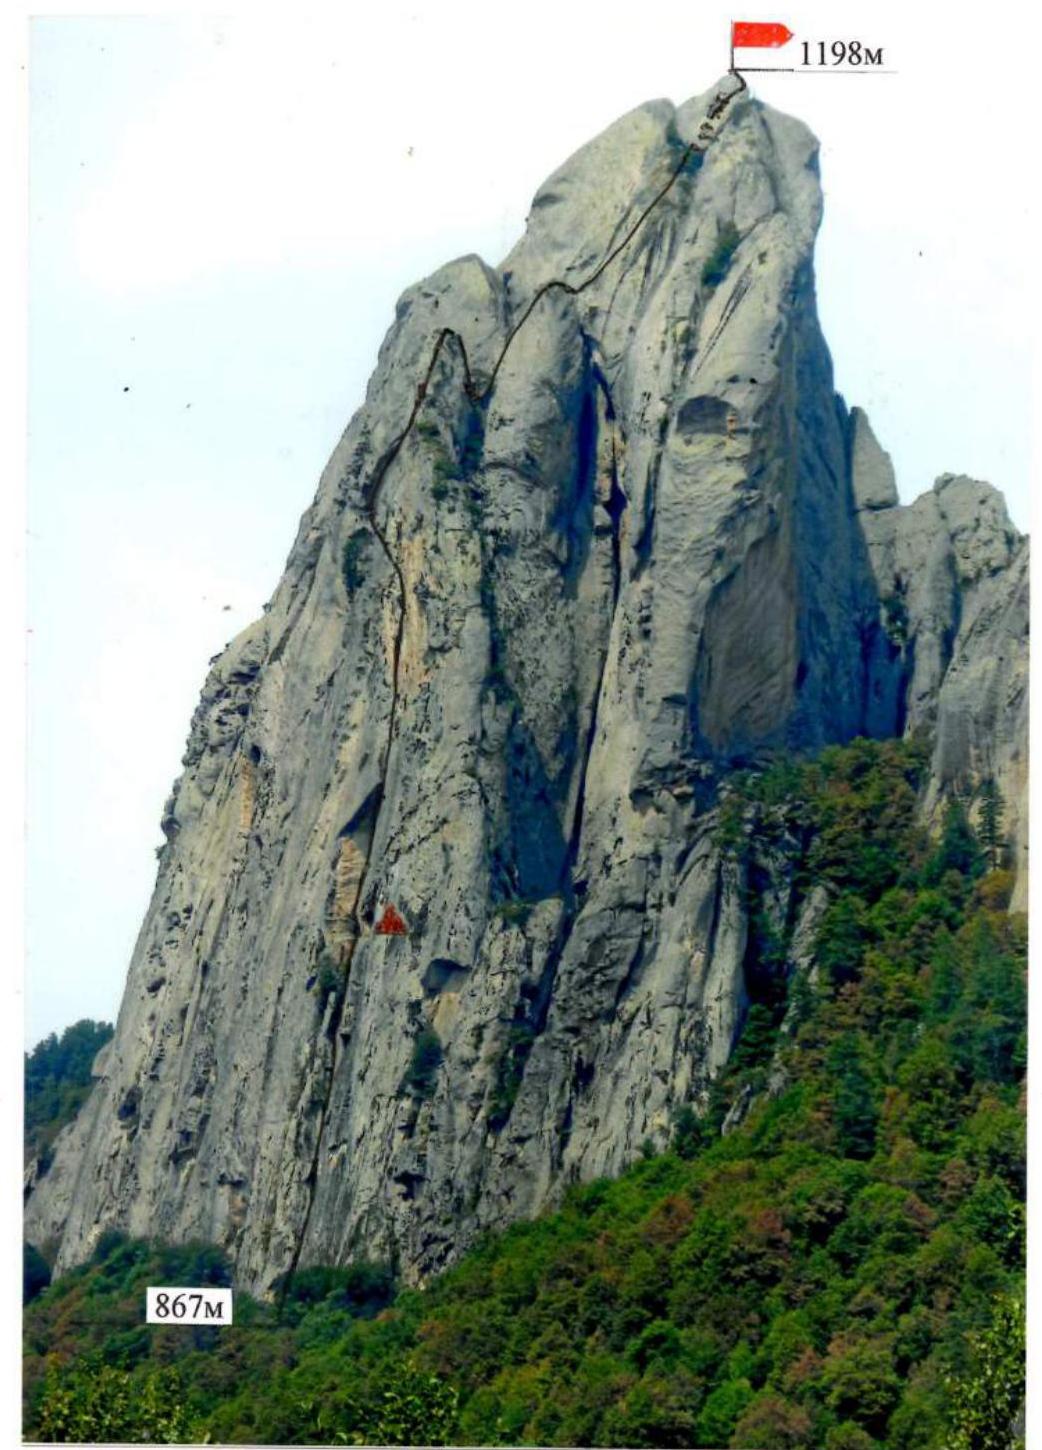
on v. Sobor-Skala Gl. (1st tower) from the South
Climbing passport
-
Climbing area, section number according to the 2008 classification table
-
Name of the peak, its height, route name.
-
Proposed:
-
Nature of the route:
-
Height difference of the route: Route length: Length of sections: Average steepness: main part of the route —
-
"Hooks" left on the route: total —
-
Team's travel hours:
-
Leader:
Participants:
-
Coach
-
Exit to the route from B.L.
Route started: Reached the summit: Returned to base camp: Descent from the summit:
-
Organization:
-
Responsible for the report:
Email address and phone:
-
Caucasus
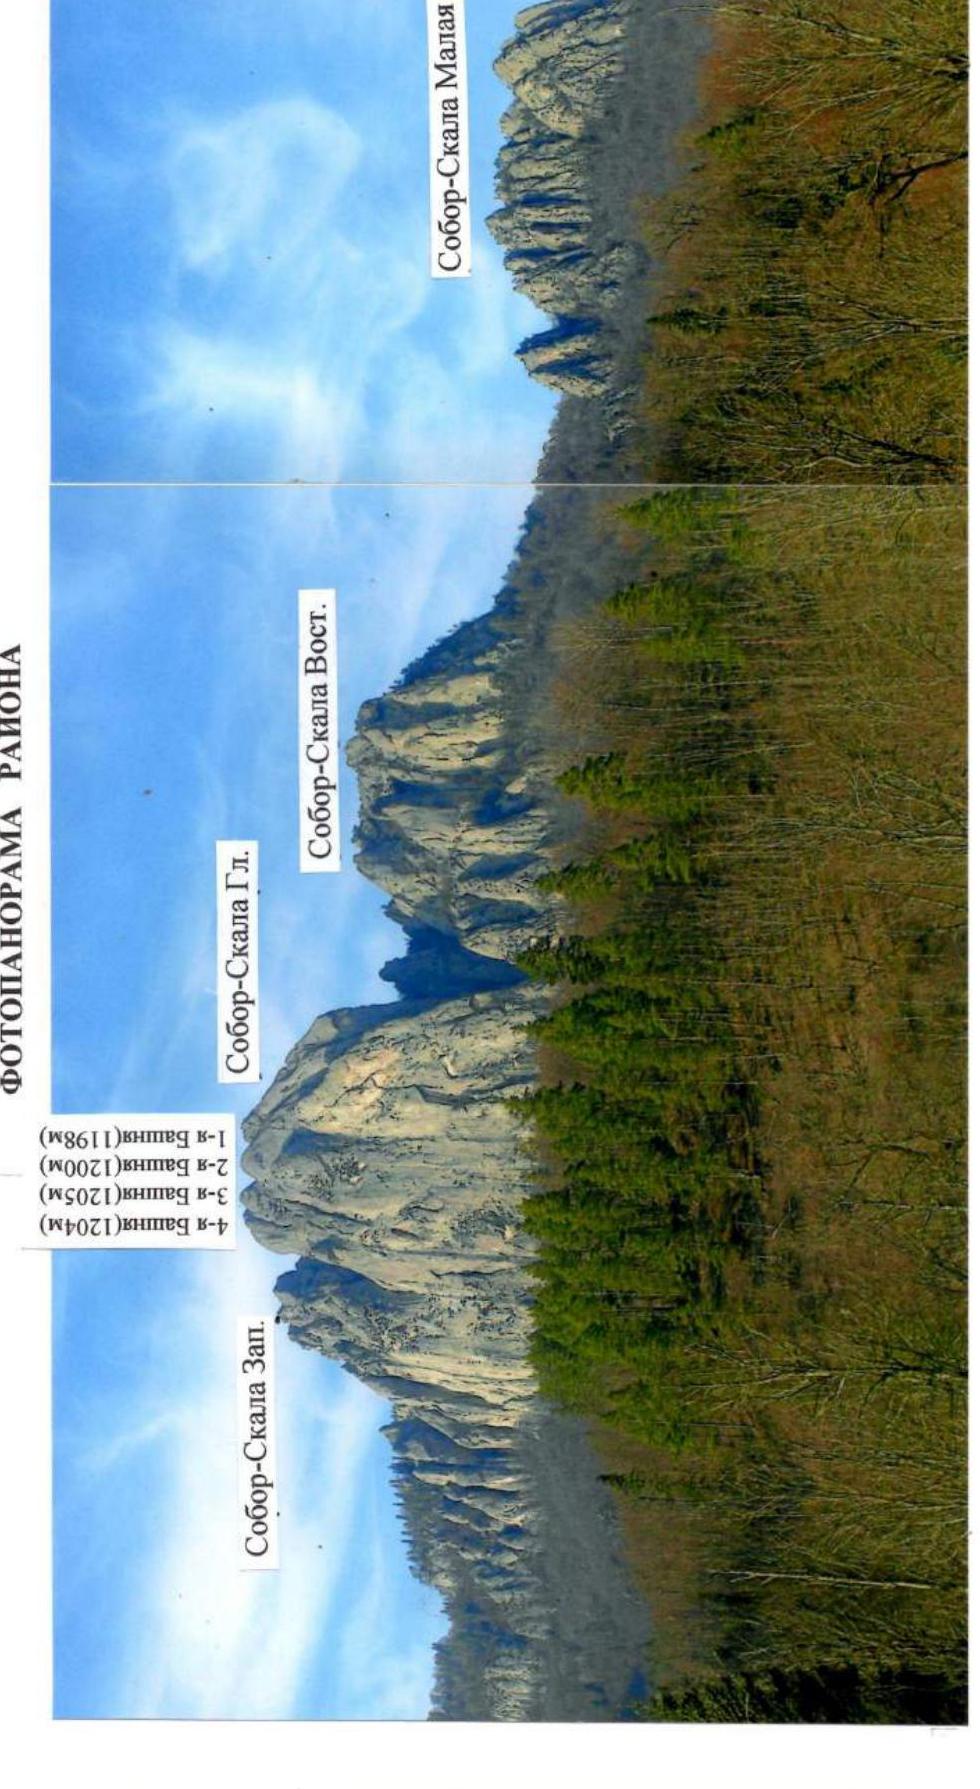
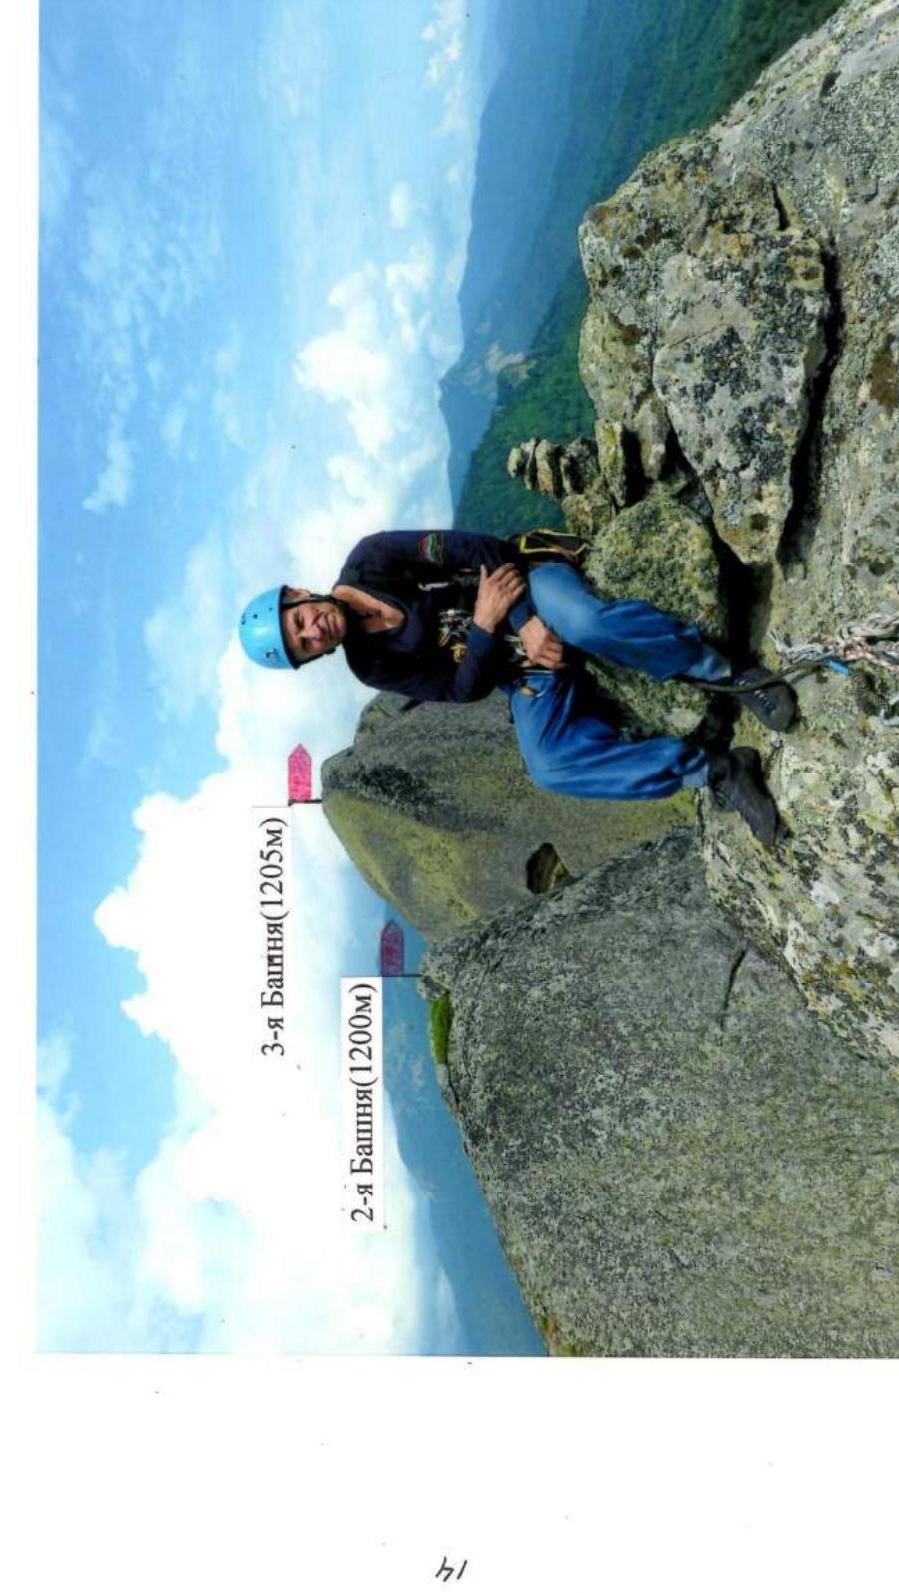
2.1. Krasnodar region up to Marukh pass. Sobor-Skala Glavnaya (1205 m) 1st Tower from the South — 1198 m, 5B cat. diff., first ascent Rocky 331 m (by GPS) 497 m V cat. diff. — 78 m, VI cat. diff. — 94 m whole route — 61° 73°
10; including bolted hooks — 7
31 hours, 3 days
Andryushchenko Anatoly Viktorovich — MSMK
Demenko Roman Anatolyevich — 1st sports rank
Andryushchenko Anatoly Viktorovich
- 5:30 June 29, 2011
- 6:00 June 29, 2011
- 18:10 July 1, 2011
- 20:50 July 1, 2011
to the North Apcheronsky Emergency Rescue Team "Kuban - SPAS"
Andryushchenko Anatoly Viktorovich
apsher-spas@rambler.ru ph. 89184278113
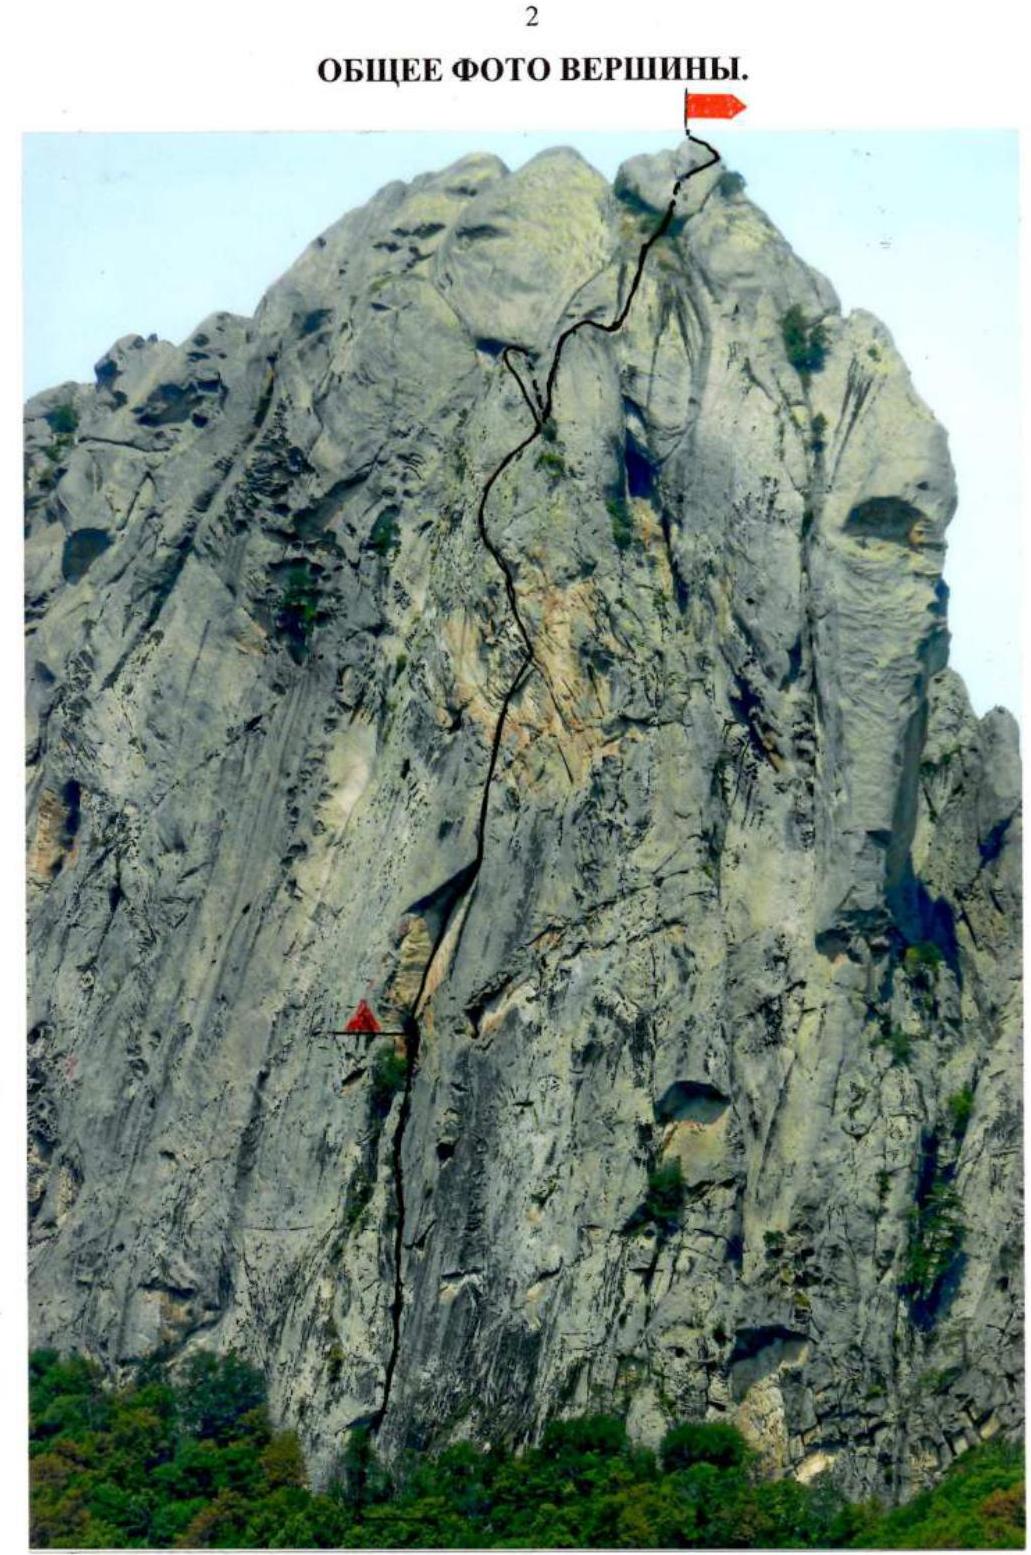
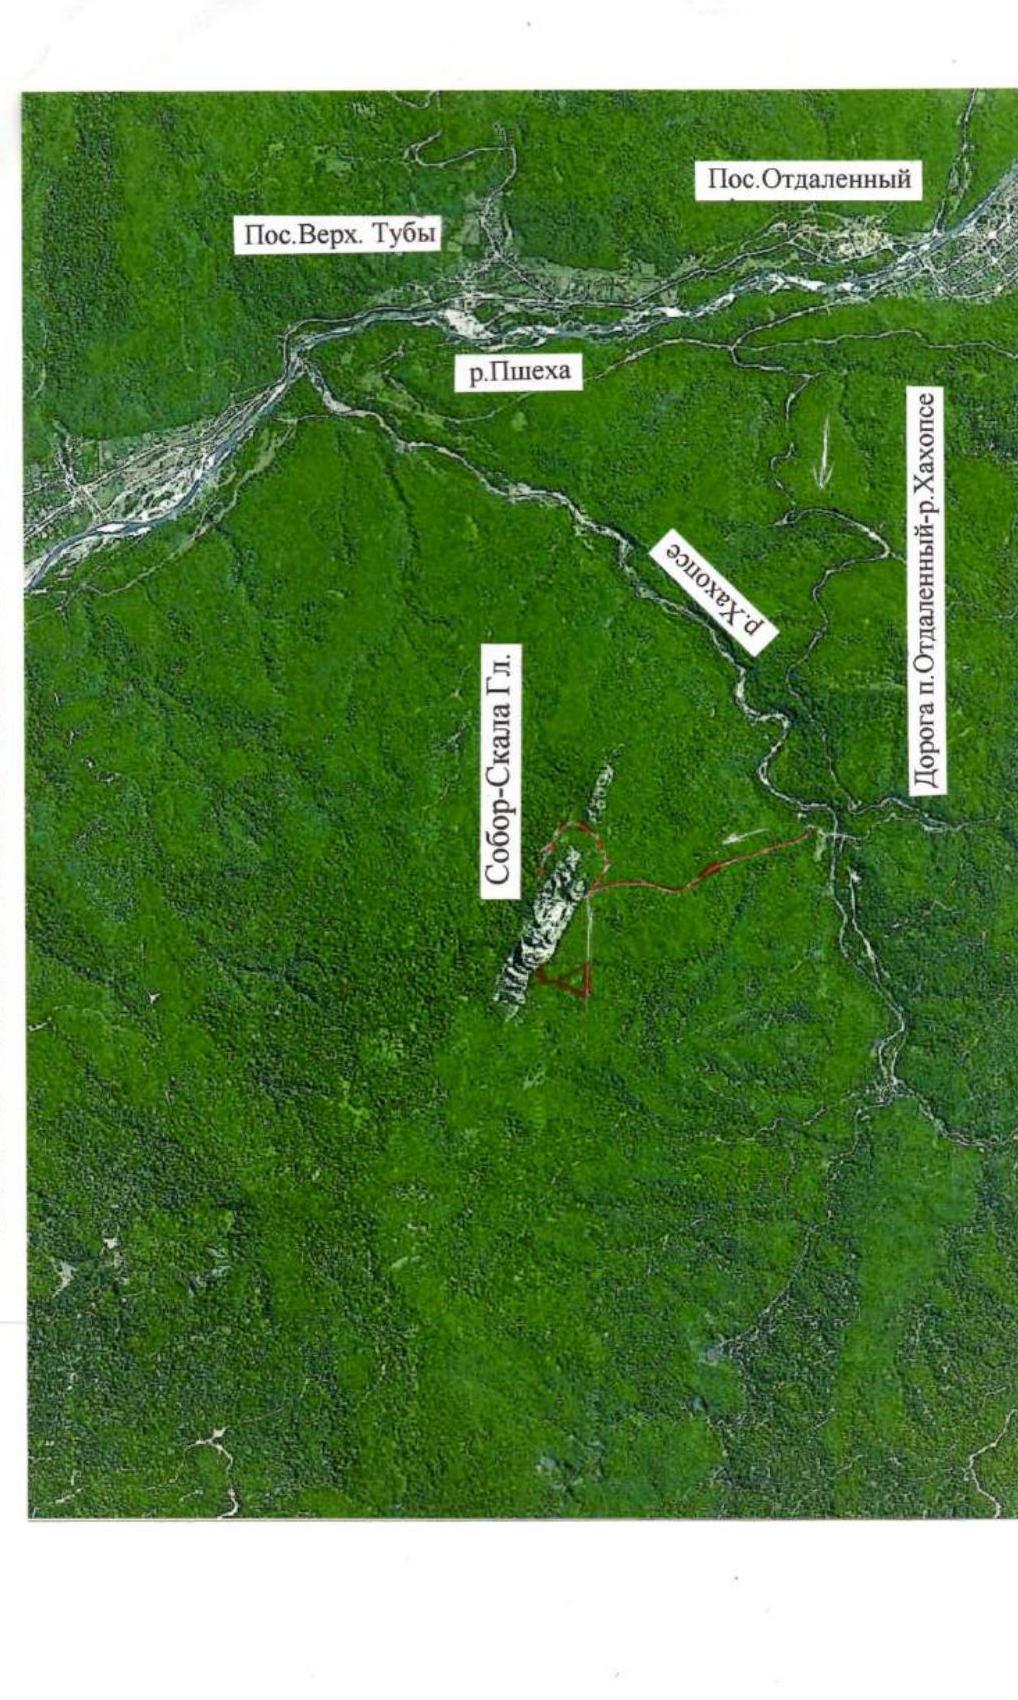
Photo taken on June 1, 2011 from the road near the Khakopse River. (N 44°04′39.2″; E 39°40′05.6″) → — team route A — overnight stay location
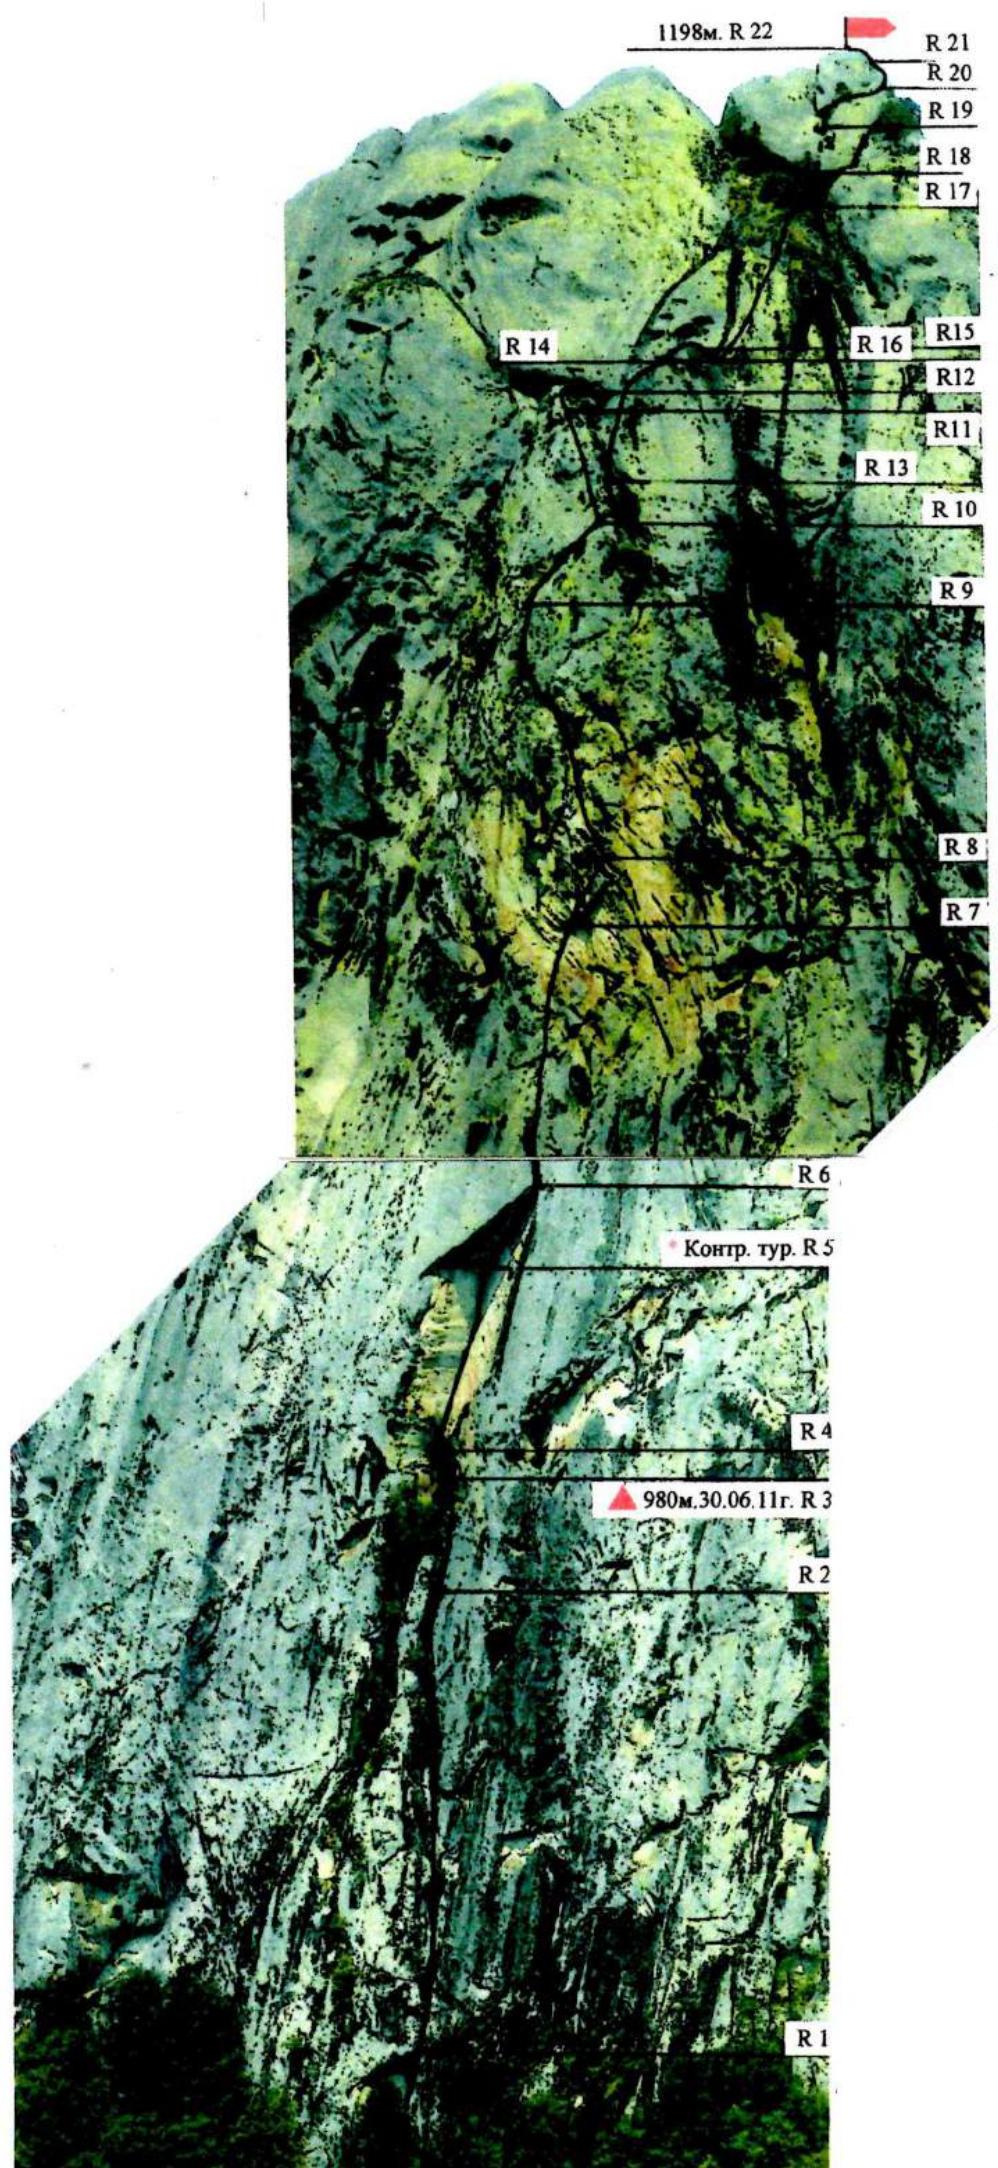
Photo of the route profile on the right
Route profile
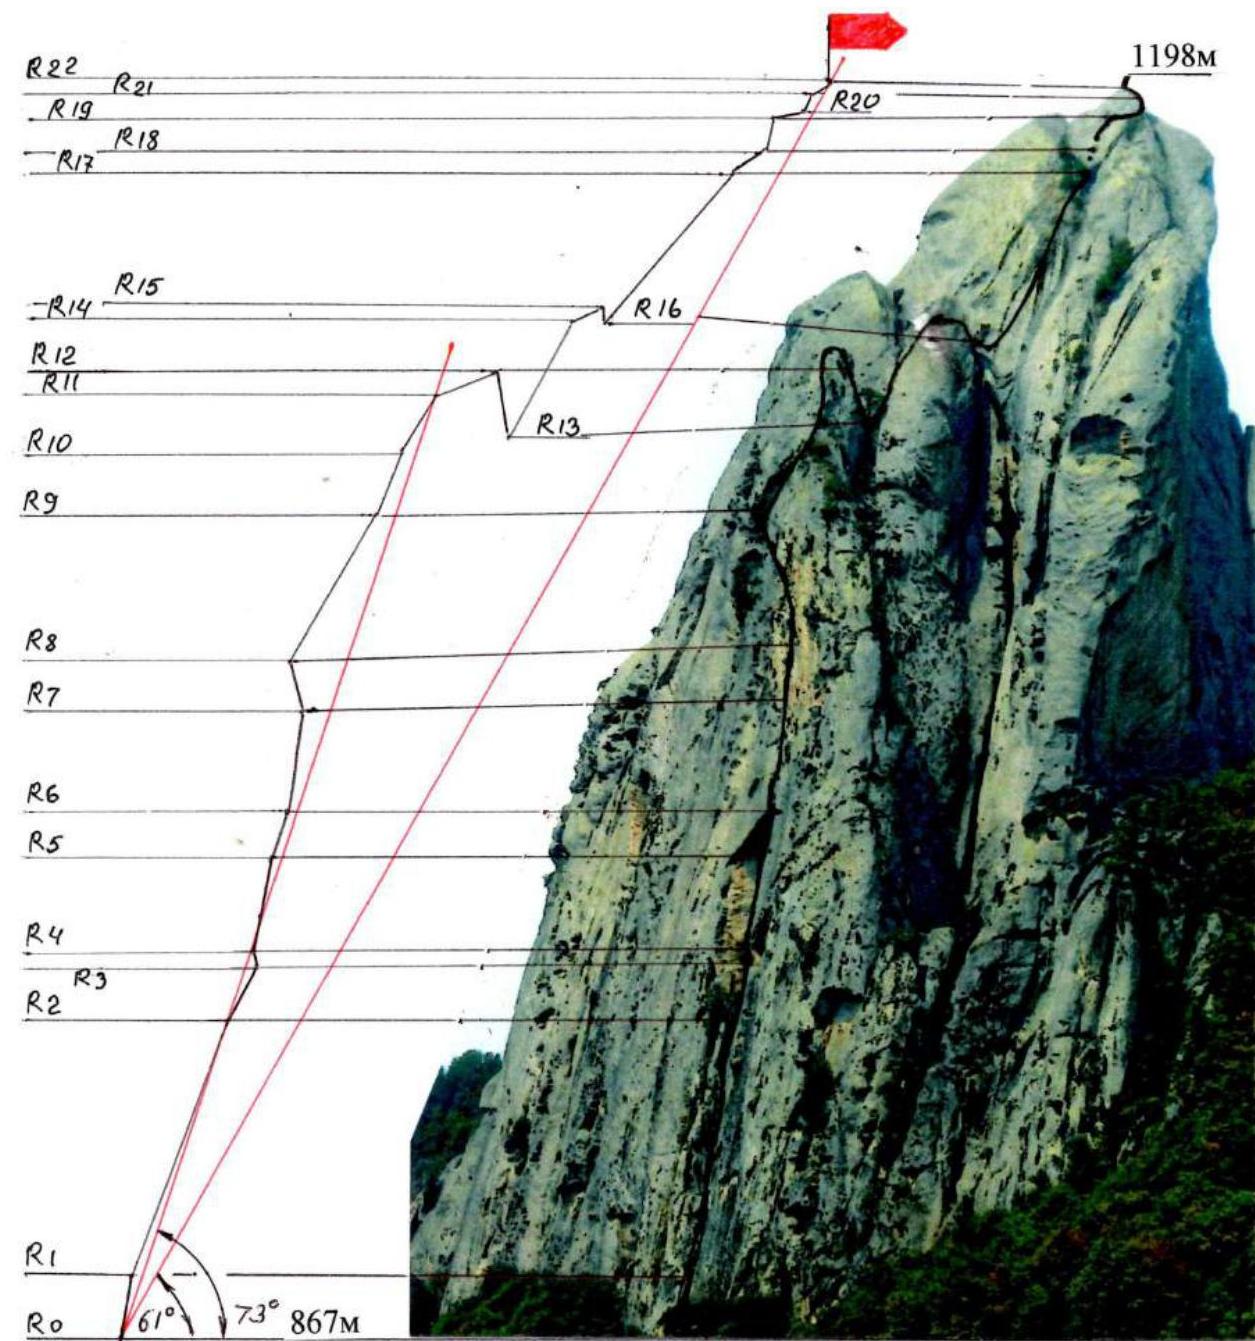
Scale 1:2000
Photo of the upper part of the route profile
Panoramic photo of the area
Area map
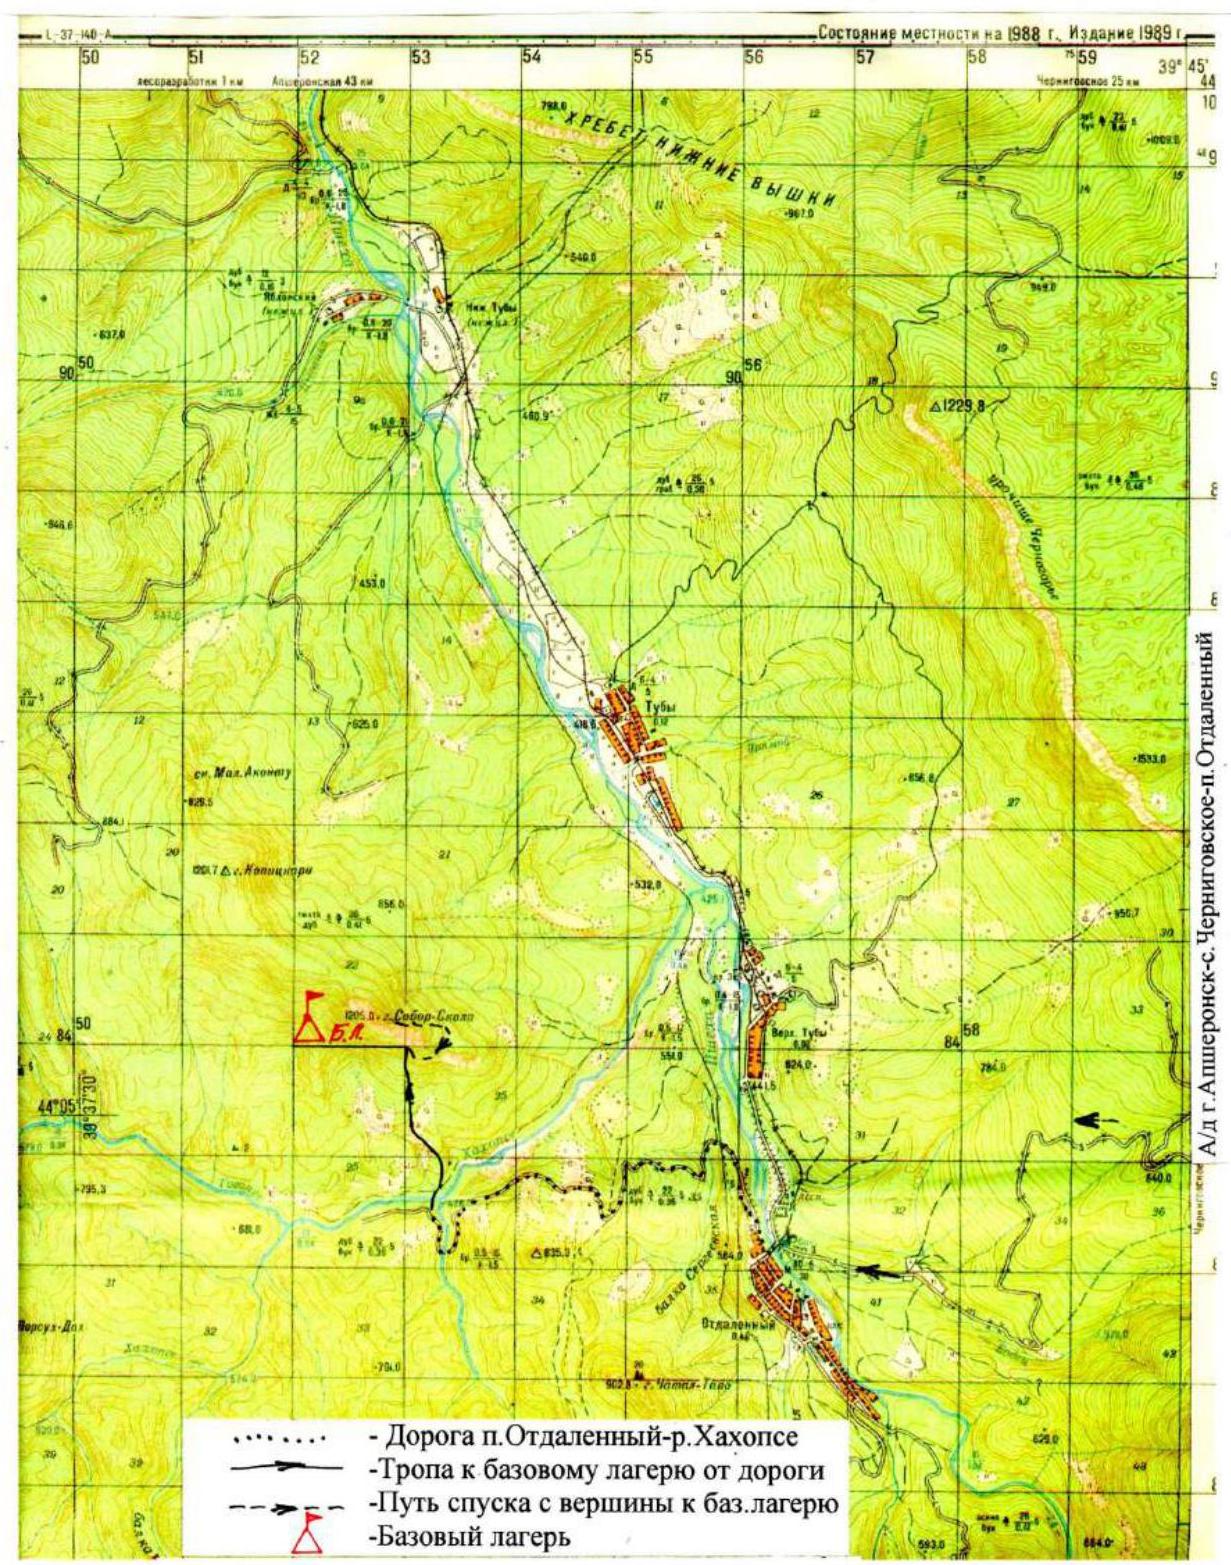
Peak coordinates: N 44°05′26.5″; E 39°39′31.3″
- Trail to the base camp from the road
- Descent path from the summit to the base camp
- Base camp
Route diagram in UIAA symbols

Scale 1:2000

Technical photo of the route
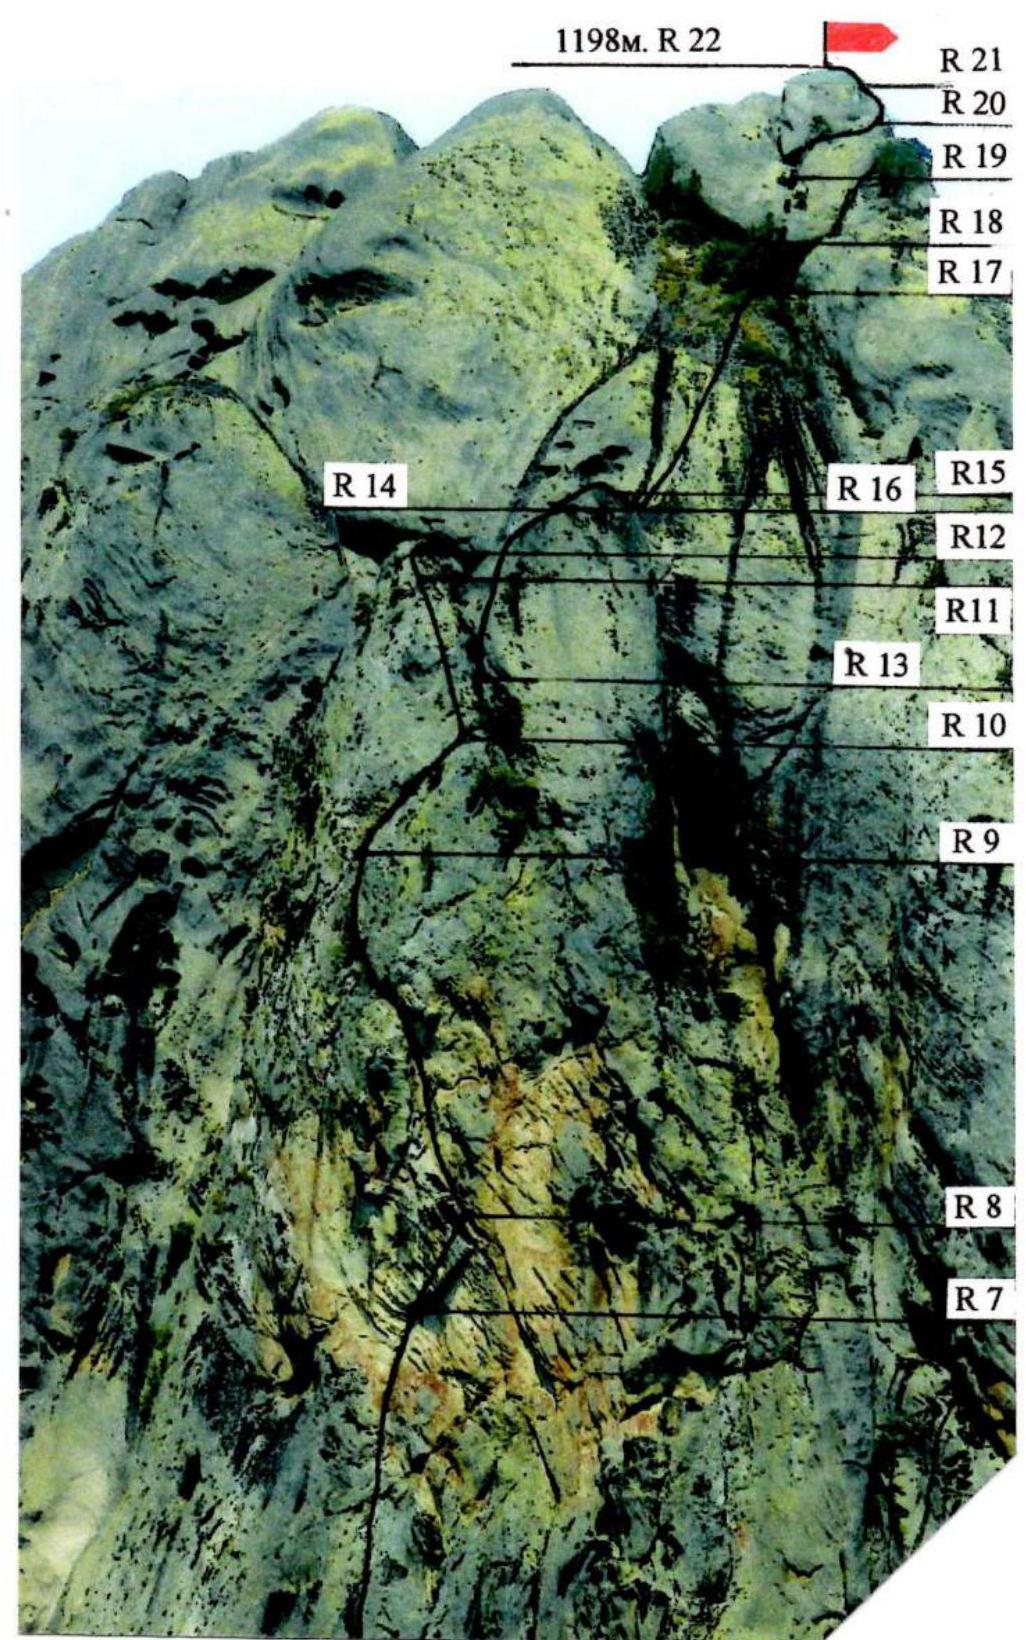
1198 m. R22–R15, R12, R11, R13, R10, R9
Brief description of the route passage
Sec. 0–1 — Wall, solid, without rocks. In its lower part, there are no cracks for reliable hooks, in the upper part, when bypassing the cornice, with wet rocks, ITO may be needed. (Key point of the section).
Sec. 1–2 — Couloir, narrow, with steep sides, turning into a chimney at the top, where there are several rock plugs, heavily overgrown with grass and bushes, "live rocks" are present, no shelter locations. In the lower and upper thirds of the couloir, it's possible to exit left to the rib, where there is significantly less vegetation and more opportunities for organizing reliable belays.
Sec. 2–3 — Wall, partially covered with moss and grass, with several small trees. The wall leads to the base of a grotto, the entrance to which is blocked by loose rocks. Careless movement can cause rocks to fall into the couloir (Sec. 1–2).
Inside the grotto, there is a possibility of a lying overnight stay for 2-3 people, but it's impossible to set up a tent. The grotto remains dry in any rain due to the strongly overhanging rocks above.
Sec. 3–4 — Wall, strongly overhanging, monolithic, without cracks, technically complex and passed only on ITO, requiring significant physical effort.
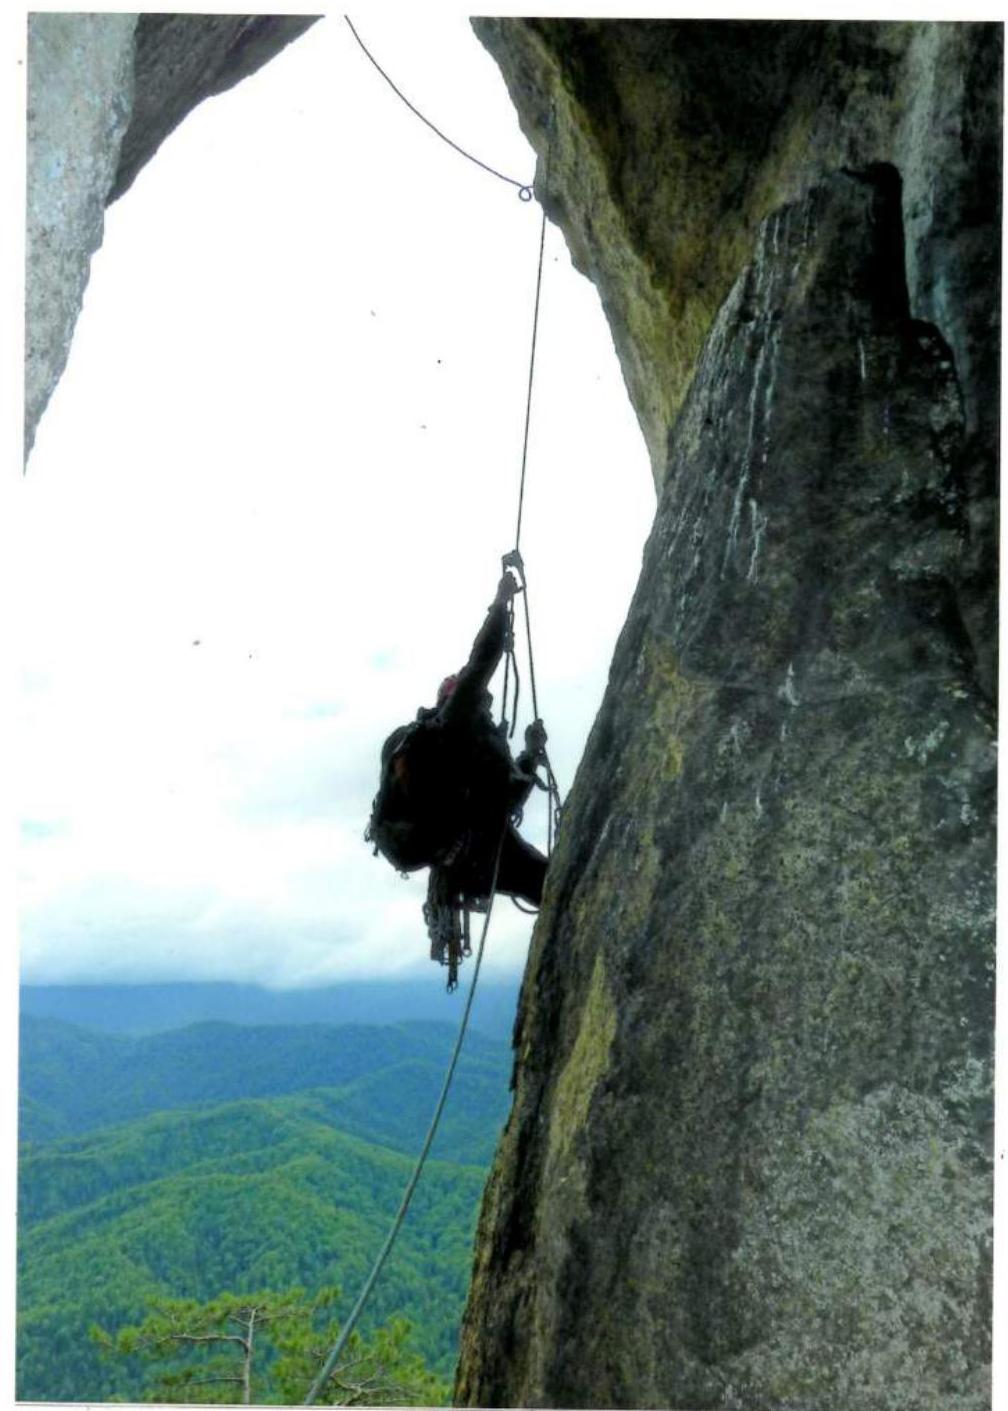
Sec. 4–5 — Internal corner ("Book") formed by monolithic rocks of reddish color with a crack along the entire length of the corner. The crack is partially blind and can be used for horizontal rock hooks and small placements. It leads under a large cornice, under which a control cairn with a note is located on a rock hook. Climbing is very tense, difficult, with a limited number of holds; mostly artificial climbing is used. Belay organization is done using ladders, hanging.
Sec. 5–6 — Internal corner bypassing the cornice on the right. Under the cornice, there is a blind crack that can be used for placements and friends. Intermediate belay points are unreliable, there are very few holds, the section is passed almost entirely on ITO, skyhooks were used. Belay station at the end of the section before exiting from under the cornice to a safe location is hanging on two bolted hooks.
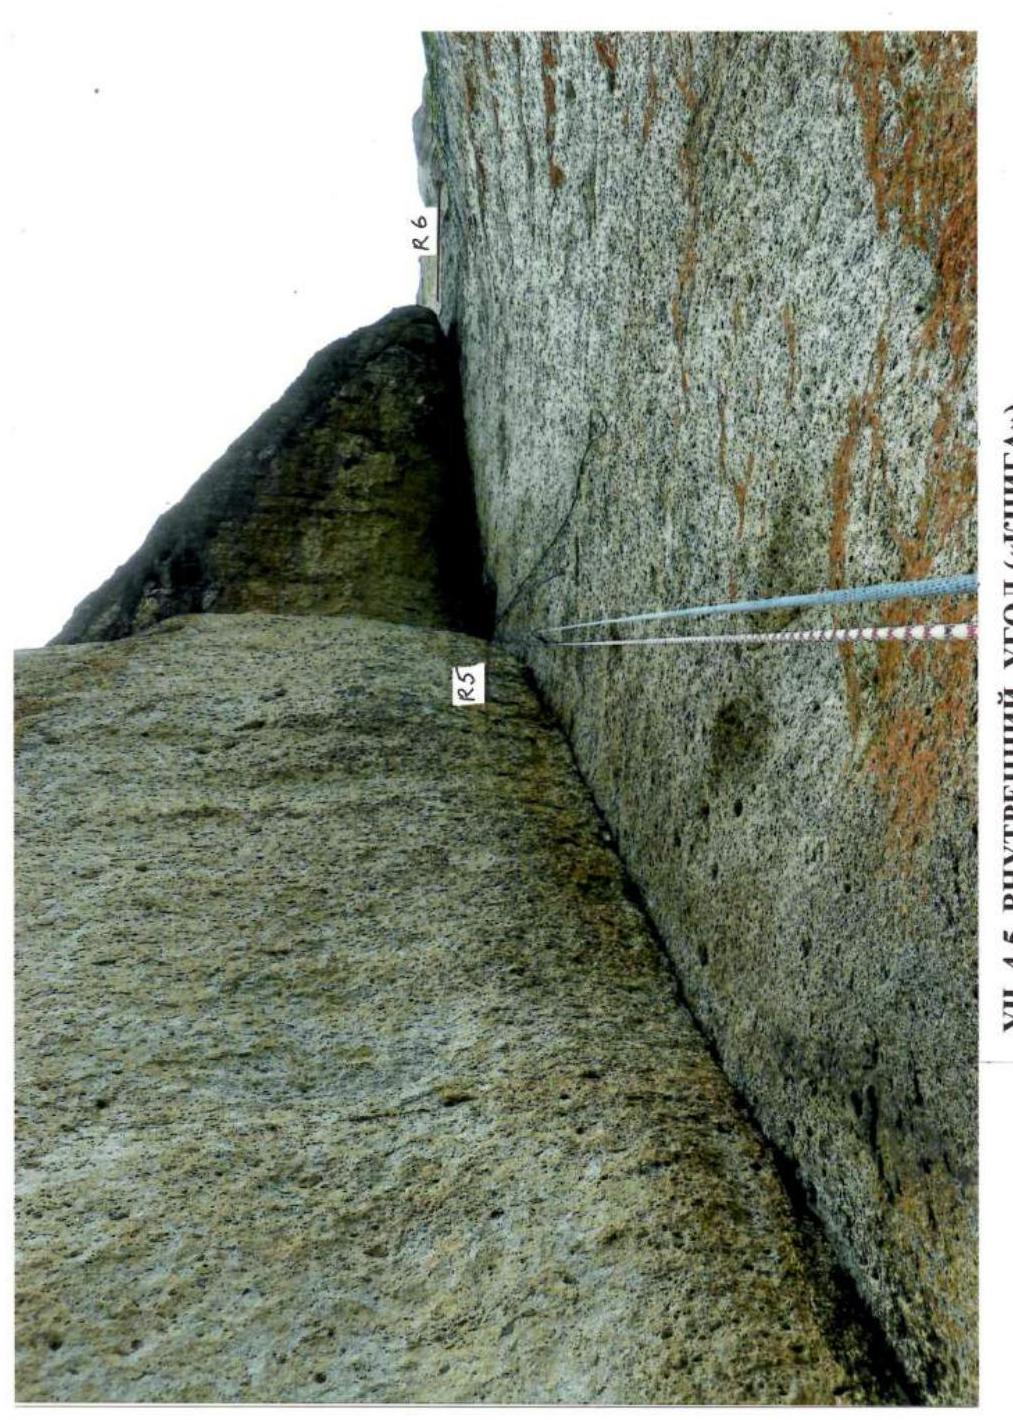
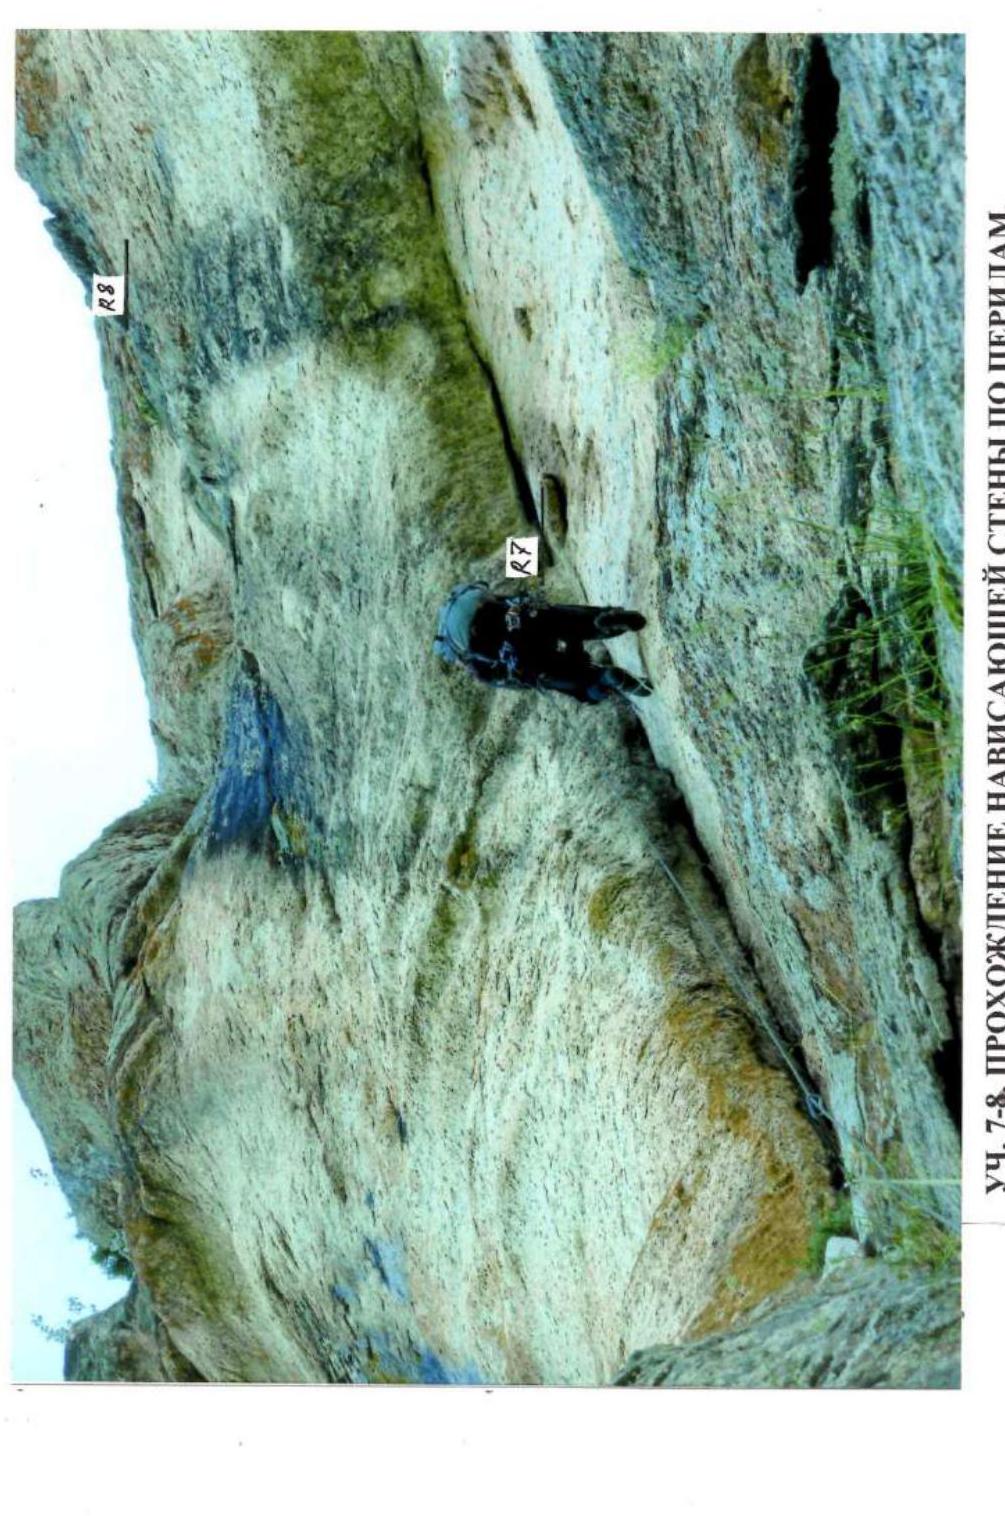
Sec. 6–7 — Internal corner with a crack, points for organizing intermediate belays are not very reliable. Rocks are partially covered with moss and grass, are "furry" and crumbling. The section is partially climbed.
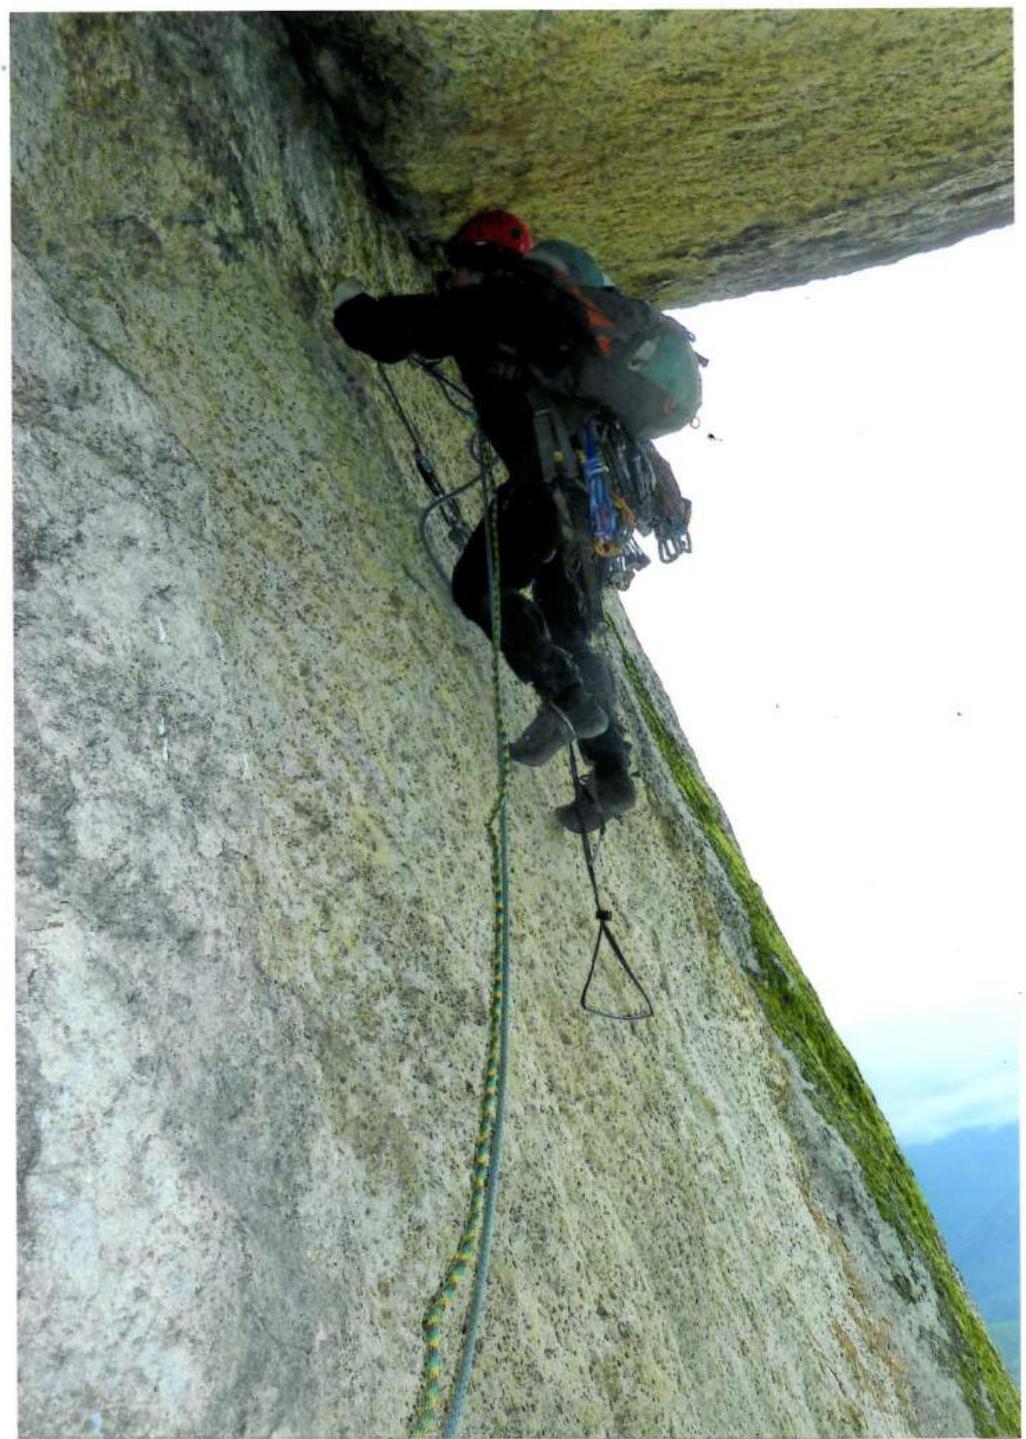
Sec. 7–8 — Wall, monolithic, without cracks and holds, strongly overhanging, passed exclusively with ITO on bolted hooks in the direction right-up. Work on this section is technically complex and requires significant physical tension.
Sec. 8–9 — Oblique ledge along the wall left-up on unstable rocks, wide at the beginning, then turning into an almost horizontal crack overgrown with bushes and small trees, and further with grass. There are not many reliable places for organizing intermediate belays.
Sec. 9–10 — Wall, mostly solid. There are enough places for organizing intermediate belay points, leading to the rib of a gendarme. There is enough space for the group to stay, and belay can be organized through a tree.
Sec. 10–11 — Rib. Rocks are not very solid, there are cracks for hooks. As you ascend, the steepness decreases.
Sec. 11–12 — Rib. Simple rocks lead to the summit of a gendarme.
Sec. 12–13 — Rappelling. Descent towards the summit, which is clearly visible, into a depression to a pine tree. Descent is organized on a bolted hook.
Sec. 13–14 — Wall, monolithic, smooth, without footholds and cracks. Passed with ITO on skyhooks and bolted hooks. As you ascend, it becomes gentler. Climbing is done towards a large loose rock, which is bypassed on the left (Be careful, do not load!).
Sec. 14–15 — Ridge, starting behind the rock and leading to the summit of the second gendarme.
Sec. 15–16 — Rappelling. Short descent to a saddle to the base of a wall leading to the summit. Bolted hook.
Sec. 16–17 — Wall, monolithic, without cracks, holds are heavily smoothed. Assuming dry rocks, it's mostly climbed with intermediate belays on bolted hooks, becoming gentler in the upper part, partially covered with moss.
Sec. 17–18 — Slab, covered with moss, bushes, and trees, doesn't present difficulties and leads to a grotto.
Sec. 18–19 — Grotto, through, vertical, leads to an almost horizontal narrow ledge. There are places for intermediate belay organization.
Sec. 19–20 — Ledge, technically simple, leads to the most gentle ascent to the 1st Tower.
Sec. 20–21 — Wall, short, with a small number of holds. On wet rocks — 2-3 times ITO on skyhooks, exit to a ridge.
Sec. 21–22 — Ridge, leading to the summit of the 1st Tower of Sobor-Skala.
Recommendations for preliminary route assessment
This route is beautiful, very logical, and relatively safe. It's one of the few routes on Sobor-Skala that, although partially, is climbed with free climbing. Despite the relatively low absolute height and presence of vegetation, due to the length of complex sections, variety of rock relief forms, and technical techniques used during the ascent, it can be recommended for sports climbing on par with the most complex Crimean routes.
The route to the 1st Tower of Sobor-Skala from the South significantly surpasses in complexity and length of complex sections routes of 5A cat. diff. such as:
- Fischt North via West wall;
- Fischt via East wall;
- Tyutyu West via South wall;
and is not inferior to routes of 5B cat. diff. such as:
- Layoub East via North-East wall;
- Amanauz Main via South wall;
- Amanauz Uzlovoy via East wall.
SEC. 3–4. PASSING THE WALL ON FIXED ROPES (PHOTO FROM THE GROTTO).
SEC. 4–5. INTERNAL CORNER ("BOOK").
SEC. 5–6. BYPASSING THE CORNICE ALONG THE INTERNAL CORNER.
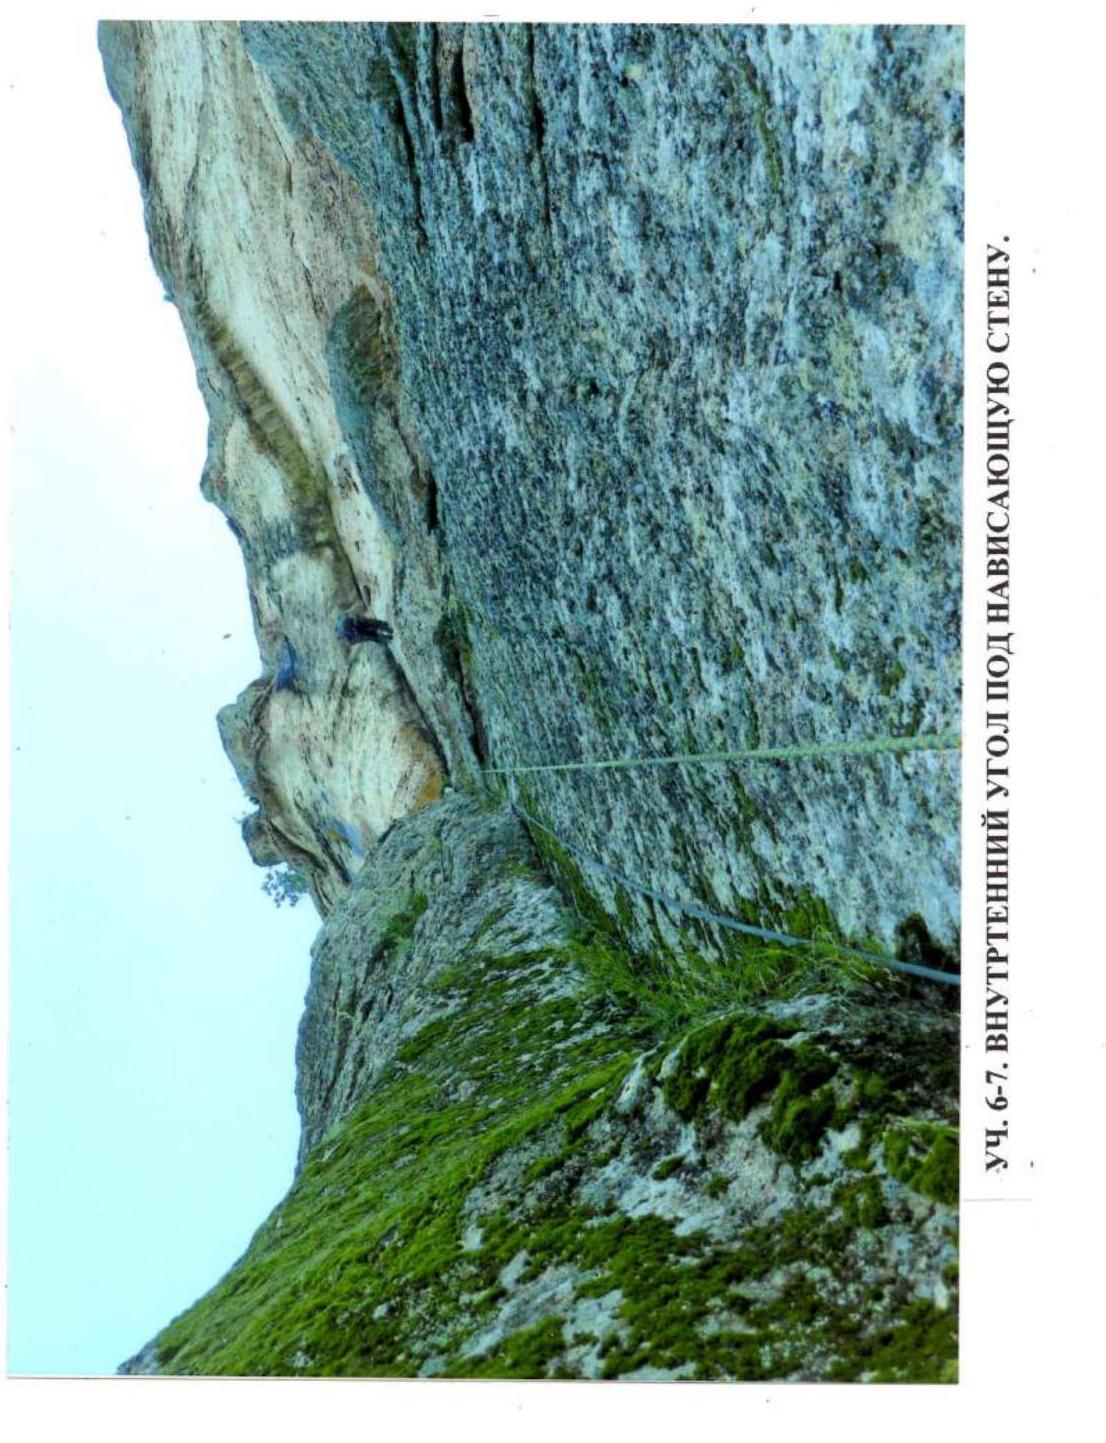
SEC. 6–7. INTERNAL CORNER UNDER THE OVERHANGING WALL.
SEC. 7–8. PASSING THE OVERHANGING WALL ON FIXED ROPES.
ON THE SUMMIT OF THE 1ST TOWER OF SOBOR-SKALA AT THE CONTROL CAIRN.
Note
Due to heavy fog on the first day when the most complex part of the route was climbed, and limited ability to take photos during the ascent as a duo, it was not possible to fully capture the work of the lead climber, as well as the techniques, technical means, and belay methods used. Photos were mostly taken when climbing complex sections on already fixed ropes.
 △ 980 m. June 30, 2011. R3