Report
ON THE FIRST ASCENT OF KYAJO RI VIA "THE CENTER OF THE WESTERN WALL" ROUTE, CATEGORY 6B, BY THE ROSTOV REGION ALPINISM TEAM FROM OCTOBER 2 TO OCTOBER 9, 2019
I. Climbing Passport
| 1. General Information | ||
|---|---|---|
| 1.1 | Full Name, Sports Rank of the Leader | Vasiliev Andrey Sergeevich, Master of Sports |
| 1.2 | Full Name, Sports Rank of Participants | Osipov Ivan Dmitrievich, Master of Sports, Rybalchenko Dmitry Andreevich, Master of Sports, Shipilov Vitaly Viktorovich, Master of Sports |
| 1.3 | Full Name of Coach | Pyatnitsin Alexander Alekseevich, Spiridonov Alexander Semenovich |
| 1.4 | Organization | FAiS RO, a/c "Planeta" |
| 2. Characteristics of the Climbing Object | ||
| 2.1 | Region | Himalayas, Solukhumbu region |
| 2.2 | Valley | Bhote Koshi river valley, Thame Valley |
| 2.3 | Section Number according to the 2013 Classification Table | 10.1 |
| 2.4 | Name and Height of the Peak | Kyajo Ri, 6186 m |
| 2.5 | Geographic Coordinates of the Peak (Latitude/Longitude), GPS Coordinates *(1) | 27.909293, 86.670548 |
| 3. Route Characteristics | ||
| 3.1 | Route Name | Via the center of the western wall |
| 3.2 | Proposed Category of Difficulty | 6B |
| 3.3 | Degree of Route Exploration | First Ascent |
| 3.4 | Nature of the Route Terrain | Combined |
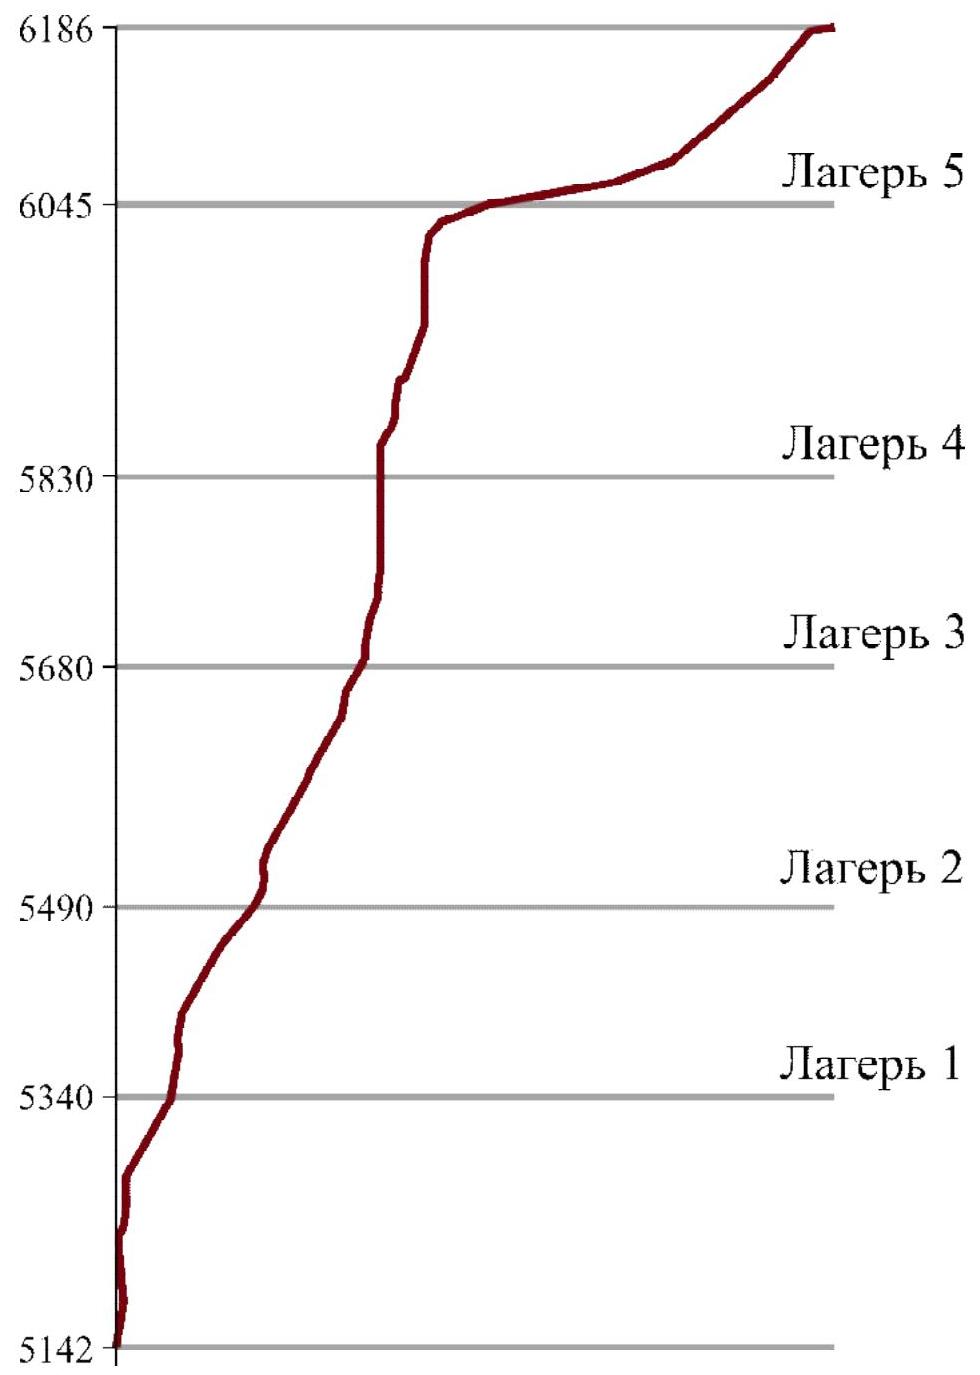
| 3.5 | Height Difference of the Route (Altimeter or GPS data) | 1040 m |
| 3.6 | Route Length (in meters) | 1487 m |
| 3.7 | Technical Elements of the Route (Total length of sections by category of difficulty, indicating terrain type: ice-snow, rock) | Category I combination — 185 m. Category II combination — 20 m. Category III combination — 145 m. Category IV combination — 155 m. Category V combination — 455 m. Category VI rock — 352 m. Category VI combination — 175 m. Rock VI, A3 — 173 m |
| 3.8 | Average Steepness of the Route, (°) | 62° |
| 3.9 | Average Steepness of the Main Part of the Route, (°) | 75° |
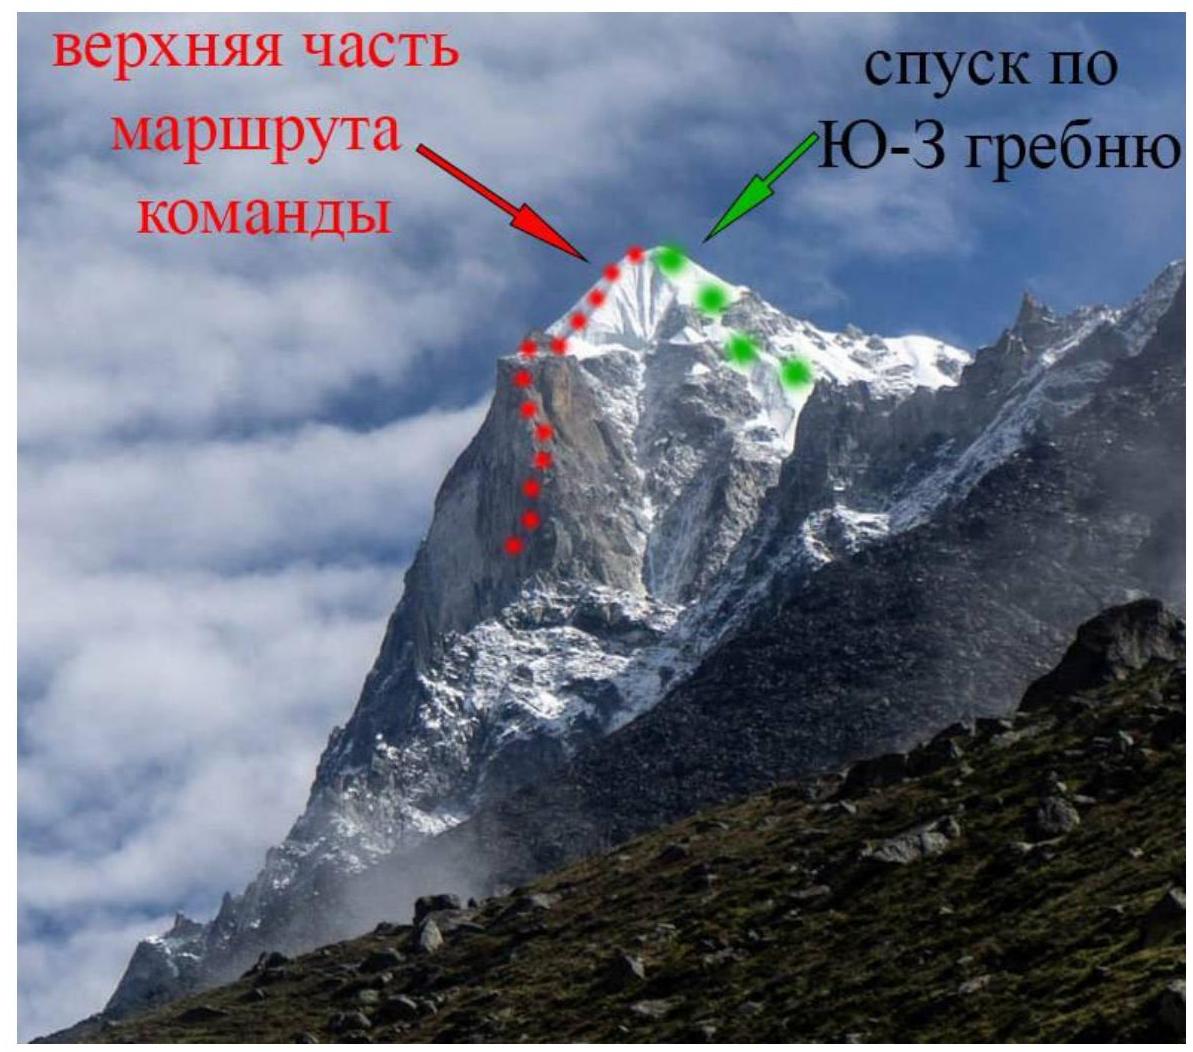
| 3.10 | Descent from the Summit | Via the southwest ridge, category 5A (approximately) |
| 3.11 | Additional Route Characteristics | Water is present on the route; difficulties with organizing bivouacs are possible (depending on snow volume on the route) |
| 4. Team Action Characteristics | ||
| :--: | :-----------------------------------------------------------------------------------------------------------------------------------------------------------------: | :-----------------------------------------------------------------------------------------------------------------------------------------------------------------: |
| 4.1 | Time in Motion (Team's Walking Hours, in hours and days) | 66 hours, 7.5 days |
| 4.2 | Bivouacs | 6 (3 bivouacs on ledges — reclining). The other three bivouacs were organized on snow lying on steep 60° rock slabs. Used a hammock to create a platform. Good snow conditions allowed literally shaping the platform; under different conditions, organizing comfortable bivouacs may be impossible without a platform. |
| 4.3 | Route Processing Time | 10 hours, 1 day (October 2, 2019) |
| 4.4 | Start of the Route | 7:00, October 2, 2019 |
| 4.5 | Summit Arrival | 9:00, October 9, 2019 |
| 4.6 | Return to Base Camp | Did not return to BC; descent to the col (end of the technical part of the route) at 14:30 on October 9; descent to Thamo — 17:00 on October 10 |
| 5. Meteorological Conditions | ||
| 5.1 | Temperature, °C | Daytime +5…+10°C, nighttime −5…−10°C |
| 5.2 | Wind Speed, m/s | Virtually no wind, 0–2 m/s |
| 5.3 | Precipitation | October 2: rain from 13:00 to 4:00 — 10 mm; October 7: snow from 19:00 to 4:00 — 10 cm. |
| 5.4 | Visibility, m | Each day: fog from 10:00–14:00 to 17:00, visibility up to 50 m. |
| 6. Report Responsibility | ||
| 6.1 | Full Name, e-mail | Vasiliev A.S., andre.vasiliev@gmail.com +79054559237 |
II. Climbing Report
1. Characteristics of the Climbing Object
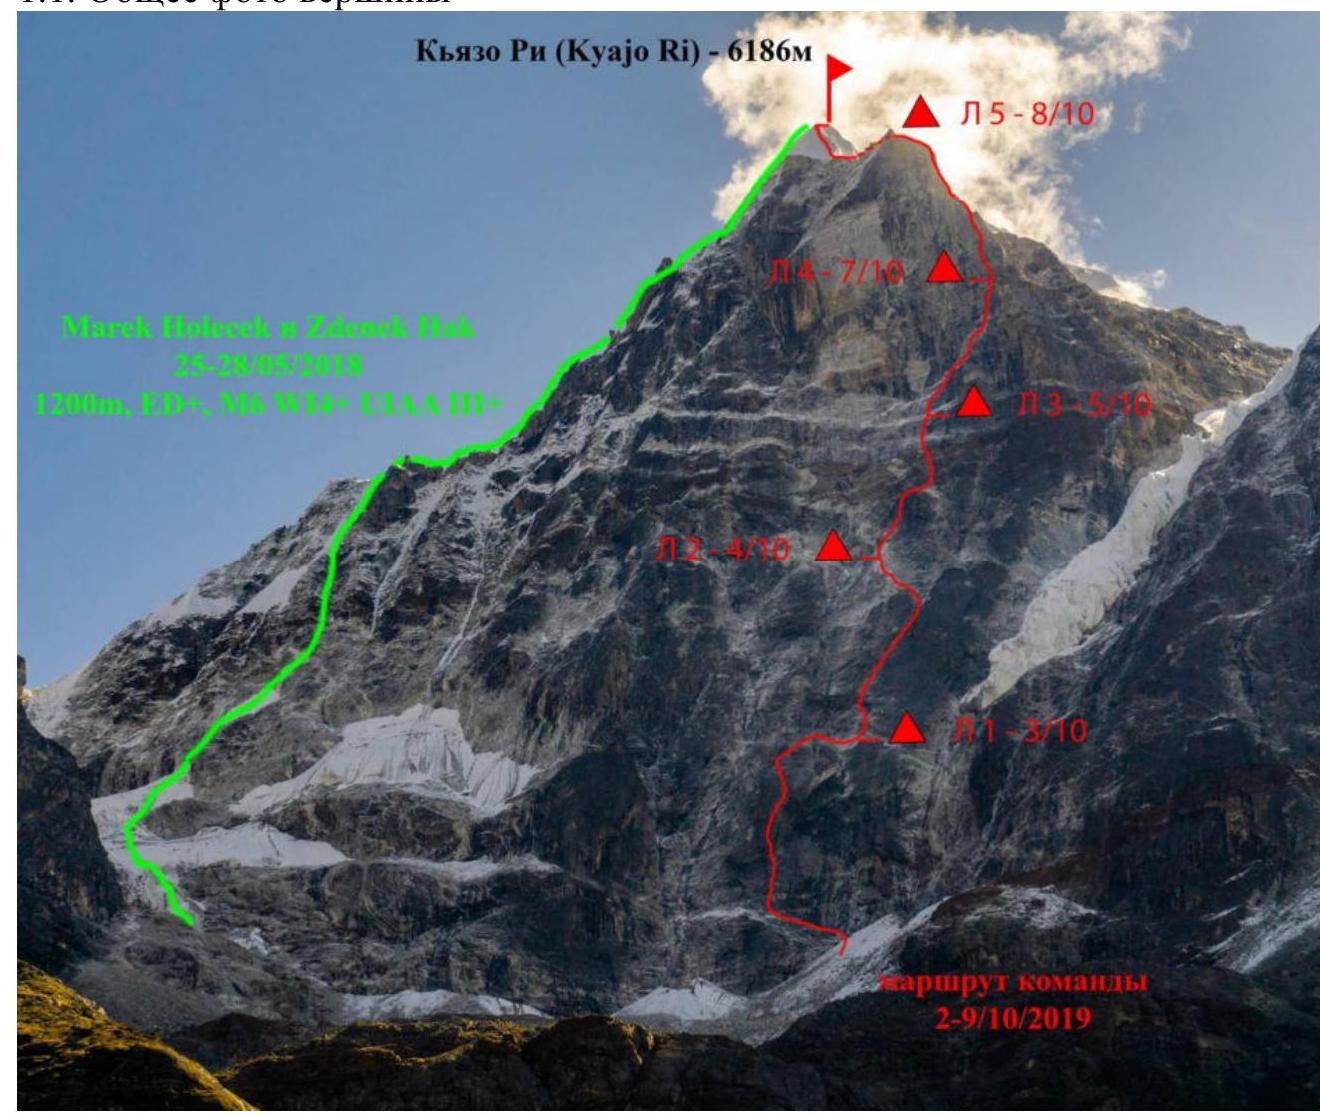
1.1. General Photo of the Peak
8:50, September 21, 2019. Approach to the route from Lunghden village, shooting height 4900 m.
10:20, September 20, 2019. Shot from the crossing between Thame and Lunghden, shooting height 4000 m.
1.2. Photo of the Route Profile
Taking high-quality photos of the wall profile was not possible due to poor weather conditions in the area during the approach, with virtually no visibility, and the technical difficulty of reaching a vantage point.
Photos found online are provided below.

Photo from http://www.jamesak.sk/content/column/article_dependency.asp?id_dependency=3346↗
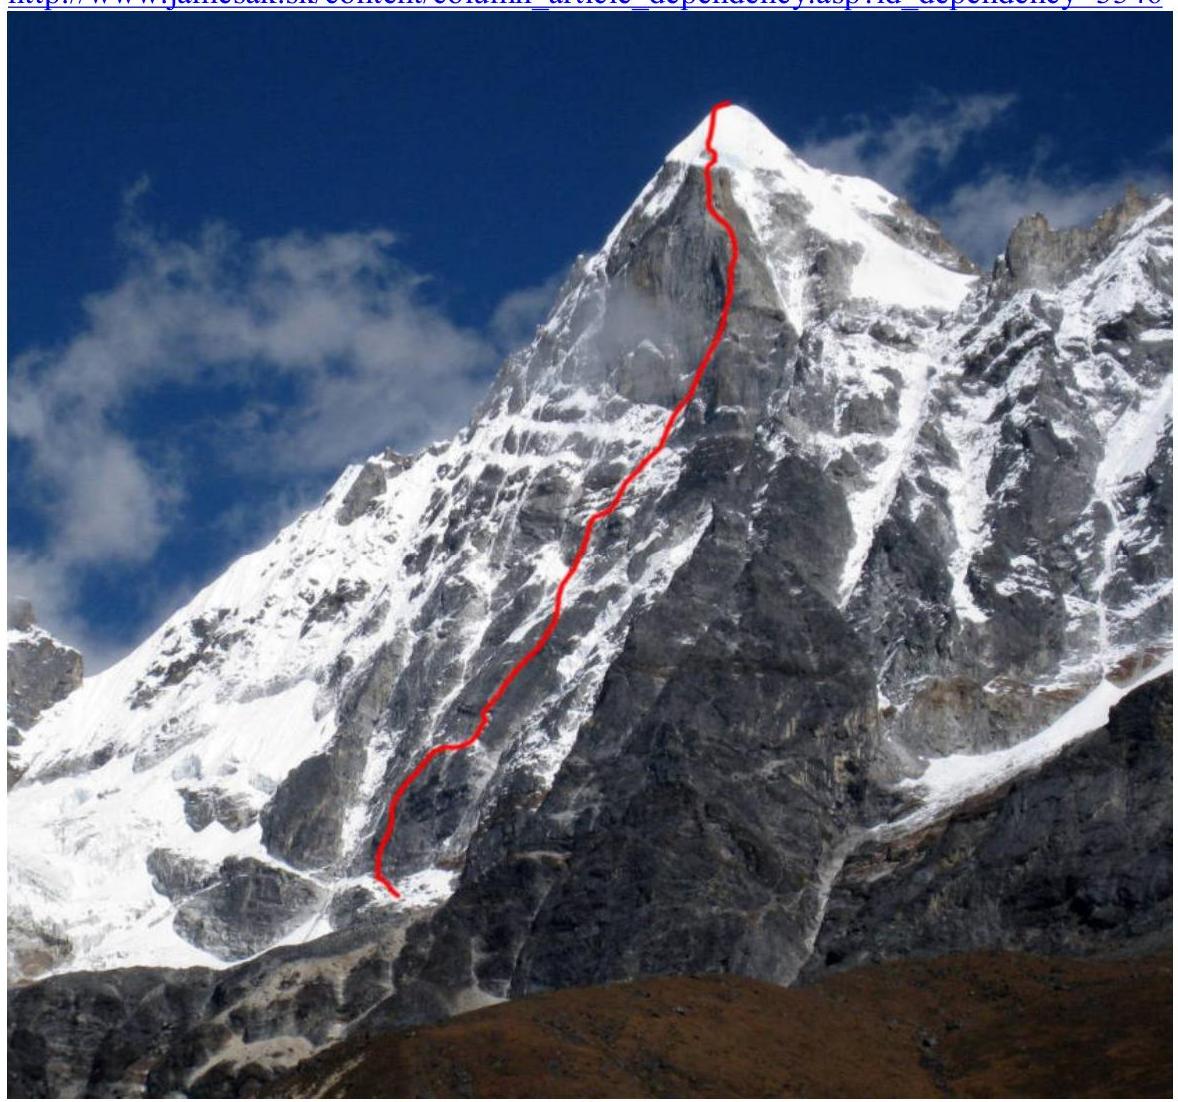
Photo from https://www.gore-ljudje.net/novosti/136848/↗
1.3. Hand-Drawn Profile of the Route
1.4. Panoramic Photo of the Area
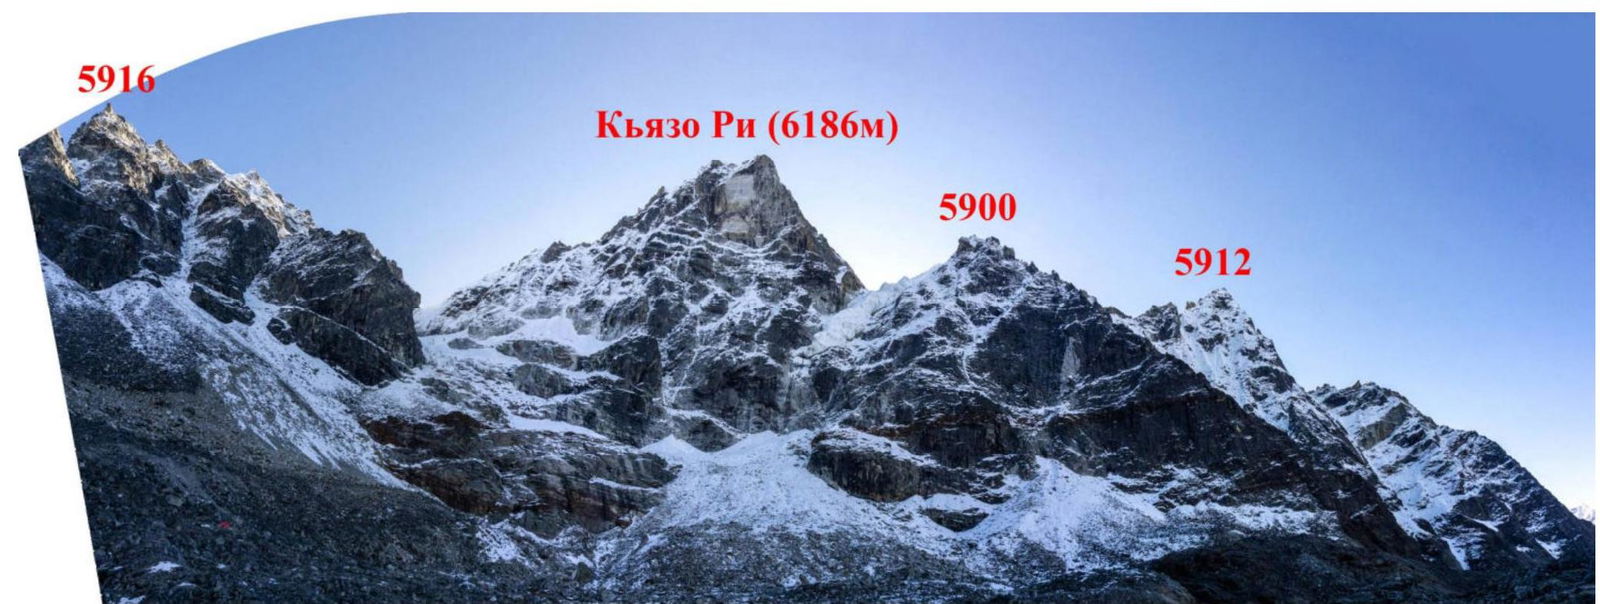
Names of neighboring peaks are unknown. Heights are taken from https://www.himalaya-info.org/Map%20khumbu_gokyo.htm↗
1.5. Area Map
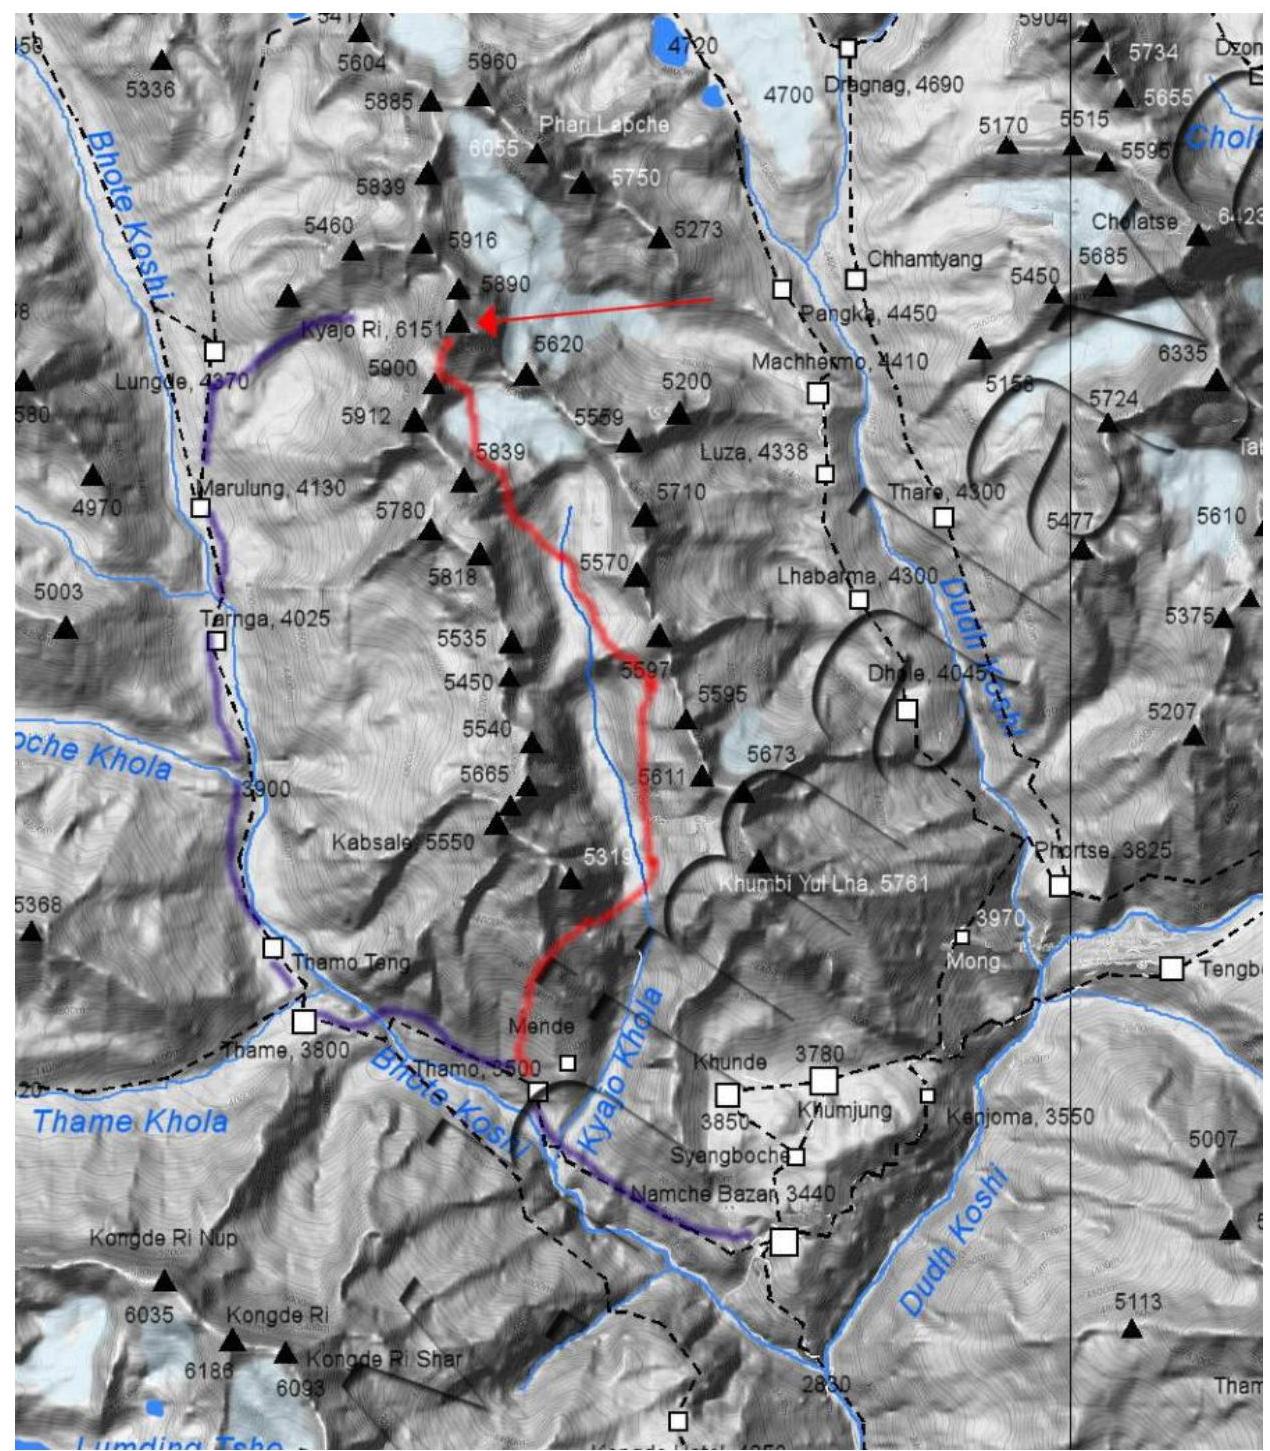
Purple line — approach to the western wall, red — descent via the southwest ridge. Scheme from https://www.himalaya-info.org/Map%20khumbu_gokyo.htm↗
The peak Kyajo Ri (6186 m) is located in the Solukhumbu region, Nepal. It is situated north of Namche Bazaar in a long line of peaks continuing up to Cho-Oyu (8201 m) on the Nepalese-Tibetan border. To the west of this line of peaks lies the Thame Valley, and to the east, the Gokyo Valley, both popular trekking routes. Kyajo Ri is the highest point in the southern part of this ridge.
The peak was opened for climbing by the Nepalese Ministry of Tourism in 2002, and the first official ascent was made by a Franco-British team the same year via the southwest ridge, the most popular and straightforward route to date, often used for commercial climbs. Kyajo Ri is listed among Nepal's "Trekking Peaks," group A.
The second route to Kyajo Ri was climbed in 2005 by an American team via the southeast ridge. Several unsuccessful attempts were made on the eastern wall (Danish teams in 2003, 2011, and 2012; a German team in 2009). The first successful ascent of the eastern wall was achieved on May 9–13, 2013, by the duo V. Belousov–M. Koptev — the "Stealing Beauty" route, category 6A (6b/A2/M5).
In 2018, a Czech duo (Marek Holeček and Zdeněk Hák) completed an ascent from the west. Their line lay far to the left on the western wall and then followed the northwest ridge — the "Lapse of Reason" route, 1200 m long (M6, WI 4+, 3+UIAA, ED+).
The base camp to the west is conveniently located in the village of Lunghden (4400 m). The approach from Namche Bazaar (3440 m) along a good trail is 18 km, taking 5–8 hours. A bivouac under the start of the route can be set up near a small lake at 5000 m, reachable from Lunghden by ascending directly up grassy slopes and scree (with some trails) in 2–3 hours. From the lake to the wall is 40 minutes to 1 hour.
2. Route Characteristics
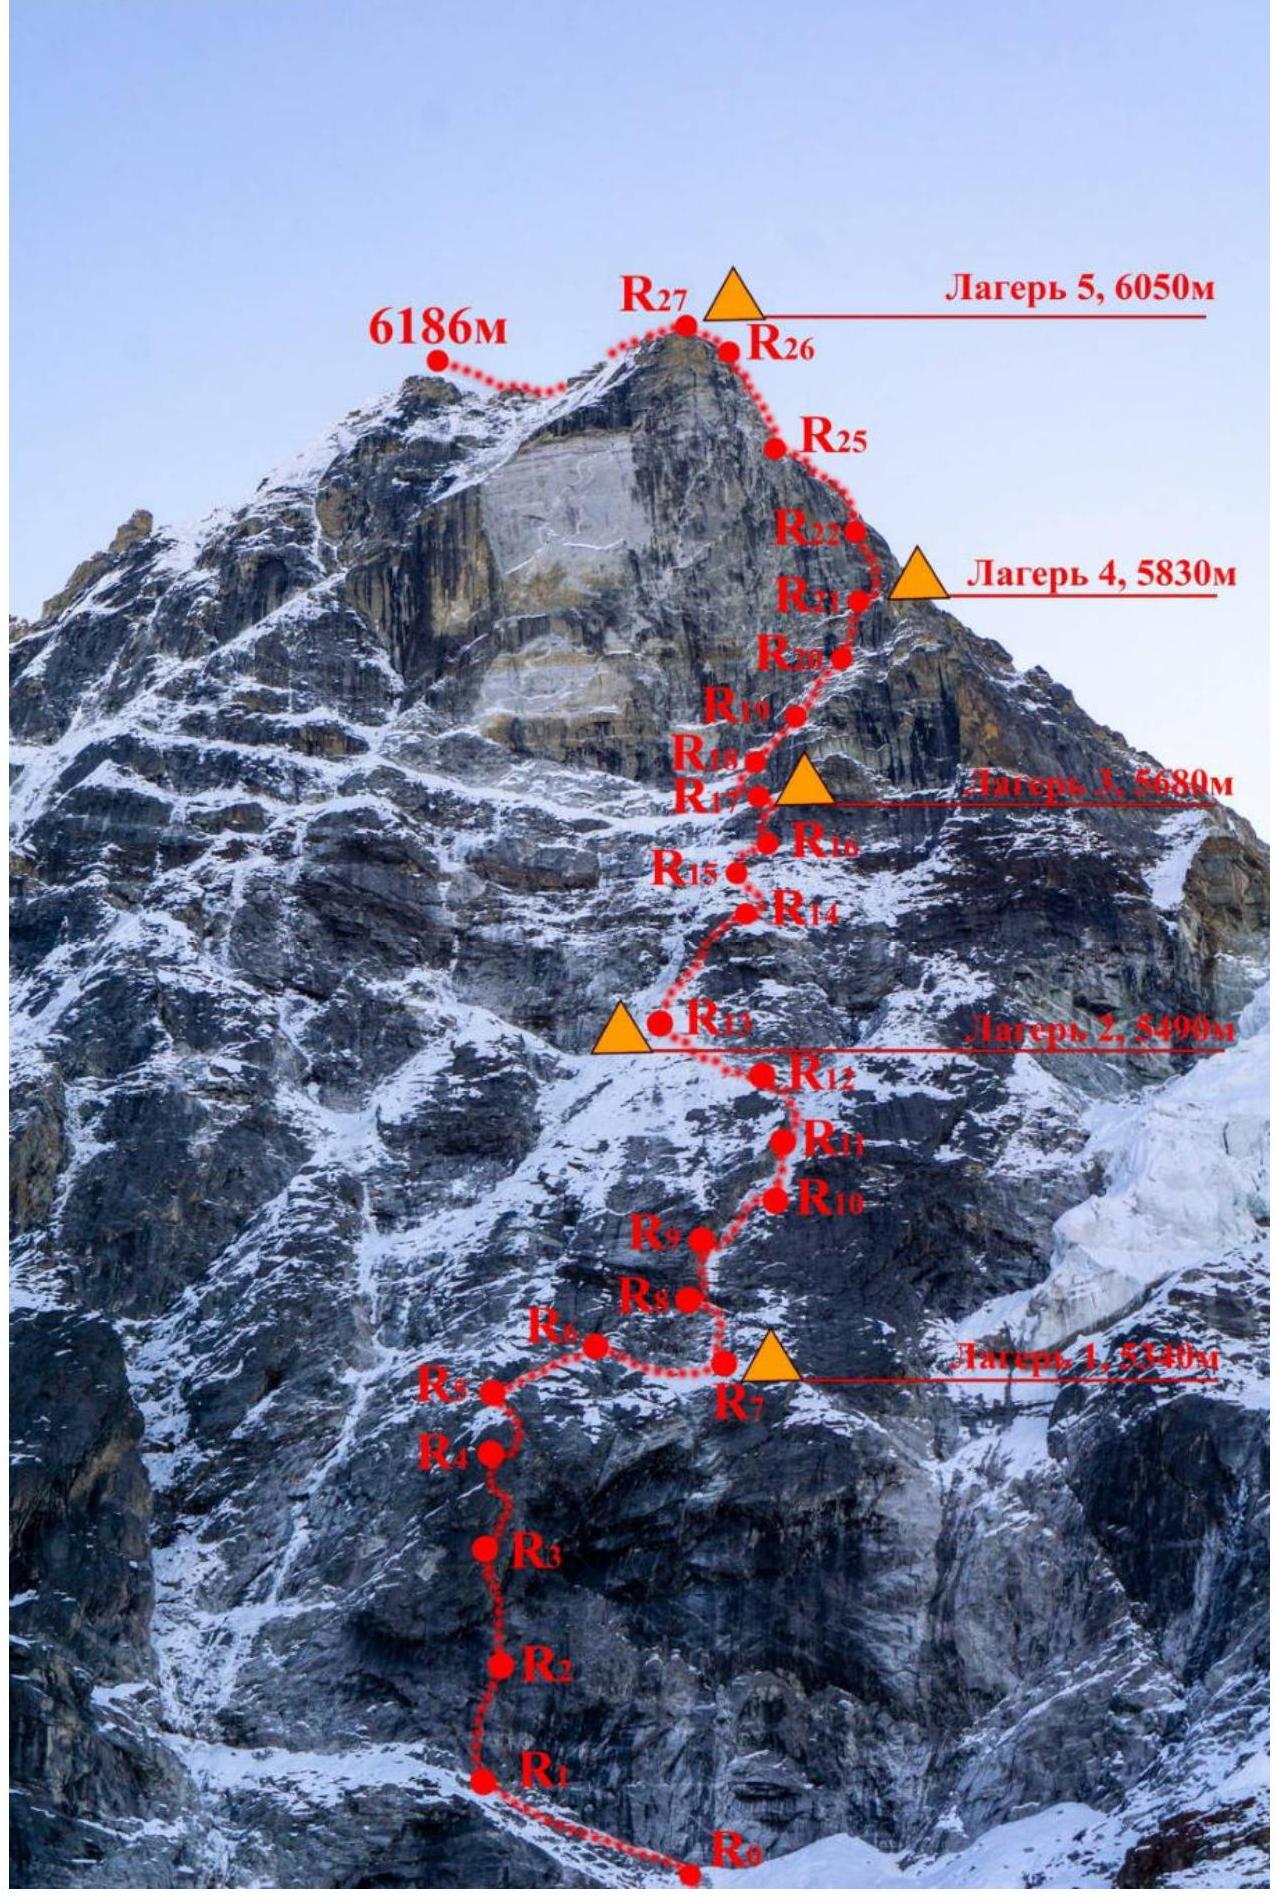
2.1. Technical Photo of the Route
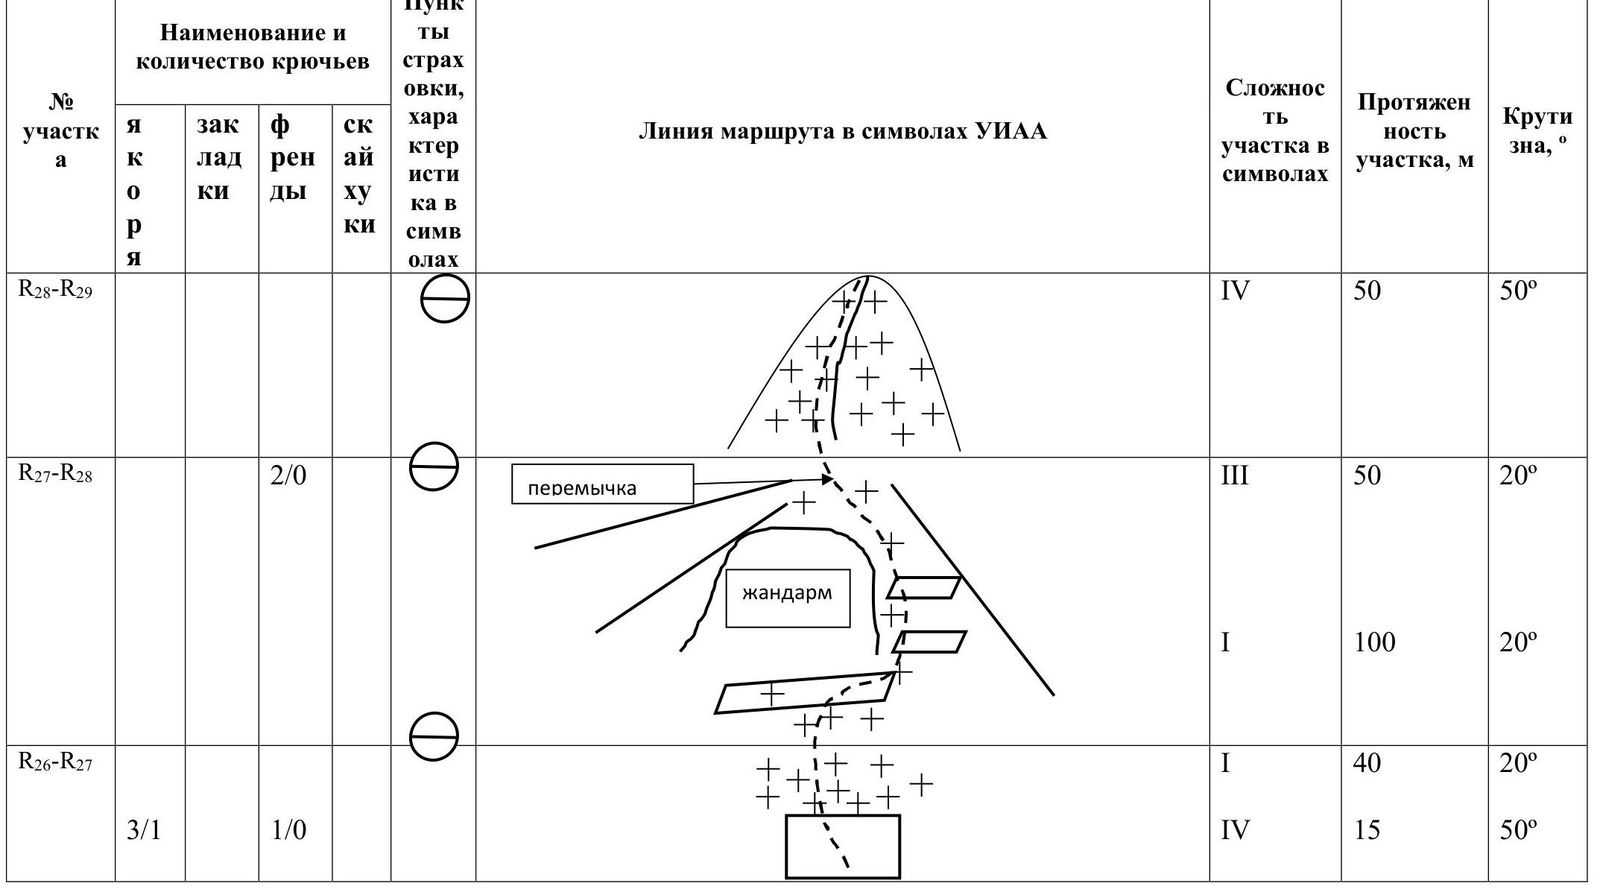
2.3. Route Diagram in UIAA Symbols
| Section # | Anchors | Friends | Rock Hooks | Belay Points, Nature in Symbols | Route Line in UIAA Symbols | Section Difficulty in Symbols | Section Length, m | Steepness, ° |
|---|---|---|---|---|---|---|---|---|
| R28–R29 | 3/0 | IV | 50 | 50° | ||||
| R27–R28 | 2/0 | Traverse | III | 50 | 20° | |||
| Ridge | I | 100 | 20° | |||||
| R26–R27 | 3/1 | 1/0 | I | 40 | 20° | |||
| IV | 15 | 50° | ||||||
| R25–R26 | 35/35 | 1/1 | 5/5 | 15/15 | Southwest Ridge | VI, A2 | 20 | 80° |
| VI, A3e–12 m | 50 | 90° | ||||||
| R24–R25 | 3/0 | 5/0 | V | 45 | 70° | |||
| R23–R24 | 13/10 | I | 5 | 20° | ||||
| VI, A1 | 20 | 80° | ||||||
| VI, A3e–3 m | 10 | 90° | ||||||
| R22–R23 | 5/0 | 2/0 | Southwest Ridge | V | 10 | 70° | ||
| Rock Tooth | II | 20 | 30° | |||||
| III | 15 | 50° | ||||||
| R21–R22 | 25/23 | 8/8 | 8/8 | 7/7 | V | 10 | 60° | |
| VI, A3 | 50 | 90° | ||||||
| R20–R21 | 25/23 | 3/3 | 5/5 | 2/2 | III | 5 | 45° | |
| VI, A2 | 45 | 90° | ||||||
| R19–R20 | 13/10 | 1/0 | VI, A2 | 20 | 80° | |||
| V+ | 10 | 90° | ||||||
| III | 10 | 50° | ||||||
| R18–R19 | 8/5 | 1/0 | 1/0 | VI, A2 | 35 | 70° | ||
| R17–R18 | 18/13 | 3/3 | 4/4 | V+ | 10 | 60° | ||
| VI, A3 | 20 | 70° | ||||||
| VI, A1 | 10 | 90° | ||||||
| R16–R17 | 17/12 | 3/3 | V | 30 | 60° | |||
| VI, A3 | 20 | 80° | ||||||
| R15–R16 | 9/5 | V | 50 | 60° | ||||
| VI, A2 | 10 | 70° | ||||||
| R14–R15 | 7/0 | 2/0 | 5/0 | V | 60 | 60° | ||
| R13–R14 | 15/13 | 1/1 | 6/6 | 3/3 | IV | 10 | 30° | |
| V | 10 | 70° | ||||||
| VI, A1 | 5 | 85° | ||||||
| VI, A3 | 10 | 95° | ||||||
| VI, A2 | 10 | 80° | ||||||
| R12–R13 | 7/0 | V, M4 | 60 | 60° | ||||
| R11–R12 | 4/0 | IV, M3 | 60 | 50° | ||||
| R10–R11 | 5/0 | 1/0 | 1/0 | V, M4 | 50 | 60° | ||
| R9–R10 | 6/0 | 1/0 | 1/0 | V, M4 | 50 | 60° | ||
| R8–R9 | 13/13 | VI, A2 | 22 | 80° | ||||
| VI, A3 | 8 | 100° | ||||||
| R7–R8 | 12/12 | 3/3 | 1/1 | VI, A2 | 40 | 80° | ||
| R6–R7 | 3/0 | III | 50 | 50° | ||||
| R5–R6 | 6/0 | V | 50 | 60° | ||||
| R4–R5 | 2/0 | IV | 20 | 60° | ||||
| 12/12 | 1/1 | VI, A2 | 22 | 90° | ||||
| R3–R4 | 12/10 | 2/2 | 2/2 | VI, A1 | 10 | 85° | ||
| V | 10 | 80° | ||||||
| III | 15 | 50° | ||||||
| VI, A2 | 10 | 90° | ||||||
| R2–R3 | 23/23 | 5/5 | 4/4 | 2/2 | VI, A2 | 25 | 90° | |
| VI, A3e–3 m | 20 | 95° | ||||||
| R1–R2 | 17/17 | 4/4 | 5/5 | VI, A2 | 35 | 80° | ||
| R0–R1 | I | 40 | 30° |
3. Characteristics of Team Actions
3.1 Brief Description of Route Passage.
| Section # | Description | Photo # |
|---|---|---|
| R0–R1 | The route begins from a ledge at the bottom of the central part of Kyajo Ri's western wall. To the left of the ledge is a couloir with flowing water, and to the right is a talus cone under the icefall. Approach via scree covered in snow. Debris occasionally falls from the icefall. 60 m, 30°, I. | Photo 1 |
| R1–R2 | Start under an overhanging internal corner, moving towards this corner. Via a series of internal corners and cracks to the "ram's foreheads" under a large overhanging internal corner. 35 m, 80°, VI, A2. | Photo 2 |
| R2–R3 | To the left on the "ram's foreheads" into the overhanging internal corner, up its left wall, the terrain is fragile and overhangs. Transition through the left edge of the internal corner and up via a system of small internal corners (each subsequent one steeper), encountering an overhanging "mirror," with two transitions on "skyhooks" (6 mm) to the left to a crack under "camelots." Up the crack and right, returning to the continuation of the large destroyed internal corner. 45 m, 95°, VI, A2–A3. | Photo 2 |
| R3–R4 | Up under the overhang, bypassing it on the right. Reaching a small ledge, simple climbing to the left 15 m, and then up via an internal corner on artificial aids. Station before a vertical "mirror." 10 m, 90°, VI, A2; 15 m, 50°, III; 10 m, 80°, V; 10 m, 85°, VI, A1. | |
| R4–R5 | From the station, a pendulum swing right 3 m to a vertical slit. Up the slit through a small overhang 8 m. When the slit ends, another pendulum swing right to the next slit under anchors and "fiffies." Up the slit 10 m and then via an internal corner to its end. 22 m, 90°, VI, A2; 20 m, 60°, IV. | Photo 3 |
| R5–R6 | Under the wall, up and right via an internal corner filled with snow and ice, and then right along a ridge. Not difficult climbing, with short steep sections. 50 m, 60°, V. | |
| R6–R7 | Right and down via simple terrain, bypassing steep, snow-covered slabs, into a large, wide chimney-couloir. Traverse the couloir, with a station on its right wall. 50 m, 40°, IV. | |
| R7–R8 | Up the right internal corner to a flattening, then with a slight ascent to the left and up to a ledge under an overhanging rock belt. Rocks are ice-covered. A combination of climbing and artificial aids. 40 m, 80°, VI, A2. | Photo 4 |
| R8–R9 | The overhang is overcome at its narrowest part (water flows in the evening). Emerging into a large chimney-couloir. Up its left wall via steep, smoothed rocks. 8 m, 100°, VI, A3. 22 m, 80°, VI, A2. | Photo 4 |
| R9–R10 | Climbing rocks on the left side of the chimney, then mixed climbing up the chimney. Station on the right wall of the large chimney. 50 m, 60°, V, M4. | |
| R10–R11 | Continuing up the chimney. Station on the left wall. 50 m, 60°, V, M4. | Photo 5 |
| R11–R12 | Continuing up the chimney to its end and slightly left. 60 m, 50°, IV, M3. | |
| R12–R13 | Careful climbing left with a slight height gain across snow-covered slabs. Slabs are smooth, with little relief; snow is not always sufficient to support a person's weight. Difficult to organize belays and stations. Station on an indistinct ridge, with a large couloir below and to the left, where water flows and rocks occasionally fall. 60 m, 60°, V, M4. | |
| R13–R14 | Up the ridge under an overhang, steep slabs with minimal relief. Through the overhang's lowest part under an internal corner, relief is poor, cracks are deep, requiring ice axes. Up the steep internal corner, initially on artificial aids, then climbing, and right along a ledge to a wide, destroyed chimney (continuation of the R9–R11 chimney). 10 m, 80°, VI, A2; 10 m, 95°, VI, A3; 5 m, 85°, VI, A1; 10 m, 70°, V; 10 m, 30°, IV. | Photo 6 |
| R14–R15 | Along the chimney up (rock under snow and ice), with lying-down relief but few holds. Becomes steeper with more destroyed relief but a bouldery structure, many holds. Initially, everything is frozen with ice in the morning, aiding progress. Not very difficult climbing but unreliable. Then the terrain flattens, mixed climbing — slabs under snow. Difficult (sometimes impossible) to organize reliable belays. Station on an indistinct ridge. 60 m, 60°, V. | |
| R15–R16 | Along the ridge up. Mostly climbing, with short, smooth walls passed on artificial aids. Difficult to find relief for belays. Rocks are thinly covered in snow, requiring clearing to find cracks. Belays are unreliable. Station under a steep rock belt under an overhang. 10 m, 70°, VI, A2–A3; 50 m, 60°, V. | |
| R16–R17 | Via slabs covered in ice (water flows in the evening) with very scarce relief, slightly left of the overhang on artificial aids. Ice is too thin and brittle, requiring clearing. Then the rock flattens. Difficult transition to snow (slabs under snow). Initially, the snow layer is very thin, not supporting a person's weight. Then movement on snow, seeking places with a thick enough layer. Organizing belays is challenging. Station under the next steep rock belt. 20 m, 80°, VI, A3; 30 m, 60°, V+. | Photo 7 |
| R17–R18 | Overcoming the steep rock wall in the area with the richest relief. When the rock flattens, relief becomes poor, cracks are deep. Two holes for "skyhooks" are present, requiring ice axes. Difficult transition to snow. Organizing belays is challenging. 10 m, 90°, VI, A1; 20 m, 80°, VI, A3; 10 m, 70°, V+. | Photo 8 |
| R18–R19 | "Ram's foreheads" under snow, direction right and up. Difficult mixed climbing, dry tooling. Station on a flake. 35 m, 70°, VI, A1. | |
| R19–R20 | Traverse right and up an internal corner with destroyed relief (dry tooling). Up and right via a series of walls and ledges. Difficult mixed climbing with some artificial aid sections. 10 m, 50°, III; 10 m, 90°, V+; 20 m, 80°, VI, A2. | |
| R20–R21 | Right along an internal corner with a deep crack. On the right side to a ledge, traverse right and up an internal corner with a slight overhang, through it to the next ledge (friends, anchors, "fiffies"). 45 m, 90°, VI, A2; 5 m, 45°, III. | Photo 9 |
| R21–R22 | Along the ledge right under a large internal corner with a cornice. Undercut through large blocks right and up, then along the right wall of the corner left and up along the edge. All sorts of metal gear are used. The corner ends with a slight overhang and transitions into a narrow couloir. After the overhang, climbing (snow-covered blocks, living rock) 50 m, 90°, VI, A3; 10 m, 60°, V. | Photo 10 |
| R22–R23 | From the station right and up to a pass under a rock tooth and from the tooth, traverse right along inclined slabs. Then up the wall climbing. 15 m, 50°, III; 20 m, 30°, II; 10 m, 70°, V. | |
| R23–R24 | Along a wide crack under a "camlot" # 4 (we didn't have one that size, so there are 4 holes for "skyhooks"). To a ledge and then a combination of artificial aid and climbing up the crack to a wide ledge with living rocks. Here, the southwest exposure means less snow and ice on the rocks. Station on a ledge. 10 m, 90°, VI, A2; 20 m, 80°, VI, A1; 5 m, 20°, I. | Photo 11 |
| R24–R25 | Straight up from the ledge via an almost vertical wall with good relief, then cracks lead right. Encountering "booming" slabs and individual blocks. Climbing is sometimes on friction. Reaching a large ledge with living rocks under a steep wall of the pre-summit bastion. From the ledge, the relief leads left to a pass. Many living blocks and slabs of various sizes. Very careful, though not difficult, climbing. Avoiding loading blocks. An unpleasant section. Station on the pass. 45 m, 70°, V. | |
| R25–R26 | From the pass up and right via deep cracks (anchors, "fiffies," ice axes, holes for "skyhooks"). Then via a series of cracks under "fiffies" and anchors (the crack becomes deep at the end) to a slab forming a wide crack with the wall. Inside the crack are thin living slabs, making it impossible to organize belays. For belays, two points were blocked. Along the left wall via a "mirror" on "skyhook" holes 10 m to a ledge. Then left to a pass (undercuts, artificial aid). Along the ridge right of it to a "roof." Gentle, smooth slabs alternate with steep walls. A very long and difficult rope. Belays are sometimes unreliable. Station on the "roof" on a ledge. 50 m, 90°, VI, A3; 20 m, 80°, VI, A2. | Photo 12 |
| R26–R27 | Up via simple terrain (a short wall) climbing and then on foot on snow. A good spot for a bivouac under a "gendarme." 15 m, 50°, IV; 40 m, 20°, I. | |
| R27–R28 | Around the "gendarme" right along a ledge, emerging onto a pass. The ledge becomes quite narrow towards the end, with ice encountered. 100 m, 20°, I; 50 m, 20°, III. | Photo 13 |
| R28–R29 | From the pass up a snowy slope slightly left of the ridge — emerging onto the summit. Steeper as you ascend. 100 m, 40°, III; 50 m, 50°, IV. | Photo 14 |
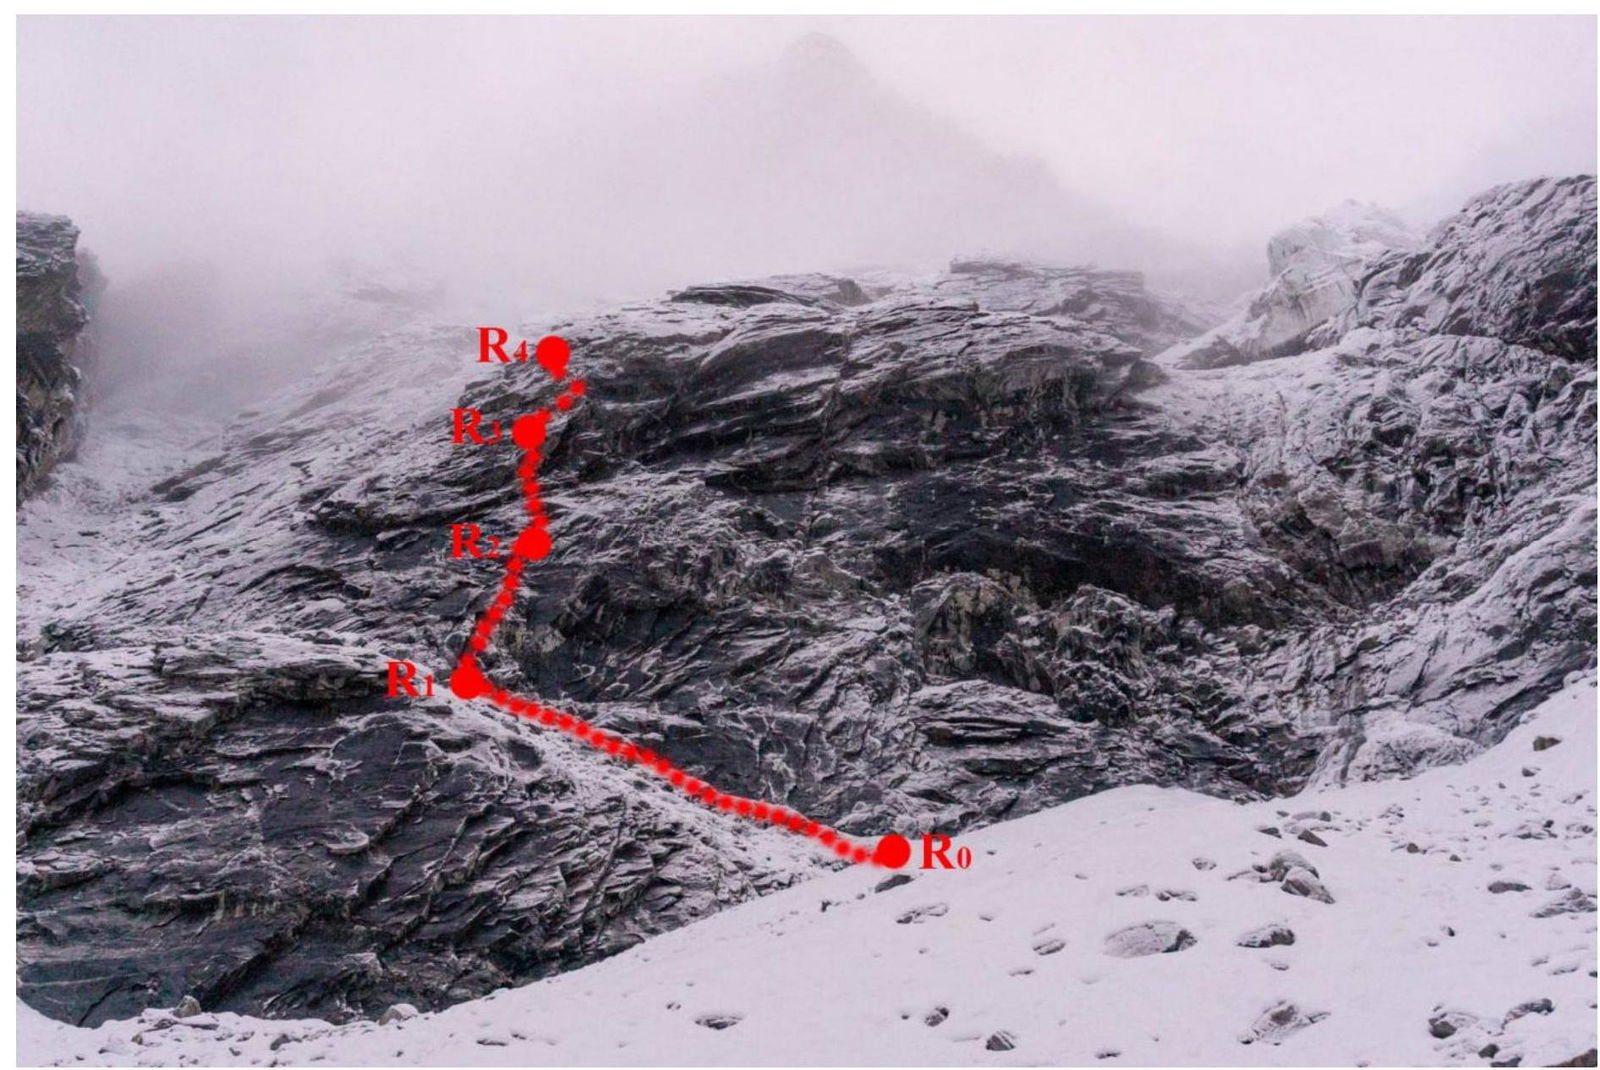
Photo 1. Lower bastion, start of the route
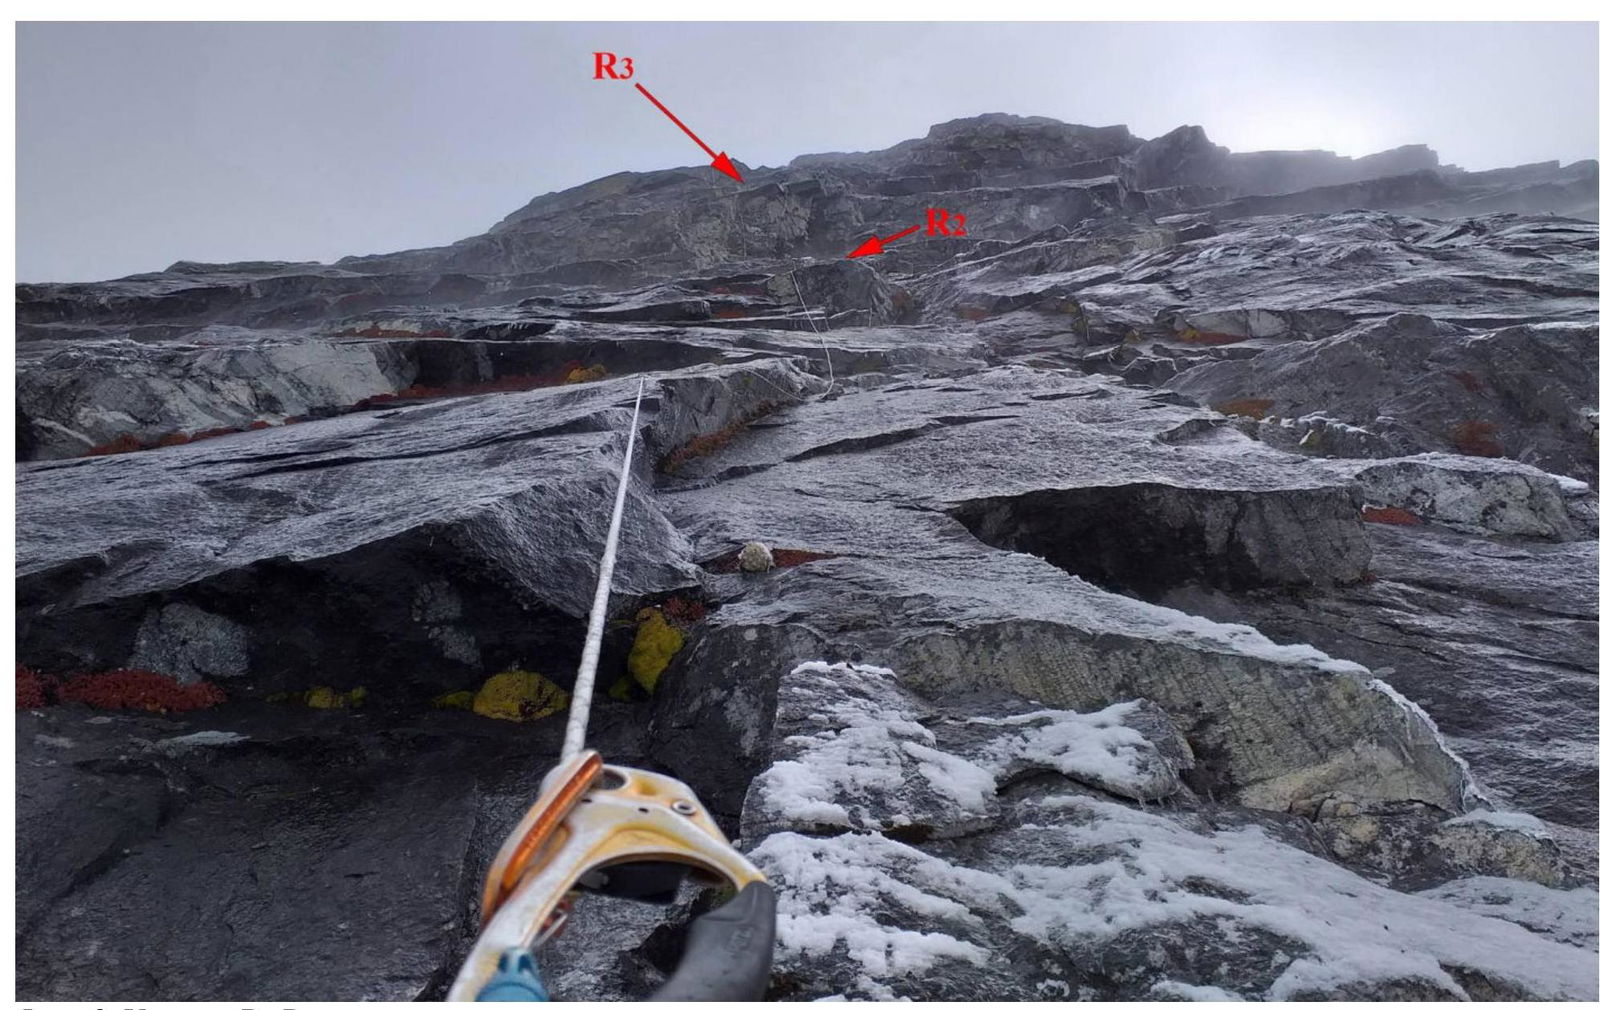
Photo 2. Section R1–R3.
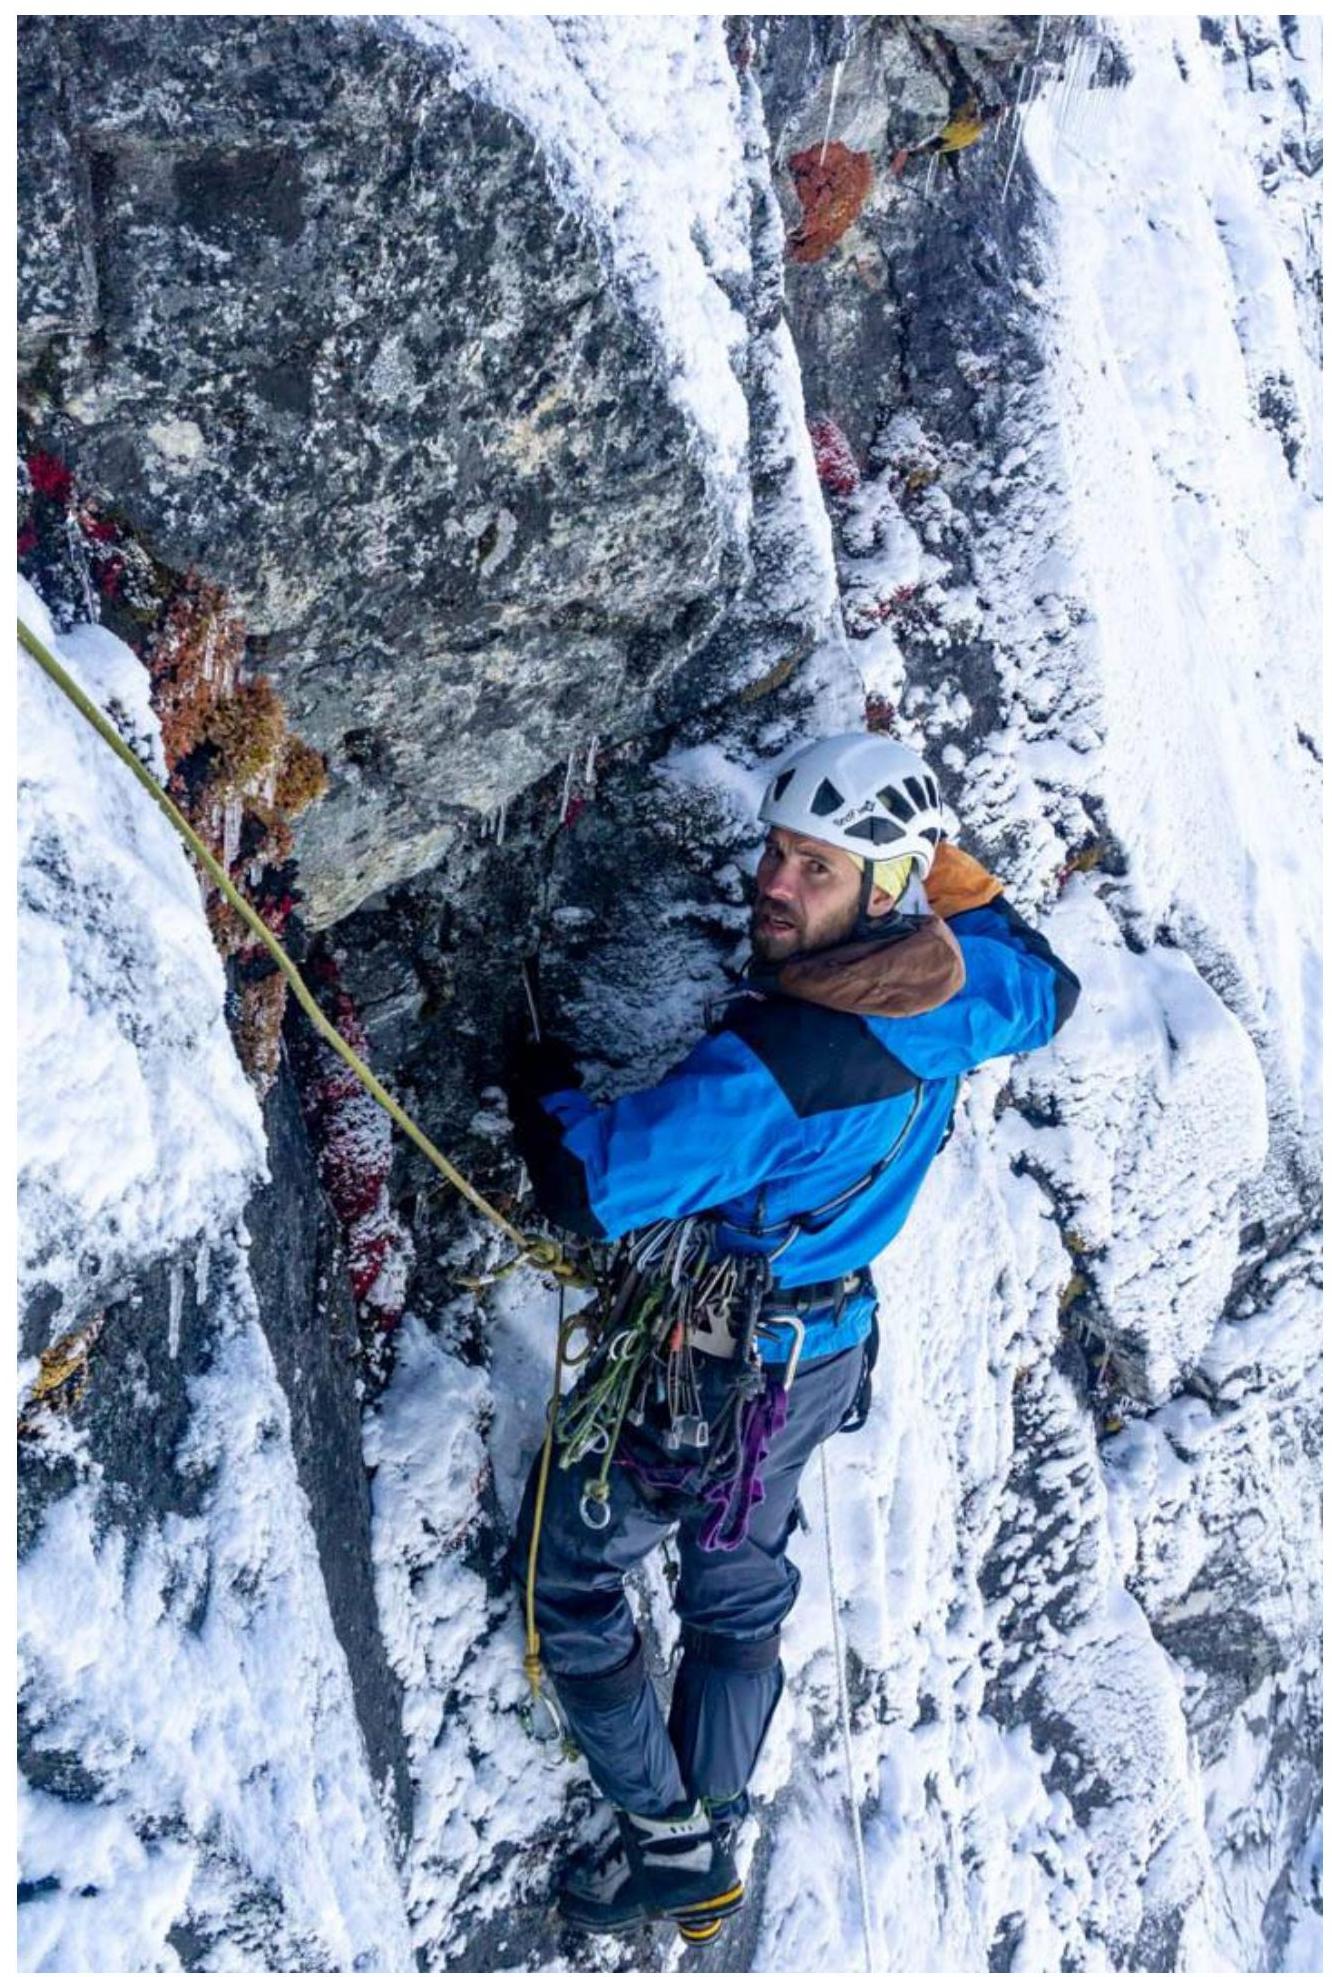
Photo 3. Start of section R4–R5. Pendulum swing from the station right.
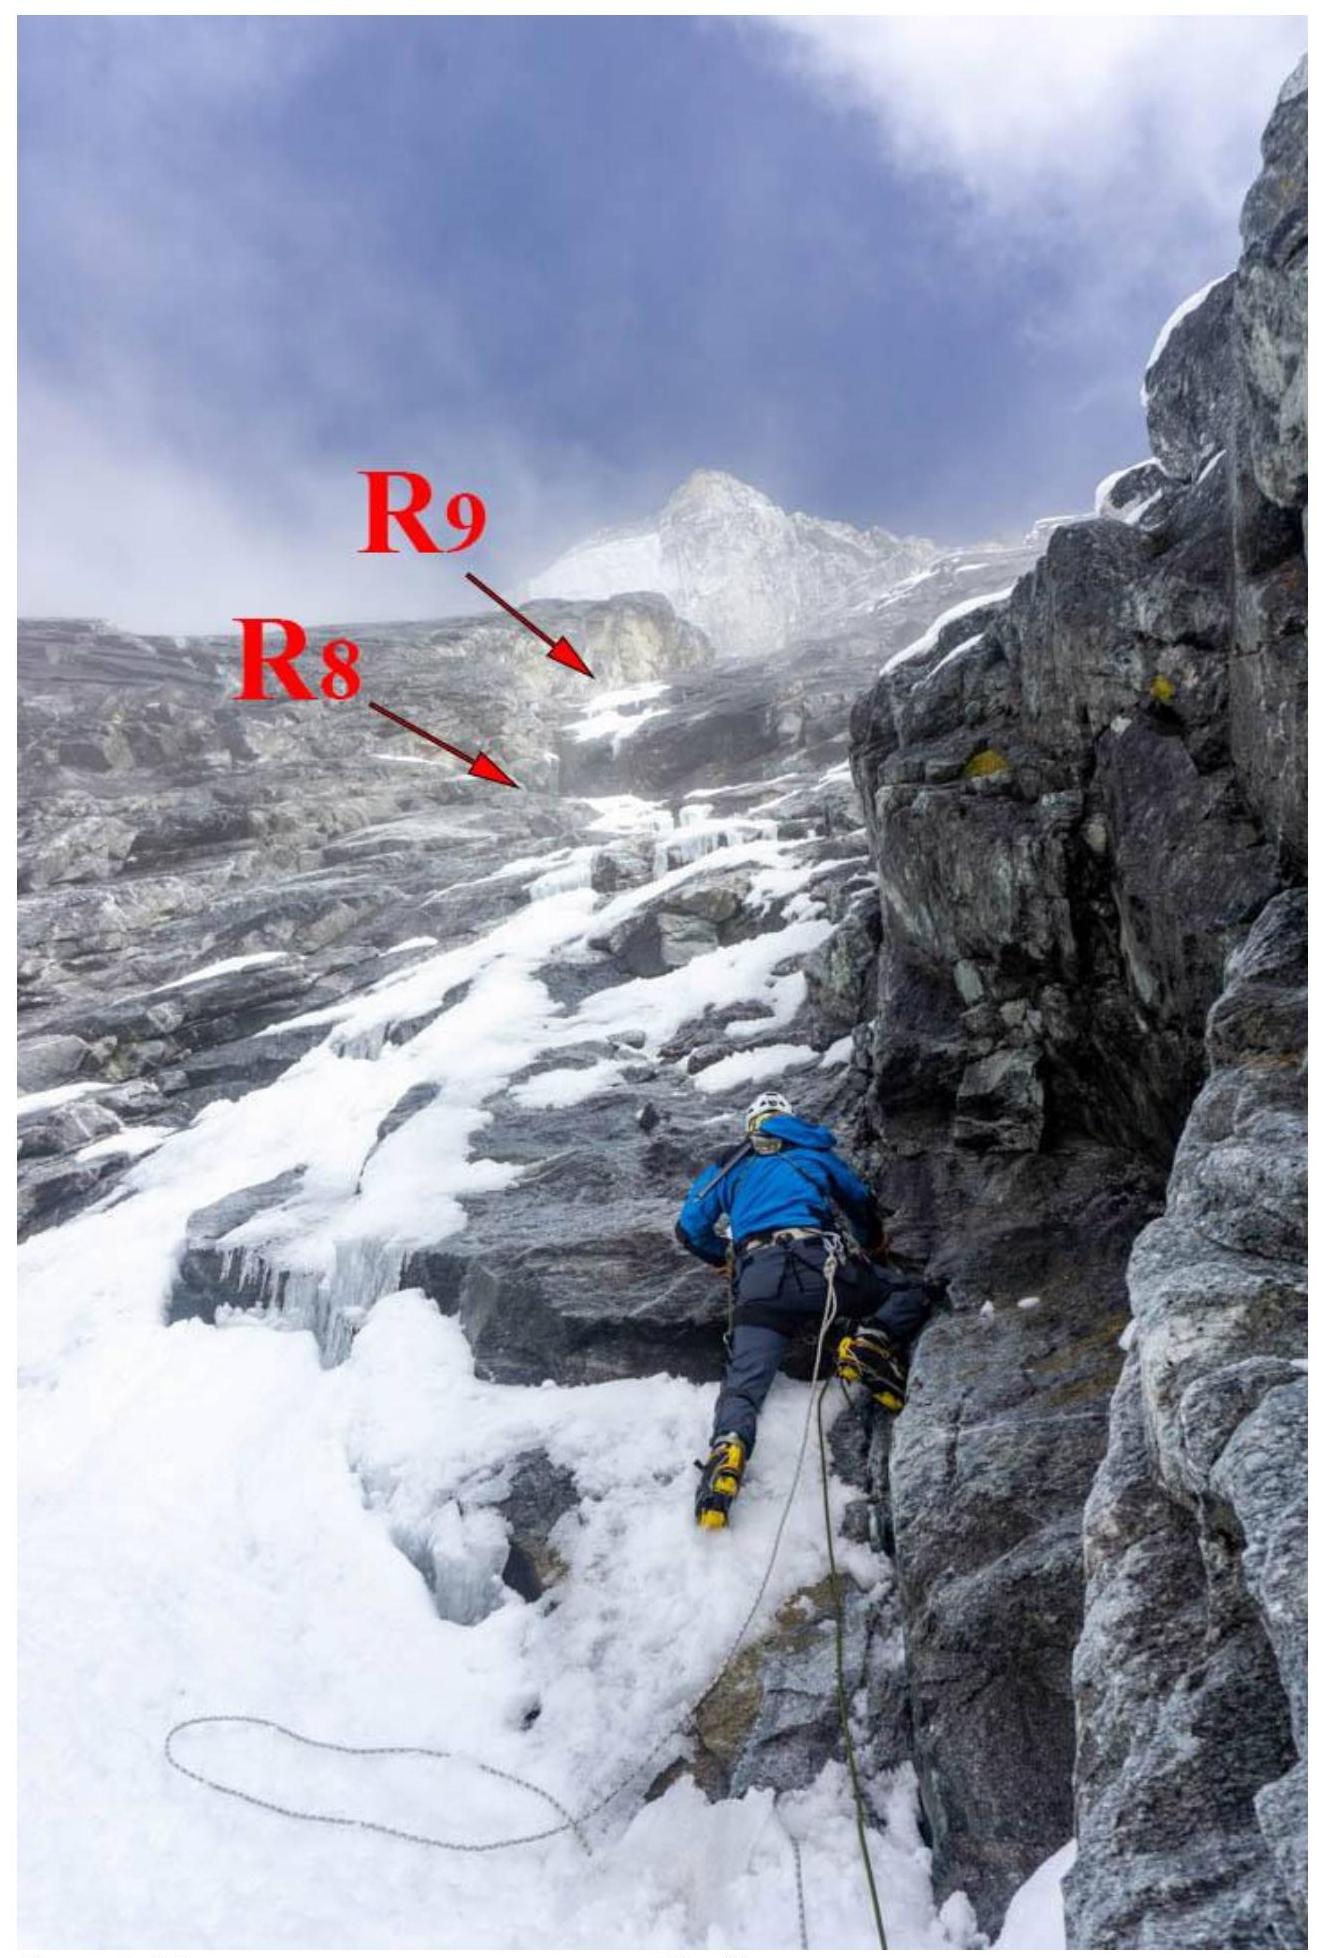
Photo 4. Mixed climbing on section R8–R9.

Photo 5. Mixed climbing on section R10–R11. ![img-17.jpeg]({"width":1310,"height":1239,"format":"Jpeg","uri":"https://summitx↗