Passport
I. Climbing category — rock climbing
II. Climbing area — Pamir-Alay, Gissarsky Ridge, Tagrich valley
III. Peak 4200 via the center of the southeast wall
IV. 5B category difficulty, repeat ascent (6th)
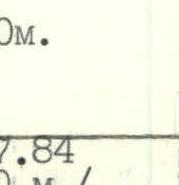
V. Height difference — 650 m. Length — 1140 m. Length of sections with 5–6 category difficulty — 614 m. Average steepness of the wall section — 84°, including 6 category difficulty — 84° (3580–3750 m) — 87° (3850–4150 m).
VI. Pitons used:
| Rock | Bolt | Chocks |
|---|---|---|
| 38/(4+2) | (2+3²)/0 | 145/3 |
VII. Team's travel hours — 18, days — 2
VIII. Overnight stays: one on the summit ridge on a comfortable platform.
IX. Team leader: Voiko Viktor Viktorovich CMS Team members:
- Abarbarchuk Georgy Samuilovich CMS
- Aristov Ivan Efimovich CMS
- Sorokin Alexander Georgievich MS USSR
- Ruzhentsev Dmitry Konstantinovich CMS
X. Coach: Sorokin Alexander Georgievich MS USSR
XI. Approach to the route — July 12, 1984
Summit — July 13, 1984
Return — July 13, 1984

General photo of Peak 4200
1 — route taken by the team (O. Kapitanov 1982 via the center of the southeast wall); 2 — V. Glushko's route 1982, 6B category difficulty via the SE wall; 3 — A. Khafizov's route 1983, 5B category difficulty.
July 15, 1984, 16:30. Taken from the southern slopes of Peak 4200. Shooting point #1 on the area map. Height of the shooting point 3250 m. Distance to the object approximately 1 km. Lens "Triplet-43", focal length 40 mm.
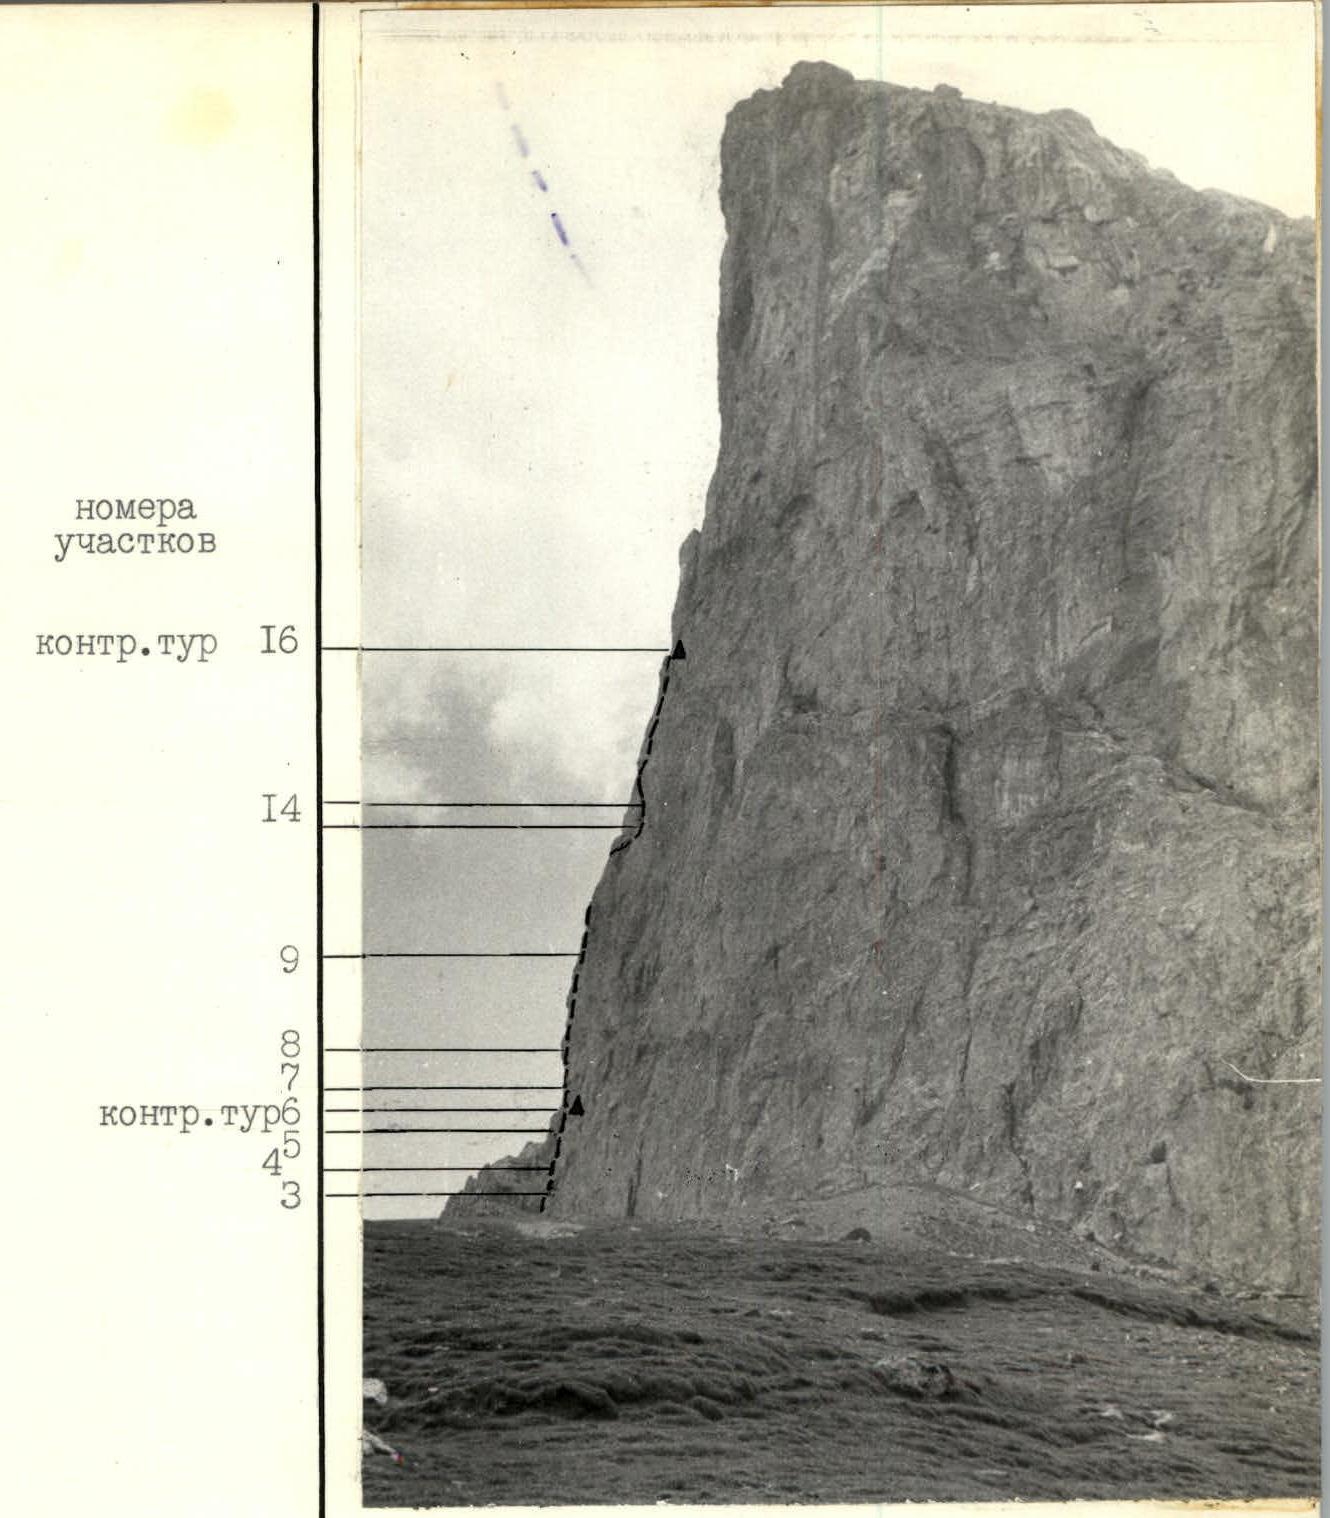
Profile of the southeast wall of Peak 4200 (right)
Taken from the eastern slopes of Peak 4200 on July 13, 1984, at 14:00 from a distance of approximately 700 m. Shooting point #2 on the area map. Height of the shooting point 3500 m. Lens "Triplet-43", focal length 40 mm.
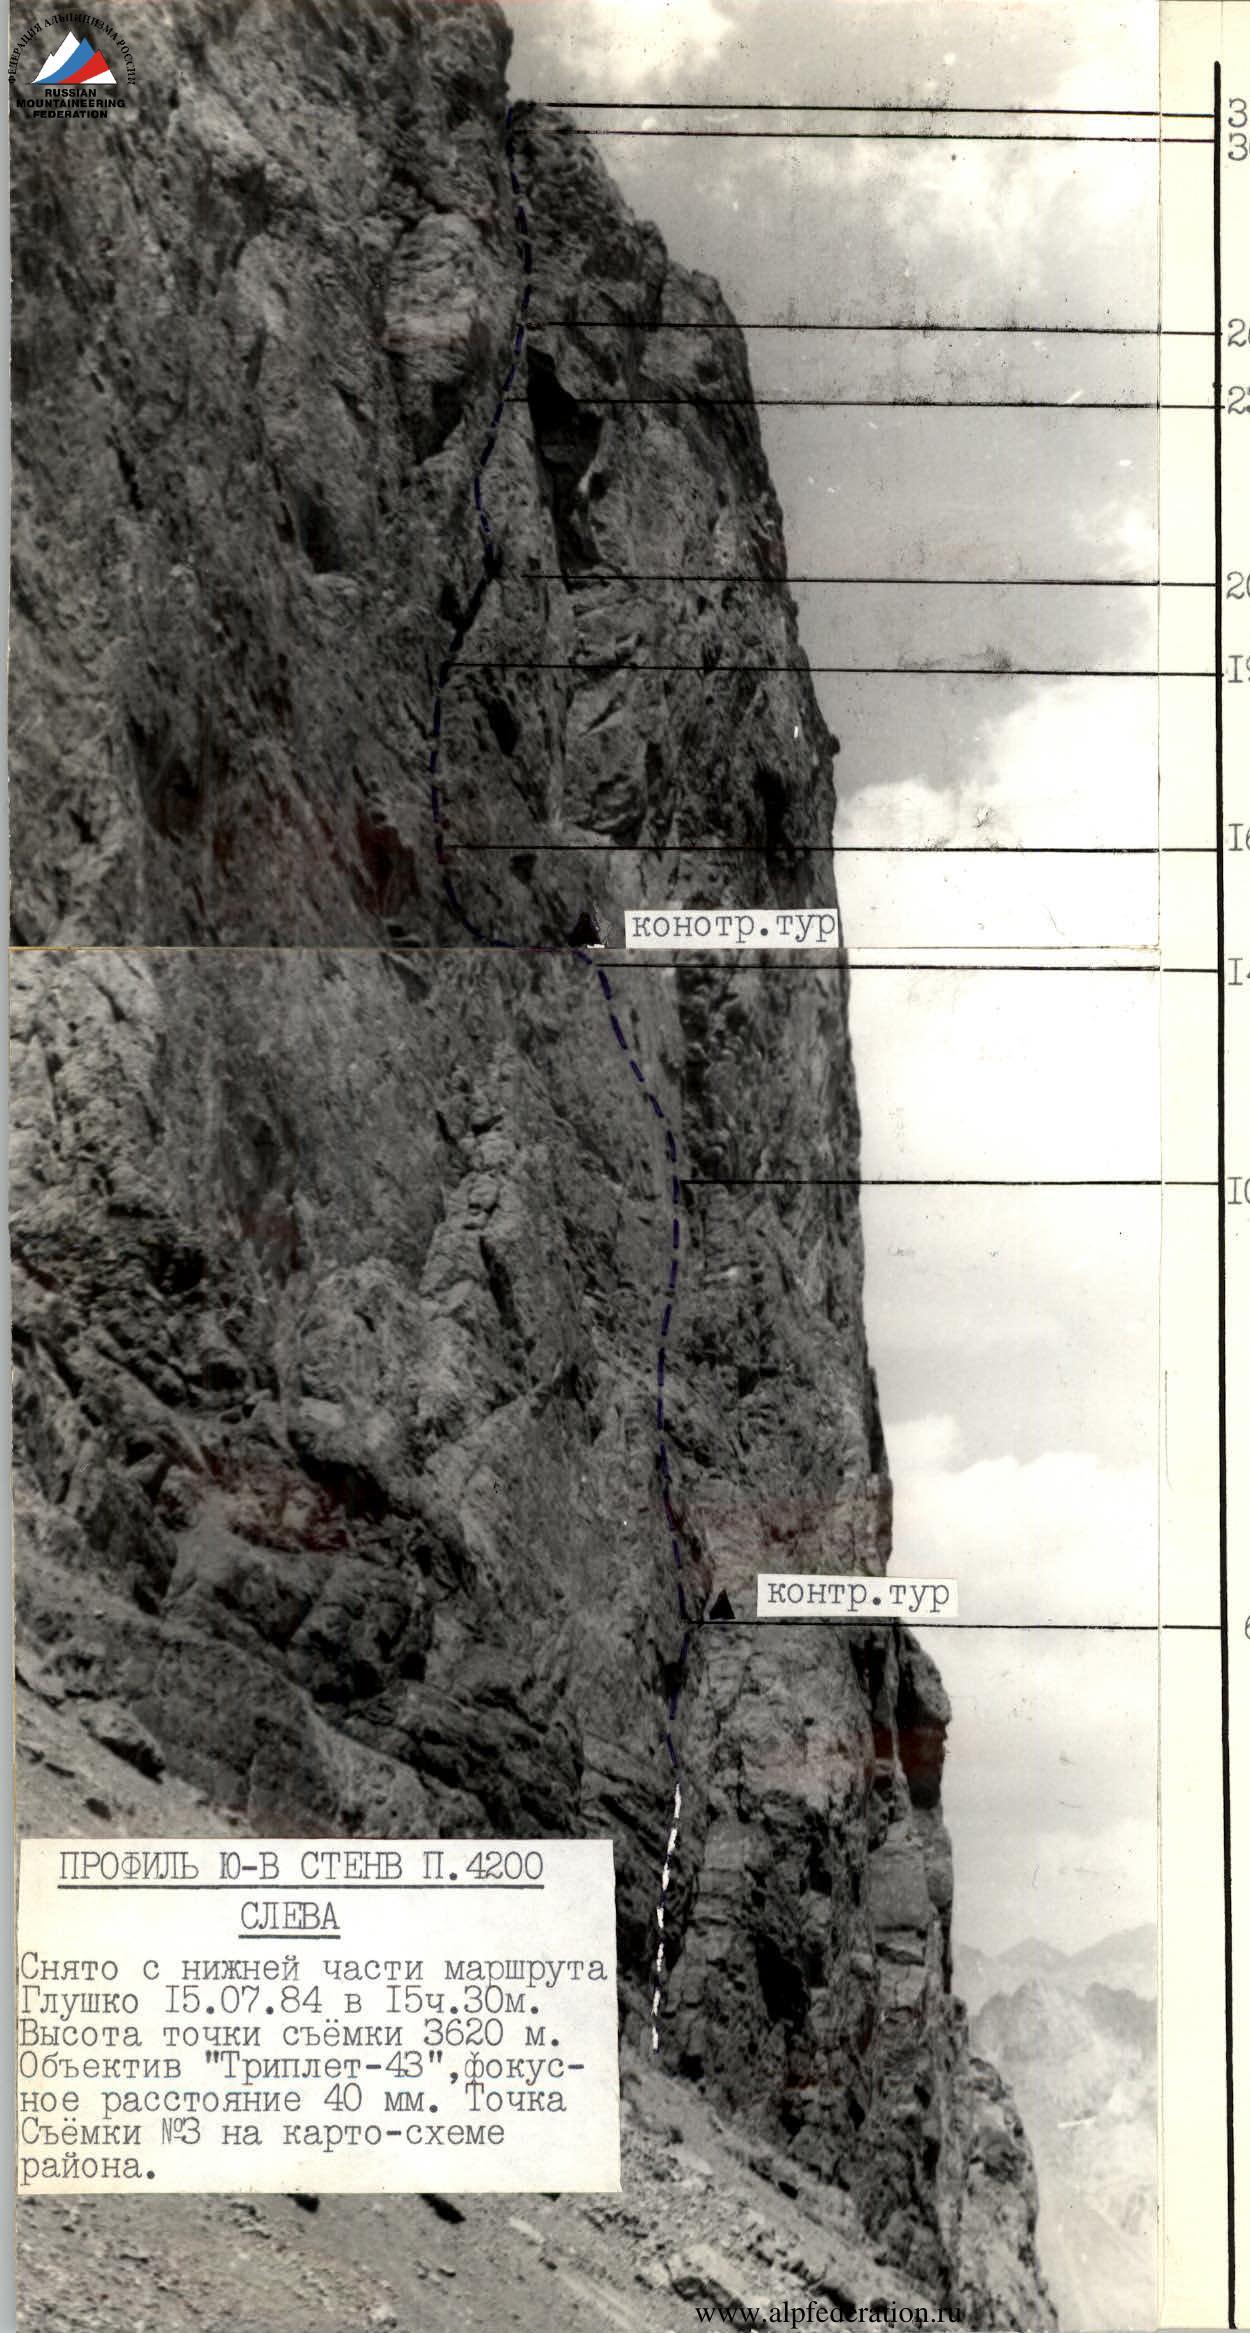
Profile of the southeast wall of Peak 4200
Left
Taken from the lower part of Glushko's route on July 15, 1984, at 15:30. Height of the shooting point 3620 m. Lens "Triplet-43", focal length 40 mm. Shooting point #3 on the area map.

Photopanorama of the area
- Peak 4200 via the SE wall, 5B category difficulty, V. Glushko 1982;
- Peak 4200 via the center of the SE wall, 5B category difficulty, O. Kapitanov 1982.
Taken from Tagrich pass on July 11, 1984, at 14:30. Shooting point #4 on the area map, height of the shooting point 3578 m. Distance to the object approximately 2.5 km. Lens "Helios-44", focal length 50 mm.
Brief overview of the climbing area
Peak 4200 is located in a spur of the Gissarsky Ridge, in the area of the popular among climbers Zamin-Karor massif (Yaghnob wall). To the southeast, the peak drops off with a sheer wall, while the northern slopes are relatively gentle. The SE wall of Peak 4200 is of climbing interest. The difficulties faced by athletes on this wall — lack of suitable places for overnight stays, great steepness, fragile rock (marbleized limestone, schist), lack of water and snow, heat — put the SE wall of Peak 4200 among the strongest wall routes in the Pamir. The route is popular among teams participating in various alpine championships. By the 1984 season, the route had been climbed by four teams, and all ascents were prize-winning:
1982 — first ascent by the "Varzob" team, gold medals at the USSR Championship; 1982 — gold medals at the Armed Forces Championship; 1983 — second place at the RSFSR Championship.
The approach to the peak starts from the village of Verkhniy Margib, located directly under the Zamin-Karor wall. From Dushanbe, take the highway Dushanbe — Leninabad to the bridge over the Yaghnob River, then to the village of Margib (5 km from the highway). From the village, follow the trail, bypassing the western shoulder of the Zamin-Karor massif to Tagrich pass (4 hours). From the pass, descend along the scree slopes to the SE wall of Peak 4200 (2 hours).
The area is characterized by stable, hot weather in the summer.
The area is described in more detail in the report by the "Varzob" team (first ascenders of the route on Peak 4200).
Below are illustrations describing the types of protection used (pitons and chocks):
Route description by sections
The route goes left of two huge cornices resembling the number "7". The route starts directly under the base of the lower cornice.
| Section | Rock | Bolt | Chocks | Section description/Difficulty category |
|---|---|---|---|---|
| R0–R1 | 3 | 3 | 25 m, 85° V- | |
| R1–R2 | 1 | 3 | 15 m, 90° V+ | |
| R2–R3 | 1 | 8 | 30 m, 90° VI | |
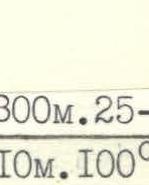
| R3–R4 | 3 | 5 m, 100° VI | ||
| R4–R5 | 1 | 3 | 15 m, 45° III | |
| R5–R6 | 1 | 2 | 10 m, 90° V+ | |
| R6–R7 | 1 | 5 | 20 m, 80° VI | |
| R7–R8 | 2 | 3 | 10 m, 85° V | |
| R8–R9 | 4 | 6 | 40 m, 80° VI | |
| R9–R10 | 1 | 11/3 | 40 m, 90° VI, A2 | |
| R10–R11 | 6/2x2 | 4 | 20 m, 90° VI, A2e | |
| R11–R12 | 3 | 10 m, 80° V- | ||
| R12–R13 | 3 | 10 m, 80° V+ | ||
| R13–R14 | 3 | 30 m, 85° V- | ||
| R14–R15 | 2 | 8 | 50 m, II traverse | |
| R15–R16 | 5 | 50 m, 80° V+ | ||
| R16–R17 | 4 | 8 | 40 m, 90° VI, A2 | |
| R17–R18 | 1 | 4 | 17 m, 80° V | |
| R18–R19 | 3 | 3 | 7 m, 100° VI | |
| R19–R20 | 10 | 65 m, 80° V+ | ||
| R20–R21 | 2 | 5 m, 90° V | ||
| R21–R22 | 4 | 15 m, 100° VI | ||
| R22–R23 | 2 | 50 m, 80° VI | ||
| R23–R24 | 3 | 5 m, 110° VI | ||
| R24–R25 | 1 | 3 | 15 m, 80° V+ | |
| R25–R26 | 1 | 3 | 15 m, 80° VI | |
| R26–R27 | 2 | 7 m, 75° IV | ||
| R27–R28 | 2 | 5 m, 110° V+ | ||
| R28–R29 | 1 | 2 | 20 m, 85° V+ | |
| R29–R29а | 7 | 10 m, 80° VI, A2 | ||
| R29а–R30 | 2 | 17 travel hours, 148 chock elements, 5 bolt and 44 rock pitons | 10 m, 100° VI | |
| R30–R31 | 1 | 1 | 300 m, 25–30° II |
R0–R1. Up a steep gray wall with a cleft to a narrow ledge under the base of a smooth gray wall. Free but strenuous climbing. (photo 1)
R1–R2. Very difficult free climbing, few holds, oriented downwards. Enter the base of the rusty inner corner.
R2–R3. The corner is made of fragile rock and is covered by a cornice from above. Climbing is psychologically difficult, mainly in stemming and friction. Passed by free climbing.
R3–R4. The cornice is passed on the left side. Extremely difficult climbing.
R4–R5. The upper part of the cornice is an inward-sloping corner to the right. Follow it to the chimney.
R5–R6. The chimney is steep but is passed by free climbing. When exiting the chimney to the right onto a ledge, the first control point (1st and 2nd bivouacs of the first ascenders).
R6–R7. Up goes a wall of light gray color. Free climbing on friction, at the limit of possibility. (photos 2, 3)
R7–R8. The wall leads to an inner corner. Free climbing.
R8–R9. The corner turns into a large inner corner, with the right face being a slab and the left face overhanging. Between the faces of the corner is a smooth, holdless crack. Passed by free climbing.
R9–R10. The steepness of the corner increases to vertical. Climbing is extreme with a transition to artificial aids. Large chocks go well. The upper part of the corner is heavily destroyed. Move to the left overhanging face of the corner by pendulum.
R10–R11. From the anchor point down 20 m, then a difficult traverse practically along a smooth wall to a narrow platform on the overhanging wall. Artificial aids were used. Up the wall 20 m.
R11–R12. Up and right. Free climbing.
R12–R13. Difficult traverse along a smooth wall to the left. Extremely difficult friction climbing. Exit under the wall with a cleft along a ten-meter wall. (photo 4)
R13–R14. Straight up by free climbing along the wall with a cleft, leading to a ledge convenient for a bivouac (site of 3rd and 4th bivouacs of the first ascenders). (photos 5, 6)
R14–R15. Along the ledge to the left under the base of the inner corner. Easy climbing. (2nd control point)
R15–R16. The corner leads under the base of the rusty overhanging wall. Passed by stemming and free climbing. (photos 7, 8)
R16–R17. Extremely difficult climbing with the use of artificial aids (work with ladderettes, use of knee pitons) (photo 9)
R17–R18. The wall turns into an inner corner. Free climbing.
R18–R19. In the upper part, the corner overhangs. Climbing is extremely difficult. Exit under the base of a large inner corner.
R19–R20. The corner is passed along the right face by free friction climbing. (Large "hexes" and "eccentrics" go well). (photo 10)
R20–R21. The corner ends with a five-meter chimney with smooth walls.
R21–R22. Overhanging, extremely difficult chimney. Free climbing. Leads to the base of the second large inner corner.
R22–R23. The left face of the corner overhangs. Passed along the junction of the faces and on the right side of the corner. Very difficult, free climbing.
R23–R24. The corner is covered by a cornice, passed by tense free climbing. (photo 11)
R24–R25. Then up and right along the rusty wall (rock is fragile). Exit into a chimney formed by the main wall and the roof of the cornice.
R25–R26. The chimney is passed by extreme free climbing. Opportunities for piton protection and chocks are limited. The chimney leads to a convenient bivouac platform, protected from above by an overhanging wall.
R26–R27. Along the ledge to a chimney, which is passed by free climbing and leads under a black cornice with white streaks.
R27–R28. The cornice is passed on the left side. Very difficult climbing.
R28–R29. Inner corner with a cleft. Very difficult climbing (no opportunity for piton protection, large-sized chocks are used). (photo 12)
R29–R29а. Smooth eighty-degree wall. No opportunity for free climbing. Artificial aids. Leads to a short overhanging chimney. On the wall, ladderettes are used, "hook-legs" are used, two bolt pitons are driven. (photo 13)
R29а–R30. The chimney is passed by stemming (very difficult) and leads to the ridge.
R30–R31. Technically easy ridge leads to the summit. On the ridge, it is practically possible to organize a convenient bivouac anywhere.
Descent from the summit along the western ridge to the saddle between Peak Khosilot and Peak 4200 (3 sports), then right along the scree slopes into the northern cirque. Bypass the massif of Peak 4200 to the observers' camp.

- R29
- R28
- R25
- R23
- R22
- R20
- R18
- R17
- R16
- R15
- R14
- R11
-
R10
-
R7
-
R6
-
R3