2010 Russian Mountaineering Championship. First Ascent Category
The summit of Kupol (2954 m) via the center of the North face of the East shoulder. Route category 6B (approx.), first ascent. Eastern Sayan, Tunkinskie Goltsy ridge, Barun-Khandagai valley, 6.1
Irkutsk Region team
- Eastern Sayan, Tunkinskie Goltsy ridge, Barun-Khandagai valley, 6.1.
- Summit Kupol (2954 m), via the center of the North face of the East shoulder.
- Proposed category: 6B, first ascent.
- Route type: rock.
- Route height difference: 850 m
Route length: 1218 m
Main part height difference: 680 m
Main part length: 771 m
Overhanging part length: 400 m
Section lengths:
- Category V: 211 m
- Category VI: 463 m Average steepness of the main part: 86°
- Pitons left on the route:
total: 18; including bolted pitons: 18
Total used on the route:
- bolted pitons: 27
- rock pitons (including anchors): 81
- protection gear: 167
- friends: Height control points (IT): 697
- Team hours (to the summit): 91 h; days: 9 Number of bivouacs on the route: 8
- Team leader: Kuzmenko Ivan Mikhailovich, 1st sports category Team members: Klepikov Aleksandr Aleksandrovich, 1st sports category
- Team coach: Afanasiev Andrei Evgenievich (Master of Sports)
- Departure time: 10:00, March 11, 2010 Summit time: 23:50, March 19, 2010 Return to Base Camp: 4:00, March 20, 2010
Photo of the North face of the Kupol summit.
A. E. Afanasiev's 2007 route (category 6A). A. E. Afanasiev's 2002 route (category 6A).
Team's route
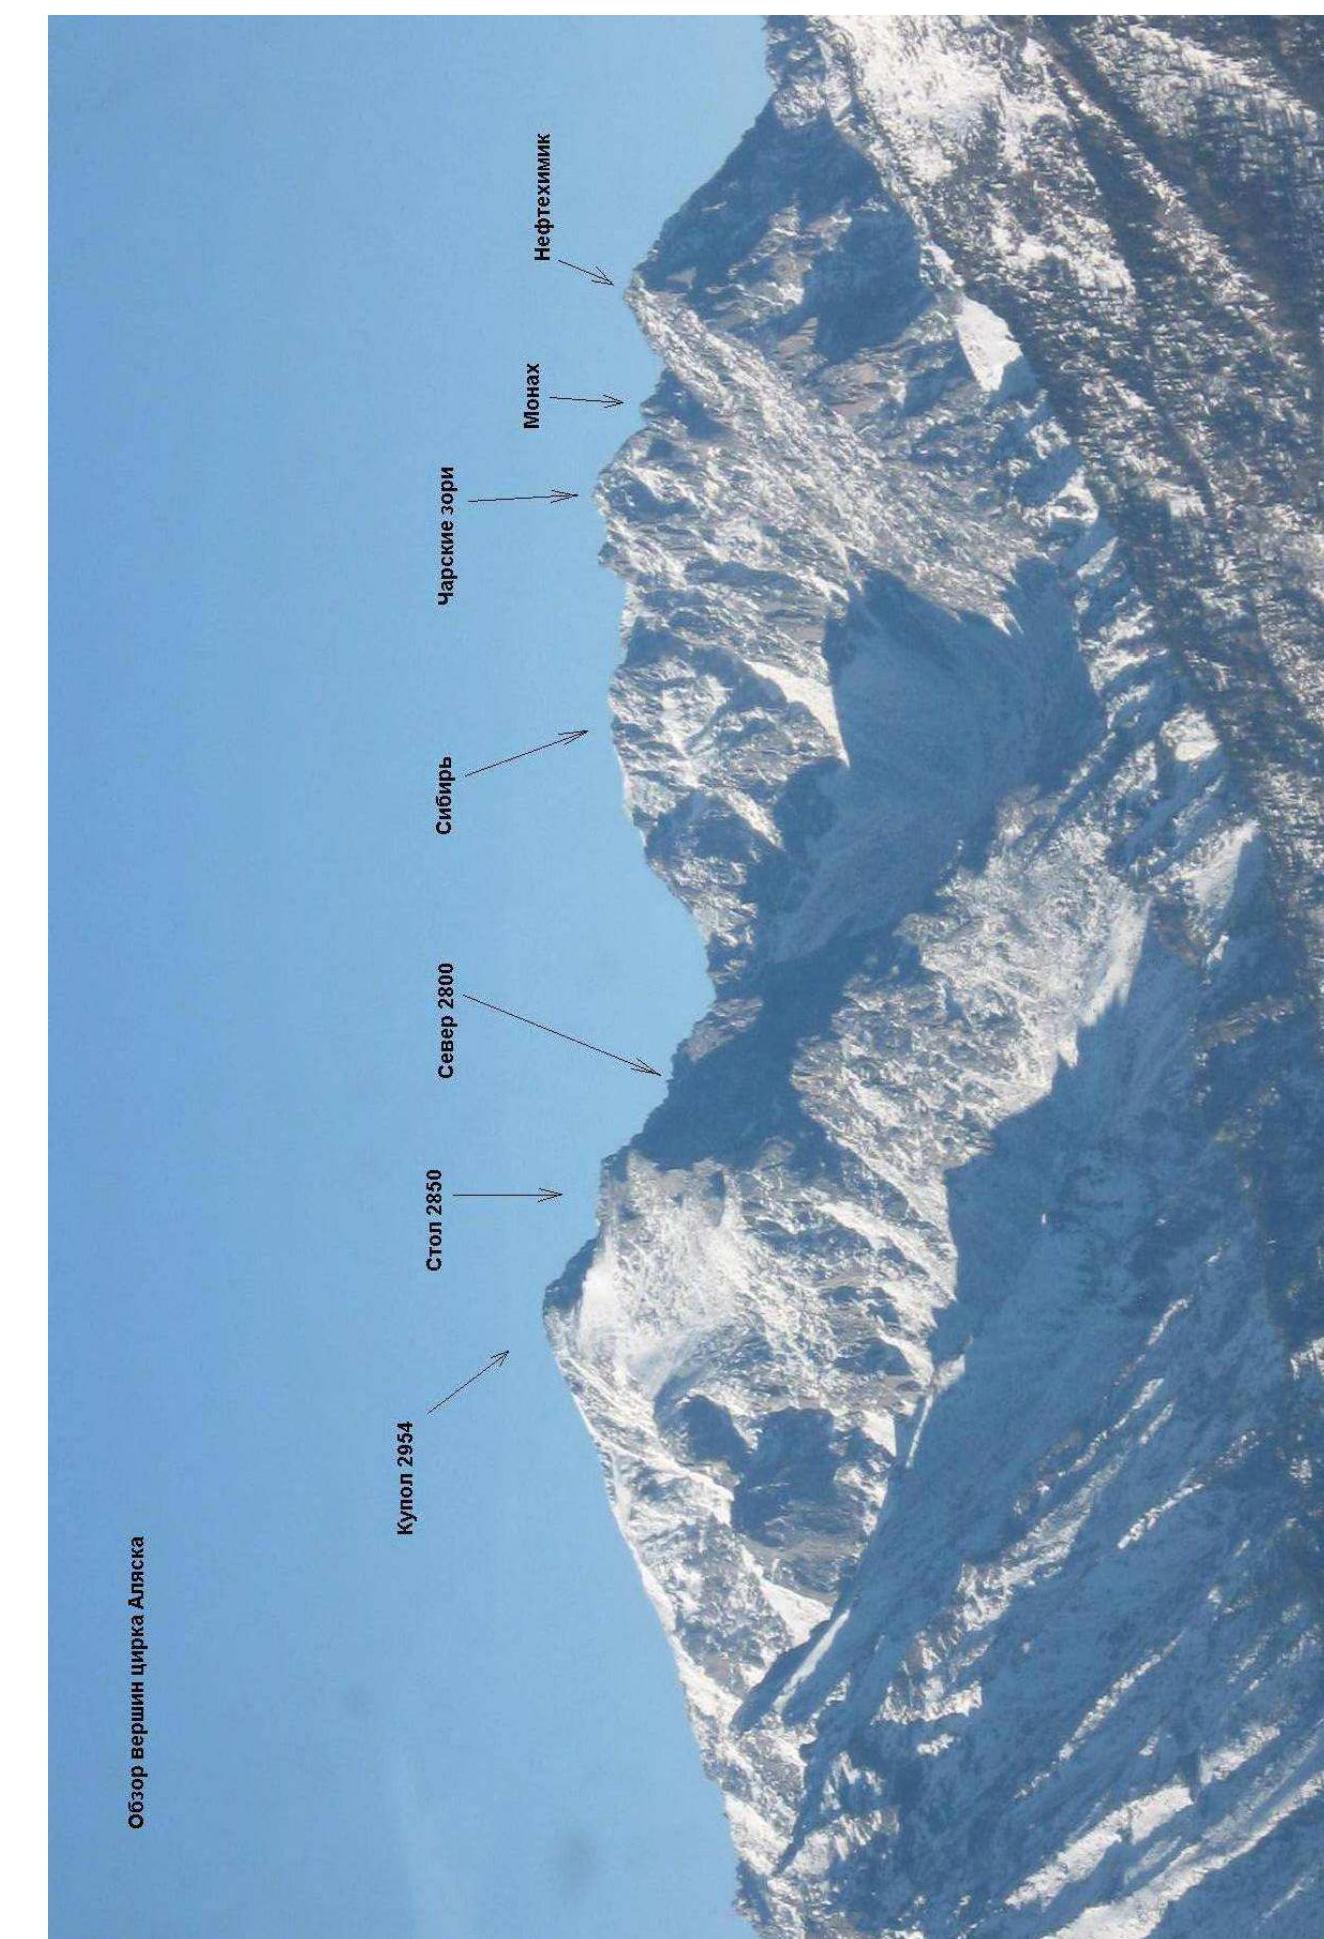
The photo was taken from the slope of Neftekhimik (2850 m) on March 10, 2010.
Photo of the Kupol summit with the route marked.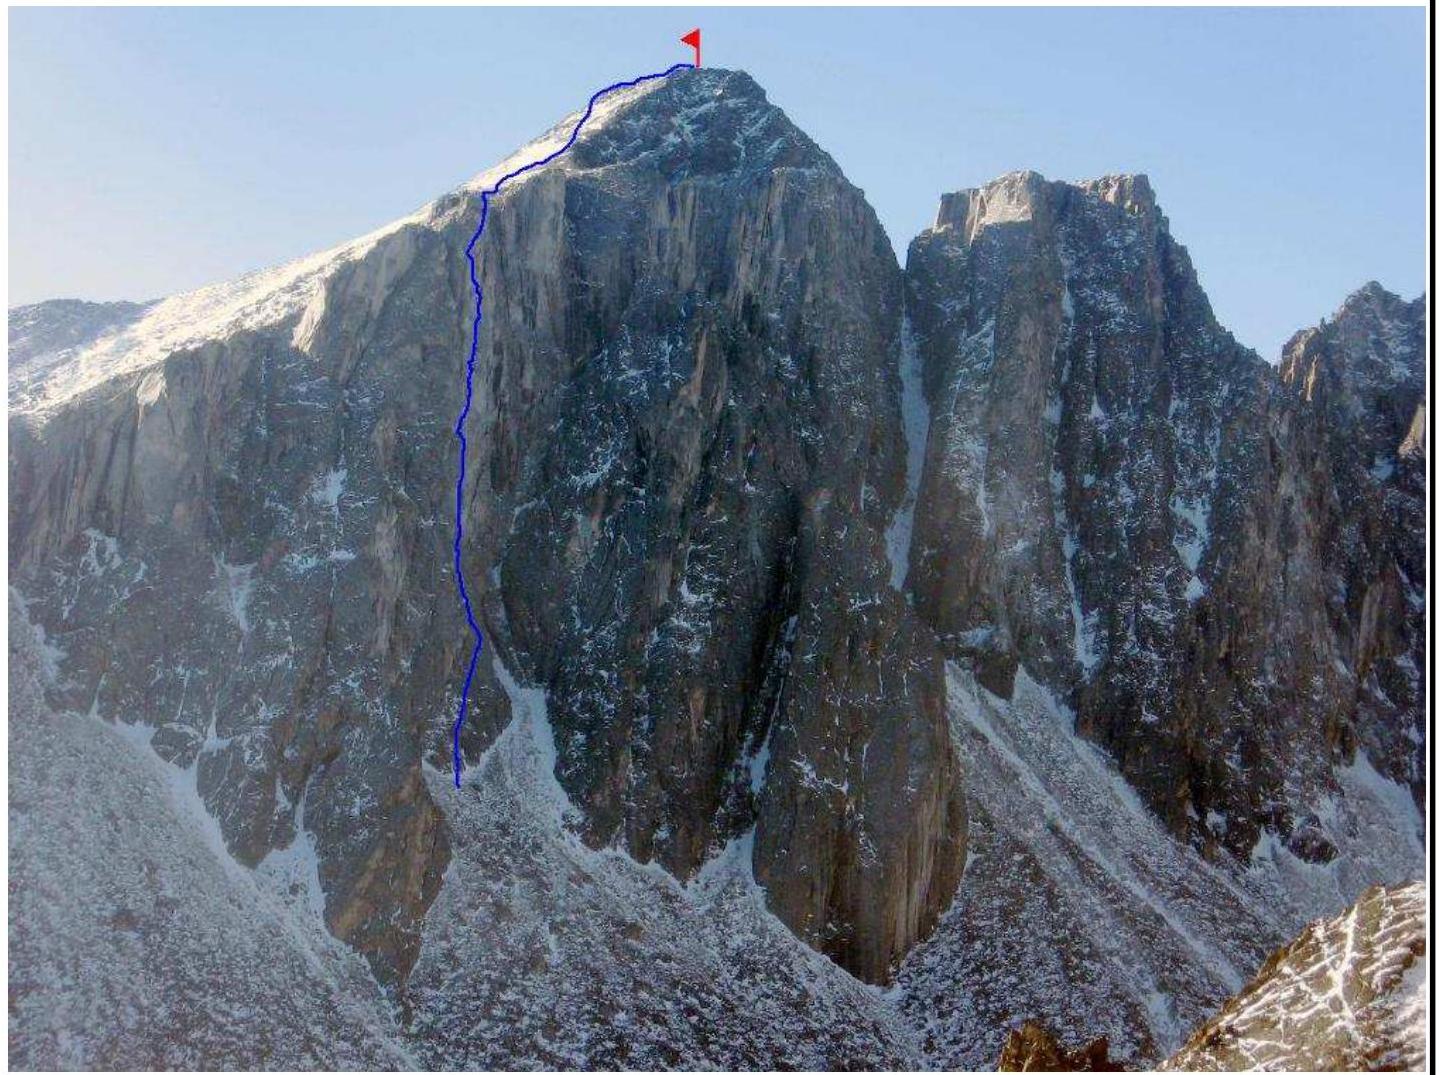
Photo taken from a helicopter
Photo of the left wall profile from the Alaska circus.
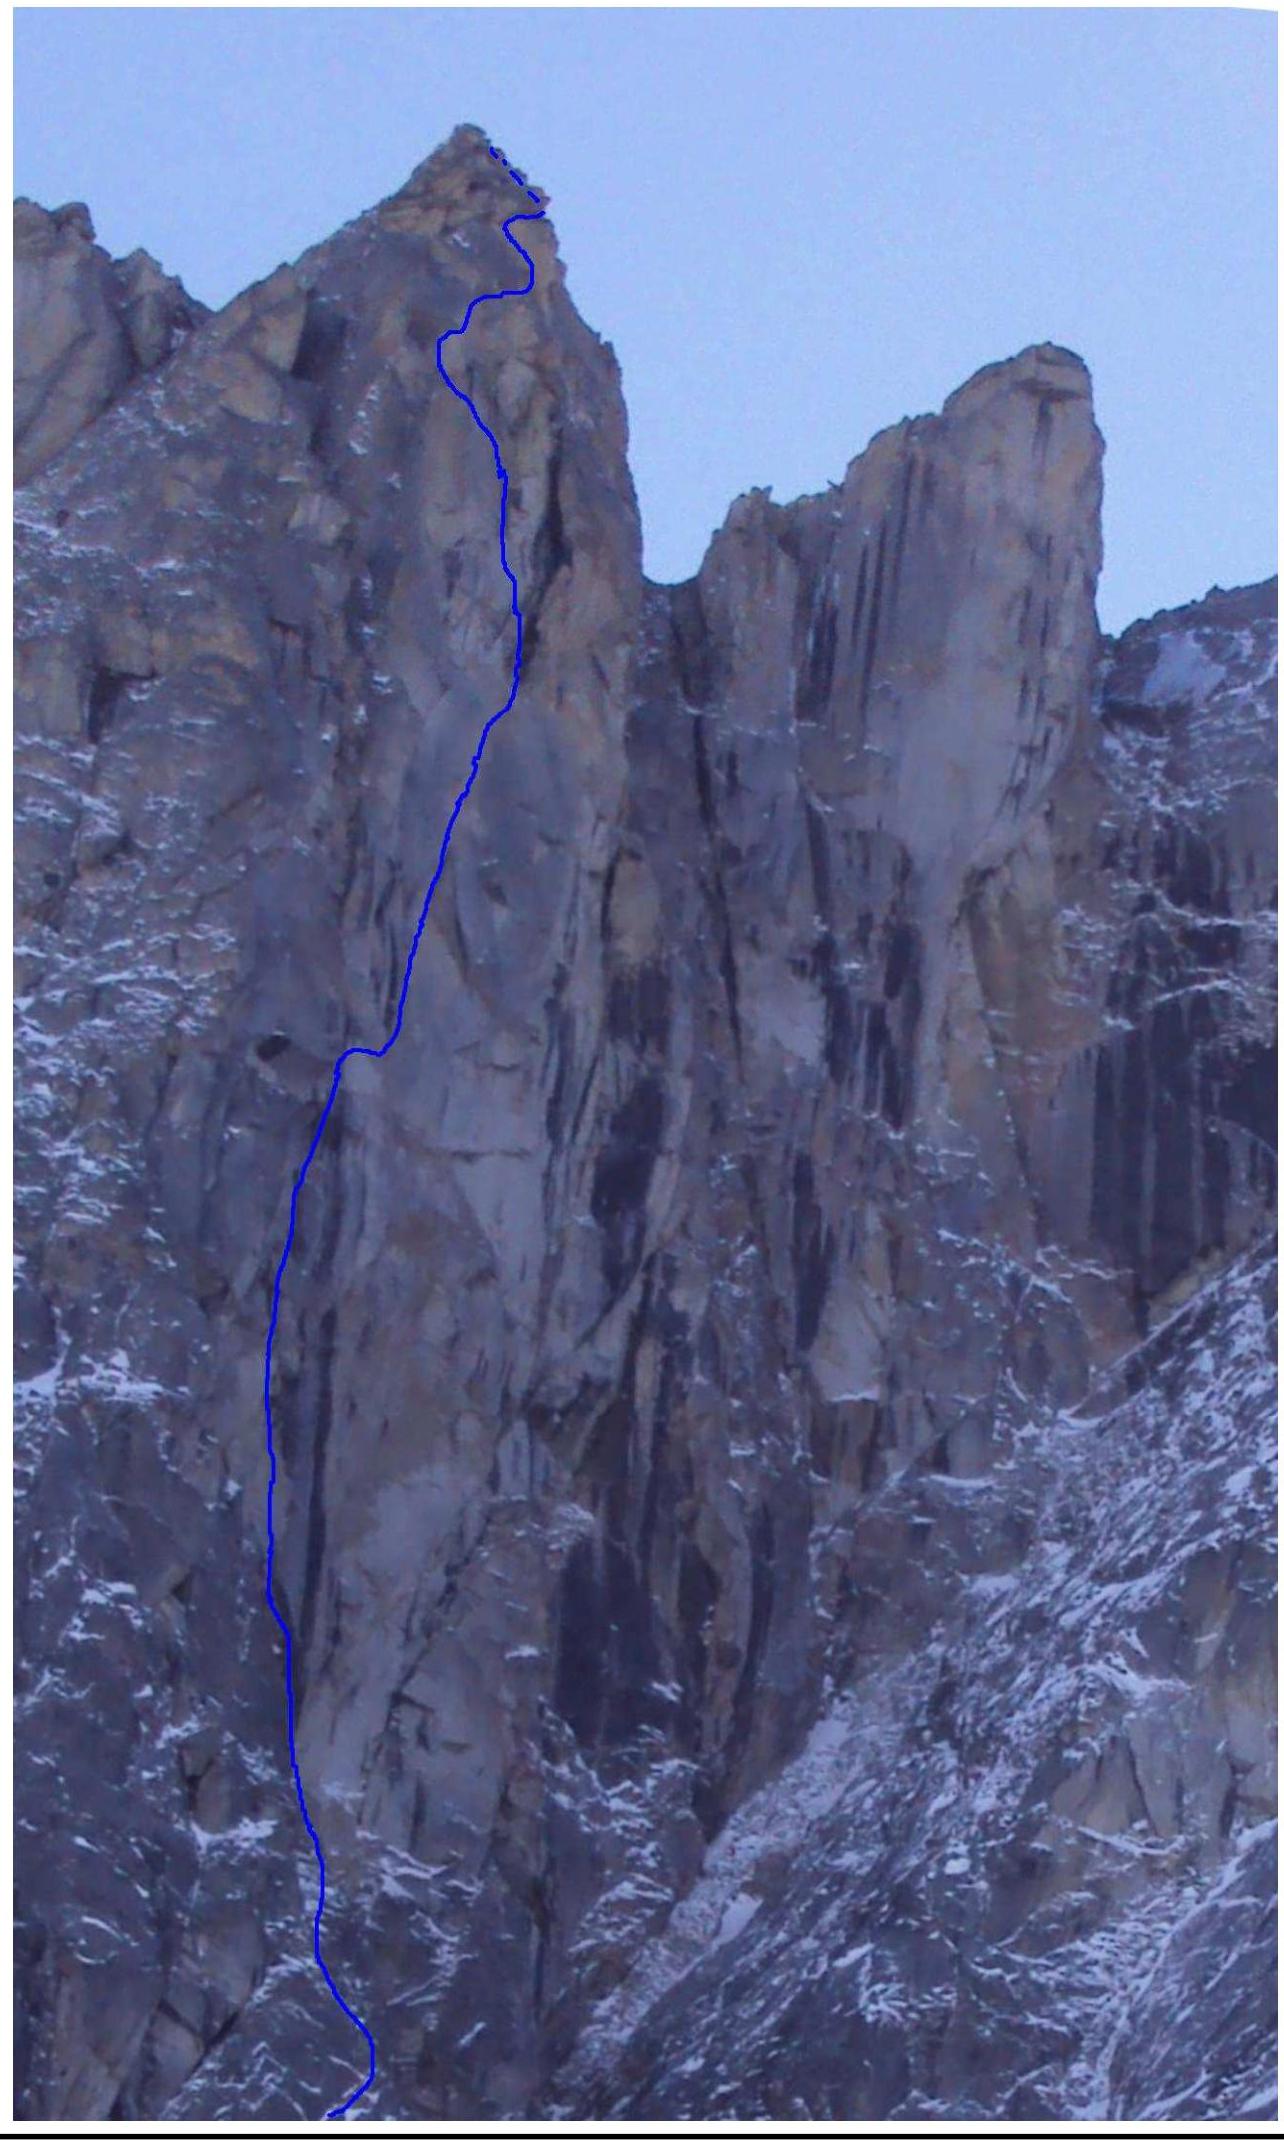
Photo of the right wall profile from the Klinok 6A route (Afanasiev, 2002).
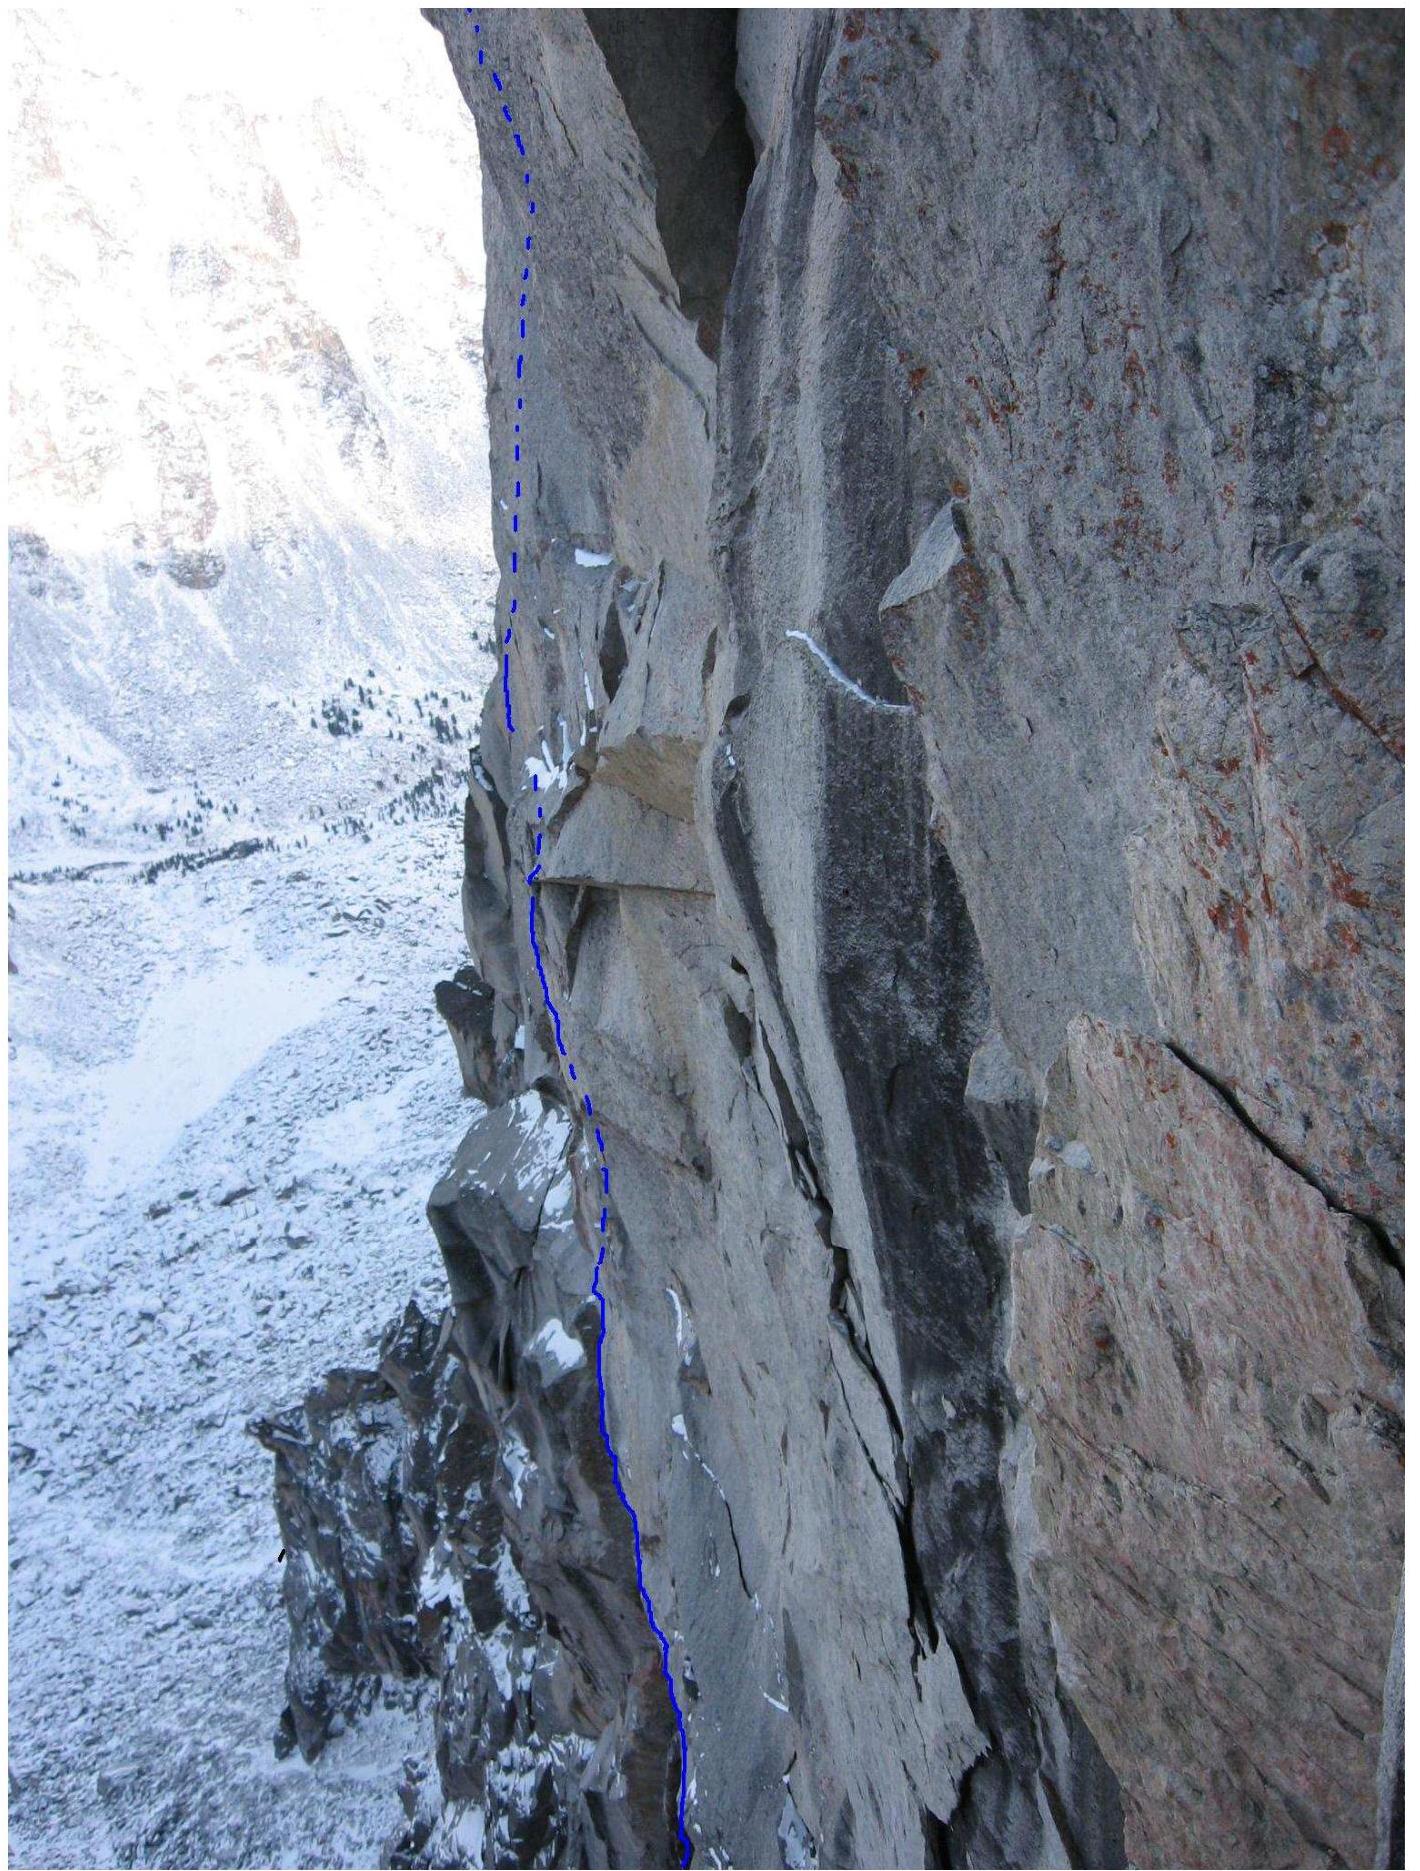
Diagram of the main part's steepness.

Panorama of the Alaska circus peaks.
Barun-Khandagai Valley Map
The Barun-Khandagai valley is one of the most promising areas in the Eastern Sayan for sports mountaineering. Currently, there are 2 category V routes and 2 category VI routes in the valley, not counting the route climbed by our team. The Kupol summit (2954 m) is the dominant peak in the area.
Located in the Tunkinsky District of the Republic of Buryatia. The nearest large settlement is the Arshan village.
To reach the valley, follow these steps:
- From Arshan, take a high-clearance vehicle to the valley entrance, known as the Barunskaya "meadow", approximately 15 km.
- Then, hike up the valley along the trail; the area is popular with tourists during the summer.
The Alaska circus is located on the left side of the valley:
- Elevation gain on the approach: 1200 m.
- Length: approximately 15 km.
- In the summer, it takes 6-8 hours to reach the wall.
- In winter, it may take 5-6 days due to the large amount of snow.
Several challenging routes pass through the North wall of the Kupol summit:
- Category 5B route by Afanasiev on the North face, 1982.
- Category 6A route by Afanasiev (Klinok) on the North face of the East shoulder, 2002, 1st place at the 2002 Russian Championship.
- Category 6A route by Afanasiev on the overhangs of the North face of the East shoulder, 2007, 4th place at the 2007 Russian Championship.
The main team and the support team of four people took four days to reach the wall due to the abundance of snow in the valley.
Climbing schedule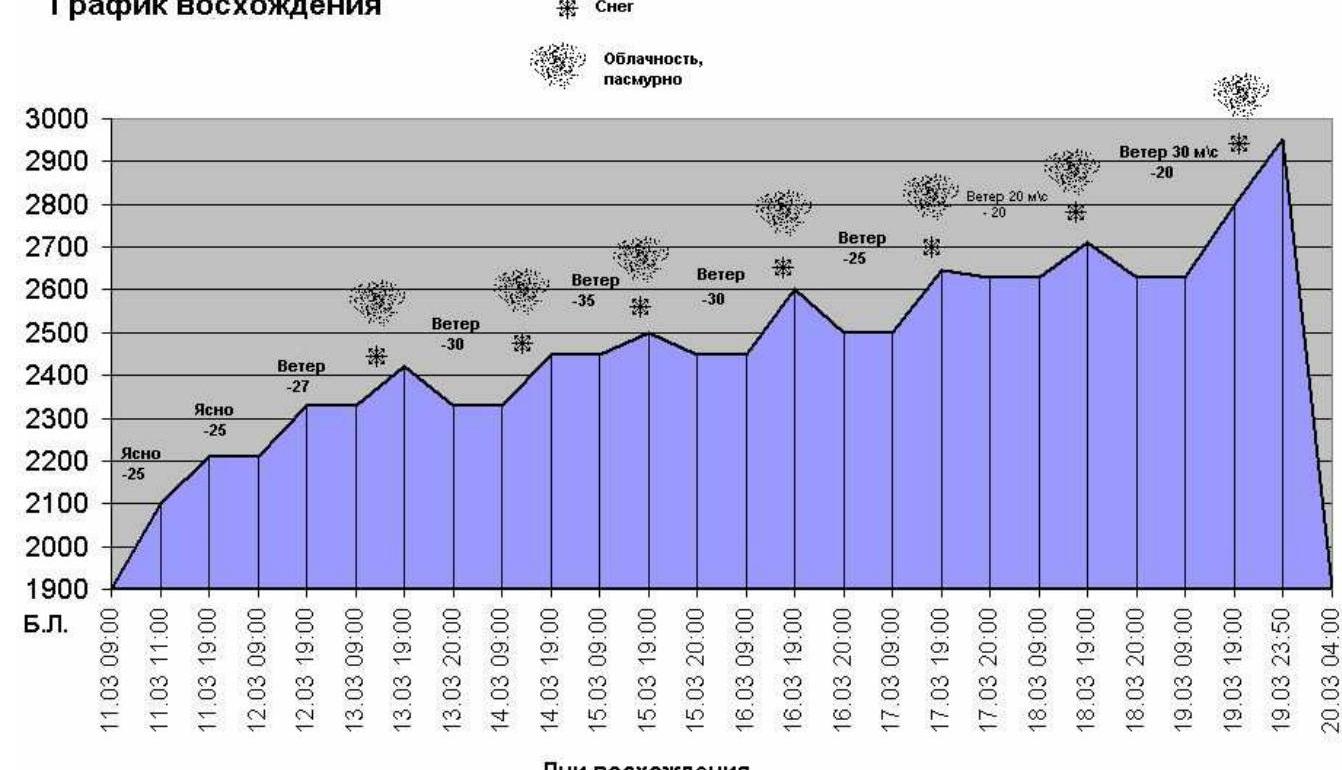
Climbing days
Team movement schedule on the route:
- March 11, 2010: 10:00-19:00, sections R0-R7. Overnight at CAMP 1.
- March 12, 2010: 9:00-20:00, sections R7-R16. Overnight at CAMP 2.
- March 13, 2010: 10:00-19:00, sections R16-R24. Overnight at CAMP 2.
- March 14, 2010: 9:00-19:00, sections R24-R26. Overnight at CAMP 3.
- March 15, 2010: 9:00-18:00, sections R26-R29. Overnight at CAMP 3.
- March 16, 2010: 9:00-20:00, sections R29-R36. Overnight at CAMP 4.
- March 17, 2010: 9:00-19:00, sections R36-R40. Overnight at CAMP 5.
- March 18, 2010: 9:00-19:00, sections R40-R43. Overnight at CAMP 5.
- March 19, 2010: 9:00-18:00, sections R43-R56. 18:00-23:50, section R56-R57. (Summit 2954 m)
- March 20, 2010: 00:00-4:00, descent to Base Camp via the route (category 1B, rock).
Main part route diagram in UIAA symbols, 1:2000 scale
| Section | Protection Gear | Friends | Rock Pitons | Sky Hooks Fifas | Bolted Pitons | Length (m) | Steepness (°) | Climbing Grade | AID |
|---|---|---|---|---|---|---|---|---|---|
| R31–R32 | 15 | 6 | - | - | 2 | 19 | 90 | 6+ | A3 |
| R30–R31 | 4 | 2 | - | 1 | 1 | 5 | 130 | 6+ | A4 |
| R29–R30 | 20 | 6 | 2 | 5 | - | 30 | 90 | 6- | A3 |
| R28–R29 | 3 | - | 2 | 7 | - | 10 | 90 | 6- | A2 |
| R27–R28 | 1 | - | 3 | 15 | 1 | 25 | 90 | 6+ | A4–A3e |
| R26–R27 | 2 | - | 1 | 5 | 2 | 10 | 90 | 6+ | A3–A2e |
| R25–R26 | 2 | 1 | 1 | 5 | 3 | 10 | 90 | 6- | A3–A2e |
| R24–R25 | 5 | 2 | 2 | 10 | 4 | 20 | 95 | 6+ | A3–A2e |
| R22–R24 | 1 | 1 | 2 | 5 | 1 | 10 | 120 | 6+ | A4 |
| R20–R22 | 1 | - | 1 | 5 | 1 | 10 | 80 | 5+ | A2 |
| R19–R20 | 4 | 1 | 2 | 13 | 4 | 18 | 100 | 6+ | A3–A3e |
| R18–R19 | 1 | - | 1 | 3 | 1 | 15 | 90 | 6- | A3e |
| R17–R18 | - | - | 1 | 3 | - | 10 | 85 | 5+ | A1 |
| R16–R17 | - | - | - | - | - | 20 | 80 | 5- | - |
| R15–R16 | 3 | - | 3 | - | - | 11 | 65 | 4+ | - |
| R14–R15 | - | - | - | - | - | 17 | 70 | 5- | - |
| R13–R14 | 1 | - | 1 | - | - | 10 | 70 | 5- | - |
| R12–R13 | 2 | - | 2 | - | - | 15 | 70 | 5- | - |
| R11–R12 | 1 | - | 1 | 2 | 1 | 16 | 70 | 5+ | A1 |
| R10–R11 | - | - | - | - | 0 | 8 | 65 | 4+ | - |
| R9–R10 | 1 | - | 1 | - | 0 | 9 | 75 | 5+ | - |
| R8–R9 | 2 | 2 | 2 | 10 | 0 | 20 | 80 | 6- | A3 |
| R7–R8 | 3 | 0 | 2 | 12 | 0 | 25 | 75 | 6- | A3 |
| R6–R7 | 2 | 0 | 2 | 7 | 1 | 17 | 80 | 5+ | A3 |
| R5–R6 | 2 | 0 | 2 | 5 | 0 | 11 | 75 | 6- | A3 |
| R4–R5 | 2 | 0 | 3 | 2 | 0 | 18 | 75 | 5+ | A2 |
| R3–R4 | 3 | 0 | 2 | 0 | 0 | 10 | 80 | 4+ | - |
| R2–R3 | 2 | 0 | 1 | 0 | 0 | 25 | 75 | 5- | - |
| R1–R2 | 3 | 0 | 2 | 0 | 0 | 50 | 75 | 4+ | - |
| R0–R1 | 0 | 0 | 0 | 0 | 0 | 45 | 50 | 1+ | - |
Route diagram in UIAA symbols, 1:2000 scale, Sheet 2
| Section | Protection Gear | Friends | Rock Pitons | Sky Hook Fifas | Bolted Pitons | Length (m) | Steepness (°) | Climbing Grade | AID |
|---|---|---|---|---|---|---|---|---|---|
| R57–R58 | - | - | - | - | - | 400 | 25 | 1+ | - |
| R56–R57 | 2 | - | - | - | - | 22 | 60 | 5- | - |
| R55–R56 | 2 | - | - | 1 | - | 5 | 80 | 5+ | A2 |
| R54–R55 | 3 | 1 | 2 | 5 | - | 7 | 95 | 6+ | A4 |
| R52–R54 | 3 | - | 3 | 7 | - | 10 | 95 | 6- | A3 |
| R51–R52 | 1 | - | 1 | 1 | - | 1 | 130 | 6+ | A4 |
| R49–R51 | 3 | - | 7 | 8 | - | 15 | 85-110 | 6+ | A3–A4 |
| R47–R49 | 2 | 2 | 5 | 10 | - | 14 | 95 | 6+ | A4 |
| R46–R47 | 5 | 4 | 1 | 2 | - | 10 | 100 | 6+ | A3 |
| R45–R46 | - | 1 | - | 10 | - | 6 | 90 | 6+ | A3e |
| R44–R45 | 1 | - | - | 10 | - | 6 | 90 | 6+ | A3e |
| R43–R44 | - | - | 2 | 7 | - | 9 | 70 | 6- | A3e |
| R42–R43 | - | - | - | - | 5 | 90 | 5+ | - | |
| R41–R42 | - | - | 2 | 40 | 2 | 28 | 92 | 6+ | A3e |
| R40–R41 | - | - | 2 | 30 | 1 | 20 | 92 | 6+ | A3e |
| R39–R40 | 3 | - | 3 | 12 | - | 15 | 95 | 6+ | A4 |
| R38–R39 | 1 | - | 1 | 1 | - | 12 | 70 | 5+ | A1 |
| R37–R38 | 1 | - | 2 | 10 | - | 8 | 100 | 6+ | A3 |
| R36–R37 | 10 | 5 | 2 | 10 | - | 25 | 90 | 6- | A3 |
| R35–R36 | 12 | 4 | 2 | 15 | 2 | 27 | 92 | 6- | A3 |
| R34–R35 | 5 | 2 | 1 | 5 | - | 11 | 95 | 6+ | A4 |
| R32–R34 | 8 | 3 | 3 | 5 | - | 13 | 92-110 | 6+ | A3–A4 |
| R31–R32 | 15 | 6 | - | - | 2 | 19 | 90 | 6+ | A3 |
Due to the complexity of the route's terrain and extreme negative temperatures, almost all points indicated in the UIAA diagram were used for ITO.
Relief Description
R0–R1 45 m, 50°, 1+, Steep, packed snow. R1–R4 85 m, 75°, 4+, 5-, Walls with good terrain. R4–R5 18 m, 75°, 5+, A2 Internal corner (IC) with ice. R5–R6 11 m, 75°, 6-, A3 IC with a chimney, left wall is vertical. R6–R7 17 m, 80°, 5+, A3 IC with loose rocks, left wall is heavily overhanging. R7–R8 25 m, 75°, 6-, A3 IC, a narrow slot for pitons. R8–R9 20 m, 80°, 6-, A3 Diagonal crack to the right. R9–R10 9 m, 75°, 5- Unstable rocks. R10–R11 8 m, 65°, 4+ Slab to the right. R11–R12 16 m, 70°, 5+, A1 Unstable rocks upwards. R12–R13 15 m, 70°, 5- Slab to the right. R13–R14 10 m, 70°, 5- Unstable IC. R14–R15 17 m, 70°, 5- Slab to the right. R15–R16 11 m, 65°, 4+ Slab to the right. R16–R17 20 m, 80°, 5- IC - chimney. R17–R18 10 m, 85°, 5+, A1 Wall. R18–R19 15 m, 90°, 6-, A3e Vertical wall. R19–R20 18 m, 100°, 6+, A3 Overhanging wall. R20–R22 10 m, 80°, 5+, A2 IC under a cornice. R22–R23 6 m, 100°, 6+, A3 Overhanging IC. R23–R24 6 m, 120°, 6+, A4 Cornice. R24–R25 20 m, 95°, 6+, A3–A3e Overhanging, wide IC. R25–R26 10 m, 90°, 6-, A3–A3e Wall under a large cornice to the left. R26–R27 15 m, 90°, 6+, A3 Steep IC. R27–R28 25 m, 90°, 6+, A4–A3e Traverse to the right, around the relief bend. R28–R29 10 m, 90°, 6-, A2 Wall under an IC with a large cornice above. R29–R30 30 m, 90°, 6-, A3 Steep IC under a large cornice. R30–R31 5 m, 130°, 6+, A4 Large cornice with a crack. R31–R32 19 m, 90°, 6+, A3 Diagonal crack to the right, under cornices. R32–R33 8 m, 92°, 6-, A3 Crack upwards, under a cornice. R33–R34 5 m, 110°, 6+, A4 Overhang - cornice. R34–R35 11 m, 95°, 6+, A4 Overhanging IC - chimney. R35–R36 27 m, 92°, 6-, A3 Crack to the right. R36–R37 25 m, 90°, 6-, A3 Crack to the right, under an overhang. R37–R38 8 m, 100°, 6+, A3 Overhanging wall. R38–R39 12 m, 70°, 5+, A1 Unstable rocks under a large flake - chimney. R39–R40 15 m, 95°, 6+, A4 Crack to the left, through overhanging blocks. R40–R41 20 m, 92°, 6+, A3e Wall to the left. R41–R42 28 m, 92°, 6+, A3e Wall to the left. R42–R43 5 m, 90°, 5+ Crack upwards. R43–R44 9 m, 70°, 6-, A3 IC under a cornice. R44–R45 6 m, 90°, 6+, A3e Under the cornice, to the right. R45–R46 6 m, 90°, 6+, A3e Chimney. R46–R47 10 m, 100°, 6+, A3 Overhanging IC to the right. R47–R49 14 m, 95°, 6+, A4 Traverse under the cornice to the right. R49–R50 11 m, 85°, 6-, A3 Crack upwards. R50–R51 4 m, 100°, 6+, A4 Overhang to the right, under a cornice. R51–R52 1 m, 130°, 6+, A4 Cornice. R52–R53 10 m, 95°, 6-, A3 Overhanging crack to the left. R53–R54 7 m, 95°, 6+, A4 Under the cornice, to the right. R54–R55 5 m, 80°, 5+ A2 Wall upwards. R55–R56 22 m, 60°, 5- IC to the left. Exit from the wall. R56–R57 400 m, 25°, 1+ Slope to the summit.
Technical photo of the route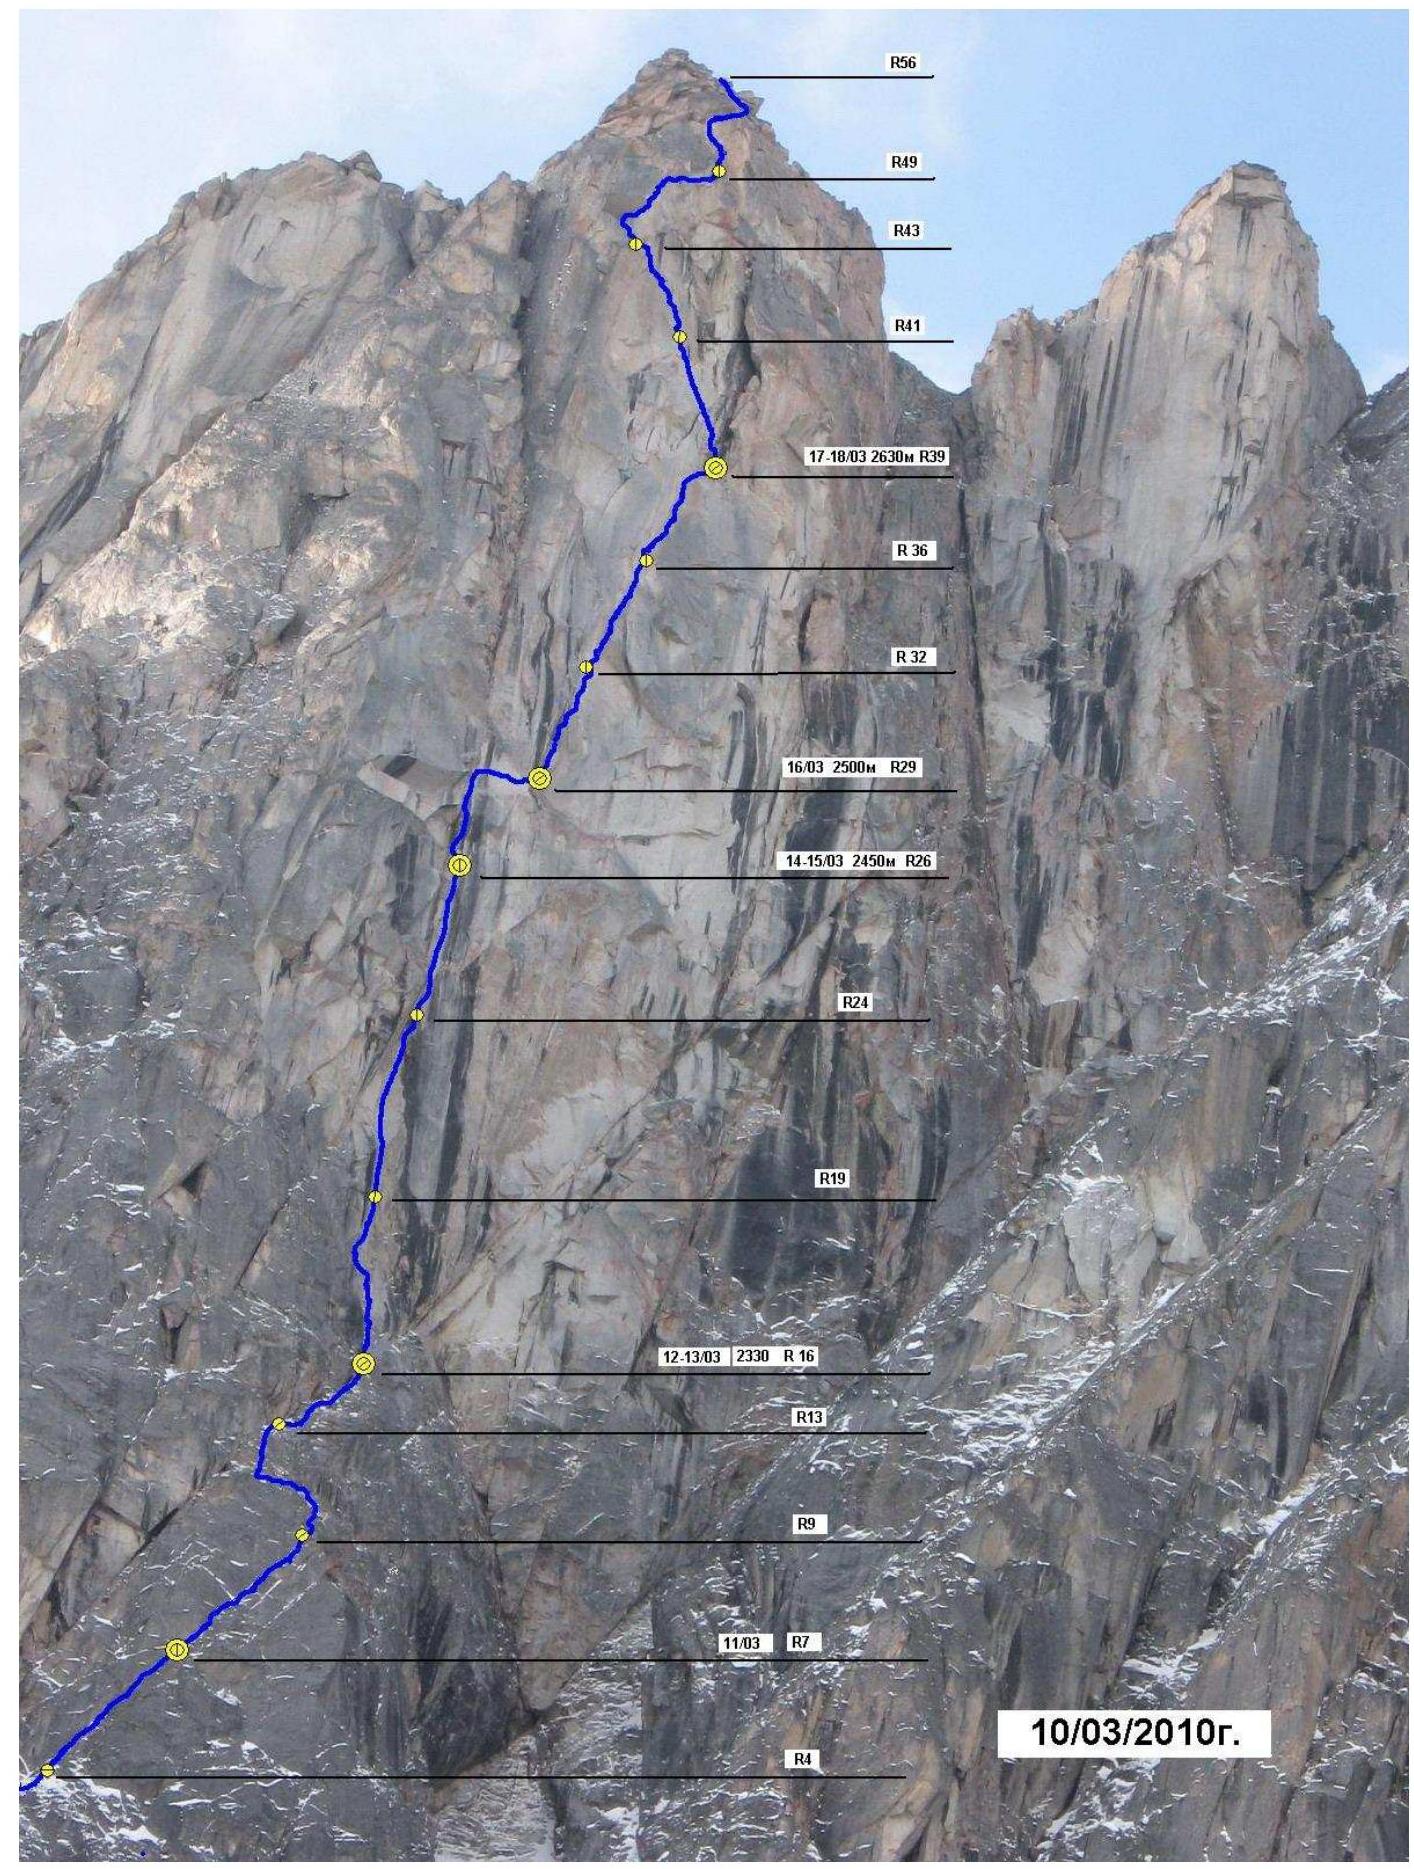
Route characteristics and team actions on the wall.
The route climbed by the team is the result of years of visits and observations of the area by the coach and the team. The route follows the center of the longest overhang in the area. Currently, it is the most challenging route in the Eastern Sayan.
The wall has a northern exposure, resulting in no sunlight from August to April. Daytime temperatures during the ascent dropped to -30 °C, and nighttime temperatures to -35 °C or lower. Most of the route is overhanging, requiring the team to bring water in the form of ice (30 kg).
The route was climbed in alpine style without prior preparation. The team conducted eight bivouacs in five camps - all bivouacs were on a platform. The route was climbed by a two-person team, limiting the speed of movement due to the need to carry loads and restricted rest conditions. Team members worked in shifts, alternating almost every day:
- Day 1 - lead climber Kuzmenko
- Day 2 - Klepikov
- Day 3 - Kuzmenko
- Day 4 - Klepikov
- Day 5 - Klepikov
- Day 6 - Kuzmenko
- Day 7 - Klepikov
- Day 8 - Kuzmenko
- Day 9 - Klepikov
The terrain is mostly reliable and monolithic, with many cornices.
Section R19–R20 - complex ITO on an overhang.
R19–R20 - load transfer using a pulley system.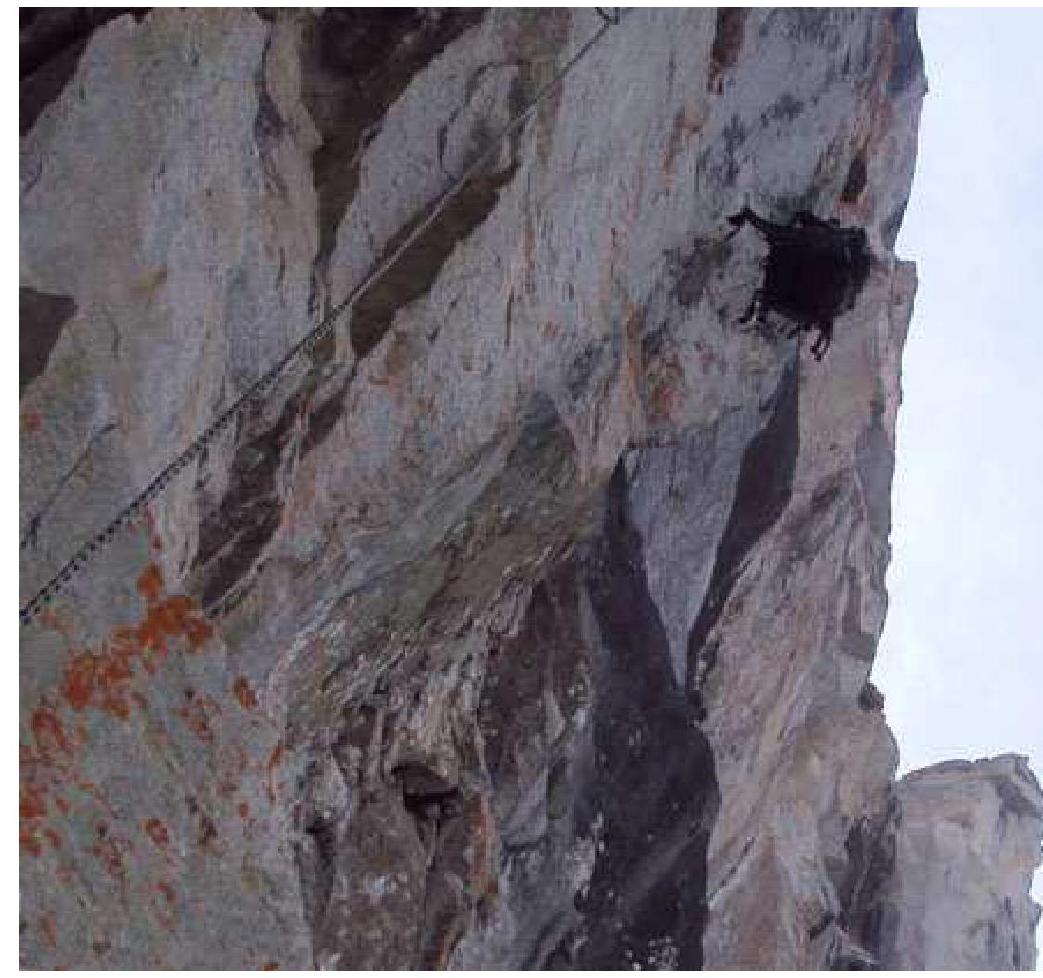
R26–R28 - end of section R27, start of traverse to the right. Complex ITO on sky hooks.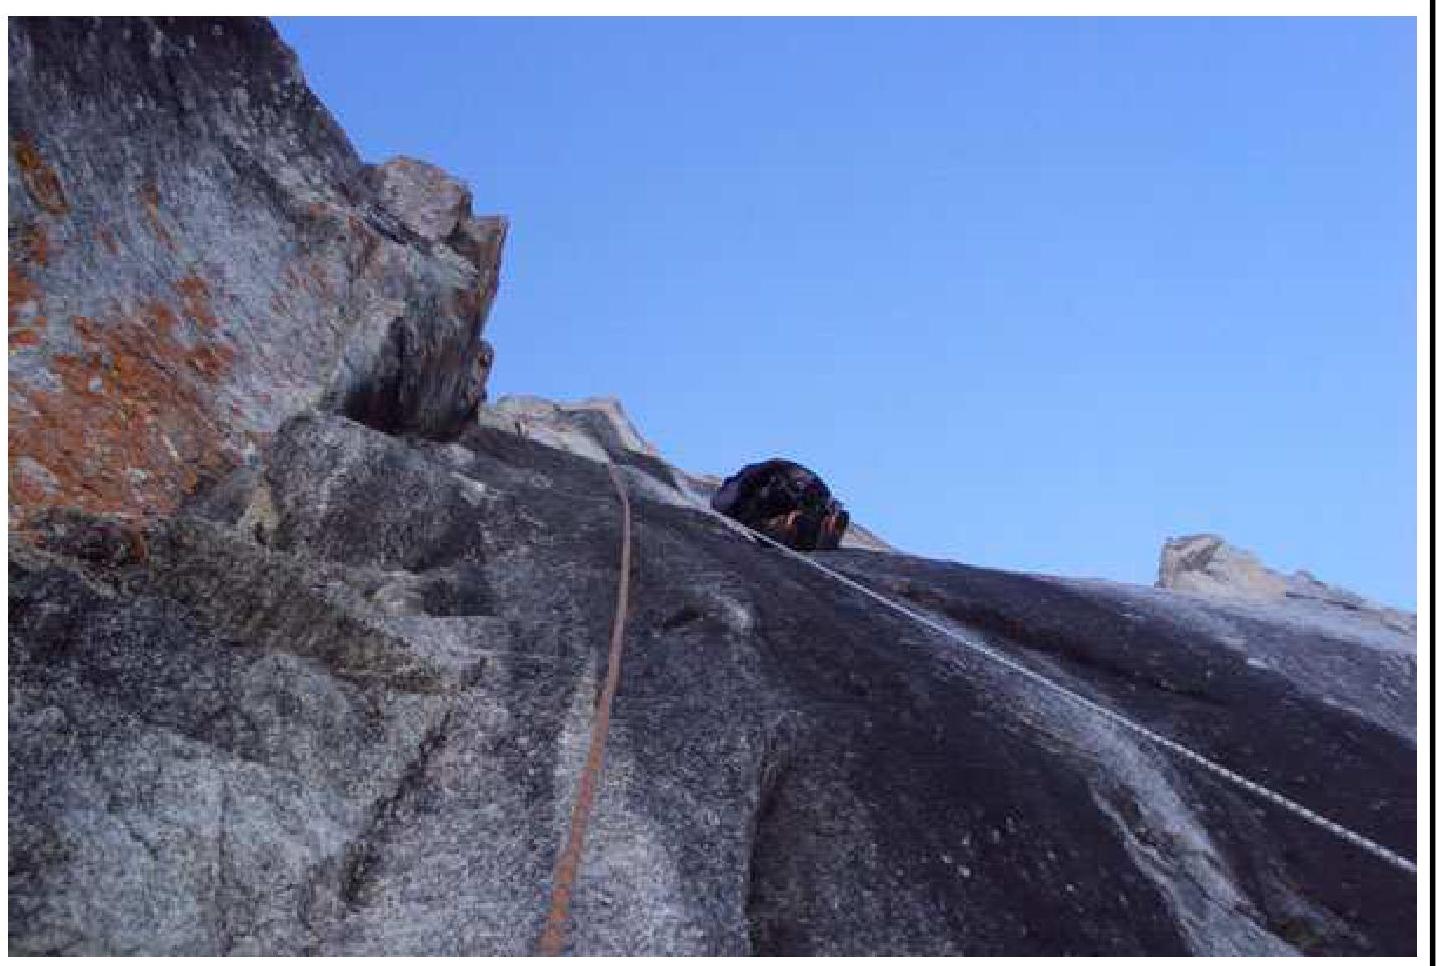
End of section R29–R30. Section R30–R31 - passing the cornice. Complex ITO.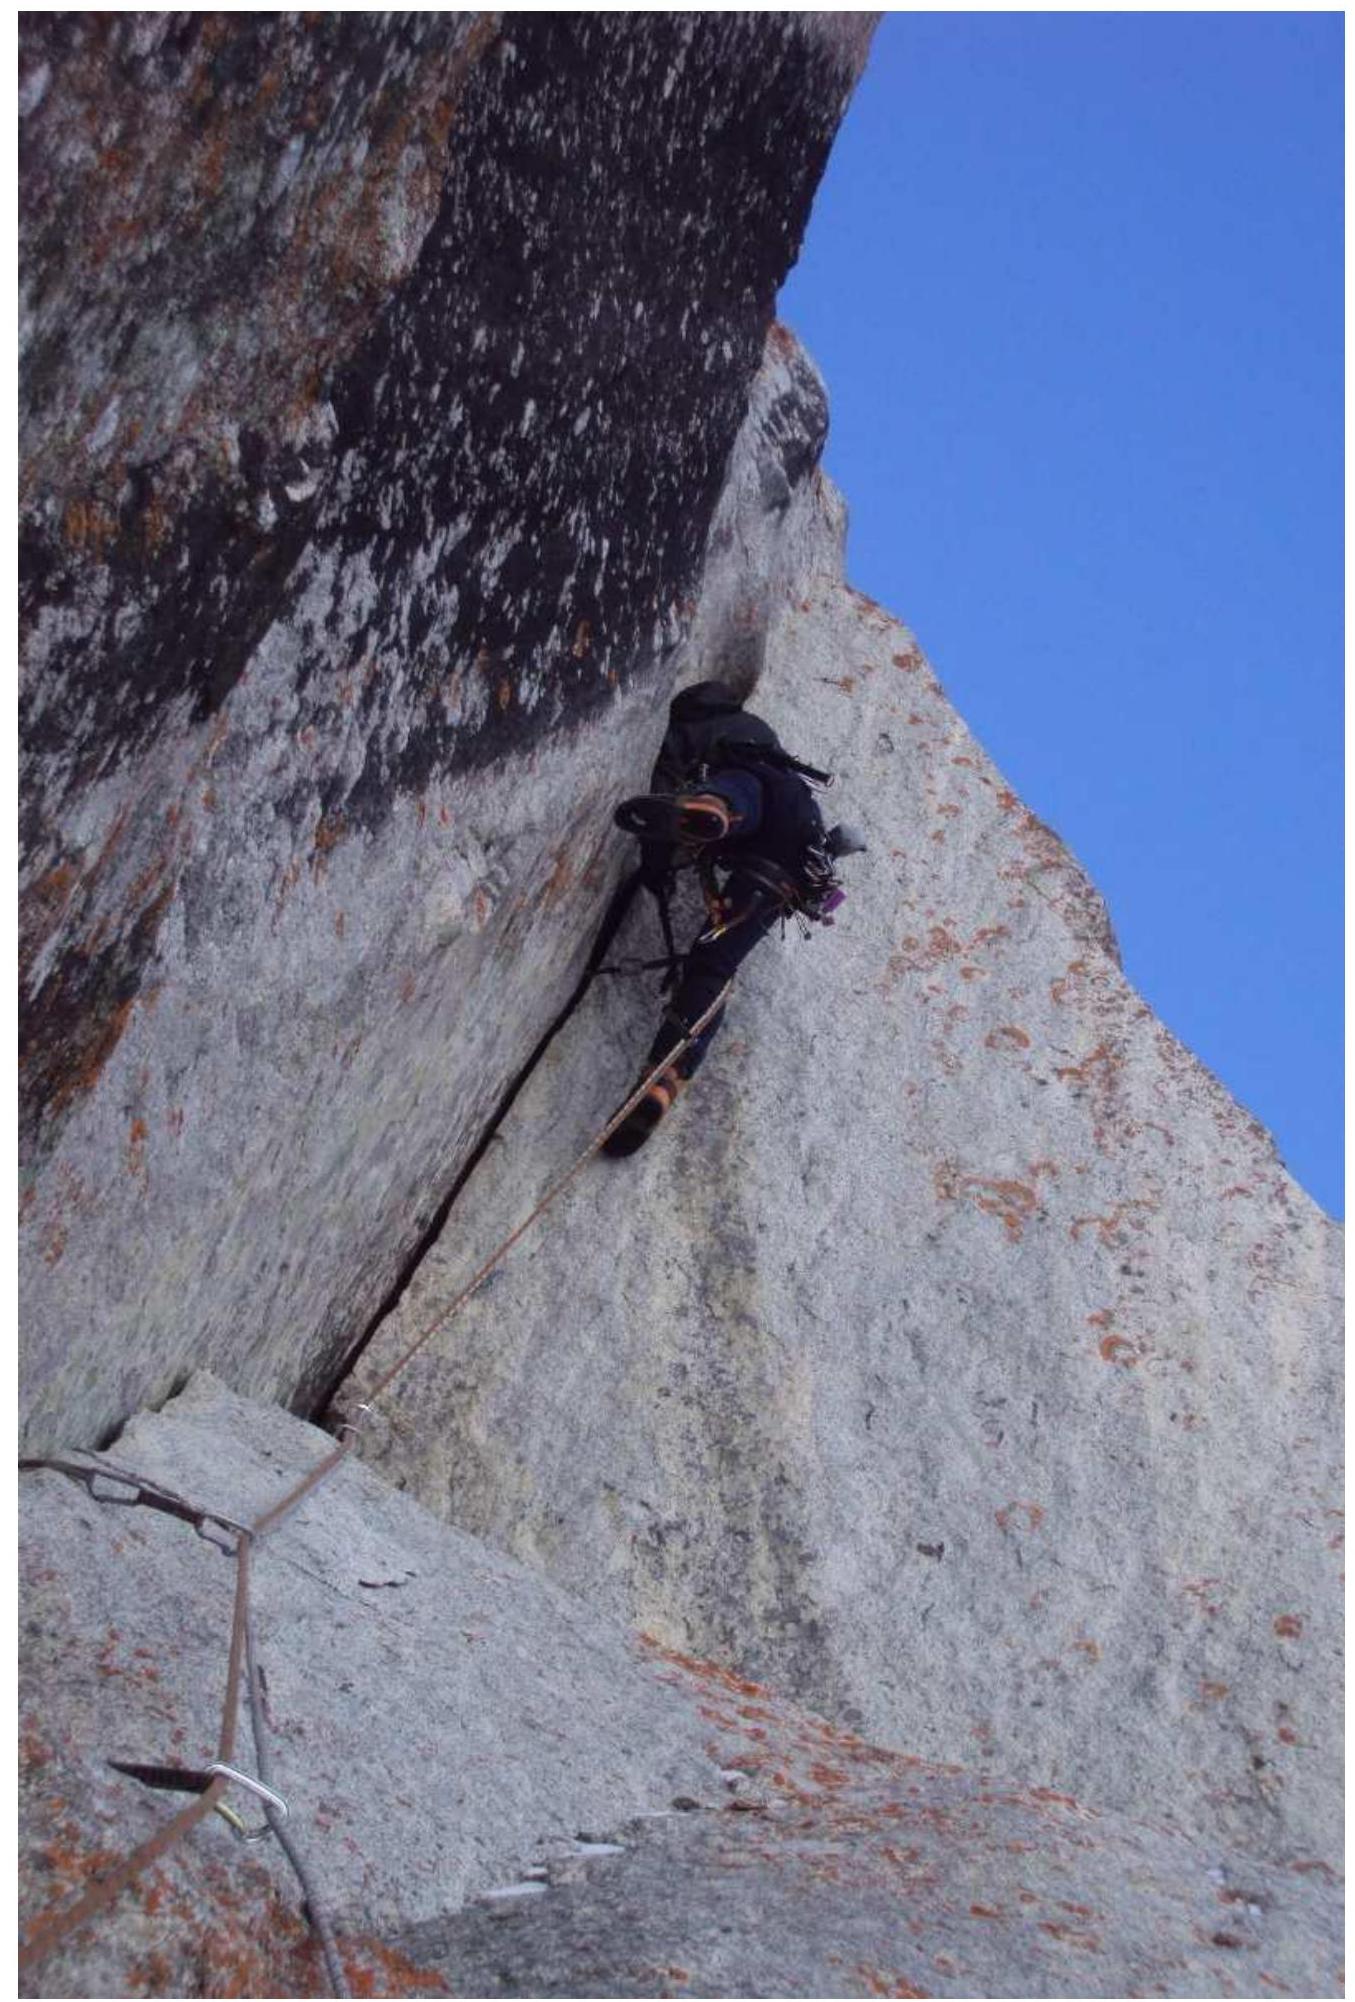
End of section R31–R32. Station at point R32.
Section R33–R34 - complex ITO on an overhanging, widening crack, placement of points is challenging.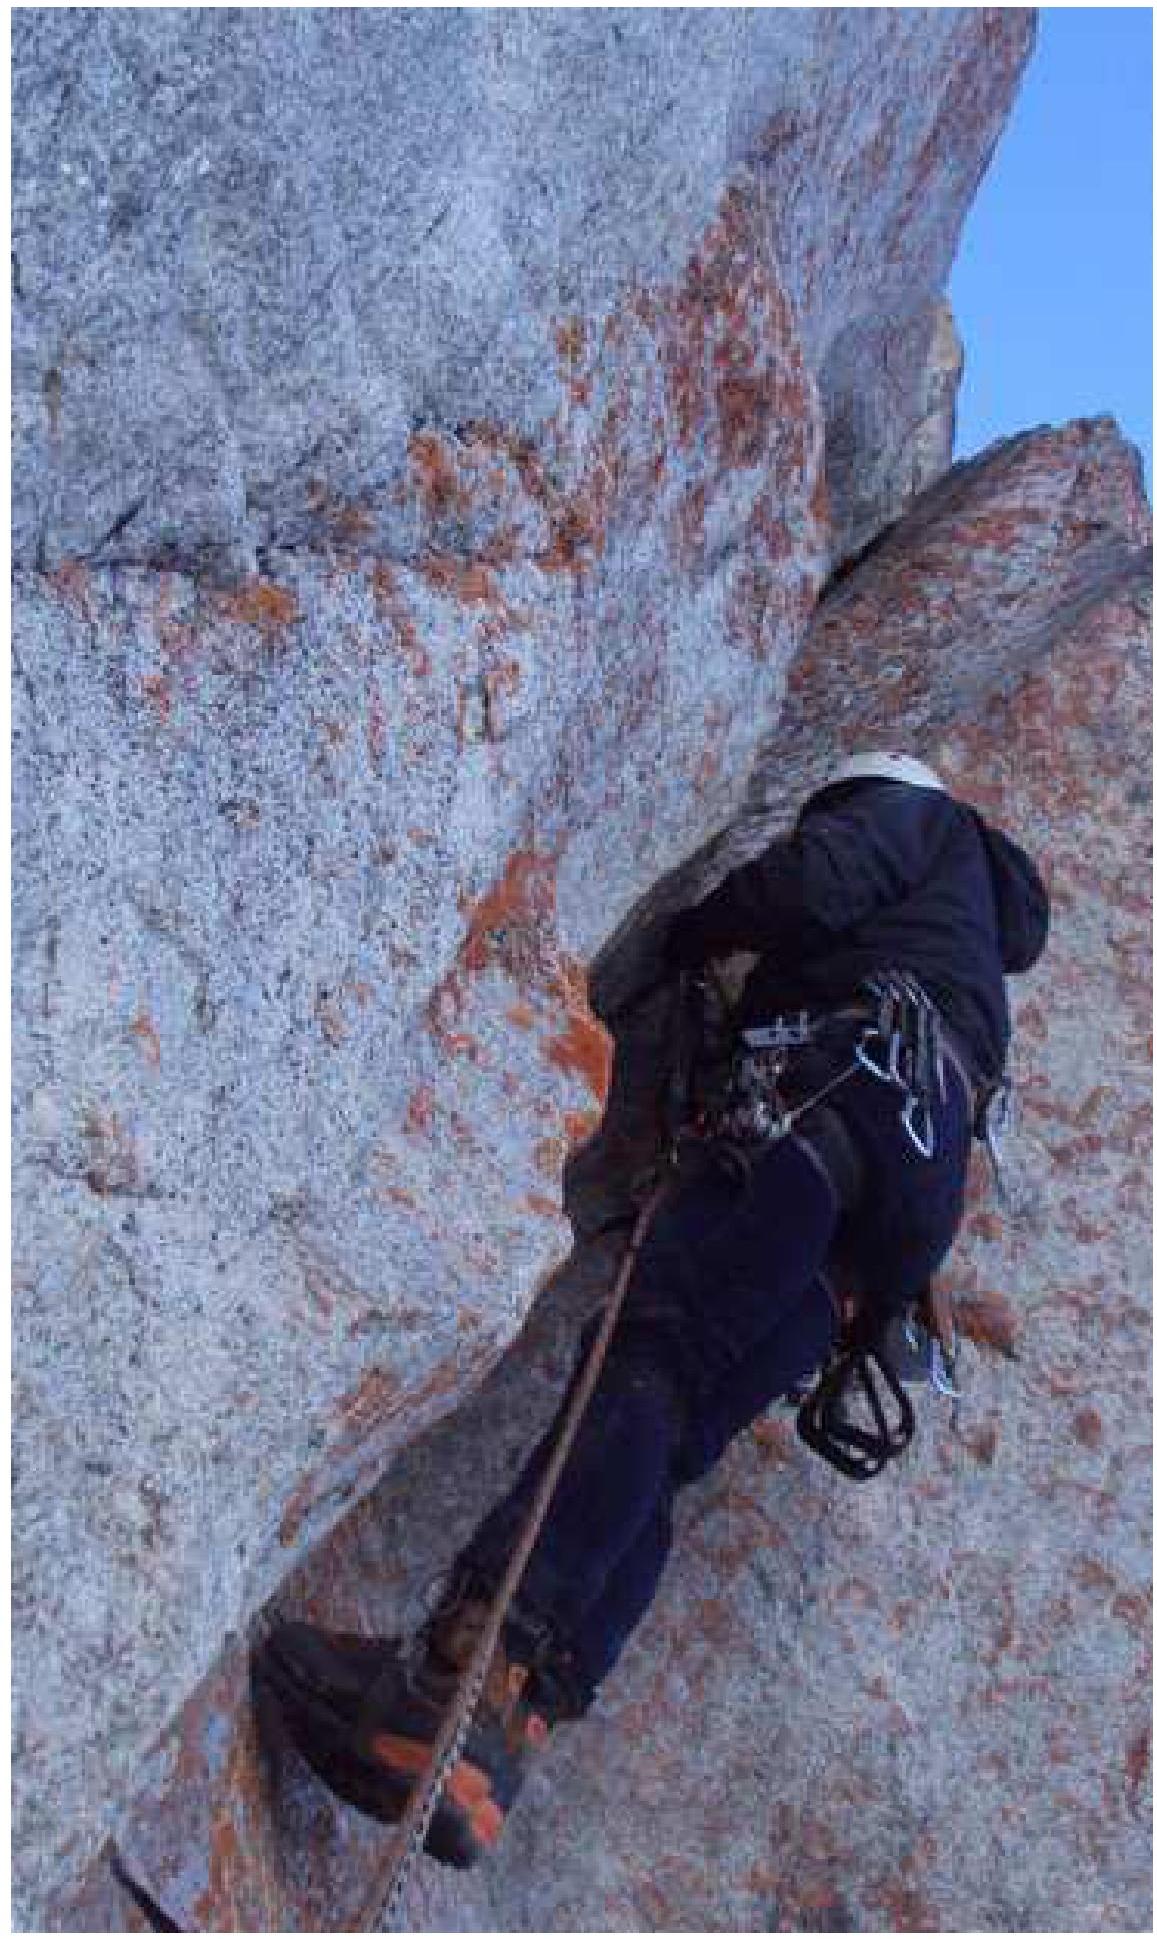
End of section R36–R37, start of section R37–R38 - complex ITO on a crack under an overhang.
R37–R38 - very complex ITO on a crack. The crack is widening. The lead climber had to work in a down jacket due to extreme negative temperatures.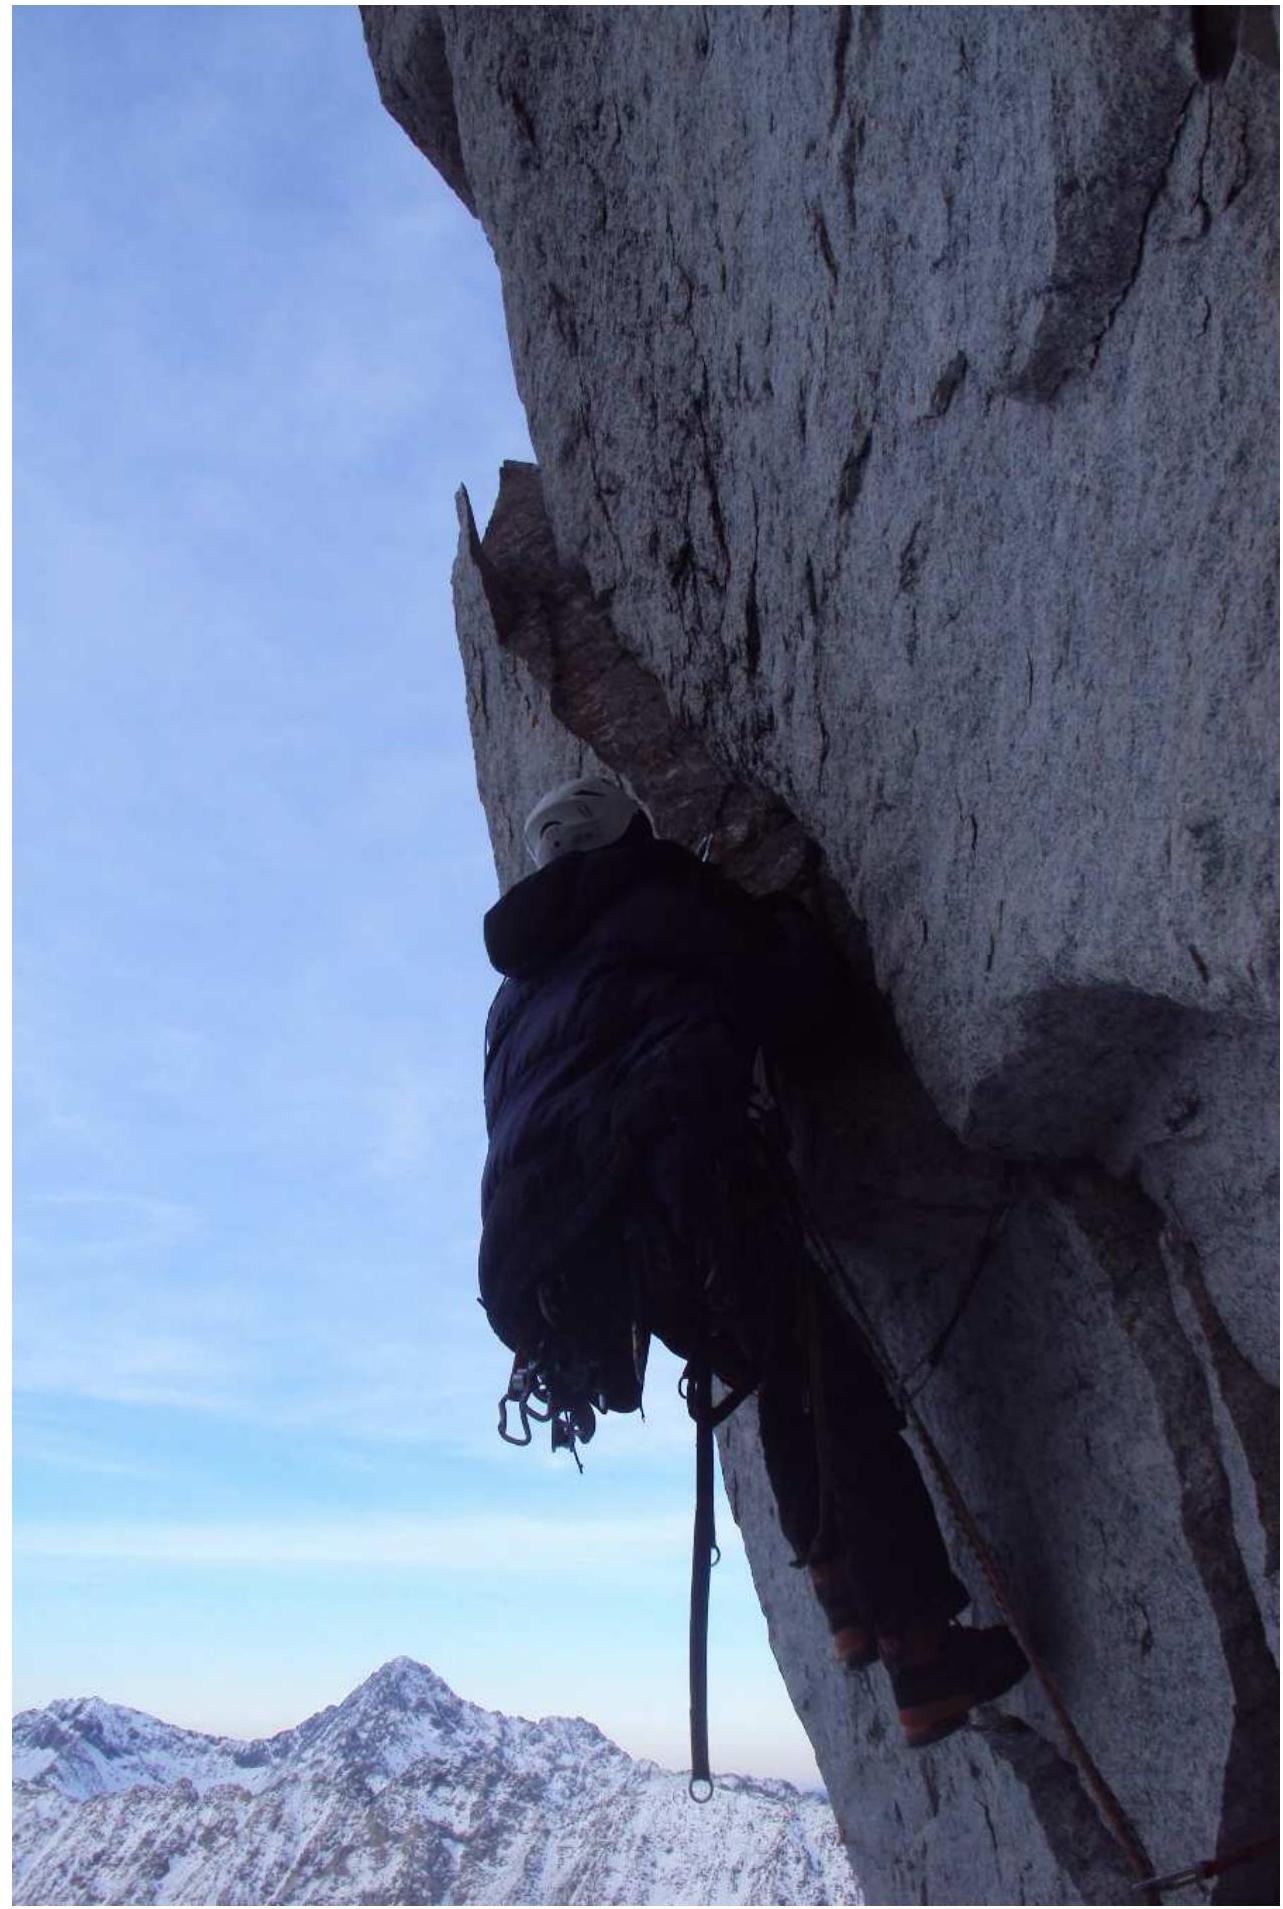
End of section R44–R45. Sections R45–R48. Lead climber at point R48. Complex ITO under cornices on wide cracks and sky hooks.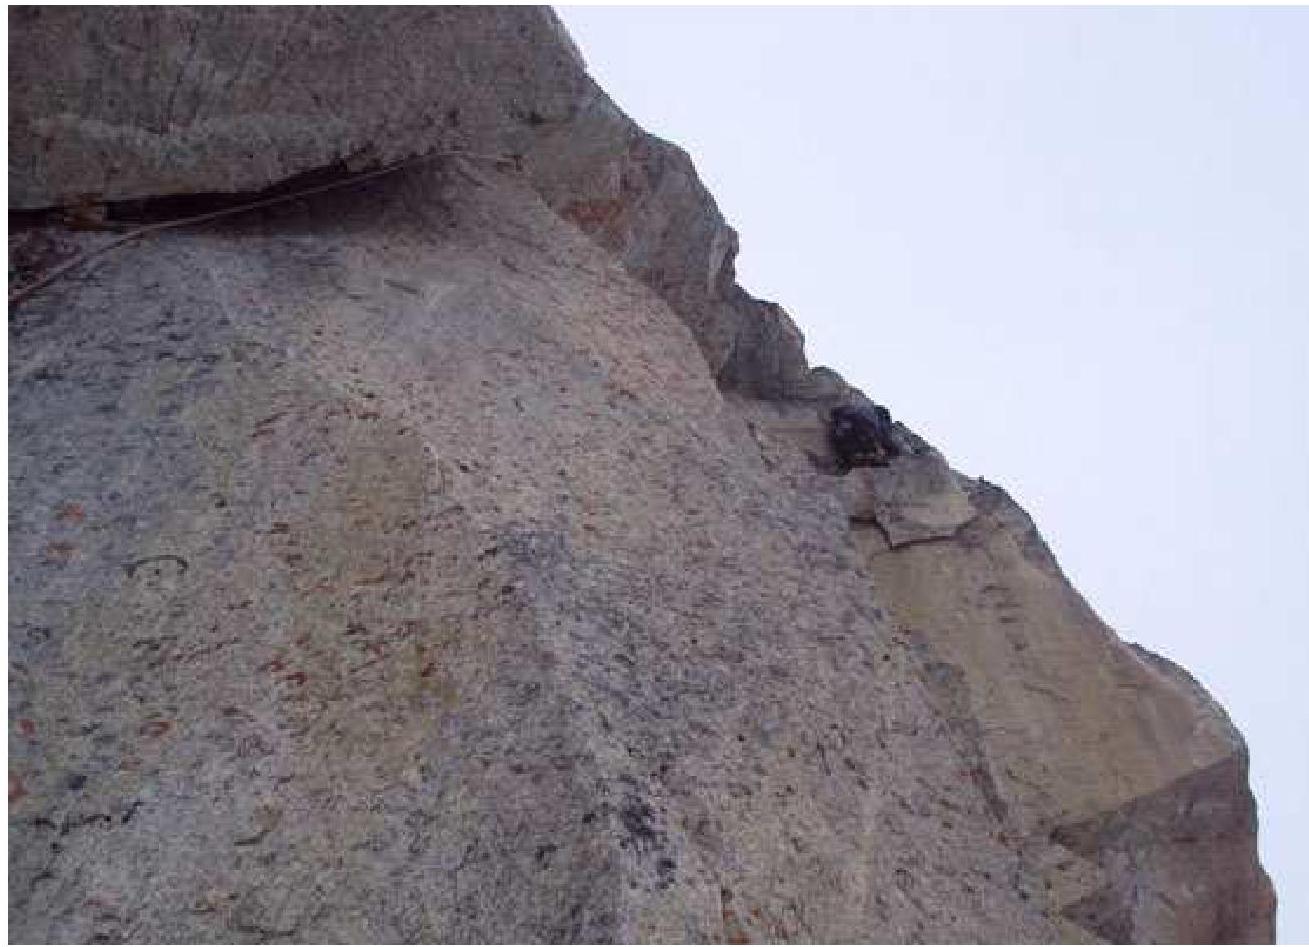
Photo of the team at point R57 (summit), time 23:50 - the photo did not turn out due to a frozen camera. The photograph was taken by the support team leader Ilyinsky V.