Tourist and Alpinist Club
PLANET
Report
on the first ascent to
Yerydag peak
via the right part of the western wall.
Team members: team leader Maksyukov Artyom Aleksandrovich An Konstantin Radievich
Coach: Dmitrienko Evgeny Vladimirovich
Rostov-on-Don
Year 2010, February
1. Ascent Passport
- Caucasus, Dagestan Mountains, Chekhychay gorge, section in the classification table 2.10
- Yerydag peak 3925, via the right part of the Western wall
- Proposed 5B category, First ascent
- Route type: rock
- Route characteristics: height difference of the wall section — 340 m, total 825 m, wall section length 400 m. Length of sections: V category — 115 m. Average steepness of the wall section — 70°
- Pitons left on the route (on descent): Total 6, including 4 bolted pitons. Pitons used on the route: 4 stationary bolted pitons, 50 chocks, 65 anchors, 2 rock pitons, 30 fifi hooks. Total artificial aids used: 50
- Team's total climbing hours: 35 hours
- Team leader: Maksyukov Artyom Aleksandrovich, 1st sports category. Team members: An Konstantin Radievich, 2nd sports category
- Coach: Dmitrienko Evgeny Vladimirovich, Master of Sports
- Departure to the route: 5:00 February 21, 2010 Summit: 13:00 February 25, 2010 Return to Base Camp: 19:30 February 25, 2010
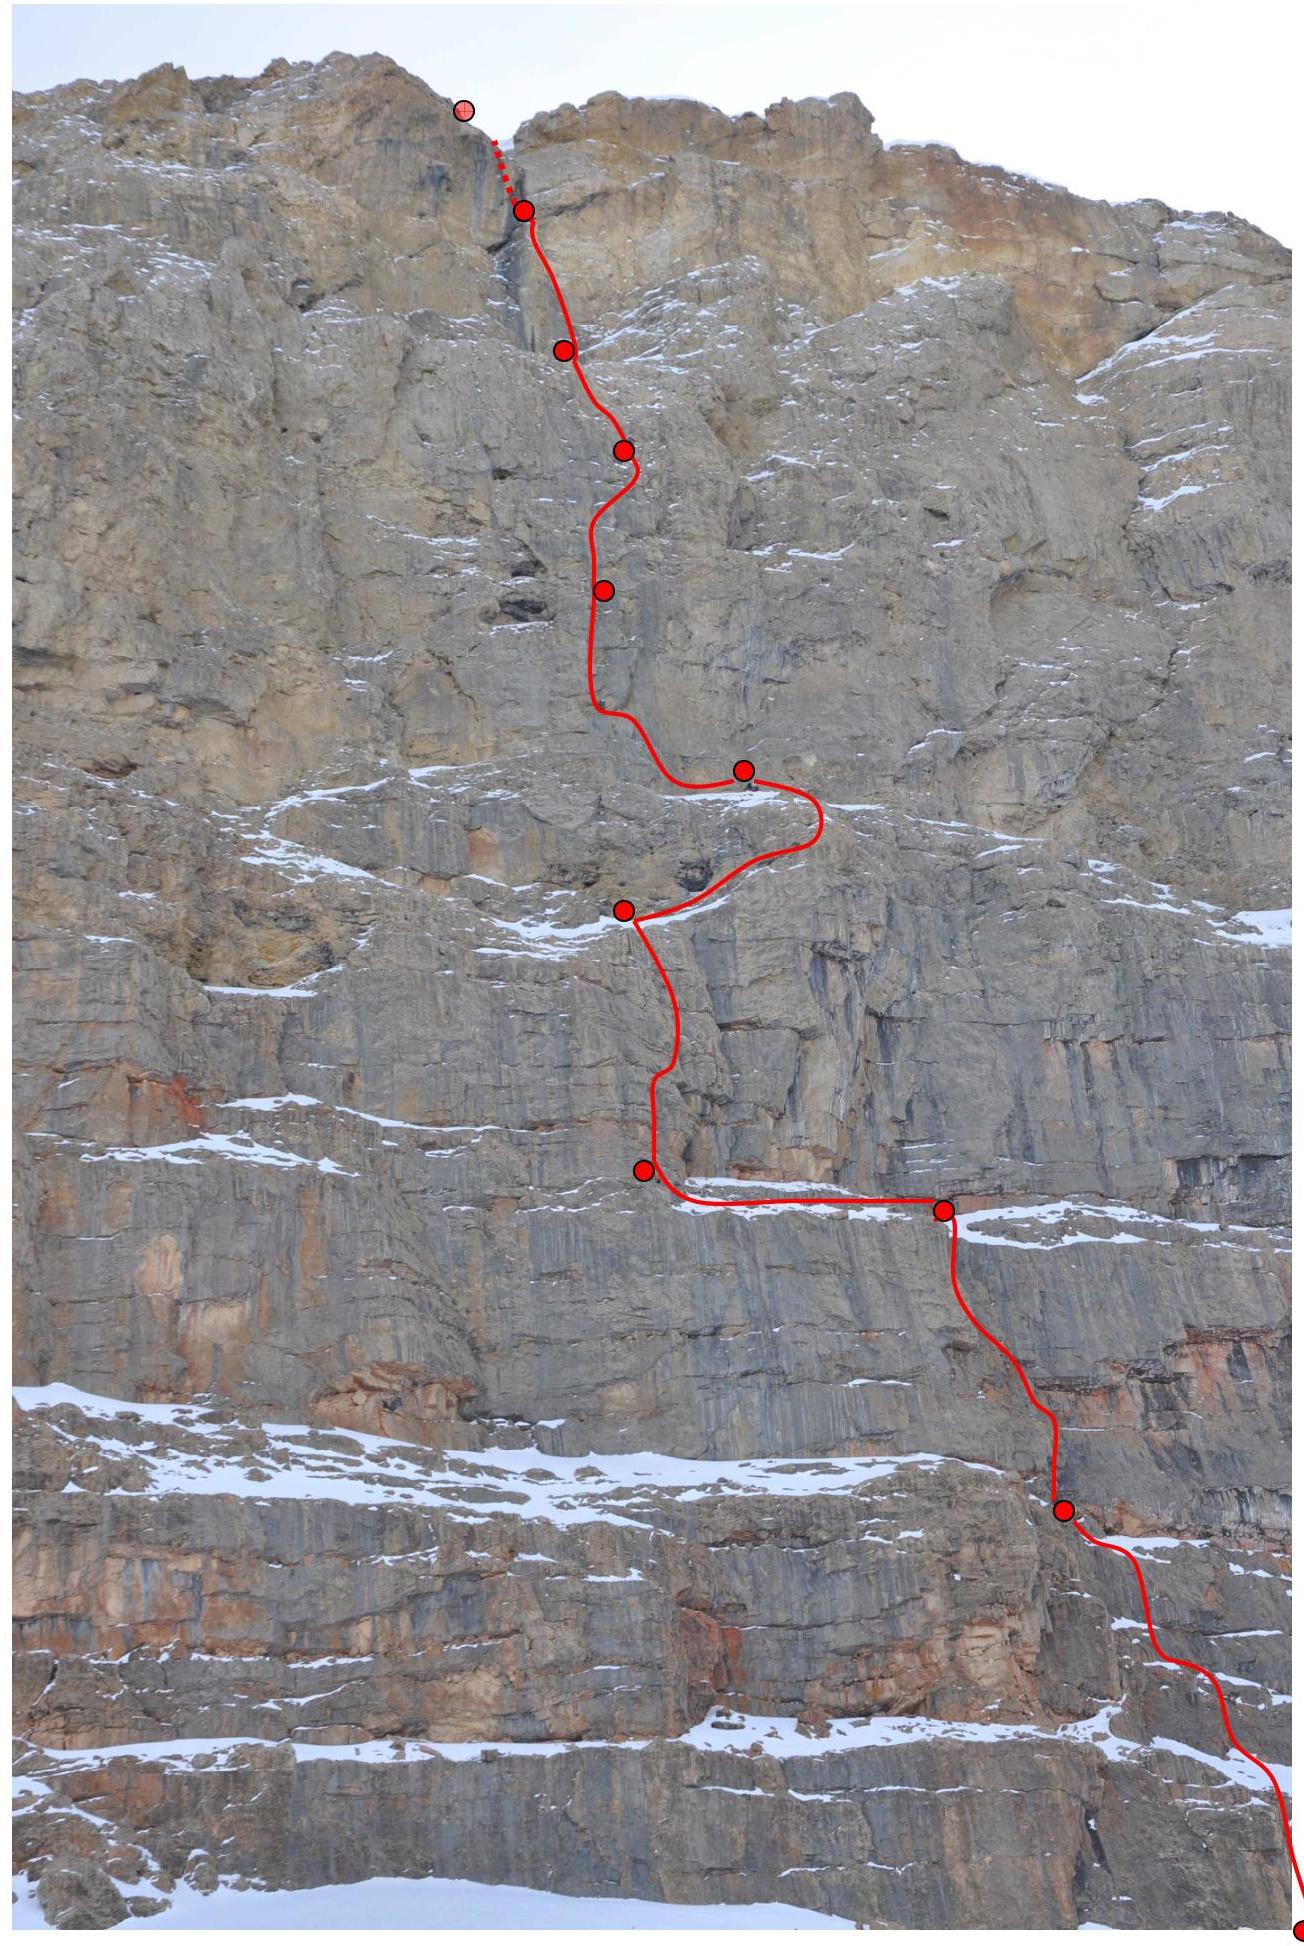
2. Technical photograph of the route
3. General photograph of the route
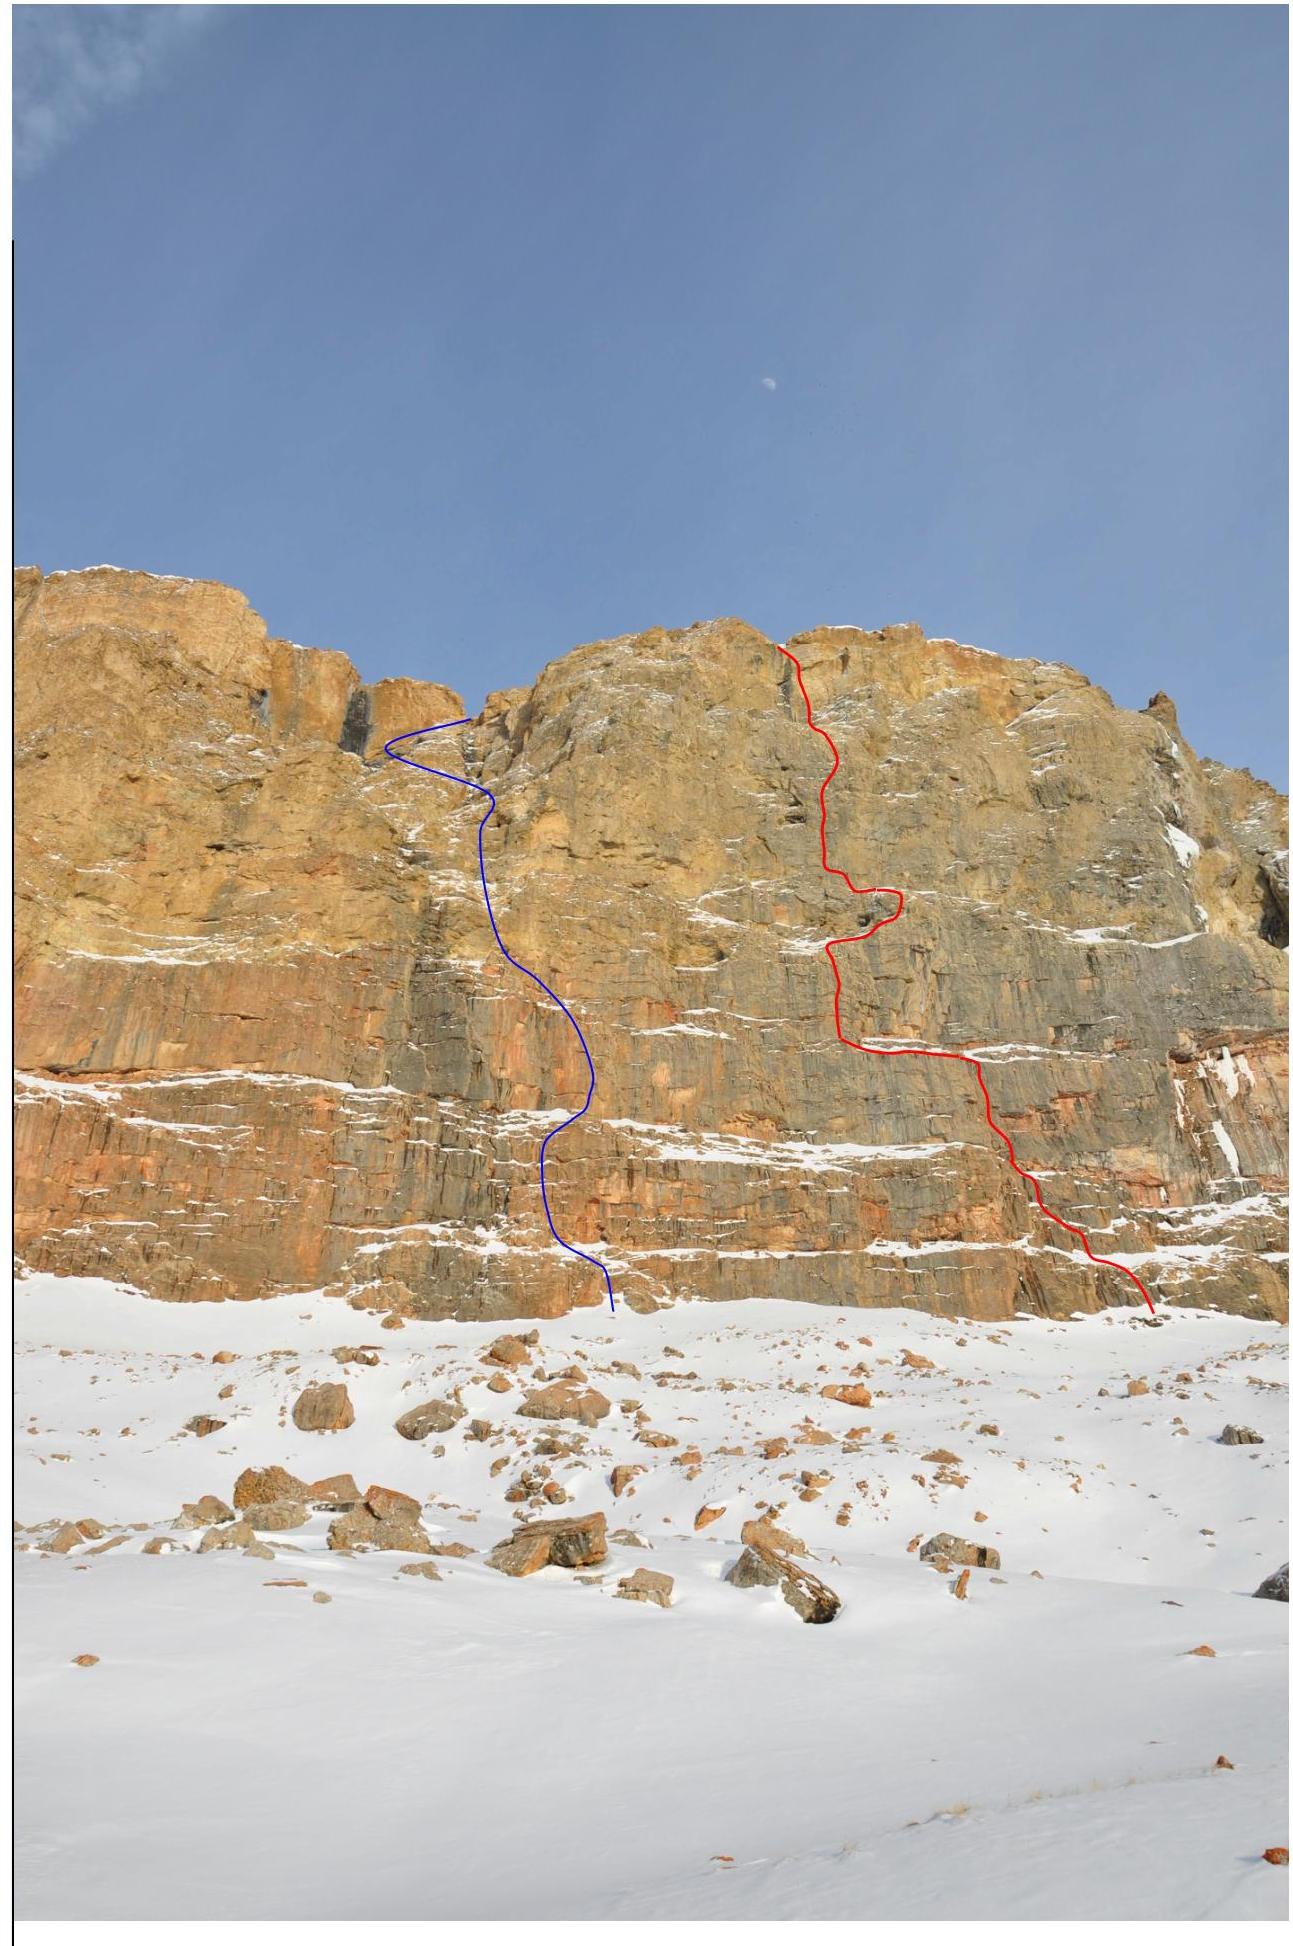
Nezametdinov's Route 5A
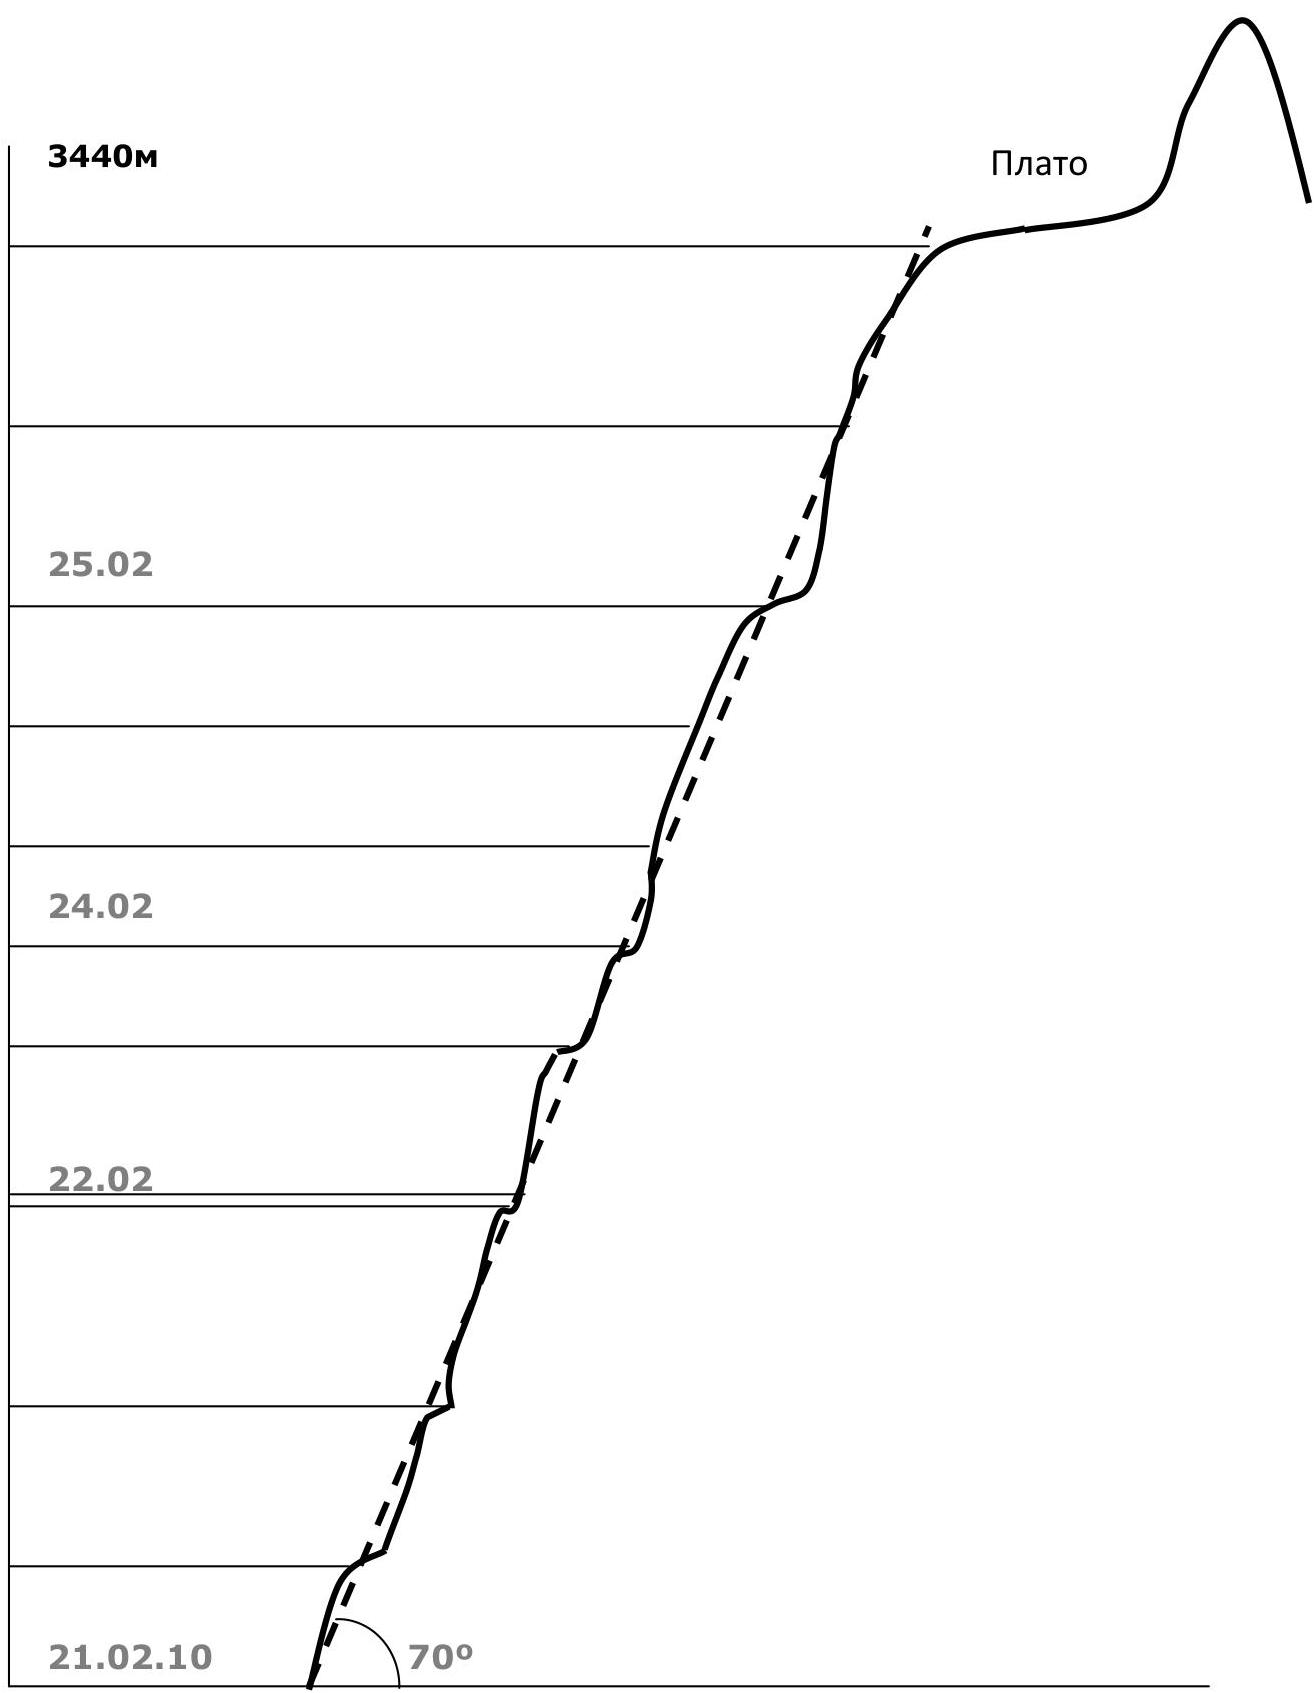
4. Route profile
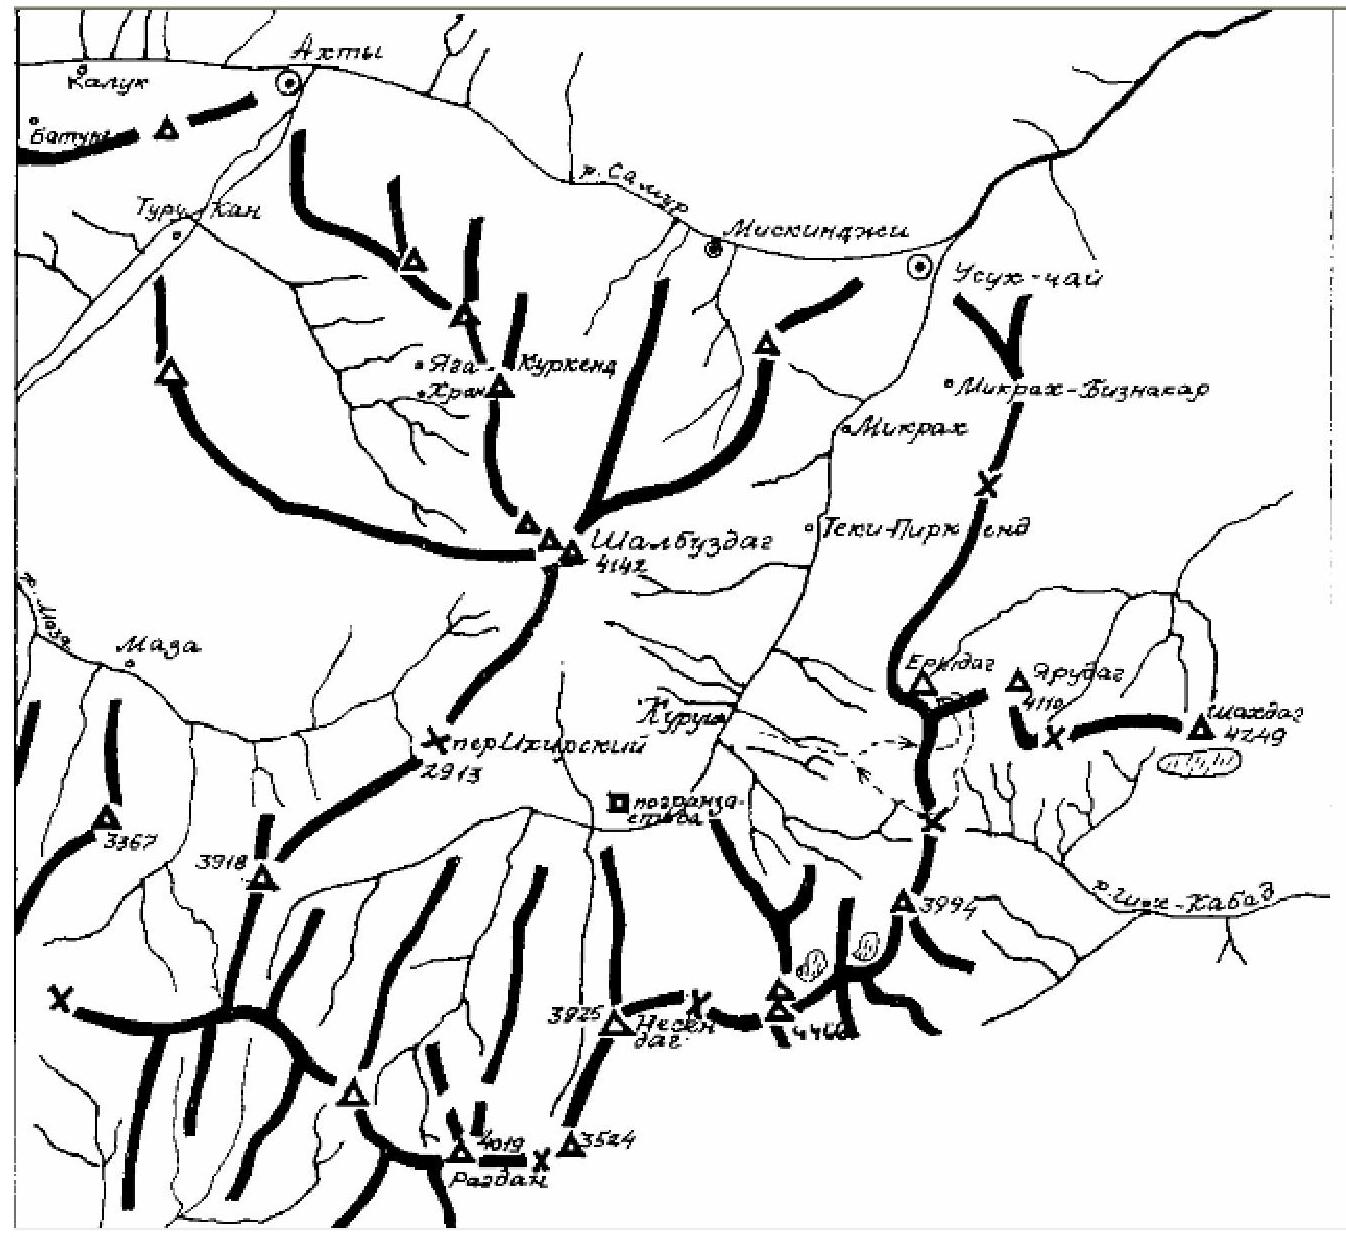
5. Map of the ascent area
(data on the area obtained from the report of the Dagestan Republican Search and Rescue Service team of the Ministry of Emergency Situations of Russia)
6. Brief overview of the area
Yerydag massif is located in a short North-Eastern spur of the Main Caucasian Ridge, on the border between Russia and Azerbaijan. It forms an almost single plateau with Yarudag and Shahdag. In Dagestan, walls drop with heights of 300–1100 m. The wall is composed of metamorphosed limestones. The climate in the area is dry, but with more precipitation in May–July. In winter — frosty dry weather with periods of strong winds and precipitation (no more than 2–3 days).
To reach the ascent area from Makhachkala, drive along the "Caucasus" federal highway south to Novo-Gopak village (180 km), then turn right, up the Samur river to Usukhchay village (district center of Dokuzparinsky district). Then turn left onto a dirt road up the Usukhchay river to Kurush village (250 km, 2500 m above sea level). The journey takes 6–8 hours. In Kurush, it is possible to rent a kungan for accommodation and storage of things.
From Kurush village:
- Descend along the trail to the confluence of the Selda river into Chekhychay (2250 m) on the right.
- Then cross two bridges to reach a terrace (right bank).
- Along it, slightly left in the direction of the Wall, walk about 800 m, cross a stream and reach a kosh.
- From the kosh, move along the ridges and grassy slopes in the direction of the rightmost "Well".
- Reach a terrace 200 meters from the Wall (opposite Nezametdinov's Route, 5 "A"). Here is the Base Camp.
From Kurush village to Base Camp: 5–6 hours.
Attention! The entire right part of the Western wall (from Nezametdinov's Route to Sosulka) may be covered in ice in the spring (approximately from May to the end of June).
The route, however, is in relatively normal, undamaged condition, and in dry weather, can be climbed by free climbing.
7. Ascent schedule by days
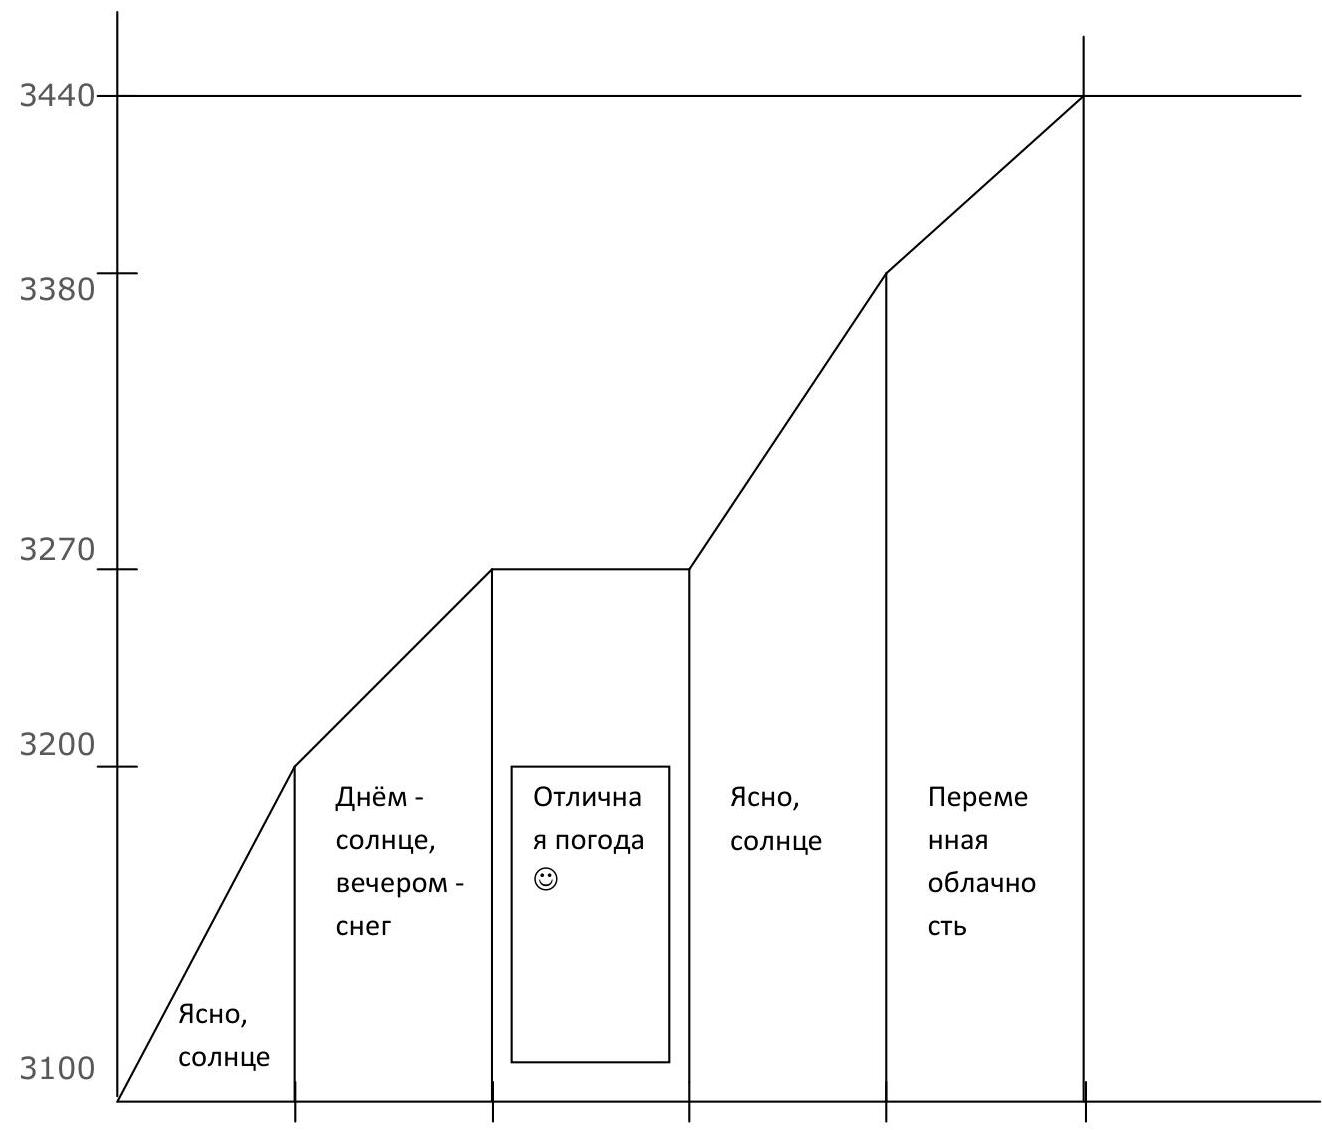
On the first day, 2 ropes were covered. Second day — 2 ropes (most of the time was spent on reconnaissance and searching for the optimal passage).
- Third day — February 23. Rest day.
- Fourth day — 3 ropes.
- Fifth day — 2 ropes, exit to the plateau.
8. Route diagram in UIAA symbols

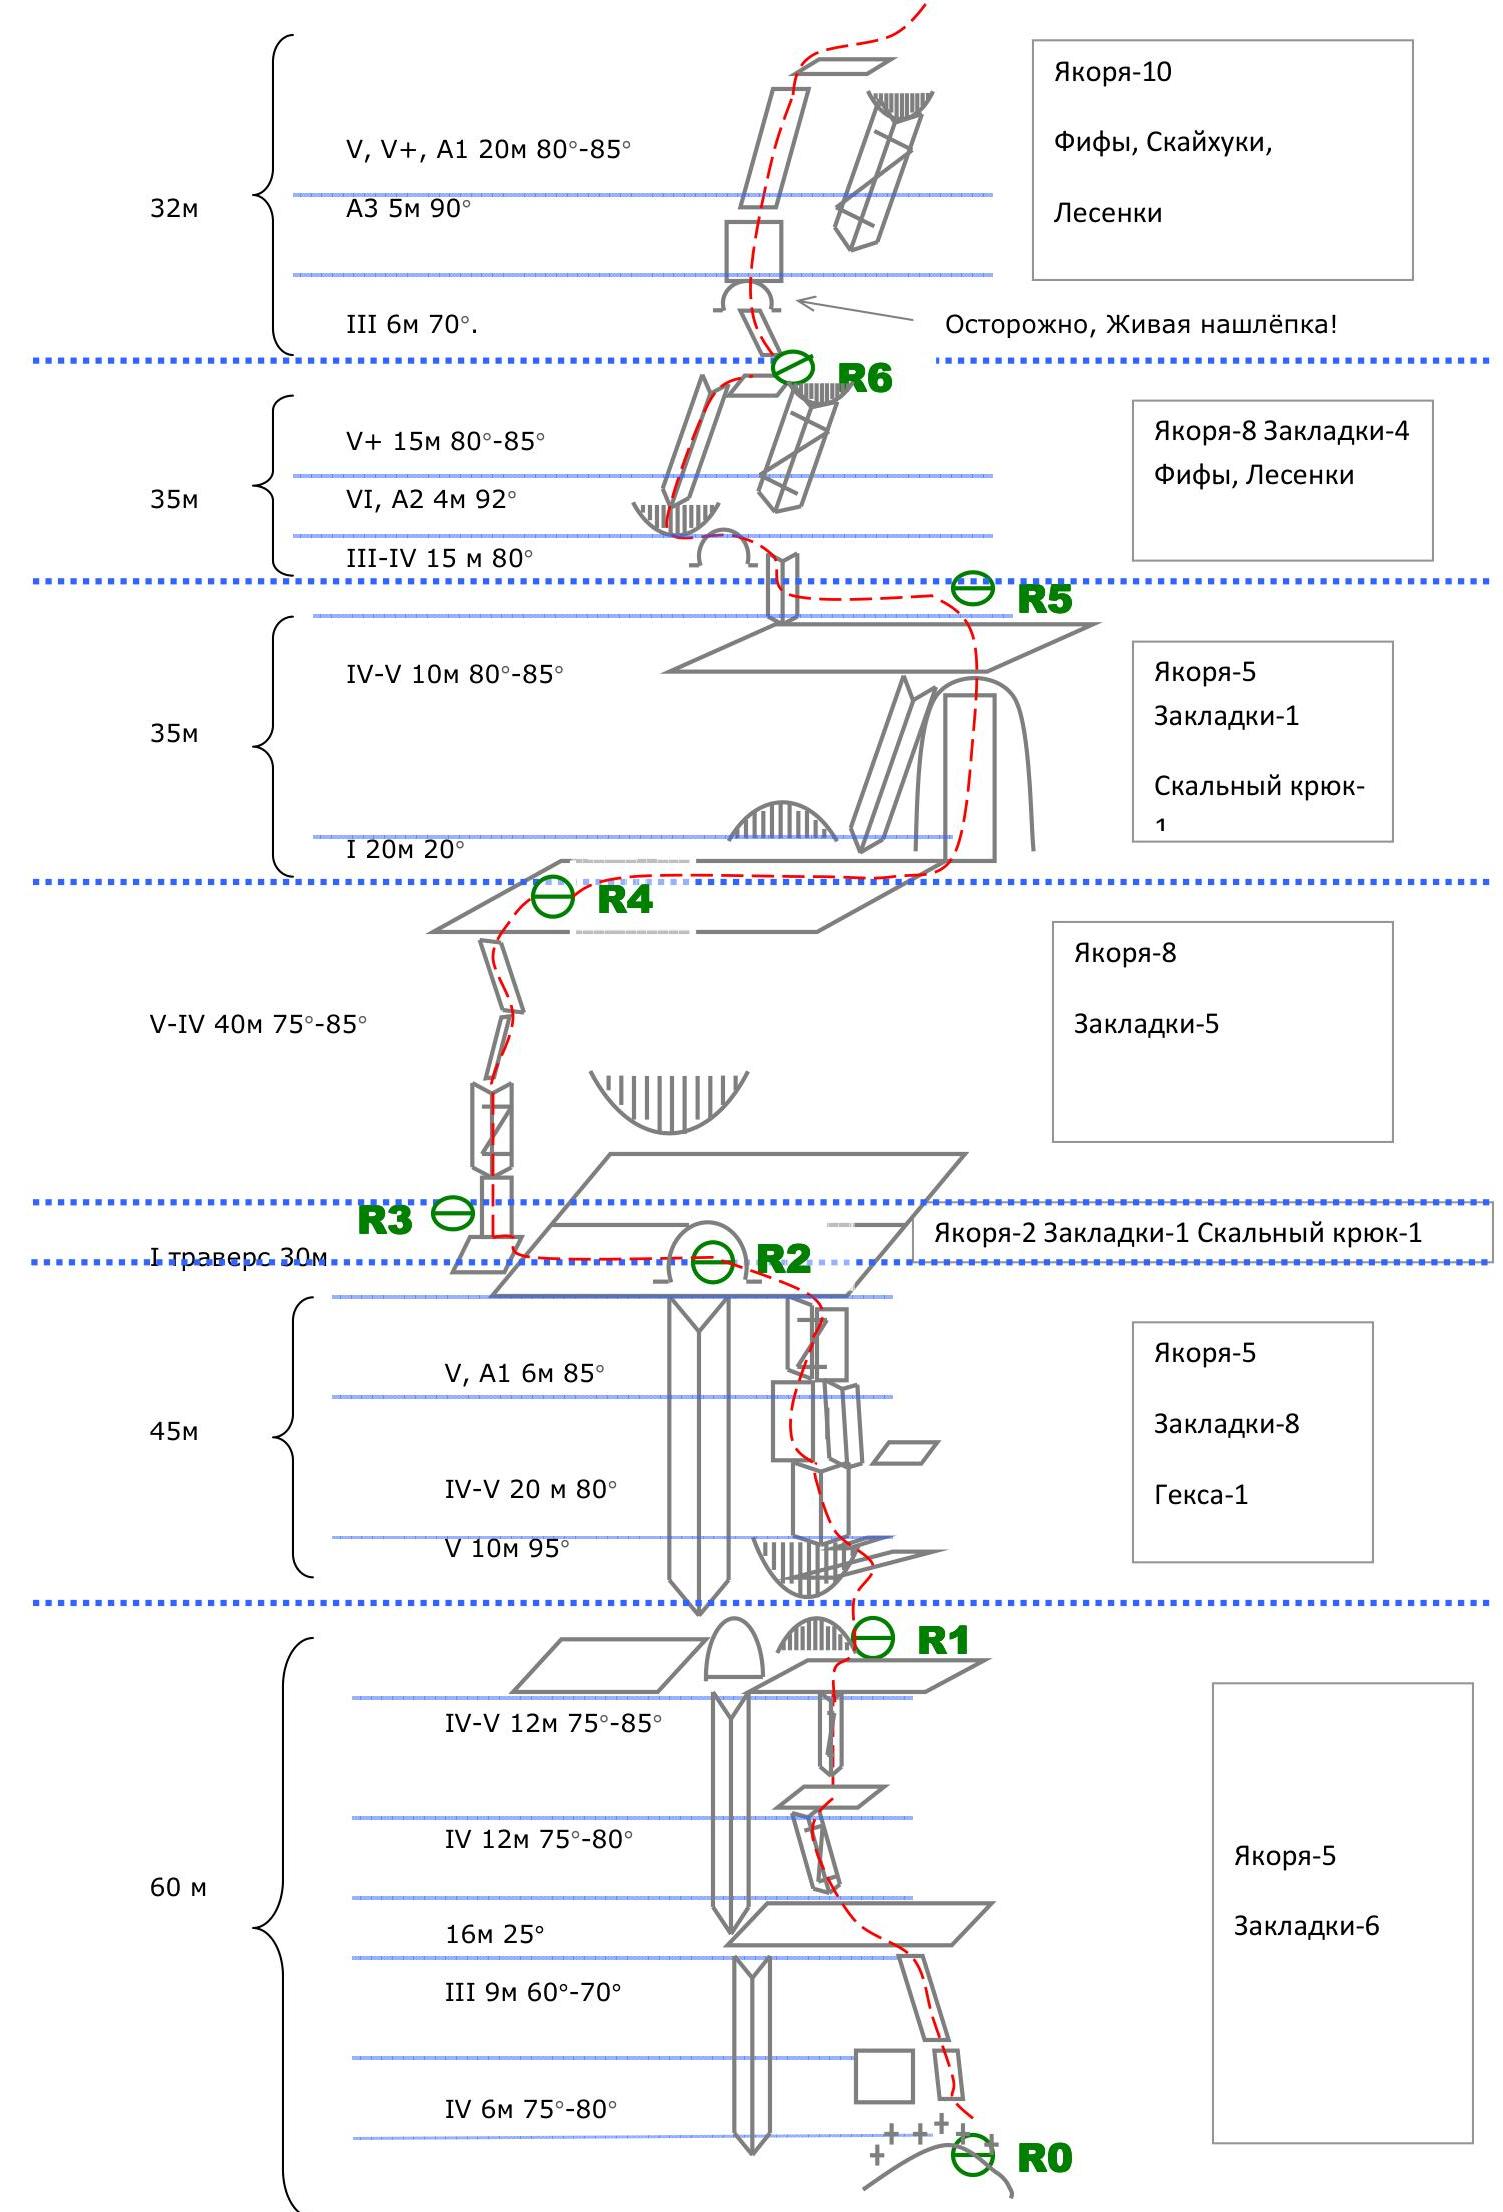
9. Brief description of the route
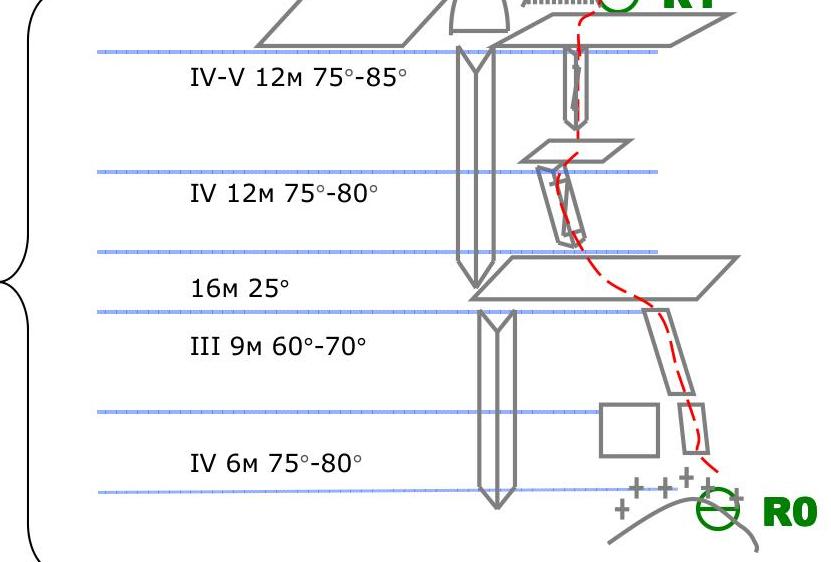
From Base Camp, move up to the right along small ridges towards a rocky outcrop under the wall.
R0–R1: Start about 30 meters to the right of the destroyed inner corner. Climb simple slabs and cracks to a large ledge. On the ledge, move straight to a corner with a crack. Climb to a small ledge and from it straight up the crack. Then exit to a ledge in a grotto.
R1–R2: From the grotto, climb overhanging feathers, then a crack, and a slab to the left of the crack (avoiding the inner corner on the left — it is destroyed and has loose rocks!). Then climb a 5-meter wall with a corner and crack (artificial aids). Then exit to a ledge. 5 meters to the left above is a bolt on a large vertical slab.
R2–R3: Traverse along the ledge to the left (along its lower step). From the large ledge, climb to a small one at the base of a buttress. Here is a bolt.
R3–R4: Through a small wall, exit to a crack in a moderately expressed corner. Climbing is tense, power-based, on large rough holds. Exit to a large ledge.
R4–R5: Move right along the ledge to its end, then up a buttress to the next ledge. To the left above is a bolt.
R5–R6: 7 m left along the ledge, then up through destroyed feathers. The landmark is an overhanging inner corner with a crack. Bypass the corner on the left at the base along a large flake. Here is the start of a groove. Exit to the groove through a hang — artificial aids on anchors or fifi hooks. Climb the groove (tense climbing), then up to the right to a small ledge (this is the top of the landmark — overhanging inner corner). Station — anchors, chocks (bolt is knocked out).
R6–R7: Bypass the next overhanging corner on the left, approach a 90° wall. At the base is a live flake. 5 m artificial aids, skyhooks may be useful. Then up to the right, climbing with elements of artificial aids. Traverse 4 m along a small ledge, above it is the next inclined ledge with a bolt.
Possible variations:
- There may be a simpler option — from the station, climb up to the right under the overhanging corner (likely artificial aids), and then climb a moderately difficult groove straight up to the next station.
R7–R8: Then climb moderately difficult terrain through cracks and slabs to a large ledge.
R8–R9: To the right of black streaks, a large flake is visible. In its right part, where it joins the Wall, there is a crack. Climb the crack to a large plug between the top of the flake and the Wall.
R9–R10:
- Climb a black crack to a chimney with black streaks (93°, artificial aids).
- Exiting the chimney, climb moderately difficult rock to a col on the plateau.
On the plateau, in the direction of the summit, bypass rocky spurs on the right along scree, exit to Yerydag peak (from the exit to the plateau, 3–4 hours).
Descent was made via the ascent route due to the snow overload in the descent couloir 2B. 2 anchor pitons were left on rappel.
Descent via route 2B:
- From the exit to the plateau, climb up to the right, about 80 m from the edge of the plateau.
- After about 600 m — a large gendarme, 50 m from the edge of the plateau.
- Between the gendarme and the first couloir, move to the second couloir.
- Descend into the couloir along scree to the left and down. The landmark is a narrow chimney going down. To the left is a small flake with a sling.
- 30 m rappel to the start of a snowy (partially névé, ice under the snow!) couloir.
- After 150 m, the couloir turns right.
- Move along the couloir, going along the Wall to the right!
10. Photo report
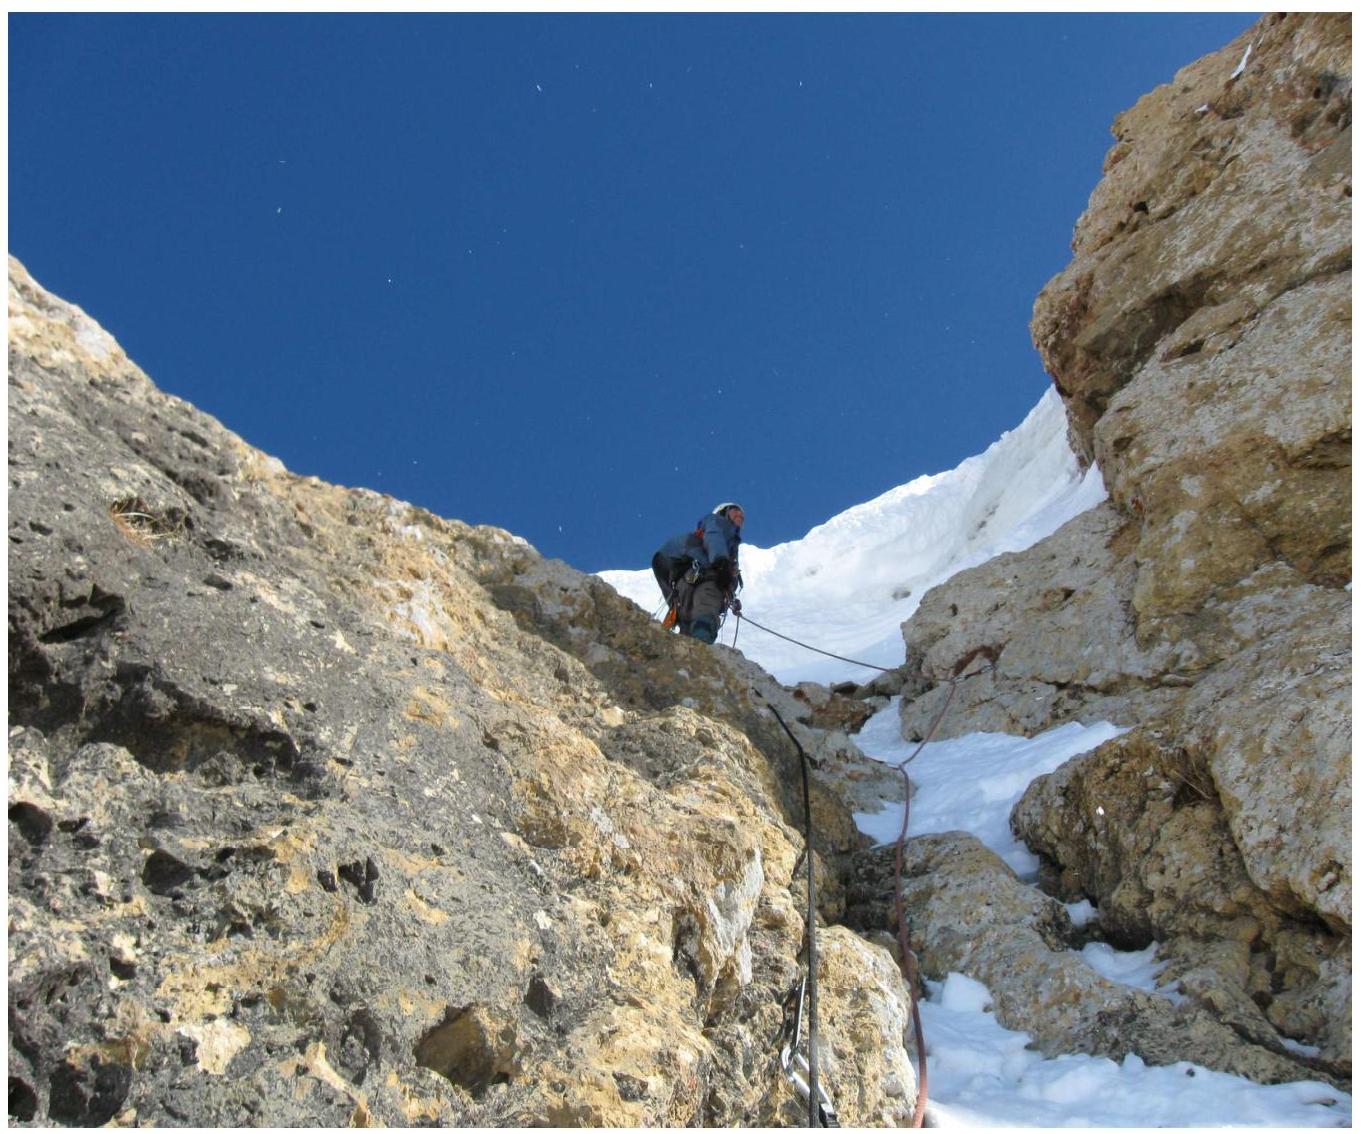
On section R1–R2
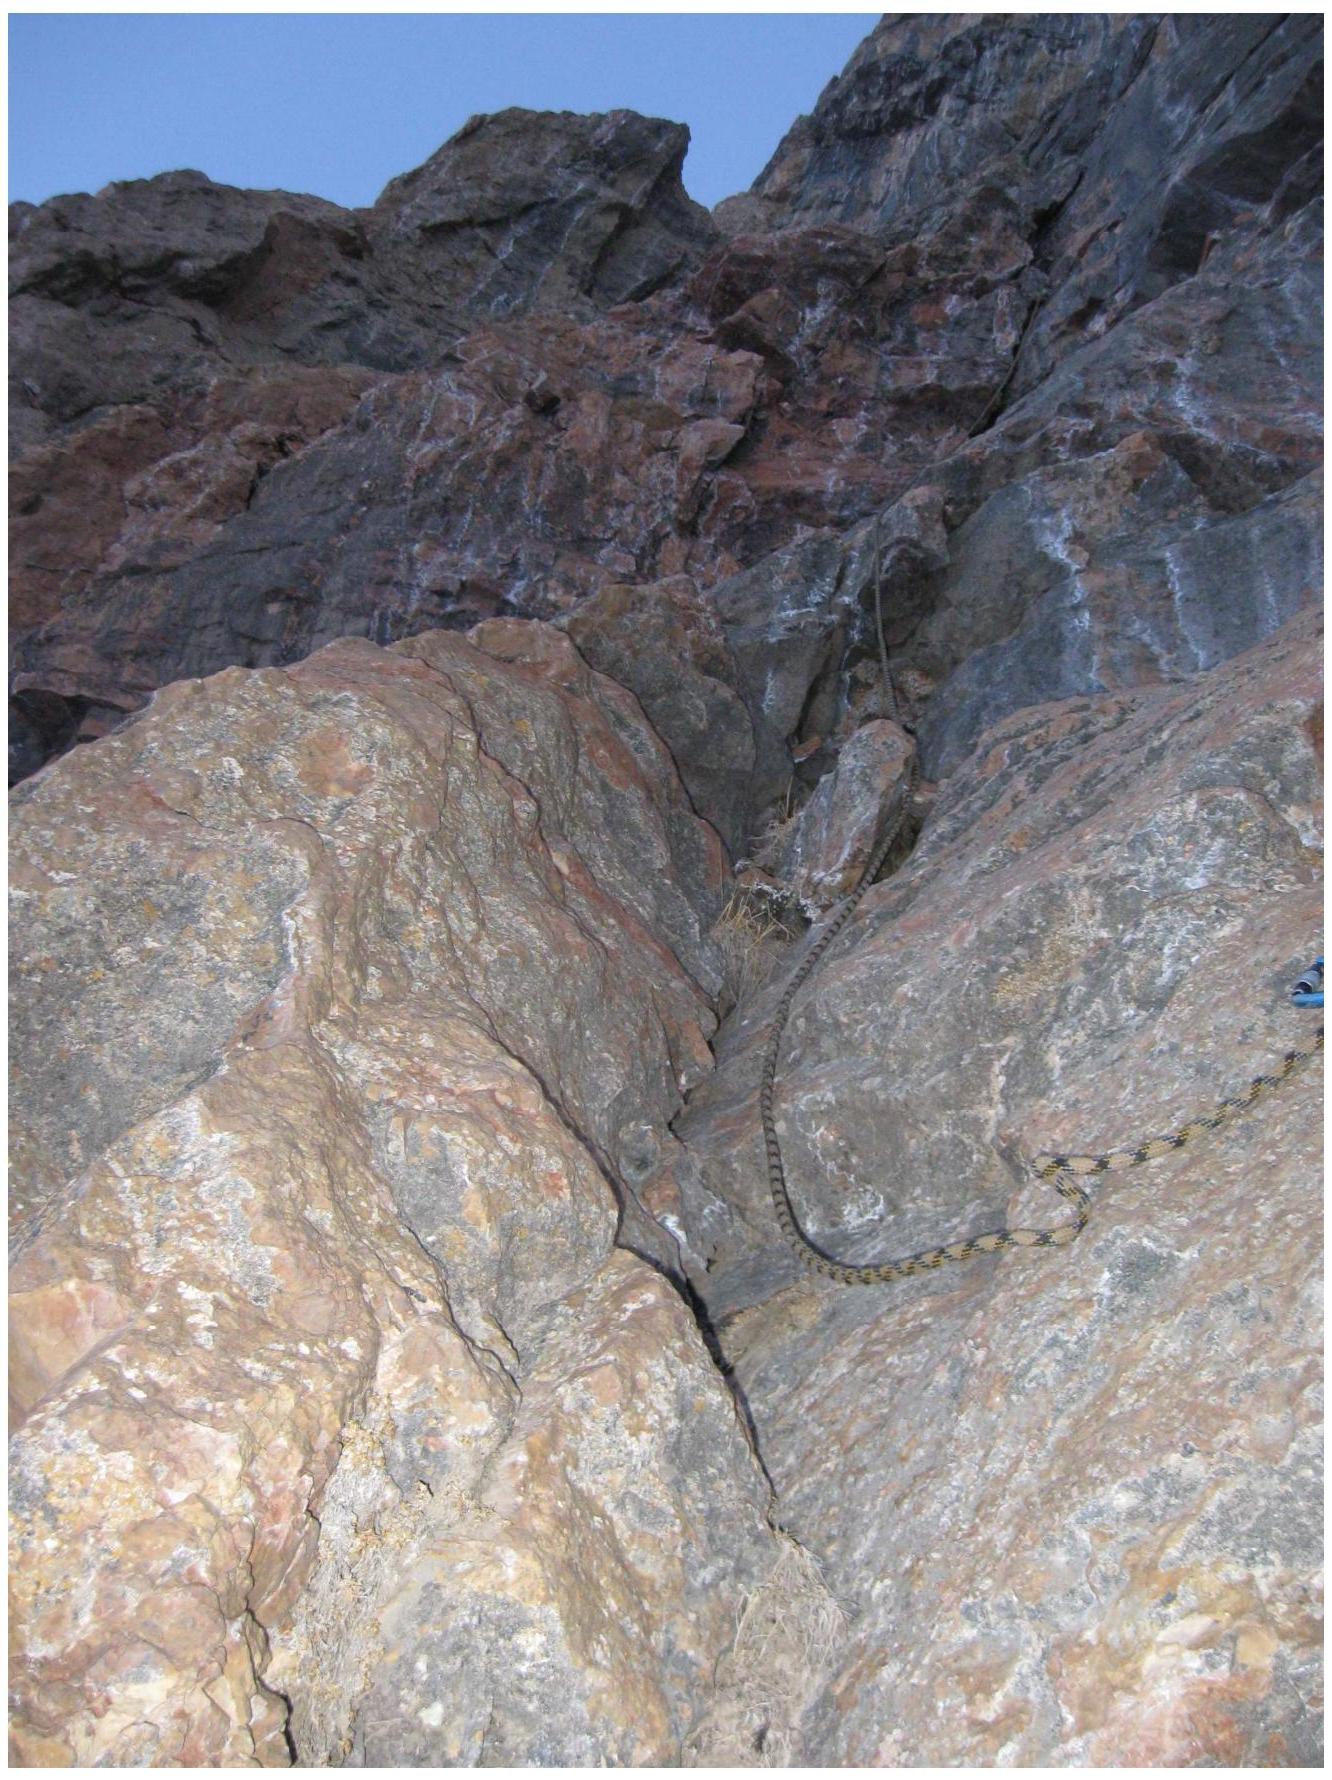 (after the overhang with feathers)
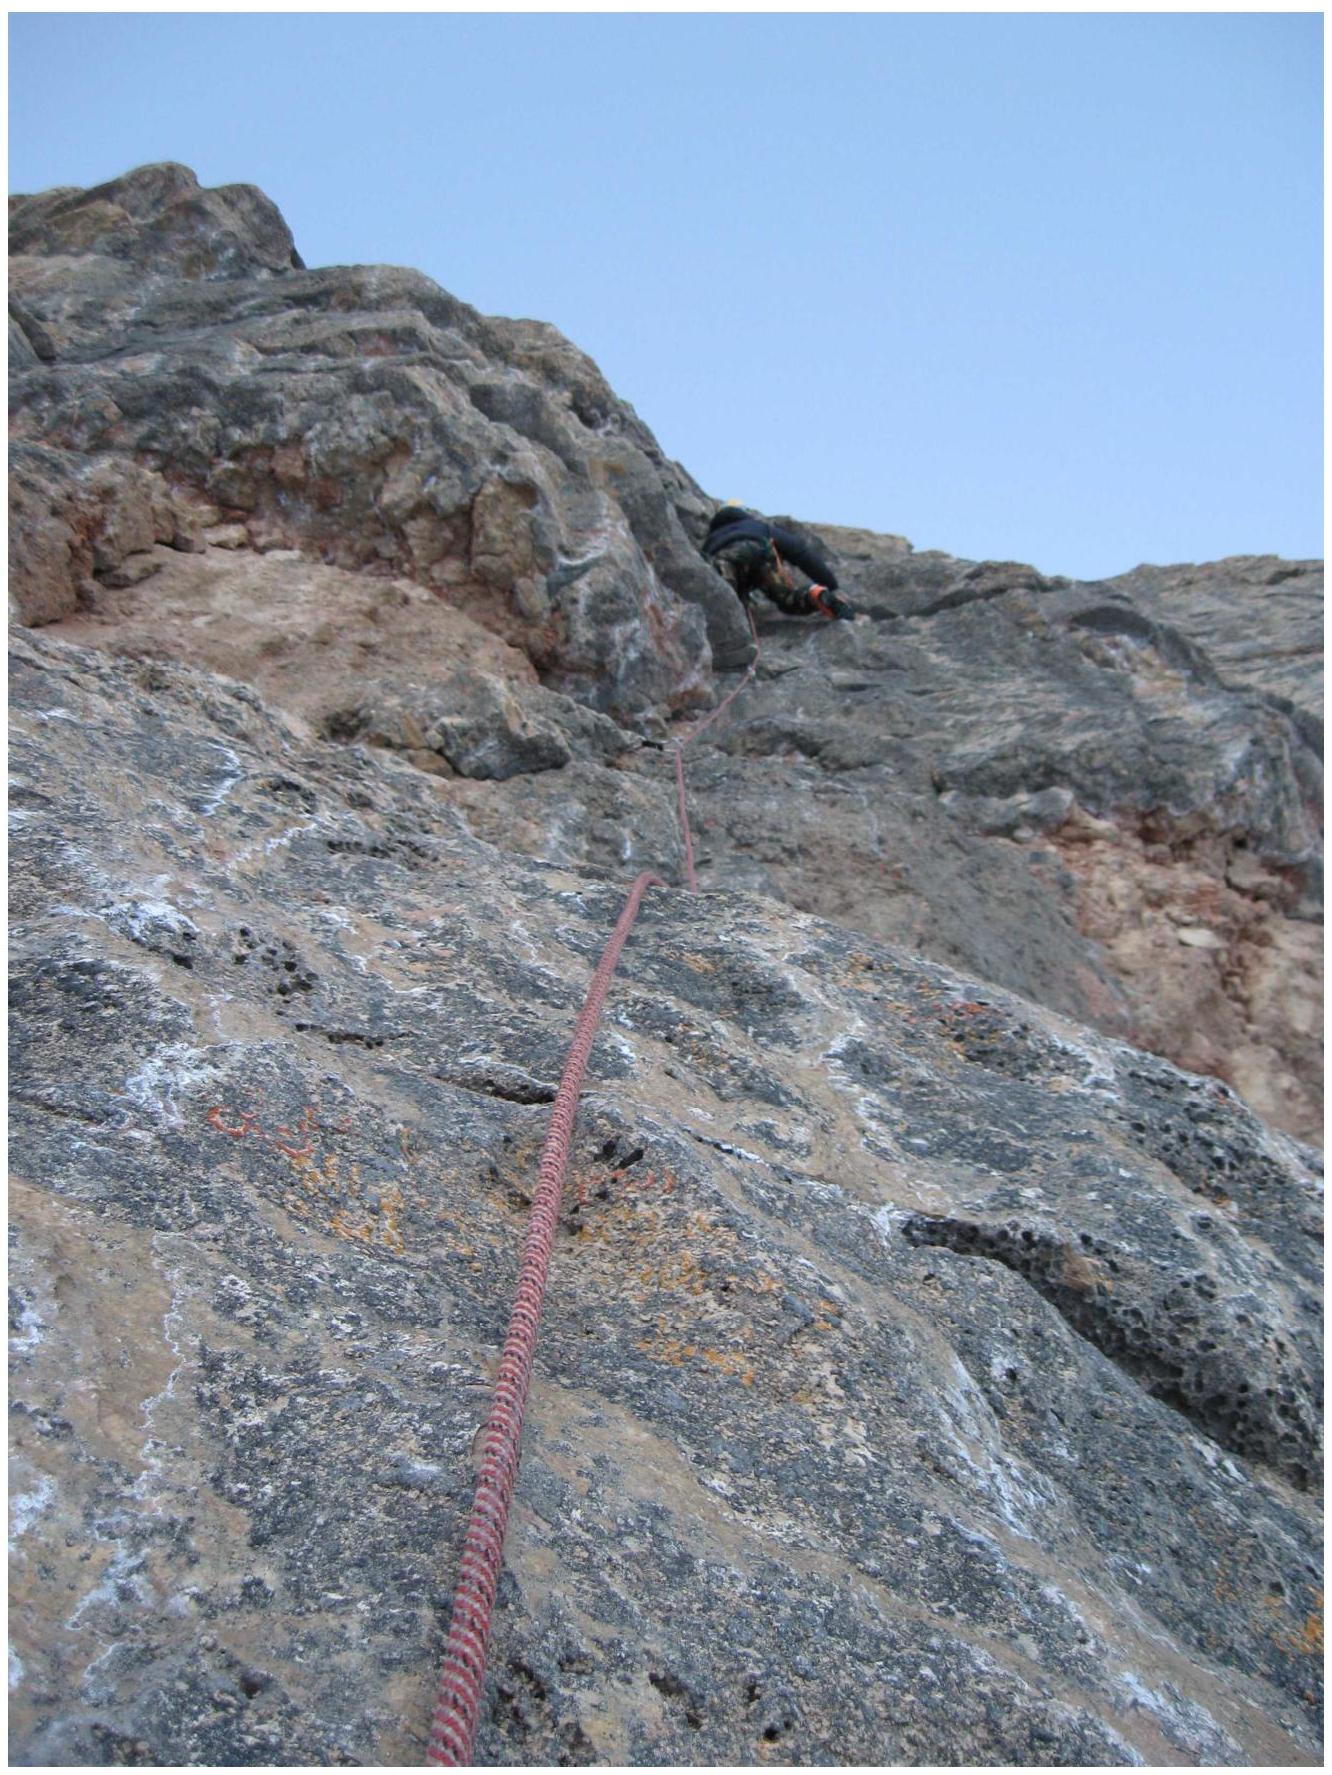
On section R3–R4
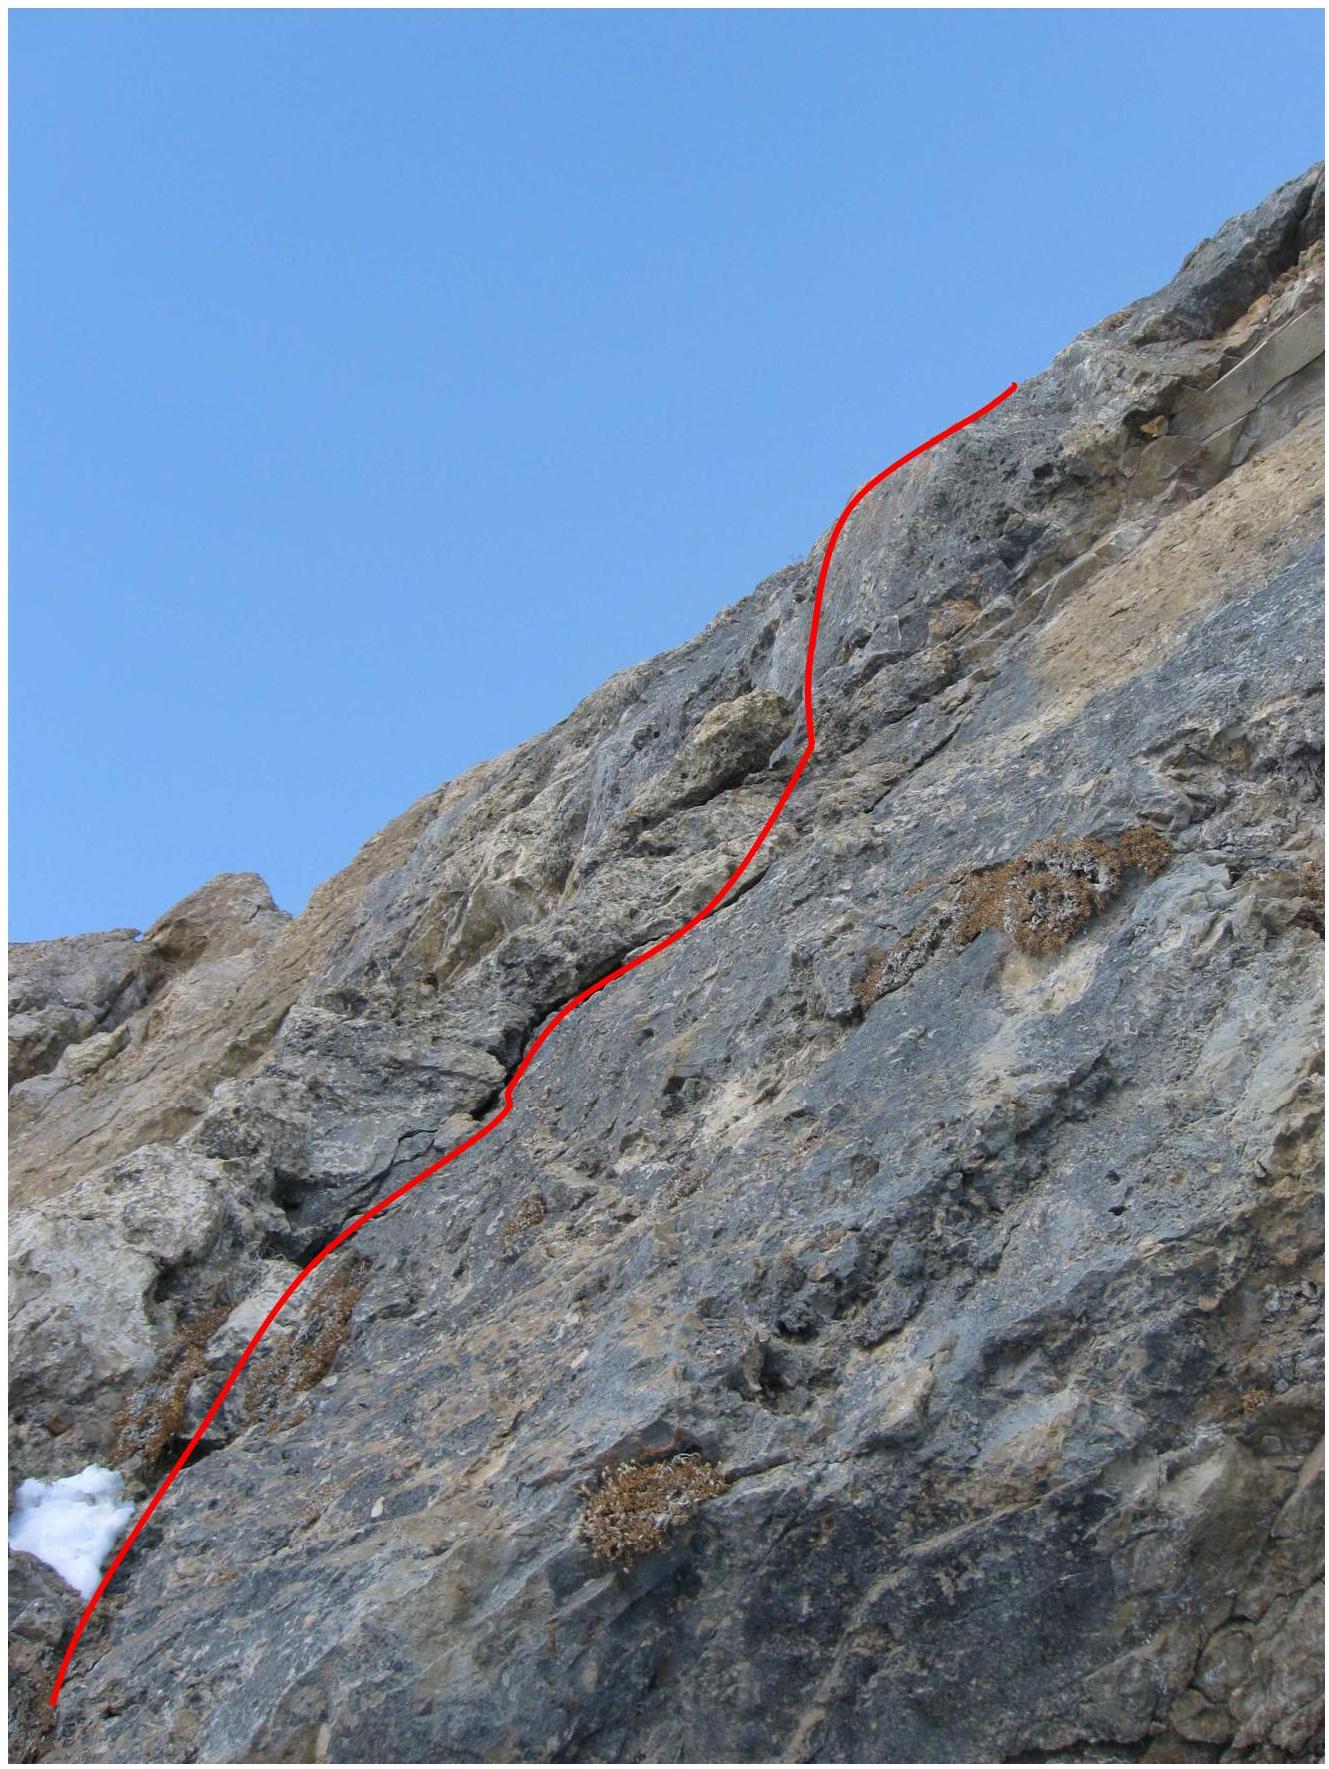
On section R6–R7 — live flake before the wall
On section R8–R9
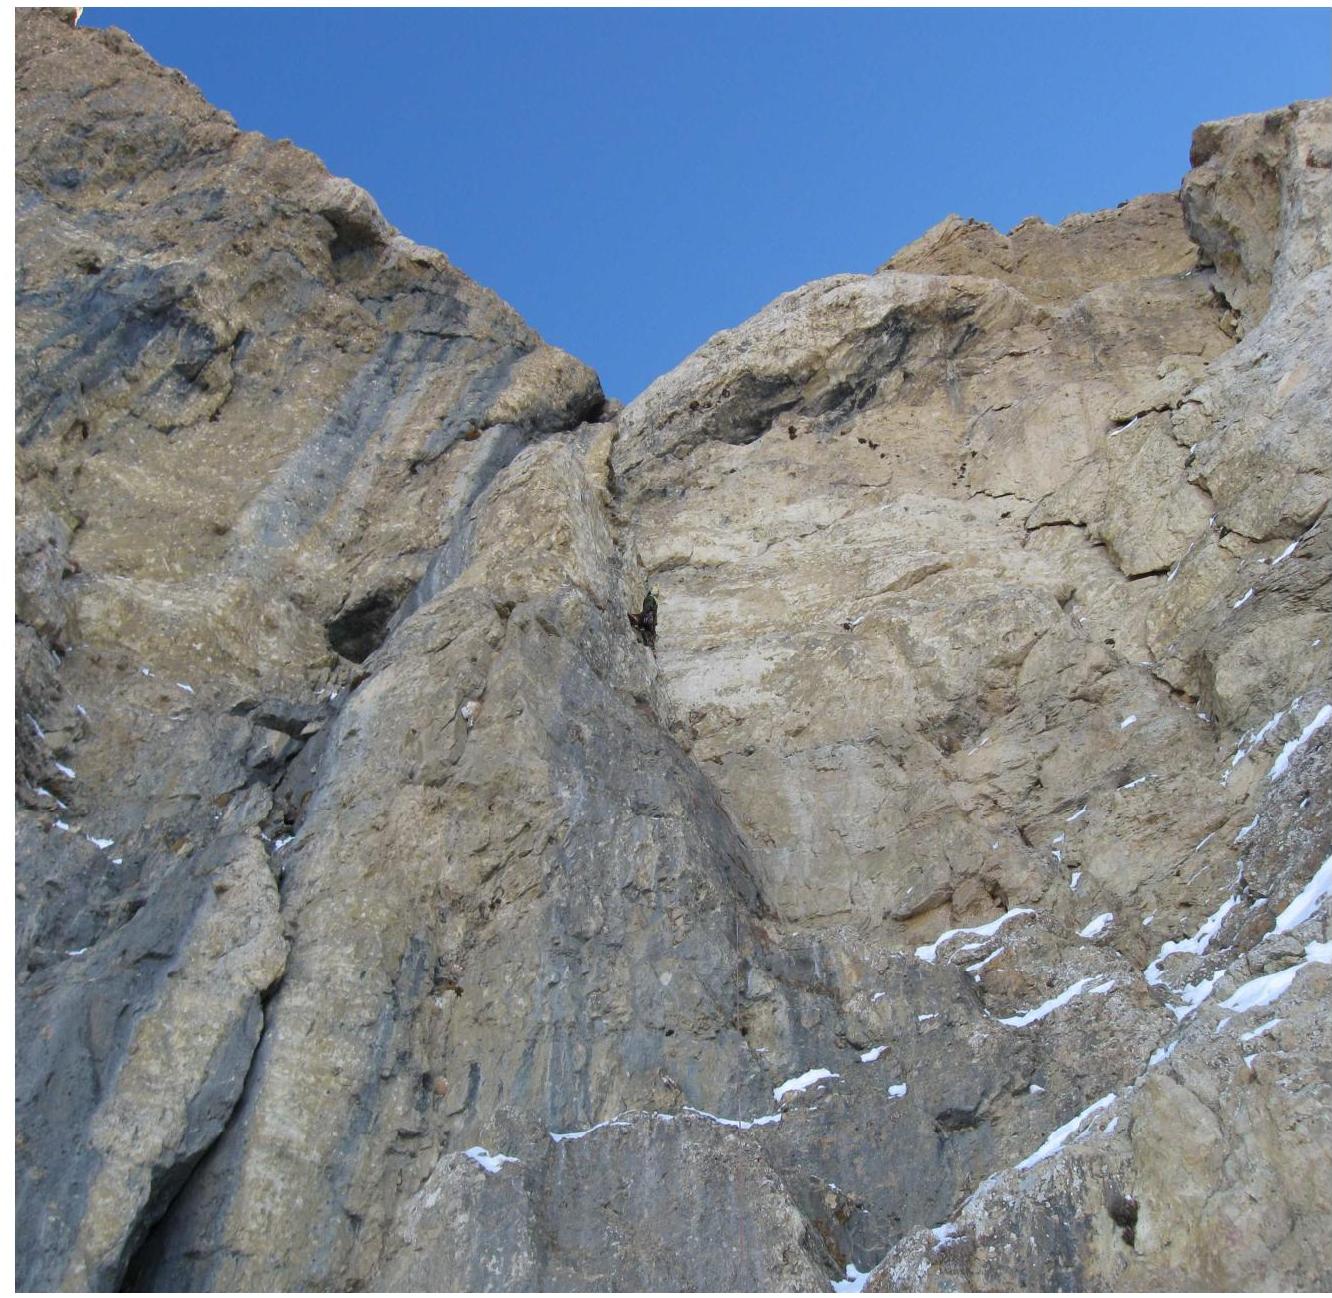
On section R9–R10
Digitized by Google

Before exiting to the Plateau