New route in Crimea on g. Treugolnik — “Gendalf Seryy” 4A
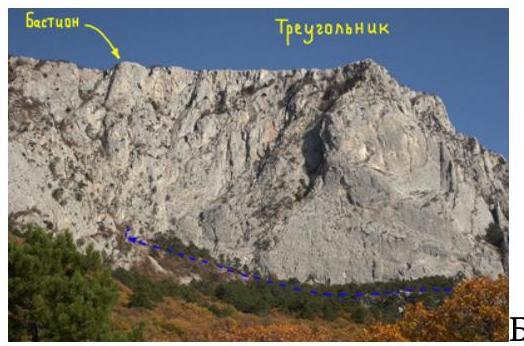
The bastion to the left of Treugolnik's main wall. Maybe it was climbed before, but it's not in the classifier and there are no descriptions anywhere. On the route, we didn't find any hooks or drill holes, nor any signs of previous passage.
The first time we came with the intention to make a first ascent, we were unlucky with the weather — it was raining. So, we decided to just scout the approaches and get as close as possible to examine and photograph everything.
Gora Treugolnik, route “Gendalf Seryy” 4A
First ascent (2011): Dmitry Lesnoy, Maxim Berezhnoy (Kherson)
It turned into a whole reconnaissance expedition in harsh conditions :). We had never been under Treugolnik before, but knew it was possible to approach from the quarry. We decided to head straight to the bastion from the road through the forest, and return via the quarry to compare these two approach options.
The second option, through the quarry, turned out to be much more convenient and readable.
The second time, the decision to climb this route was practically spontaneous, the weather was favorable, and we completed it as a two-person team in 10 hours without using any technical equipment or hanging belays — everything was done on-sight by both participants.
Approach
Approach through the quarry under the mountain, veer left. Then along the scree along the wall to the left — upwards. Find a trail and continue through the forest between the wall on the right and individual rocks on the left. Opposite the center of the main wall, there's a fire pit and a place for a tent.
Continue, staying close to the wall — it's easier to pass here. Move under the bastion to a ledge — a 10-meter high rock, it's better to ascend it from the left, but you can also from the right. From it, a beautiful view opens up on:
- the main wall of Treugolnik,
- Merdven-Kayasy,
- the sea.
On the same ledge, closer to the wall, there's a tree where it's convenient to set up a station.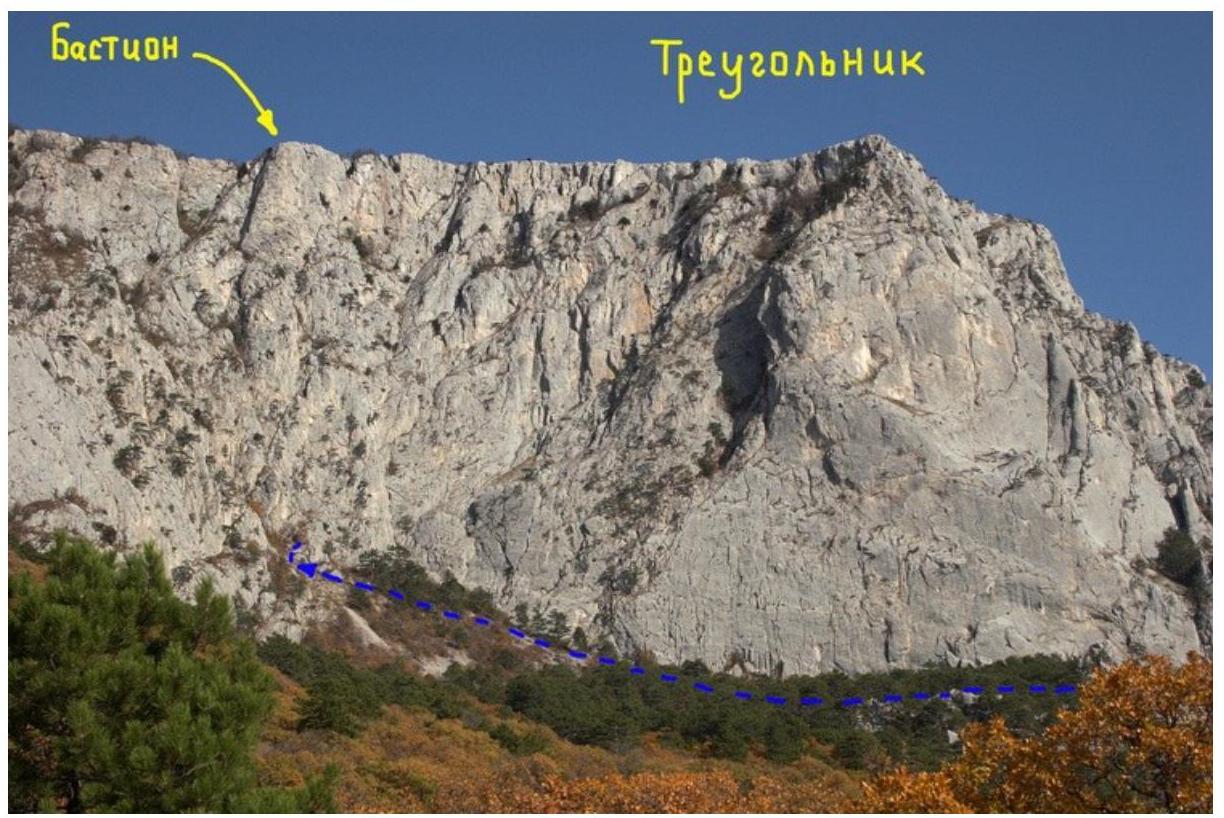
Gora Treugolnik. Approaches to the route
About the route
The route can be conditionally divided into three parts:
- Approach to the 1st bastion (a little over 1 rope length).
- 1st bastion (ropes 2, 3, 4, 5) is the most extensive. Initially, we planned to climb it along a more even line — without traverses on ropes 3 and 4. But already on the route, after exploring the ledge left and right and finding 3 lines upwards, it became clear that if we went along any of them, there would be nowhere to belay, although it might be possible to climb it. To confirm this, we later dropped the ropes from R4 and climbed down the center of the wall with top-rope. As expected: to climb here, you'd need to drill bolts for belays. Considering that the option with traverses and self-belaying wouldn't be less complex than a bolted sport route up the center, and the route as a whole would lose in directness but not in interest, we decided to keep the "clean" logical line without bolts. Although, it's probably worth discussing this with more experienced climbers. There's still an option to climb the center with artificial aids, but it seems out of place on a 4A route where all other sections are climbed clean, and the style of ascent isn't the least important.
The station at R3 is a bit inconvenient because the belayer will get some dust and earth falling on their head while the first climber ascends a 7-meter, somewhat crumbly crack, but not rocks. In my opinion: it's not too bad, but I decided to warn. To avoid this, the station should be set up a bit to the right — still on the ledge. But there, you might need to hammer in hooks; I don't remember if there's relief for stoppers or friends.
- 2nd bastion (7, 8 ropes) is climbed not up the center, but along the left edge, behind the rib.
This edge is a beautiful, positive, even wall, dotted with slightly overgrown cracks, which seems to be a characteristic relief of Treugolnik's main wall. Climbing along the entire wall is roughly the same IV–V category difficulty.
The entire route is climbed clean, with free climbing without using technical aids. There's a lot of diverse, interesting climbing, with a difficulty not exceeding 6a–6a+. The relief is generally monolithic and pleasant for climbing. Exceptions include:
- a section above R3 with earth-dust, mentioned earlier;
- a ledge before R3, which we thoroughly cleaned of loose rocks, so it's now definitely not rockfall-prone.
Number of bolts used
Number of hooks used — 2
- 1 on R7
- 2nd before the exit to the yayla, left behind
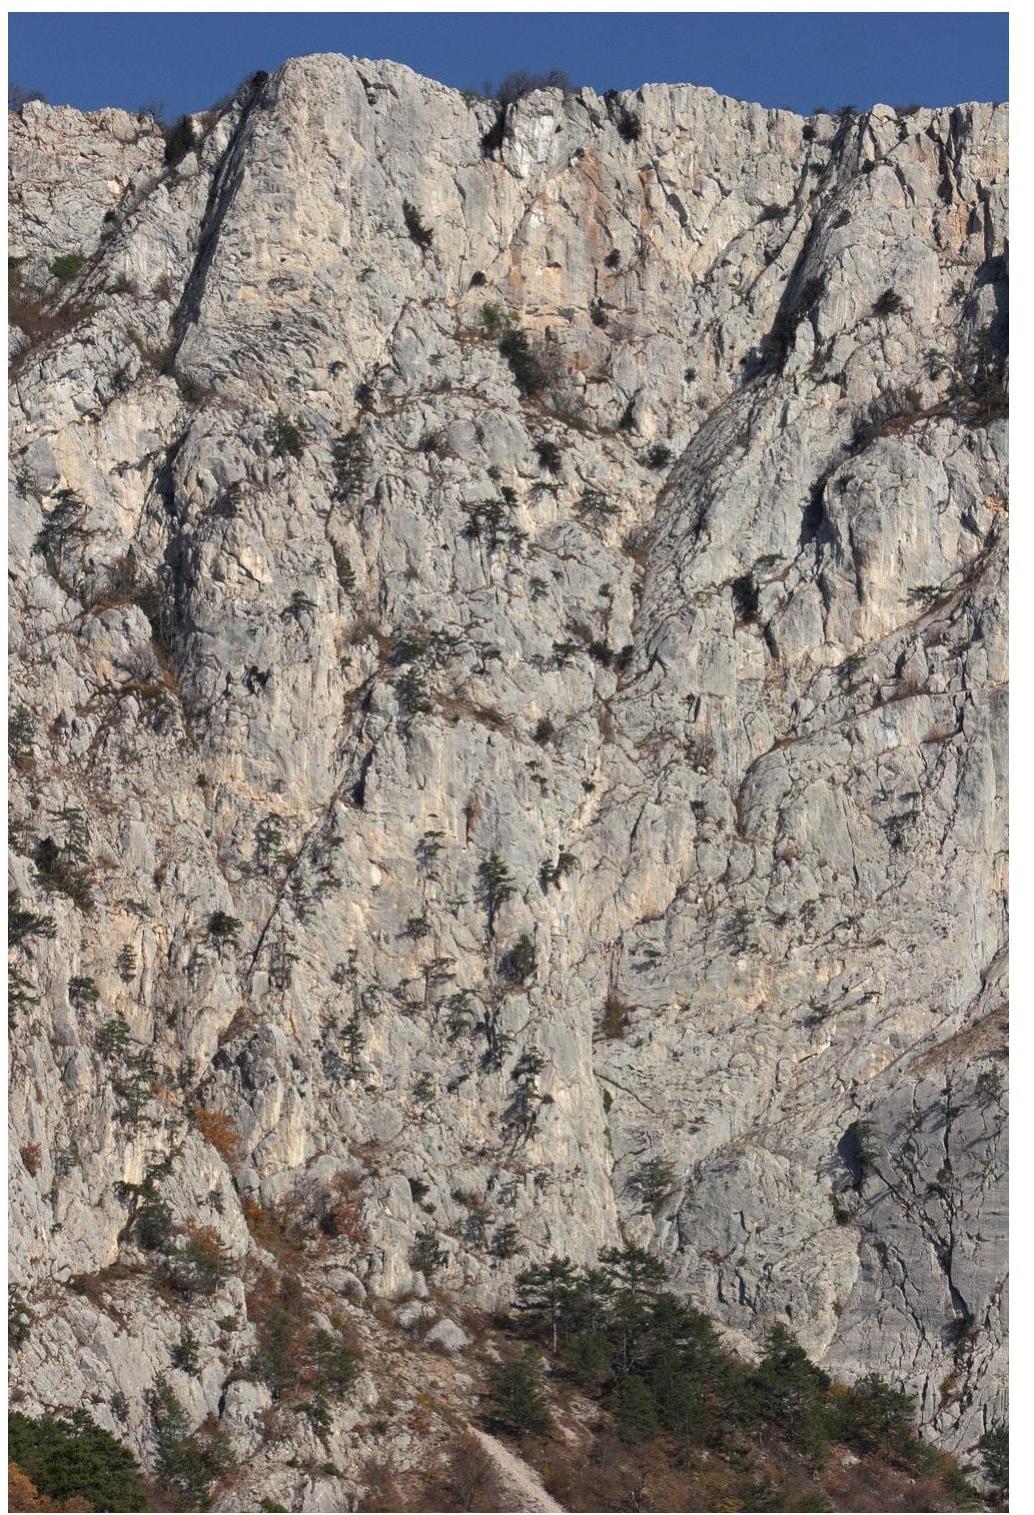
Approaches and beginning of the route. Close-up view
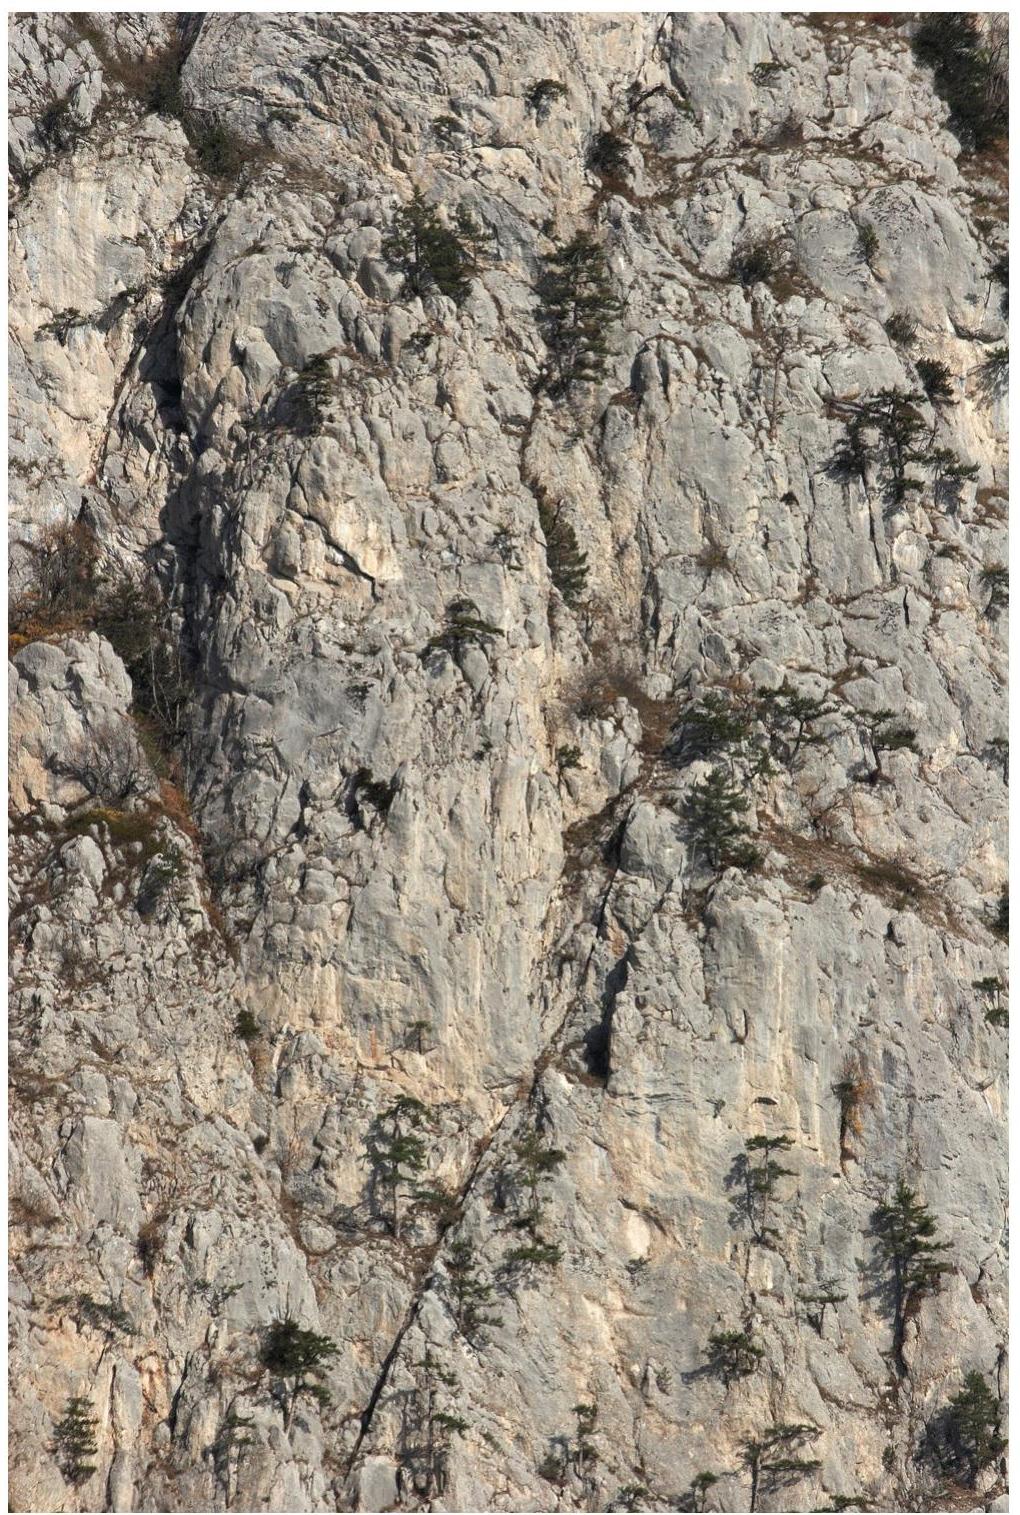
1st bastion in close-up
TECHNICAL DESCRIPTION OF THE ROUTE
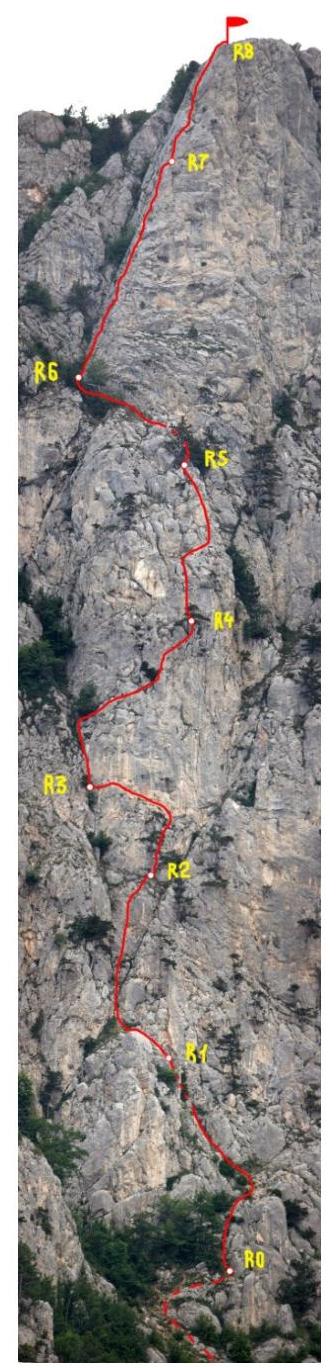
Line of the route. High-resolution photo
R0–R1. Up through a bush to a large inclined ledge, then turn left and up through simple rocks to a good bush, not reaching the shoulder-ledge by about 3 meters. Station on the bush. Cat. diff. 2B, 50 m.
R1–R2. Exit onto the shoulder-ledge, turn right and straight up the wall to a large pine.
Climbing:
- Initially through the bastion — challenging
- Then becomes easier
Carefully with stopper belays — you'll have to search for them. Station is convenient on the pine. Cat. diff. 3B, 40 m (10 m — II; 5 m — IV+; 25 m — III).
2–3. Up 12 m slightly to the right of the tree and then a long traverse to the left with a slight gain in height to a tree growing in a cleft, station on it.
Traverse:
- Passes along the ledge
- Not very difficult
- You'll have to search for belay points
III cat. diff. 35 m (12 m — III; 20 m — II+).
3–4. Up through a somewhat crumbly crack to a large tree. Before it, go right upwards — traverse in the direction of a large juniper. The bush is quite sprawling and dense, better to pass it from below.
Above the bush to the right, a good crack starts. Along it, roughly upwards for 3 m and then up to the right to a pine, station on it. The rope length is just enough, for it to run smoothly, it's better to place longer slings on the tree and bush.
Cat. diff.: IV+
Length: 50 m
Sections:
- 15 m — IV
- 22 m — IV–V
- 3 m — IV
- 10 m — III
4–5. Up 15 m, climbing is challenging, then a simple traverse to the right behind a protrusion and up to a tree. Station on it. IV cat. diff. 40 m:
- 3 m — V;
- 7 m — IV;
- 10 m — II;
- 17 m — IV.
5–6. Up to the right 7 m and exit onto an overgrown terrace — this is the end of the first bastion. Along this ledge, go far to the left around the corner of the 2nd bastion. Near a tree by the wall, you can make an intermediate station. 7 m — I cat. diff.; 50 m — no category.
6–7. Up along the left edge of the 2nd bastion, mainly along the right edge of the wall, closer to the ridge, but not on it.
The most convenient place for a station:
- a protrusion on the ridge a bit above the middle of the wall.
Equipment:
- a sling on the protrusion;
- for reliability — 12 small stoppers or a hook.
Cat. diff.: IV–V cat. diff. Height: 45 m.
7–8. Straight up.
Options for passing before the yayla:
- go left;
- continue straight (belaying is more complex, can't do without 1–2 hooks);
- or on determination, climb about 7 m under the top.
Cat. diff.: IV–V. Height: 40 m.


