Falcon — 18
Author: Sovich Alexey, Kiev. The route description is based on the state as of August 19, 2003. Photos taken with a "Smena-8M" camera.
"Fourth between the breasts" route, 4B category
A fairly interesting 4B route. It can be a good warm-up before attempting Sokol's 5th category routes.
Over the years, the route has changed slightly — it has become a bit more challenging:
- Rockfalls have destroyed several convenient trees.
- Water flows have smoothed out the relief on the second key — the лобке (forehead).
- For various reasons, there are fewer pitons on the route.
In my opinion, all these changes have only made the route more mature. I believe the route is even more interesting than "White Triangle" (5A), especially in light of the recent changes. You also need to make your own belay points — there aren't many pitons here.
For the route, it's sufficient to have:
- A set of friends (e.g., Stregore, 10 pcs.)
- A set of cams
- Quickdraws — 12–14 pcs., with two of them equipped with Irbis carabiners on one side (on the route, you often encounter pitons with either small holes or deeply embedded — other carabiners won't fit), although you can use a rope
- A large hex (Camp №10) — useful, but can be omitted
- Assorted slings — 6 pcs. won't be too many
You can take a minibus from Sudak to Novy Svet and ask the driver to stop near the ruins (visible from the road on a small cape) — local drivers know this spot.
The lower part of the route — three ropes — is fairly visible from the road. The route passes between two huge towers — breasts (see the name, and Photo 1) and is well-marked by the water flowing here during bad weather — a white, clearly visible strip descends along the route; you need to follow it.
There are three options to approach the route:
- Direct, straightforward — the most interesting and correct: the first 1.5–2 ropes of relatively easy climbing (also along the white strip, but from the very beginning) can be done simultaneously, belaying from trees and occasionally using placements, which will allow you to warm up a bit, as the first key of the route is the first two ropes.
- Economical variant, bypassing to the left — through gardens — grassy ledges, then to the right upwards, almost under the red grotto in the left breast (large, clearly visible from the road) and again to the right onto a ledge with a huge pine — standing at the foot of the route. This pine is also well visible from the road — it's very large and beautiful — you won't mistake it.
3. To the right through the cracks.
It's not recommended to set up the R0 station on this pine, although it seems convenient — the rope won't be long enough to reach R1 (on Photo 1, this is the intersection point of the left and central variants). R0 is made on a small snag (what's left of a tree that once stood here), located to the right of the route line, 20 m from the large pine, on a small counterfort. The snag still holds well, it's comfortable to sit here, and the first climber is well visible. On Photo 1, this spot is below the meeting point of the first, second, and third variants — the snag is barely visible with strong magnification.
The first two ropes bring the most pleasure, with a difficulty of approximately 5C–6A. Main protection points are:
- Friends
- Old pitons
- Occasional cams
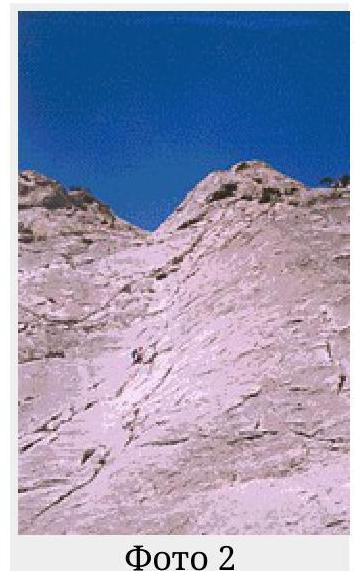
A short traverse along the slab from the top of the counterfort (see Photo 2) leads to the white strip (medium-sized friend).
Up the white strip, through a crack of variable width:
- Friends
- Cams
- Pitons — лепестки (petals)
- Швеллера (channels) — look carefully, as in many places, pitons are overgrown with grass and are hard to spot.
The actual angle of the wall on the first two ropes is approximately 70°. Photo 2 doesn't quite accurately convey the angle — it appears less steep than it is, and it's not possible to climb purely on friction.
Gradually, the crack veers slightly to the right and ends at a driven channel. A bit earlier, from the left below, another crack approaches — you need to transfer to it across a slab with almost no holds — a local quasi-key.
This can be done as follows:
- Preliminarily climb to the channel at the end of the crack, along the way placing a couple of reliable points before it (a tricky channel).
- Return back down.
- Make a quasi-pendulum move — try to load the channel as little as possible.
If you look closely, on Photo 2, with magnification, you can see the zigzag of the rope in this spot. This is for those who can't manage a clean traverse.
Immediately after the transfer, in the left crack, a piton is driven — place a long quickdraw of about 0.5–1 m here — the rope makes a nasty zigzag from the upper piton if you still managed to pendulum.
Further, there's a channel that's hard to squeeze through (deeply embedded) — and it's not necessary.
Looking up, you can see the eye of a шлямбур (a type of piton) — actually, it's a thick bolt driven into the slab (only two such bolts are on the first part of the route, the first one being the station).
Exit the crack to the bolt, make a station R1 on it and a small friend — a fairly reliable station (on Photo 2, a person is hanging on this station). The spot isn't very comfortable for prolonged hanging — there's little underfoot.
The next rope represents a section of similar difficulty. Again, there are pitons hidden by grass, often discovered by the second climber.
Photo 3 gives an approximate idea of the first two ropes in terms of:
- Angle of inclination
- Character of cracks
The snapshot is taken from R1 (first meters of the second rope).
Closer to the end of the second rope, you'll encounter another bolt. Station R2 is made near a dry, unreliable tree located above a huge rhombus, visible from the road. To reach the rhombus, traverse to the right (to its lateral vertex) along a ledge, under a juniper bush (there's a piton on the traverse), to the tree above the lateral vertex of the rhombus (better not to load the tree).
Above the rhombus, there's a comfortable ledge, a шлямбур is driven, and there's nothing else convenient for a station (a "нашлёпка" to the right sounds hollow when hit); the tree can be included but not loaded.
The third rope goes from R2 initially to the left upwards (several meters), to the start of an inclined crack going to the right upwards (a small friend at the beginning of the crack).
Then, along the inclined crack to the right upwards:
- Bushes
- Friends
On this rope, this spot is the most challenging, and it's not very convenient to belay — you need to proceed with caution. There was also an option to go not through the rhombus but straight (without making a traverse to the left), where cracks and pitons are also encountered.
Further, logically, along the path of least resistance upwards — climbing gradually becomes easier, but live rocks become a concern. The next station, R3, is made on a large dry snag (there were even slings from an old rope on it). Under the snag, there's a comfortable ledge.
The fourth rope goes from the snag straight upwards, through rocks with medium climbing difficulty. You can go slightly to the right — there's a row of trees convenient for belaying.
The goal is to reach a tree standing a bit to the right of the ascending couloir between the breasts, in front of a vertical wall (here, the rocks change character, becoming steeper). This is R4, before the second key. Here, there's a comfortable platform, and under the tree, you can hide from rocks that might fall from the couloir above.
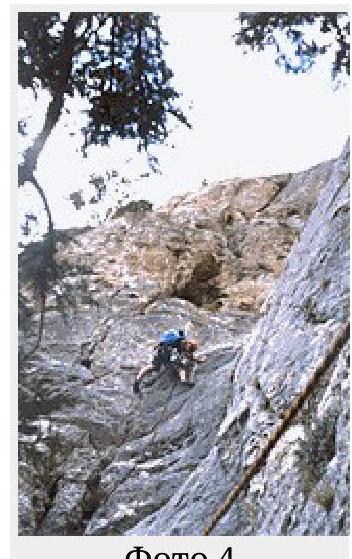
The fifth rope: from the tree to the left across the entire ledge, a small bush — approach the left part of the couloir. Upwards through a series of cracks and cavities (friends, old pitons), sticking to the left side (Photo 4).
In the center, there are three cavities — you can place a friend in one, and another has a good hold for a clenched fist.
To the left upwards from them, a small hollow is visible (not visible on Photo 4 as it's behind the person), and before it, a horizontal лепесток (petal) will be encountered, followed by a "pie" made of two лепестковые (petal-like) pitons just before the hollow.
In the hollow itself, a hex (Camp №10) fits perfectly with its wide part (highly recommended), it jams well and insures the vertical лепесток driven 0.5 m above. This лепесток is the last point for the next 10 m of climbing (not visible on Photo 4 — it's above), of which approximately 5 m (the first few moves) are 6A–6B — decide for yourself whether to bring a hex.
On my part, I'll add that last time I fell there due to carelessness, on those 10 m; the лепесток held, but who knows, it's quite old. This is the second key — the лобке (forehead). Earlier, it was easier here — there were longitudinal grooves — промоины (erosion channels) where you could brace and hold on with your fingers — on a щипок (pinch). Now the spot has become smoother, resembling a toilet drain — the промоины are gone.
There are a couple of cavities underfoot:
- One in the center
- Another to the right, a bit higher
Under the hands — small cavities. Properly positioning your feet on the cavities, you can proceed further. The next 5 m are done on friction — until the first cracks (friends).
Station R5 should be made on a tree in the couloir, after the лобке. This tree is also visible from the road, resembling a candle. The spot isn't very comfortable: an inclined surface under the tree, rockfall hazard, but you can hide behind the tree.
The sixth rope — challenging ahead, but don't relax. There are large live rocks in the couloir. Easy climbing leads to the right breast. There are no pitons on this section. R6 is made on the right breast, on the uppermost surviving snag.

The seventh rope: simple climbing along the slabs to the right to the left, towards the overgrown внутренний угол (inner corner). Here, our 4th category route converges with the 3rd category route — further ascent follows the 3rd category route.
(Don't go straight up — you'll end up on slabs without the possibility of placing a point (A5), and the transition to the внутренний угол will become non-trivial).
The goal is a juniper bush to the left upwards at 45°, where the station is. The station is either on the juniper or on a шлямбур 3 m higher (there was also a sling from a rope tied to a channel driven a couple of meters higher, and a juniper root — three points for station R7).
The eighth rope: from R7, up the внутренний угол to a large tree (R8). 6–7 m from R7, there are two шлямбуры, then for 25 m, there are no pitons (there used to be plenty). Climbing is simple — third-category difficulty.
From R8, half a rope to the yayla (alpine meadow). Great. On the yayla, in a few meters from the tree (climb directly above it) — a "морковка" (carrot-shaped rock). After the "морковка", the rocks flatten out — a simple exit. At the top, three шлямбуры are driven, but it's better to:
- Walk 15 m along the yayla to a large pine
- It's more comfortable and reliable to belay the second climber, going around it.