
- Technical class
- Italy, Alps, Sarca valley
- Monte Breno (1535 m) by the Eastern wall, "Il Grande Incubo" route
- Presumably 6B cat. dif.
- Height difference 850 m, length 1015 m, length of V cat. dif. climbing sections — 345 m, length of VI cat. dif. climbing sections — 255 m, length of VII¹ cat. dif. climbing sections — 65 m, length of A0 ITO sections — 85 m, length of A1 ITO sections — 15 m, length of A2 ITO sections — 160 m, length of A3 ITO sections — 120 m, average steepness of the route — 85°, average steepness of the lower part of the route — 65°, average steepness of the upper part of the route — 115°
- Driven in hooks: rock: 69/38* chocks: 20/0 bolt: 111/111* * — previously driven
- Team's walking hours 47 h, 5 days to ascend, descent on the day of reaching the summit.
- Overnights: 1 — sitting on a ledge 2 — hanging on a boulder 3 — hanging on a boulder 4 — hanging on a boulder
- Leader: Novikov Alexander Viktorovich, 1st sports category, Moscow. Participants: Belousov Vladimir Alexandrovich, CMS, Odintsovo.
- Coach: Kauts Leonid Sergeevich, CMS, Moscow.
- Start of the route: January 3, 2007 Summit: January 7, 2007 Return: January 7, 2007
- Moscow City Alpine and Rock Climbing Federation.
Description of the area
The Monte Breno massif is located in northern Italy, in the southern spurs of the Italian Alps. This area is known worldwide for its rock climbing and mountaineering routes laid out on limestone walls rising along the right (orographic) bank of the Sarca River valley. From south to north, the walls of the Colodri, Cima Allya Coste, Monte Breno, Monte Casale, and other massifs stretch out. The height difference on these walls reaches one and a half kilometers (Monte Casale), but mostly ranges from 300 to 600 meters. The absolute heights of the massifs are comparable to the Crimean yayla.
Monte Breno (1535 m) stands out among the others due to its unusually long overhangs forming the upper part of the wall. The wall's height difference is 850 meters. Two routes have been laid out along the center of the overhangs. The oldest one, "Via Vertigine" (1992), was completed using a colossal number of bolt hooks and is not particularly challenging or interesting for climbers. This route was ascended in 2005 by V. Belousov to familiarize himself with the wall's relief.
The second route, "Il Grande Incubo," is considered the gem of the alpine routes in the valley, according to experts. This relatively young route (1997) was pioneered by Andrea Zanetty and Diego Filippii and has had only a few repetitions. The first repetition was made in 2000. After that, the route was repeated no more than once a year, possibly even less frequently.
The climate here is quite warm. In the summer, the heat complicates ascents due to the lack of water on the wall. Autumn, winter, and spring are more suitable seasons. In winter, the day is very short, which increases the duration of the ascent.
Italy has an extensive road network, making it convenient to drive up to the routes and take a short approach (1.5–2 hours).
As part of the Russian Alpine Championship in the technical class in the winter of 2006–2007, we decided to ascend the "Il Grande Incubo" route on the eastern wall of the Monte Breno massif (1535 m).
Technical and tactical actions of the team
On January 2, 2007, a cache was made, and some equipment was left under the route. This was done to scout the path and facilitate the approach to the wall early in the morning.
The weather before the ascent was unstable: cloudy during the day, with rain at night. On the day of the cache, it was clear, and the wall had a chance to dry out. Given that the lower, positive part of the route was dry, it was possible to complete the route in any weather, as the upper part is heavily overhanging and protects against precipitation. Based on this, the start was planned for January 3, 2007.
It is impossible to replenish water supplies on the route, so the team took 12 liters, calculated for 4 full days. All overnights were planned to be either sitting or hanging on a boulder and a sit hanger. The equipment was selected based on the route description published in Diego Filippii's book "The Walls of the Sarca Valley." The team had skyhooks, hooks, chocks, hatchets, anchor hooks, and camalots at their disposal. This set is sufficient for routes of 6th category.
On January 3, the team started the ascent. According to the tactical plan, the entire lower part of the route was completed on the first day. The next four days, the team worked on the overhangs and reached the summit on January 7. On the same day, in the evening, the team returned to the base.
Key sections of the route were ascended using free climbing and ITO, including on skyhooks. Bolts are present on the route in sufficient numbers to ensure satisfactory safety. The lead changed every day. The first climber went with two ropes — dynamic and static. The dynamic rope was used for belaying, and the static rope was used with a Petzl ProTraction to pull up the boulder. The second climber climbed the fixed rope with a backpack and accompanied the boulder.
On traverses, an auxiliary rope was used to issue the boulder to avoid rope abrasion.
The team was monitored from the road under the wall using binoculars. Communication was carried out using a mobile phone.
Description of the route by sections
The route can be conditionally divided into three main parts: the base, the large ledge, and the overhangs.
Part one. The base.
Mostly overcome by free climbing. The rock is generally solid, with good points for belaying. Stations are equipped for abseiling.
Section R0–R1
Straight up the vertical wall. Length — 30 m, VI+.
Section R1–R2
Passes straight above the white slab, with a belay point above. Then head right. Length 45 m, V+.
Section R2–R3
Along an inclined slab ending in a second wall. Length 45 m, IV+.
Section R3–R4
Climb straight up the wall, then a simpler section ends at a station. Length 50 m, VI, A0.
Section R4–R5
Path goes along a simple positive wall, direction — right. Length — 45 m, III.
Section R5–R6
The route goes vertically up a slab. Length — 55 m, V+.
Section R6–R7
Traverse right, then along a mossy crack, V, 40 m, followed by more difficult climbing VII, 10 m.
Section R7–R8
Along an expansion to the right, then vertically to the left. Length 45 m, V.
Section R8–R9
Along a slab and then vertically up to the left. Length 45 m, V.
Section R9–R10
Up a slab, then along gentle rocks to trees. Length — 30 m, V.
The section ends at a large ledge under the main overhangs. To continue the route, make a traverse to the left and then go up along the large red overhangs.
Part two. The large ledge.
Section R10–R11
Traverse left along the ledge overgrown with grass to a station with a chain, which also relates to the "Via Vertigine" route. Length — 100 m.
Section R11–R12
Traverse left, ending at a bolt for a station. Length — 40 m (section shared with "Via Vertigine").
Section R12–R13
Along a slab and a small ledge to a tree. Station. Length 40 m, +IV (section shared with "Via Vertigine").
Section R13–R14
Then traverse left. (Climbing straight up is incorrect; it's a variation of the route taken by Andreotti.) Follow the common bolts with "Via Vertigine." The section ends at a station. Length: 40 m, V+, A0.
Part three. Overhangs.
General characteristics: difficult ascent along slabs, overhangs, and cornices. The rock structure is sufficiently solid in the first section. Then it crumbles, making it challenging to overcome. The first thirteen ropes are particularly difficult. There are hooks and, quite rarely, bolts. There are holes for skyhooks. The remaining seven ropes of the overhangs are bolted. Returning via a double rope after the first seven sections is challenging.
Section R14–R15
From the station on "Via Vertigine," make a traverse right across a slab. Overcome by free climbing. The rock is solid. Length — 20 m, VI.
Section R15–R16
Continue traversing right to a hook and a bolt. Length — 35 m, VI, A2.
Section R16–R17
Traverse left across a cornice with unreliable belay points, then directly up to a hook and a bolt on the station. Length — 30 m, VI, A3.
Section R17–R18
Straight up a slab with a crack to the "Cornice of Despair," then right — to an offset. Frequent belaying is necessary; there are few reliable belay points. Length: 40 m, VI+, A3.
Section R18–R19
Traverse right, then vertically up the wall. Frequent belaying is necessary; many points are unreliable. Length: 35 m, VII.
Section R19–R20, "The Nutcracker"
It is the key to the entire ascent. Start directly above the station. Move straight (not right!) until the first overhang ends. Then make a traverse right above the large living columns and then tackle another overhang starting in the "Grigio Corner." Within this section, overcome a giant column literally growing out of the main wall. At times, it seems that this column will collapse or crack at any moment. Hence the name "The Nutcracker." Section length 40 m, VI, A3.
Section R20–R21
Straight up the inner corner. Belay at the base of the corner. Length 15 m, V.
Section R21–R22
Yellow inner corner and "Tendiniti" cornice. The section requires intense effort; it's quite difficult to overcome. There are many places for belay points; the section ends with an overhang and a station. Length 40 m, VI, A2.
Section R22–R23
Continue moving up the inner corner, then exit through a small cornice. Then an obvious traverse left ends at a station. Length 40 m, VI, VI+.
Section R23–R24
The first 15 m are quickly overcome by free climbing. Then begins the "Sun Diagonal." The section passes over solid, reliable rock, slightly overhanging. Climbing becomes more difficult, and after 10–15 m, it's necessary to switch to ITO. There's an opportunity to move quickly using hooks and bolts. Length 50 m.
- V — 10 m
- VII — 15 m
- A2 — 25 m
Section R24–R25
This section involves overcoming the "Cornice of Hope."
- Initially, 6 m vertically, then a restep.
- Then a series of holes for skyhooks about 10 m with one bolt at the top.
- Followed by 4 m of climbing to a station. Length 30 m. VI (5 m), A0 (10 m), A3 (15 m).
Section R25–R26
After the first meters of strong overhang, a traverse right begins. Intensive belaying is necessary. This traverse leads to the "Cathedral of the Afterlife." The station here is exceptionally inconvenient. Length 20 m, VI, A1.
Section R26–R27
A very elegant traverse along a narrow ledge leading to the "Miseri Corner." Up the corner, then veer left. Before the station, there's a slight complication in climbing. Length 45 m, VI, VII, A0.
Section R27–R28
Traverse left along a solid, reliable slab, then straight up to an overhang using bolts and skyhooks. Length 30 m, VI, A2.
Section R28–R29
"The Crusher." Like the inner "Miseri Corner," this section has the most crumbling, friable rock parts. Make a traverse right, then ascend to a solid white arch. Bolts, hooks, and holes. Length 40 m, A2+.
Section R29–R30
Straight up along an expanding inner corner. Movement by climbing, then ITO on hooks, holes, and bolts. Here, the rock structure is the best on the entire route. Length 30 m, VI, A3.
Section R30–R31
Straight up the inner corner, then right, and further to a station under a cornice. From this section, it's possible to see almost the entire route — visibility is about 800 m. Length 30 m, A2.
Section R31–R32
The final cornice! The section is fully bolted. 15 m, A0.
Section R32–R33
Traverse right along a slab, then straight in the direction of the inner corner. Then exit onto a grassy slope. Length — 40 m, V.
Then ascend directly into the forest — along a rocky trail, where under the roof of one of the overhanging cornices, you can set up an excellent campsite!
Technical photo of the route 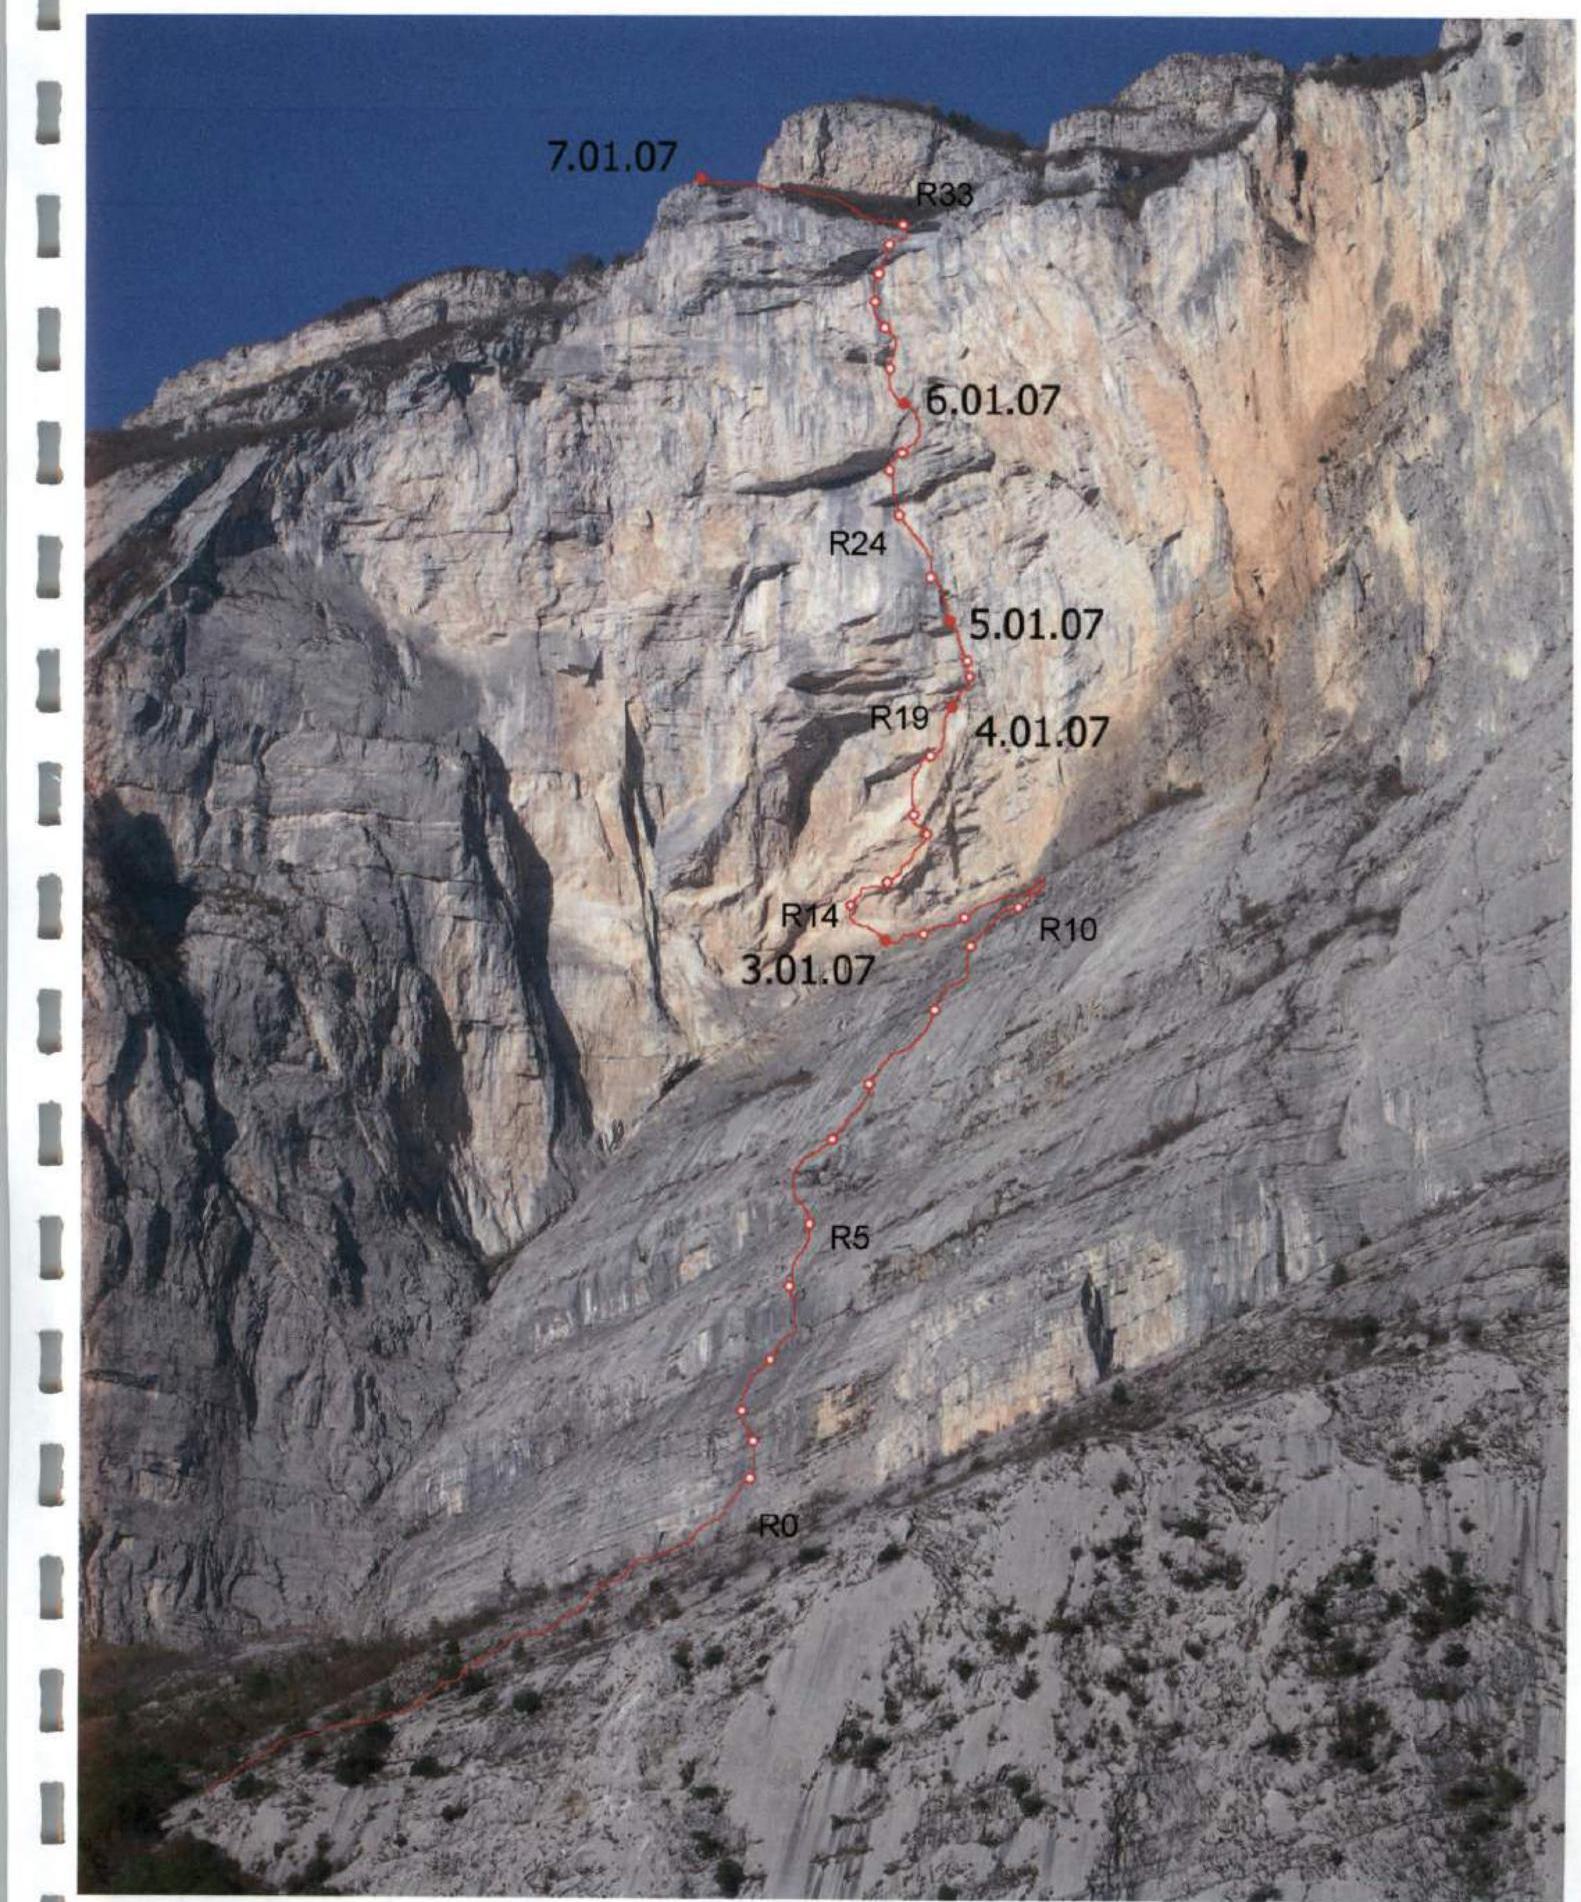 Route profile
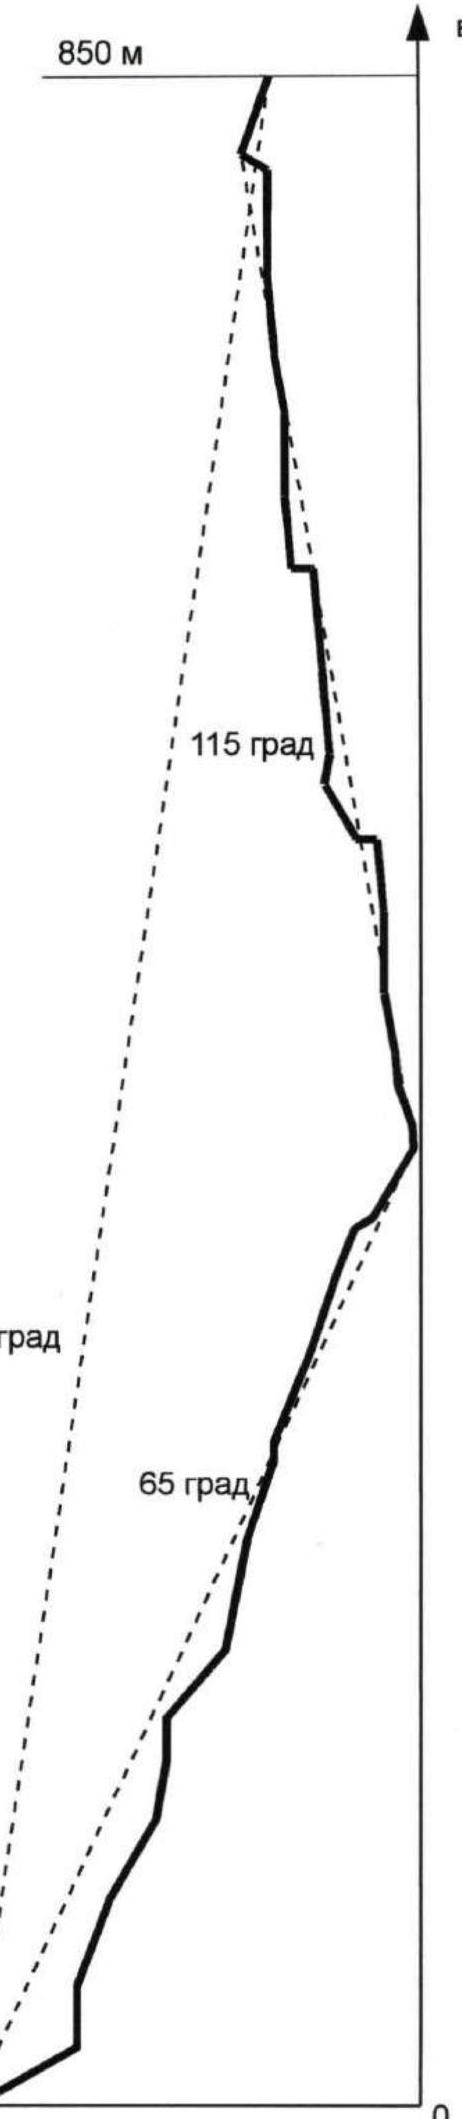
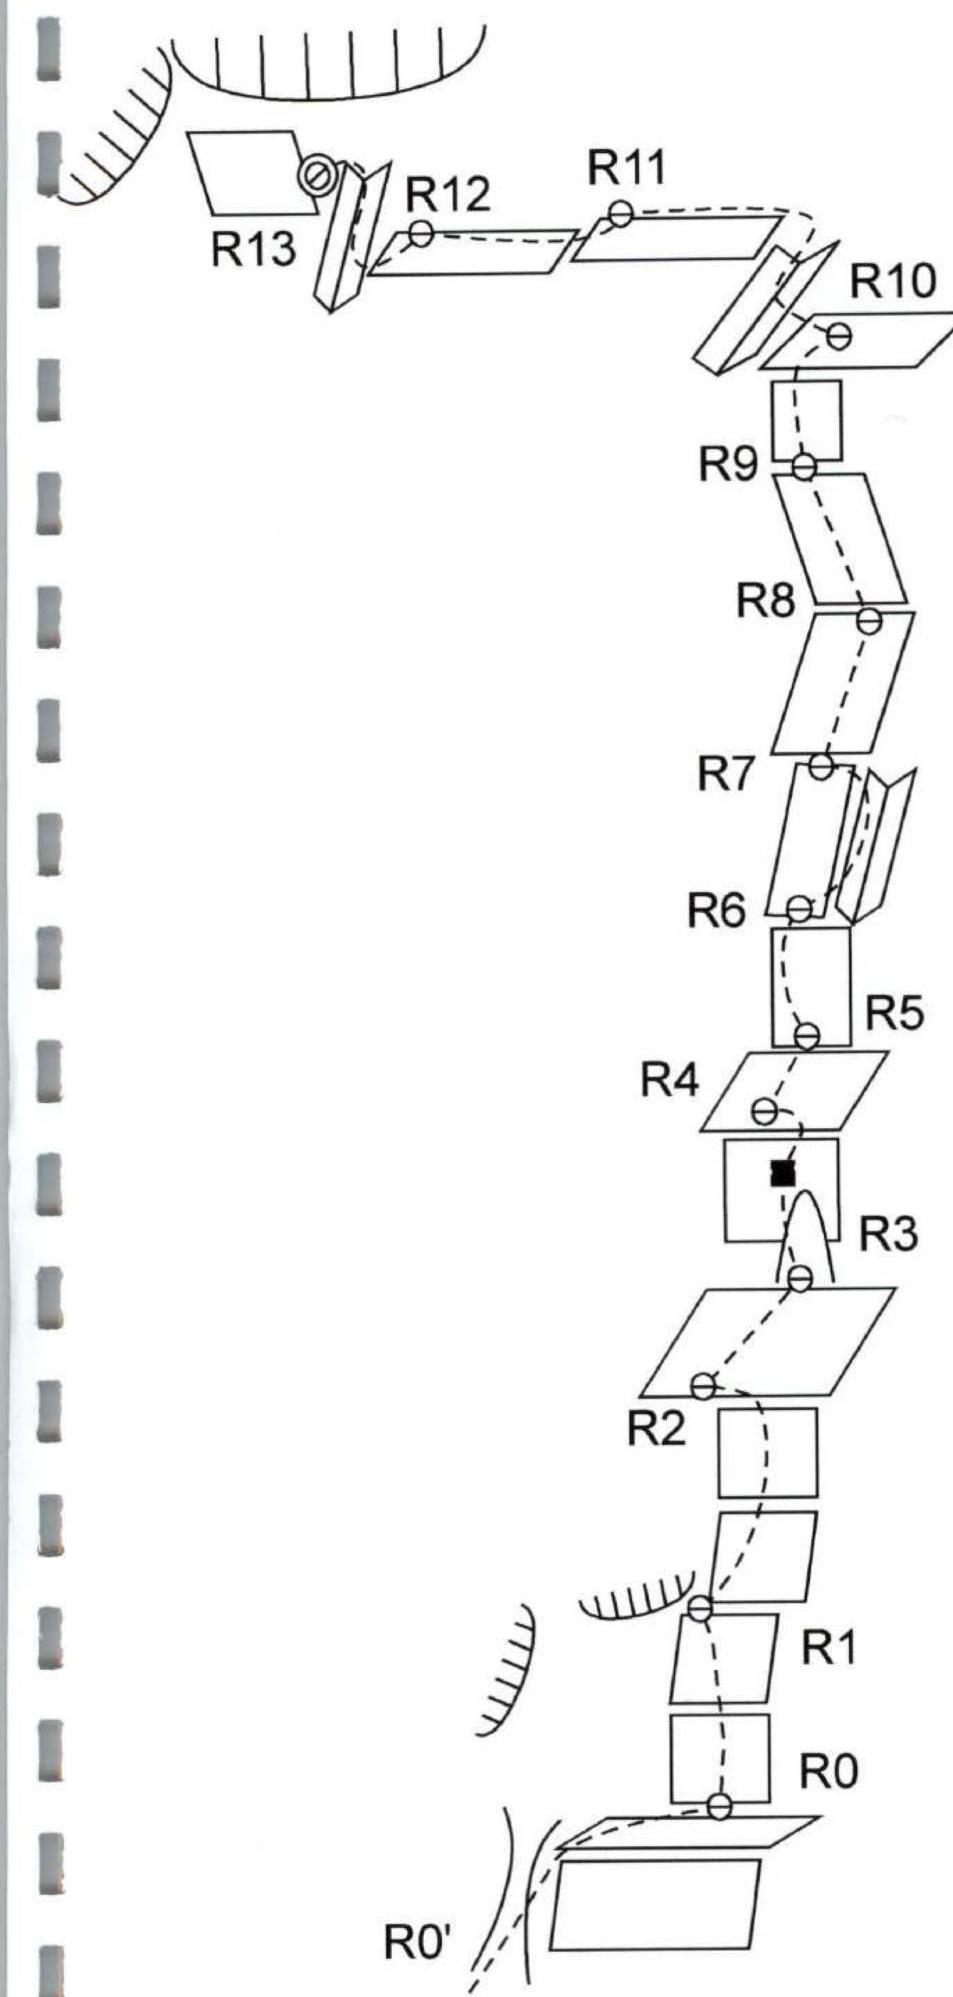
Route diagram in UIAA symbols
| Section | Difficulty, length (m), and steepness (°) | Hooks / Chocks / Bolts |
|---|---|---|
| R13–R12 | IV, 40 m, 60° | 0 / 0 / 1* |
| R12–R11 | I, 40 m, 30° | 0 / 0 / 0 |
| R11–R10 | I, 100 m, 30° | 0 / 0 / 0 |
| R10–R9 | V, 20 m, 70°; II, 10 m, 30° | 0 / 2 / 0 |
| R9–R8 | V, 45 m, 70° | 3* / 0 / 0 |
| R8–R7 | V, 45 m, 70° | 1* / 1 / 0 |
| R7–R6 | V, 40 m, 70°; VII, 10 m, 80° | 2* / 0 / 1* |
| R6–R5 | V+, 55 m, 80° | 2* / 2 / 0 |
| R5–R4 | III, 45 m, 50° | 0 / 0 / 1* |
| R4–R3 | VI, 30 m, 80°; A0, 20 m, 90° | 2* / 1 / 6* |
| R3–R2 | IV+, 45 m, 60° | 0 / 0 / 1* |
| R2–R1 | V, 45 m, 70° | 2* / 0 / 0 |
| R1–R0 | VI+, 30 m, 90° | 3* / 1 / 1* |
| R0–R0′ | I–II, 60 m, 30° | 0 / 0 / 0 |
| * — local | ||
| R24–R23 | V, 10 m, 80°; VII, 15 m, 90°; A2, 25 m, 95° | 1+* / 0 / 8* |
| R23–R22 | VI, 40 m, 90° | 2 / 2 / 2* |
| R22–R21 | VI, 10 m, 80°; A2, 30 m, 100° | 2+2* / 5 / 2* |
| R21–R20 | V, 15 m, 70° | 0 / 1 / 0 |
| R20–R19 | VI, 10 m, 90°; A3, 30 m, 120° | 11 / 0 / 5* |
| R19–R18 | VII, 35 m, 90° | 2 / 3 / 3* |
| R18–R17 | VI+, 10 m, 90°; A3, 30 m, 85° | 6 / 0 / 2* |
| R17–R16 | VI, 5 m, 90°; A3, 25 m, 100° | 3+1* / 3 / 0 |
| R16–R15 | VI, 20 m, 80°; A2, 15 m, 95° | 0 / 0 / 6* |
| R15–R14 | VI, 20 m, 80° | 0 / 0 / 2* |
| R14–R13 | V+, 20 m, 90°; A0, 20 m, 110° | 0 / 0 / 10* |
| * — local | ||
| R33–R32 | V, 40 m, 70° | 2* / 0 / 0 |
| R32–R31 | A0, 15 m, 130° | 0 / 0 / 10 |
| R31–R30 | A2, 20 m, 90° | 3* / 0 / 5* |
| R30–R29 | VI, 10 m, 80°; A3, 20 m, 90° | 2* / 0 / 2* |
| R29–R28 | A2, 40 m, 95° | 5* / 0 / 15* |
| R28–R27 | VI, 10 m, 90°; VI, 20 m, 100° | 1* / 0 / 8* |
| R27–R26 | VI, 20 m, 80°; VII, 5 m, 90°; A0, 20 m, 95° | 1+5* / 0 / 10* |
| R26–R25 | VI, 5 m, 90°; A1, 15 m, 100° | 3+2* / 0 / 3* |
| R25–R24 | VI, 5 m, 90°; A0, 10 m, 130°; A3, 15 m, 95° | 1 / 0 / 11* |
Ascent graph by days
| Hours | 03.01.2007 | 04.01.2007 | 05.01.2007 | 06.01.2007 | 07.01.2007 | Days |
|---|---|---|---|---|---|---|
| 23:00 | ||||||
| 22:00 | ||||||
| 21:00 | ||||||
| 20:00 | ||||||
| 19:00 | ||||||
| 18:00 | Clear, overnight stay sitting on a ledge. Passed the lower lying part of the route, approached the overhangs. Night -1°, day +12°. | Entire day cloudy, passed 6 ropes along the overhangs. Overnight stay hanging on a sit hanger and boulder. Night 0°, day +8°. | Clear, passed 3 ropes. Key section "The Nutcracker". Overnight stay hanging on a sit hanger and boulder. Night +3°, day +15°. | Clear, passed 5 ropes. Overnight stay hanging, on a sit hanger and boulder. Night 0°, day +12°. | Descent along the trail towards San-Giovanni. | |
| 17:00 | Entire day clear, passed 6 ropes and reached the yayla (summit). Daytime 15° warmth. | |||||
| 16:00 | ||||||
| 15:00 | ||||||
| 14:00 | ||||||
| 13:00 | ||||||
| 12:00 | ||||||
| 11:00 | ||||||
| 10:00 | ||||||
| 09:00 | ||||||
| 08:00 | ||||||
| 07:00 | ||||||
| 06:00 | ||||||
| 05:00 | ||||||
| 04:00 |
Table of distribution of climbing and ITO on the route
| Section | Length | I | II | III | IV | V | VI | VII | A0 | A1 | A2 | A3 |
|---|---|---|---|---|---|---|---|---|---|---|---|---|
| L01 | 30 | 30 | ||||||||||
| L02 | 45 | 45 | ||||||||||
| L03 | 45 | 45 | ||||||||||
| L04 | 50 | 30 | 20 | |||||||||
| L05 | 45 | 45 | ||||||||||
| L06 | 55 | 55 | ||||||||||
| L07 | 50 | 40 | 10 | |||||||||
| L08 | 45 | 45 | ||||||||||
| L09 | 45 | 45 | ||||||||||
| L10 | 30 | 30 | ||||||||||
| L11 | 100 | 100 | ||||||||||
| L12 | 40 | 40 | ||||||||||
| L13 | 40 | 40 | ||||||||||
| L14 | 40 | 20 | 20 | |||||||||
| L15 | 20 | 20 | ||||||||||
| L16 | 35 | 20 | 15 | |||||||||
| L17 | 30 | 5 | 25 | |||||||||
| L18 | 40 | 10 | 30 | |||||||||
| L19 | 35 | 35 | ||||||||||
| L20 | 40 | 10 | 30 | |||||||||
| L21 | 15 | 15 | ||||||||||
| L22 | 40 | 10 | 30 | |||||||||
| L23 | 40 | 40 | ||||||||||
| L24 | 50 | 10 | 15 | 25 | ||||||||
| L25 | 30 | 5 | 10 | 15 | ||||||||
| L26 | 20 | 5 | 15 | |||||||||
| L27 | 45 | 20 | 5 | 20 | ||||||||
| L28 | 30 | 10 | 20 | |||||||||
| L29 | 40 | 40 | ||||||||||
| L30 | 30 | 10 | 20 | |||||||||
| L31 | 30 | 30 | ||||||||||
| L32 | 15 | 15 | ||||||||||
| L33 | 40 | 40 |
Led by Novikov Led by Belousov
Table comparing free climbing categories
| UIAA | French system |
|---|---|
| I | I |
| II | II |
| III | III |
| IV– | 4a |
| IV | 4b |
| V | 4c |
| V+ | 5a |
| VI– | 5b |
| VI | 5c |
| VI+ | 6a |
| VII– | 6a+ |
| VII | 6b |
| 6b+ | |
| VII+ | 6c |
| VIII– | 6c+ |
| VIII | 7a |
| 7a+ | |
| VIII+ | 7b |
| 7b+ | |
| IX–IX | 7c |
| 7c+ | |
| IX–IX+ | 8a |
| 8a+ | |
| X | 8b |
| 8b+ | |
| X+ | 8c |
| 8c+ | |
| XI | 9a |
Photos
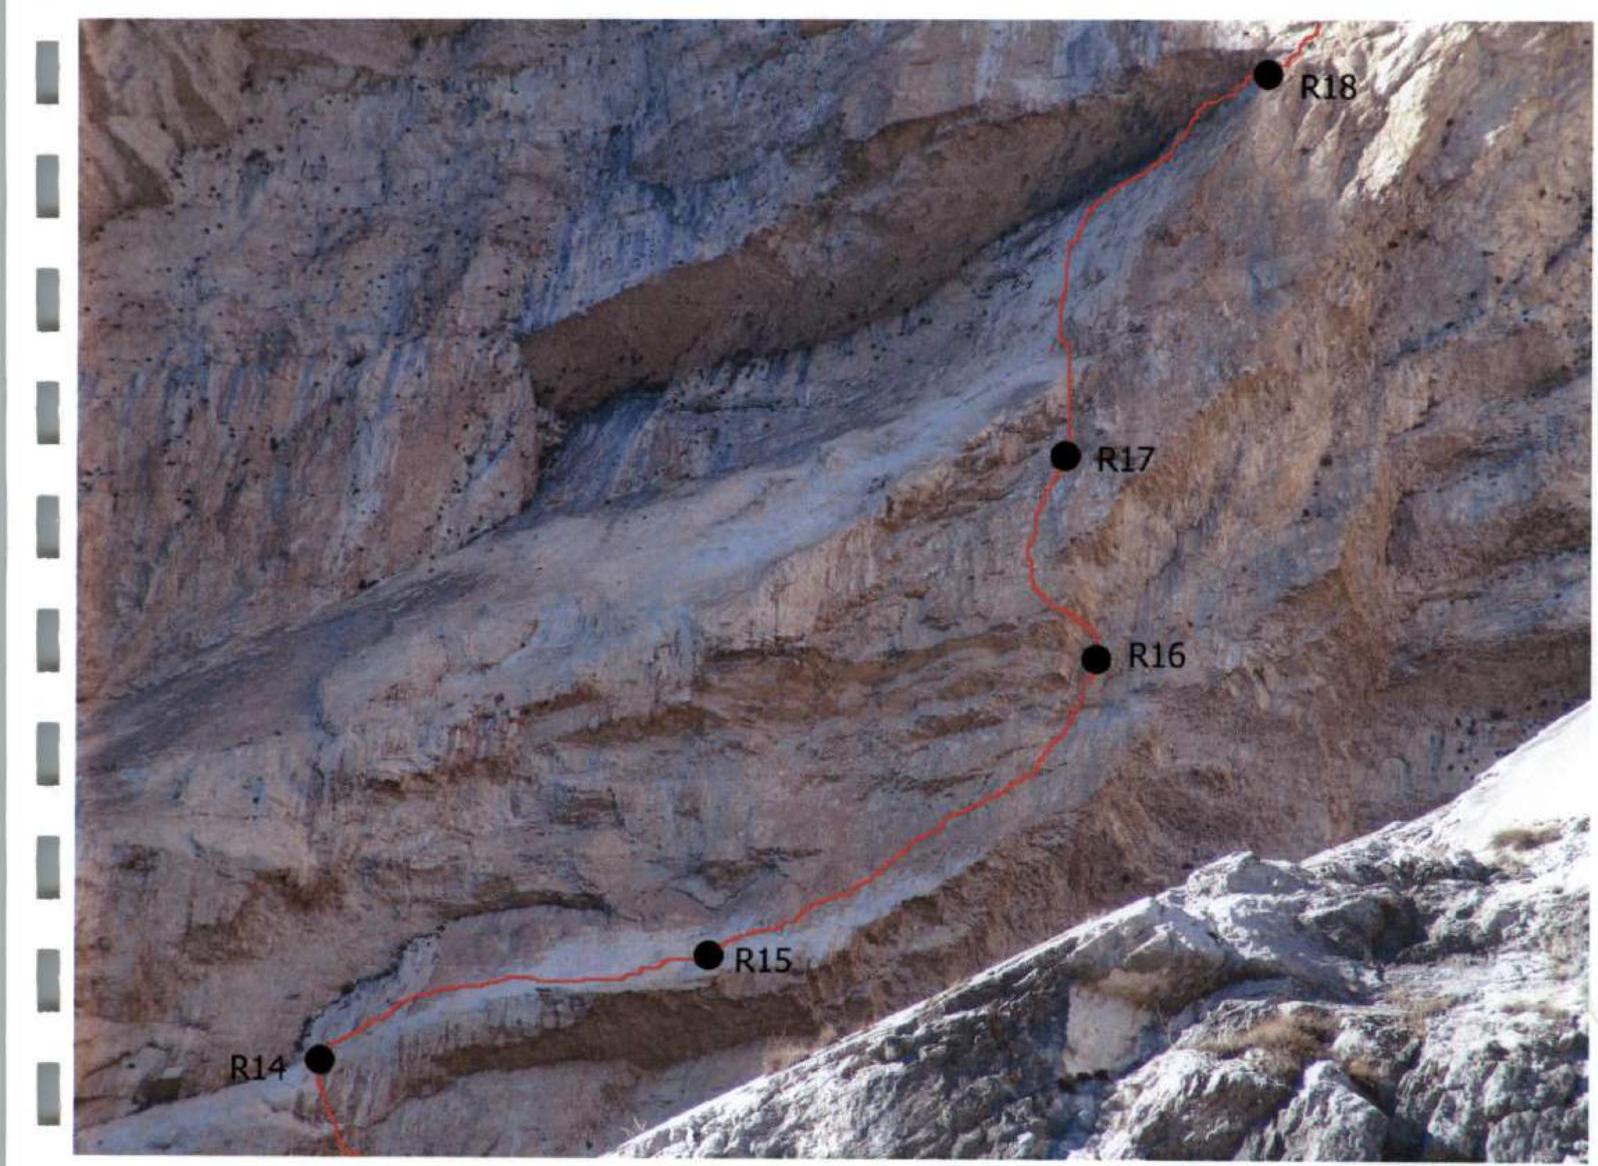
Photo 1: Section R14–R18 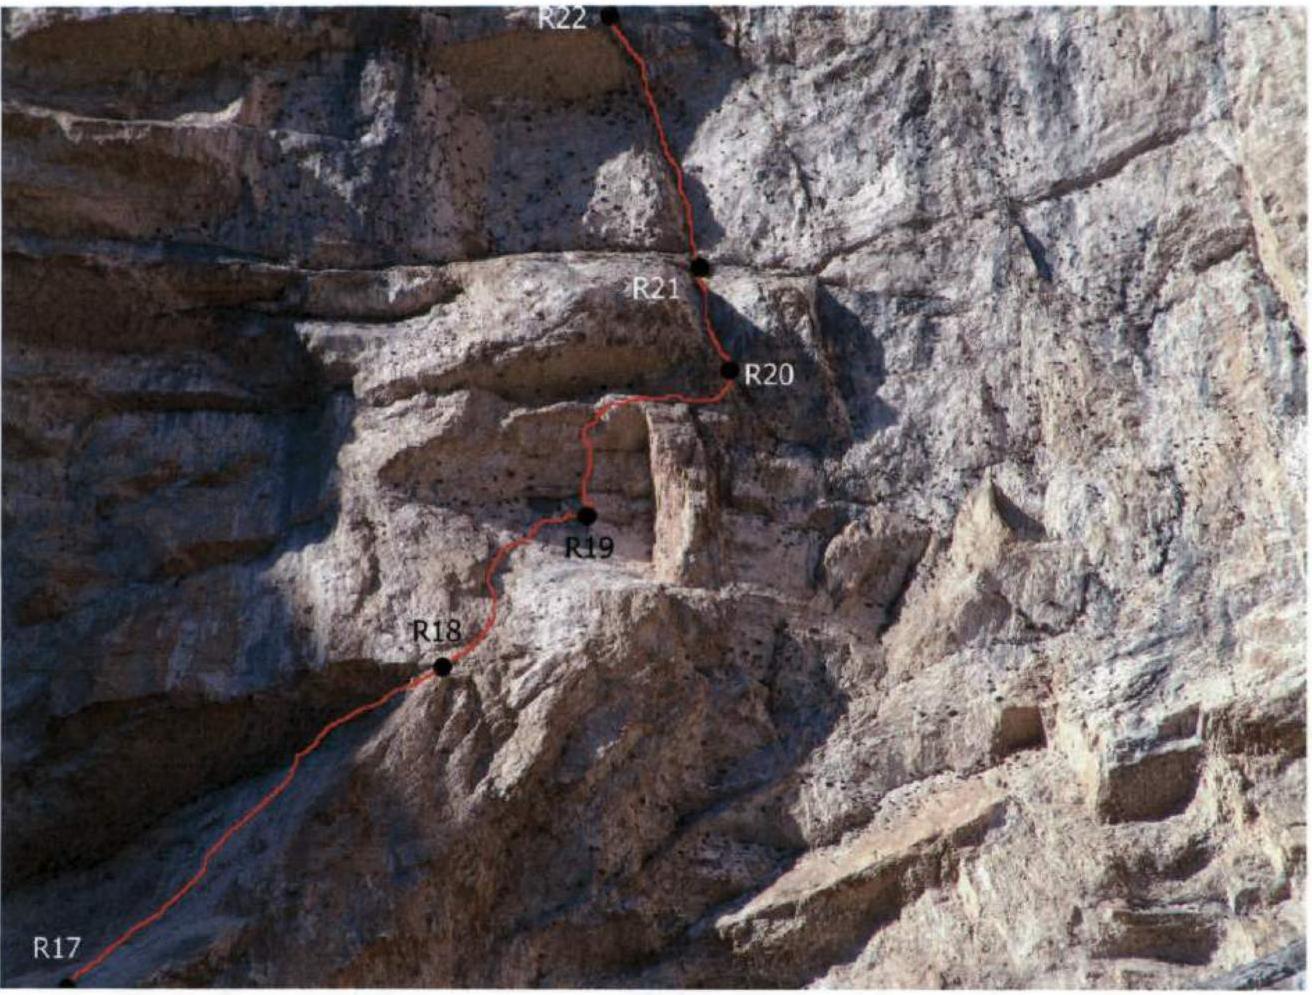
Photo 2: Section R17–R22 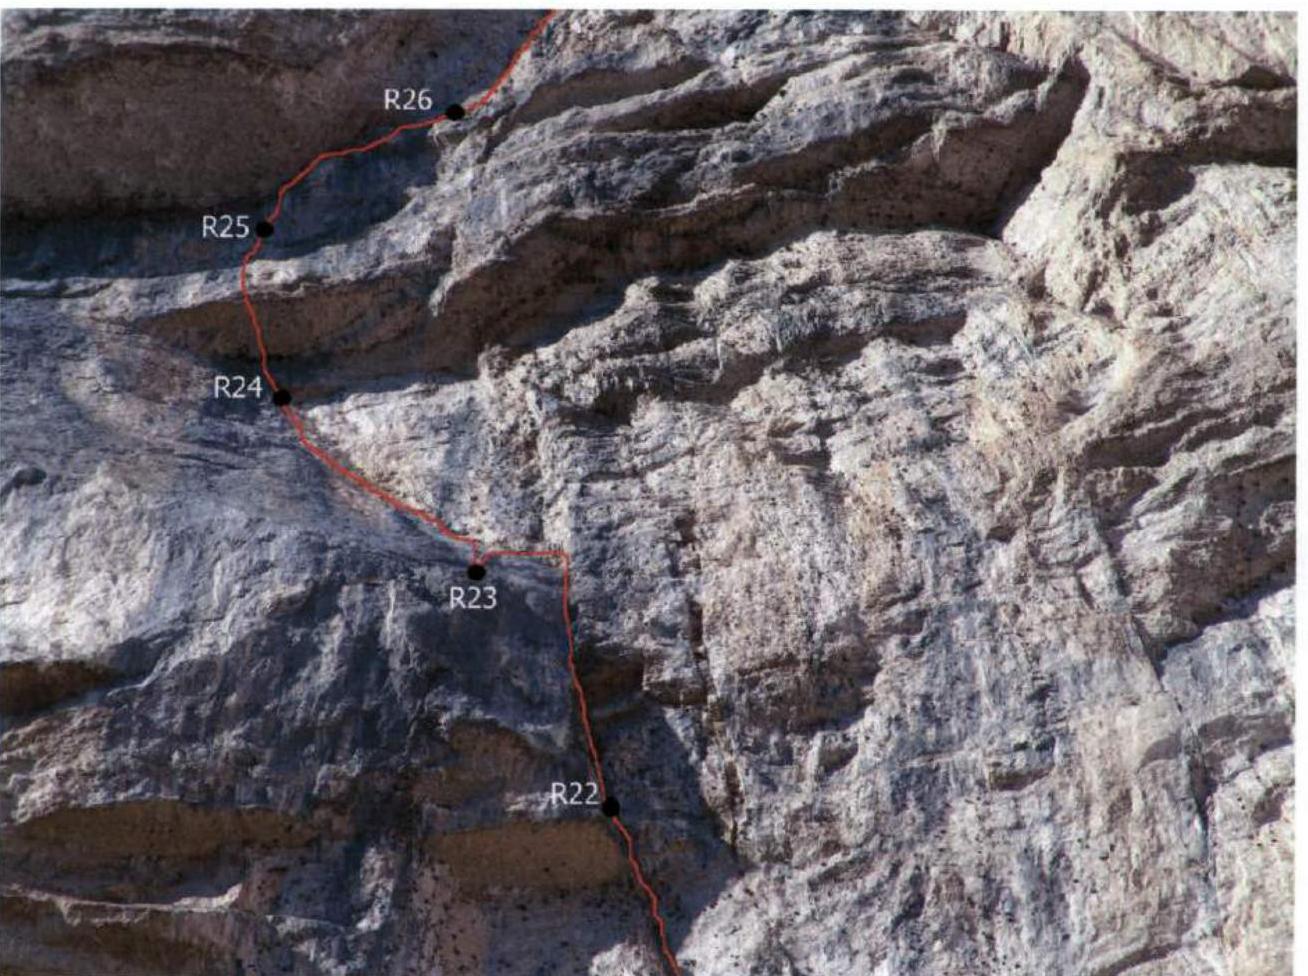
Photo 3: Section R22–R26 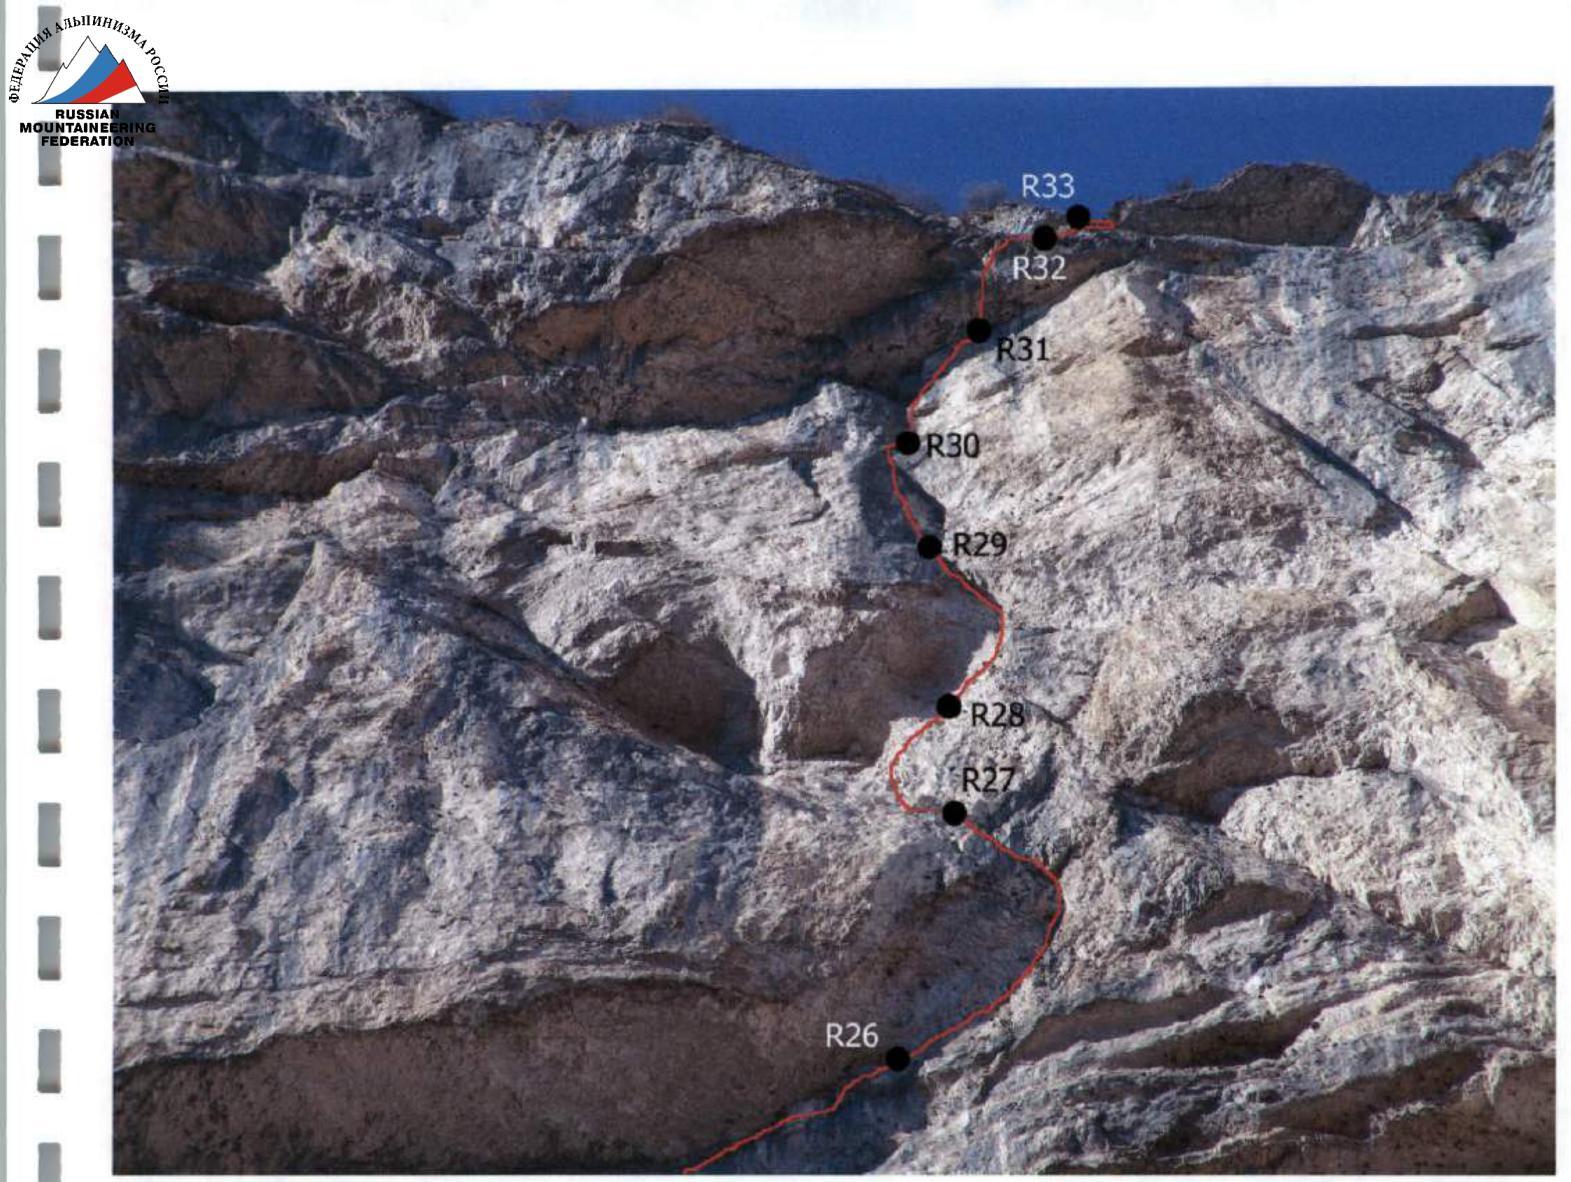
Photo 4: Section R26–R33 
Photo 5: R0–R1 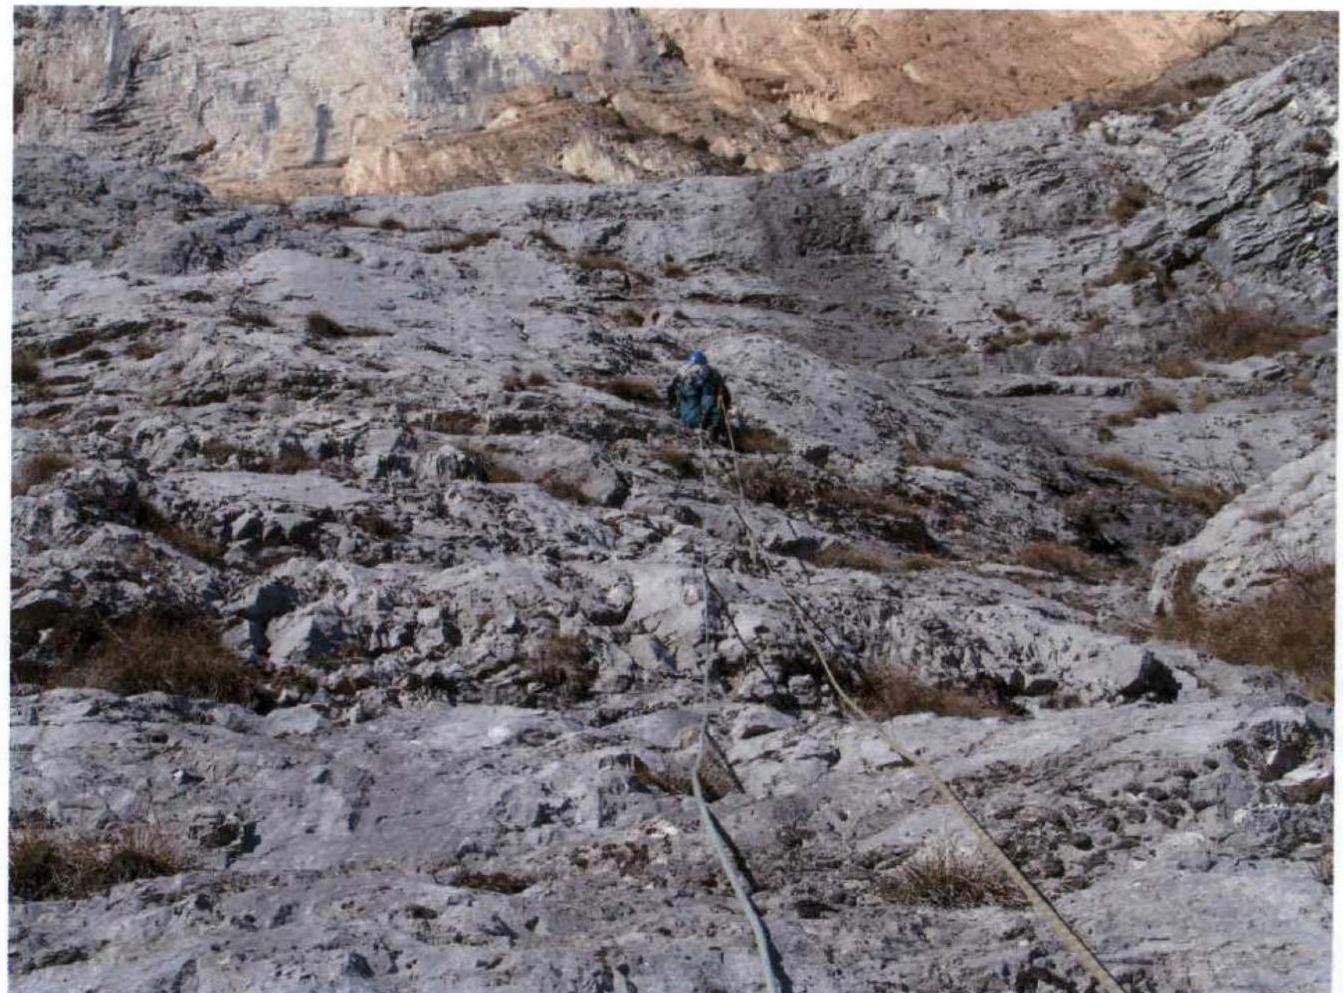
Photo 6: R8–R9 
Photo 7: overnight stay on R13 — January 3, 2007 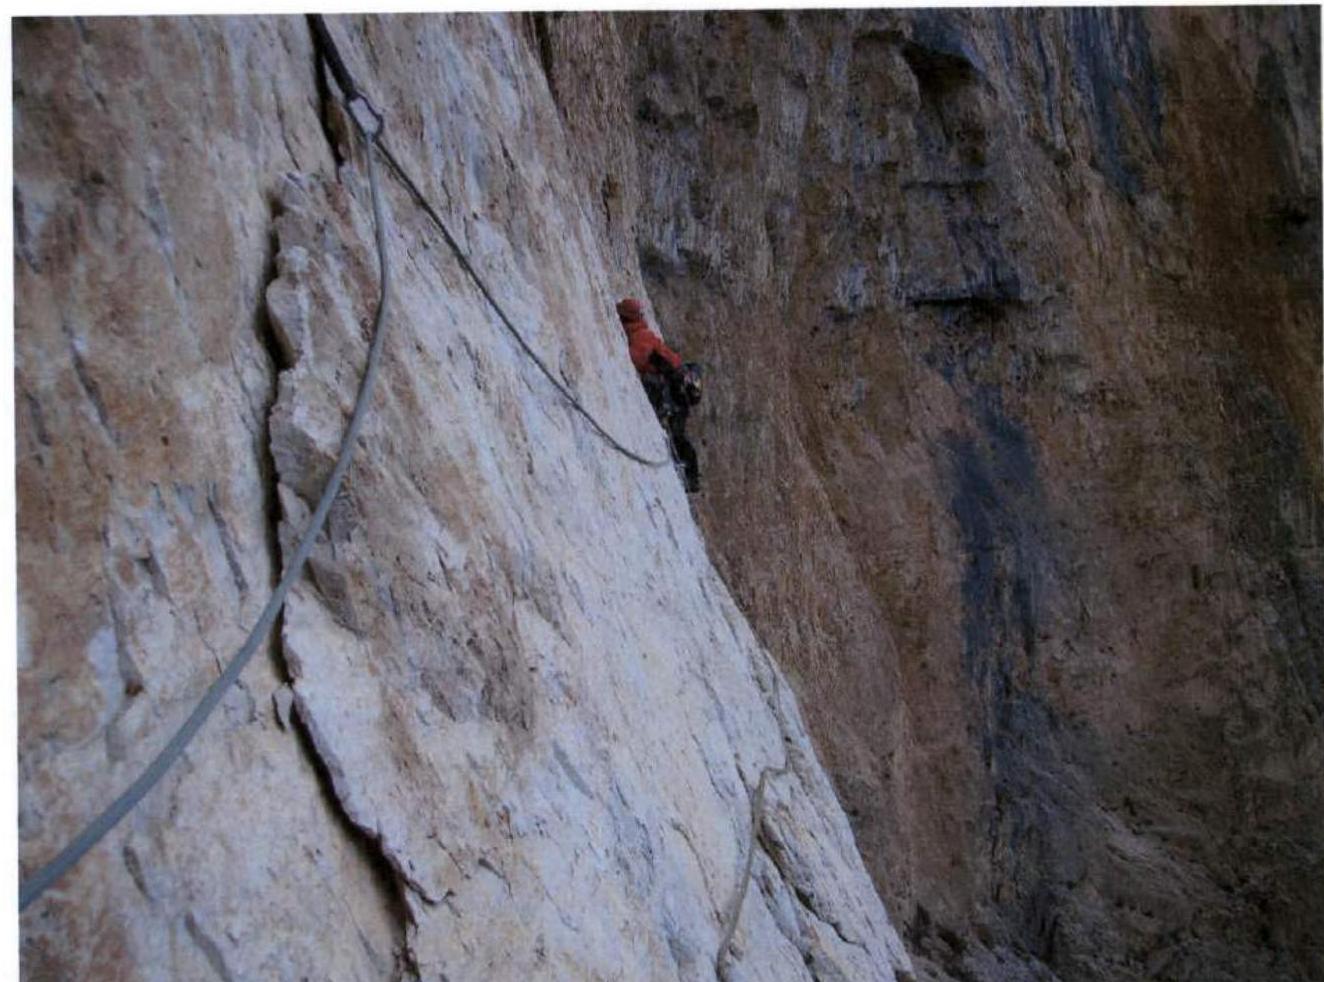
Photo 8: R14–R15 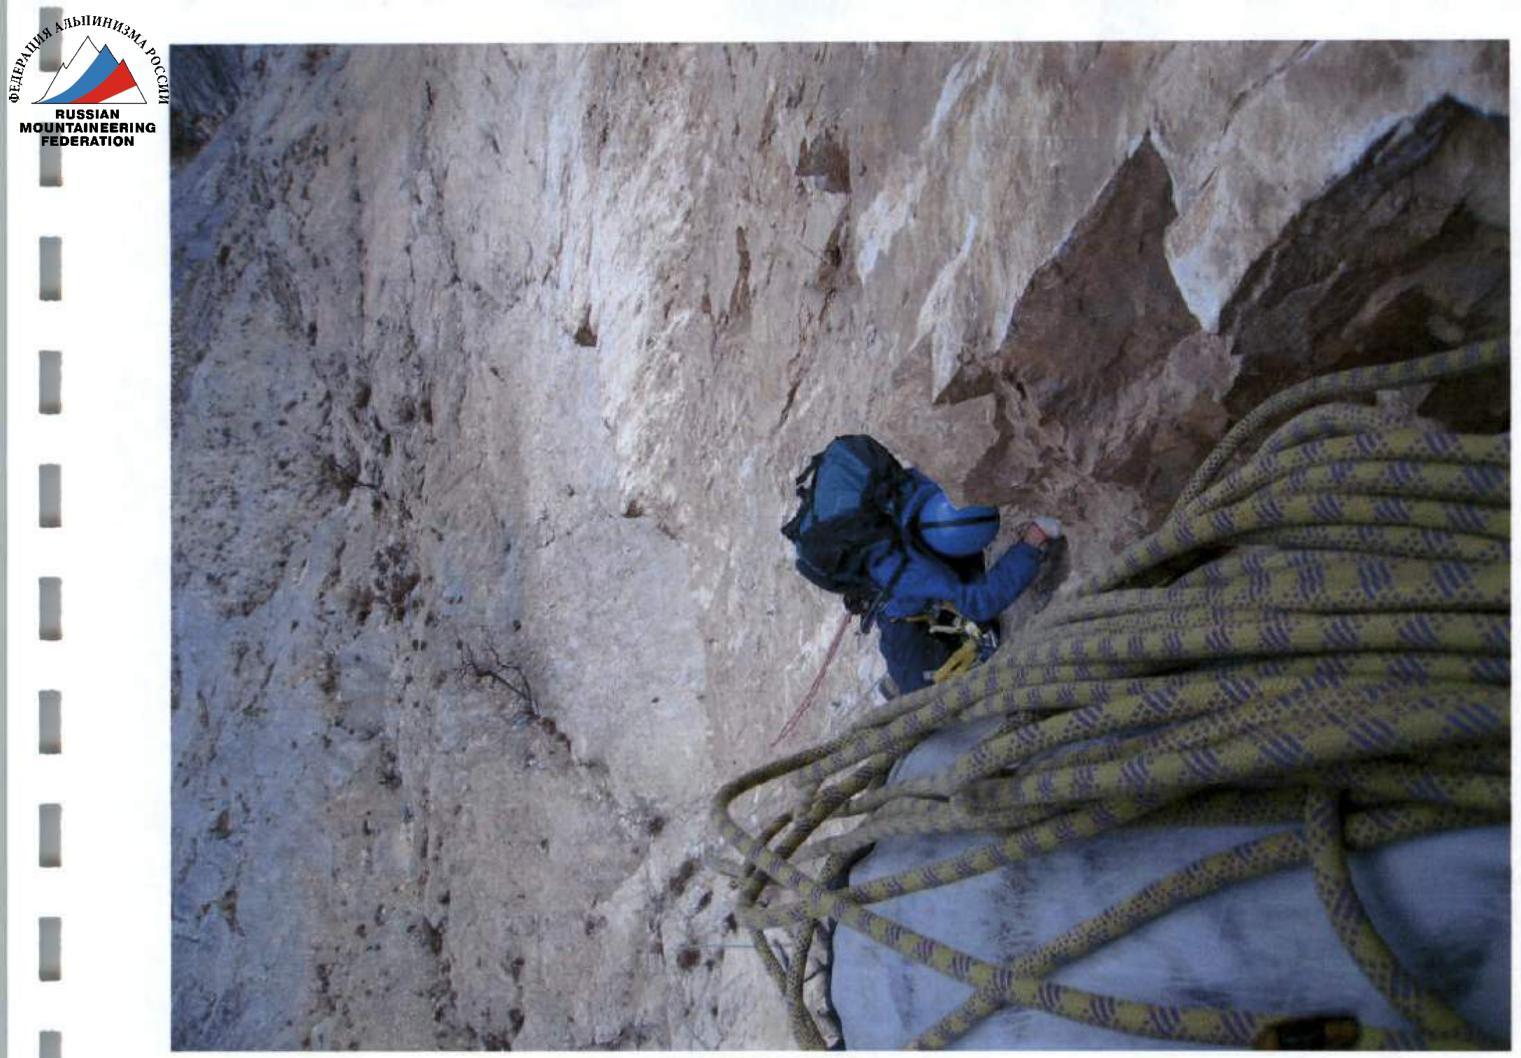
Photo 9: R15–R16 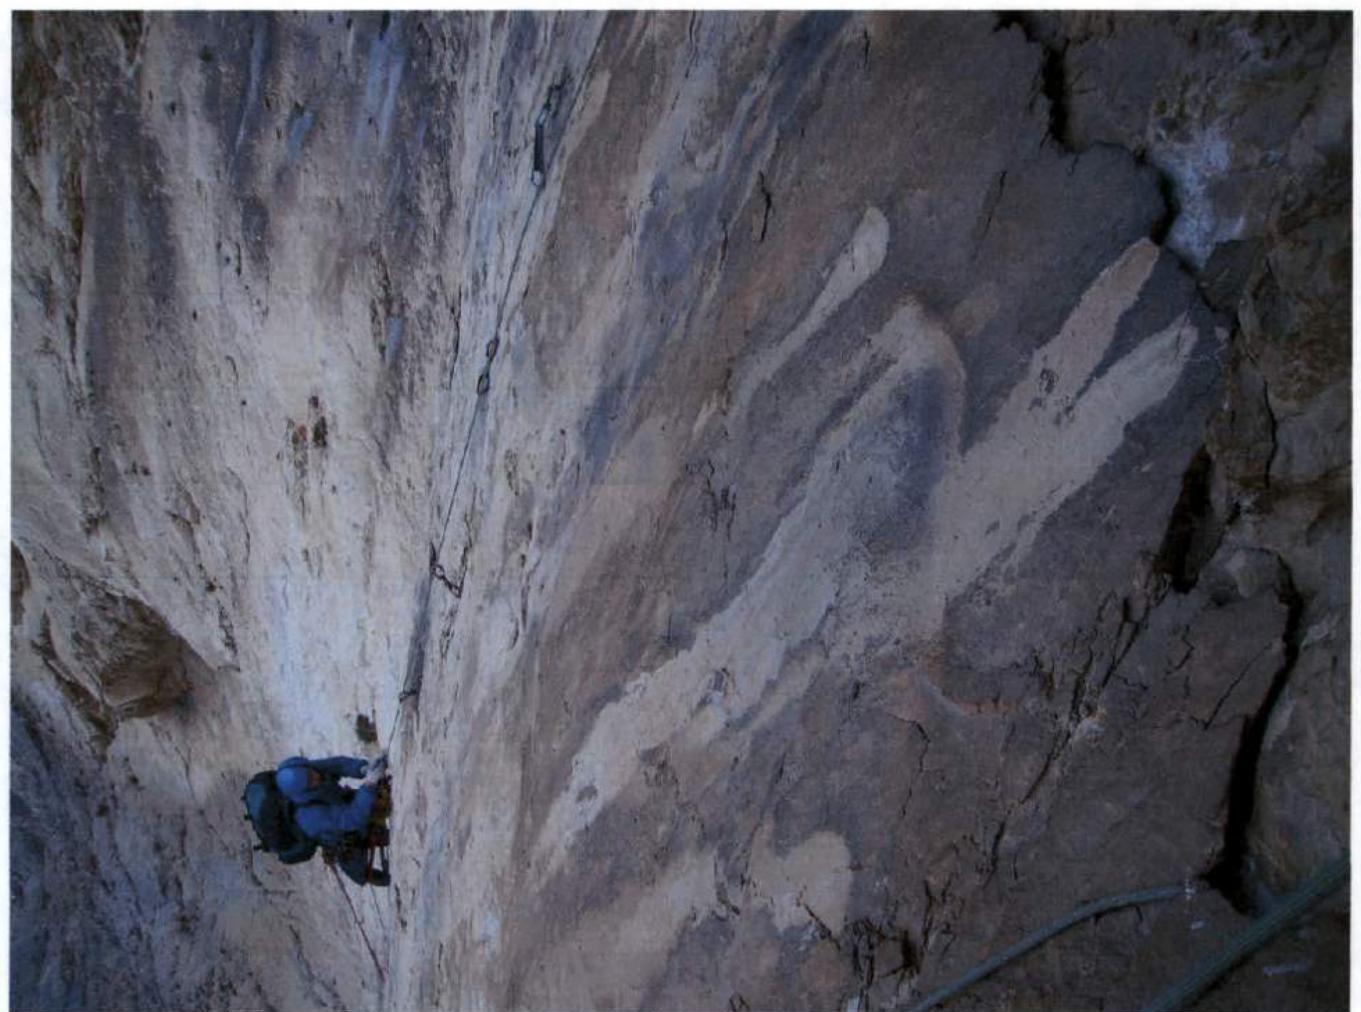
Photo 10: R17–R18 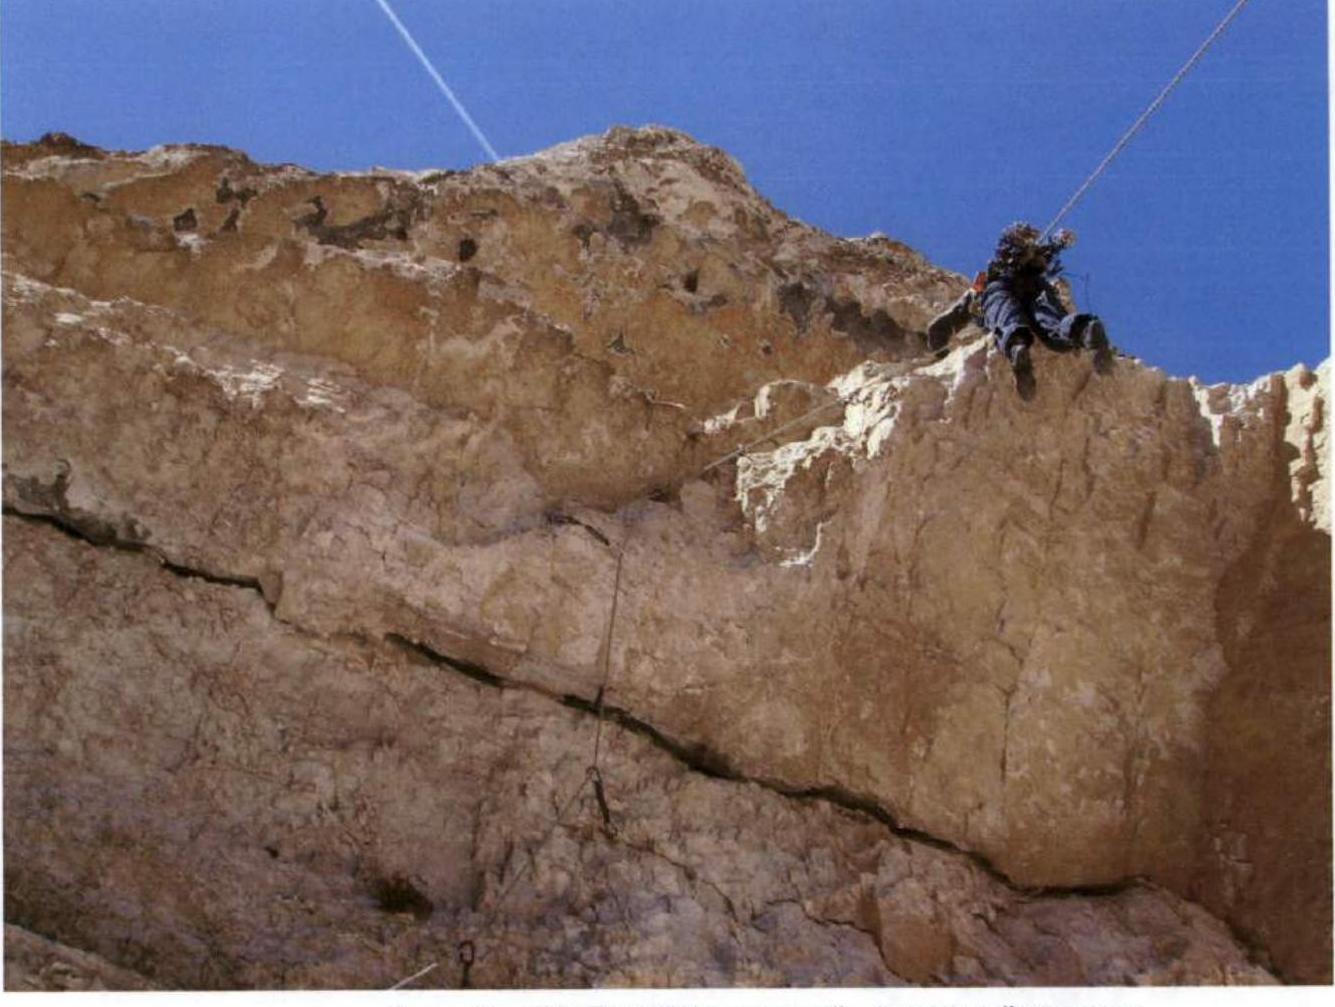
Photo 11: R19–R20 "The Nutcracker" — key section 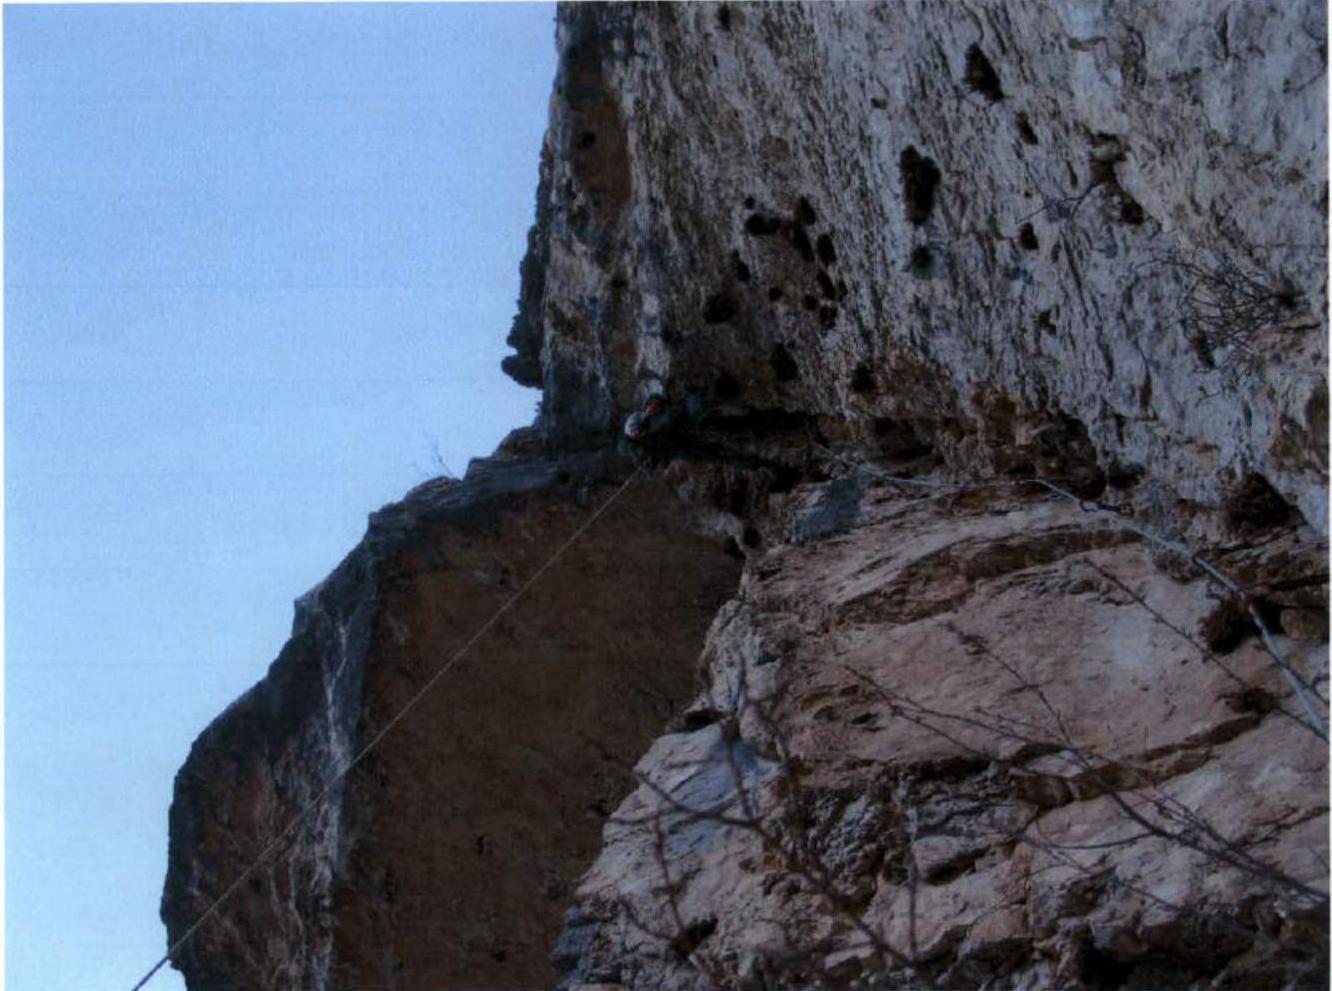
Photo 12: R21–R22. Before overnight stay — January 5, 2007 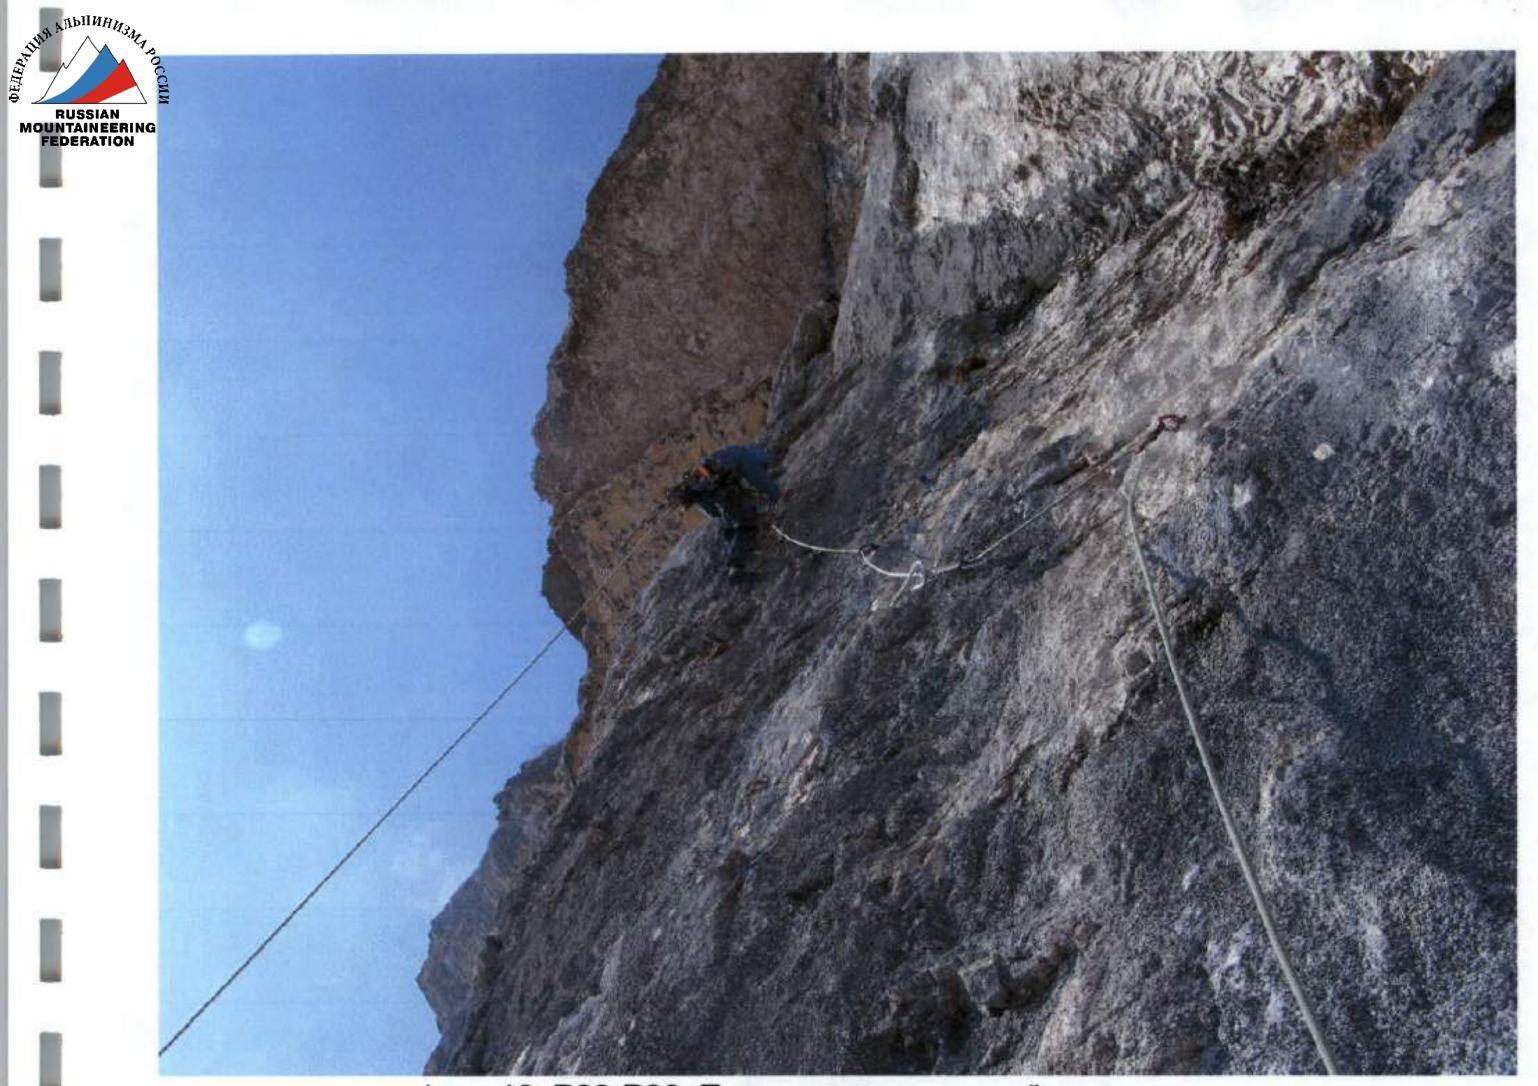
Photo 13: R29–R30. Climbing on skyhooks. 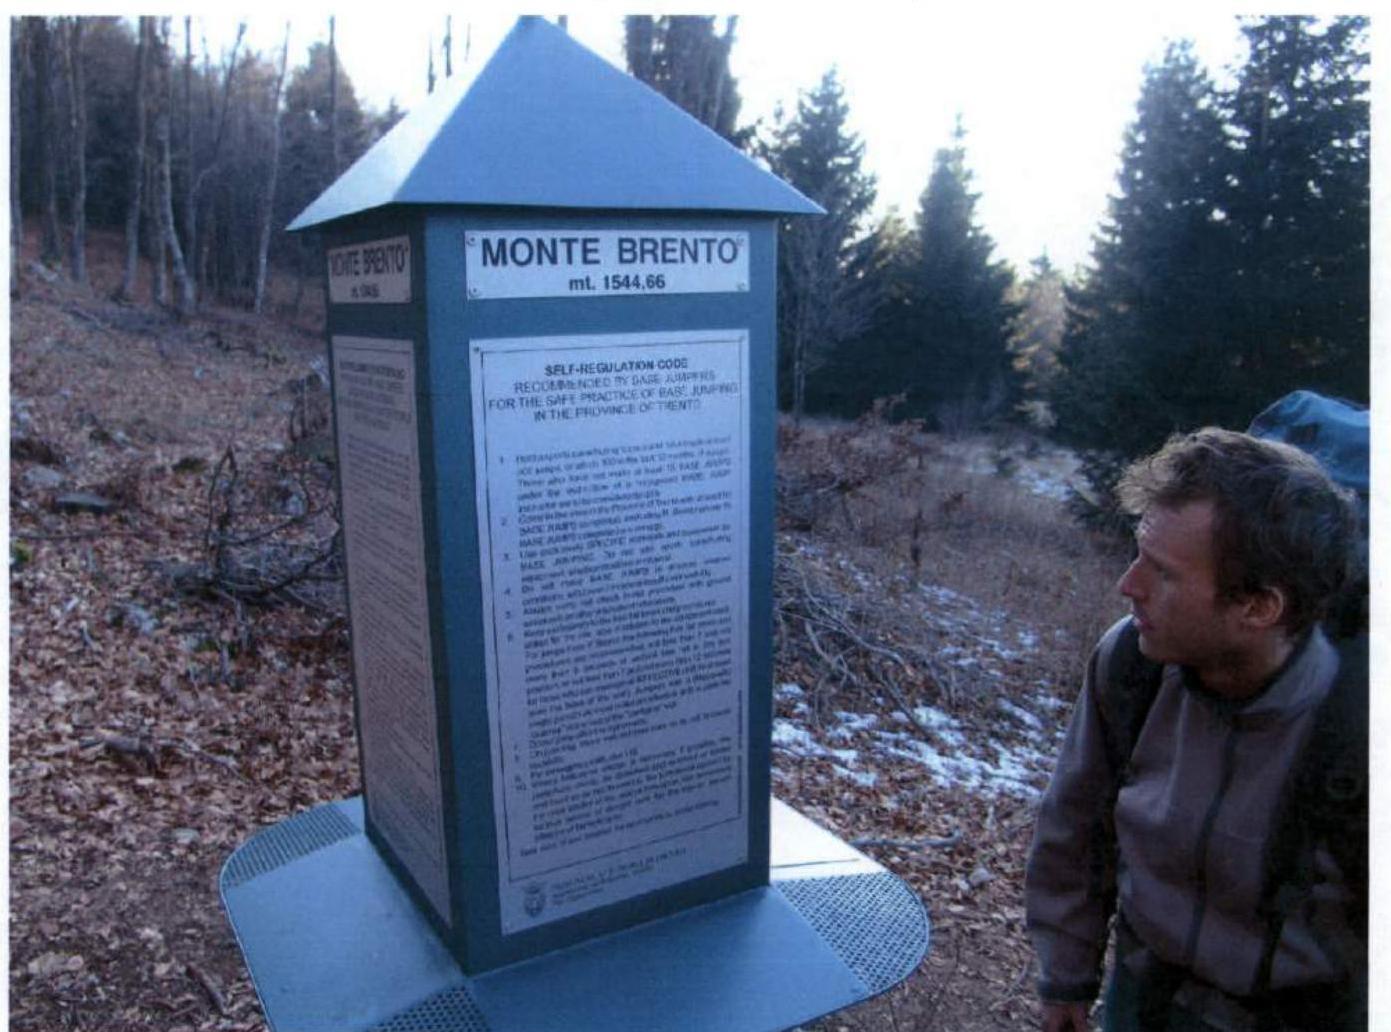
Photo 14: Monte Breno summit.


