

Report
Ascent to the summit of Matterhorn (4478 m) via the SE ridge (Furggen), 5A category. Alps, Cervinia area, Valle d'Aosta region, Italy
Climbing Details
- Valais Alps, Italy/Switzerland, Valle d'Aosta region, Cervinia. Section № 10.3 (according to KGBM 2013)
- Summit Matterhorn/Monte Cervino [Matterhorn/Monte Cervino] 4478 m. Via SE ridge Furggen (M. Piacenza, J. Carrel, J. Giesper, 1911)
- Difficulty category — 5A (TD (Italian))
- Route type: rock
- Route elevation gain: 1100 m Route length: 1800 m. Section length: 5th category – 75 m, 6th category – 50 m. Average steepness: main part of the route (tower) — 60°; entire route — 45°
- Pitons left (used) on the route: total 0; including drilled 0
- Team's climbing hours: 12 hours (excluding descent)
- Leader: ascent in a pair: Yurkin A.V. MS. Fedorov V.V. CMS
- Coach: Fedorov V.V. Yurkin A.V.
- Departure from "Bossi" hut: 4:00, August 4, 2016. Summit reached: 16:00, August 4, 2016. Descent from the summit: via NW ridge (Hörnli ridge) 4A category.
- Organization: CSKA im Demchenko (Moscow), Tour Club "Abriss" (Ivanovo)
- Report responsible: Yurkin A.V. Email: s2aleks@mail.ru
General Information about the Climbing Area
The Matterhorn summit, which was the target of the ascent, is located in Western Europe, in the Valais Alps on the border between Italy (Valle d'Aosta region) and Switzerland (Zermatt area). There are about 25 routes of various difficulty categories leading to the mountain. Classic ascent routes start from both countries.
Main routes follow the 4 main ridges:
- SE ridge Furggen (Furggen)
- SW ridge Leone or Italian ridge (Cresta del Leone)
- Zmutt ridge (Zmutt)
- Hörnli ridge (Hörnli)
Approaches to the ascent from the Italian side begin from the town of Breuil-Cervinia. The direct exit to the route taken by the team via the Furggen ridge was made from the "Bossi" hut. The main climbing season on Matterhorn is during the summer months.

View of Matterhorn from Breuil-Cervinia
Panoramic View of the Area

Panoramic view of Matterhorn summit. Original photo by S. Egorin. Markings on the photo:
- Rifugio Duca Degli Abruzzi All'Orionde (2810 m)
- Biv. Jean A. Carrel (3830 m)
- Solvay hut (4003 m)
- Biv. Bossi (3325 m)
- Hörnli hut (3260 m)
Area Map

Map of the Cervino-Matterhorn area. Ministry of Tourism, Valle d'Aosta (Italy)
Approach to the Route Start
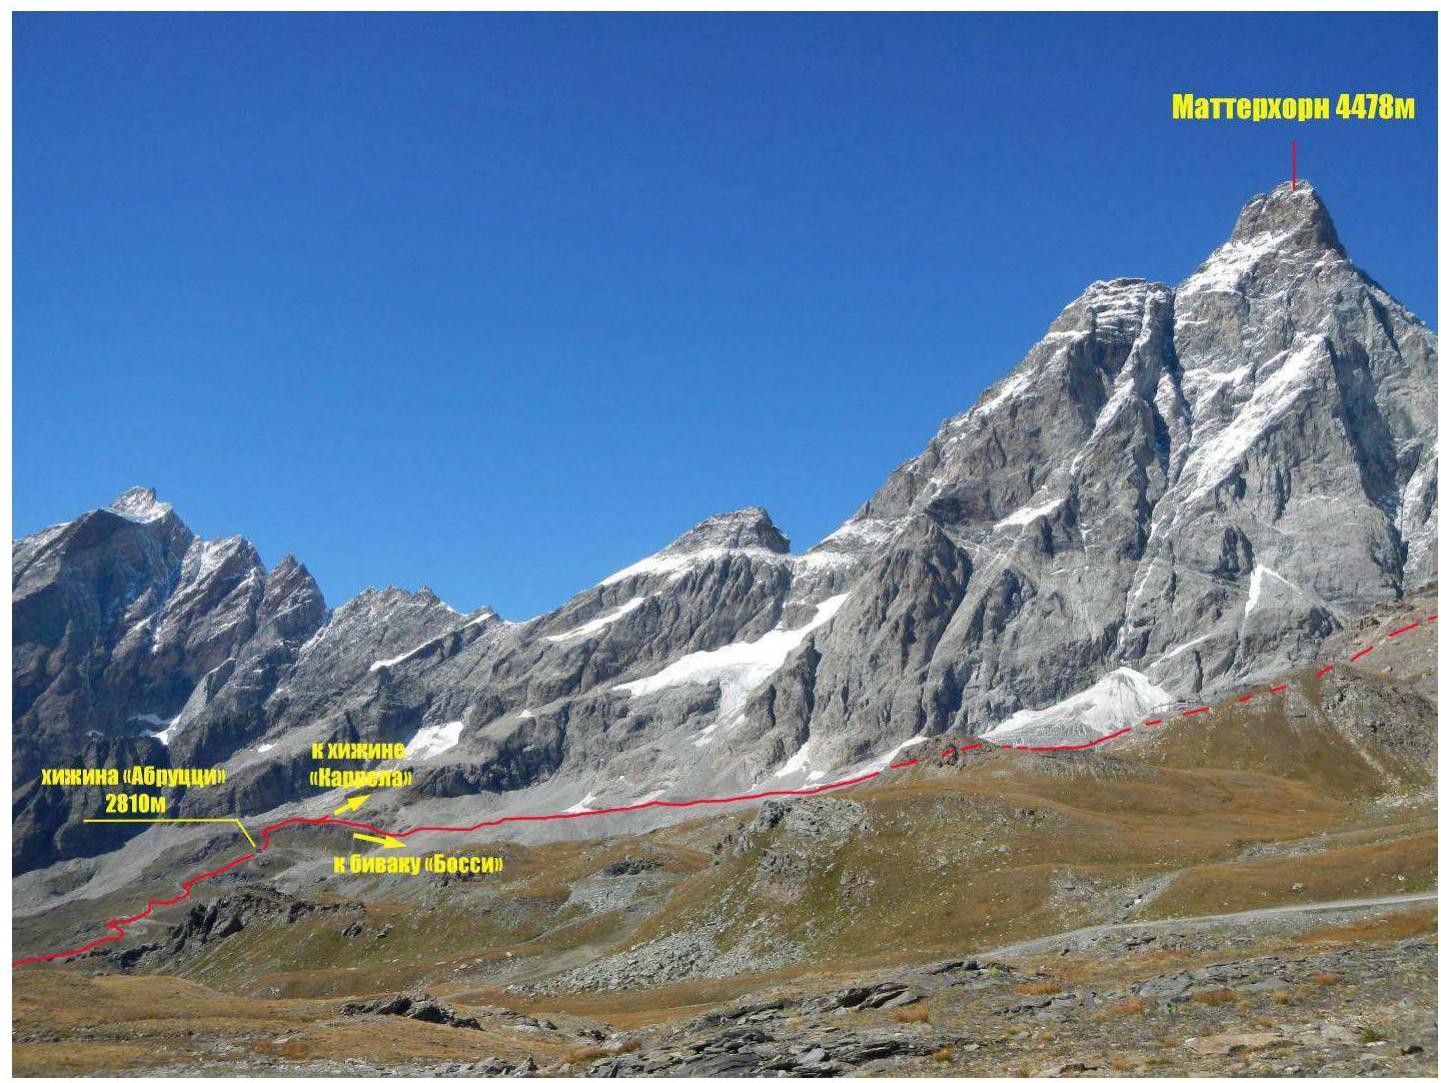
Approach route to Biv. Bossi from Rifugio Abruzzi. Original photo by S. Egorin
From Breuil-Cervinia, ascend to Rifugio Abruzzi (2810 m). The trailhead is located in the upper part of the town, to the left of the cable car (see signs). The ascent on foot takes 3–4 hours. It's also possible to take a 4WD vehicle to the hut (30–40 minutes).
From Abruzzi, follow the trail upwards towards the Leone ridge until the first ascent (500–600 m). Here, cross a large terrace to the gentle moraine part of the southern slopes of Matterhorn (moraines, scree, snow in places). Move in the direction of the saddle at the beginning of the Furggen ridge, where Biv. Bossi (3325 m) is located, typically used for ascents via the SE ridge and Furggen ridge.
The final ascent before the ridge involves a steep snow slope (firm snow in the early morning, crampons required). Bypass the "ram's foreheads" either to the left or right. The landmark for entering the rocks is the boundary between the white and grey rock belts. Follow this boundary upwards to the left into a small couloir leading to the hut. The rocks are I–II category, with scree, snow, and possible ice. If the slope condition is poor (heavy snow cover, ice on rocks, etc.), use protection. The travel time from Rifugio Abruzzi is 2–2.5 hours.
An alternative route to Biv. Bossi:
- Follow the cable car route from Breuil-Cervinia along ski trails.
- This route is shorter but can be confusing due to multiple roads and trails.
- It's better suited for a quick descent into the town.
- If used for ascent, it requires good navigation skills (using trekking signs and maps) and clear visibility.
It's also possible to approach Biv. Bossi from the Swiss side — from Zermatt.
Biv. Bossi is a metal cabin accommodating 9 people, equipped with:
- mattresses
- blankets
- pillows
- a small set of local dishes
There's no water at the bivouac; snow must be melted. As of 2016, no fee was charged for accommodation.

Upper part of the approach to Biv. Bossi. Photo taken on August 3, 2016.
General Summit Photograph

General summit photograph. Original photo by S. Egorin.
Route markings on the photo:
| № | Peak | Height | Difficulty | Route Type | Route | Leader, Year of Ascent |
|---|---|---|---|---|---|---|
| 1 | Cervino / Matterhorn (CERVINO) | 4478 | 4А (D-) | rock | via SW ridge (Leone) (Cresta del Leone) | J. A. Carrel, J. Bich, 1865 |
| 2 | 4478 | 4Б (D) | rock | via SW buttress of Tyndall peak | W. de Amicis and A. Frusta, 1906 | |
| 3 | 4478 | 6 (ED) | rock | via S face of Tyndall peak | R. Casarotto, J. Grassi, 1983 | |
| 6 | 4478 | 5Б (ED-) | rock | via S "bastion" of Tyndall peak | A. Deffye, L. Carrel, 1942 | |
| 7 | 4478 | 5Б (ED) | rock | via center of S face | V. de Tuoni and M. Barmasse, 1983 | |
| 8 | 4478 | 5А (TD) | rock | via S face ("classic") | E. Benedetti, M. Bich, L. Carrel, 1931 | |
| 9 | 4478 | 5Б (ED-) | rock | via SW ridge of Muzio peak | L. Marcuinaz, I. Muzio, L. Carrel, 1953 | |
| 10 | 4478 | 6А (ED) | rock | via SE face of Muzio peak "Via Ragini" | J. Lanfranconi, A. Zucchi, 1965 | |
| 11 | 4478 | 5А (D+) | rock | via SE ridge (Furggen ridge) | M. Piacenza, J. Carrel, J. Giesper, 1911 | |
| 12 | 4478 | 5Б (ED) | rock | via E face | E. Benedetti, J. Mazzotti, M. Bich, A. Giesper, L. Carrel, 1932 | |
| 13 | 4478 | 3Б (AD) | rock | via NW ridge (Hörnli ridge) | M. Croz, F. Douglas, D. Hadow, C. Hudson, P. Taugwalder, E. Whymper, 1865 |
Route Profile Photograph

Route profile. Original photo by S. Egorin.
Hand-Drawn Route Profile

Technical Route Photograph

Technical photograph of the lower part of the route. Photo taken on August 3, 2016.

Middle and visible upper part of the route.
Description of Route Difficulty Sections
| Section | Length | Steepness | Relief Type | Difficulty Category | Number of Pitons |
|---|---|---|---|---|---|
| R0–R1 | 200 | 15–30° | Snow, firn, scree, ice | 1 | 0 |
| R1–R2 | 30 | 60° | Rock | 4 | 3 |
| R2–R3 | 40 | 70° | Rock | 4 | 5 |
| R3–R4 | 500 | 40° | Rock, scree, snow | 2 | 0 |
| R4–R5 | 500 | 50° | Rocks | 3 | 0 |
| R5–R6 | 40 | 20° | Rocks, snow | 2 | 0 |
| R6–R7 | 40 | 30° | Rocks | 2 | 1 |
| R7–R8 | 50 | 40° | Rocks, ice | 3 | 2 |
| R8–R9 | 50 | 50° | Rocks | 3 | 2 |
| R9–R10 | 50 | 45° | Rocks | 3 | 1 |
| R10–R11 | 50 | 50° | Rocks | 3 | 2 |
| R11–R12 | 40 | 60° | Rocks | 3 | 3 |
| R12–R13 | 40 | 50° | Rocks, snow | 2 | 1 |
| R13–R14 | 50 | 80° | Rocks | 6 | 7 |
| R14–R15 | 25 | 70° | Rocks | 5 | 3 |
| R15–R16 | 50 | 80° | Rocks | 5 | 3 |
| R16–R17 | 40 | 50° | Rocks | 3 | 1 |
| R17–R18 | 30 | 45° | Rocks | 3 | 2 |
| R18–R19 | 40 | 70° | Rocks | 4 | 2 |
| R19–R20 | 70 | 20° | Snow, ice, rocks | 2 | 0 |
Brief Description of Route Passage by Sections
R0–R1 From Biv. Bossi, ascend to the start of the SE ridge, moving over snow, sometimes scree. 200 m, 15–30°, category I.
R1–R2 Ascend to the right and upwards along an oblique ledge, then continue upwards via small walls and ledges. 30 m, 60°, category IV.
R2–R3 From station 2, initially follow an internal corner, then traverse a rib onto a small wall. Ascend until reaching a large, wet internal corner (often wet and with water flow). In the crevices, ice is possible. Follow the internal corner upwards until a bend, then traverse onto the right, gentler side of the SE ridge. 40 m, 70°, category IV.
R3–R4 Move upwards along the right side of the SE ridge, avoiding the E face. The terrain includes oblique rock ledges, scree, and "ram's foreheads." Snow is possible. 500 m, 40°, category II.
R4–R5 Continue along the ridge, staying on the right side. Reach a snow saddle, from which the start of the summit tower is visible. To the right of the saddle on the E face lies a sharp gendarme. 500 m, 50°, category III.
R5–R6 Traverse a gentle saddle to the start of the ascent. Rocks, some snow and ice. 40 m, 20°, category II.
R6–R7 Ascend to the right along a broad ridge. The terrain includes gentle ledges with residual snow and ice. Caution: rockfall is possible from the upper part of the tower. 40 m, 30°, category II.
R7–R8 Ascend to the right, crossing a snow patch, then climb onto oblique, smoothed inclined slabs. Orient towards a small saddle between a sharp gendarme and the main slope. 50 m, 40°, category III.
R8–R9 Continue upwards onto a small buttress and climb under the base of the summit tower. 50 m, 50°, category III.
R9–R10 Traverse left and upwards along oblique, smoothed rock ledges. Be cautious of falling rocks and ice from above. 50 m, 45°, category III.
R10–R11 Continue moving left and upwards towards the shoulder of the SE ridge. A large ledge is available on the shoulder with an anchor. 50 m, 50°, category III.
R11–R12 Ascend to the right and upwards via an oblique, ruined internal corner. Station on a ledge. 40 m, 60°, category III.
R12–R13 Ascend to the right along inclined ledges filled with live rocks, ice, and snow. Reach the base of a steep ascent. Station on the right side of a large, vertical internal corner on a comfortable ledge (anchor and old pitons). 40 m, 50°, category II.
R13–R14 From the station, traverse left and upwards, almost traversing, until reaching an internal corner transitioning into chimneys. Along the way, there are anchors (3) and old pitons. From the last anchor (under an overhang), move left and upwards onto a ridge ledge. Station: anchor and old pitons. Icing and icicles are possible in the chimney. 50 m, 80°, category VI.
R14–R15 Ascend to the right, bypassing an overhang, and reach a slight flattening. Then, move left and upwards under a large internal corner. 25 m, 70°, category V.
R15–R16 Ascend a steep internal corner until reaching a ledge, then continue upwards via an oblique internal corner. Station on a ridge bend. 50 m, 80°, category V.
R16–R17 Ascend rocks of moderate difficulty along the ridge. Snow and ice are possible. 40 m, 50°, category III.
R17–R18 Continue along the ridge, reaching a small (5 m) snow saddle before the final ascent. Station on a ledge behind the saddle on an anchor and personal gear. 30 m, 45°, category III.
R18–R19 Ascend to the right onto an oblique ledge, then left, bypass an overhang, and continue upwards. Station on a good ledge before the summit flattening. Old pitons and remnants of rope may be encountered. 40 m, 70°, category IV.
R19–R20 Climb the remaining 5 m of vertical terrain and traverse onto a snow ridge leading to the summit. The Swiss route from Hörnli also converges here (marked by a statue of St. Bernard). Follow the horizontal snow ridge to the summit (marked by a large cross). 70 m, 20°, category II.
Descent from the Route
Descent can be made either to the Italian side (via Leone ridge) or the Swiss side (via Hörnli ridge), depending on the planned itinerary. On descent, it's possible to overnight at "Carrel" hut (Italian) or "Solvay" hut (Swiss).
Route Recommendations
The route is generally logical and interesting. Given its length and relatively low equipment level for mass visits (by European standards), it's essential to plan the ascent and descent carefully.
A well-prepared team can complete the route in a "light style" and good terrain conditions in one day, with an overnight stay on descent at huts on the ridges, or, for very fast teams, an overnight stay in the town is possible.
It's advisable to check the weather forecast for the next day or two before the ascent.
Cell phone coverage is available throughout the mountain and surrounding area (connections possible to Swiss and Italian operators). Emergency phone number: 118 (Italian).
Hazardous sections of the route:
- The rock belt under the summit tower should be traversed without long delays and with observation.
On descent, be aware that "Carrel," "Solvay," and "Hörnli" huts may be overcrowded during the season.
The necessary gear for a 5A category route includes a set of cams, nuts, etc.
In terms of length and difficulty, the route is comparable to:
- 5A Kapkov on Mt. Zamok (Fan Mountains);
- 5A on Mt. Passionaria (Polevoy's route) — this route is shorter but similar in difficulty;
- 5A Kalinkin (SKF) on Mt. Zamok (Uzunkol).
Photo Illustrations of the Report

Section R1–R3

Section R4–R6

Section R8–R9

Section R10–R11 — Approach to the shoulder

Section R13–R14. Route key
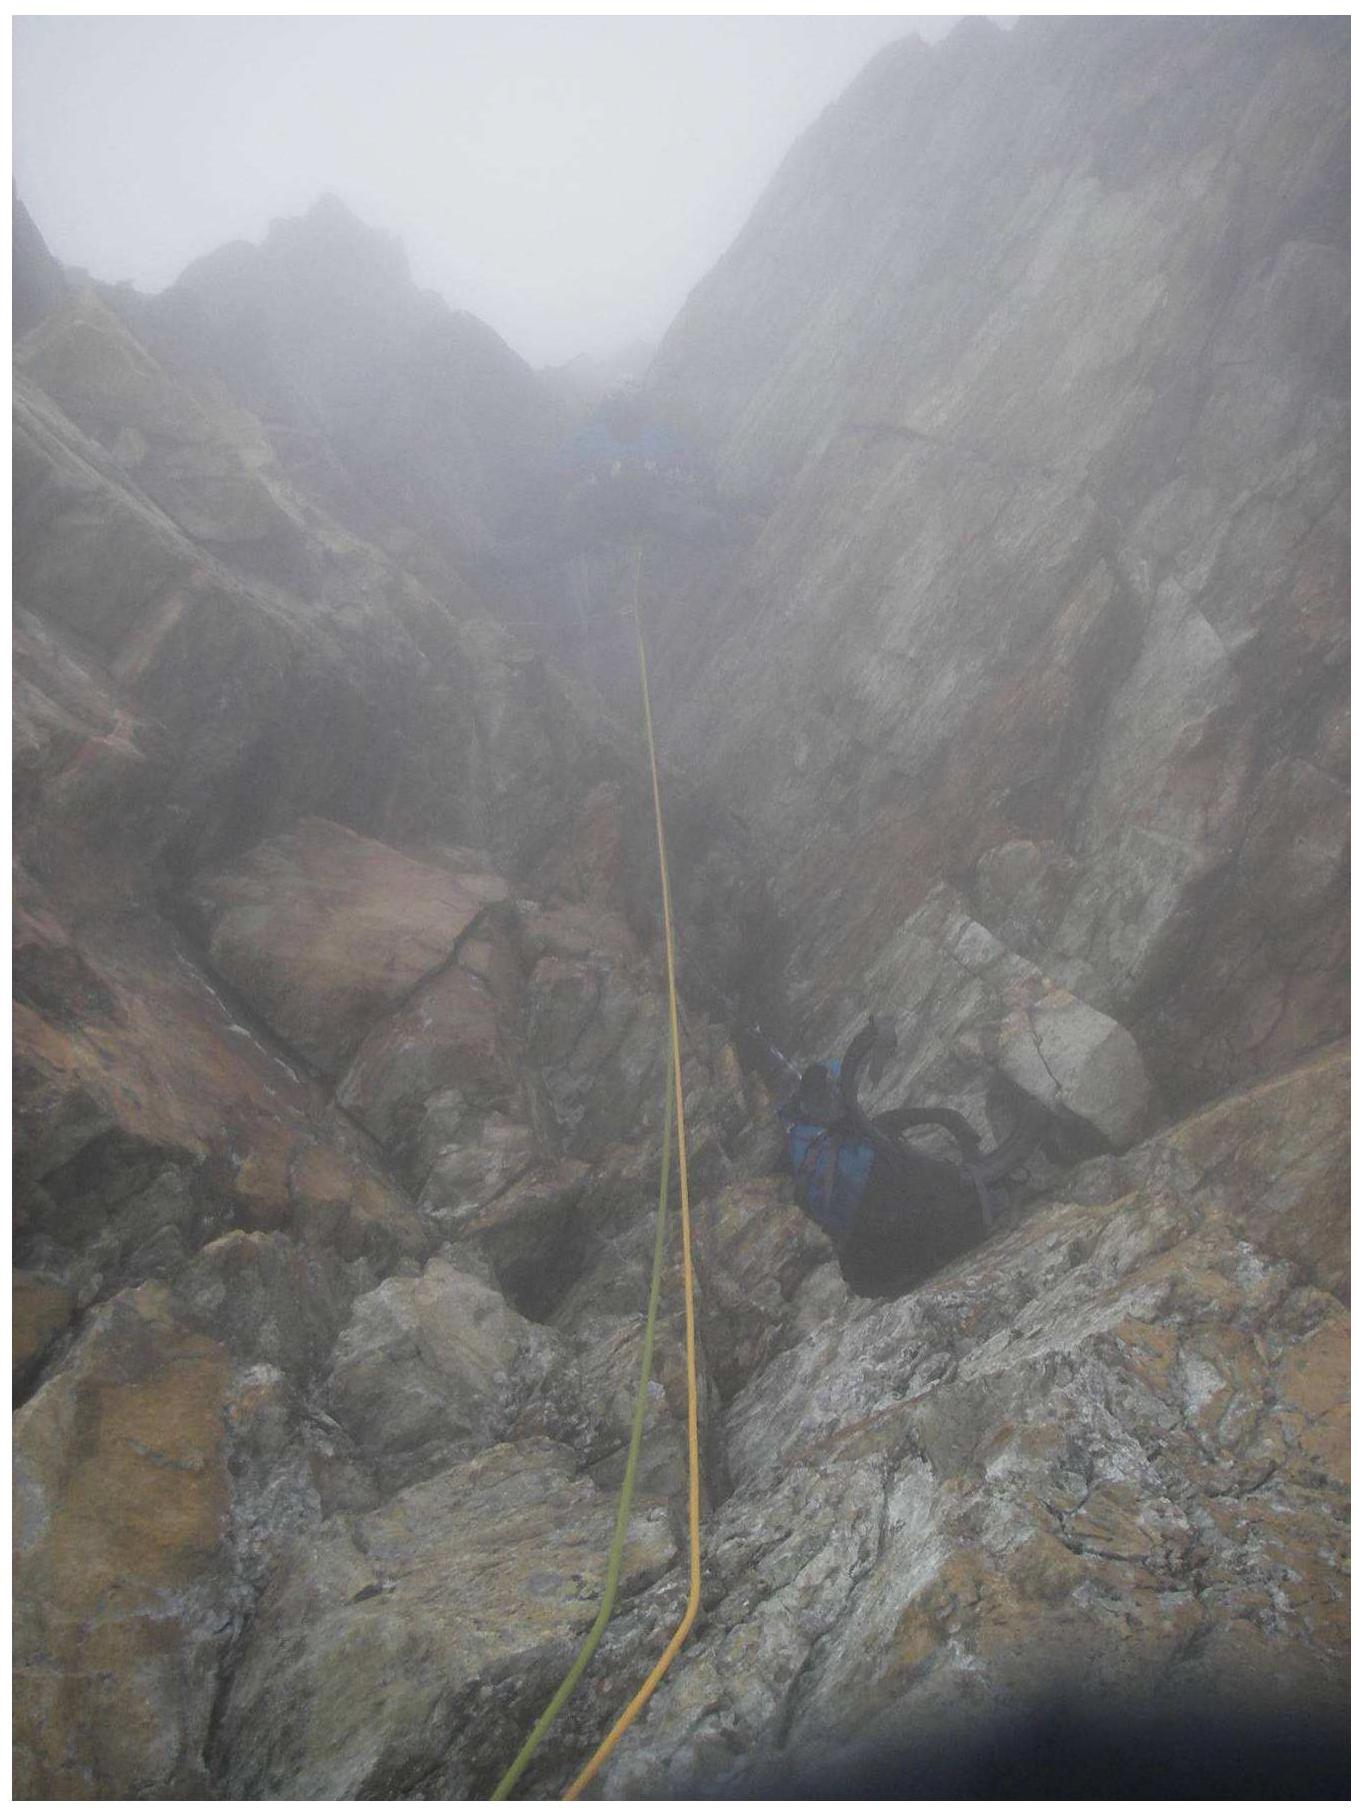
Section R15–R16. Leader has left the backpack to ease passage

Section R19–R20. Summit ridge
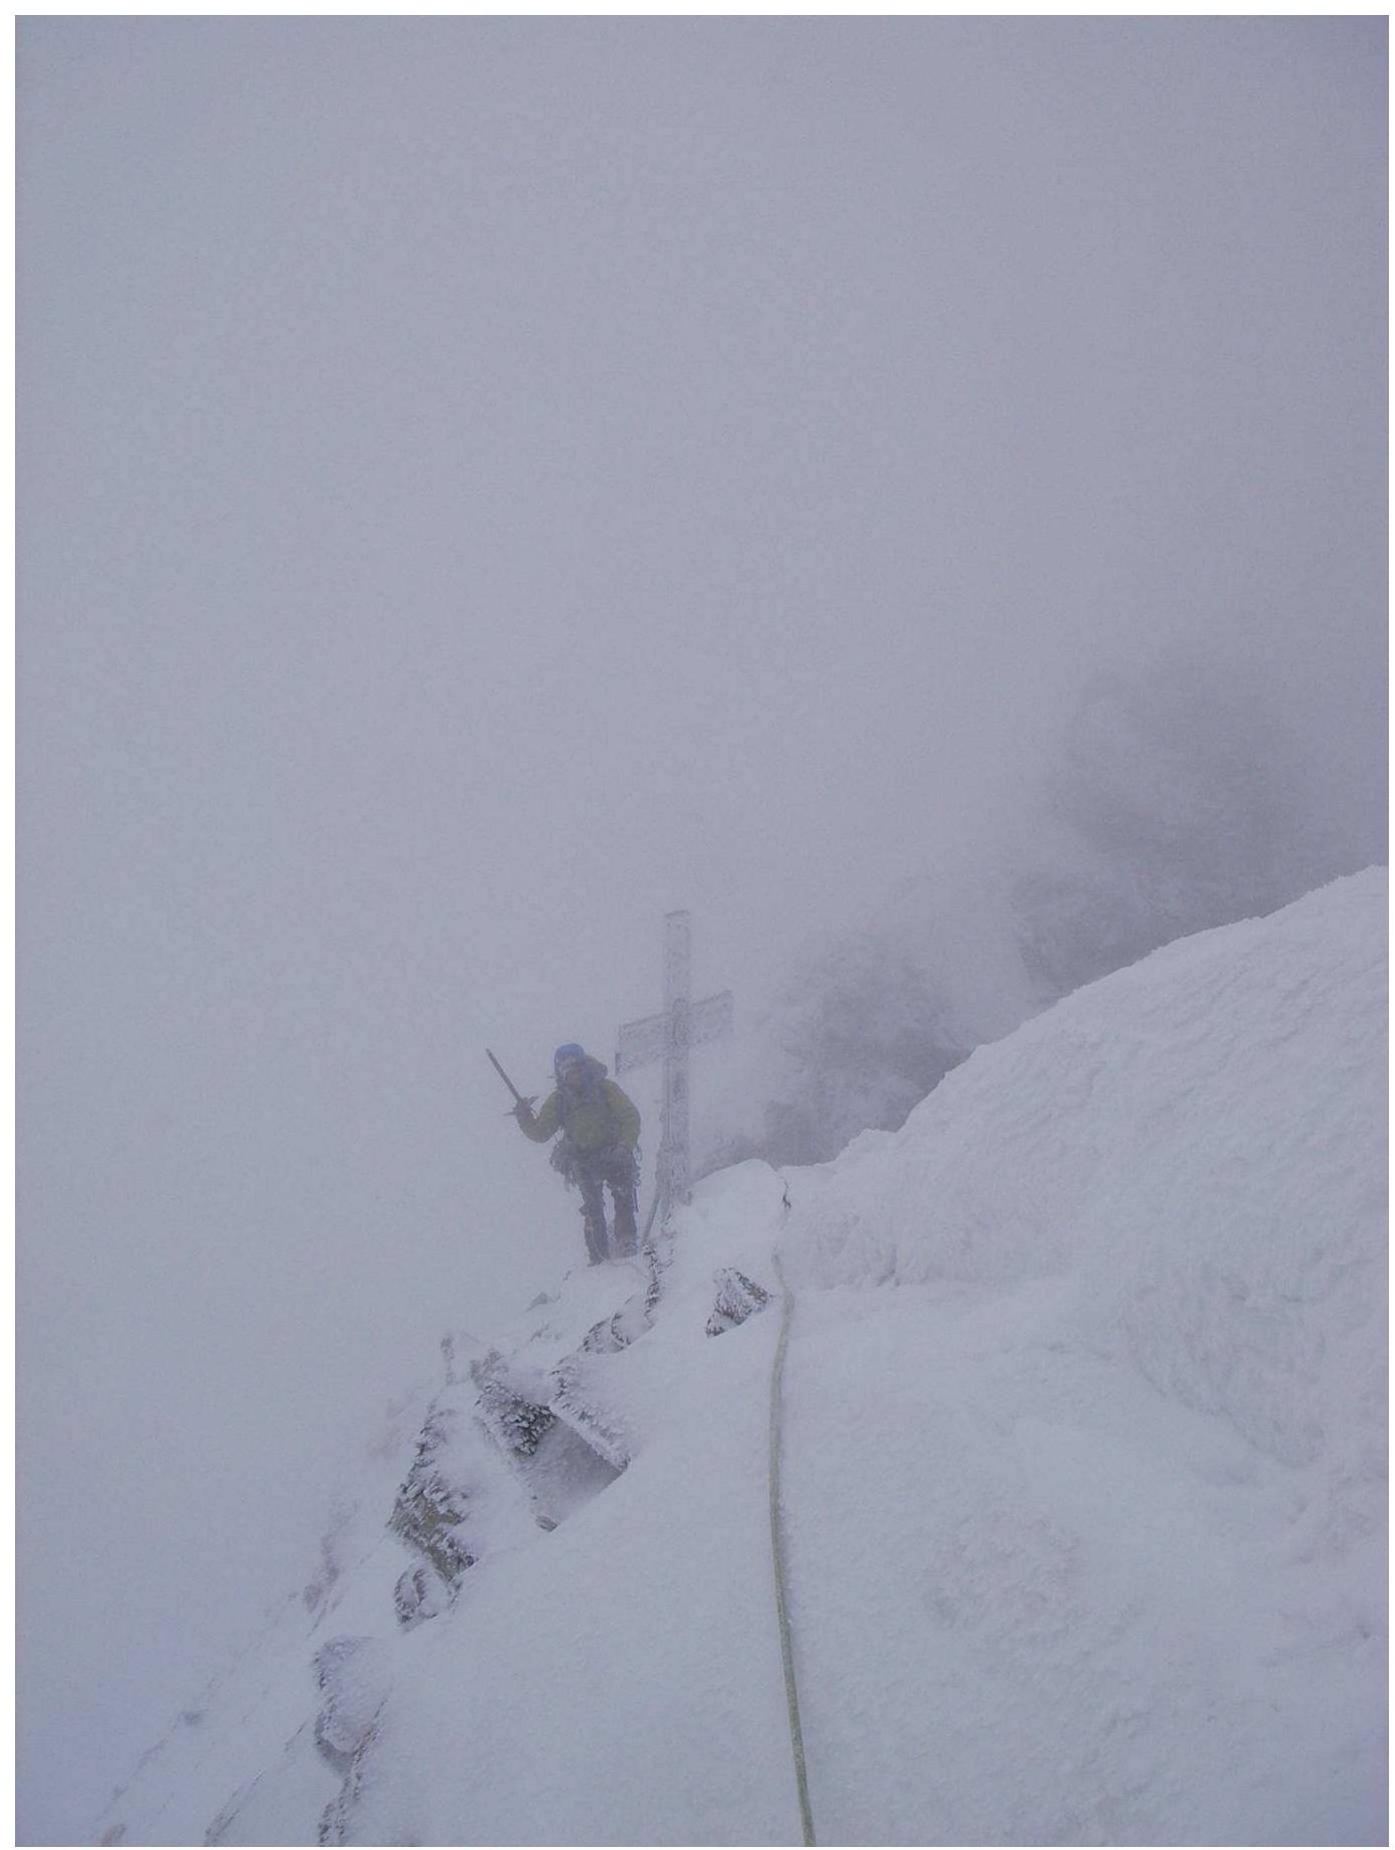
At the summit
Photos used in the report:
- S. Egorin
- A. Yurkin
- V. Fedorov
Comments
Sign in to leave a comment