Passport
- Technical category.
- Pamir-Alay, Turkestan Ridge, Karavshin valley.
- Peak "4520", via the right part of the NW wall.
- Category 6B proposed, first ascent.
- Height difference 1100 m, length 1485 m.
Length of sections with 5-6 category difficulty is 1275 m, including 645 m of 6B category.
The average slope of the route is 70° (3420-4520). The average slope of the wall part of the route is 76° (3420-4340).
- Pitons used:
| Rock | Bolt | Nuts | Ice |
|---|---|---|---|
| 212/63 | 12/12 | 186/53 | 0/0 |
- Team's total climbing hours: 38, days — 4, descent on the 4th and 5th day took 6.5 hours.
- Overnight stops: 1st and 2nd — lying on a stone-laid platform, 3rd — semi-reclining on the descent ridge.
- Team leader: Igolkin Viktor Ivanovich, Master of Sports. Team members: Kirievsky Gennady Pavlovich, Candidate for Master of Sports; Kraitor Sergey Grigorievich, Candidate for Master of Sports; Lapko Alexander Vladimirovich, Candidate for Master of Sports; Rogozin Viktor Alekseyevich, Candidate for Master of Sports; Semenov Alexander Viktorovich, Candidate for Master of Sports.
- Coach: Kapitanov Oleg Viktorovich, Master of Sports.
- Route approach started on July 1, 1988. Summit reached on July 4, 1988. Return on July 5, 1988.
- Organized by AUSB "Varzob".
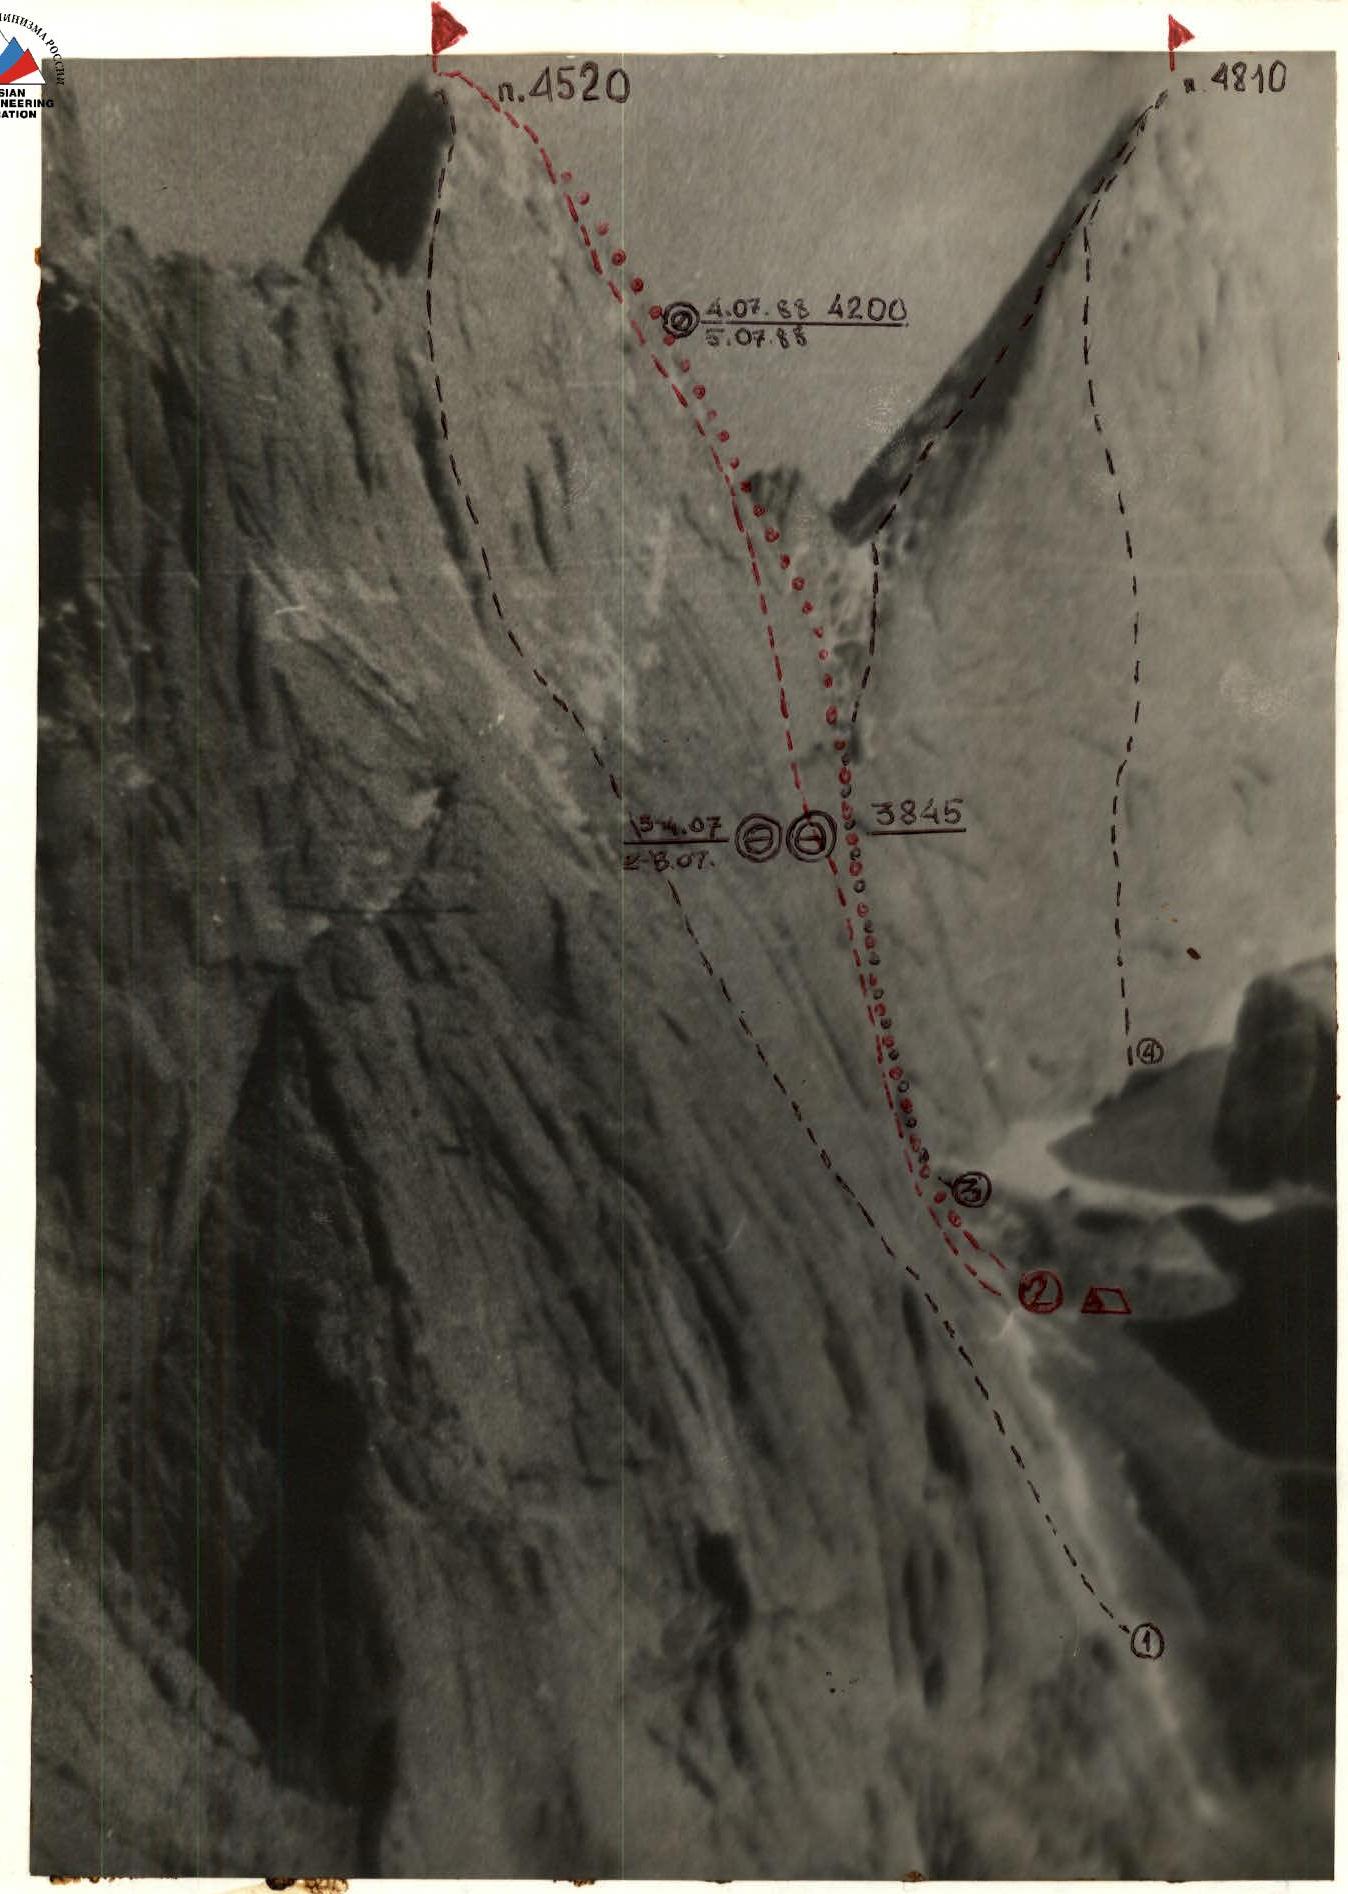
Photo 1. General photo of the summit taken from a helicopter (provided to the team). The distance to the subject is approximately 4 km.
- 1st route by the Zelenograd Alpine Club on the left part of the NW wall, category 6B (led by Skripko V.), first ascent on July 4, 1988.
- 2nd route by AUSB "Varzob" on the right part of the NW wall, category 6B (led by Igolkin V.), first ascent on July 4, 1988.
- 3rd route to peak 4810 via the N ridge (from Sitnik's method, 1986).
- 4th route to peak 4810 via the NW wall, first ascent (Moshnikov A.), July 8, 1988.
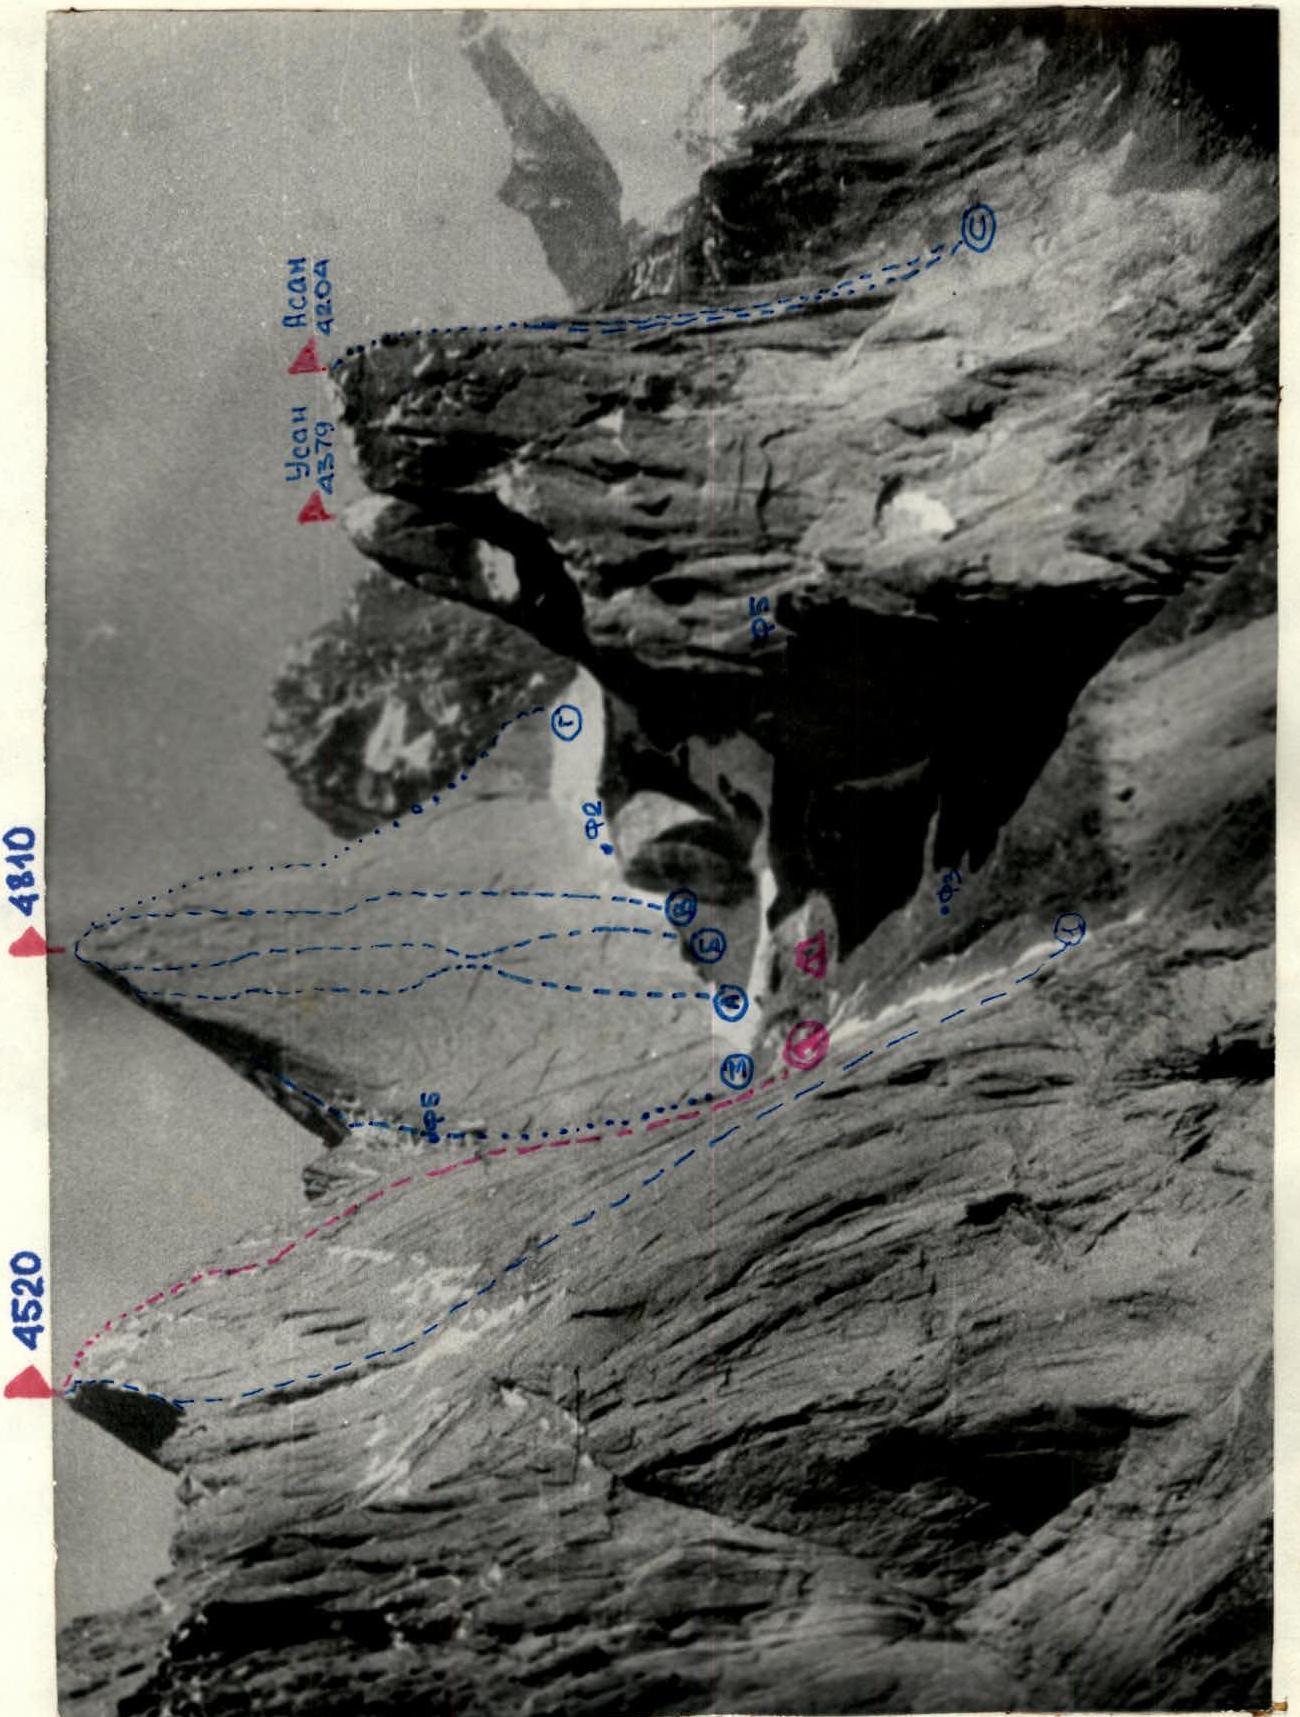
Photo 4. Photopanorama of the area taken from a helicopter (provided to the team). Distance to the subject — 4 km. 1st route by the Zelenograd Alpine Club on the left part of the NW wall, category 6B, led by Skripko V., first ascent on July 4, 1988; 2nd route by AUSB "Varzob" on the right part of the NW wall, category 6B, led by Igolkin V.I., first ascent on July 4, 1988; 3rd route to peak 4810 via the N ridge (from Sitnikov's method, 1986); A, B, C, D — new routes to peak 4810 in 1988.
Routes on peak Asan via the NW wall (5 routes):
- Route 1
- Route 2
- Route 3
- Route 4
- Route 5

Photo 5. Technical photo of the route. Taken on June 30, 1988, at 10:00 with a "Smena-simvol" camera, T-43 lens with a focal length of 40 mm from the northern ridge gap of peak Asan. The distance to the subject is approximately 2 km, the height of the shooting point is 3600 m.
Tactical Actions of the Team
The team's tactical plan was to climb the route to peak 4520 via the right part of the NW wall in five climbing days, considering preliminary processing of 100 m of the route and descent. Visual observation from the North ridge of peak Asan and the saddle between peak Asan and peak 4810 revealed a good overnight stop under a cornice for the whole team and several options for overnight stops on the upper part of the wall and on the 10th ridge, but without setting up a tent. The most problematic lower 600 m of the wall was noted, after which the average slope decreases to 60–65°.
The plan included:
- Processing the route.
- Early start on the second day to reach a ledge under a cornice and overnight stop.
- From this stop, processing the most difficult section of the wall: a series of cornices with smooth slabs between them and the slab under the upper cornice.
There is no water on the wall (ice only in the upper part, near the ridge), so all water had to be carried (15 l).
Movement was organized to utilize each rope team's capabilities, with participants taking turns leading and following, ensuring an even workload. The first to lead were: on section R0-R1 — Kraitor; R1-R4 — Semenov; R4-R7 — Rogozin; R7-R11 — Igolkin; R11-R17 — Lapko; R17-R24 — Kirievsky; R24-R30 — autonomous movement of rope teams with piton interaction. Ropes were set up on sections R0-R24. The team used all modern technical means tested at on-site USSR Championships. Sections with increased relief destruction were encountered on the route.
Safety was ensured by:
- Choosing the direction of movement.
- Gathering participants in areas protected from falling rocks.
- Working on a double rope using "Edelrid" UIAA rope for belaying in all rope teams.
The first overnight stop was on a ledge (lying down) under a monolithic powerful cornice, protected from bad weather and falling stones. The second overnight stop was on the ridge during descent (after ten rappels from the summit), semi-reclining, in a safe place under an overhang.
Nutrition was twice a day (morning and evening) with high-calorie individual rations and a drink from flasks during the day. An autoclave was used for cooking. There were no falls or injuries among participants. Problematic sections R11-R17 were overcome using:
- High individual technique.
- Partial use of the "pendulum" technique combined with "skyhooks".
- A wide range of technical приемов and means.
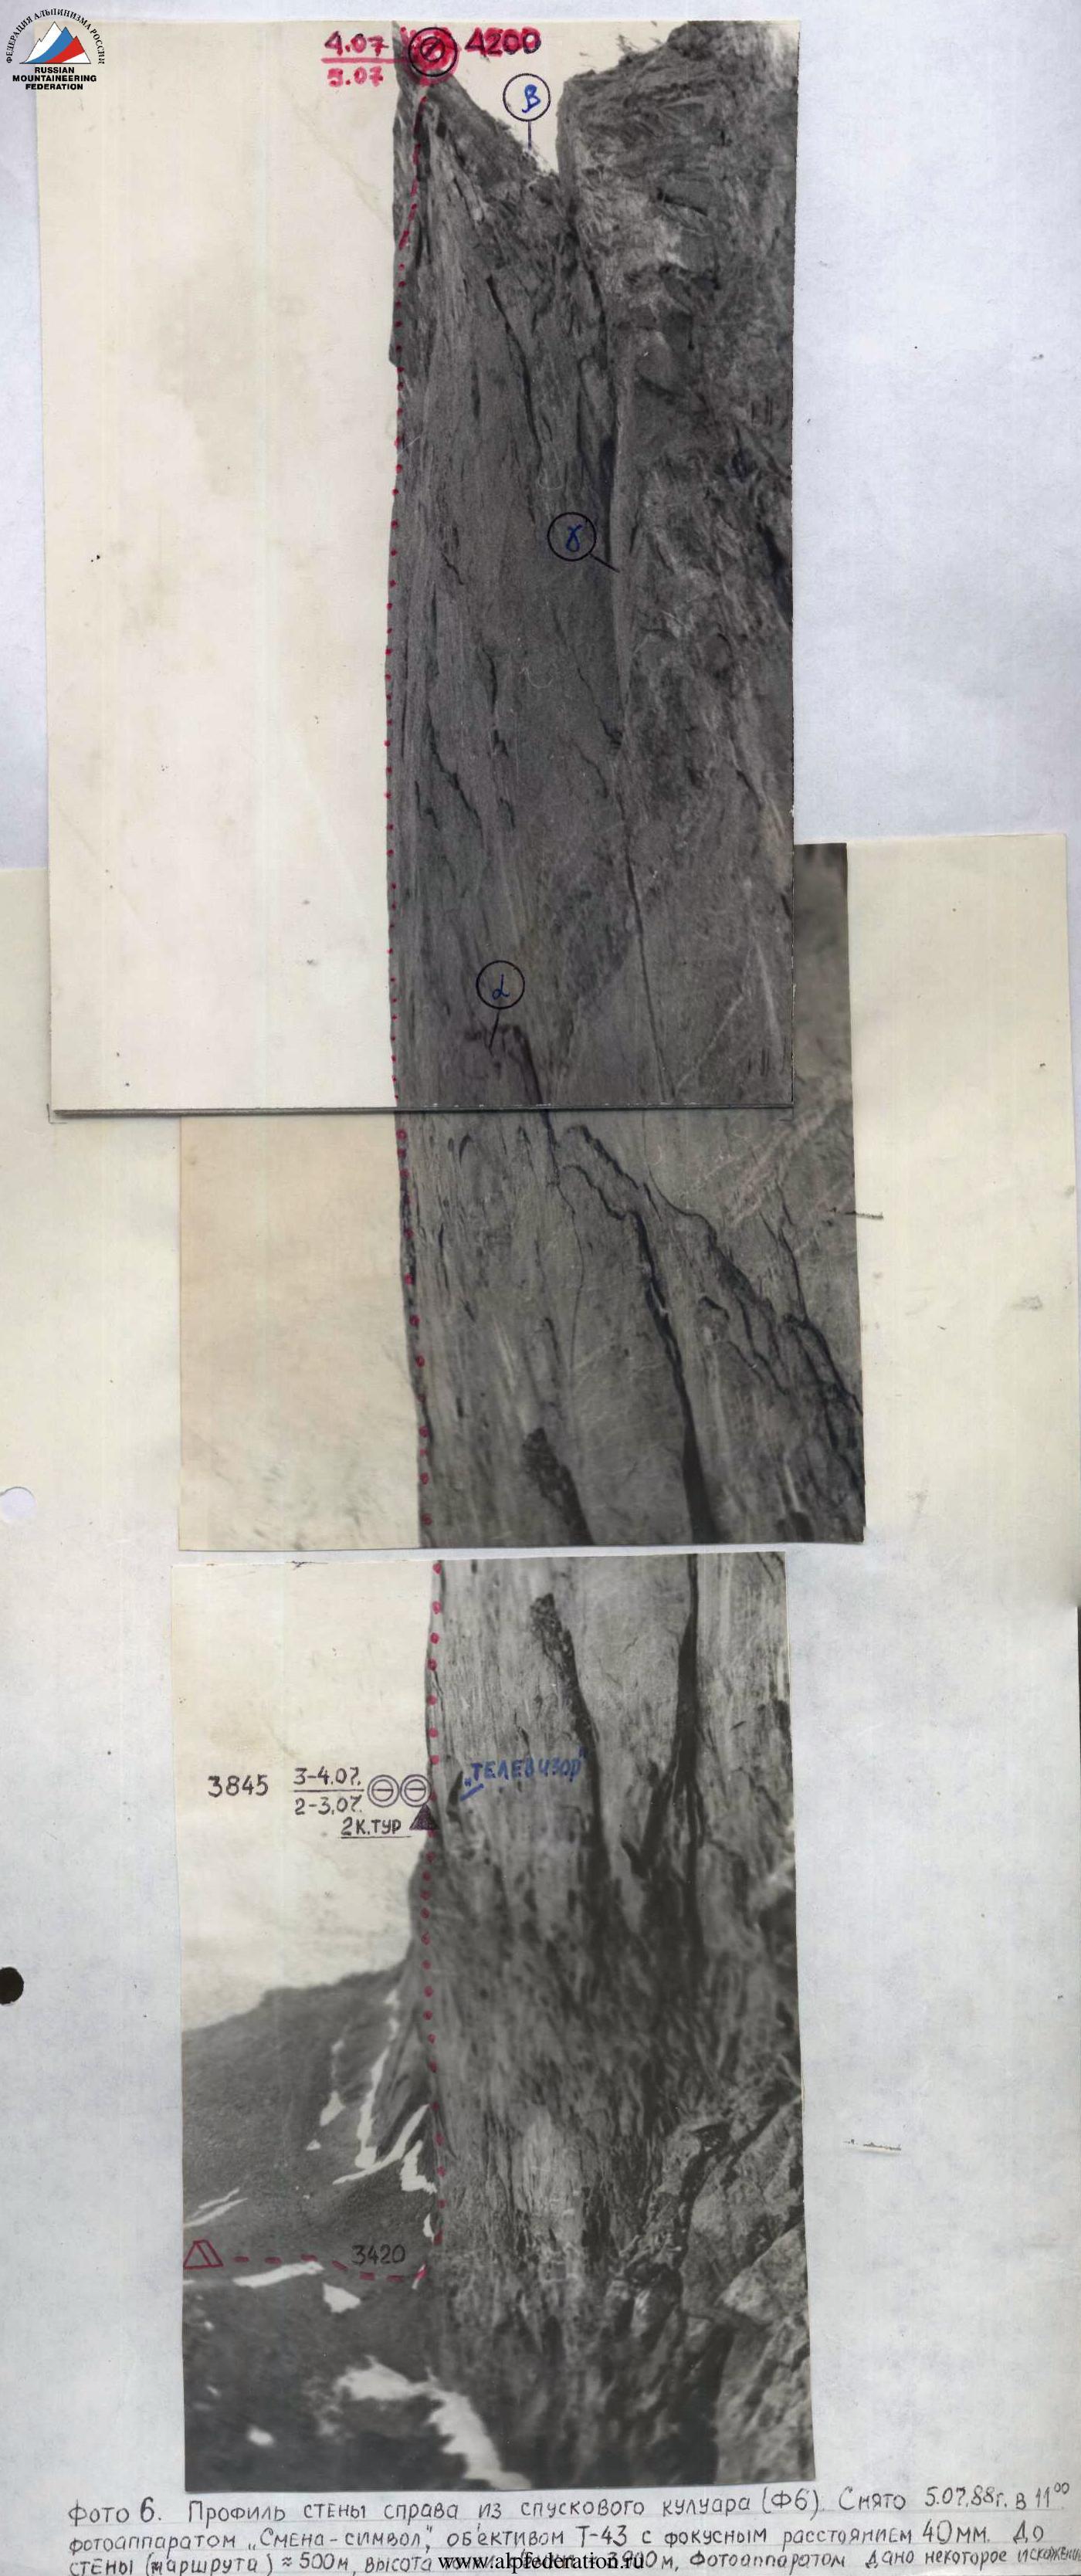
Photo 6. Profile of the wall from the descent couloir (F6). Taken on July 5, 1988, at 11:00 with a "Smena-simvol" camera, T-43 lens with a focal length of 40 mm. The distance to the wall (route) is approximately 500 m, the height of the summit is 900 m; the camera gives some distortion.
Due to the almost complete lack of protrusions, intermediate belays were set up on pitons and nuts; on slabs without cracks, using bolt pitons. "Stations" for belaying and securing ropes were organized on three to four elements, including pitons. New elements included:
- Using ring ladders sewn into "skyhooks" for "hook legs" without intermediate carabiners, allowing for belay points or ITOs to be established 10–15 cm higher than usual.
- Using, in addition to "skyhooks", small bolts with a cable, allowing for more reliable ITO organization in a hole drilled with a punch, 5–7 mm deep.
Due to the abundance of cornices in the lower part of the wall, it was possible to organize movement even in bad weather under the protection of cornices or to wait out bad weather under them briefly.
Communication with the base camp, where a rescue team was located (1.5 hours walk under the wall), was maintained through two observers with Candidate for Master of Sports qualification and 2nd sports category, constantly stationed under the route, using a "Lastochka" radio station. Observations were made through a 12x binocular, maintaining communication on the lower part of the wall.
The team's reserves included:
- Good reconnaissance and thorough study of the route.
- Excellent technical and physical preparation (1st ascent on the West face of Zamin-Karor, category 6B, processed 8 ropes in one overnight stop).
- Combination of youth and experience in the team (average age — 29 years, 4 participants in USSR Championships).
- Good material base (nutrition, equipment, medicine, rescue team).
- One and a half times reserve of food, gasoline (sealed in cans), special equipment on the route.
- Planning main work on the strongest sections.
- Regular radio communication with the Tajik KSP and AUSB "Varzob".
- Time reserve (10 days for the ascent).
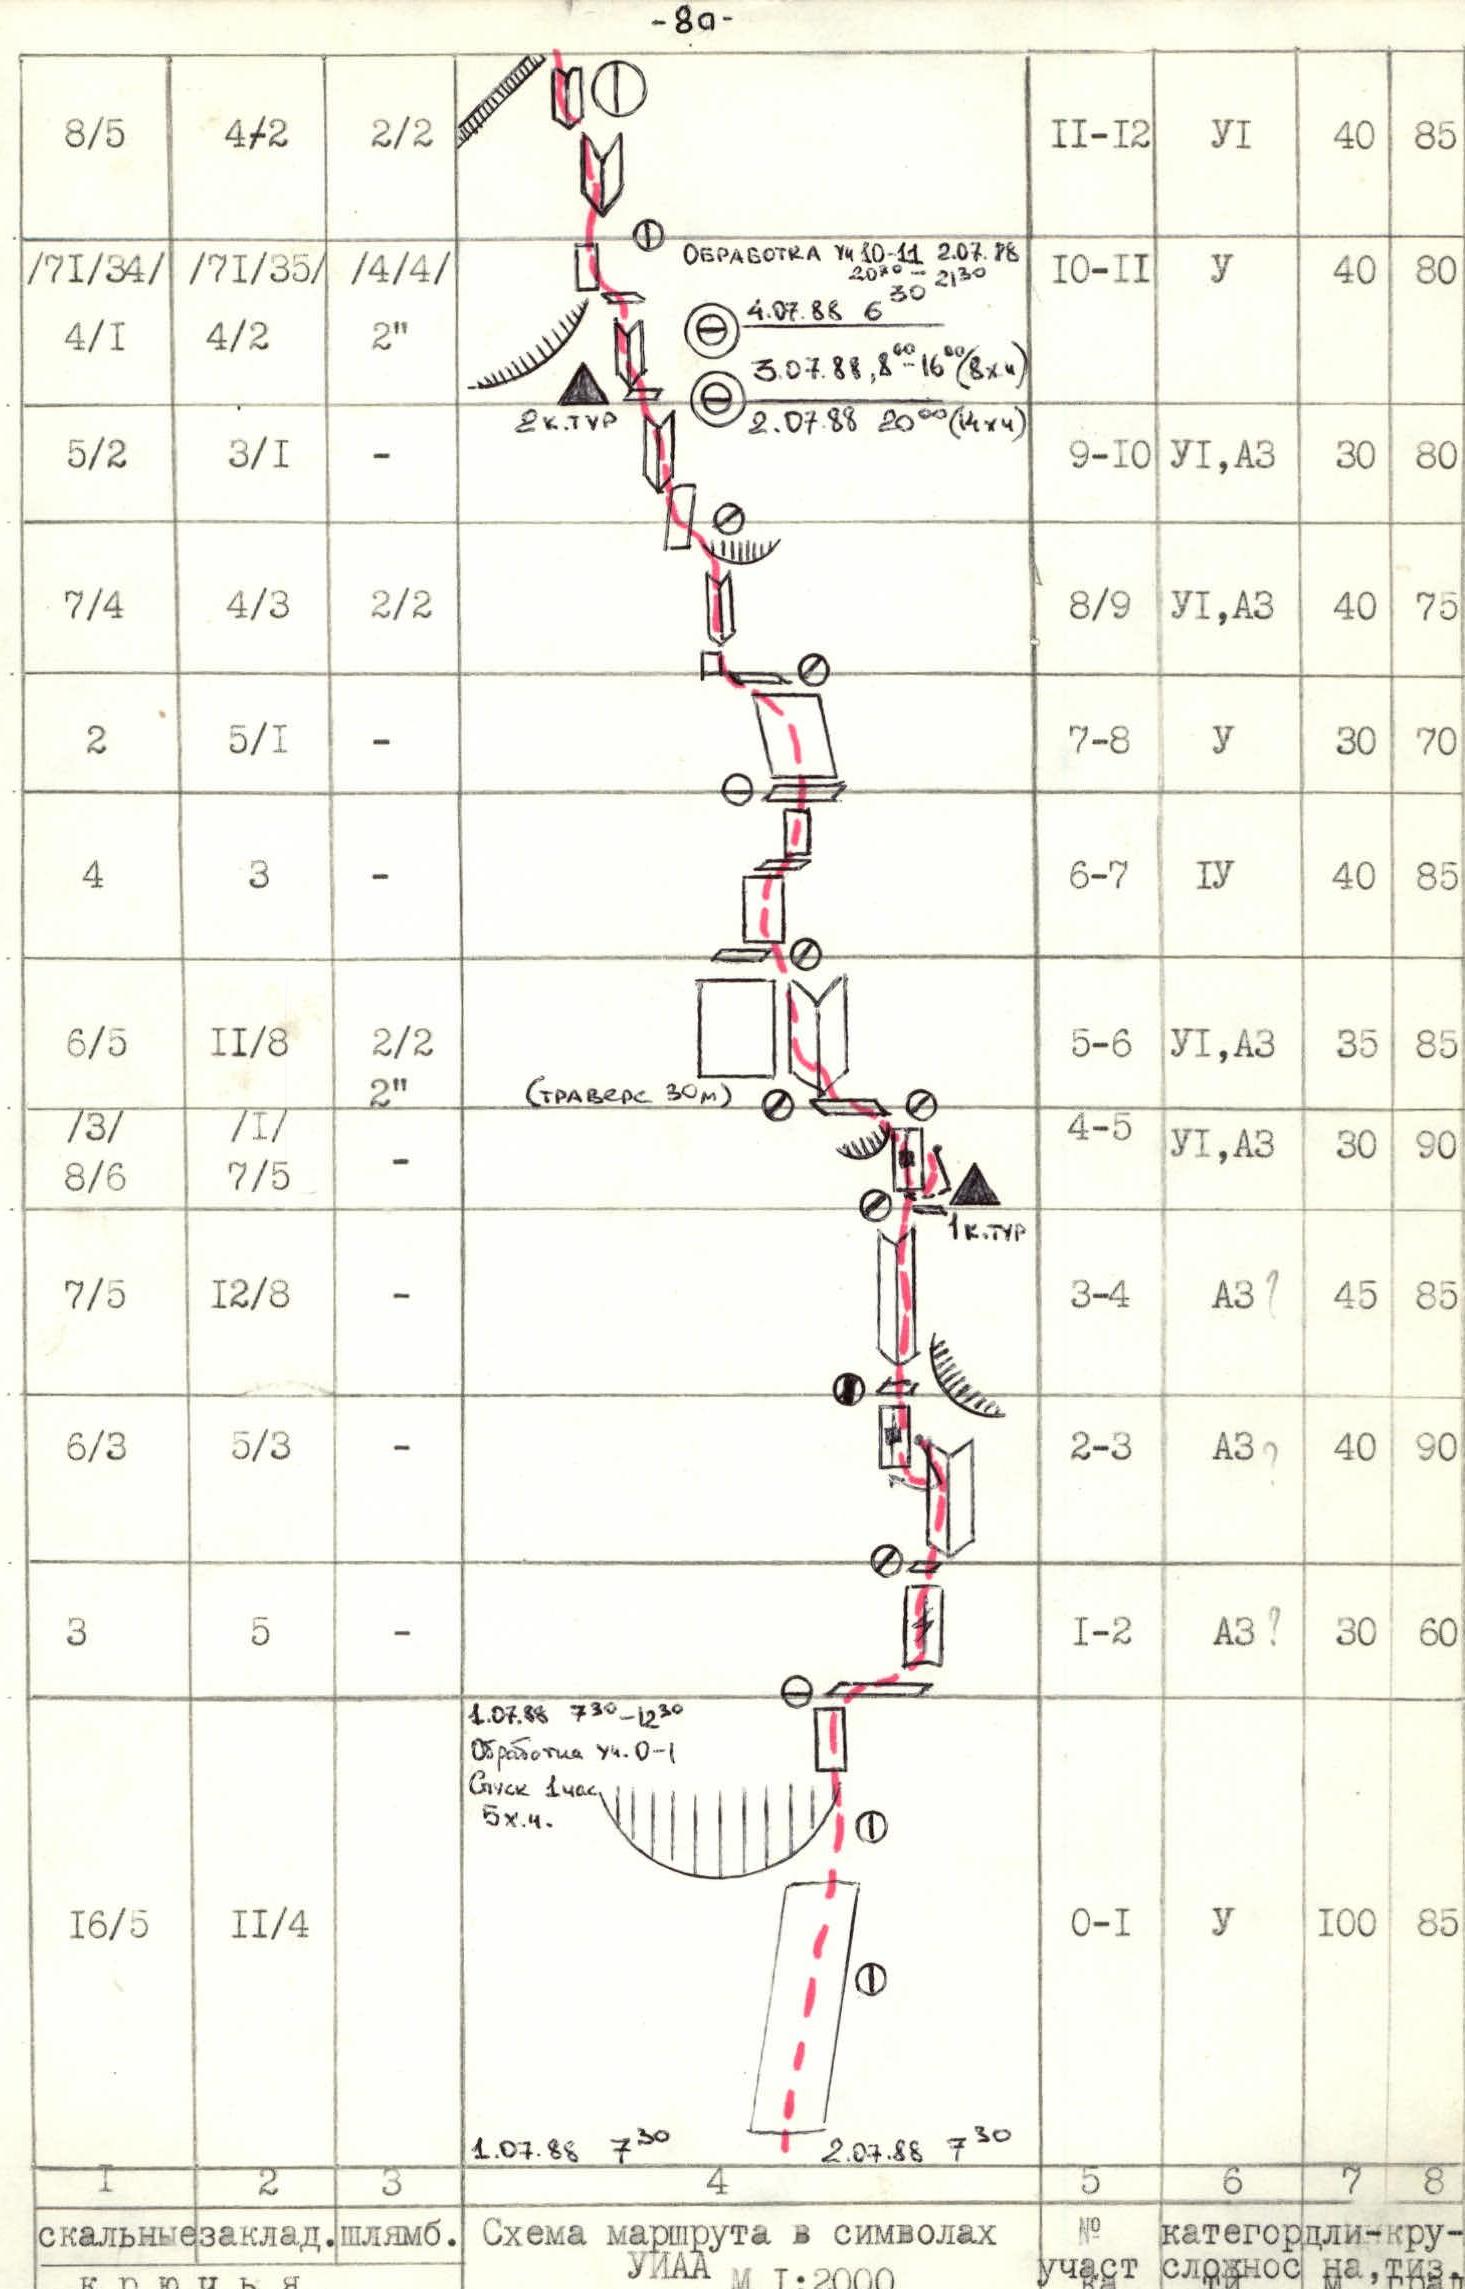
| Pitons | Nuts | Bolt | UIAA Symbol Route Diagram 1:2000 | Section | Category | Length, m | Slope, ° |
| :---: | :----: | :---: | : | :---: | :-----: | :----: | :------: |
| 16/5 | 11/4 | - | | R0–R1 | 5 | 100 | 85 |
| 3 | 5 | - | | R1–R2 | 3 | 30 | 60 |
| 6/3 | 5/3 | - | | R2–R3 | 3 | 40 | 90 |
| 7/5 | 12/8 | - | | R3–R4 | 3 | 45 | 85 |
| 6/6 | 7/5 | - | | R4–R5 | 6 | 30 | 90 |
| 13/ | 1A/ | - | | R5–R6 | 6 | 35 | 85 |
| 2 | 5/1 | - | | R6–R7 | 4 | 40 | 85 |
| 7/4 | 4/3 | 2/2 | | R7–R8 | 5 | 30 | 70 |
| 5/2 | 3/1 | - | | R8–R9 | 6 | 40 | 75 |
| 4/1 | 4/2 | 2" | | R9–R10 | 6 | 30 | 80 |
| /71/34/ | /71/35/ | /4/4/ | | R10–R11 | 5 | 40 | 80 |
| 8/5 | 4/2 | 2/2 | | R11–R12 | 6 | 40 | 85 |
| 11/8 | 4/3 | 3" | | R12–R13 | 6 | 40 | 80 |
| 9/4 | 4/2 | 2" | | R13–R14 | 6 | 40 | 85 |
| 8/4 | 4/2 | - | | R14–R15 | 6 | 40 | 80 |
| 11/1 | 3 | 3/3 2" | | R15–R16 | 6 | 40 | 75 |
| 4 | 4 | 2" | | R16–R17 | 5 | 20 | 75 |
| 14/3 | 11/4 | - | | R17–R18 | 6 | 75 | 75 |
| /43/17/ | /19/7/ | /5/5/ 9" | | R18–R19 | 6 | 80 | 75 |
| 12/3 | 14/2 | 2/2 | 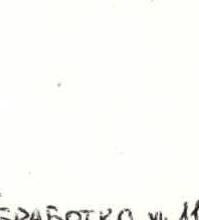 | R19–R20 | 5 | 40 | 70 |
| /6/ | /2/ | 1" | | R20–R21 | 6 | 40 | 75 |
| 10/2 | 7/2 | 1/1 | | R21–R22 | 5 | 90 | 65 |
| 14 | 11 | - | | R22–R23 | 5 | 40 | 65 |
| 3 | 5 | - | | R23–R24 | 5 | 40 | 50 |
| 3 | 6 | - | | R24–R25 | 5 | 40 | 55 |
| 3 | 7 | - | | R25–R26 | 5 | 40 | 55 |
| 6 | 2 | - | | R26–R27 | 5 | 40 | 50 |
| 4 | 7 | - | | R27–R28 | 5 | 40 | 55 |
| 2 | 6 | - | | R28–R29 | 5 | 40 | 50 |
| 2 | 5 | 2" | | R29–R30 | 5 | 30 | 60 |
| R19–R20 | 5 | 40 | 70 |
| /6/ | /2/ | 1" | | R20–R21 | 6 | 40 | 75 |
| 10/2 | 7/2 | 1/1 | | R21–R22 | 5 | 90 | 65 |
| 14 | 11 | - | | R22–R23 | 5 | 40 | 65 |
| 3 | 5 | - | | R23–R24 | 5 | 40 | 50 |
| 3 | 6 | - | | R24–R25 | 5 | 40 | 55 |
| 3 | 7 | - | | R25–R26 | 5 | 40 | 55 |
| 6 | 2 | - | | R26–R27 | 5 | 40 | 50 |
| 4 | 7 | - | | R27–R28 | 5 | 40 | 55 |
| 2 | 6 | - | | R28–R29 | 5 | 40 | 50 |
| 2 | 5 | 2" | | R29–R30 | 5 | 30 | 60 |
Note: "-" — a hole drilled for a "skyhook".
The team spent 38 climbing hours. The route length is 1345 m, and with traverses on sections R4-R5, R19-R20, R29-R30 — 1485 m.
Route Description by Sections
The route starts 40–50 m left of the snow-ice couloir descending from the saddle between peak 4520 and peak 4810. Main landmarks for the start are:
- A rectangular rock "pillar" (starting 100 m from the scree) 100–120 m long, forming with the main wall an internal angle that the route follows.
- A "TV" — a huge black recess in the wall, 150–200 m in diameter, 200 m from the scree. The route passes 50–70 m to the left of the "TV".
- The "integral" cornice — a powerful cornice belt at an angle of 50–60° to the horizon, intersected in its middle part.
- The "oak leaf" slab protruding on the main wall, 120–150 m high, located in the second third of the wall, to the left of which the route passes.
From the moraine, control cairns 1 and 2 are visible through binoculars. Due to the narrowness of the valley and the wide size of the NW wall, the summit (highest point) is not visible from the valley. It is located 200–300 m to the left of the rectangular gendarme.
The heights mentioned in the report were taken from geographical maps and an altimeter.
Section R0–R1: A niche with a cornice on top, above the scree, is bypassed on the right. From the snowfield, ascend via steps (15 m under the niche), then, bypassing the cornice on the right via steep, partly overhanging rocks, reach a small ledge. Then traverse left 5 m and overcome a series of steep walls separated by small ledges. Ascend these walls to a large inclined ledge at the base of the "pillar".
Section R1–R4: It's advisable to climb in short segments as many elements are required for ITO. This is a powerful, partly overhanging 85-meter internal angle with a variable-section crack. Various elements are used: pitons, boxes, segments, hexes, stoppers, with "friends" being particularly effective. The overhang in the middle is overcome with a "pendulum" to the left side of the offset and then, after 5 m of ascent, into the internal angle. The upper part of the crack widens significantly, so one must move along the overhanging right plane of the angle. 5 m before reaching the round cornice closing the internal angle, move left with a "pendulum" to a small ledge — 1st control cairn.
Section R4–R5: This section is 45 m long. First, ascend 10 m from the ledge up a slab with a small crack, then 10 m up and right. From this crack, "pendulum" into the left crack (5 m away). After the "pendulum", approach under the cornice and, using ITO and free climbing with a left orientation, ascend the slab with a crack to a ledge. The 30 m ledge with a slight descent leads left.
Section R5–R6: The monolithic wall above the powerful round cornice is climbed via the internal angle. Movement is mainly on ITO, sometimes requiring "skyhooks" by drilling holes with a punch. The length of this section is 35 m.
Section R6–R7: The internal angle, flattening and turning into an inclined ledge, leads right at 45° to a large ledge. Many loose rocks. The group must gather on the ledge to continue.
Section R7–R9: Characterized by large-block fractured slabs. The direction of movement is towards a slab with an overhang at the base and a 20–30 cm wide crack. This slab is visible from the scree under the route (15–20 m right of the "integral" cornice). Move under the slab via the internal angle. Exit with a "pendulum", then traverse 10 m left along a smooth slab. Then ascend under the internal angle formed by the slabs and the "integral" cornice.
Section R9–R10: Via the overhanging internal angle and the right slab — reach the site of the 1st and 2nd overnight stops — 2nd control cairn. The stop is good, under an overhanging cornice, semi-reclining for 6 people, difficult to set up a tent. The platform is protected from falling stones. A polyethylene tent was used for the overnight stop.
Section R10–R11: An overhanging internal angle with slabs and offsets, formed by the "integral" cornice on the left and a steep slab. 30 m above the stop, there's a passage through the 1st cornice step, then move left 5 m and up 7 m.
Section R11–R13: Overcome the 2nd step of the "integral" cornice using internal angles leading under the cornice. Move left-up.
Section R13–R15: A slab between the "integral" and "stormy petrel" cornices, 150 m long. The slab is climbed via cracks with transitions between them on slabs, mainly on friction.
Section R13–R17: The "stormy petrel" cornice is overcome on ITO. Under the cornice is a smooth slab, reached by "miners", drilling holes for "skyhooks". Belay on bolt pitons. Then move sharply left towards a crack.
Section R17–R18: Characterized by smooth steep slabs. Movement is facilitated by using cracks, with transitions between them made with a "pendulum" or extreme friction climbing. First, move 30 m up, then towards the "oak leaf" slab to the right.
Section R18–R19: Move along the overhanging internal angle formed by the monolithic smooth wall of the main massif and the left face of the "oak leaf" slab. The angle overhangs for 50 m, with 10 m of wet ice in the upper part. At the end of the section, there's a ledge on the slab. Here, the 3rd control cairn is set up. Above the ledge is a crack filled with ice and snow. One can melt ice.
Section R19–R21: From the 3rd control cairn, the cornice is visible against the sky. The cornice is bypassed on the right, with movement from left to right. Above the cornice is a ledge, along which one moves towards the right ridge.
Section R21–R23: The direction of movement is right-up along a 65° wall. An inclined ledge is interrupted by walls, with some wet ice. Exit to the ridge is via a steep ice couloir, bypassed on the left by the wall. On the ridge is a ledge with snow. An overnight stop can be organized.
Section R23–R29: A narrow ridge with an overhang to the east. For belaying, it's good to use "friends" and sectors.
Section R29–R30: A narrow ridge with an overhang and the summit tower represent a monolithic, slightly fractured 30-meter rock cone. The ascent to the summit is via a crack on the right side of the wall.
Descent from the summit towards the saddle between peak 4520 and peak 4810 via the SW ridge, following the ascent path to section R23 (6 rappels). Then along the ridge, 4 more rappels to a ledge where the team organized a semi-reclining overnight stop on July 4 and 5, 1988. From the stop, 3 rappels to the saddle (first along the ridge, then along the SE wall). The saddle is traversed towards peak 4810 (2 ropes), then descend west with 1 rappel. Along the NW slope, traverse towards the couloir for 100 m and exit into the rock-ice couloir (category 5B route to peak 4810). Down the couloir, 9 rappel descents, followed by a 300 m descent on snow and exit to the moraine under the route to the observers' camp.
The entire descent (23 rappels with rope retrieval) took the team 6.5 hours.