
- Climbing class — technical
- Climbing area — Upper Siama, Gissar Range
- Climbing route — via the South-Southeast buttress
- peak Khodja Lokan — 4767 m
- Proposed difficulty category — 5B
- Route characteristics: height difference — 1250 m
- length of sections with 5–6 difficulty grade — 810 m
- average steepness — 77°
- Number of pitons: rock pitons for belay — 129
- pitons for artificial holds — 24
- bolt pitons — 5/2
- chocks — 114/18
- Total climbing time — 35 hours
- Number of bivouacs and their location: 2 good bivouacs in tents
- 1st after the first wall under the second rock belt,
- 2nd on the summit
- Climbing team consists of two instructors
- Igolkin V.I. — CMS — 455 000 Magnitogorsk,
- Kudryashov V.S. — CMS Lenin group 37-18
- Departure date and return date
- departure on July 17, 1981
- return on July 19, 1981
Passing the upper part of the route with materials thrown from the base camp.

Route description
From the base camp on the "Green Glade" in Upper Siama, located under peak Medvezhiy Zamok, first walk along the moraine for 30 minutes, then along the Siama glacier for 30 minutes to approach the Chetyrekh pass. The ascent to the Chetyrekh pass along a steep snowy slope takes 30–45 minutes. From the Chetyrekh pass, descend into the Kadam-Tash river gorge in the direction of peak Mechta, down the river until you bypass the eastern wall and find yourself opposite the characteristic Southeast ridge with a gap in its middle part. The descent from the pass to the Southeast ridge takes 1.5–2 hours. A good bivouac is possible here. Ascend along the Eastern talus slope to under the Southeast ridge (1 hour). Here, on the edge of the talus slope, 20 m from the rocks at the base of the Southeast ridge, a night's stay is possible.
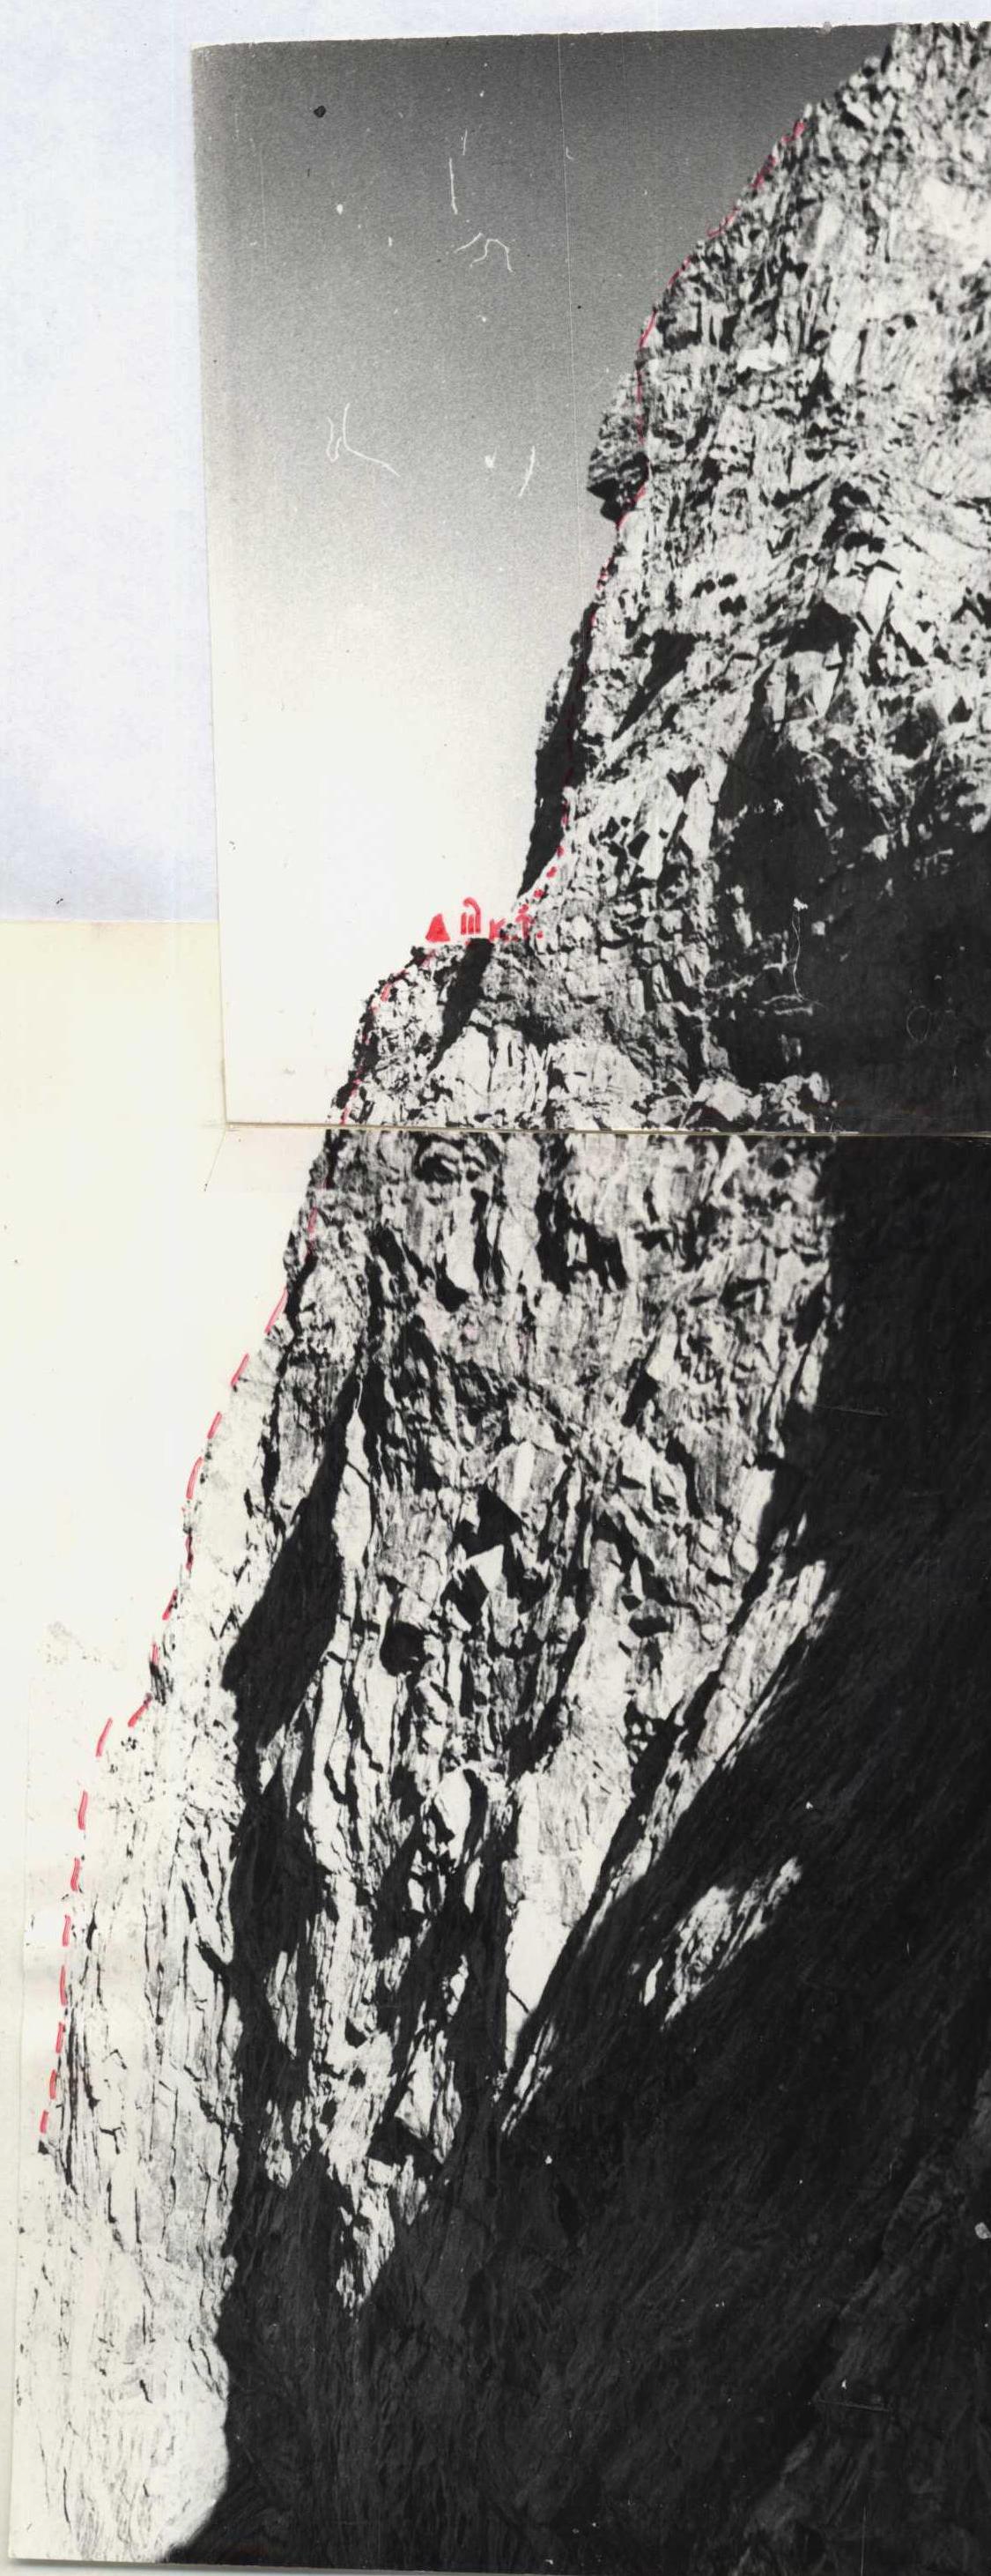
From the base of the Southeast ridge, proceed along the Southern wall for about 300 m along a rocky-talus slope with avalanche debris, and, not reaching 20–30 m to the lower waterfall, begin the ascent along the base of the Southern wall in the direction of the cirque from which the waterfall flows.
Section R0–R1. Along the internal angle, then along the ridge upwards with a leftward orientation. Steep sections alternate with ledges. Convenient protrusions for setting up belays. Rocks are relief, shell-like, slightly deteriorated. Cross the groove through which a stream flows above the first waterfall, and exit onto a ledge 80 m.
Section R1–R2. Upwards along rocks of the "ram's forehead" type, first along a not very pronounced couloir 20 m, then along smoothed slabs. Few protrusions for belay, pitons are difficult to hammer, small stones on the ledges. 58 m.
Section R2–R3. Steepness increases, but rocks become more relief, cracks for pitons appear. First along the internal angle, then along the walls, approach the left edge of the groove formed by the upper waterfall. Pass along the steep wall 10 m beyond the bend of the groove onto an inclined platform under the shelter of the wall to the left and above the waterfall. 55 m.
Section R3–R4. Along steep, dense firn, cross the cirque in the direction of the center of the wall, bounded on the left and right by steep couloirs, which are watercourses on the right part of the Southern wall. The wall is the base of the Southeast buttress. Both couloirs can be subject to rockfall, so it is recommended to cross the cirque quickly, preferably in the morning. Belay through ice axes. Ice sections are encountered. The wall serves as good protection from rocks. At the junction of the firn slope and the wall, there is a 1 m wide ranclufe.
Section R4–R6. The most logical start is along the internal angle 5 m, leading to a steep couloir with a small overhang in the middle. The overhang is overcome by moving rightwards. Then along the couloir, exit to a ledge bounded on the left and right by smooth walls. Pitons are difficult to hammer. Vertically upwards, a powerful couloir goes, convenient for climbing in its lower part. But the couloir ends with a series of powerful, up to 5 m, overhangs at a height of 50–60 m. Therefore, it is more logical to move leftwards, to the central-left part of the wall.
Section R6–R7. Along convex, absolutely smooth walls, on friction, traverse leftwards with a slight ascent. Very difficult, but it is necessary to go this way. It is hard to find cracks for pitons. After 15–20 m, there is a narrow horizontal ledge where 3 people can stand. There are cracks for pitons on the wall. The wall is steep, in many places overhanging. The location is psychologically challenging.
Section R7–R8. In the left part of the ledge, begin the ascent along a steep wall, leading to an internal angle. Rocks are smooth and monolithic, holds are rounded. The internal angle ends with an overhang.
Section R8–R9. The overhang is overcome on ladders with a leftward orientation. In the crevice under the overhang, chocks fit well. Above the overhang, there is a smooth slab, relief is rounded, no holds. Work is exclusively on friction. It is difficult to maintain balance. Here, it is necessary to hammer bolt pitons for belay and for passage through the next overhang. Extreme difficulty.
Section R9–R10. After the second overhang, there is a smooth slab with a crack at the base. The slab is bounded by an overhanging wall plane, forming an internal angle. At the base of the slab, there is a wedge-shaped chip. Caution! The slab is 4 m, and then a steep wall 4 m leads to an internal, overhanging vertical angle. For belay, another bolt piton is hammered. Along the left plane of the internal angle, there is a traverse 2 m leftwards to the edge of the angle. Here, you can secure the rope. Extremely challenging position. Climbing is of maximum tension.
Section R10–R11. To the left, the relief in the form of "ram's forehead" protrusions on the wall leads. 6 m leftwards and upwards, then along the wall vertically upwards, using artificial holds. 12 m under the overhang.
Section R11–R12. The overhang is overcome with artificial holds, relief remains smoothed, rounded with dull cracks. The 4th bolt piton is hammered.
Section R12–R13. After the overhang, there is a smooth wall with occasional rounded holds. Here, it is necessary to go traverse rightwards, using the relief, upwards, then traverse leftwards, and repeat the zigzags. Strong stretches, splits in conditions of maintaining balance. The entire arsenal of advanced sport climbing techniques is used.
Section R13–R14. 24 m leads to an internal, inclined, absolutely smooth angle with a grotto formed by the limiting angle overhang. Here, to set up a rope, it is necessary to hammer 4 petal pitons, 2 small stoppers. From the angle, move rightwards 2 m, and then along an inclined, smooth slab without holds, ascend upwards and rightwards 12–13 m. The section is passed in counter-tension, with a leftward lean. For hands, there is a vaguely expressed crack on the overhanging wall. Exit onto a ledge before a steep slab with a crevice.
Section R14–R15. Here, rocks are more deteriorated, live blocks are present. The wall is passed using the "leaning out" technique. The width of the crevice is 2–3 cm, deep. Chocks fit well. The length of the section is 12 m.
Section R15–R16. After the wall, there is an overhang. Here, rocks are relief but deteriorated. Passed using artificial holds. Good choice of places for hammering pitons and chocks.
Section R16–R17. After the overhang, there is a section of strongly deteriorated rocks. Special attention — to the rope, which can dislodge small stones. Movement is extremely cautious. Movement is complicated by "live" holds and small stone dust lying on the relief of "ram's forehead" type. The section is 20 m and leads under powerful, overhanging, местами deteriorated, overhangs. The location is "uncomfortable," ropes are secured to a protrusion and blocked by pitons.
Section R17–R18. From under the overhangs, move rightwards, first along an inclined slab, then to a steep wall with a small overhang. Rocks are relief, passed by free climbing. The small overhang is overcome by "leaning out" onto a good horizontal ledge 1 m × 1 m. Here, a signal cairn is left. The ledge is at the top as if of a small rib of the wall.
Section R18–R19. From the ledge, rightwards — into a deep, monolithic, steep, but relief chimney, 20 m upwards under a large overhang with a crevice. Under the overhang, there is a small ledge where belay can be set up. Attempting to overcome the overhang was unsuccessful. To the right, there is an absolutely smooth slab forming an inclined internal angle with the overhanging edge of the wall.
Section R19–R20. The path along the slab is possible but there are no places to hammer pitons. The slab is 12 m and is passed on friction, "leaning out." Hands are along the internal angle near the feet. The section is very "psychological," requires courage, high technique, and flexibility. Then a steep wall and exit onto a good horizontal ledge.
Section R20–R21. The ledge is interrupted in the middle by a protrusion of a steep, monolithic wall 40 m long. The width is from 1 m to 20 cm. Here is the 1st control cairn. A sitting bivouac for the entire group is possible. Move along the ledge horizontally leftwards onto a small ridge.
Section R21–R22. Two small walls, alternating with ledges, 20 m vertically upwards, lead to a vaguely expressed internal angle.
Section R22–R24. Movement is vertically upwards along a monolithic, steep wall. No ledges. Belay is hanging, climbing is challenging but pleasant. Chocks "go" well.
Section R24–R25. The wall leads to a small chimney lying as if beyond the bend of the wall, and then onto a ridge. The view opens up to the waterfall funnel, which is the left boundary of the passed 350-meter wall, covered in ice and firn.
Section R25–R26. The ridge becomes gentler and narrower. Rocks are monolithic, dry. Here, there is a pinnacle of a bizarre shape formed by weathering. Along the ridge, rightwards — exit onto a good horizontal platform lying below at the base of a monolithic wall of the next belt — the middle part of the Southern wall. This monolithic wall, being the central part of the South-Southeast buttress, has a vaguely expressed relief, many overhangs, few cracks, making it very challenging to pass. It is more logical to move to the right plane of the buttress, where it borders the right couloir of the Southern wall, separating the Southeast ridge.
Section R26–R27. From the platform where the bivouac was, descend along a narrow, inclined ledge 60 m long, rightwards, approximately 10 m downwards in the direction of the wide couloir of the Southern wall and the Southeast ridge. Here, there is a small platform at the base of a vaguely expressed couloir, which is located on the right vertical plane of the Southeast buttress.
Section R27–R28. In the right part of the vague couloir, along the internal angle, ascend onto a small counterfort highlighted from the plane of the Southeast buttress by the aforementioned couloir. Rocks are smooth, polished by water and snow, pitons are hard to hammer, everywhere — stone dust.
Section R28–R29. First along a steep wall, then along a vague ridge with rock relief of "ram's forehead" type — ascend 40 m. Relief for setting up intermediate belays is challenging. Some sections are passed on friction. Places for setting up ropes are inconvenient.
Section R29–R30. Relief on this section is very diverse. Steep walls alternate with inclined slabs and small ledges. To the left, a vague couloir is visible, simpler to pass but it leads to an overhanging wall. In the middle part of the section, there is an inclined slab 5 m, covered with rime ice. Further on the rocks, ice-encrusted firn is encountered. Further — an inclined ledge under a wall with an overhang. A very challenging 6-meter section where it is practically impossible to hammer pitons, rocks are wet.
Section R30–R31. Absolutely smooth, without holds, inclined slab 70°. Passed due to courage and use of friction. It is difficult to find points for intermediate belay. At the end of the slab, there is a steep 3 m wall with a crevice. After it — beyond the bend — a ridge, a convenient ledge for setting up belay.
Section R31–R32. Here, the direction of movement changes by 60°. Movement is along the ridge with steep walls. Good belay for protrusions. To the right, there is a steep firn slope. Approximately 140 m from the turn — exit onto a firn slope.
Section R32–R33. The ridge leads onto a saddle to the left of a pinnacle standing under the upper part of the Southeast buttress, the so-called "pillar." Under the pinnacle, a bivouac is possible, but it is better to bypass the pinnacle along the firn slope, as the lower part of the pinnacle overhangs. Along the firn — with belay through ice axes (often ice appears on the surface) — ascend to the wall and along it, 10 m — exit onto a platform under the "pillar."
Section R33–R34. Movement along the "pillar" begins from the platform on the ridge, on its left part. From the platform upwards, a vaguely expressed chimney goes, to the left of it rocks form an external angle, approximately uniform in character over 80 m. There are crevices, chocks fit well. Belay points are semi-hanging (leaning back on the self-belay).
Section R34–R35. Along steep walls, alternating with small inclined ledges, bypassing a large overhang on the left — exit under an overhanging internal angle.
Section R35–R36. The internal angle is bounded on the right by powerful overhangs, on the left — by steep, smooth slabs. In the angle, there are sufficiently good cracks. Sometimes it is necessary to use artificial holds (on chocks) and ladders.
Section R36–R37. The internal angle leads onto an overhang, which is overcome without much difficulty, using artificial holds (good crevices are available).
Section R37–R38. A steep wall and an internal angle lead onto a small platform under a smooth wall in the form of a balcony overhanging the rocks. Here — the 2nd control cairn. A sitting bivouac is possible.
Section R38–R39. A smooth, steep wall with an oblique (leftwards) crevice. At the top — an overhanging belt of overhangs. It is difficult to choose the simplest path. The location seems hopeless, very challenging psychologically and technically. First along the crevice (a large chock is needed — hex), then several meters rightwards and upwards under the lower overhang.
Section R39–R40. The overhang is overcome with artificial holds, it is difficult to find cracks for pitons. It is necessary to hammer a bolt piton.
Section R40–R41. After the overhang — an absolutely smooth, steep wall with long, inclined, and horizontal crevices. An attempt to pass along the inclined crevice is unsuccessful, but a piton and a chock (stopper #3) are hammered for a pendulum. Along the horizontal crevice, holding onto the rope — 2 m rightwards. Another inclined crevice. Here goes stopper #2. 30 cm to the right — a bolt piton. Further, there is nothing, and it is impossible to hammer pitons as it is necessary to maintain balance. Holding onto small crystals of rock with fingertips — 10 m to an inclined crevice.
Section R41–R42. The crevice is oriented upwards and leftwards. To the right, there is an overhang. Another bolt piton for belay, pitons, and chocks in the crevice for artificial holds. Extremely challenging. The crevice leads under an overhang. Under the overhang — a traverse with an ascent rightwards 5 m. Climb over a protrusion into a niche where there is a small ledge. Here, in combination with a bend, a reliable belay can be created.
Section R42–R43. In the niche, through a small overhang with a "substitution," enter a long internal angle with a relief character of rocks. The internal angle through steep walls leads under an overhang.
Section R43–R44. The overhang is bypassed along an absolutely smooth, steep wall with a crevice for feet. Below — an abyss. The location is "psychological." Extremely challenging. At the end of the slab — upwards 2 m. Exit onto an inclined ledge covered with ice, with a small protrusion.
Section R44–R45. In this part, the "pillar" significantly decreases. Along rocks representing walls, alternating with inclined ledges and combs, and internal angles, ascend straight upwards. 80 m to a steep wall, which is then bypassed on the right along a narrow ledge and crevice lying on the right plane of the "pillar" (and the Southeast buttress). Bypassing a ridge in the form of a "pinnacle," enter a horizontal part of the buttress, about 7–8 m long. Further — a targeted descent onto a narrow saddle before a steep ascent. Here — the narrowest (8–10 m) part of the Southeast buttress. To the left, you can look into the left, to the right — into the right couloir of the Southern wall. On the platform, a bivouac can be set up.
Section R45–R46. The next section consists of narrow belts (4–5) of black and light rocks. A white, steep wall is passed along a crevice by free climbing.
Section R46–R47. Here, the buttress decreases to a sharp ridge. Rocks are strongly deteriorated. Along the ridge, then leftwards between a steep wall and the ridge — along an internal angle, enter beyond the bend of the ridge onto its right part. Here, the buttress turns slightly leftwards and after 120–150 m exits onto the Eastern ridge of the sub-summit.
Section R47–R48. Here, it is better to cross a steep snowy slope and exit onto the Eastern ridge. Along the Eastern ridge (rocky-snowy), exit onto the summit.
Descent along the Western ridge, category 4A. Descent from the summit to the Mechta glacier and then along the Mechta pass takes 8–10 hours. From the Mechta pass through the Kadam-Tash valley to the Chetyrekh pass — 3–4 hours. Descent from the Chetyrekh pass to the "Green Hotel" bivouac in Upper Siama — 1 hour.
General conclusion
The route can be classified as technical. In terms of length, steepness, and height difference (1250 m), it approaches a category 6B route. Steepness and complexity in many places exclude the possibility of even the second climber going with a backpack, requiring it to be pulled up. We believe that the route will be very interesting for groups with high rock climbing skills. Some sections require the lead climber to have exceptionally high willpower and psychological preparation, perfect free climbing technique. The route as a whole demands high physical fitness and nervous tension.
Most challenging sections:
- the first half of the wall at the base of the South-Southeast buttress (150 m);
- the middle part of the upper part of the South-Southeast buttress — the "pillar" (90 m).
The duo took 27 hours to complete the route to the summit.
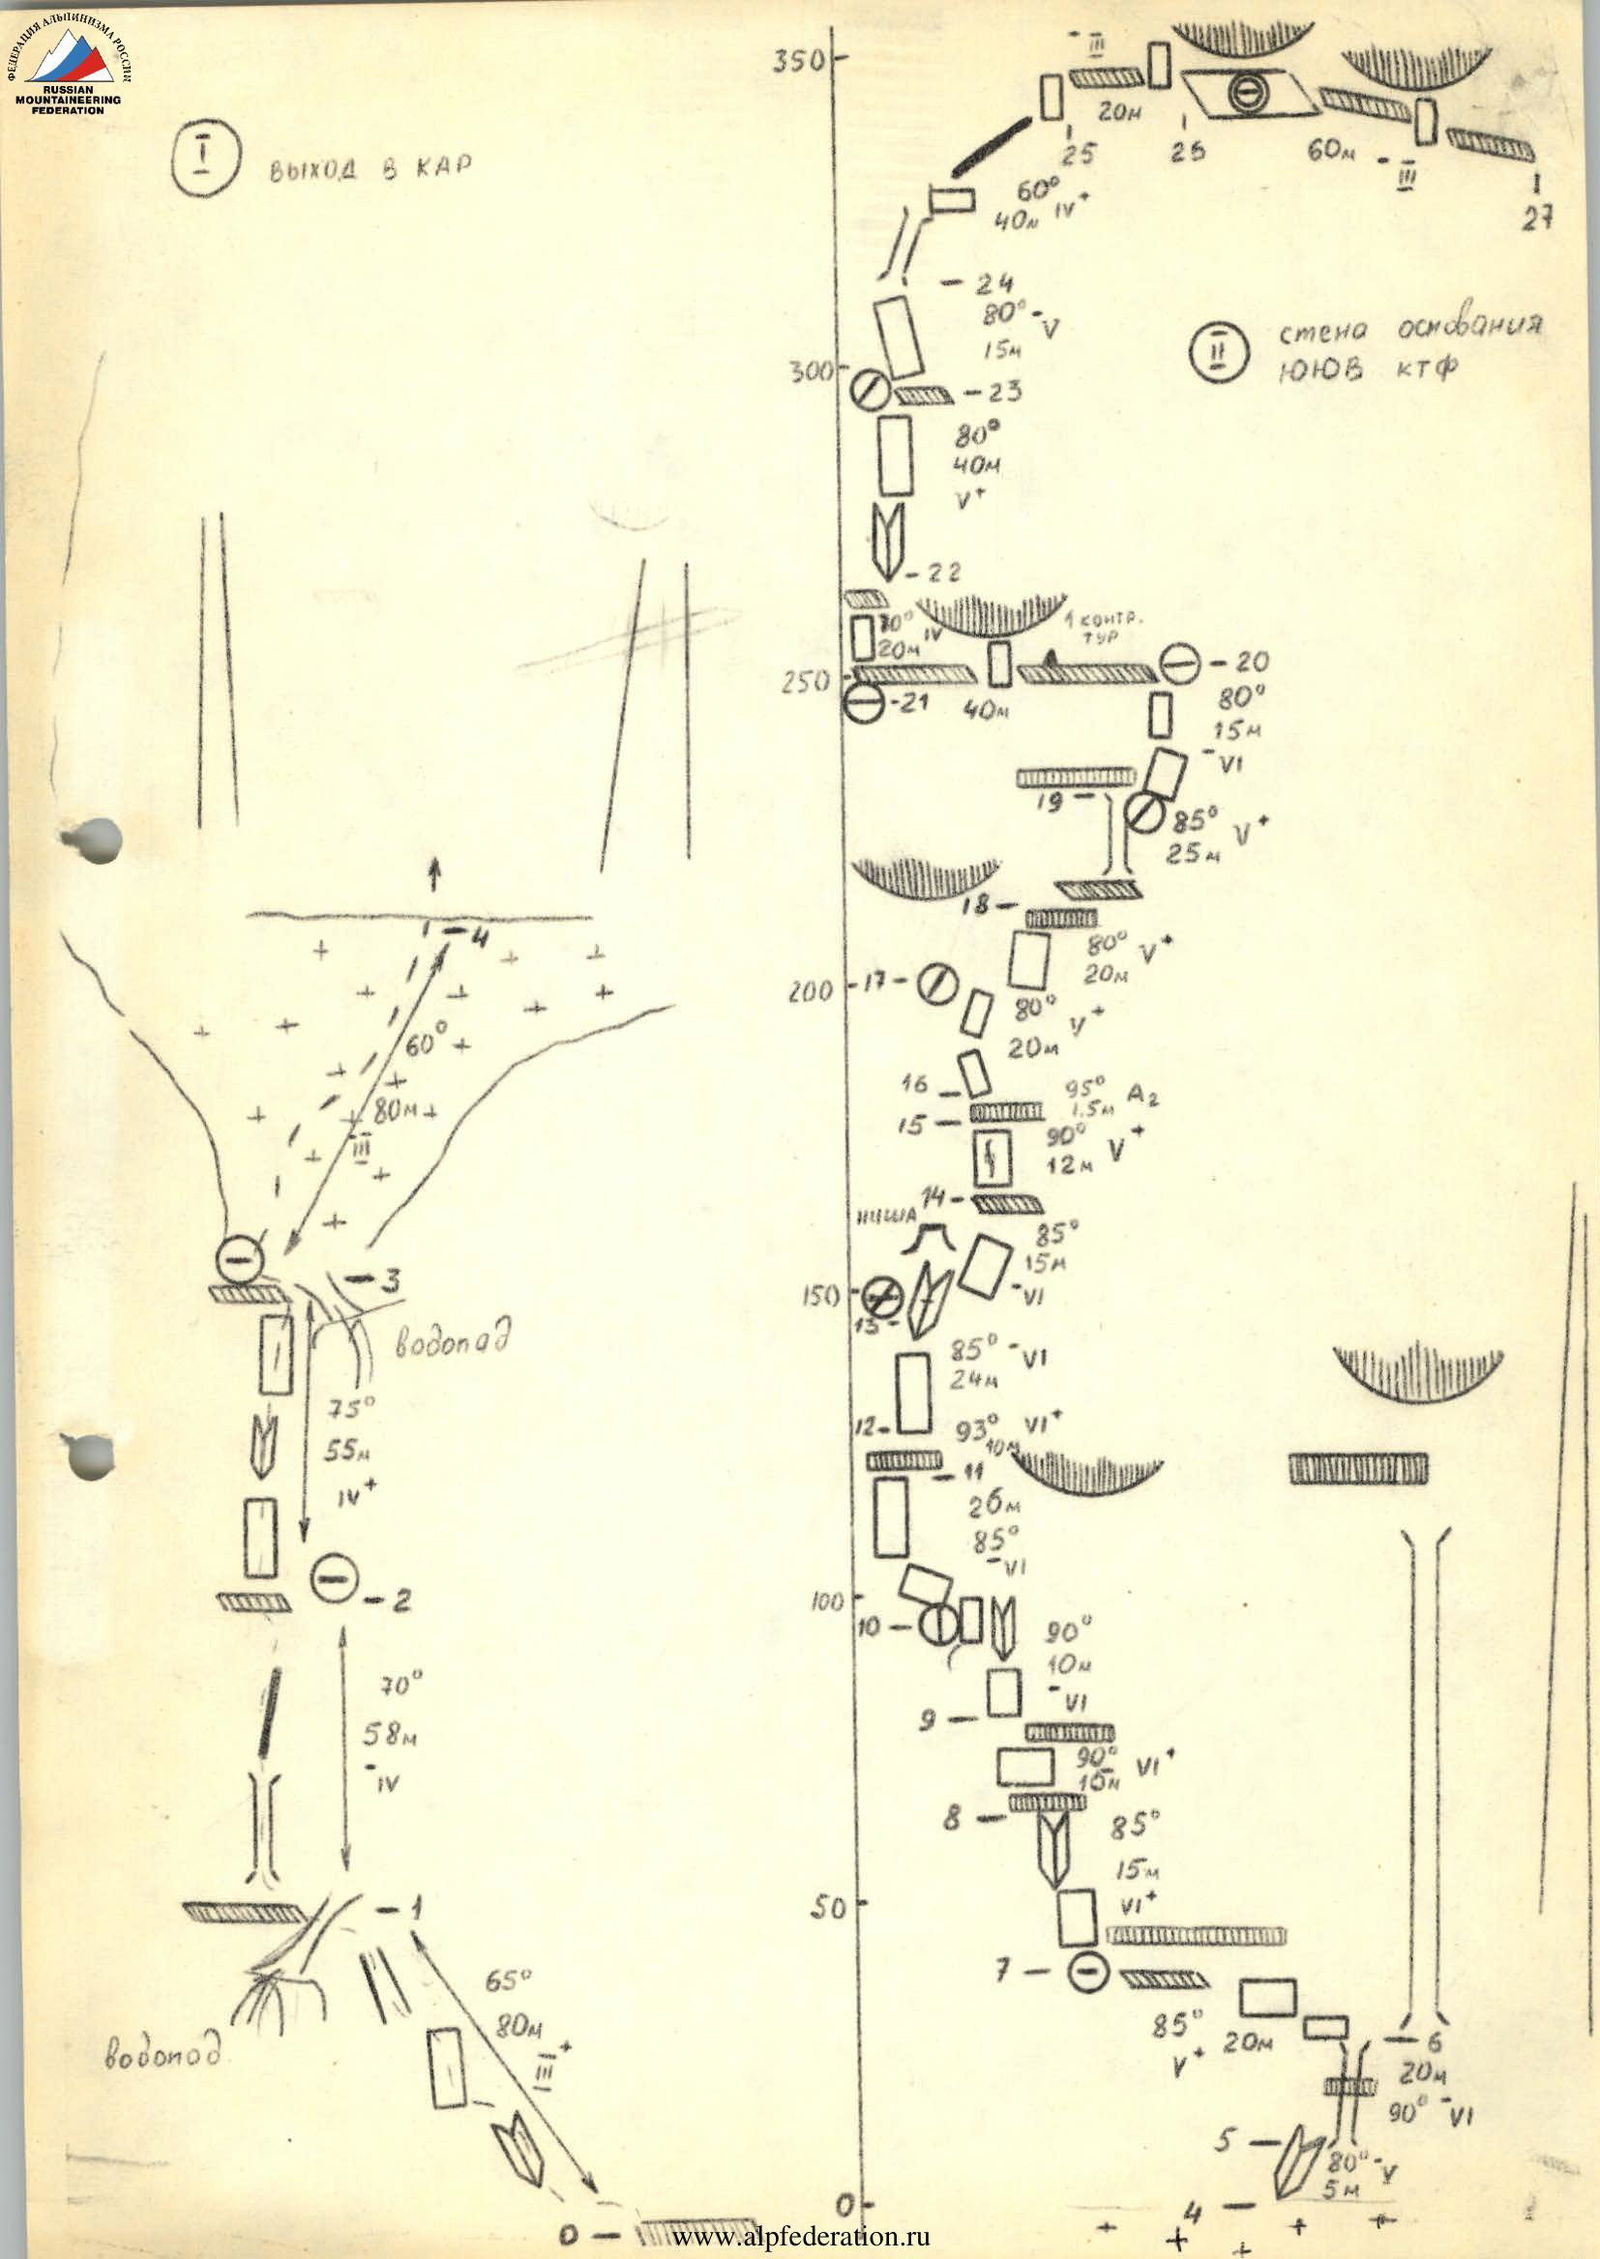
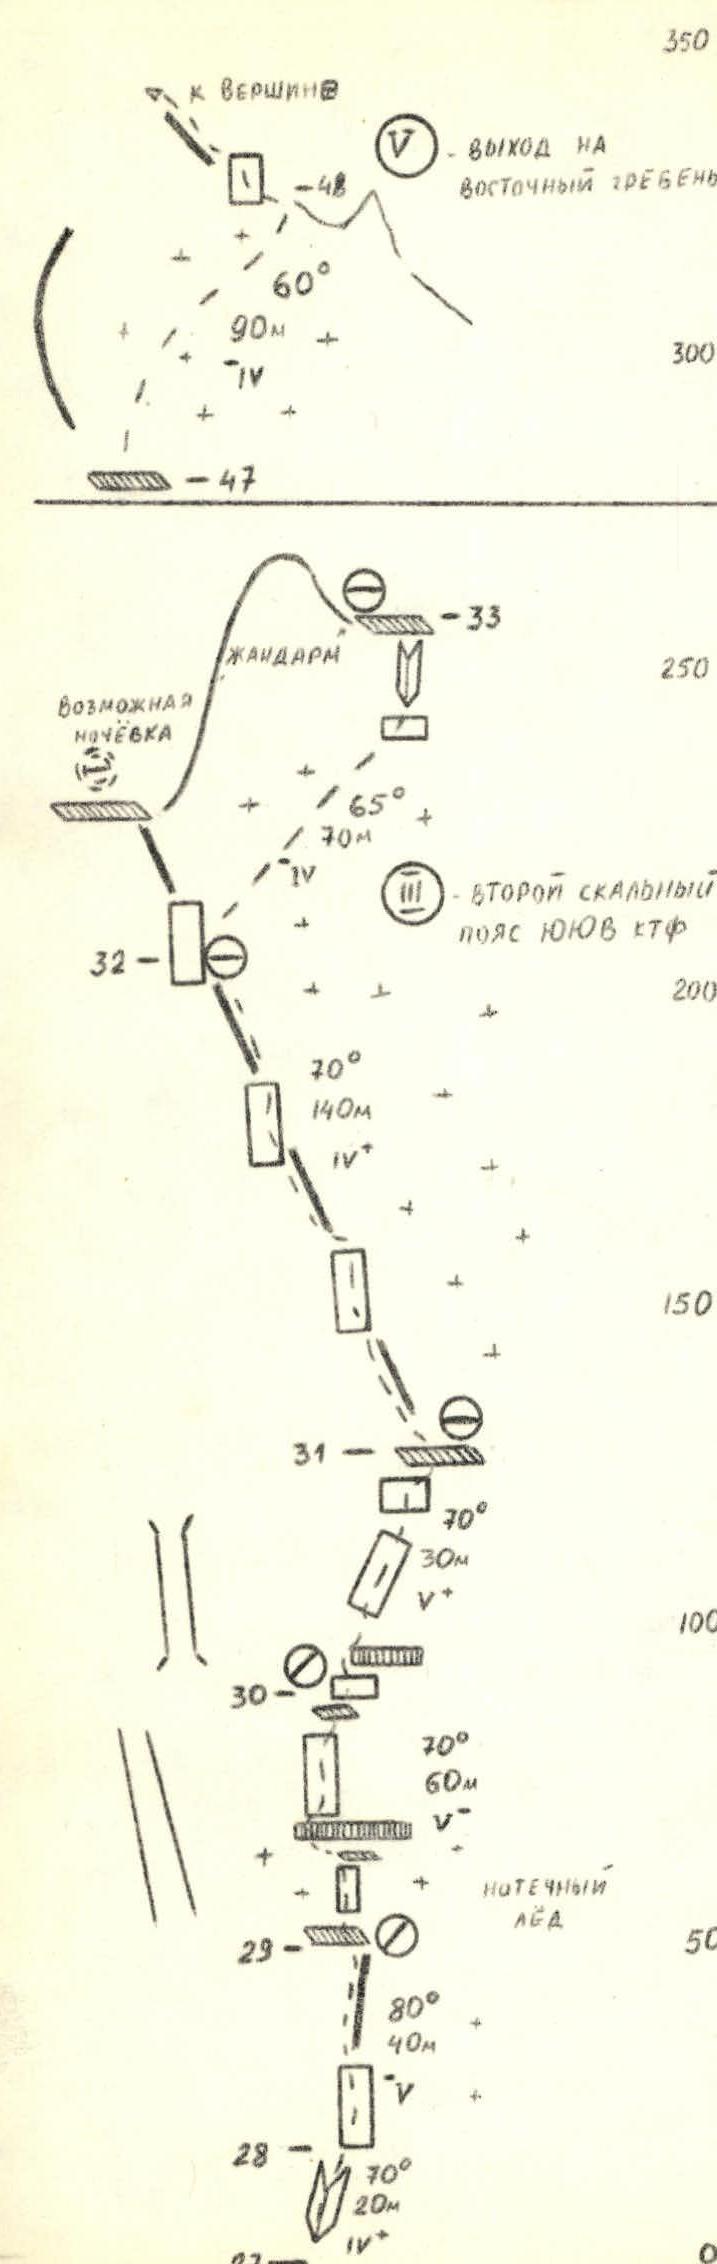
Table of main characteristics of the first ascent route on peak Khodja Lokan via the South-Southeast buttress, category 5B.

Continuation 1
| Section # | Grade | Length, m | Terrain characteristics | Steepness (section category) | Condition | Conditions | Pitons (rock) | Pitons (bolt) | Chocks | Passed (pcs.) | Time/Bivouacs |
|---|---|---|---|---|---|---|---|---|---|---|---|
| R0–R1 | 65 | 60 | internal angle, ridge | 4 | slightly deteriorated | 4 | 3 | 8 hours | |||
| R1–R2 | 70 | 60 | chimney, "ram's foreheads" | 4 | 4 | 4 | |||||
| R2–R3 | 75 | 60 | internal angle, "ram's foreheads" | 5 | monolithic | 5 | 3 | exit to the cirque (9:30) | |||
| R3–R4 | 60 | 80 | firn slope | 4 | dense firn | through ice axe | |||||
| R4–R5 | 80 | 5 | internal angle | 5 | slightly deteriorated | 2 | 1 | start at 10:00 | |||
| R5–R6 | 90 | 20 | chimney with overhang | 5 | 3+1 | 3+1 | |||||
| R6–R7 | 85 | 20 | obvious smooth wall | 5 | monolithic | 3+1 | 2+1 | ||||
| R7–R8 | 65 | 15 | wall, internal angle | 6 | 2+1 | 1+1 | |||||
| R8–R9 | 93 | 15 | overhang, wall, overhang | 6 | 3+1 | 1+1 | |||||
| R9–R10 | 90 | 10 | wall | 6 | absolutely smooth | 1+1 | 1 | 1 | |||
| R10–R11 | 80–85 | 26 | inclined ledge, wall | 5–4 | slightly deteriorated | 2+1 | 3+1 | ||||
| R11–R12 | 93 | 10 | overhanging wall with overhangs | 6 | 3+1 | 1 | 2+1 | ||||
| R12–R13 | 85 | 24 | smooth wall | 6 | smooth | 4+1 | 2 | exit to the grotto (15:00) | |||
| R13–R14 | 85 | 15 | smooth internal angle, slab | 6 | 3 | 3 | |||||
| R14–R15 | 90 | 12 | wall with crevice | 5 | slightly deteriorated | 1 | 1+1 | ||||
| R15–R16 | 95 | 15 | overhang | 6 | 2+1 | 1+1 | |||||
| R16–R17 | 80 | 20 | inclined slabs | 5 | deteriorated | 2 | 4 | exit to deteriorated rocks (17:00) | |||
| R17–R18 | 80 | 20 | smooth slab | 5 | slightly deteriorated | 4 | 2 | ||||
| R18–R19 | 85 | 25 | ledge, chimney | 5 | monolithic | 2 | 3 | ||||
| R19–R20 | 80 | 15 | smooth slab, wall | 6 | absolutely smooth | 3 | 2 | ||||
| R20–R21 | - | 40 | interrupted ledge | 5 | without stones | cloudy, windless | 2 | 2 | control cairn #1 (19:40), possible bivouac | ||
| R21–R22 | 70 | 20 | walls with ledges | 4 | slightly deteriorated | 1 | 2 | ||||
| R22–R23 | 80 | 40 | internal, external angles, walls | 5 | monolithic | 4 | 4 | ||||
| R23–R24 | 80 | 15 | relief wall | 5 | relief | 1 | 2 | ||||
| R24–R25 | 60 | 40 | chimney, wall, ridge | 4 | slightly deteriorated | 2 | 4 | ||||
| R25–R26 | - | 20 | narrow ridge | 1 | monolithic | 1 | 2 | platform, bivouac (22:00) | |||
| R26–R27 | - | 60 | interrupted ledge downwards | 4 | slightly deteriorated | on protrusions | exit at 8:00 | ||||
| R27–R28 | 70 | 20 | internal angle | 4 | smooth rocks | 3 | |||||
| R28–R29 | 80 | 40 | ridge | 5 | "ram's foreheads" | 6 | 2 | ||||
| R29–R30 | 70 | 60 | walls with ledges, overhang | 5 | rime ice | 8 | 5 | ||||
| R30–R31 | 70 | 30 | inclined wall | 5 | absolutely smooth | 4 | 1 | ||||
| R31–R32 | 70 | 140 | ridge with walls | 4 | snow-covered | 3 protrusions | 5 | at the pinnacle, possible bivouac | |||
| R32–R33 | 65 | 70 | firn | 4 | dense, with ice | through ice axe | |||||
| R33–R34 | 75 | 80 | external angle, walls | 5 | monolithic | fog, −5…+5°C | 5 | 7 | 13:00 | ||
| R34–R35 | 80 | 30 | wall | 5 | " | 2+1 | 3 | ||||
| R35–R36 | 93 | 15 | overhanging internal angle | 6 | monolithic | 2+art. holds | 3+art. holds | ||||
| R36–R37 | 100 | 3 | overhang | 6 | " | 1+art. holds | 1+art. holds | ||||
| R37–R38 | 85 | 30 | wall, internal angle | 6 | " | 3+art. holds | 4+art. holds | exit to the balcony, control cairn #2 | |||
| R38–R39 | 90 | 20 | wall with crevice | 6 | absolutely smooth | 4+art. holds | 3+art. holds | ||||
| R39–R40 | 100 | 2 | overhang | 6 | monolithic | 1+art. holds | 1 | 1 | |||
| R40–R41 | 90 | 15 | slab, traverse | 6 | absolutely smooth | 2+1 | 1 | 1+1 | |||
| R41–R42 | 85 | 20 | wall with narrow crevice | 6 | " | 2+1 | 1 | 3+1 | |||
| R42–R43 | 80 | 50 | wall, internal angle | 5 | relief | 3 | 6 | ||||
| R43–R44 | 90 | 10 | slab, traverse | 6 | absolutely smooth | 5+2 |

Continuation 2
| Section # | Grade | Length, m | Terrain characteristics | Steepness (section category) | Condition | Conditions | Pitons (rock) | Pitons (bolt) | Chocks | Passed (pcs.) | Time/Bivouacs |
|---|---|---|---|---|---|---|---|---|---|---|---|
| R44–R45 | 70 | 100 | ridge with walls | 5 | slightly deteriorated | on protrusions | 8 | pinnacle, bypass on the right | |||
| R45–R46 | 90 | 15 | wall | 5 | " | 3 | 2 | ||||
| R46–R47 | 70 | 45 | narrow ridge, internal angle | 5 | deteriorated | 4 | 4 | ||||
| R47–R48 | 60 | 90 | snowy slope | 4 | dense snow | through ice axe | |||||
| R48–R49 | 45 | 300 | rocky-snowy ridge | rocky-snowy | along the Eastern ridge, at 21:30 on the summit |
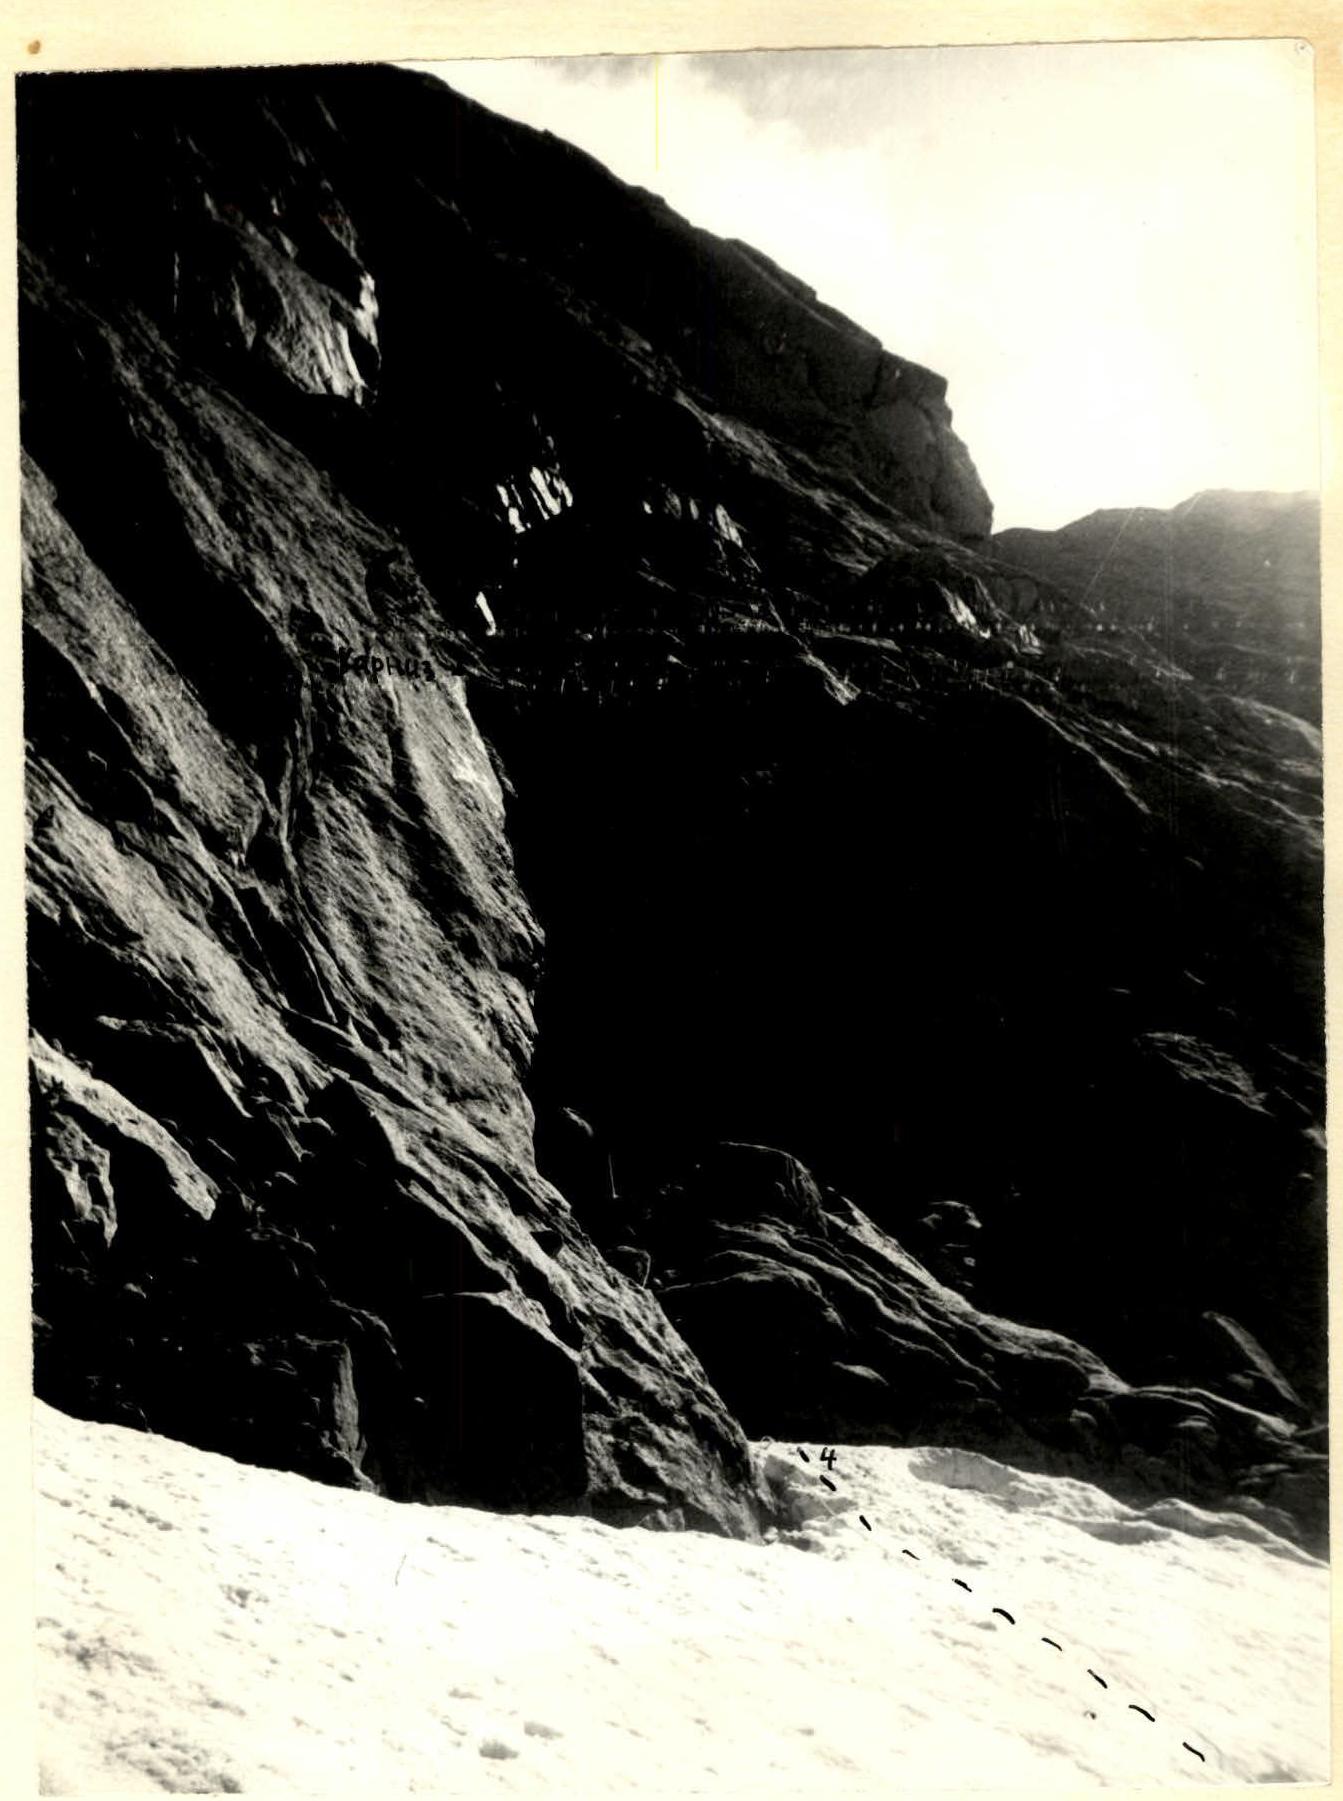
Fig. 3. Close-up view of sections R4–R5 and R5–R6 — chimney with an overhang in the middle part.
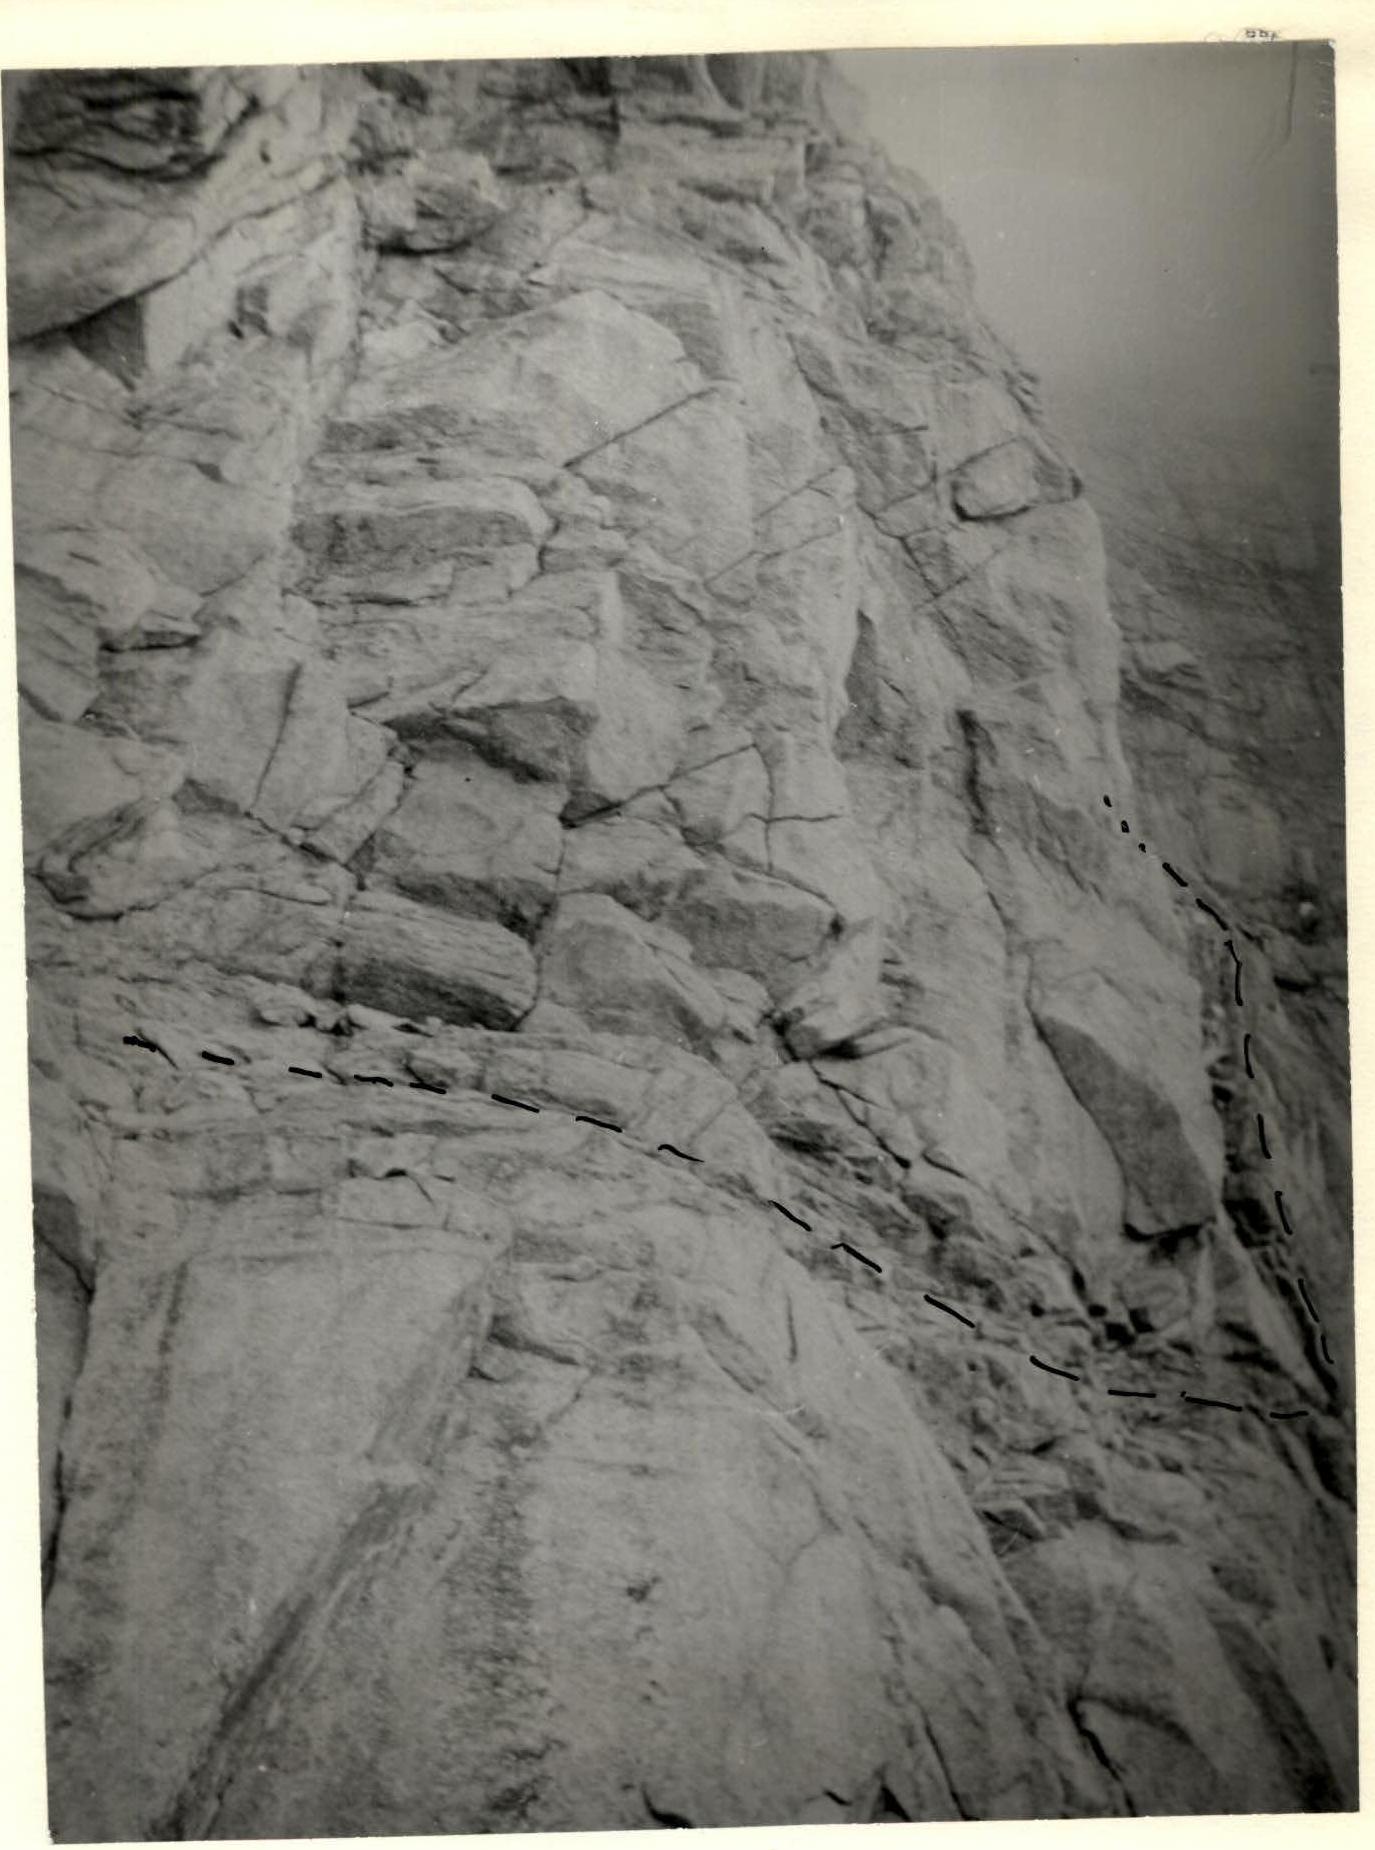
Fig. 11. General view of the middle part of the South-Southeast buttress from the bivouac site. In the right corner of the image — the edge of the fog at the level of the beginning of the upper part of the South-Southeast buttress — the "pillar."