97
High-Altitude Technical Climbing Category
Report
on the ascent to the summit of KORONA (5th tower), 4860 m via the Center of the Southwest wall, category 6A
(V. Balezin's route)
by the Sumy Regional FAiS-Ukraine team from August 10 to 11, 2007
Team Captain: Mityukhin F.P. Team Coach: Mityukhin F.P. Addresses: Coach and Leader Mityukhin Fedor Petrovich, 40004, Sumy, Metallurgov St., 14/67, ph. home 8 (0542) 24-56-06, ph. work 61-99-64, mob. ph. 810380(050)/634-34-34
Altitude measurements were made using an altimeter; slope steepness was determined visually and with a protractor.
Climbing Details
- Climbing category — technical
- Climbing area — Tian Shan, Kyrgyz Range, Ak-Sai valley.
- Summit KORONA (5th tower, 4860 m), via the Center of the Southwest wall, V. Balezin's route (1994).
- Route category — 6A.
- Height difference on the route — 895 m Route length — 960 m. Section lengths: category 6 — 205 m (including AITO — 90 m) category 5 — 240 m categories 2–4 — 515 m. Average steepness of the route — 69°. Average steepness of the wall section — 82°
- Pitons used:
- Rock pitons: 60/18
- Bolt pitons: 1/0
- Ice screws: 10/0
- Protection gear: 84/24
- Team's total climbing hours — 21 h; 2 days (including preparation — 1 day, 6 h)
- Overnight stays: one, on the descent on the South ridge below the summit — lying down.
- Leader: Mityukhin Fedor Petrovich — MS
Participants: Pyshkin Alexander Vladimirovich — CMS
- Bublik Sergey Yurievich — CMS
- Litovchenko Alexey Petrovich — 1st sports category
- Venslavovsky Dmitry Alexandrovich — 1st sports category
- Coach: Mityukhin Fedor Petrovich, MS
- Route entry: 5:00 on August 10, 2007. Summit 20:00 on August 10, 2007, return on August 11, 2007.
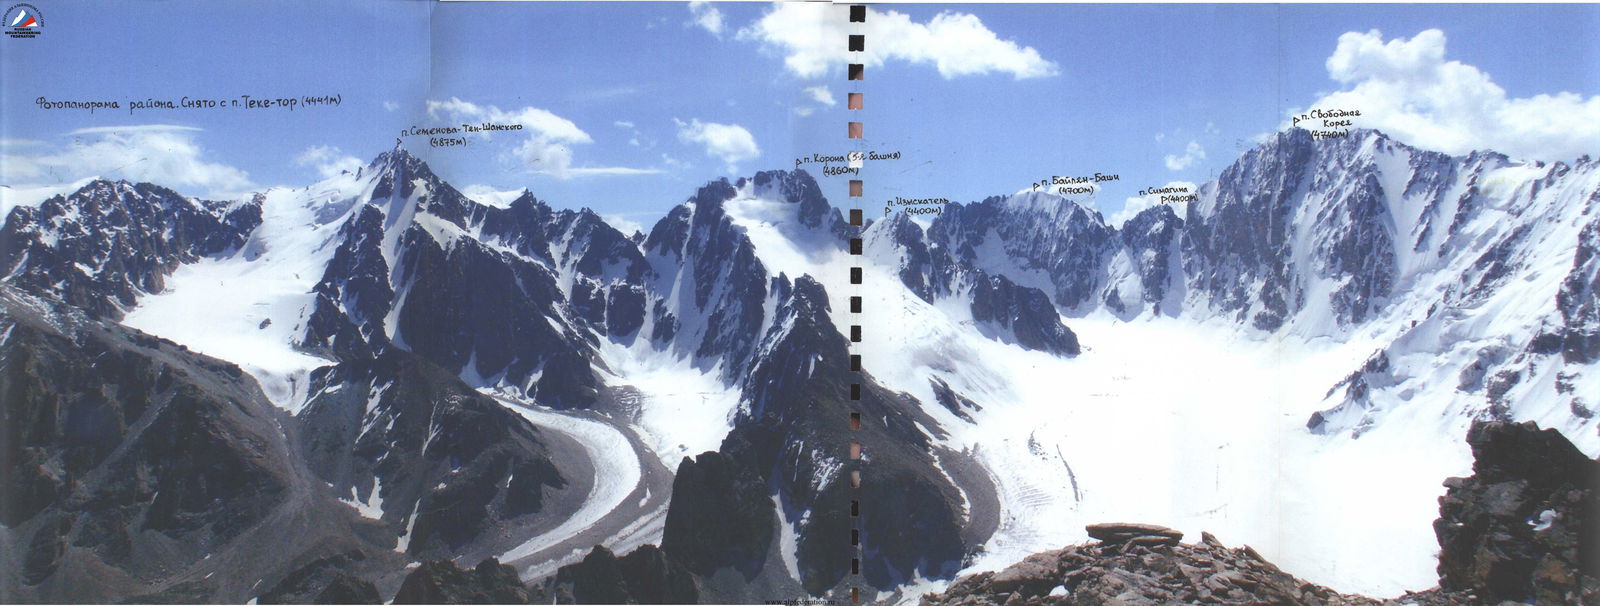
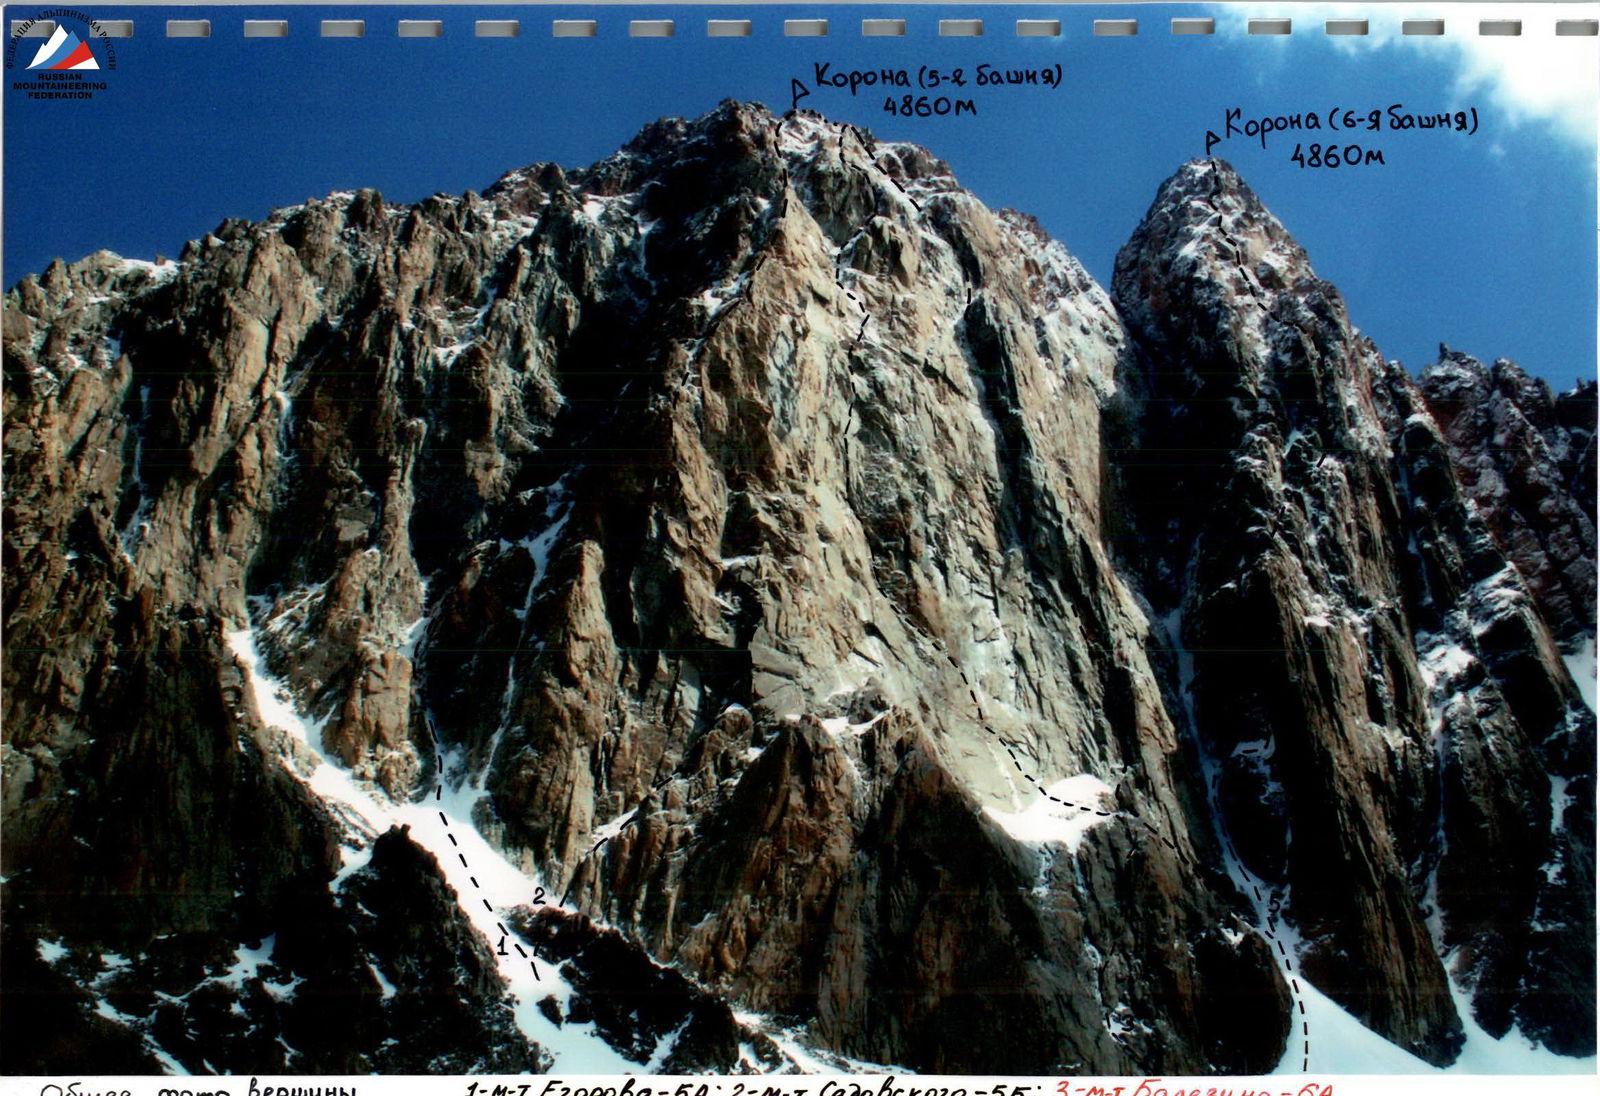 General photo of the summit
Taken on August 7, 2007 from the Ak-Sai valley
1st route — Egorov's–5A; 2nd route — Sadovsky's–5B; 3rd route — Balezin's–6A
4th route — Ruzhevsky/Lukhovtsev's–5B
General photo of the summit
Taken on August 7, 2007 from the Ak-Sai valley
1st route — Egorov's–5A; 2nd route — Sadovsky's–5B; 3rd route — Balezin's–6A
4th route — Ruzhevsky/Lukhovtsev's–5B
 Profile of the wall from the left. Taken from Iskatel peak (4400 m)
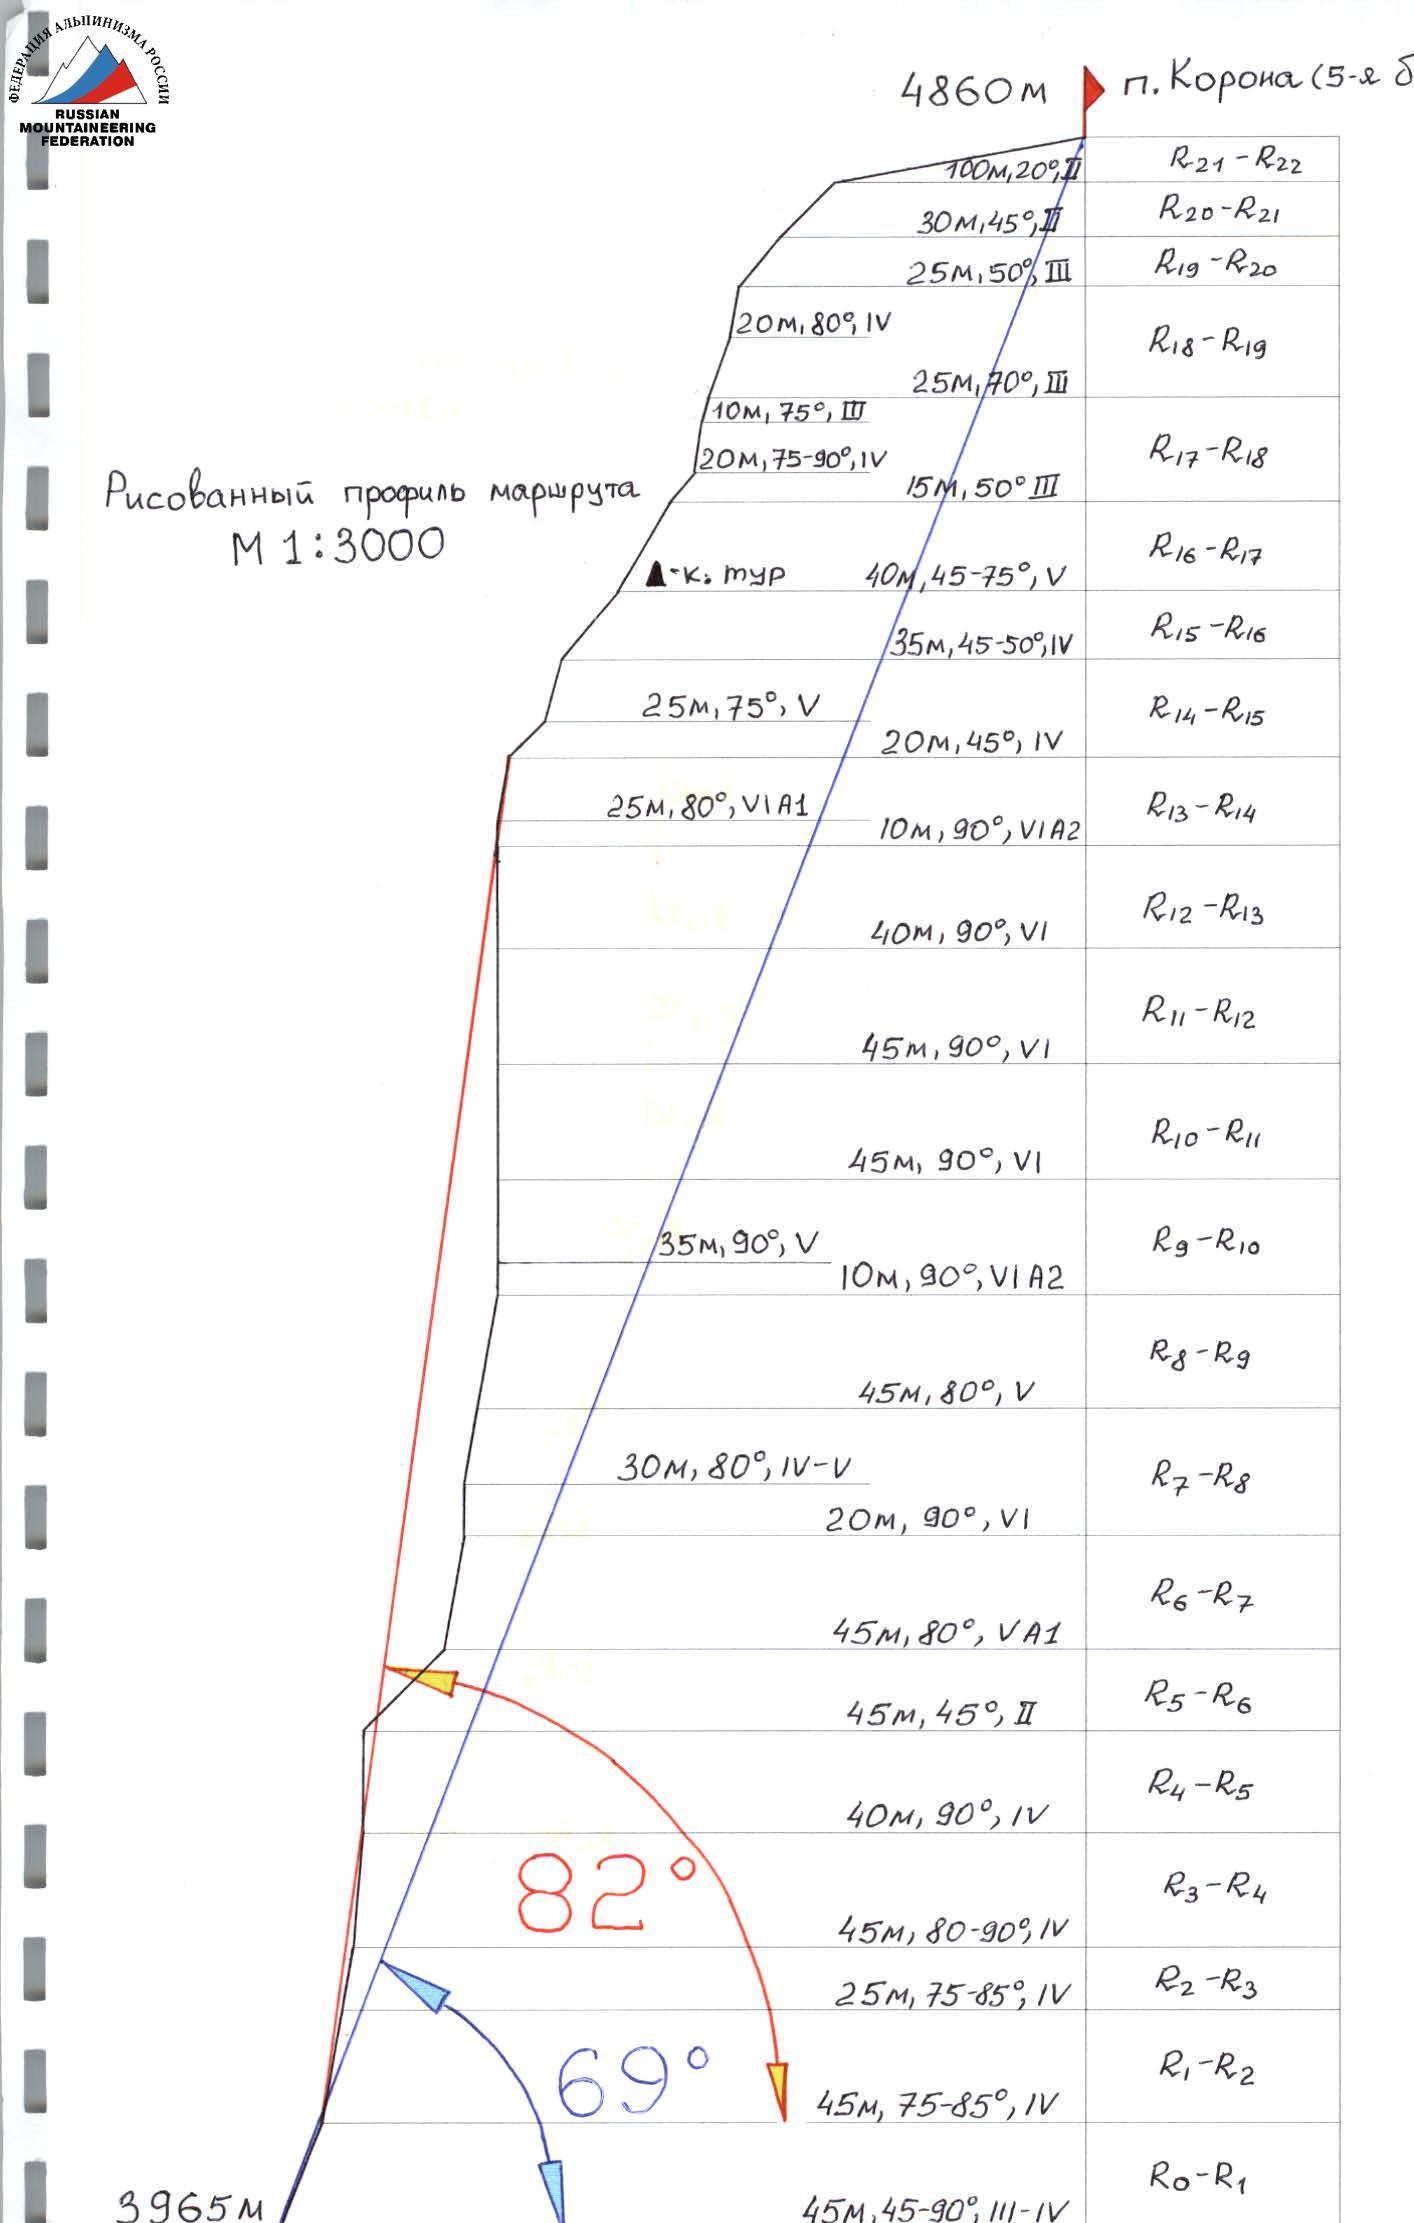 Drawn profile of the route
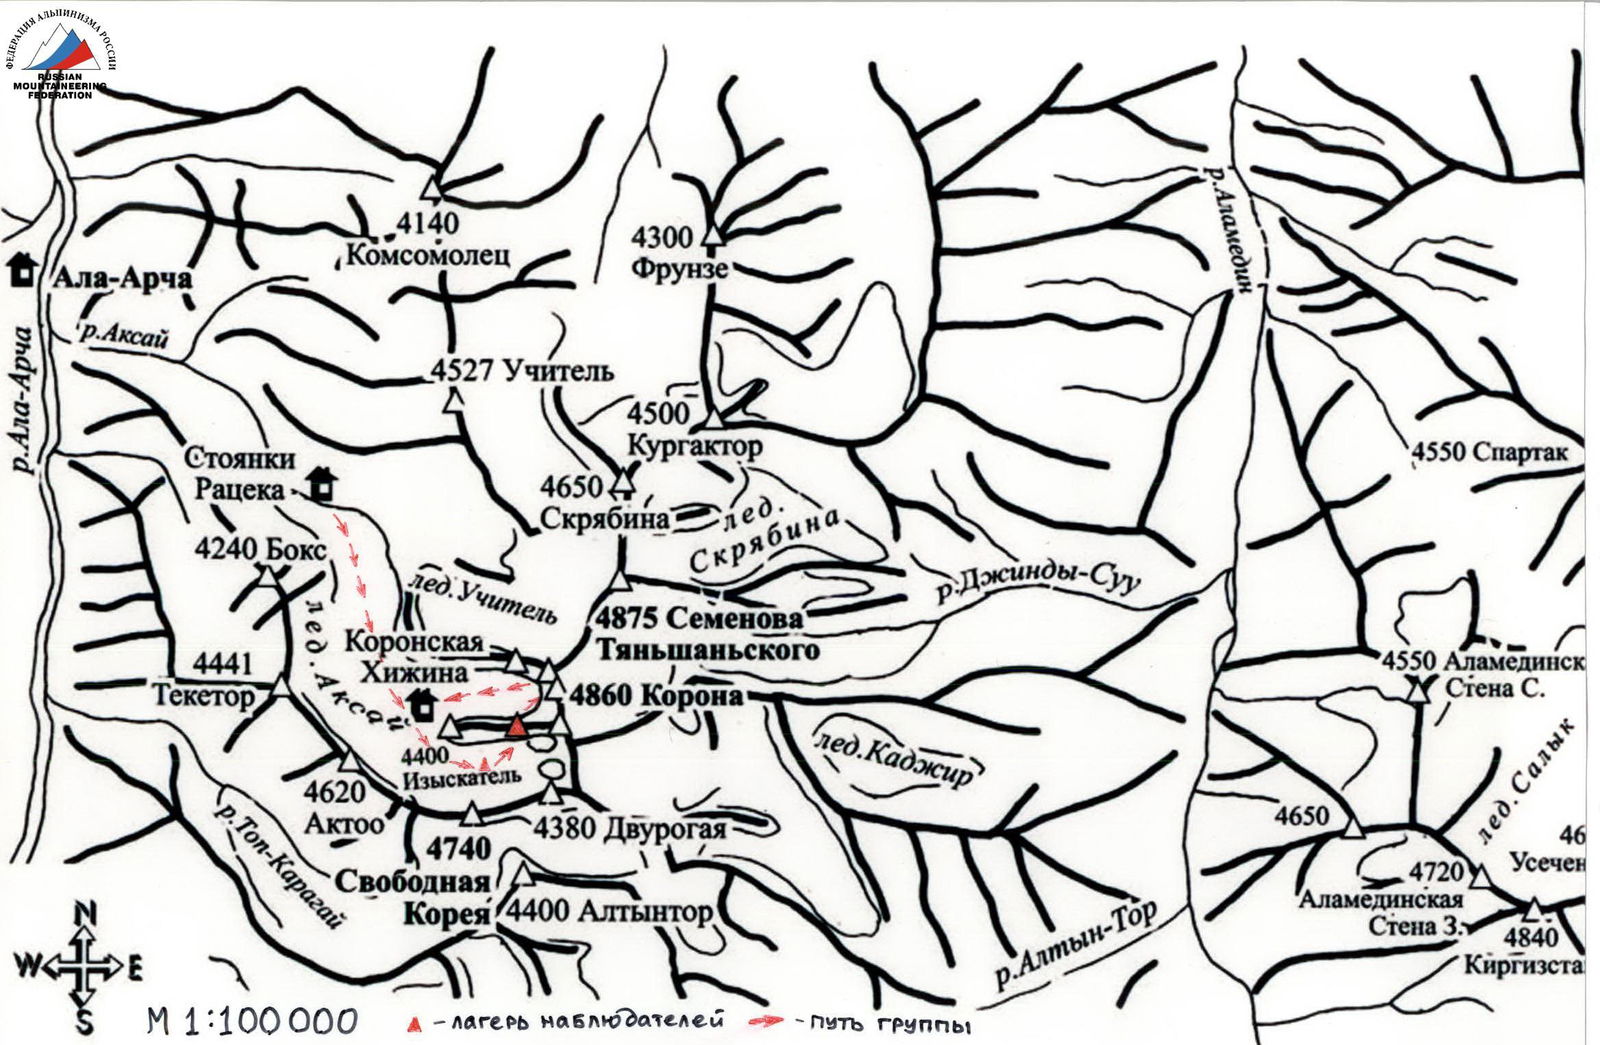
Brief Overview of the Area
The Tian Shan mountain system is considered to be relatively old, having undergone further uplifts during the Alpine era of tectonic structure formation. Tian Shan is divided into: northern, western, central, and eastern.
40–60 km south of the capital of the Kyrgyz Republic rises the mighty Kyrgyz Range. It is located in the northwestern part of Tian Shan. The range stretches for 400 km from west to east — from the city of Taraz to the Boam Canyon. The highest point of the Kyrgyz Range is Peak Semenov-Tian-Shansky (4875 m), located in its central part in the Ak-Sai valley.
The object of the ascent — Korona peak (4860 m) is a neighboring peak to Semenov-Tian-Shansky. Korona peak is formed by 6 towers. The most interesting from an alpinist's point of view are the five-pitch North wall of the 1st tower and the Southwest wall of the 5th tower of Korona. Routes to Korona are very popular and not prone to rockfall, due to the monolithic-block structure of the rocks.
The approach to Korona takes 2–3 hours from Ratsek's campsite via the Ak-Sai glacier. A detailed description of the routes and approaches can be found in the guidebook to the mountain peaks of the central part of the Kyrgyz Range (Solomatin P.I.; Bishkek — 2004).
The team was monitored using a 12x binoculars, and communication with observers and the base camp was done via "Icom" radio. Communication times: 8:00, 12:00, 16:00, 19:00; 10:00 and 14:0900 — emergency listening.
The route was completed without deviations, strictly following the path of the first ascenders. The ascent was carried out in accordance with the tactical plan and without deviations from the time schedule. Communication sessions were held regularly, without omissions. There were no injuries or illnesses among the participants during the route.
Safety measures and accident prevention on the route included:
- High individual, technical, physical, and psychological preparation of team members.
- Thought-out tactical plan.
- Excellent logistical support.
- Presence of a qualified rescue team under the route, ready to provide assistance if necessary.
It should be noted that there was no control turn at the location indicated in the description. We made a control turn and left our note (photo #18).
On sections R0–R5, R7–R13, rocks are in normal condition. Sections R6–R7, R13–R14, R16–R18 are covered with rime ice. This was the main difficulty when moving in the upper part of the route.
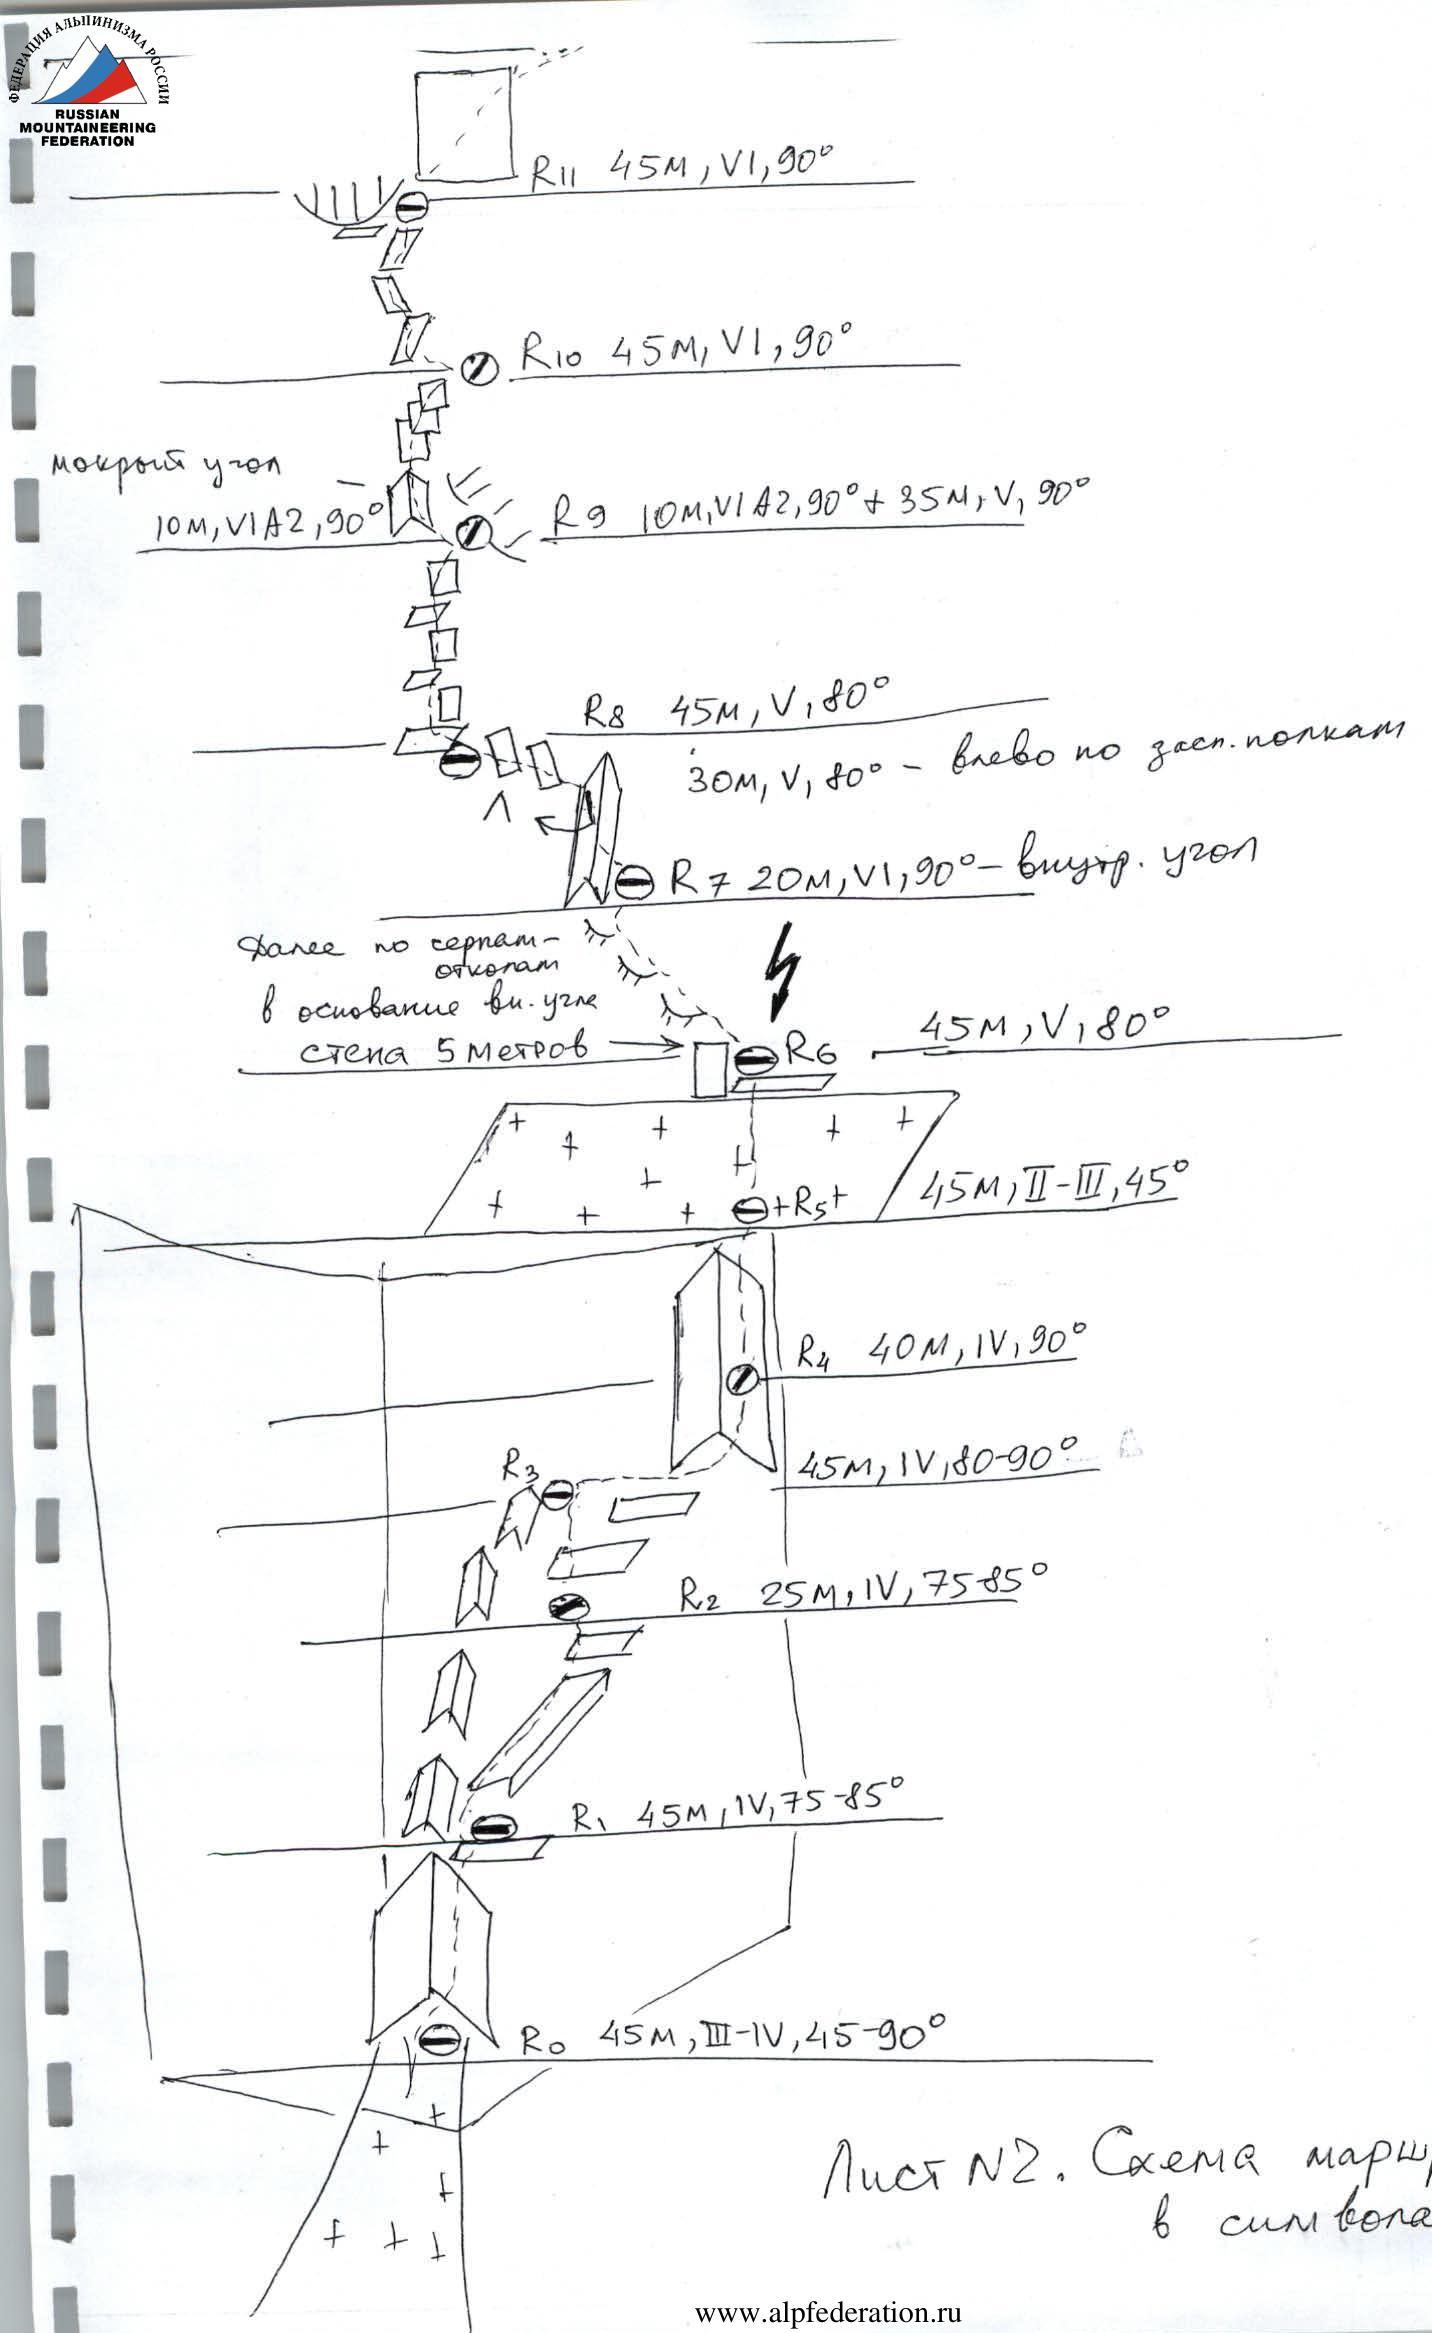
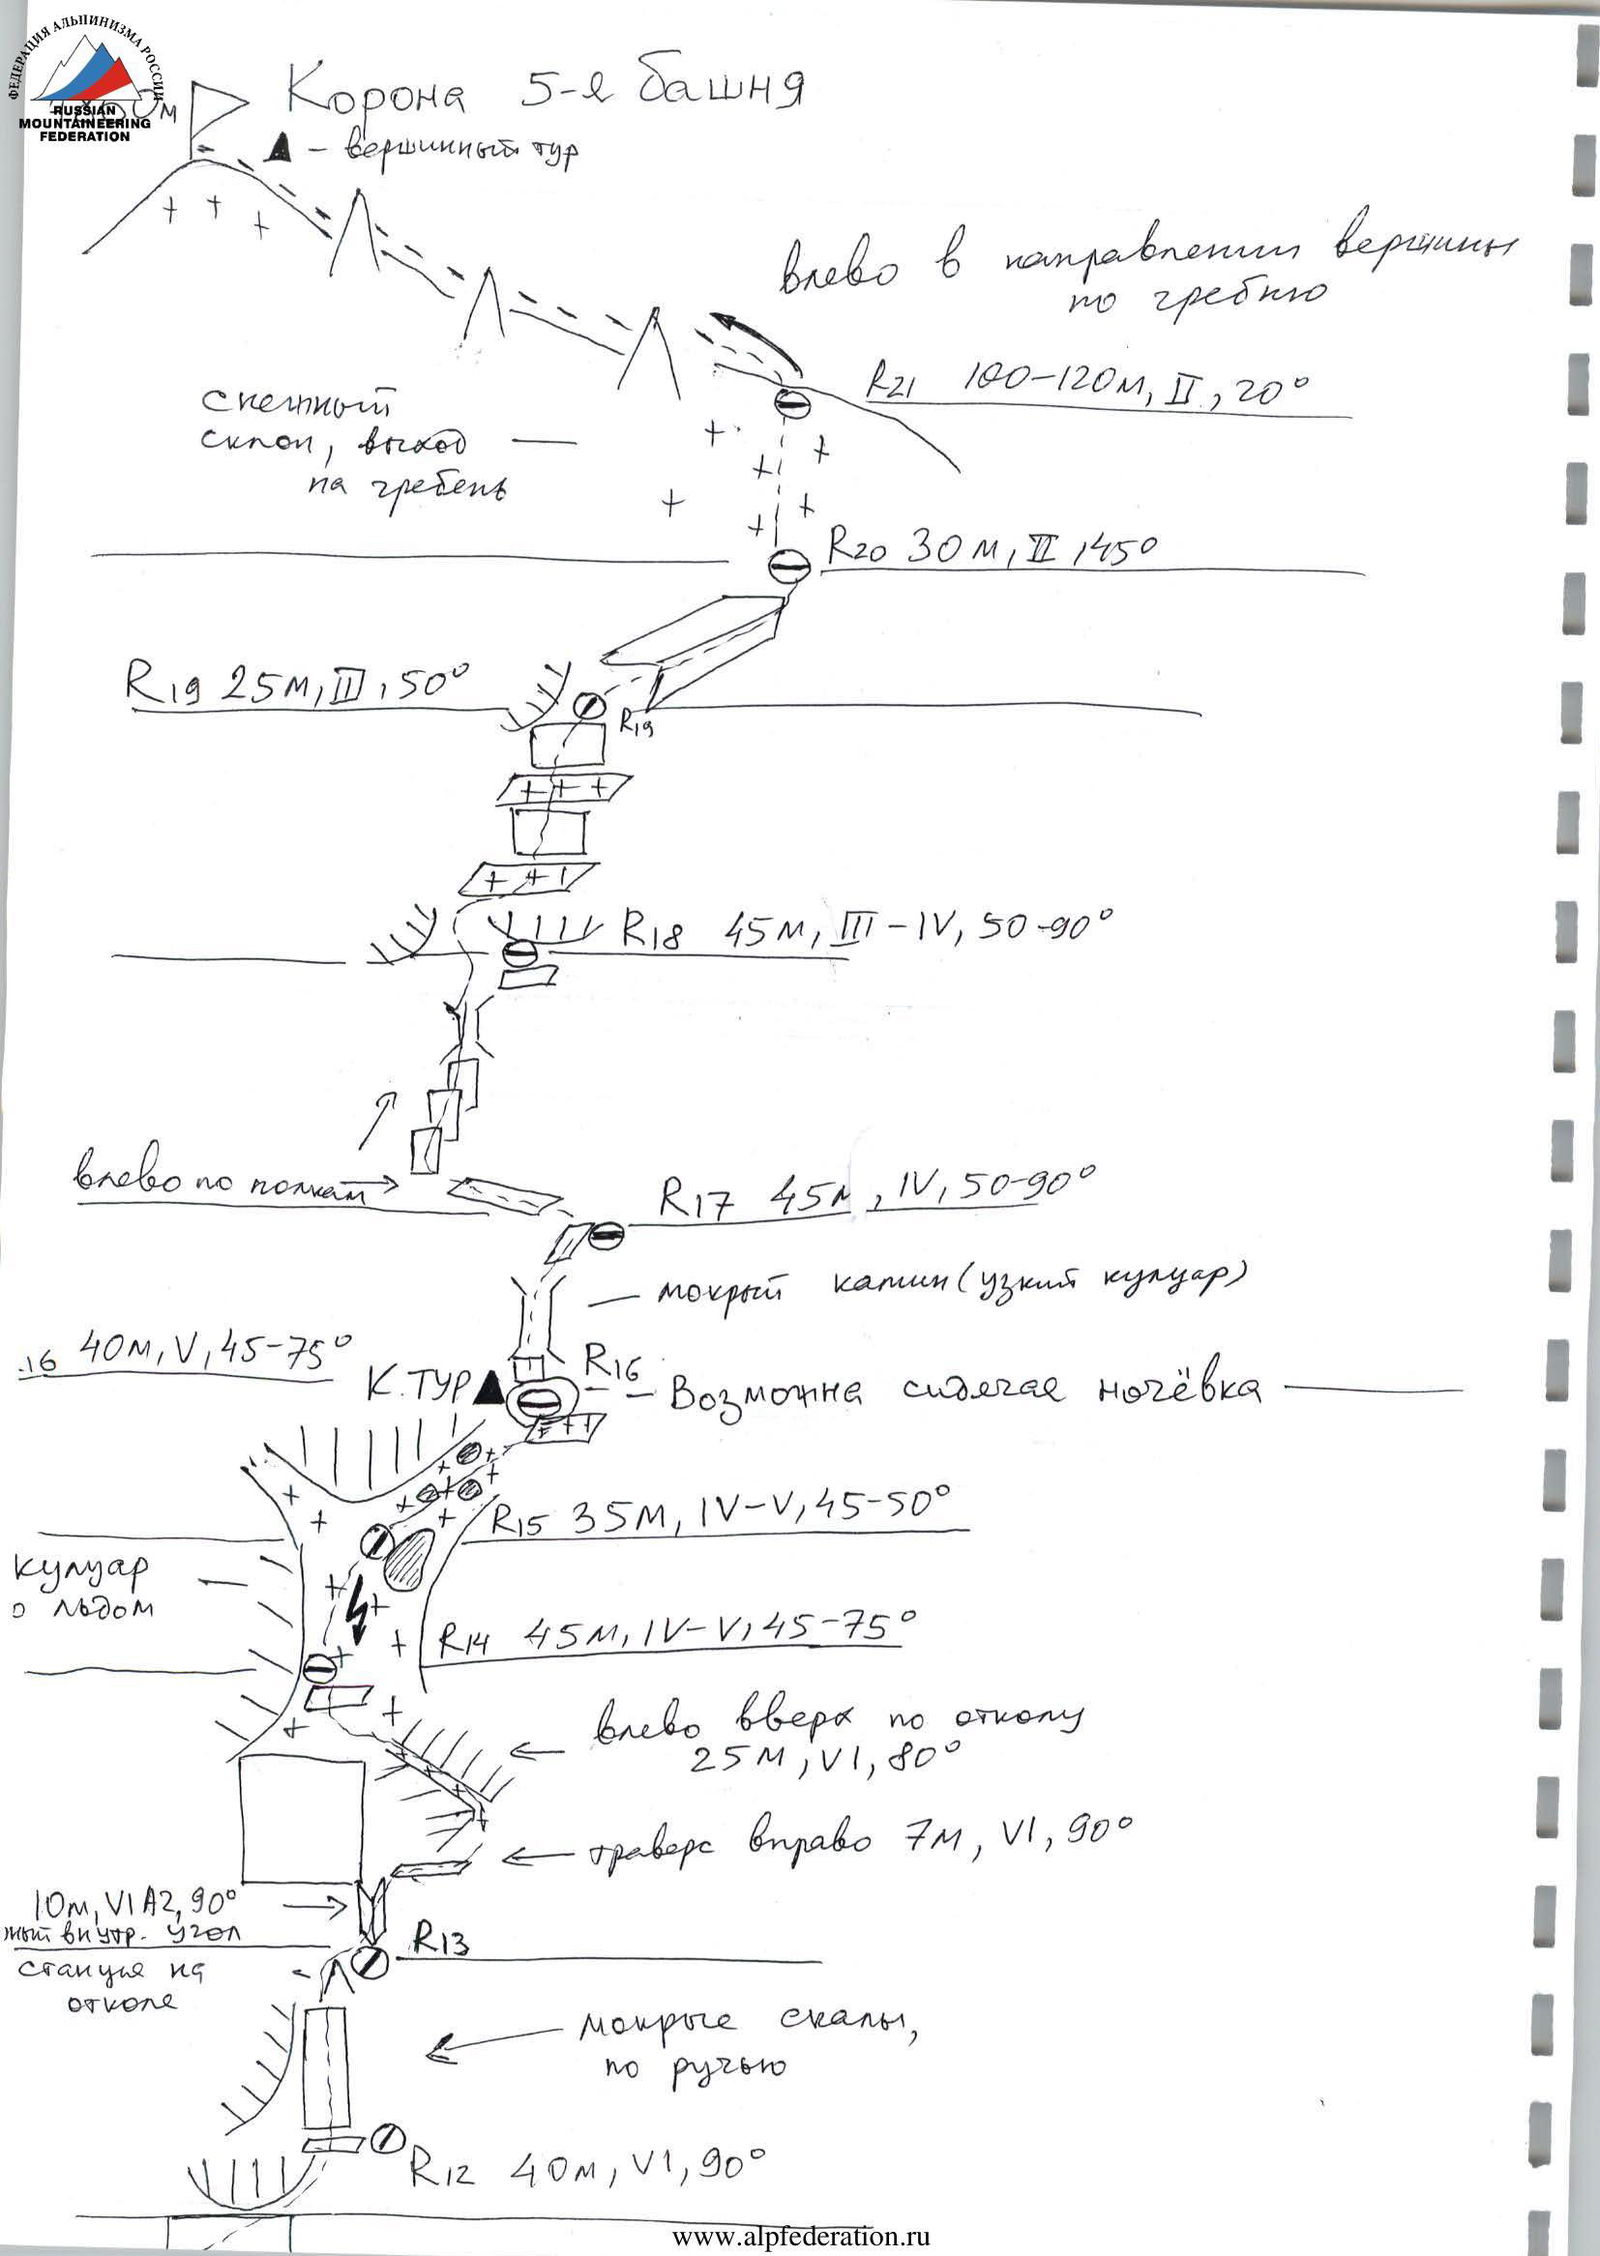
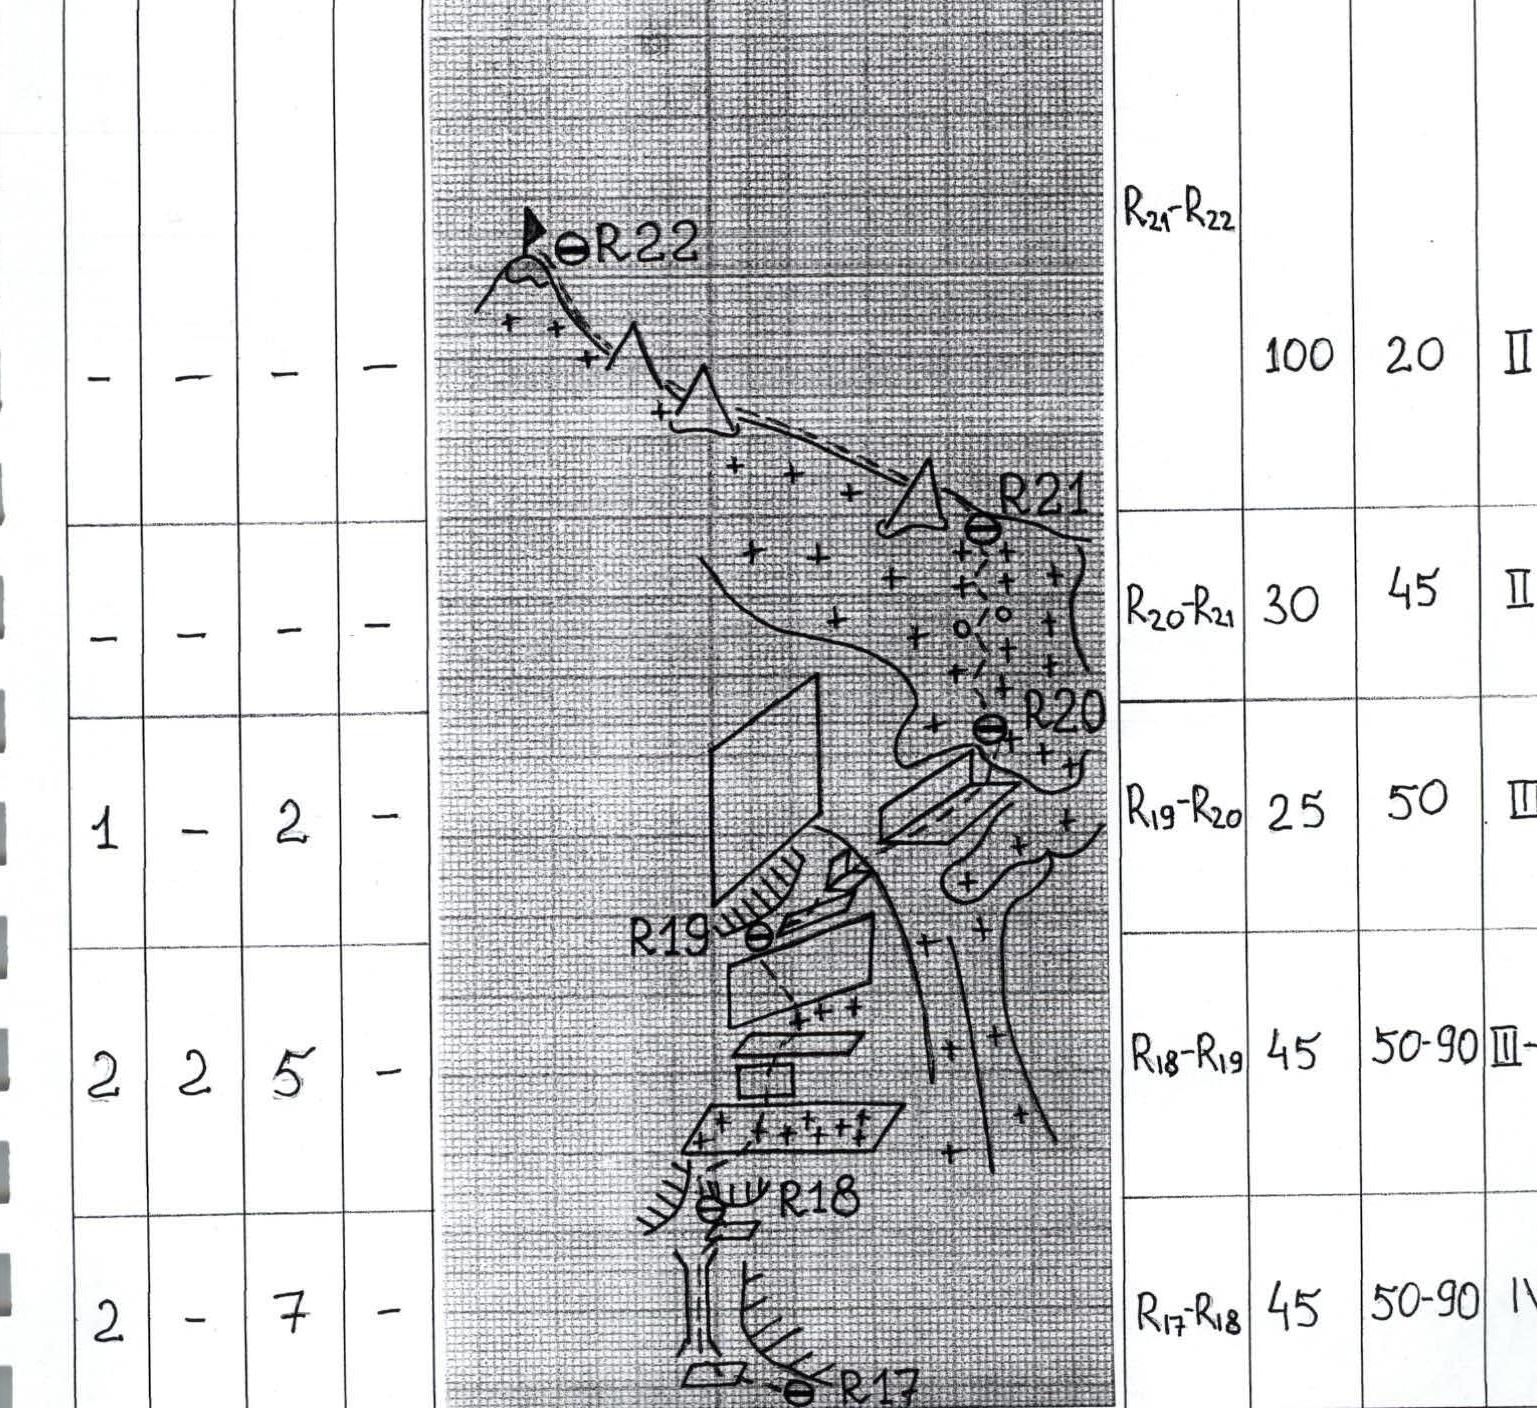
Route Diagram in UIAA Symbols
| Pitons | |||
|---|---|---|---|
| Rock. | Ice. | Cam. | Bolt |
| 3 | – | 7 | – |
| 6 | – | 5 | – |
| 7 | – | 4 | – |
| 1 | – | 2 | – |
| 3 | – | 2 | – |
| 2 | – | 4 | – |
| 2 | – | 1 | – |
| 1 | – | 3 | – |
| 1 | – | 4 | – |
| 4 | – | 4 | – |
| 3 | 3 | 1 | – |
| 4 | 4 | 1 | – |
| 5 | – | 6 | 1 |
| 3 | – | 6 | – |
| 3 | – | 7 | – |
| 4 | – | 8 | – |
| 4 | – | 5 | – |
| – | – | – | – |
| – | – | – | – |
| 1 | – | 2 | – |
| 2 | 2 | 5 | – |
| 2 | – | 7 | – |
| Section # | Length, m | Steepness, ° | Difficulty |
|---|---|---|---|
| R8–R9 | 45 | 80 | 5 |
| R7–R8 | 30 | 80 | 5 |
| R7–R8 | 20 | 90 | 6 |
| R6–R7 | 45 | 80 | 5 |
| R5–R6 | 45 | 45 | 2 |
| R4–R5 | 40 | 90 | 4 |
| R3–R4 | 45 | 80–90 | 4 |
| R2–R3 | 25 | 75–85 | 4 |
| R1–R2 | 45 | 75–85 | 4 |
| R0–R1 | 45 | 45–90 | 3–4 |
| R16–R17 | 40 | 45–75 | 5 |
| R15–R16 | 35 | 45–50 | 4 |
| R14–R15 | 45 | 45–75 | 5 |
| R13–R14 | 25 | 80 | 6 |
| R13–R14 | 10 | 90 | 6 |
| R12–R13 | 40 | 90 | 6 |
| R11–R12 | 45 | 90 | 6 |
| R10–R11 | 45 | 90 | 6 |
| R9–R10 | 35 | 90 | 5 |
| R9–R10 | 10 | 90 | 6 |
| R21–R22 | 100 | 20 | 2 |
| R20–R21 | 30 | 45 | 2 |
| R19–R20 | 25 | 50 | 3 |
| R18–R19 | 45 | 50–90 | 3–4 |
| R17–R18 | 45 | 50–90 | 4 |

Route Description by Sections
R0–R1. Move left of the stream through the center of the internal corner, leading to a ledge. Base is comfortable. 45 m, 3–4, 45–90°.
R1–R2. Through the center of the wall, icy rocks. Move up-right through a series of internal corners and ledges. 45 m, 4, 75–85°. Base is uncomfortable.
R2–R3. Further 25 m, 4, 75–85° through corners. Comfortable base on a ledge. Piton protection.
R3–R4. 20 m traverse right, then 25 m up through a not clearly defined counterfort. 45 m, 4, 80–90°. Base is comfortable.
R4–R5. Move straight up the counterfort 40 m, 4, 90°. Reach a large snow ledge. Base is comfortable.
R5–R6. Along the snow-covered ledge straight to the wall. Base is comfortable, but beware of falling rocks and icicles! 45 m, 2, 45°.
R6–R7. Initially, the wall is 5 m, then move left-up through overhanging rock fragments towards a large internal corner. At its beginning, on a small ledge, there is a base — pitons are present. Rocks are covered with rime ice. Base is comfortable. 45 m, 5, 80°.
R7–R8. Large internal corner 20 m, 6, 90°. Pendulum swing left from the corner onto a series of inclined ledges. There is a piton, cam, and loop for the pendulum. Transition left around the corner. Along a series of snow-covered ledges left-up past an outcrop with old ropes — 30 m, 4–5, 80°. Base is comfortable.
R8–R9. Series of wall sections and ledges leading under a cornice 45 m, 5, 80°. Base is uncomfortable, pitons are present for the anchor.
R9–R10. Wet internal corner, AITO. 10 m, 6 A2, 90°. Then move right-up through a series of small wall sections. Many loose rocks are present. Base is uncomfortable, semi-pendant on small ledges. 35 m, 5, 90°.
R10–R11. Initially 15 m up-right and 10 m left through rock fragments to the wall, then up through a crack leading to a ledge under a cornice, here is the anchor. 45 m, 6, 90°.
R11–R12. Further complex climbing right-up from under the cornice towards the next large cornice (icicles under the cornice!), bypassing it on the right. Immediately behind the cornice is the anchor. Base is uncomfortable. 45 m, 6, 90°.
R12–R13. Move straight up the wall under the base of the black internal corner, protection on cams. Base is uncomfortable on an outcrop, a stream is dripping from above. 40 m, 6, 90°.
R13–R14. AITO on pitons through the internal black corner covered in ice — 10 m, 6 A2, 90°. Further right along an ice ledge (7 m, 6, 70°) and left-up through an outcrop 25 m, 6 A1, 80°. Protection on cams, climbing in crampons. Base is comfortable on a ledge, pitons are present for the anchor.
R14–R15. Exit into a snow-filled and ice-covered scree couloir, move right-up (crampons, ice axes) — 45 m, 4–5, 45–75°. Base is uncomfortable.
R15–R16. Right-up through snow-covered rocks 35 m, 4, 45–50° — exit onto a snow ledge suitable for a sitting overnight stay. Made a control turn (photo #18).
R16–R17. Straight up a narrow couloir with flowing water, then exit onto ledges on the right. Climbing in crampons. Base is comfortable. 40 m, 5, 45–75°.
R17–R18. Left along ledges 15 m, 3, 50° and up through an ice-covered chimney 20 m, 4, 75–90°. Further right-up onto a ledge 10 m, 3, 75°. Protection on cams and stoppers. Base is comfortable.
R18–R19. Up-right through snow-covered wall sections and ledges 45 m, 3–4, 50–90°. Climbing in crampons. Base is comfortable.
R19–R20. Right along a snow-covered internal corner, climbing in crampons. Base is comfortable. 25 m, 3, 50°.
R20–R21. Exit onto the ridge simultaneously — 30 m, 2, 45°.
R21–R22. Move left along the ridge towards the summit — 100 m, 2, 20°. Summit tour.
A note from the Sumy FAiS team led by Romanenko, who completed the ascent via Egorov's route, category 5A, was found on the summit tour.
Equipment Table
| # | Name | Quantity | Use on sections |
|---|---|---|---|
| 1. | Main rope: D=10.5 mm - 50 m | 5 | R0–R22 |
| 2. | Rock pitons, titanium | 15 | R0–R22 |
| 3. | Rock pitons, steel | 15 | R0–R22 |
| 4. | Cams, "Sail" type | 15 | R0–R22 |
| 5. | FRIENDs | 12 | R0–R22 |
| 6. | Rock hammers | 2 | R0–R22 |
| 7. | Ice axes | 1 | R0–R1, R5–R6 |
| 8. | Ice axes | 4 | R14–R16, descent |
| 9. | Ice screws | 5 | R14–R16, descent |
| 10. | Quickdraws | 30 | R0–R22 |
| 11. | Anchor slings | 7 | R0–R22 |
| 12. | Ladder for pitons | 2 pairs | As needed |
| 13. | Crampons | 5 pairs | R5–R7, R13–R22, descent |
| 14. | Extractor | 1 | R0–R22 |
| 15. | First aid kit | 2 kits | As needed |
| 16. | Route documentation | 1 copy | R0–R22 |
| 17. | Radio "Icom" | 1 | During communication times |
| 18. | Camera | 2 | R0–R22 |
Food was taken at a rate of 500 g per person per day: 0.4 kg × 5 people × 2 days = 5 kg. The total weight of backpacks when entering the route was 75 kg.
 Photo #1. Section R6–R7
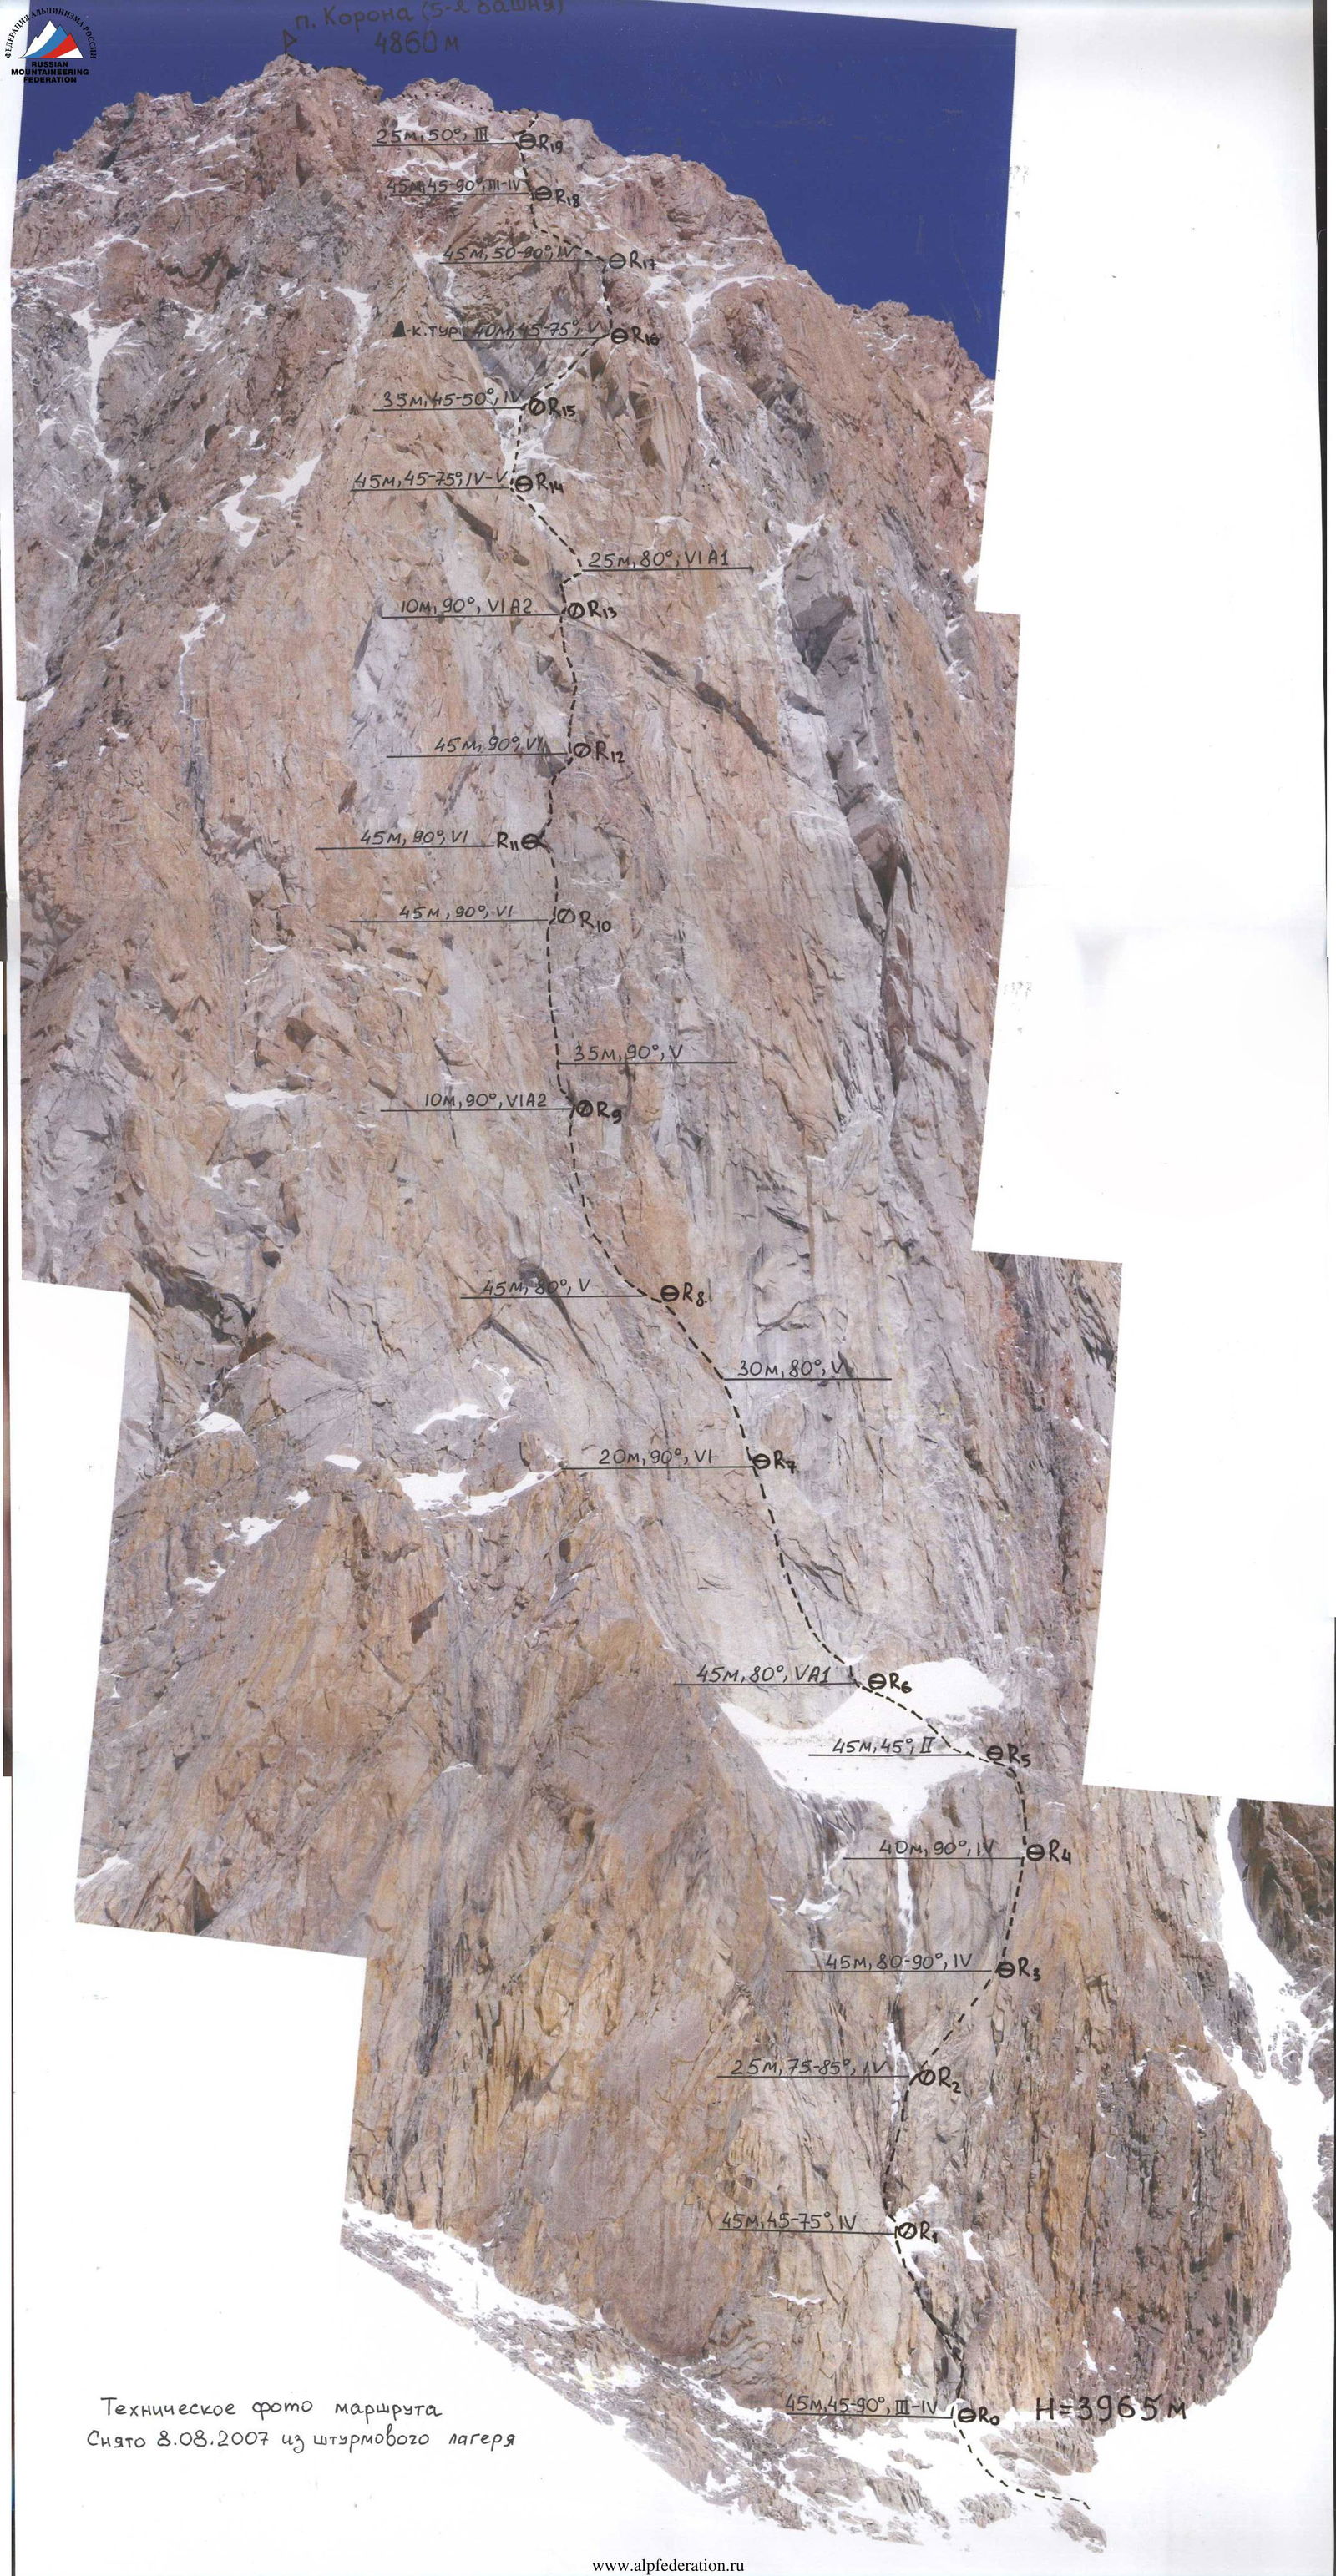 Technical photo of the route. Taken on August 8, 2007 from the assault camp.
 Photo #2. Section R7–R8
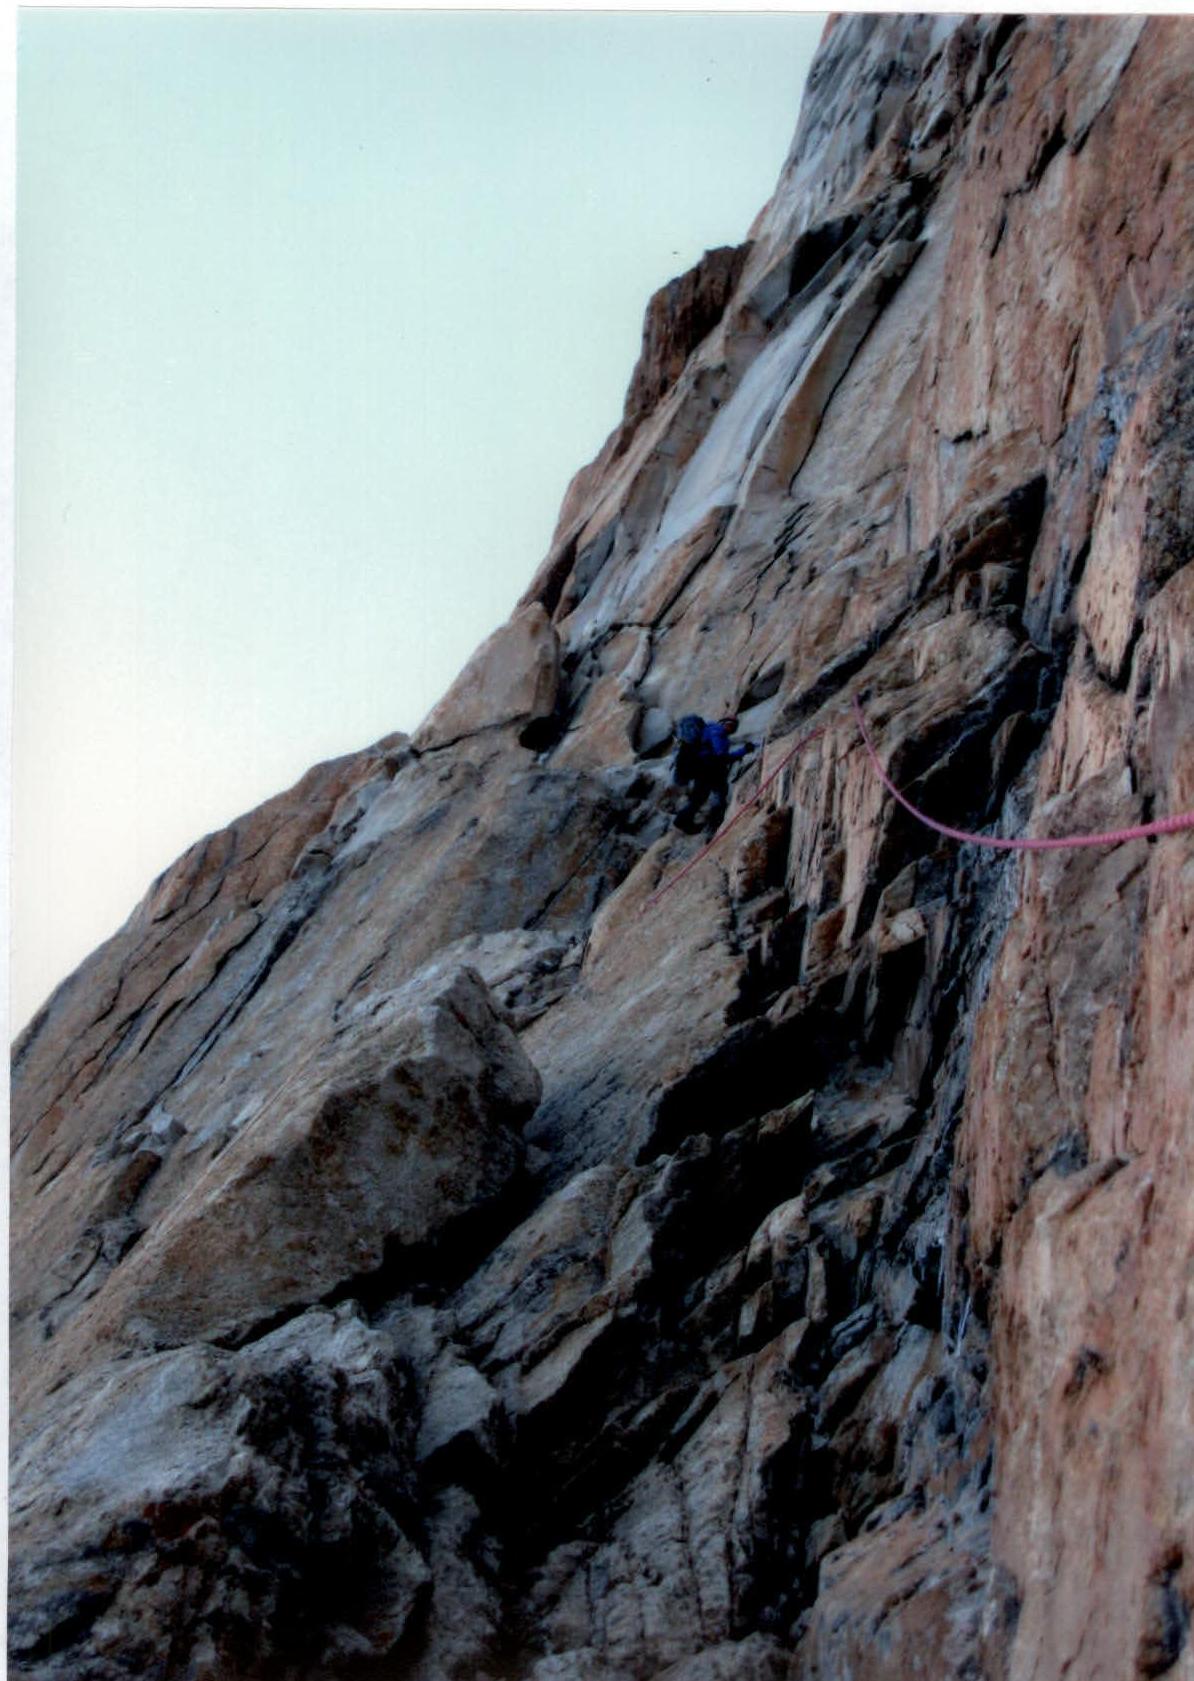 Photo #3. Section R7–R8
 Photo #4. Section R8–R9
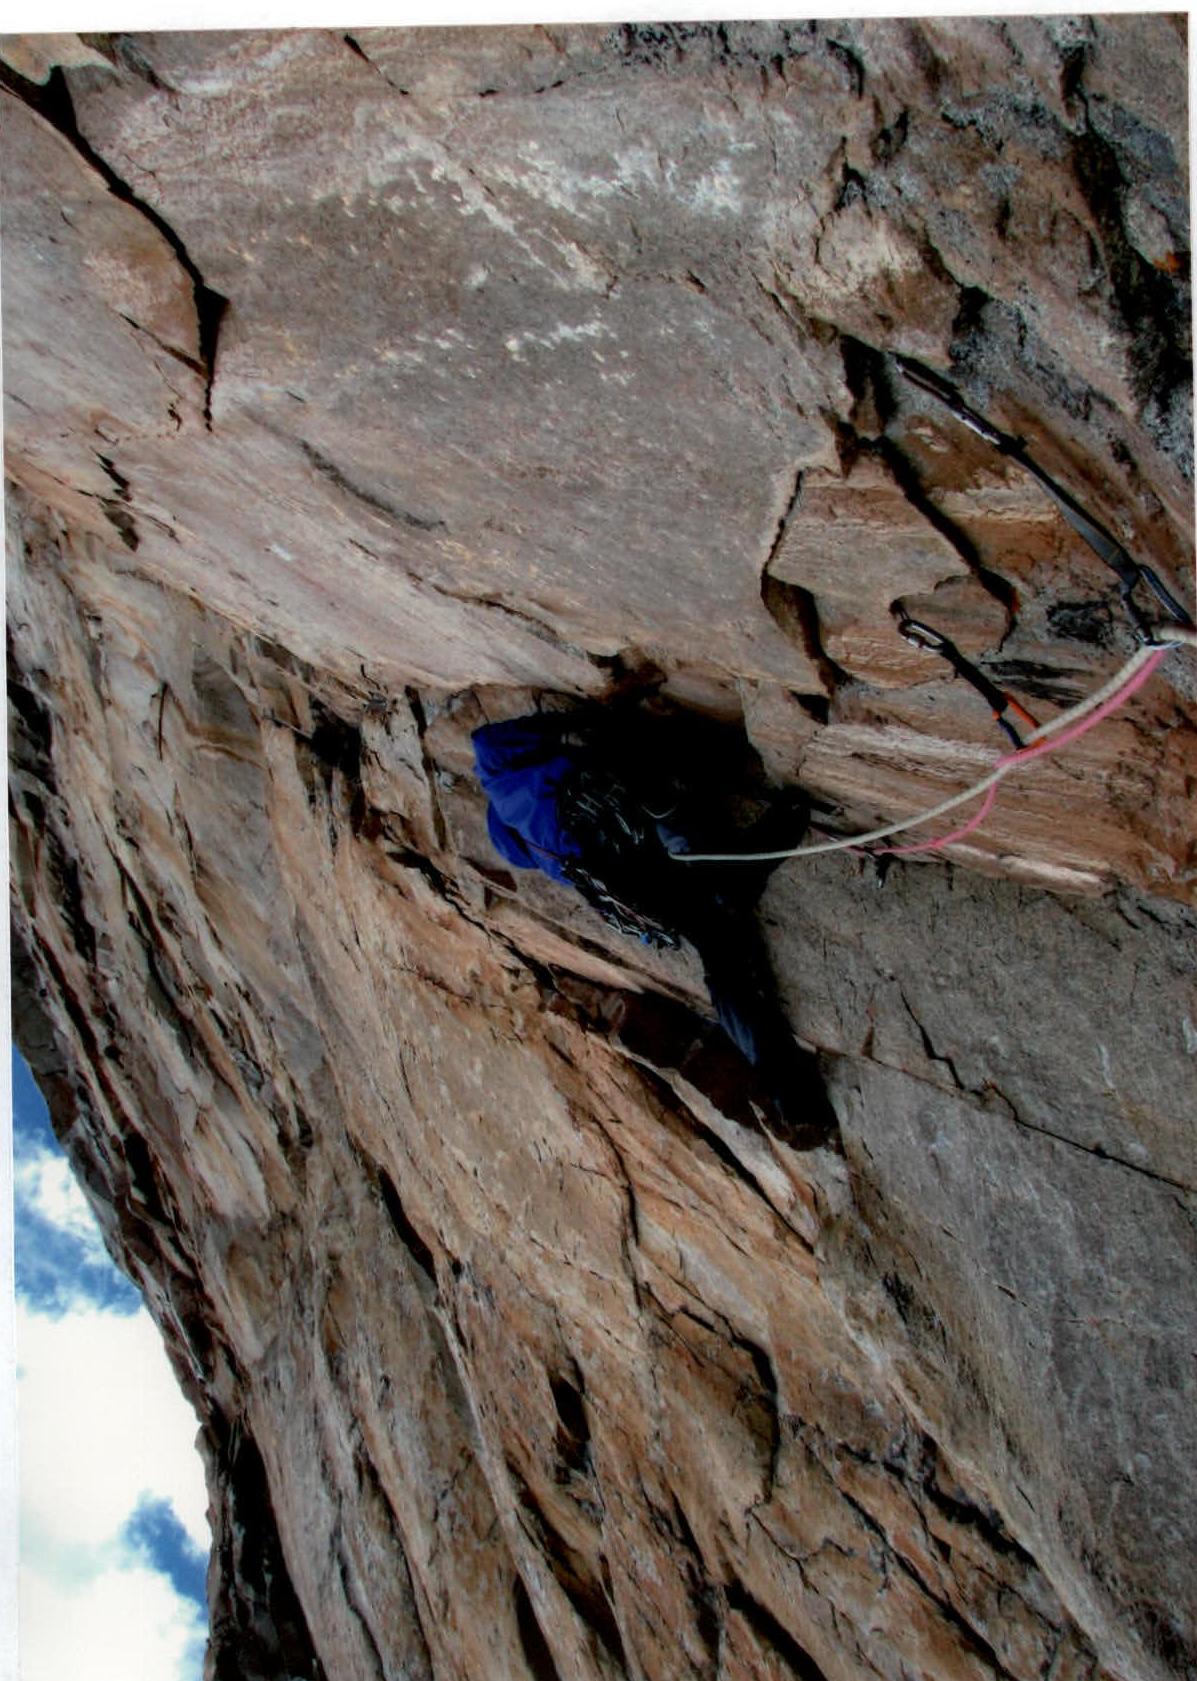 Photo #5. Section R9–R10
 Photo #6. Section R9–R10
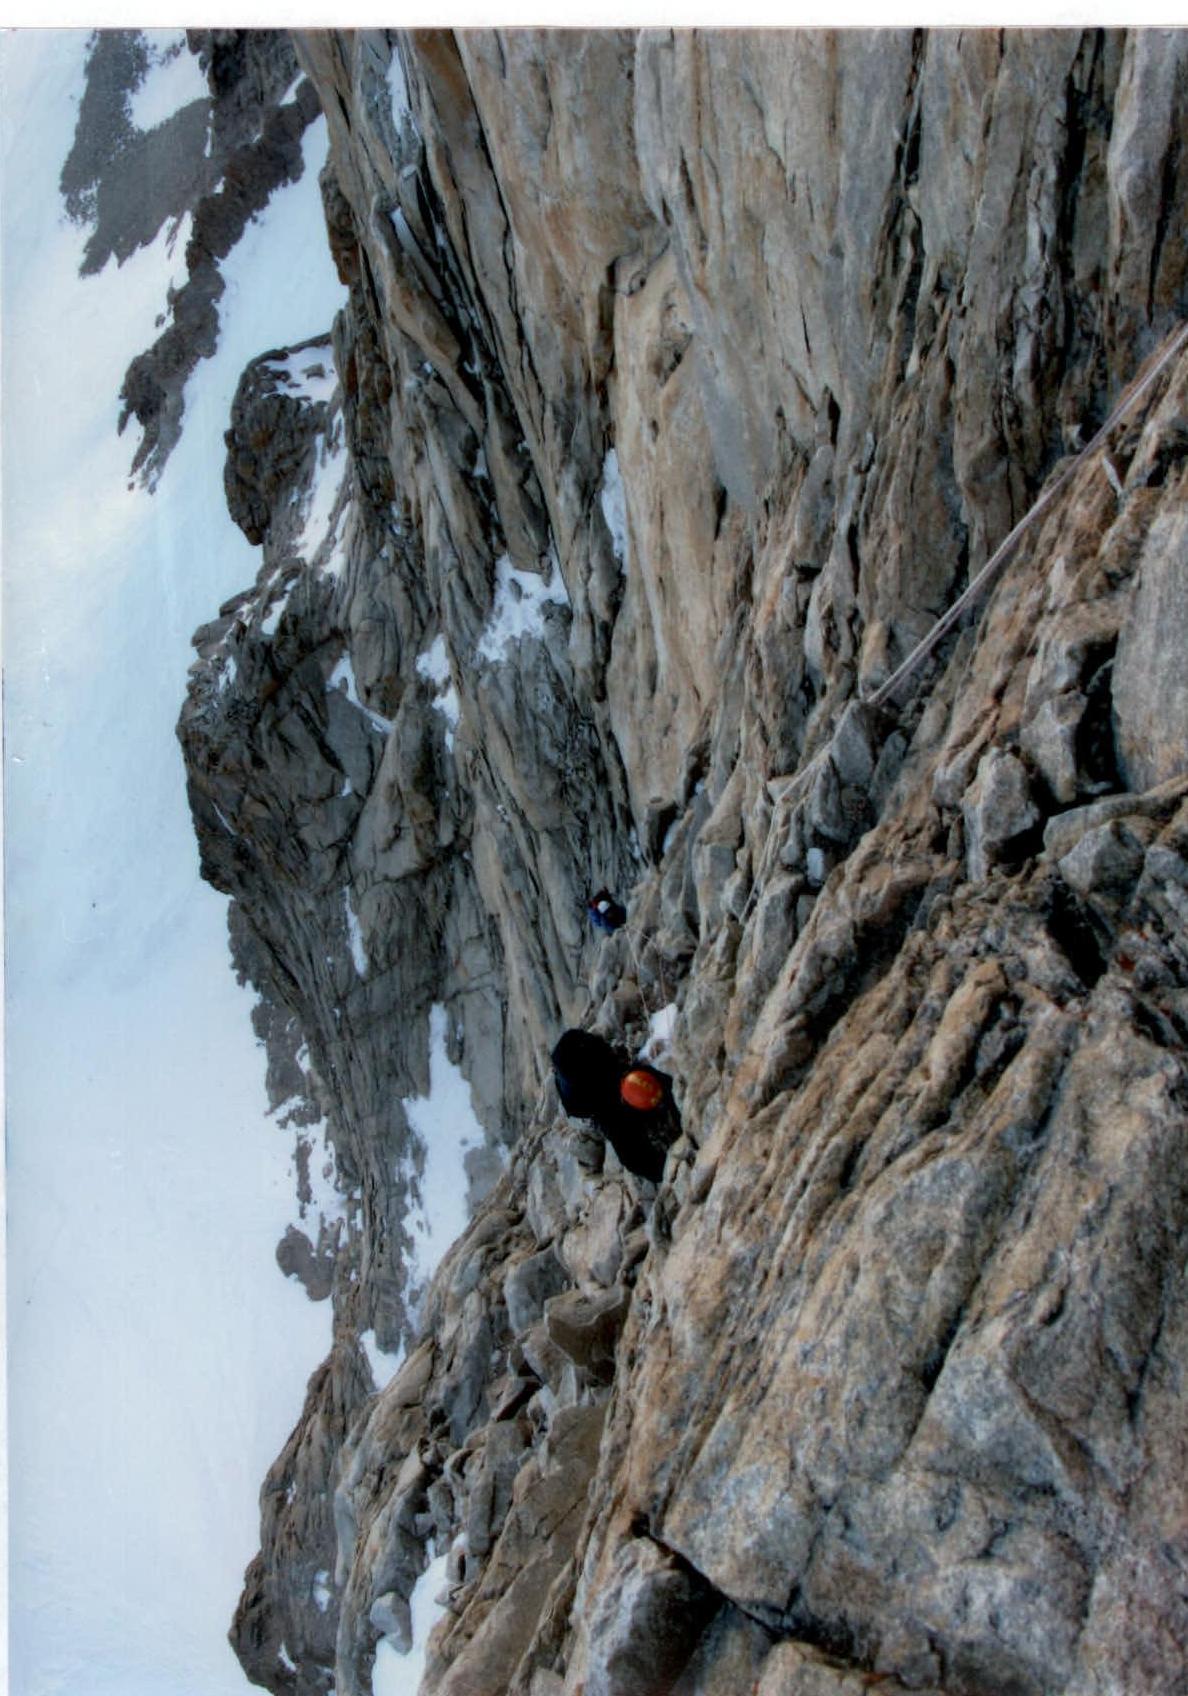 Photo #7. Section R10–R11
 Photo #8. Section R11–R12
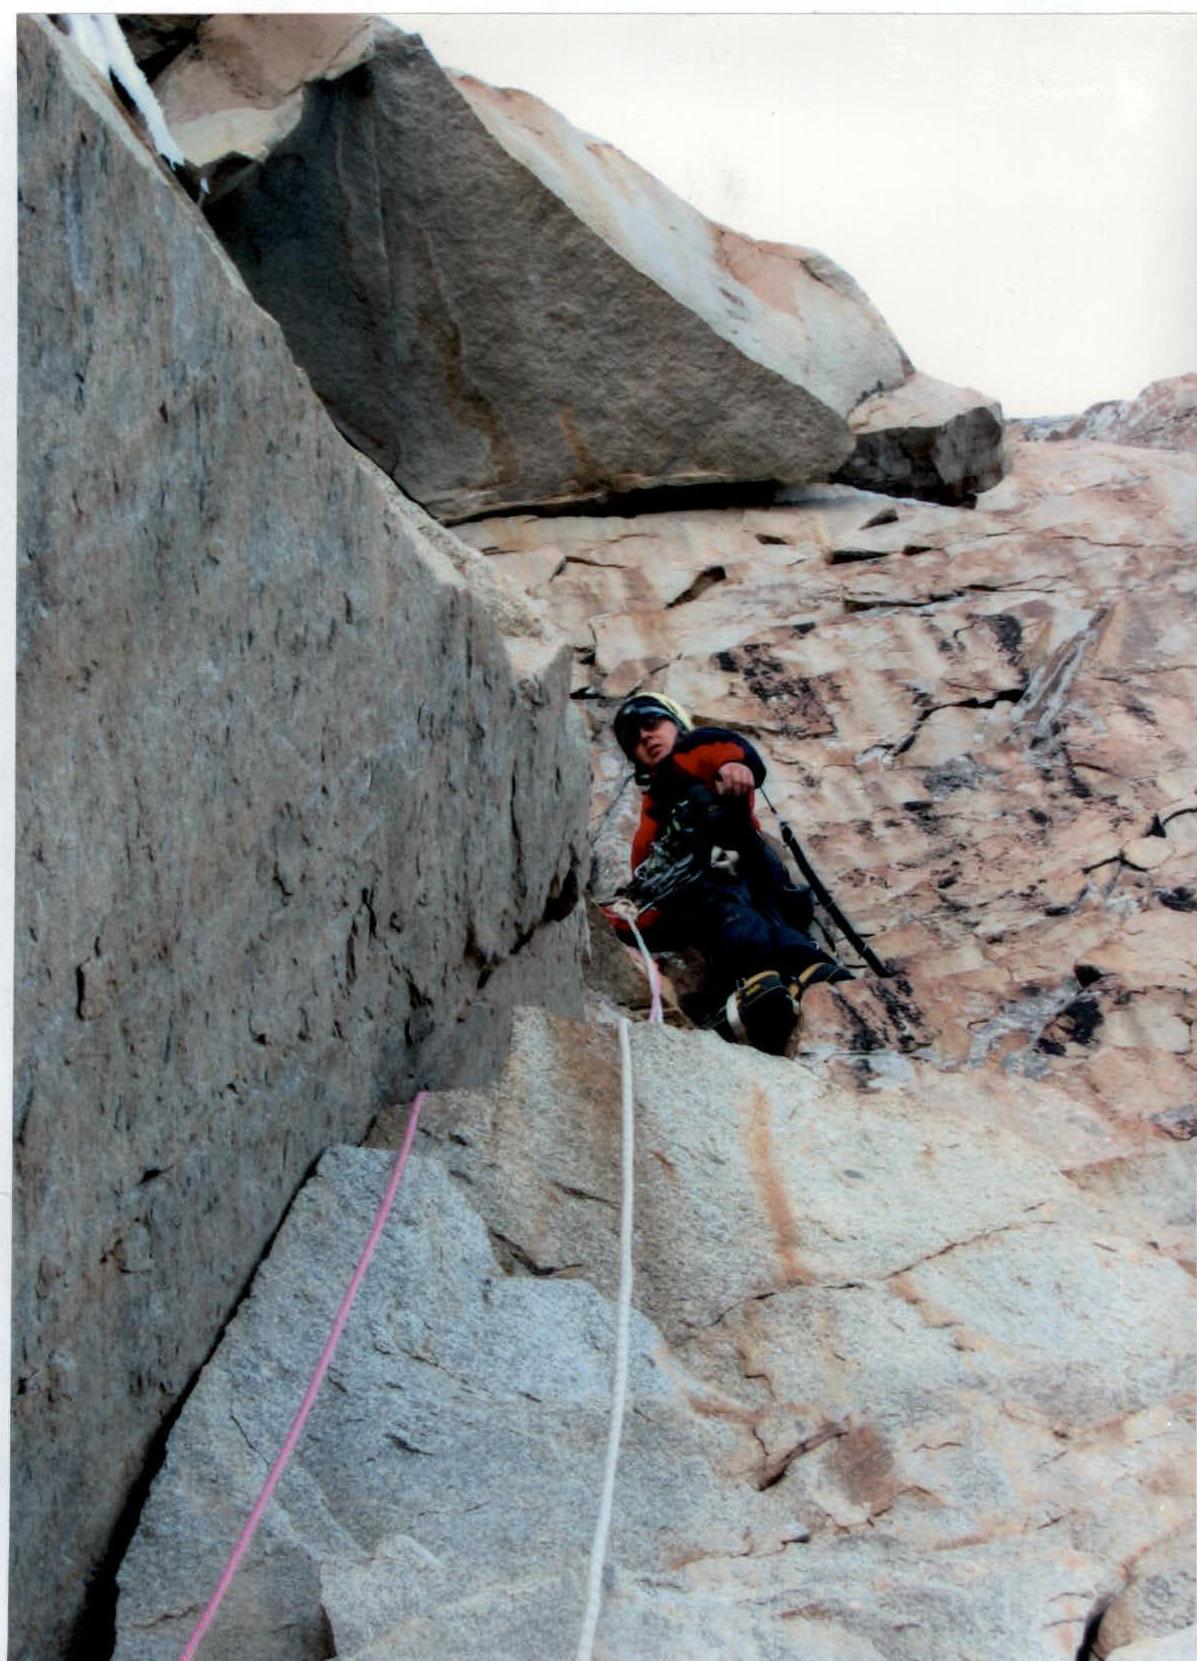 Photo #9. Section R11–R12
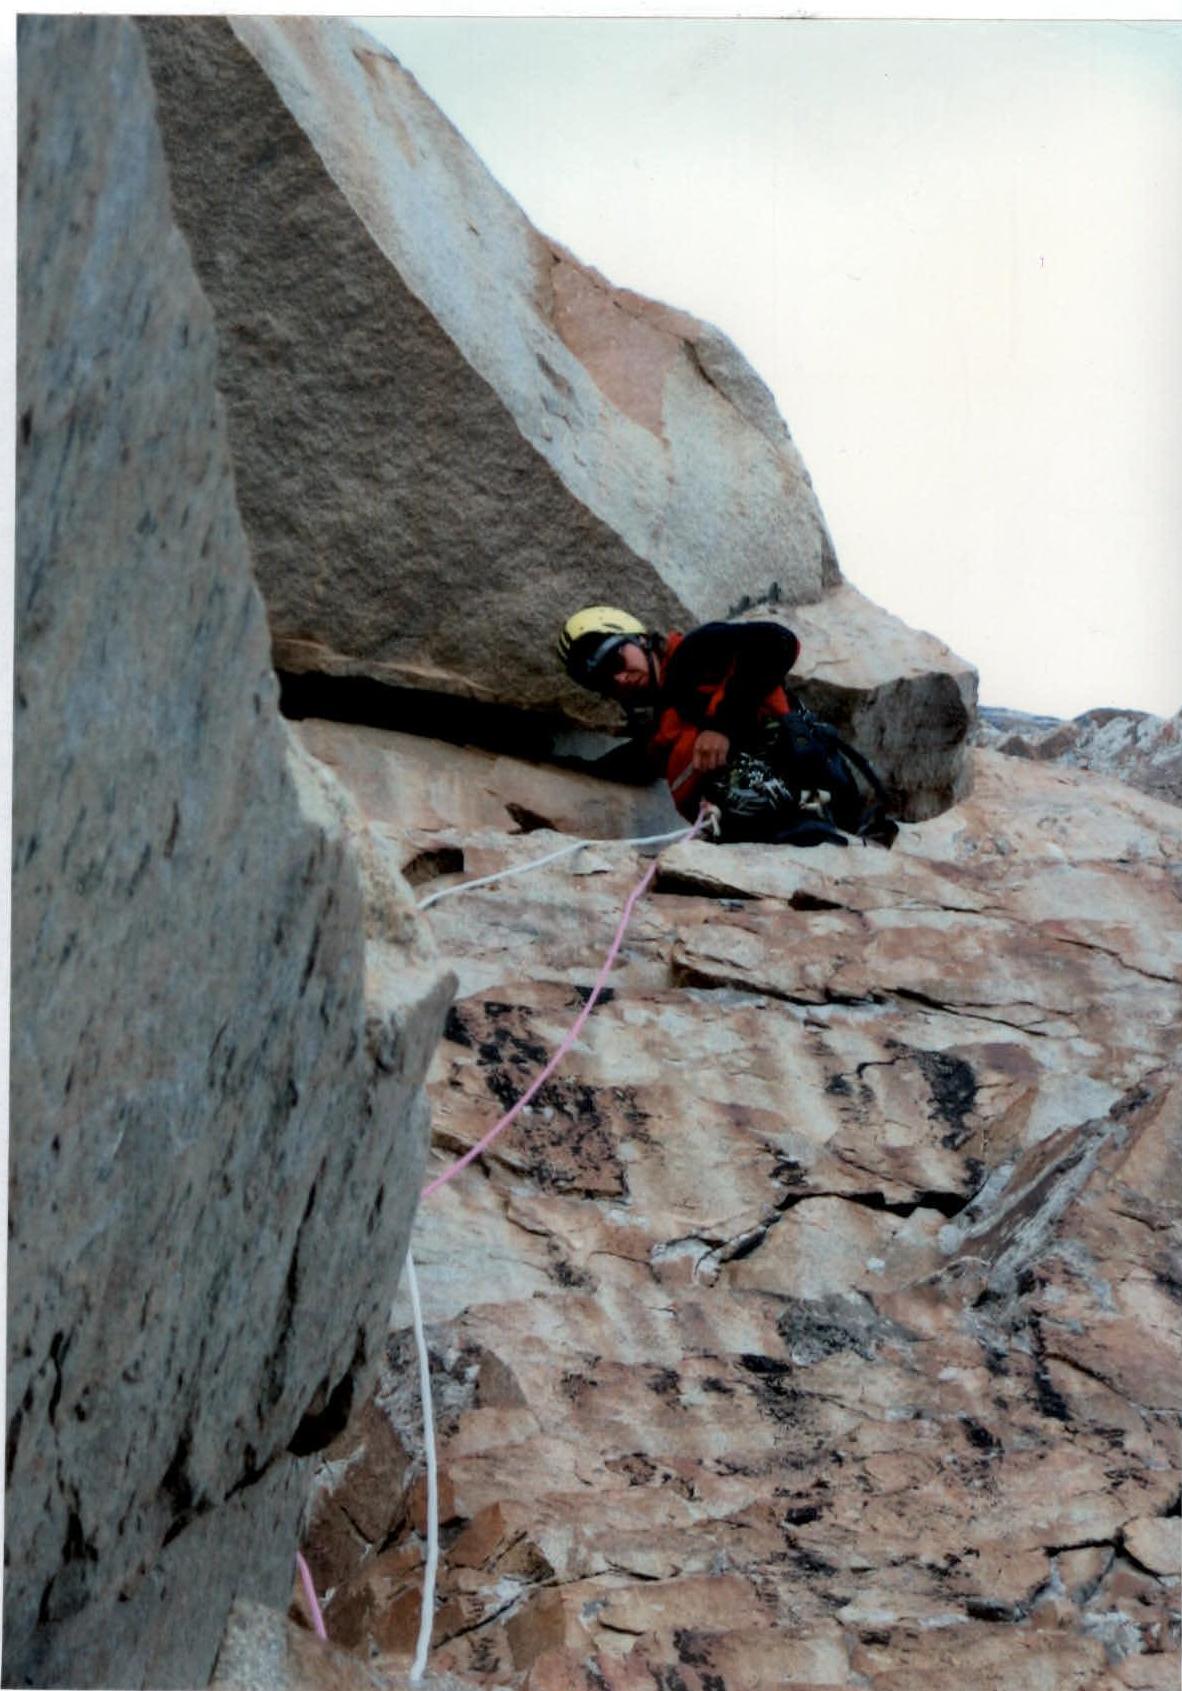 Photo #10. Section R11–R12
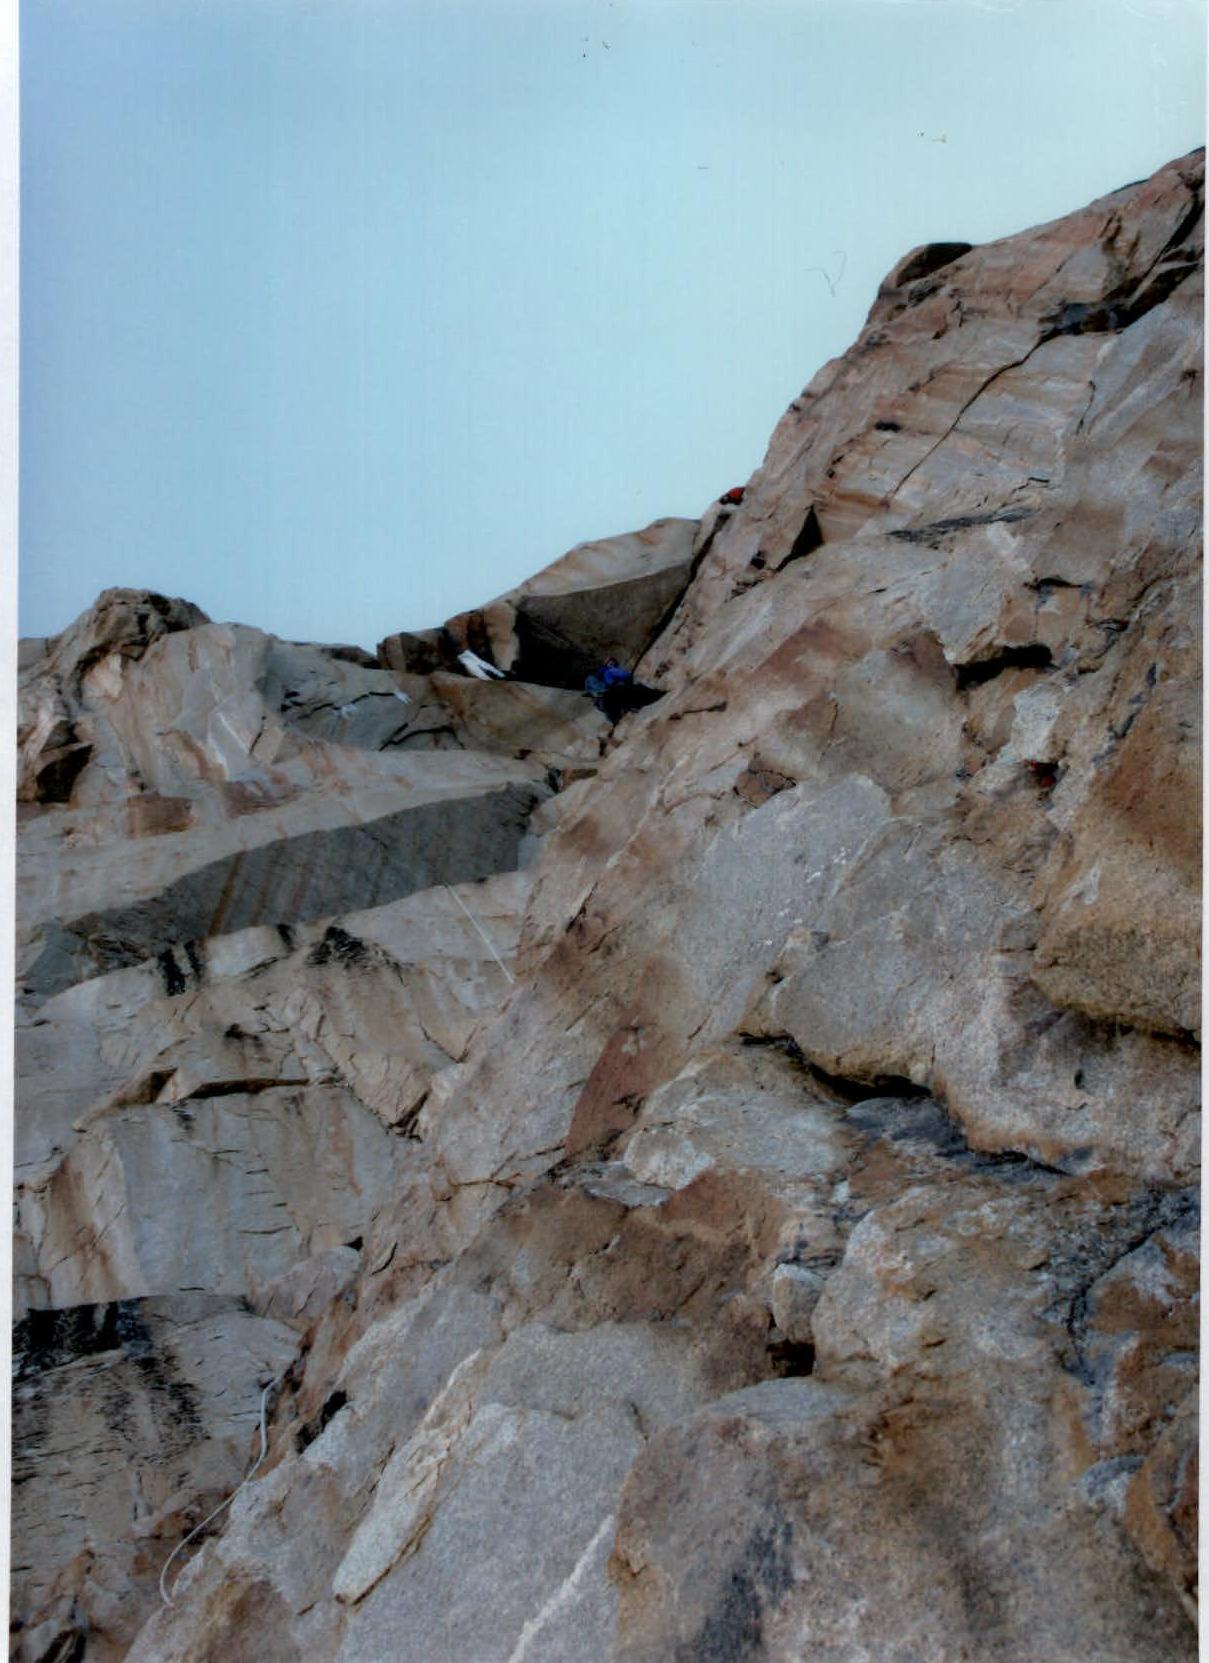 Photo #11. Section R11–R12
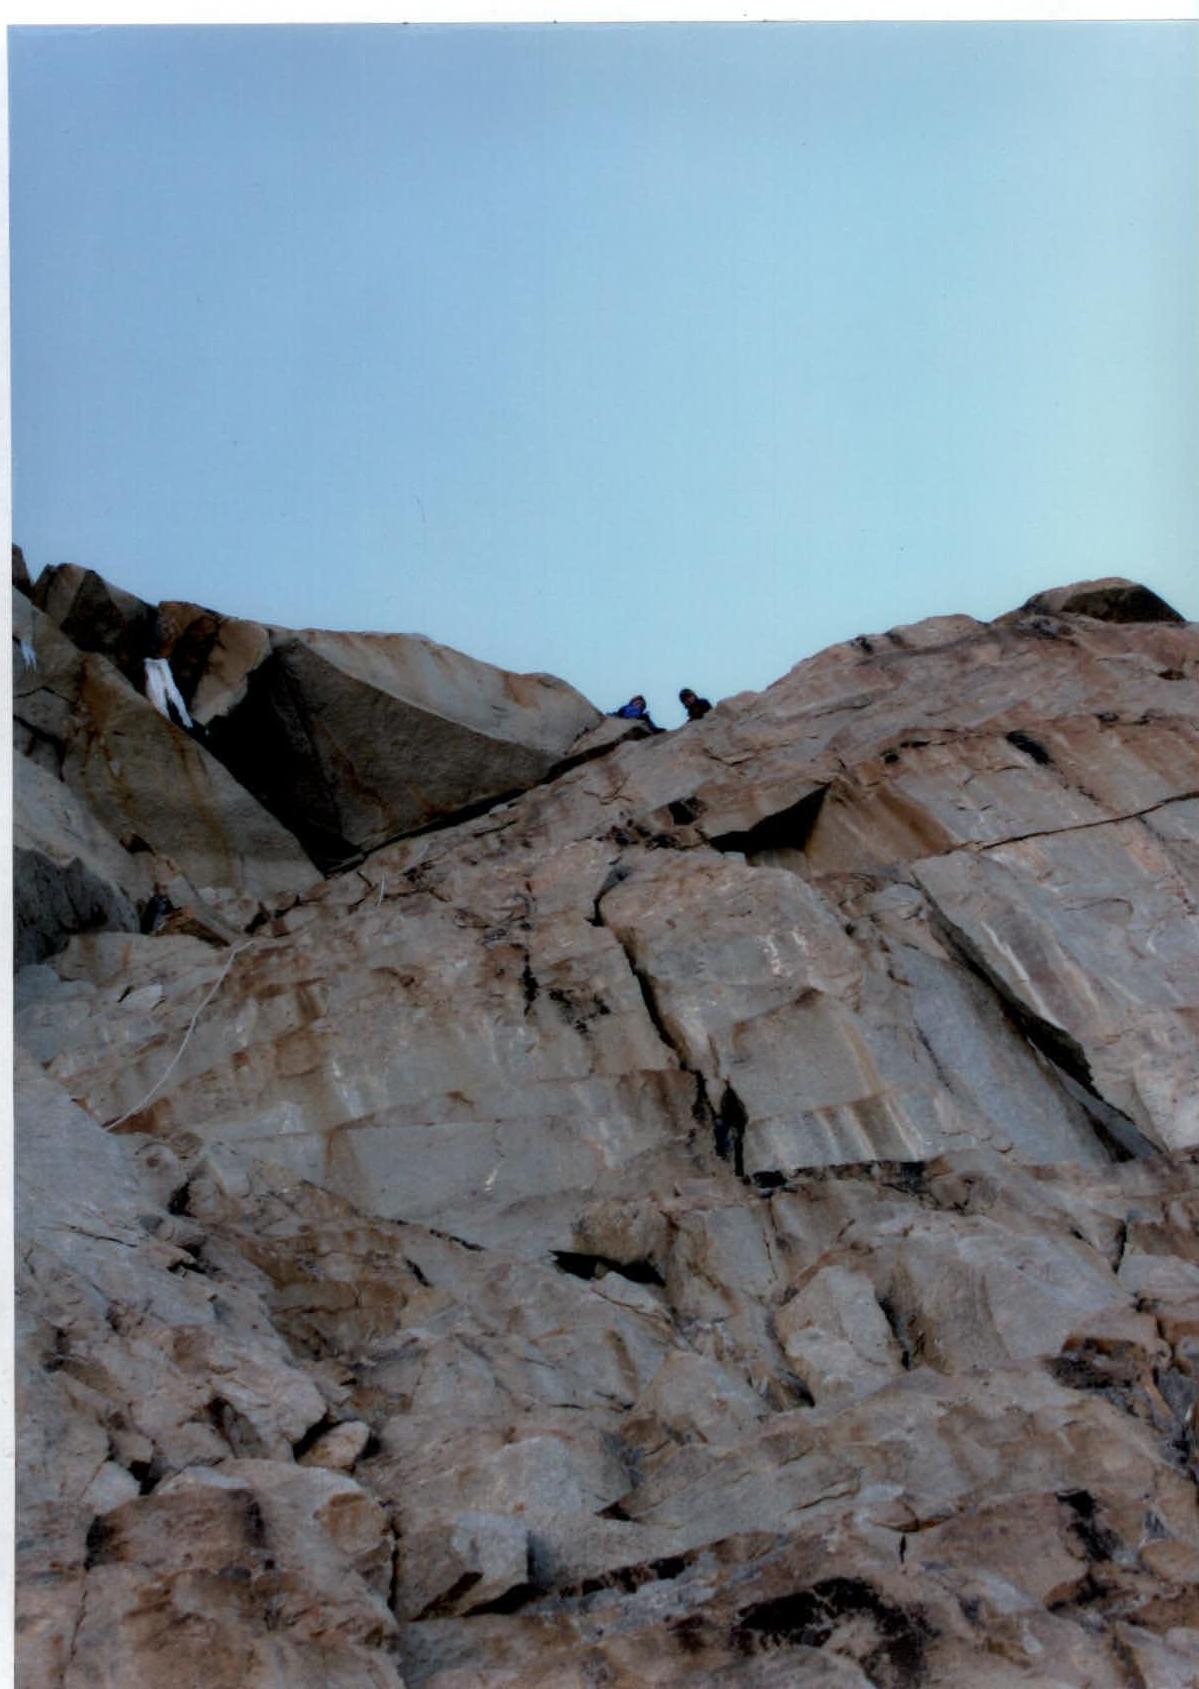 Photo #12. Section R11–R12
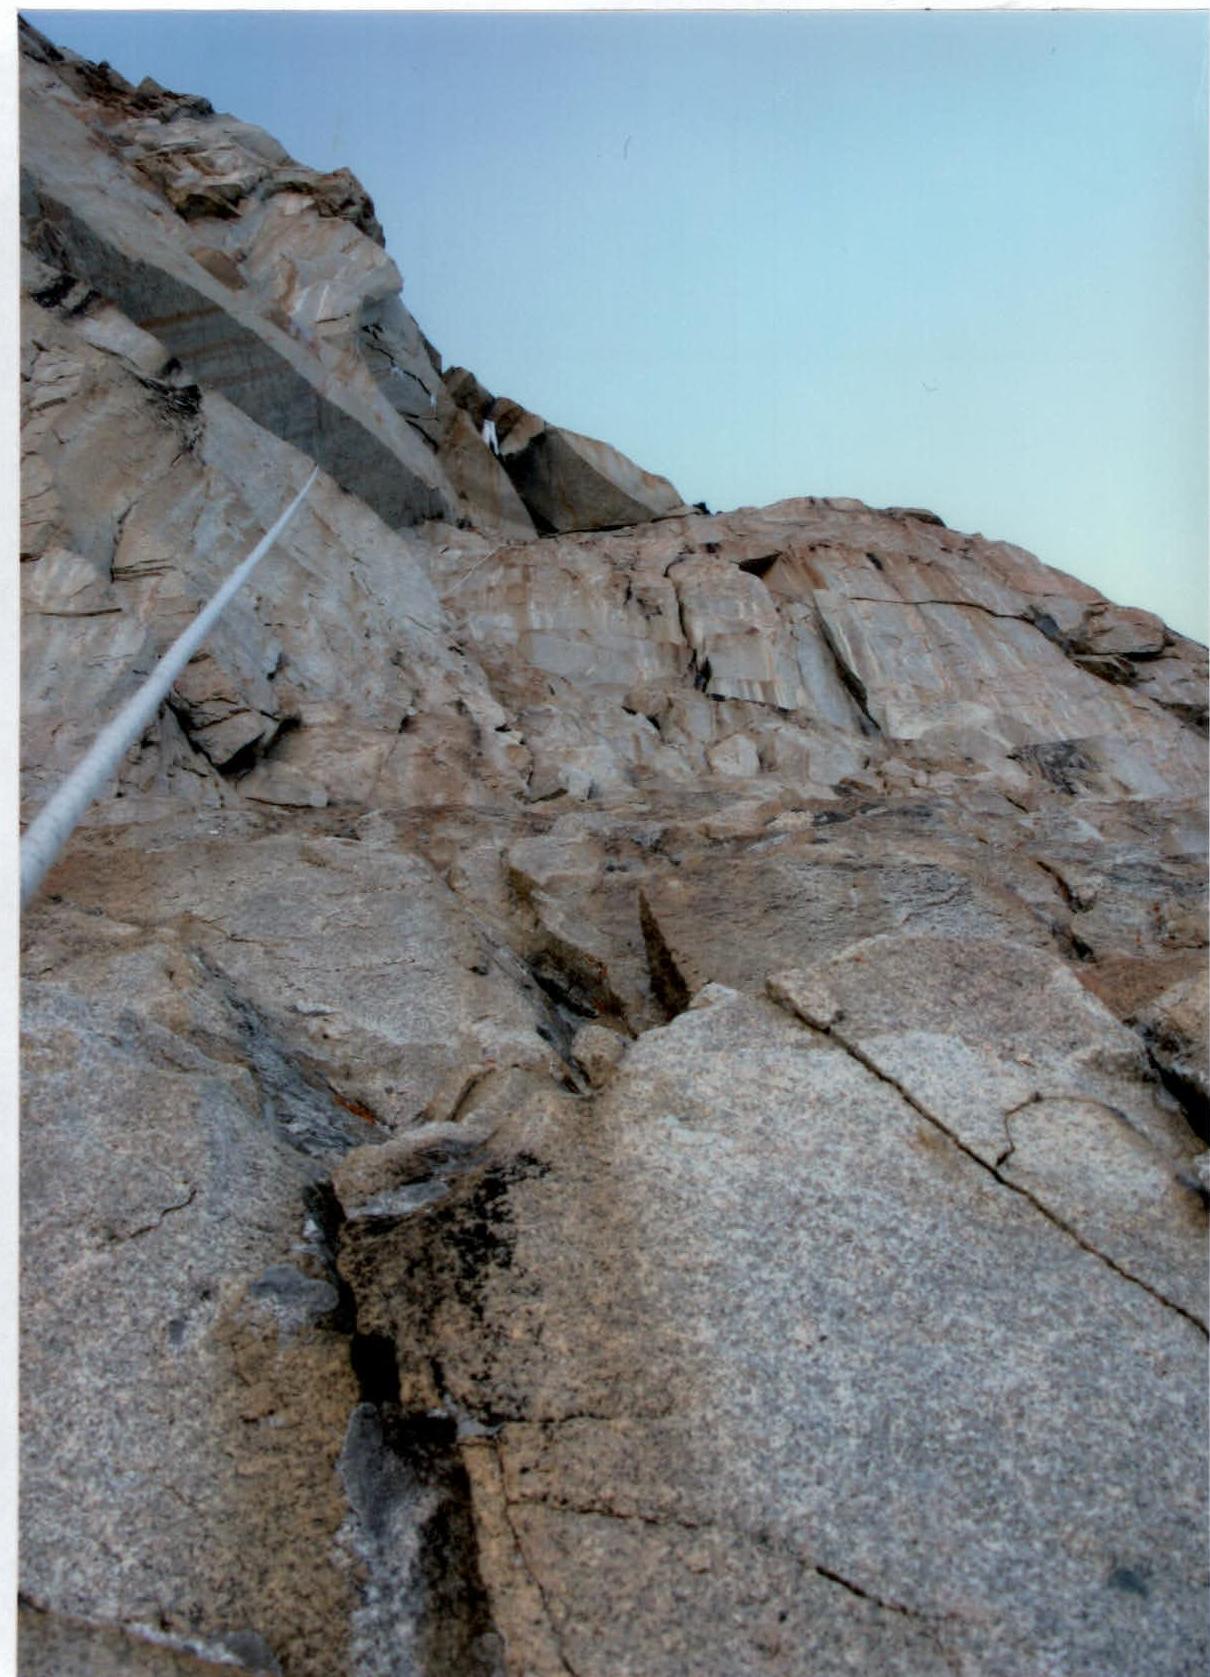 Photo #13. Section R11–R12
 Photo #14. Section R12–R13
 Photo #15. Section R13
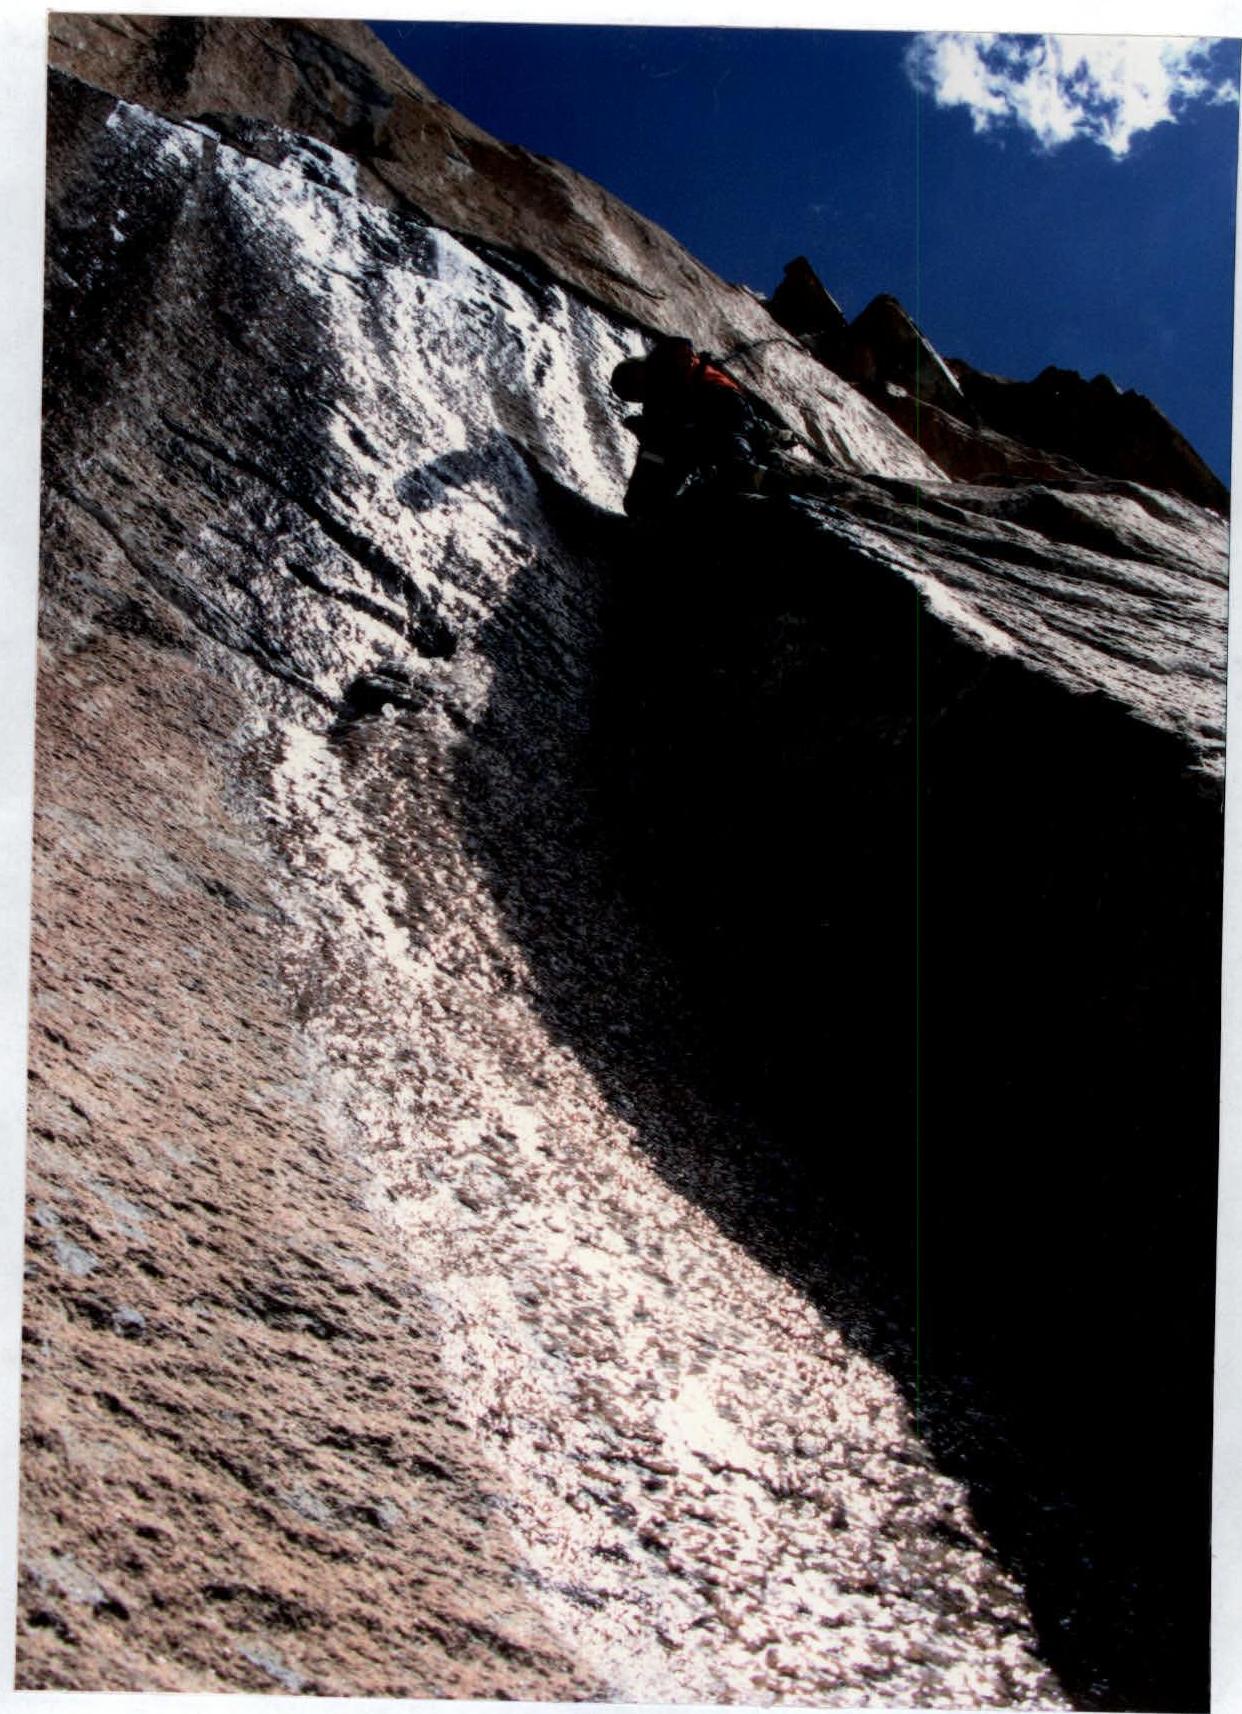 Photo #16. Section R13–R14
 Photo #17. Section R14–R15
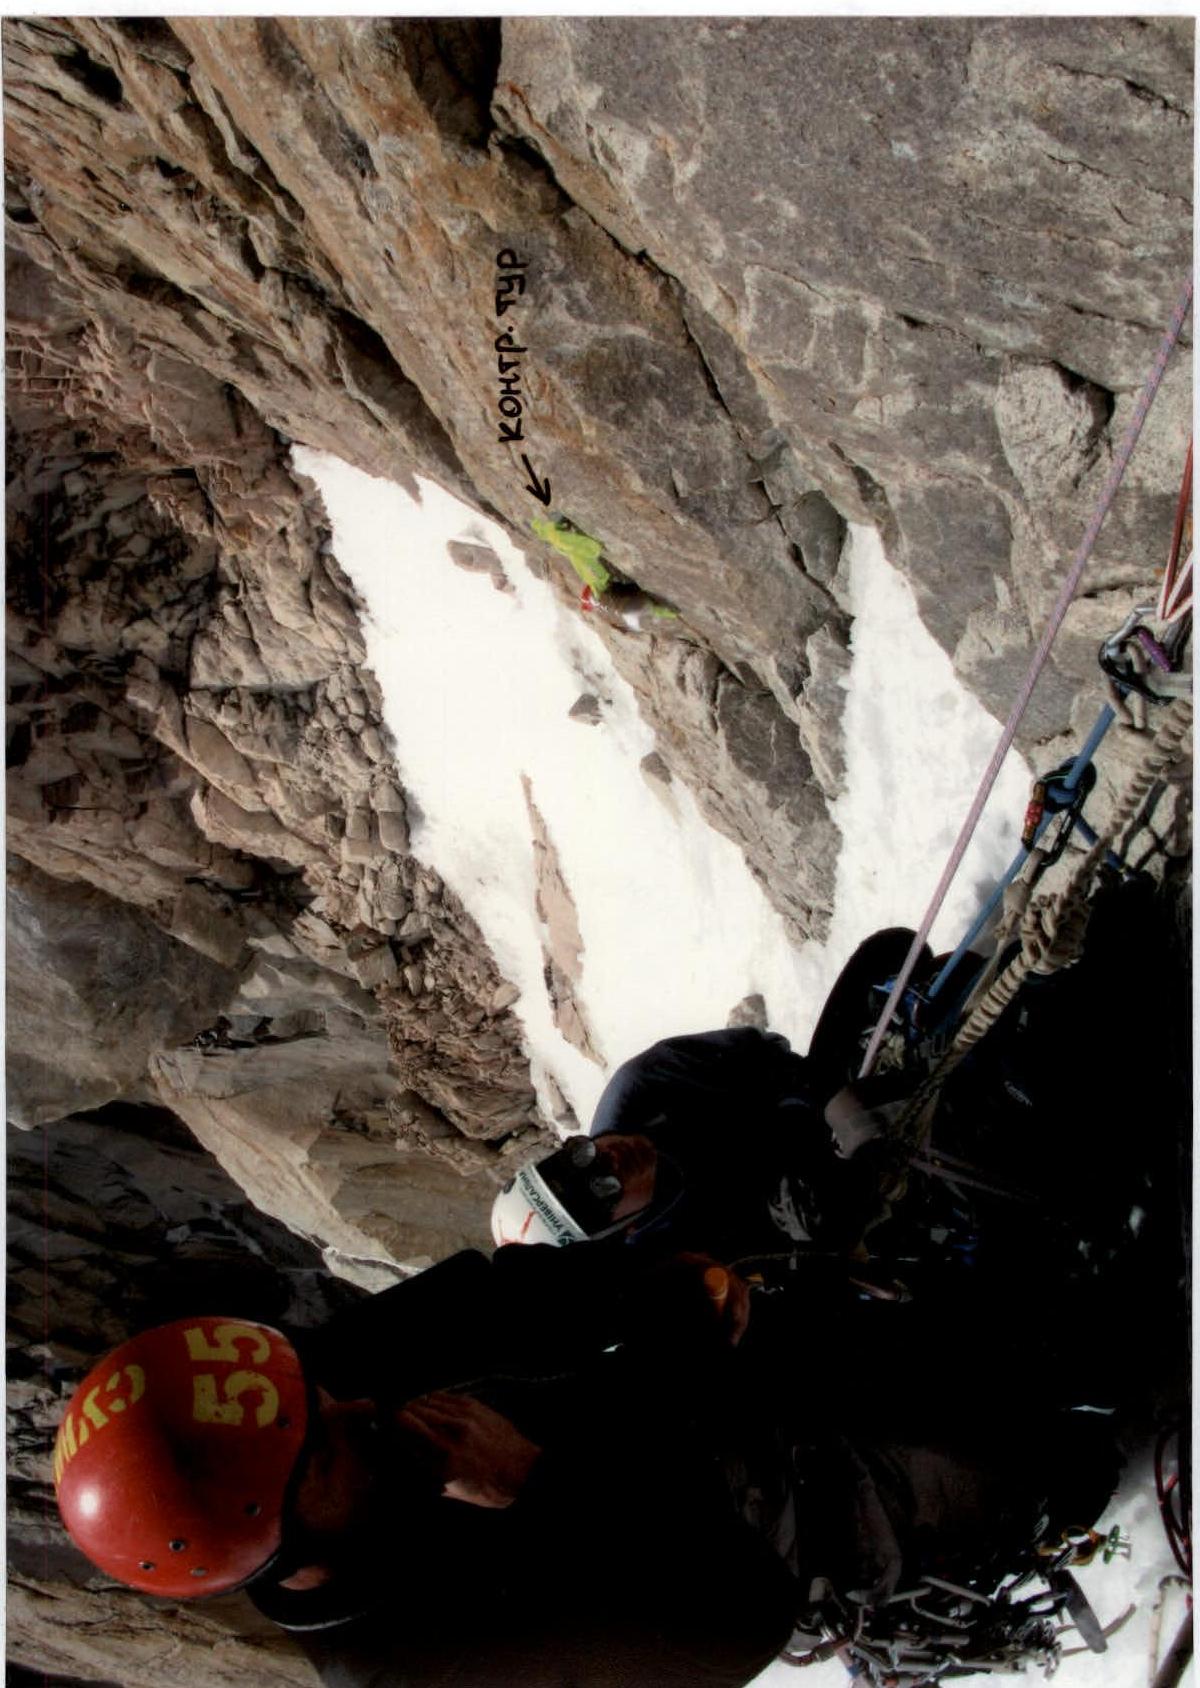 Photo #18. Section R16. Control turn
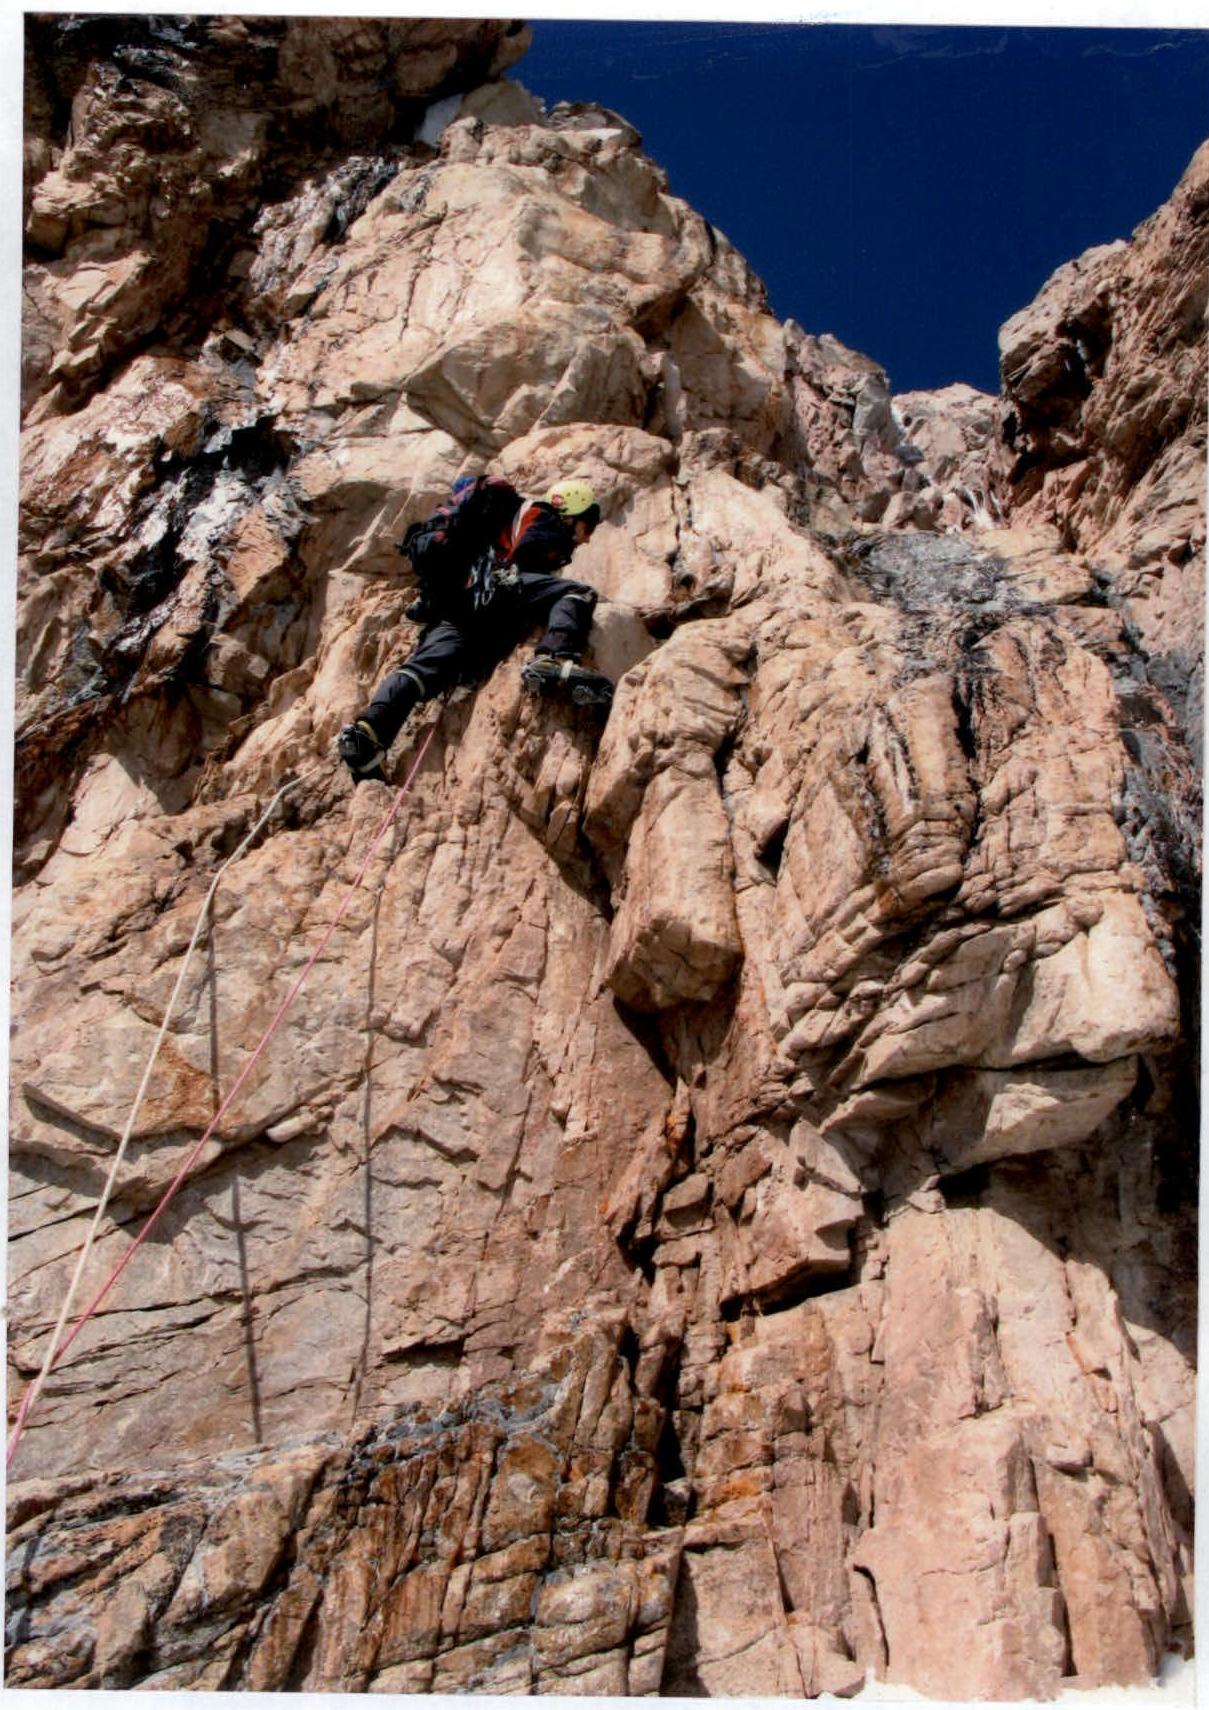 Photo #19. Section R16–R17