Report
On the ascent (first ascent) to the summit of Muldzugi-Barzond via the left part of the South Face, presumably category 3B, by the MAC "Freeline" climbing team from October 26, 2019, to October 27, 2019.
I. Ascent Passport
| № | 1. General Information | |
|---|---|---|
| 1.1 | Full name, sports rank of the leader | Semyonova Olesya Artyomovna, 1st sports rank, instructor 3rd category |
| 1.2 | Full name, sports rank of participants | Otkidichev Pavel Anatolyevich, 3rd sports rank, Shchedrin Georgy Alexandrovich, 2nd sports rank |
| 1.3 | Full name, sports rank of observer | Skripchenkova Elena Valeryevna, "znakchist" |
| 1.4 | Full name of coach | Motienko Nikolai Ilyich, instructor 1st category |
| 1.5 | Organization | MAC "Freeline" |
| 2. Characteristics of the ascent object | ||
| 2.1 | Region | Caucasus, from Gezevcek pass to Gurdzyvcek pass |
| 2.2 | Valley | Uruh valley |
| 2.3 | Section number according to the 2013 classification table | 2.6 |
| 2.4 | Name and height of the summit | Muldzugi-Barzond 3064 m |
| 3. Characteristics of the route | ||
| 3.1 | Route name | Left part of the South Face |
| 3.2 | Proposed category of difficulty | 3B |
| 3.3 | Degree of route development | First ascent |
| 3.4 | Relief characteristics of the route | Rock |
| 3.5 | Height difference of the route (altimeter or GPS data) | 260 m |
| 3.6 | Route length (in meters) | 440 m |
| 3.7 | Technical elements of the route (total length of sections with different categories of difficulty and relief characteristics) | 1st cat. rock — 20 m 2nd cat. rock — 180 m 3rd cat. rock — 180 m 4th cat. rock — 45 m 5th cat. rock — 15 m |
| 3.8 | Descent from the summit | Via route 1B |
| 3.9 | Additional route characteristics | No water |
| 4. Characteristics of team actions | ||
| 4.1 | Travel time | 6 hours 30 minutes |
| 4.2 | Overnight stays | At the kosh |
| 4.3 | Start of the route | 07:15 27.10.2019 |
| 4.4 | Summit attainment | 13:45 27.10.2019 |
| 4.5 | Return to base camp | 15:15 27.10.2019 |
| 5. Responsible for the report | ||
| 5.1 | Full name, e-mail | Otkidichev P.A., otkid@list.ru |
II. Ascent Description
1. Characteristics of the Ascent Object
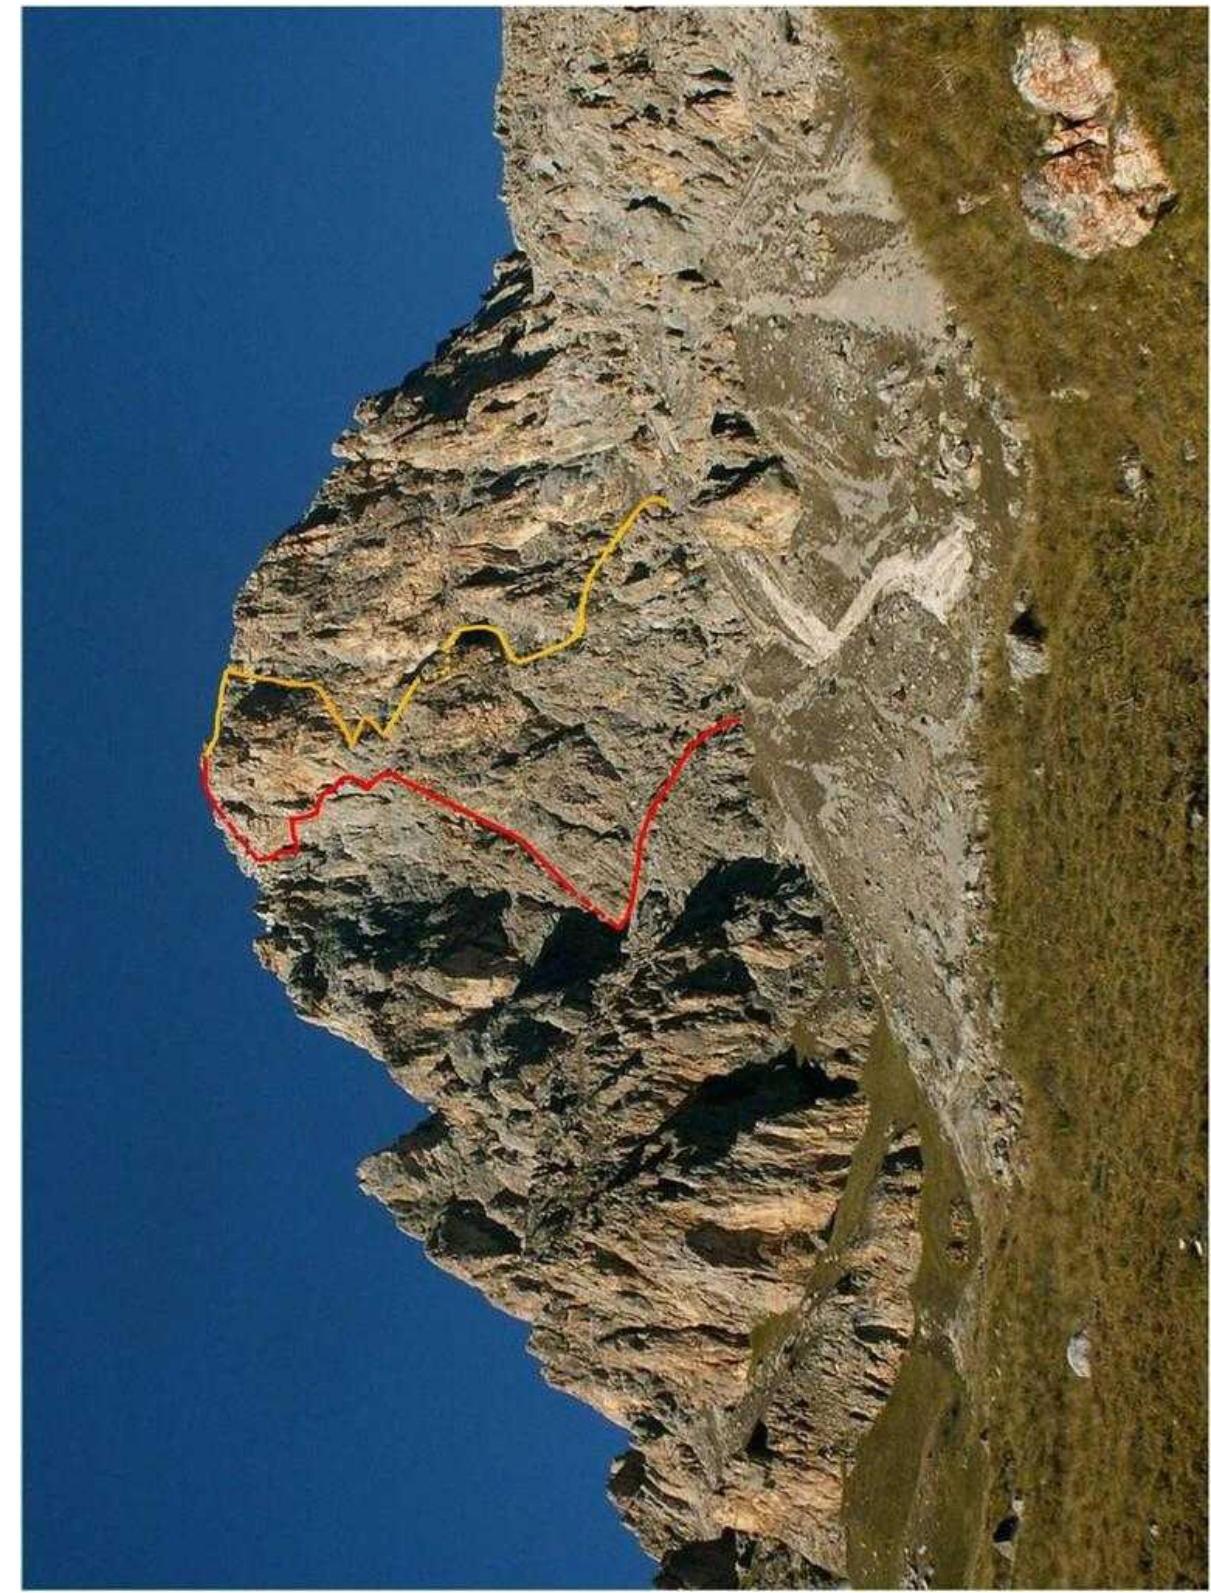
1.1. General photo of the summit taken from the south on October 1, 2016. The shooting location is the kosh. The orange line indicates the 3B route (Popov, 2019). Routes 1B (Egorin, 2003) and 2B (Levkovsky, 2002) are shown on the summit profile photographs.
 1.2. Photo of the route profile from the left. Taken on September 30, 2018, from the west, shooting location — the summit of Eastern Meshchany (Saldarikhokh). The green line indicates the descent path (coincides with route 1B to the saddle).
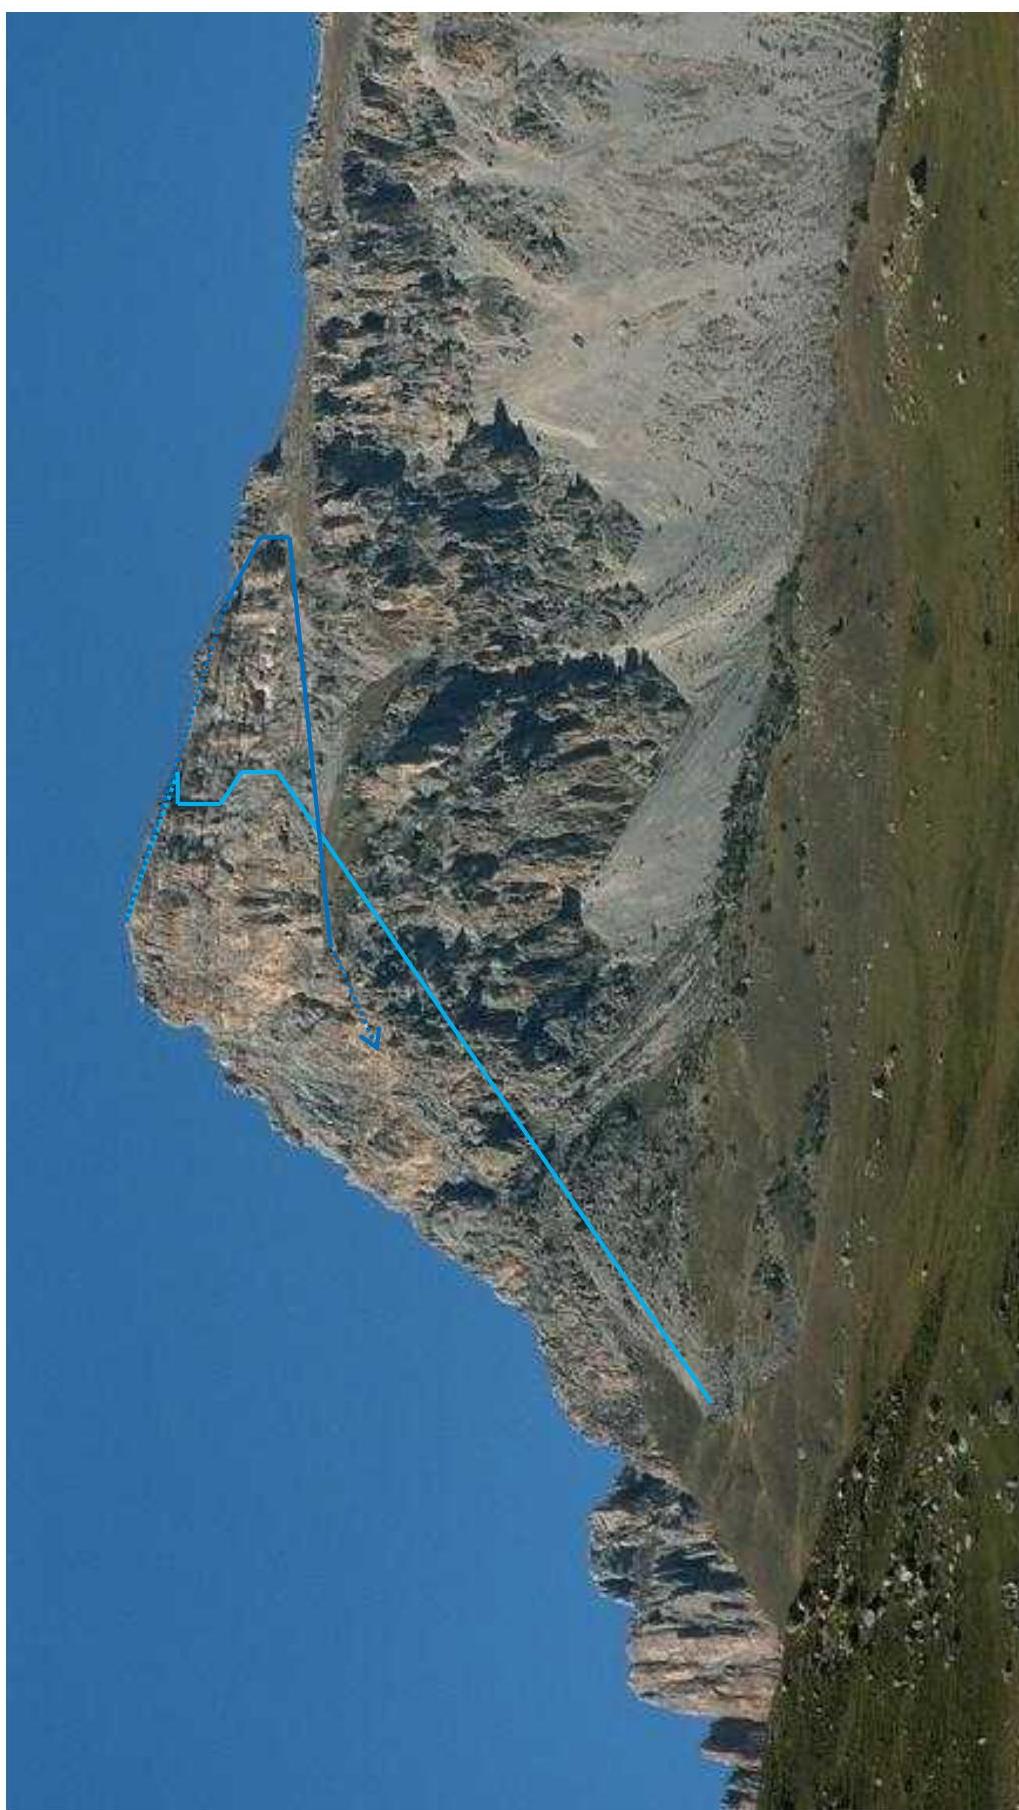
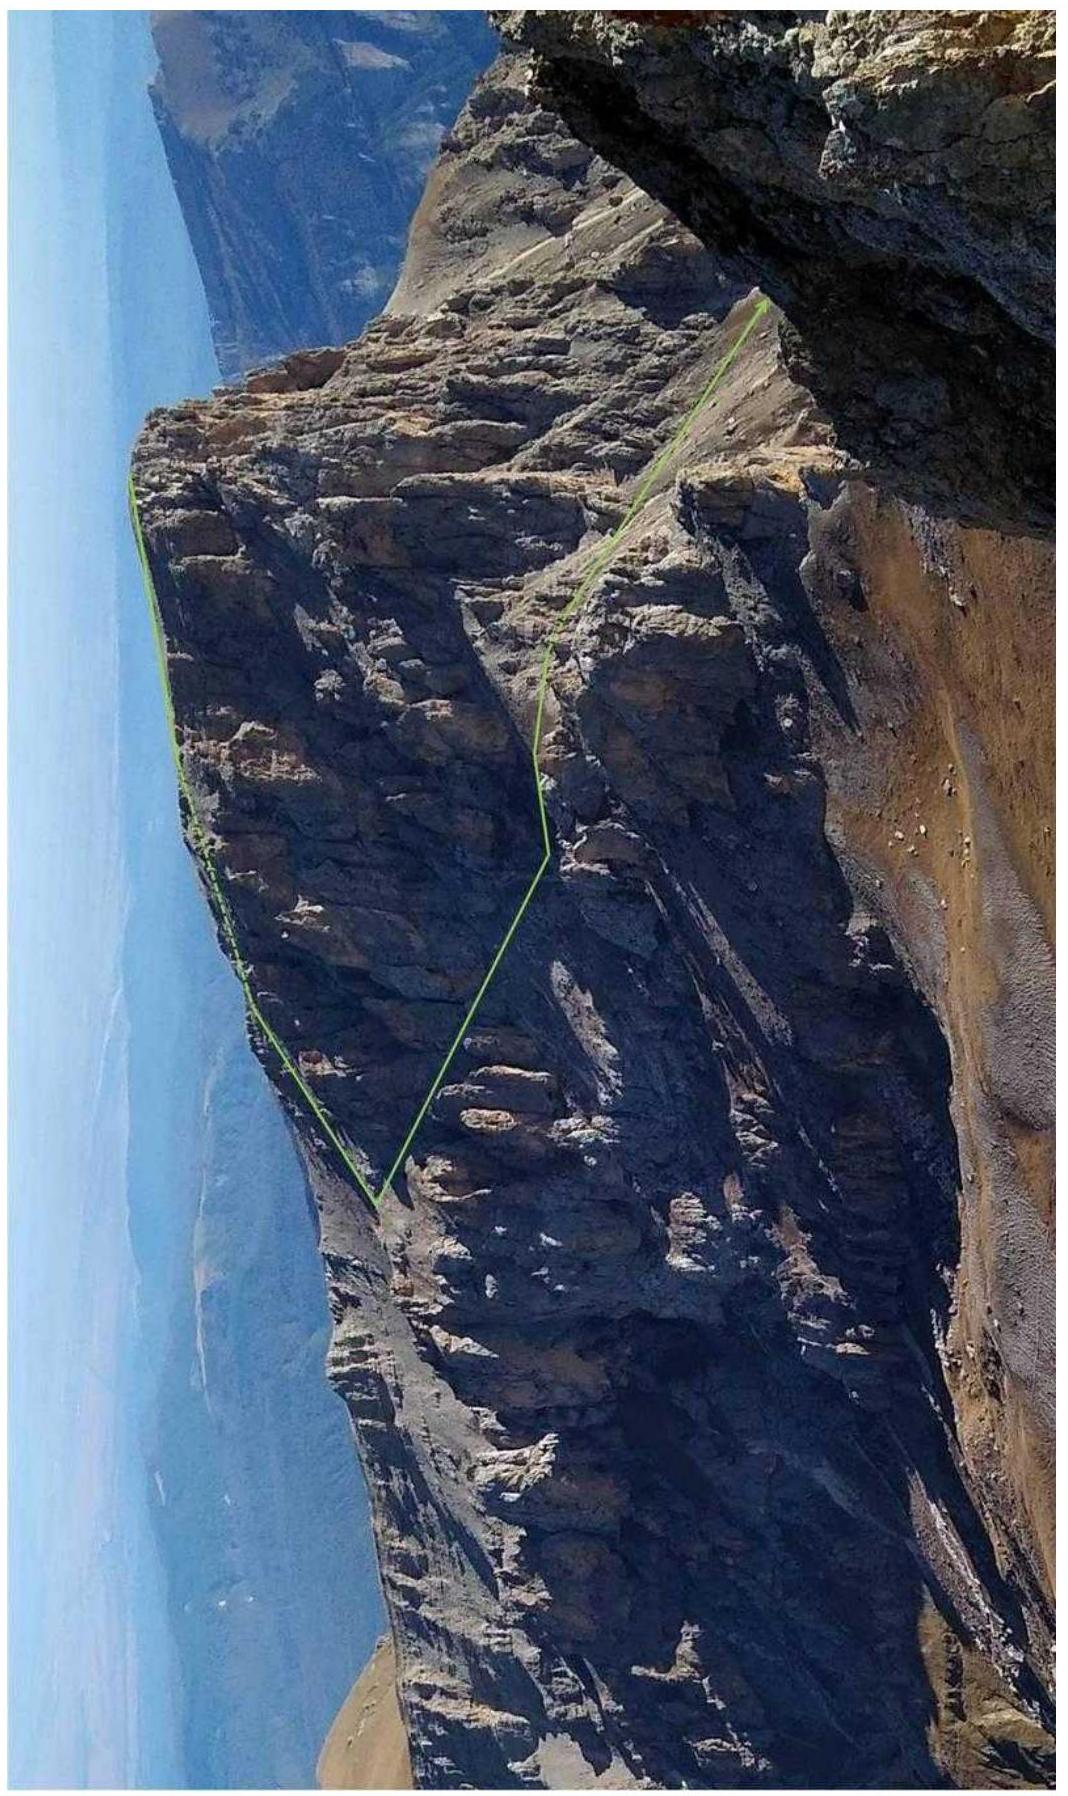 Photo of the route profile from the right. Taken on October 1, 2016, from the east, shooting location — the road near the first kosh. The blue line indicates route 2B (schematic), the blue line — a possible descent option.
 1.3. Photopanorama of the area. Taken from caucatalog.narod.ru, photo by Mikhail Goluchev on January 4, 2011, on the approach to the summit of Uazakhokh.

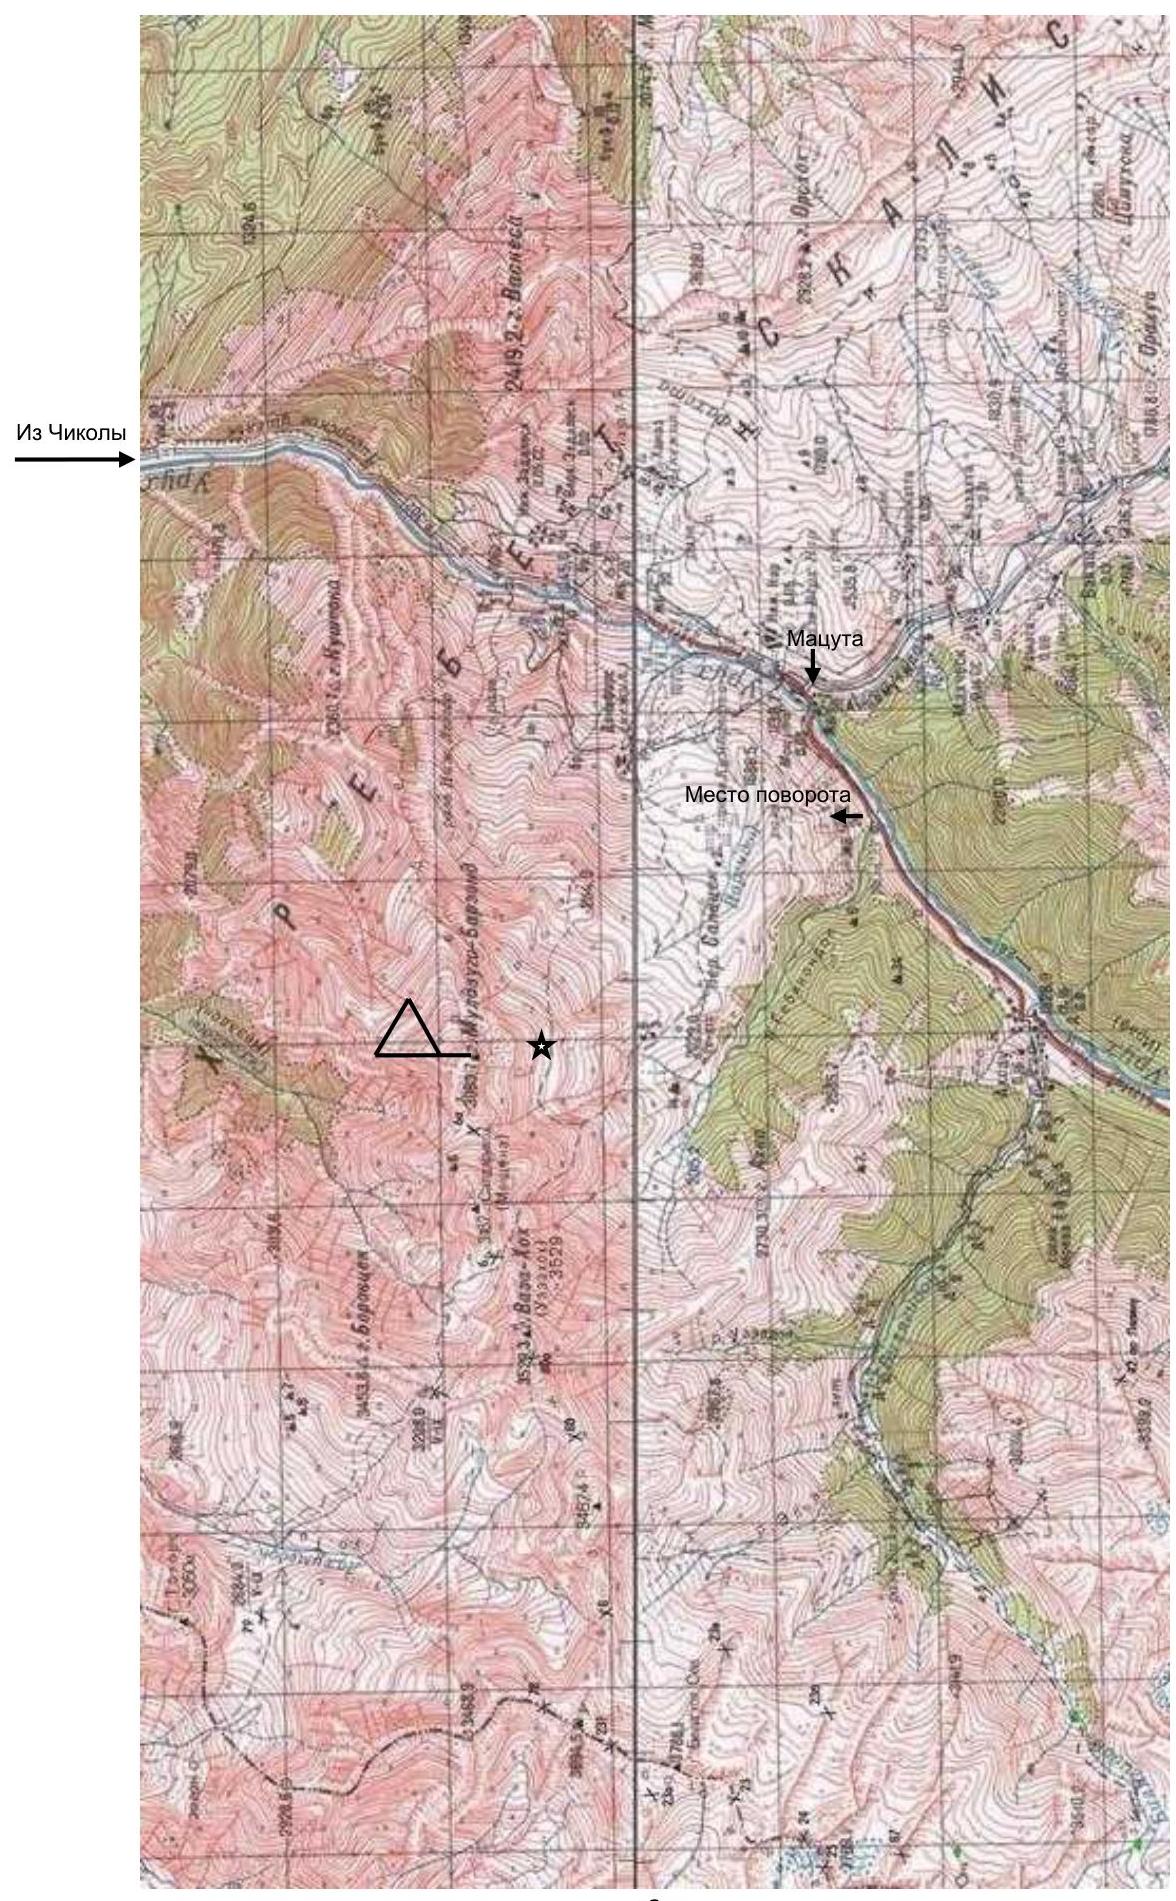
1.4. Map of the area. Taken from caucatalog.narod.ru, author Mikhail Goluchev. Grid size 2 km. The kosh is marked with an asterisk. The road to it is not shown.
1.3. Photopanorama of the area. Taken from caucatalog.narod.ru, photo by Mikhail Goluchev on January 4, 2011, on the approach to the summit of Uazakhokh.

1.4. Map of the area. Taken from caucatalog.narod.ru, author Mikhail Goluchev. Grid size 2 km. The kosh is marked with an asterisk. The road to it is not shown.
 Ascent object map. The kosh is marked with an asterisk. Screenshot taken in the ViewRanger app.

Brief Description of the Ascent Area
Muldzugi-Barzond is part of the Rocky Ridge system of the Greater Caucasus (Republic of North Ossetia, Irafsky district).
The path to the summit goes through the Uruh river valley. Turn right 2 km after the village of Matsuta. From the fork to the last (3rd) kosh — 45 minutes by SUV.
The kosh is located directly under the mountain (marked in OsmAnd). There is a spring, but it's better to bring water.
At the kosh:
- four beds
- convenient places for tents.
The kosh serves as a base camp. Its coordinates are 43.0112° N, 43.7169° E, height 2480 m. Mobile connection (Megafon) is available in the area but not stable. Registration with the Ministry of Emergency Situations by phone: 8 928 492-09-62.
No passes are required.
2. Route Characteristics
2.1. Technical photograph of the route.
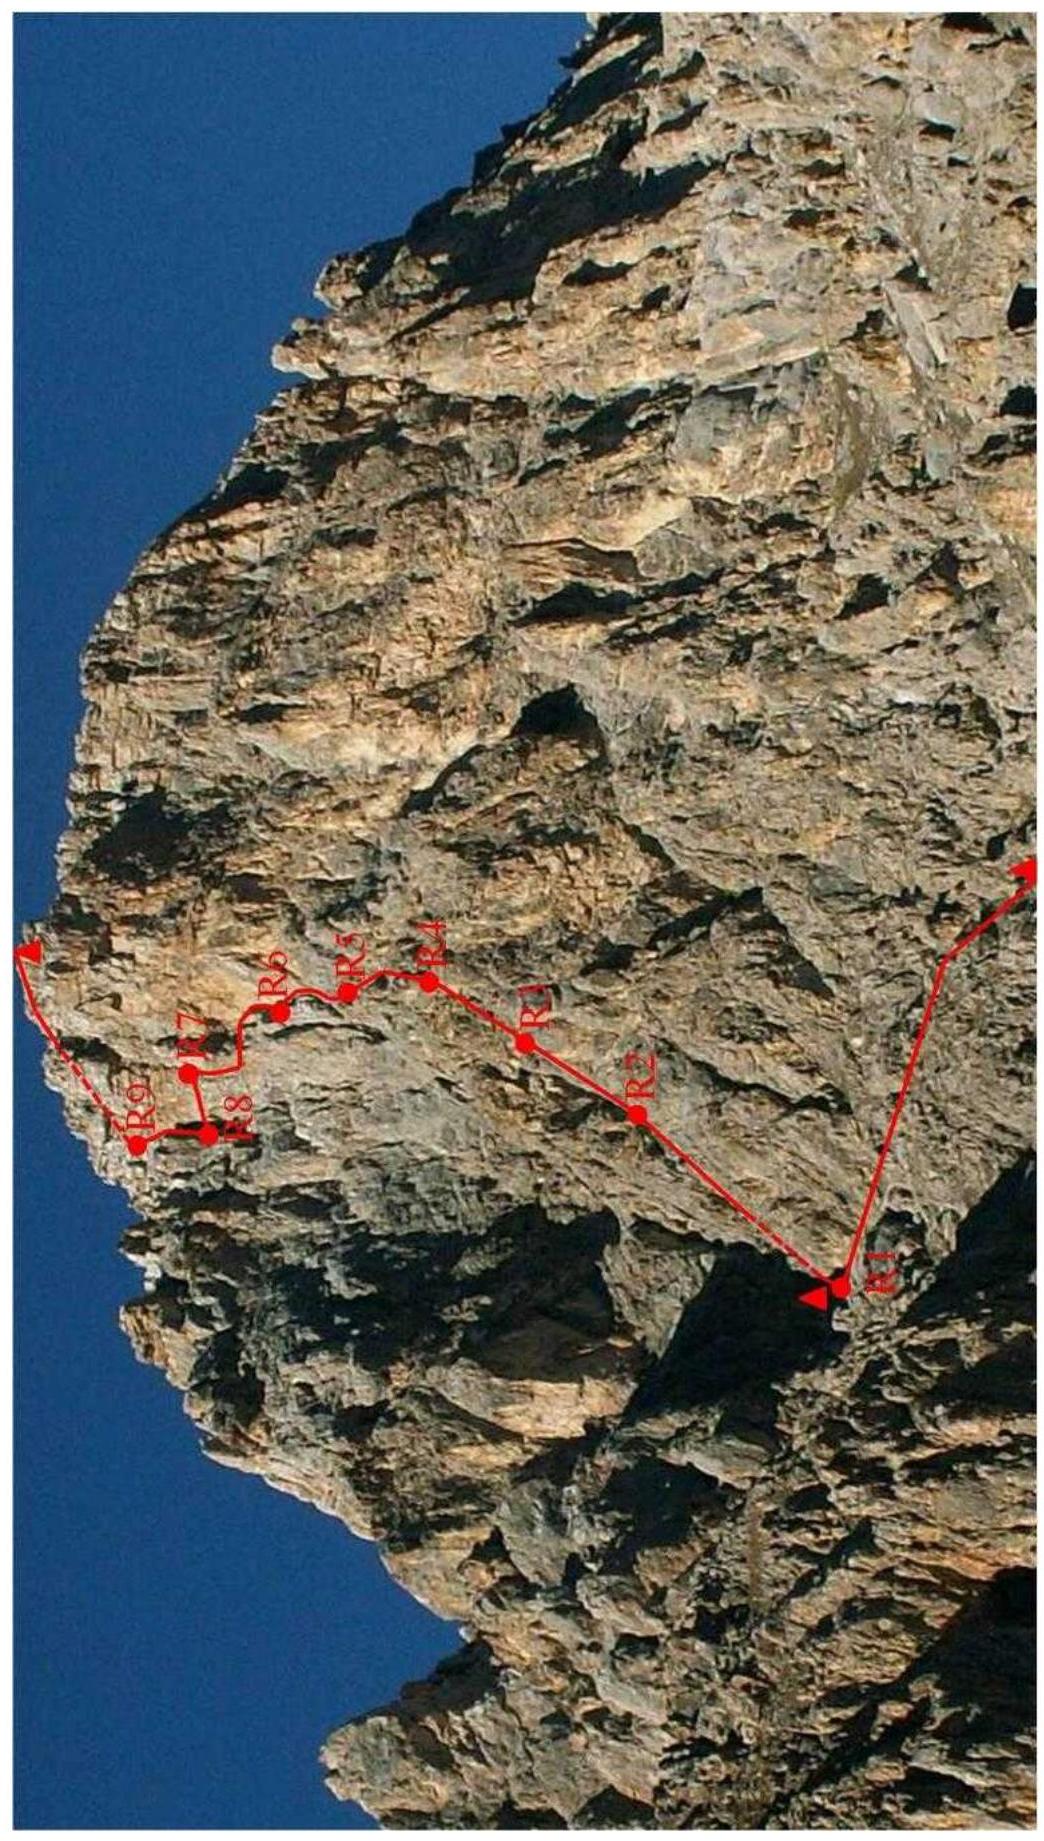
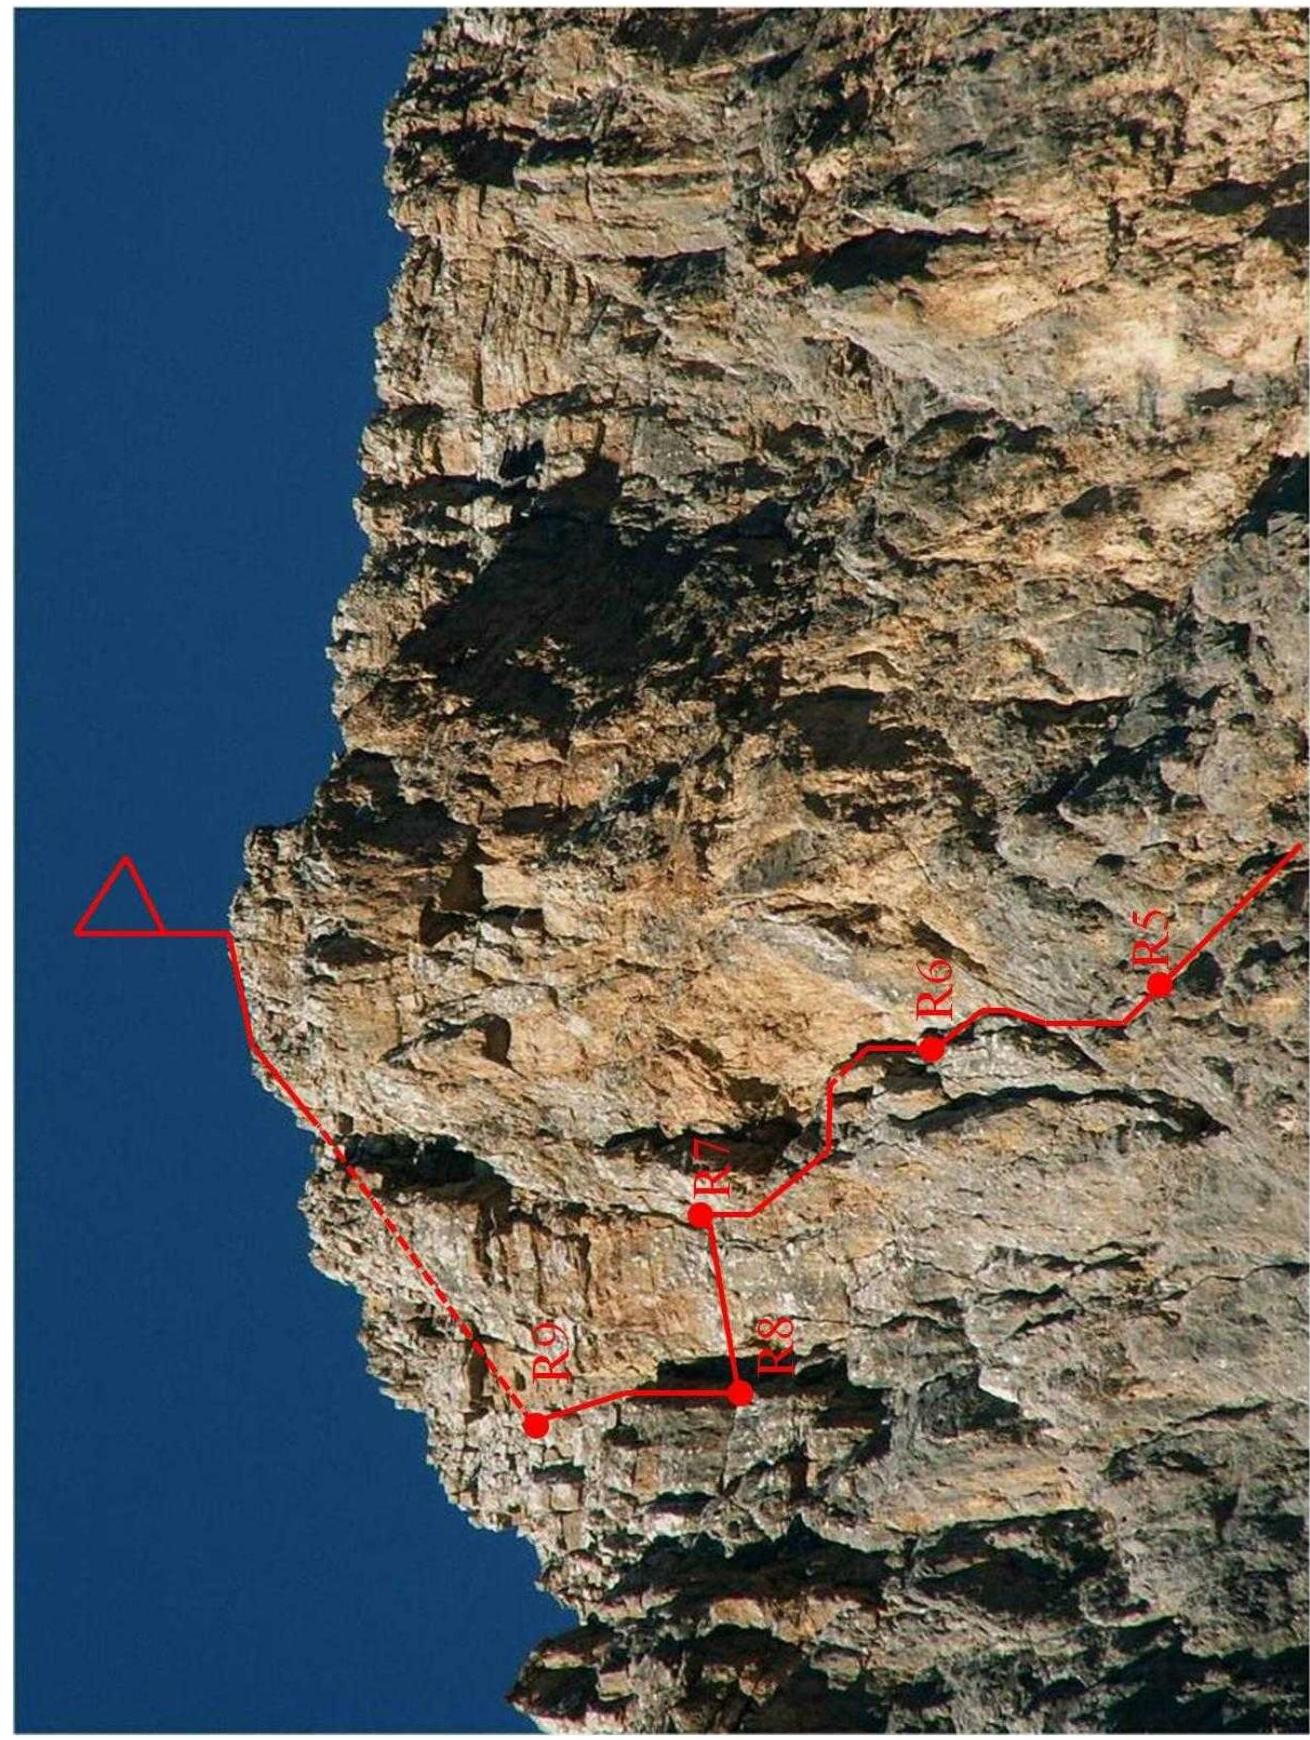
Upper part of the route.
2.2. Technical Characteristics of Route Sections.

3. Characteristics of Team Actions
The start of the route is visible from the kosh. It's located at the "ram's foreheads" approximately in the middle between the large rock gully with white streaks and a very long white scree.
The start involves:
- initially moving along a gentle grassy slope,
- then along a not very steep scree slope — 40 minutes.
A control cairn is assembled at the start of the route.
Coordinates 43.0168° N, 43.7195° E.
R0–R1. Move along the "ram's foreheads" left and up to a large gentle scree cirque. Another control cairn is located here. 70 m, 20–40°, 2–3. Simultaneous movement.
From the cirque to the middle of section R4–R5, the general direction is towards the huge overhang in the central part of the wall.
R1–R2. From the cirque, there's a fork between two gullies; take the right one, transitioning to its right edge as you move. The large "ram's forehead" at the end of the section is bypassed:
- 4 m to the right
- or straight through, 2 m, 5–
Exit to a horizontal grassy ledge. 40 m, 10–30°, 2; 30 m, 35–55°, 3–3+. Simultaneous movement.
R2–R3. Reach the edge, then cross it and move right and up towards the depression against the sky. Midway through the section, there's a difficult "ram's forehead". The station is slightly below and to the right of a gentle grassy area on friends (≈ 5–6 size, "Vertikal" scale used throughout).
- 20 m, 45–60°, 3–4
- 20 m, 20–40°, 2–3
R3–R4. Cross back to the edge and continue moving right and up. Bypass the "ram's forehead" at the end of the section counterclockwise (careful of drops). The station is on friends (≈ 8–9).
- 20 m, 40–50°, 3+
- 20 m, 10–20°, 2
R4–R5. Follow a simple broken gully first right and up, then left and up 30 m. The steepness gradually decreases towards the end of the gully.
- 30 m, 40→5°, 3→2
Here, exit to a gentle scree terrace.
Up a gentle wall (10 m, 30–40°, 3), exit to another scree area with rock outcrops. One of the outcrops has a station.
R5–R6. Move along the area to a sheer gray smooth wall (10 m, 20°, 2). Then, a complex traverse along the wall left towards a cleft. The relief is "Crimean": monolith, tiny holds, some "positive" features, good friction. About midway through the traverse, there's an opportunity to place a friend (≈ 6). The leader needs rock shoes. 5 m, 10°, 5. Then, exit up through the cleft. The left side of the cleft's lower part is an overhanging chip that looks unreliable; it's better not to load it but use tiny holds on the wall instead. A friend "10" was placed in the crack behind this chip (extend the sling here). The exit up is difficult. A psychological spot (sheer wall below). The backpack hinders. 5 m, 90°, 5. Then, the cleft transitions into a gentle scree groove. Follow the groove to the "ram's foreheads" (10 m, 30–40°, 3). One of the "ram's foreheads" has a station.
The last approximately 3 m of the traverse before the cleft and the first 3 m in the cleft are the key part of the route.
R6–R7. Here, the relief changes from gray and smooth to red and large-blocky. From the station, move right and up (9 m, 30–50°, 3) to a small chimney. From the chimney (4 m, 75°, 4), exit to a large scree ledge. From there, move left towards the edge with "hourglasses" on its nose (12 m, 10–20°, 2). Cross the edge to the left side. After this point, the partner's voice is not heard; communication was via mobile phone. Move up along the left face of the edge on reliable terrain. There's an opportunity to make protection points every 2 m. The station is at the wall on another set of "hourglasses". Exit to the station via a chip (body-sized movement). 15 m, 60–80°, 4+. There's a void below.
R7–R8. Immediately from the station, a very long chimney goes up. It seemed too complex for our route. To find a better exit, we traversed along the ledge left. There, we found another chimney. Unlike the previous one, it had a plug but was shorter and had more friendly terrain.
Climbing along the ledge is simple, but be cautious when crossing the inflection point; there are drops of about 200 m below. The station is in a niche left of the chimney with a plug, on friends (≈ 7–8).
- 20 m
- 0°
- 2–3
R8–R9. Warning! The belayer must be in the niche on this section. Climbing the chimney is tense, especially at the beginning and when exiting through the plug. 10 m, 80–90°, 4–5. The chimney is relatively wide; the terrain is large, but there are many loose stones; holds can break off. After the chimney, exit to a small inclined scree, which pours down by itself. Then, along the scree (15 m, 10–20°, 2), followed by "ram's foreheads" (15 m, 30–40°, 3) to a small cleft going right and up. To the right of it is a boulder with a cornice. The station is on a chip under the cleft.
R9–R10. Through the cleft, exit to an internal corner. Bypass the large boulder above to the right, then veer further right. The terrain is very destroyed, with many ledges. The difficulty of the rocks gradually decreases until reaching the summit plateau.
- 30 m, 60→10°, 4→2. This section is done simultaneously; the second climber starts moving after the leader reaches the plateau.
- The summit cairn is to the right. 20 m, 0°, 1.
On the summit, we found a note from a group of climbers from the "Freeline" club (Konstantinov + 2), who completed the ascent (second ascent) on June 23, 2019, via the center of the South Face, category 3B.
The descent was made via route 1B. From the summit, move approximately 250 m north along a gentle slope, then gradually veer left from the slope onto scree. After descending along the scree (another approximately 250 m), turn south and continue for about 500 m along the wall on small scree; in some places, a trail is trodden. Before the saddle, there's a small ascent. From the saddle, the kosh is visible; from here, move:
- down a steep small scree to the right of the rocks,
- then along a gentle grassy slope straight to the kosh.
Another descent option (likely simpler): from the control cairn, move northeast along the edge of the cliff for about 250 m, then, as soon as the drops end, sharply veer right and continue southwest along the wall, traversing with a slight loss of height for another 250 m, and exit to a large terrace of section R4–R5 of route 2B. From there, glacier down along the small scree. After about 200 m, you'll find the start of route 3B — a grotto with a control cairn, and another 50 m further, the start of the present route.
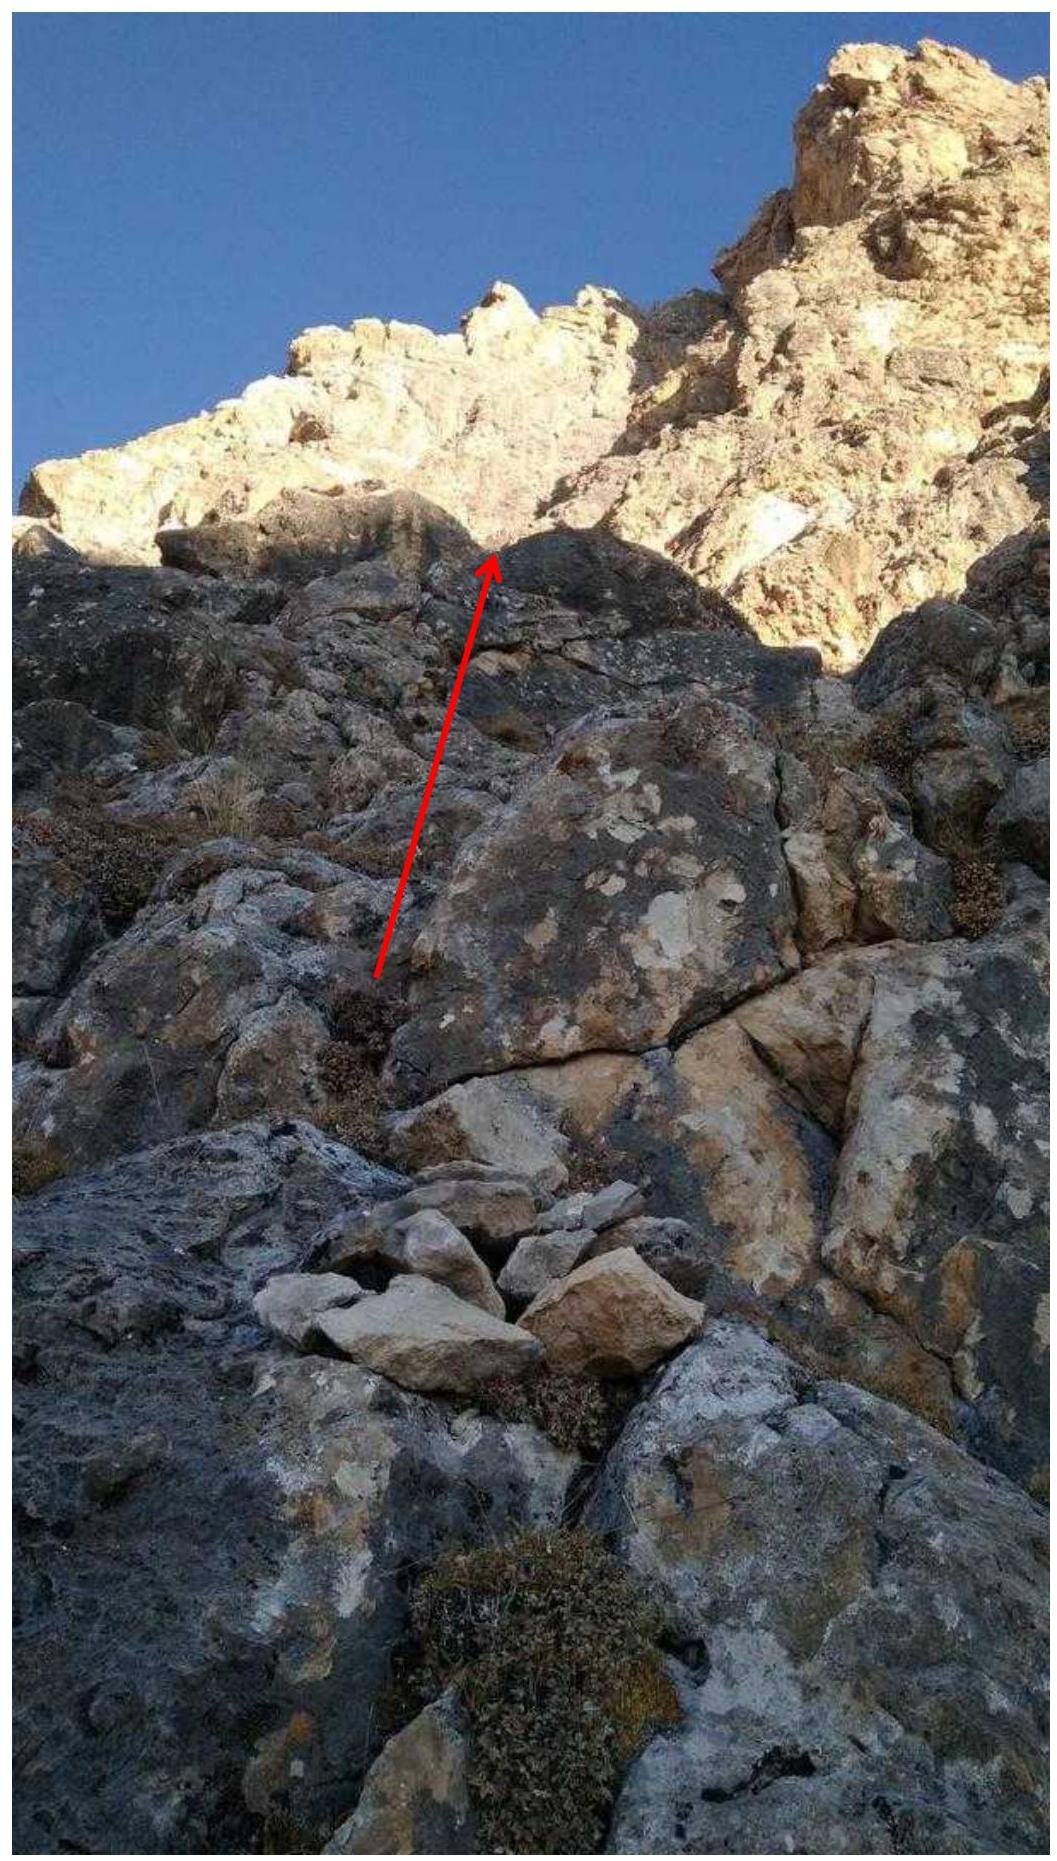
Fig. 1. Control cairn and start of the route.
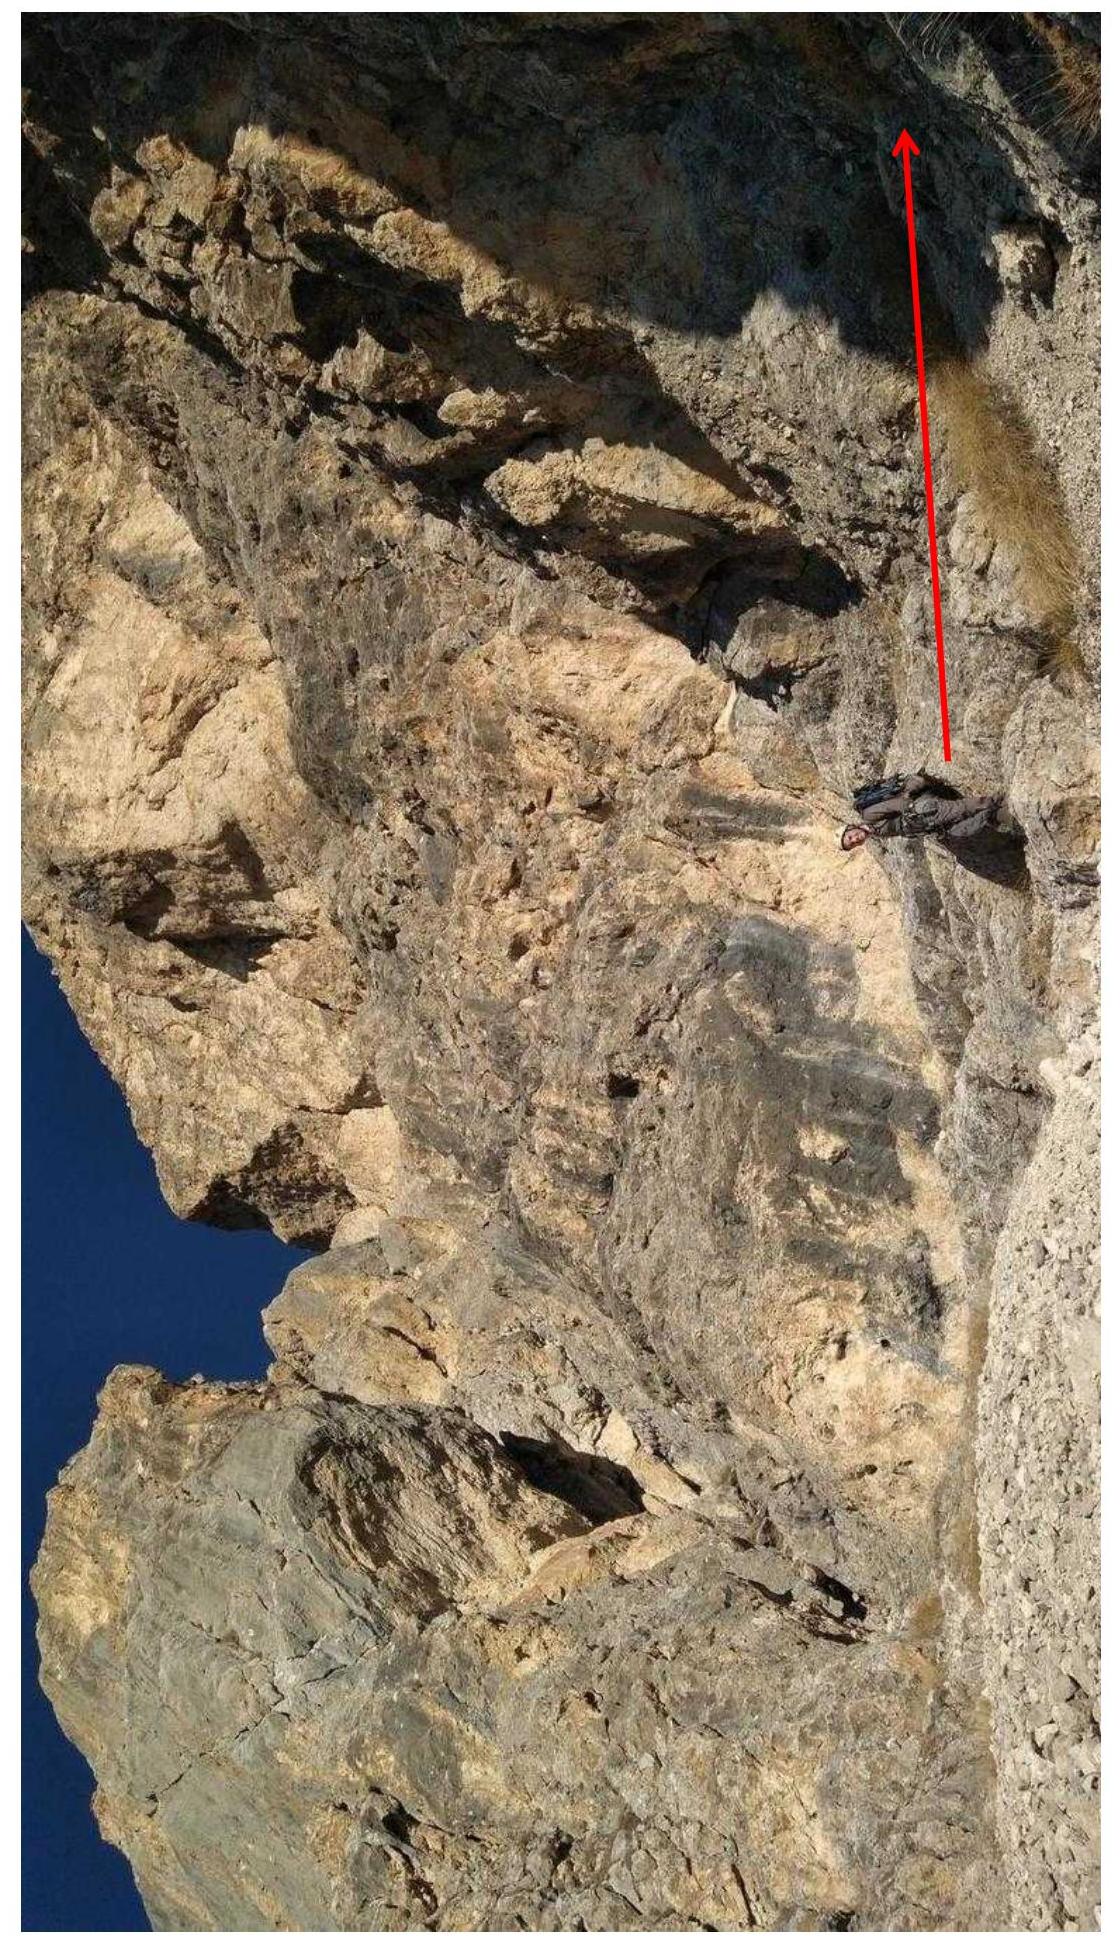
Fig. 2. Scree cirque at the start of section R1–R2.
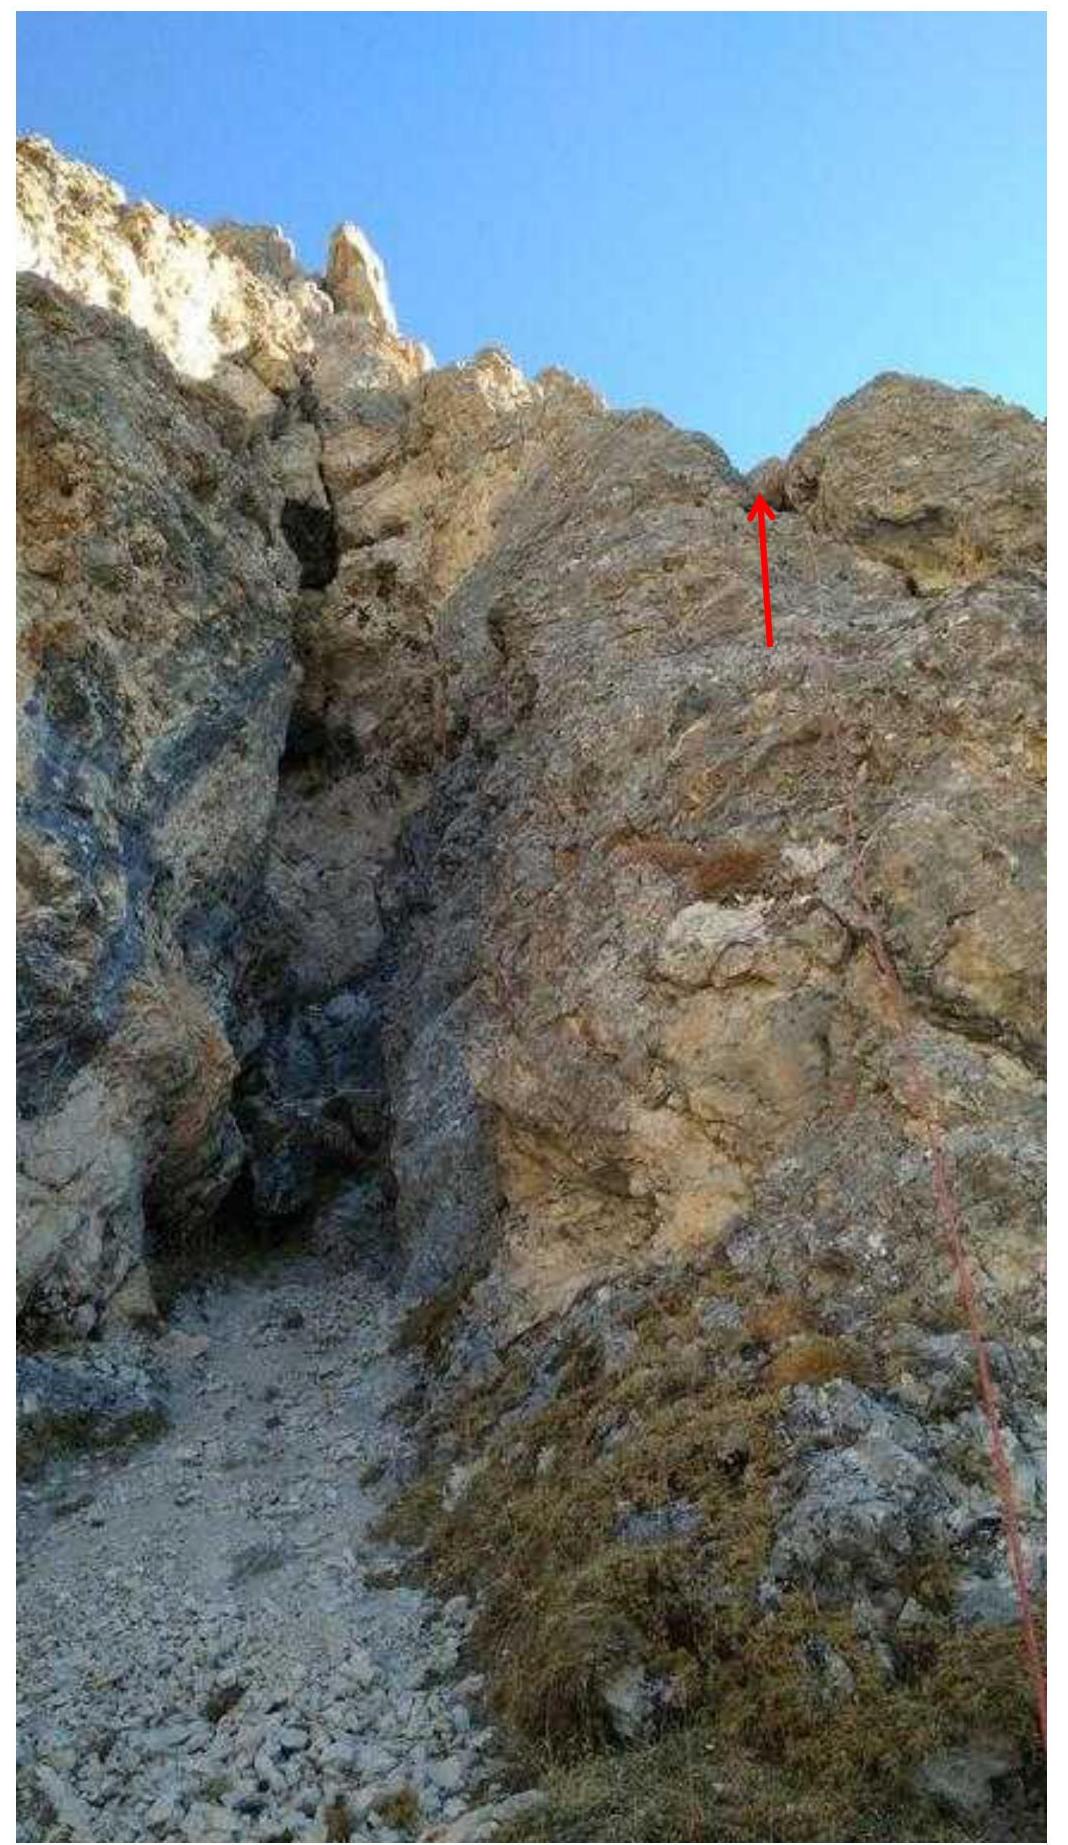
Fig. 3. Start of section R2–R3. Move right and up along the rope line.
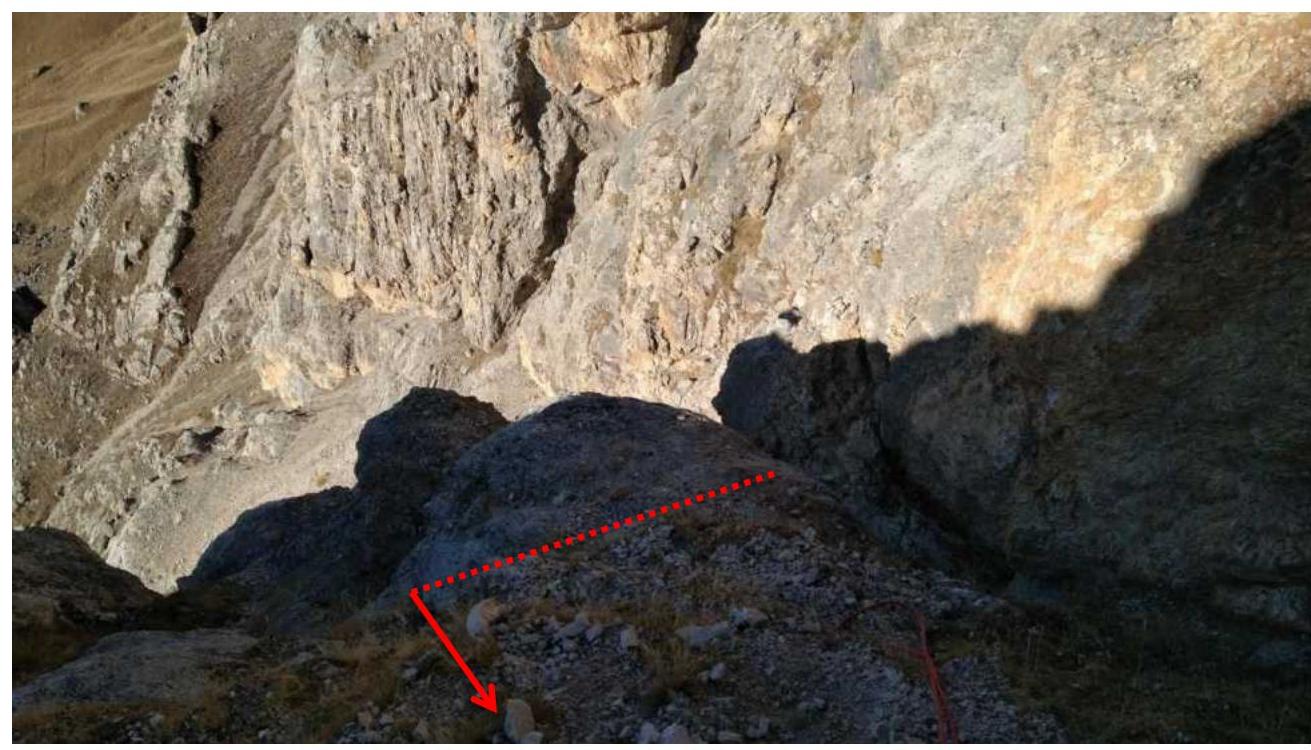
Fig. 4. View down from the start of section R2–R3.
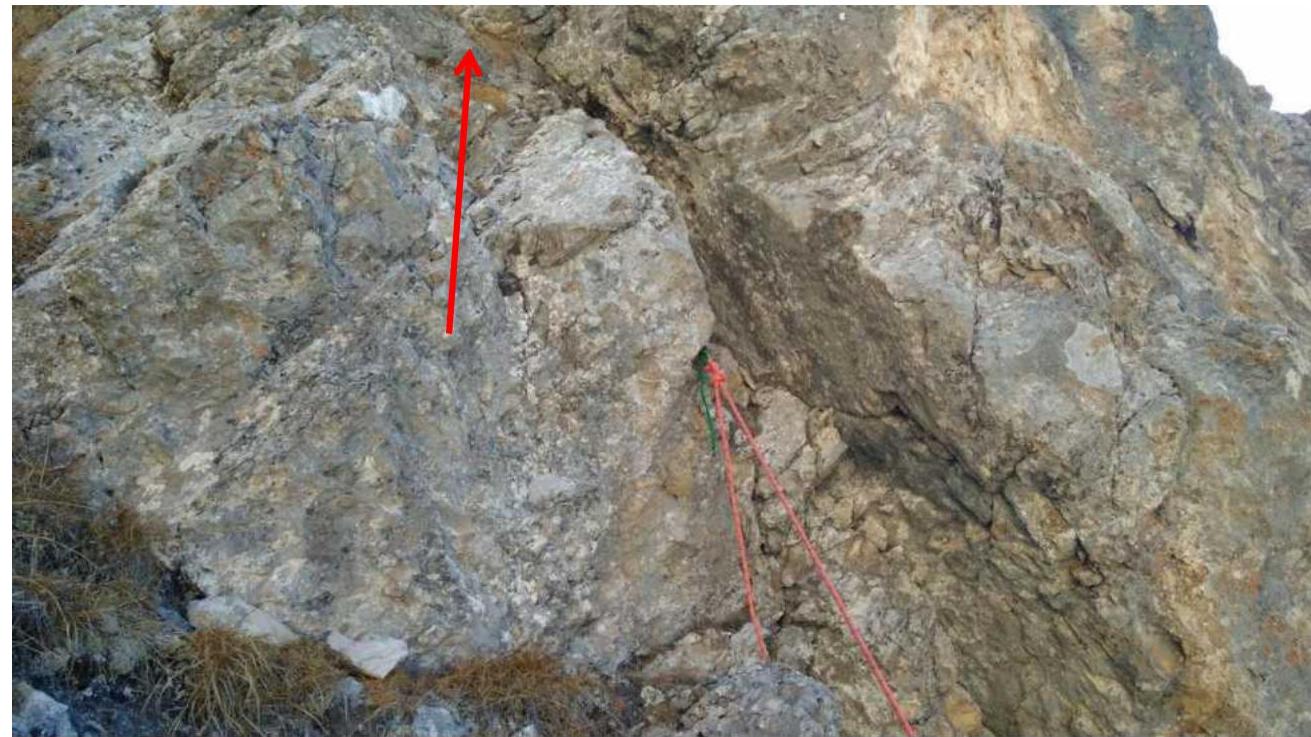
Fig. 5. Station R3.

Fig. 6. Start of section R3–R4.
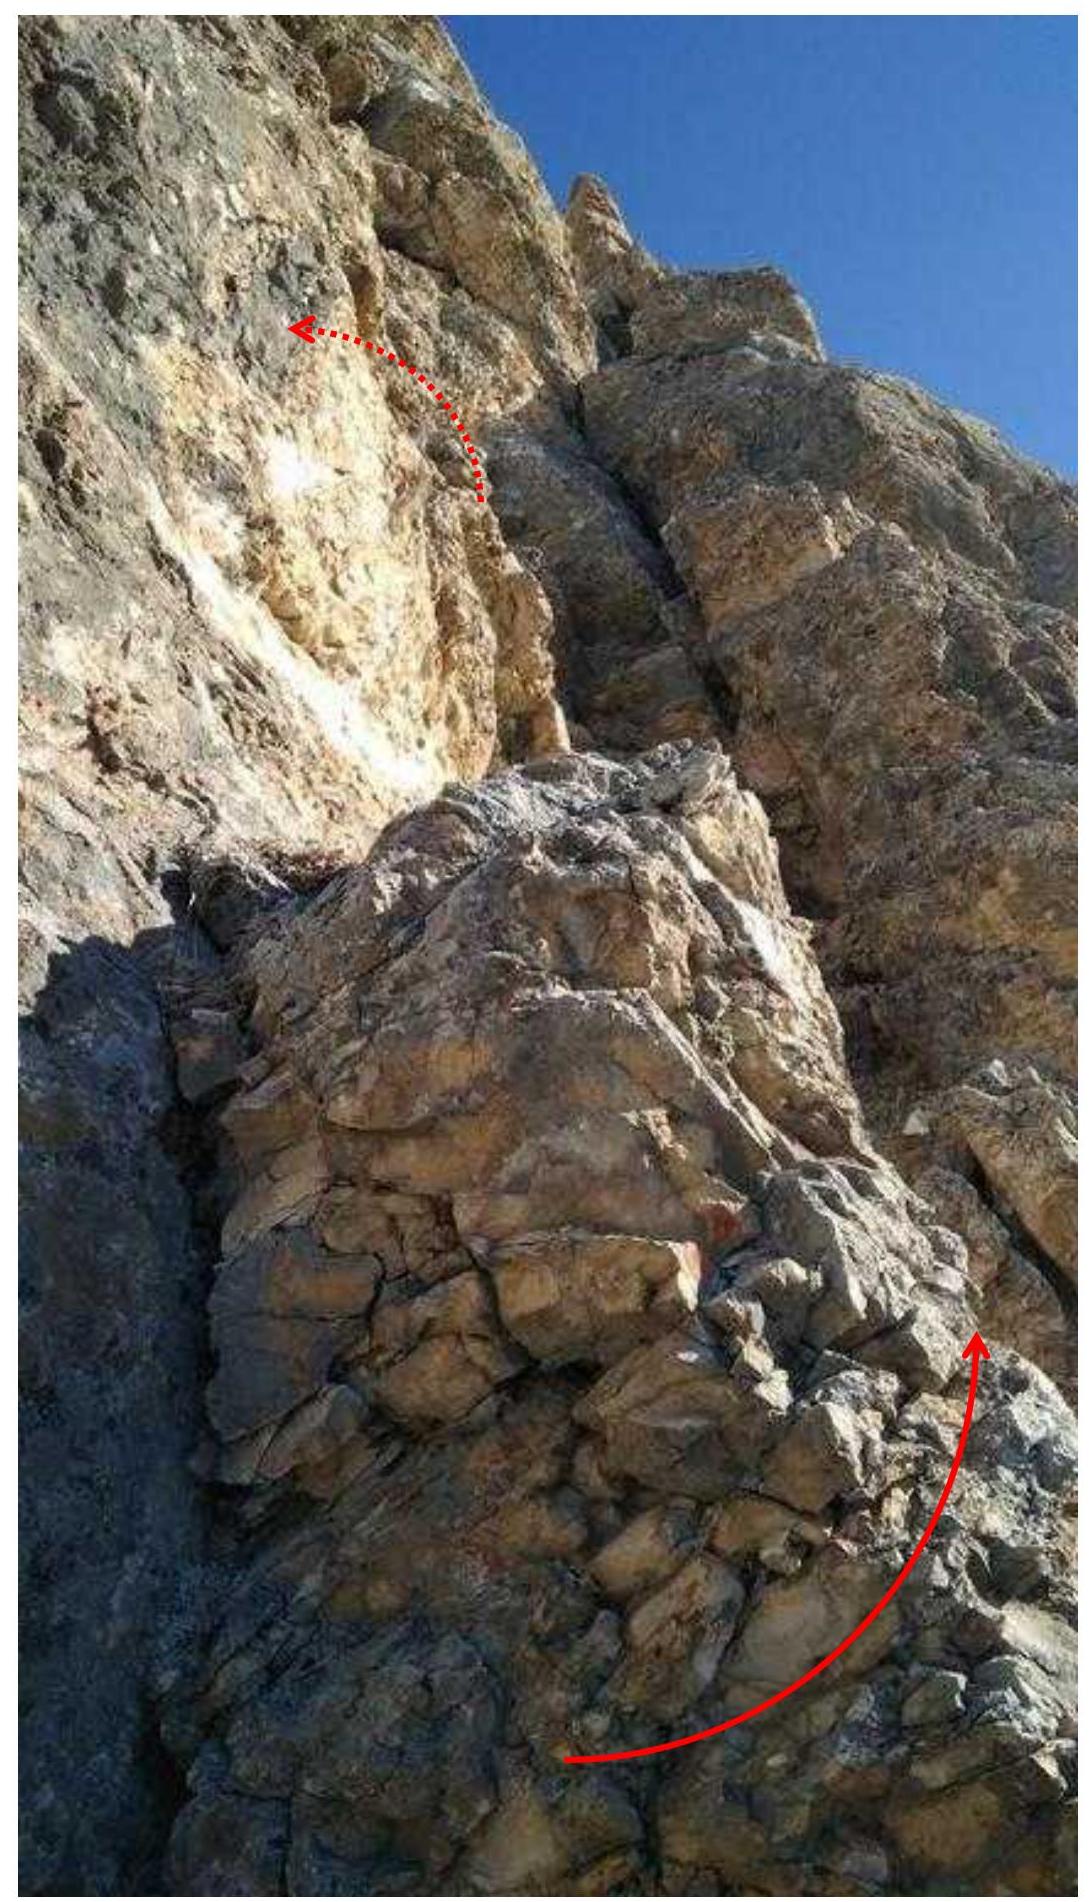
Fig. 7. Start of section R4–R5 (station on the left).
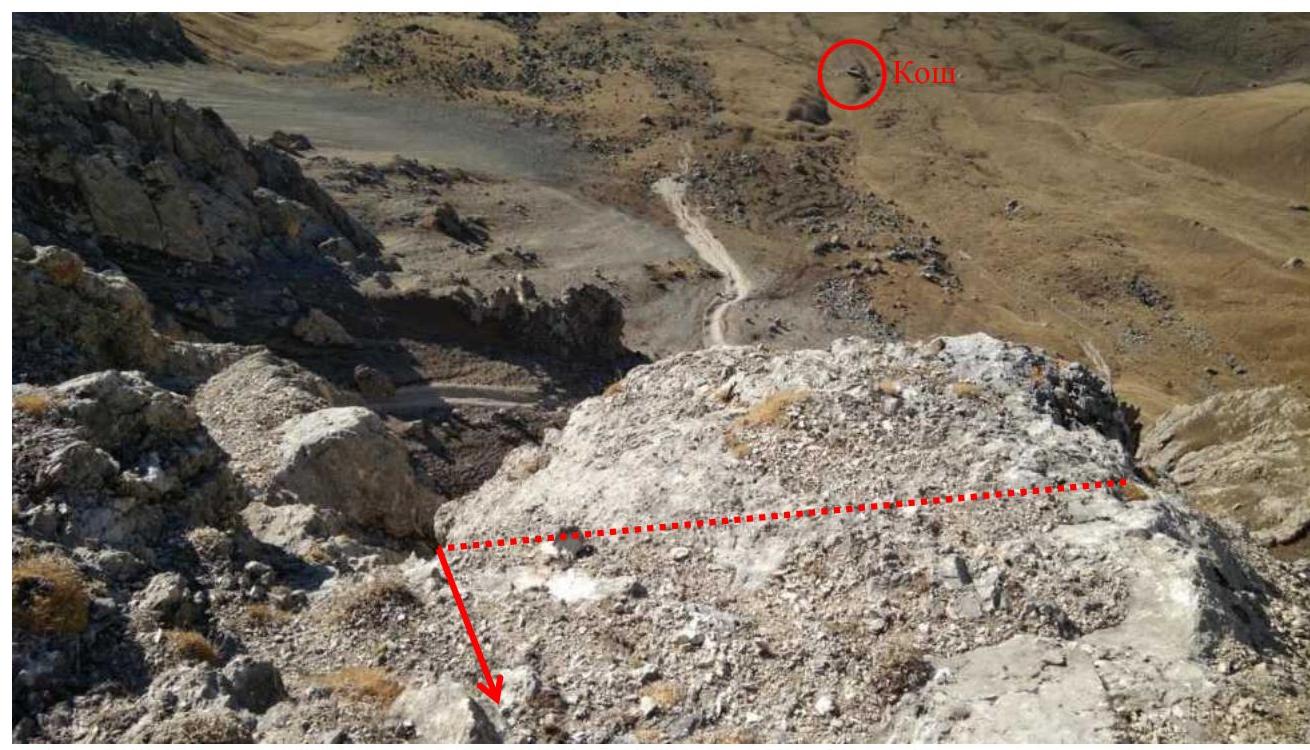
Fig. 8. "Ram's forehead" before station R4, view down from the station.

Fig. 9. Gentle wall at the end of section R4–R5.
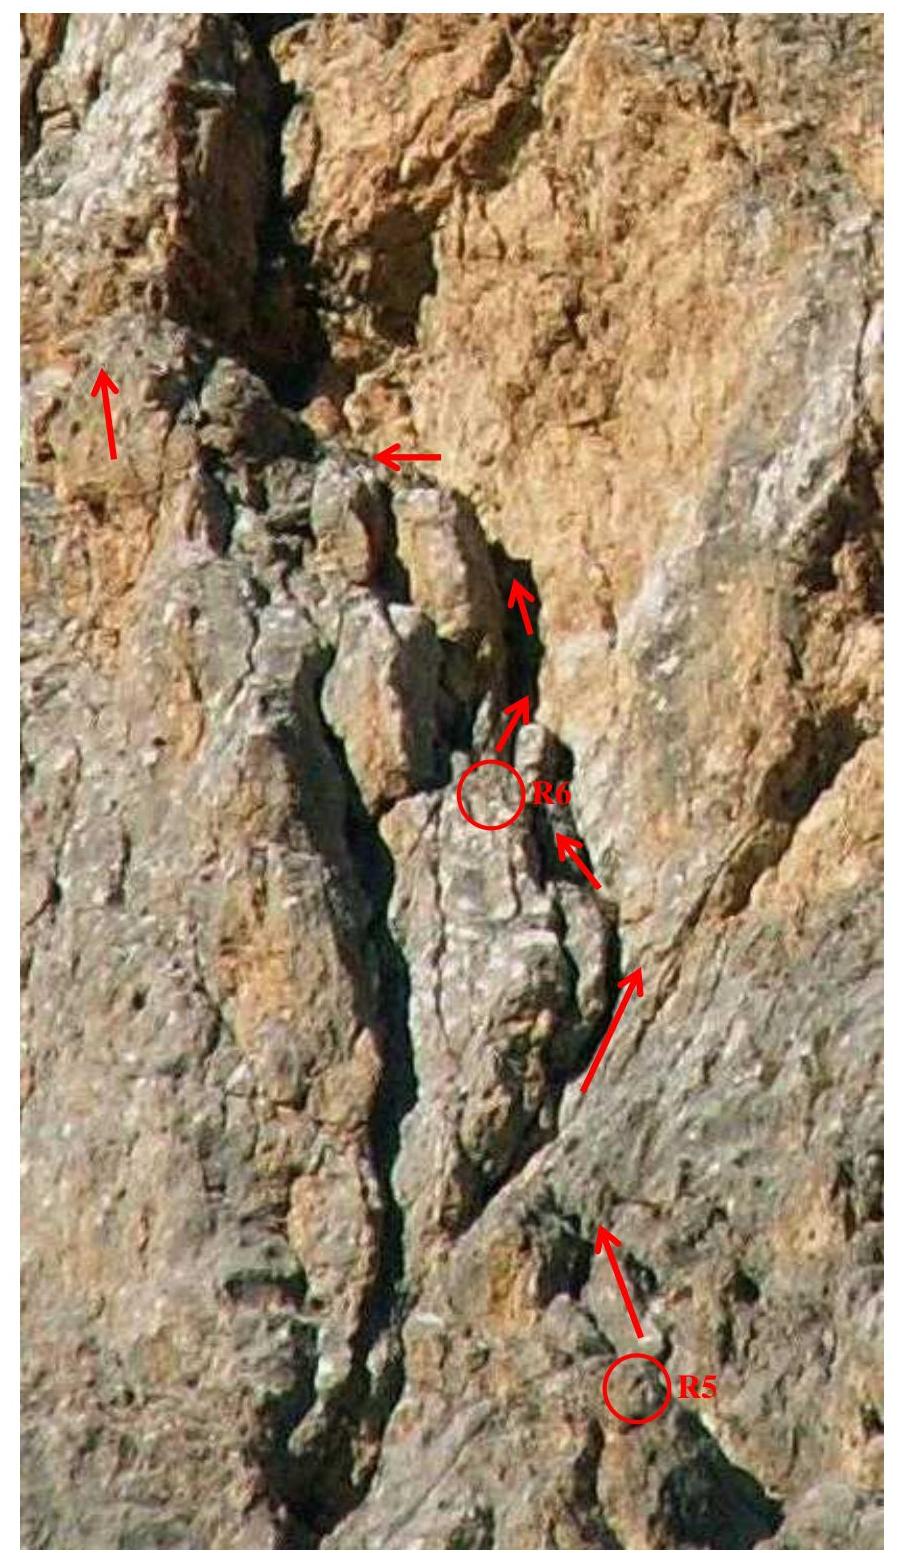
Fig. 10. Section R5–R6 and start of section R6–R7.
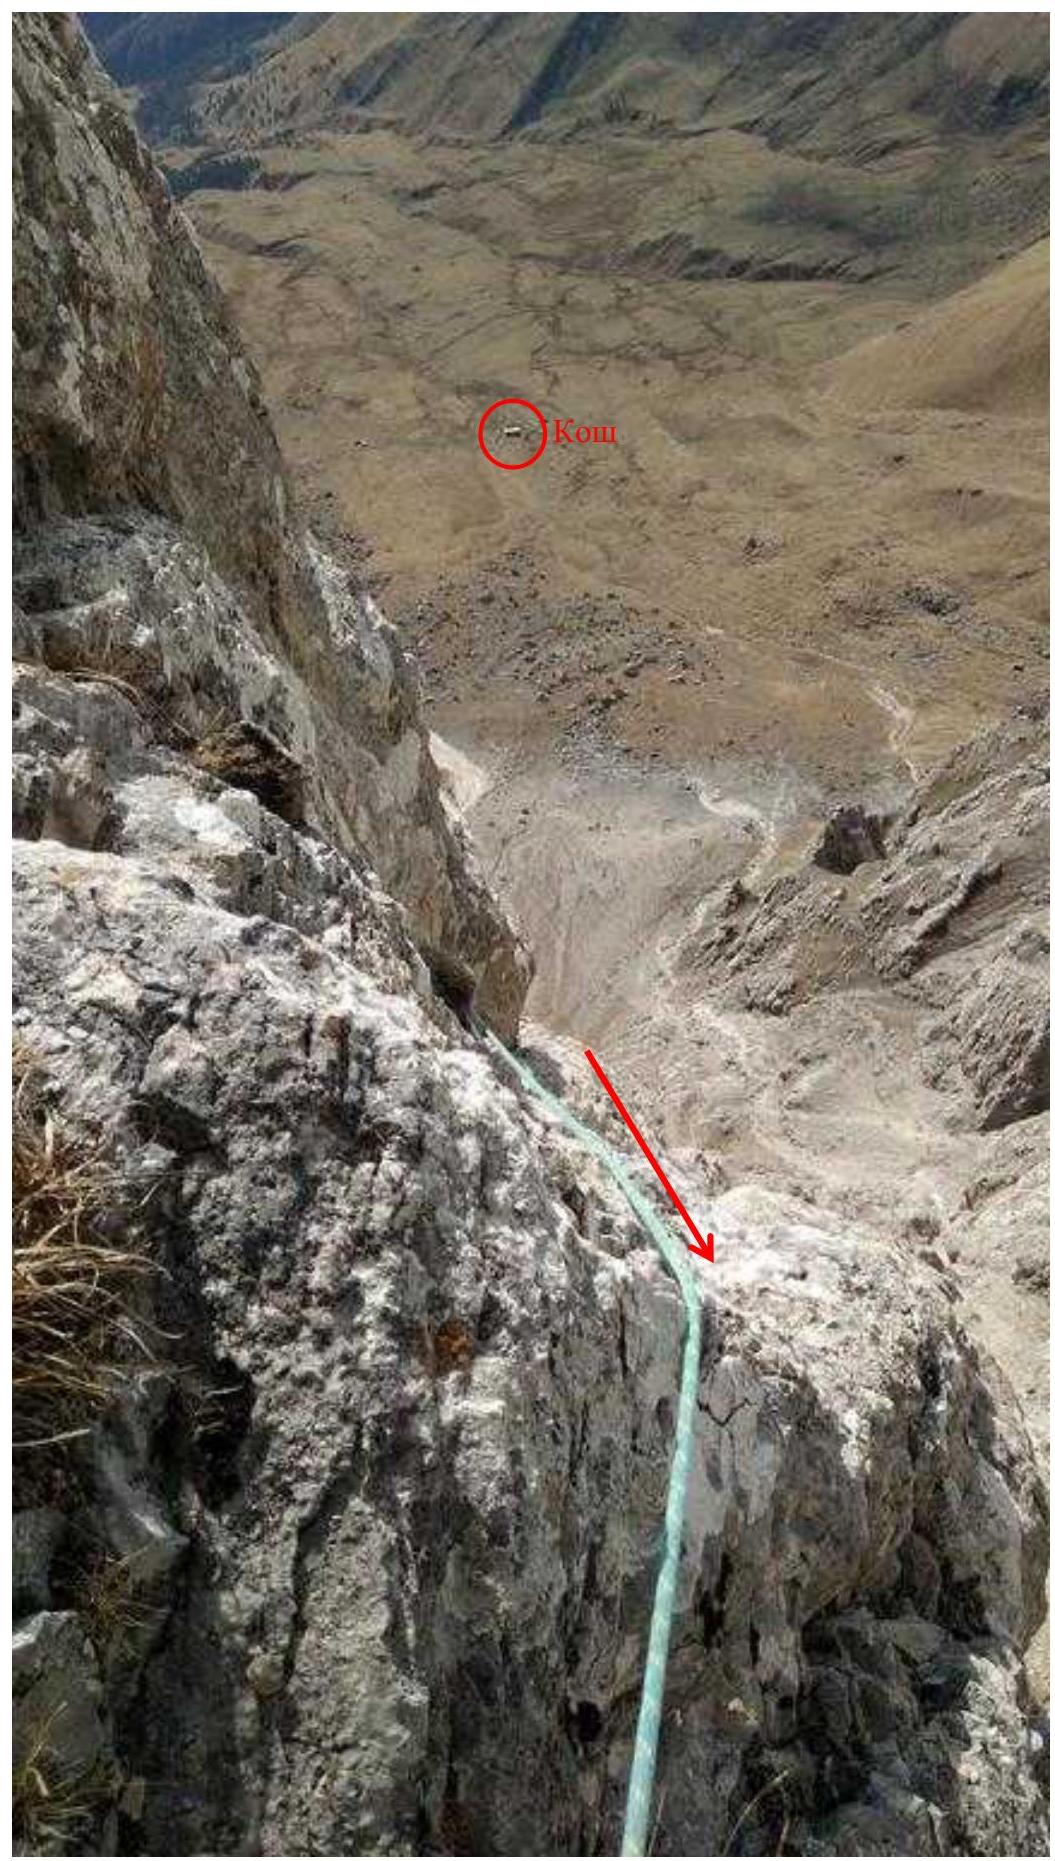
Fig. 11. View down from station R7. End of section R6–R7.
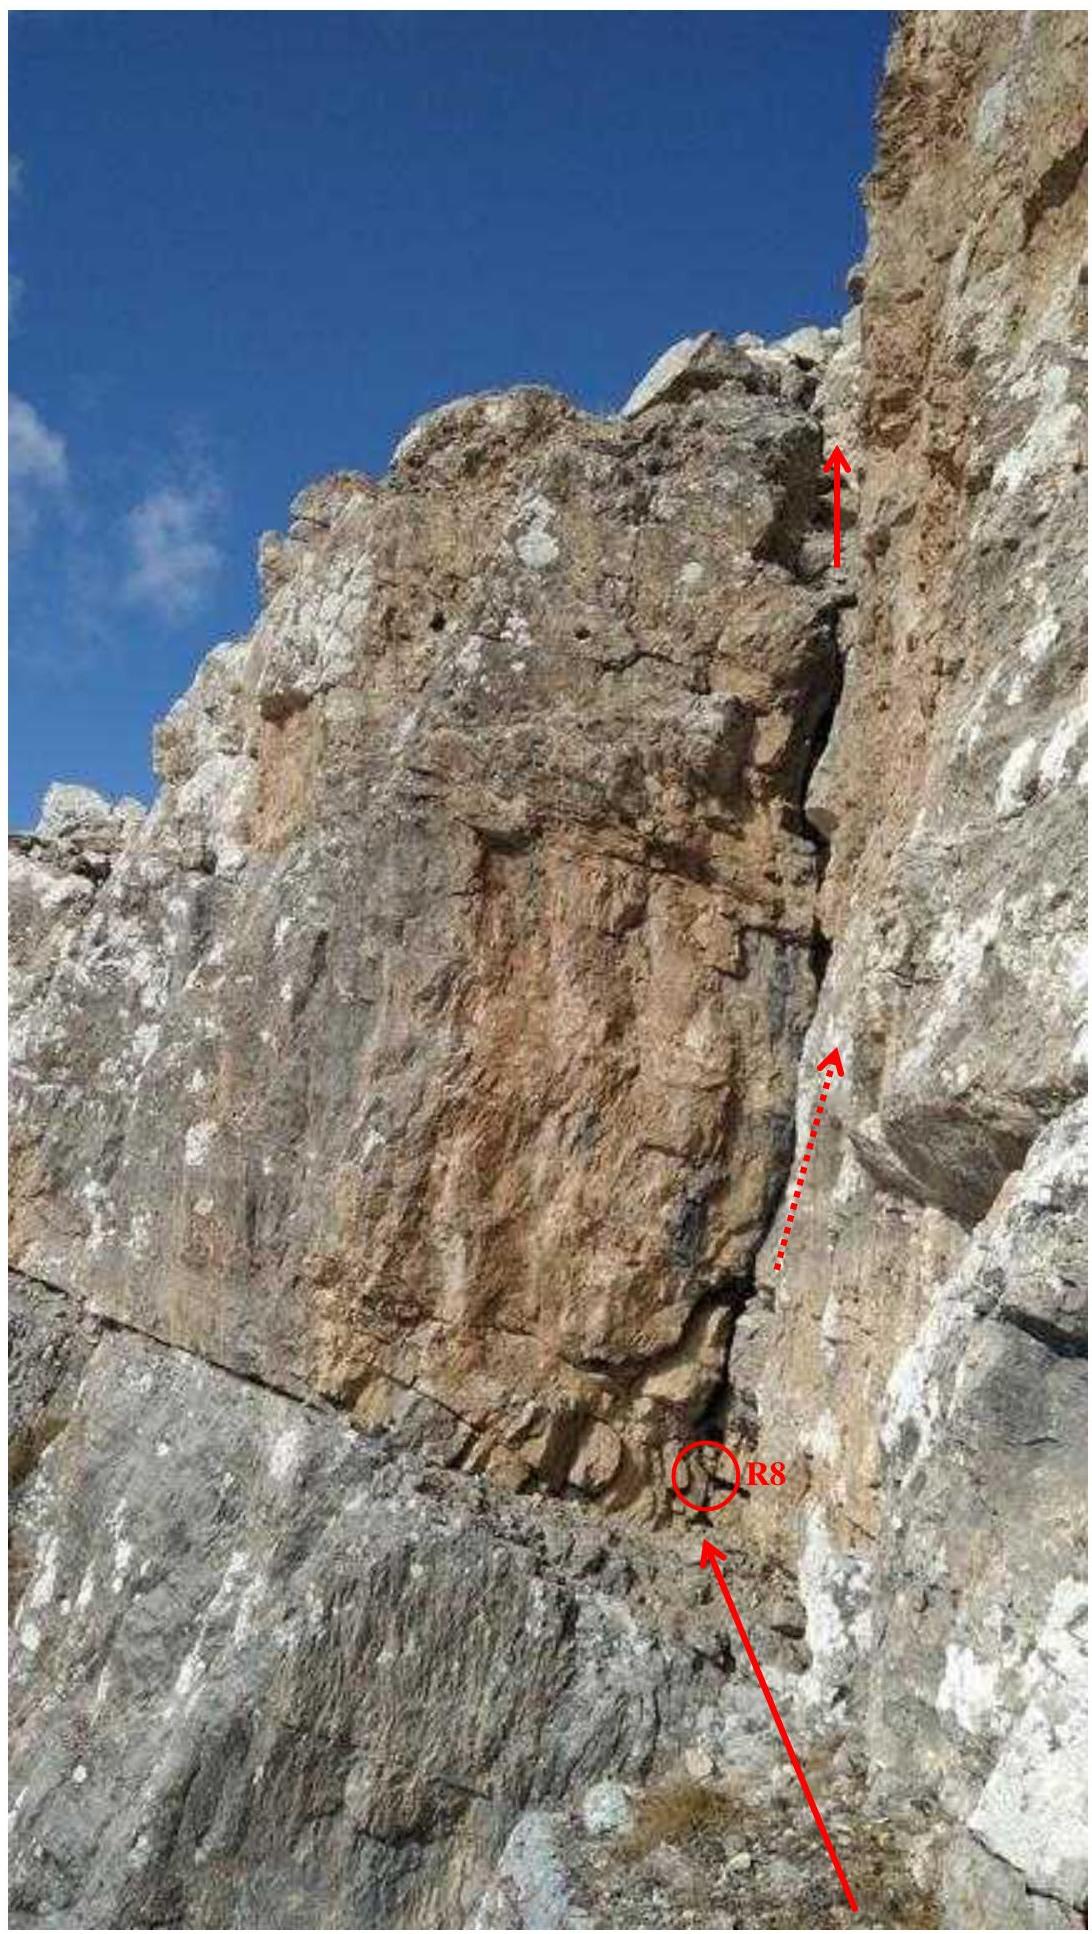
Fig. 12. View from station R7 to the traverse along the ledge to the chimney with a plug (section R7–R8).
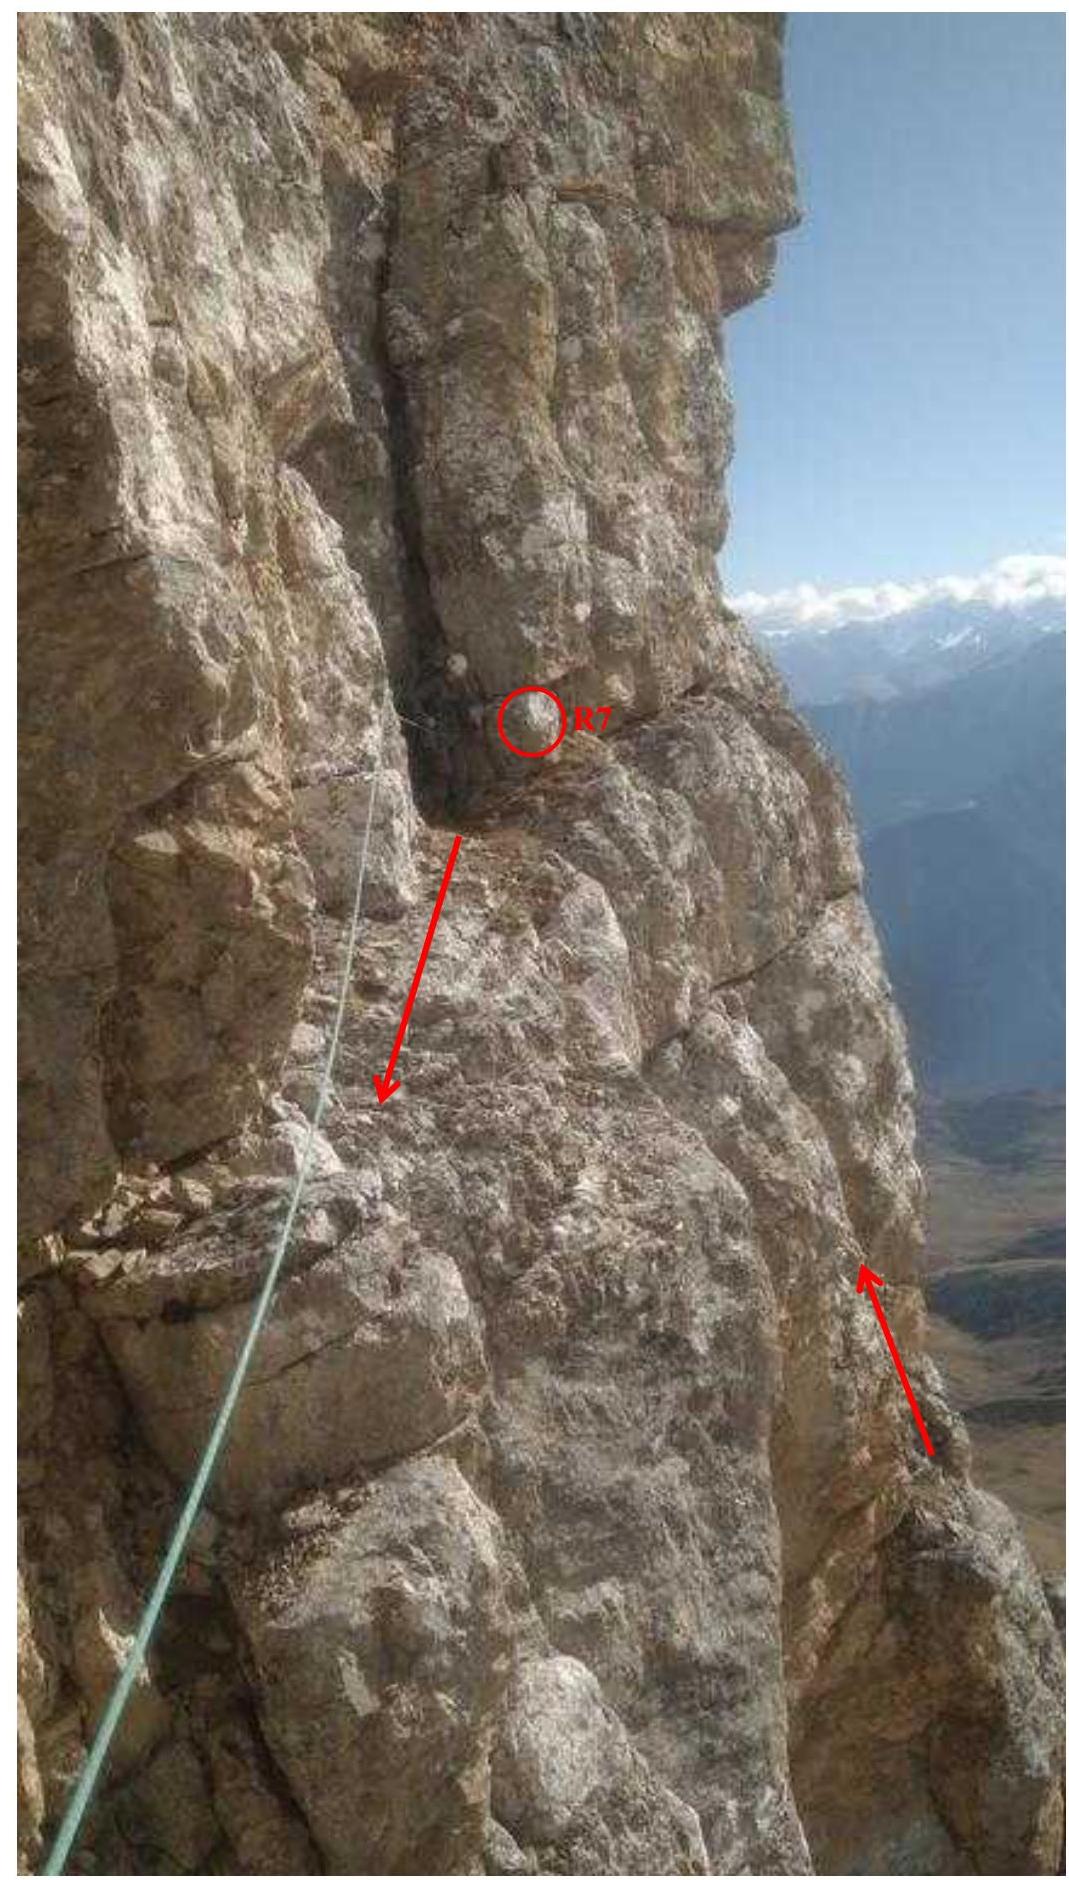
Fig. 13. View from station R8 to the end of section R6–R7 (edge) and start of section R7–R8 (traverse along the ledge). Shchedrin dismantles station R7.
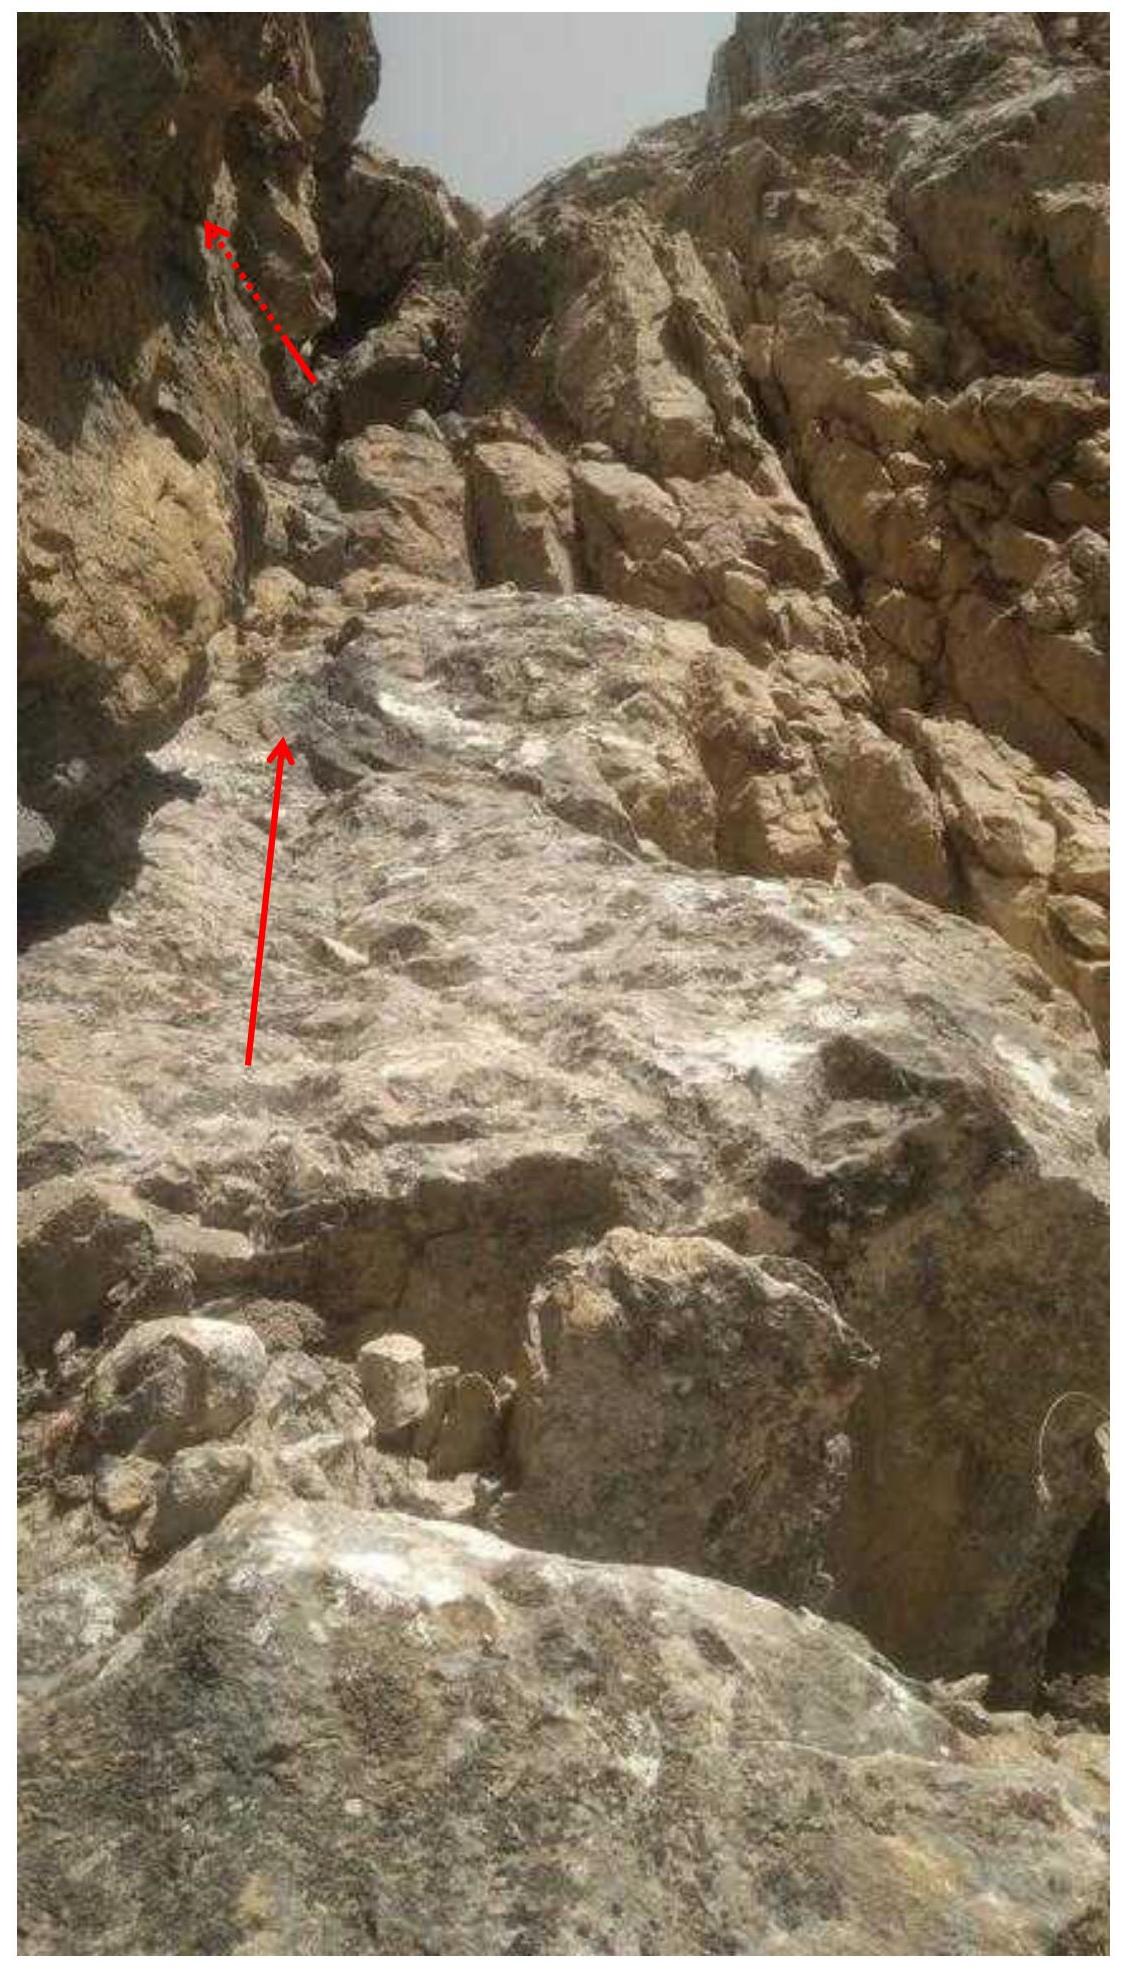
Fig. 14. Start of section R8–R9 (chimney with a plug). View from station R8.
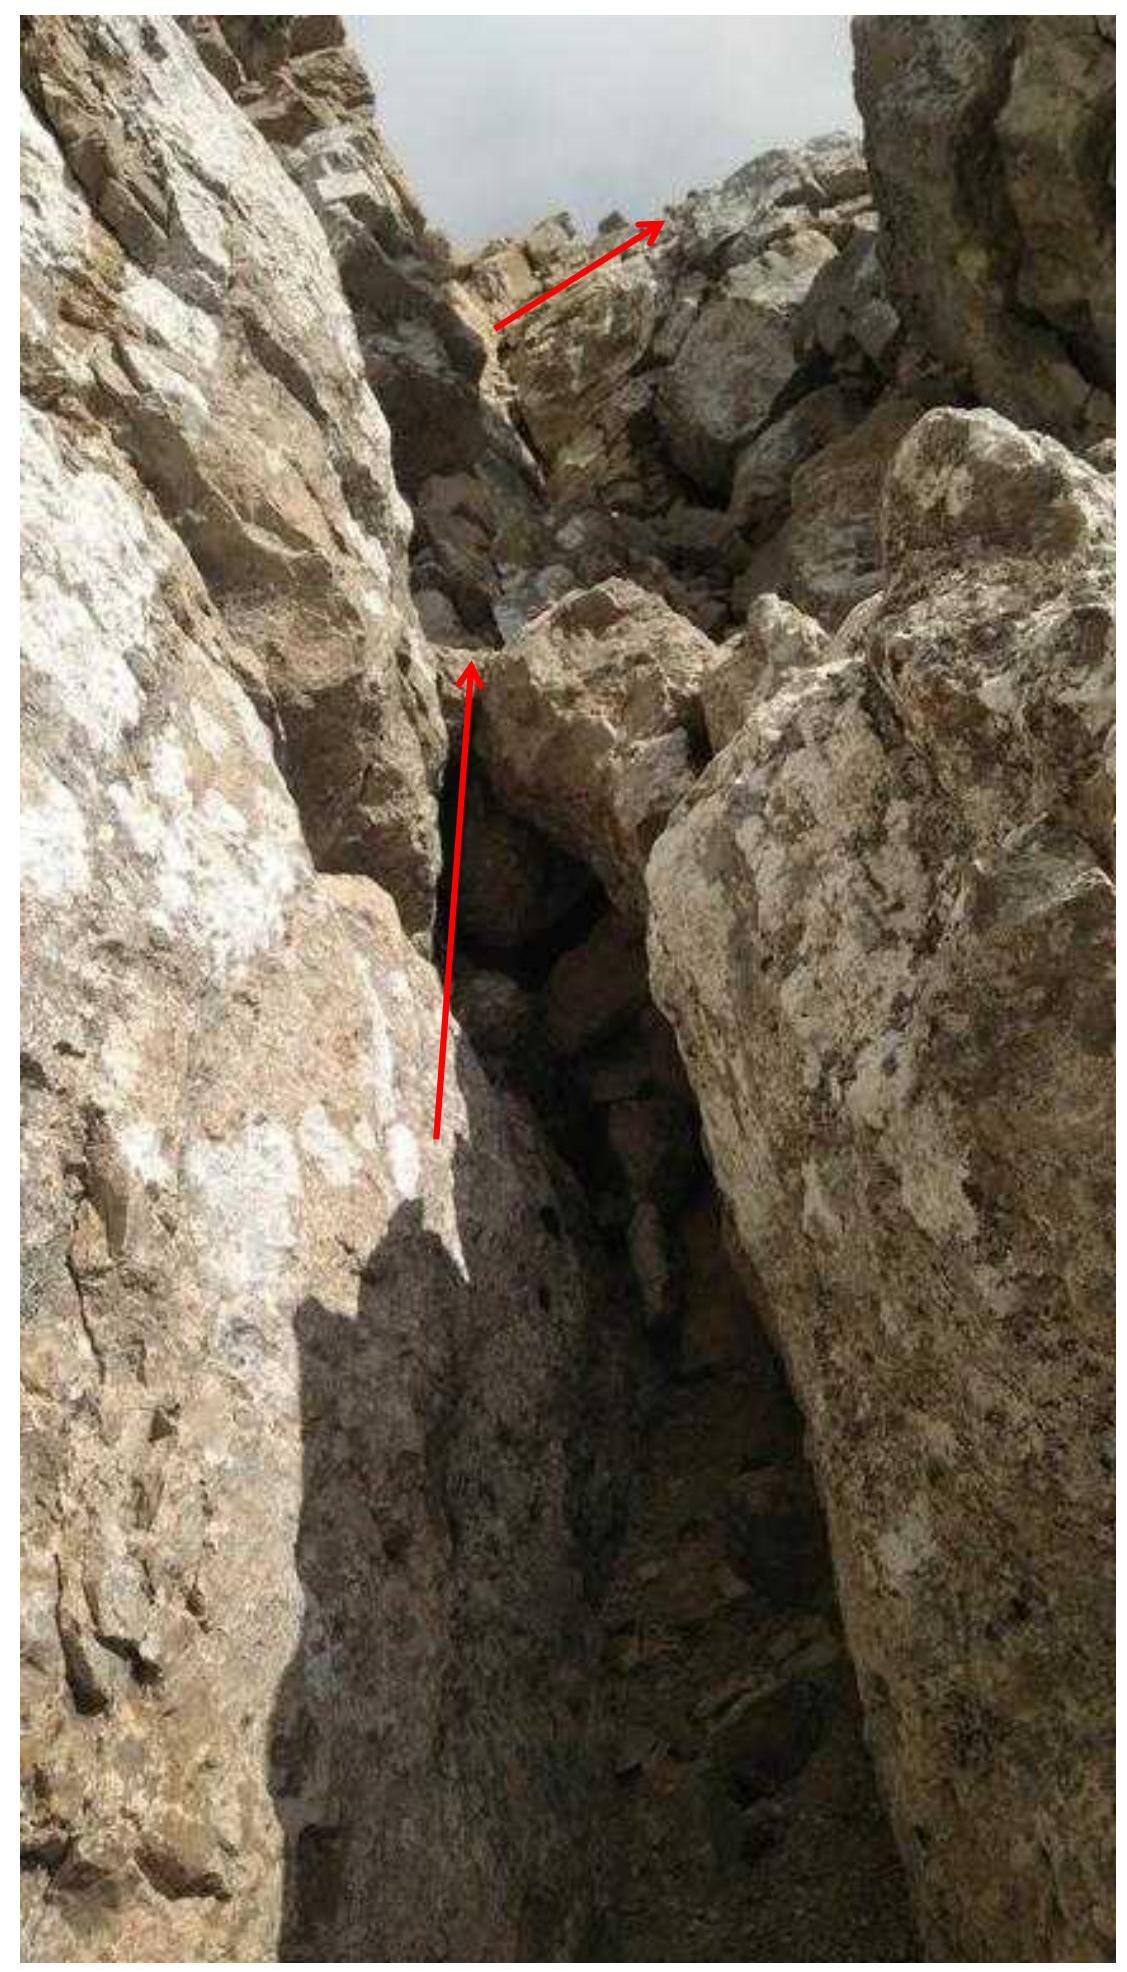
Fig. 15. Start of section R9–R10 (cleft and internal corner). View from station R9.
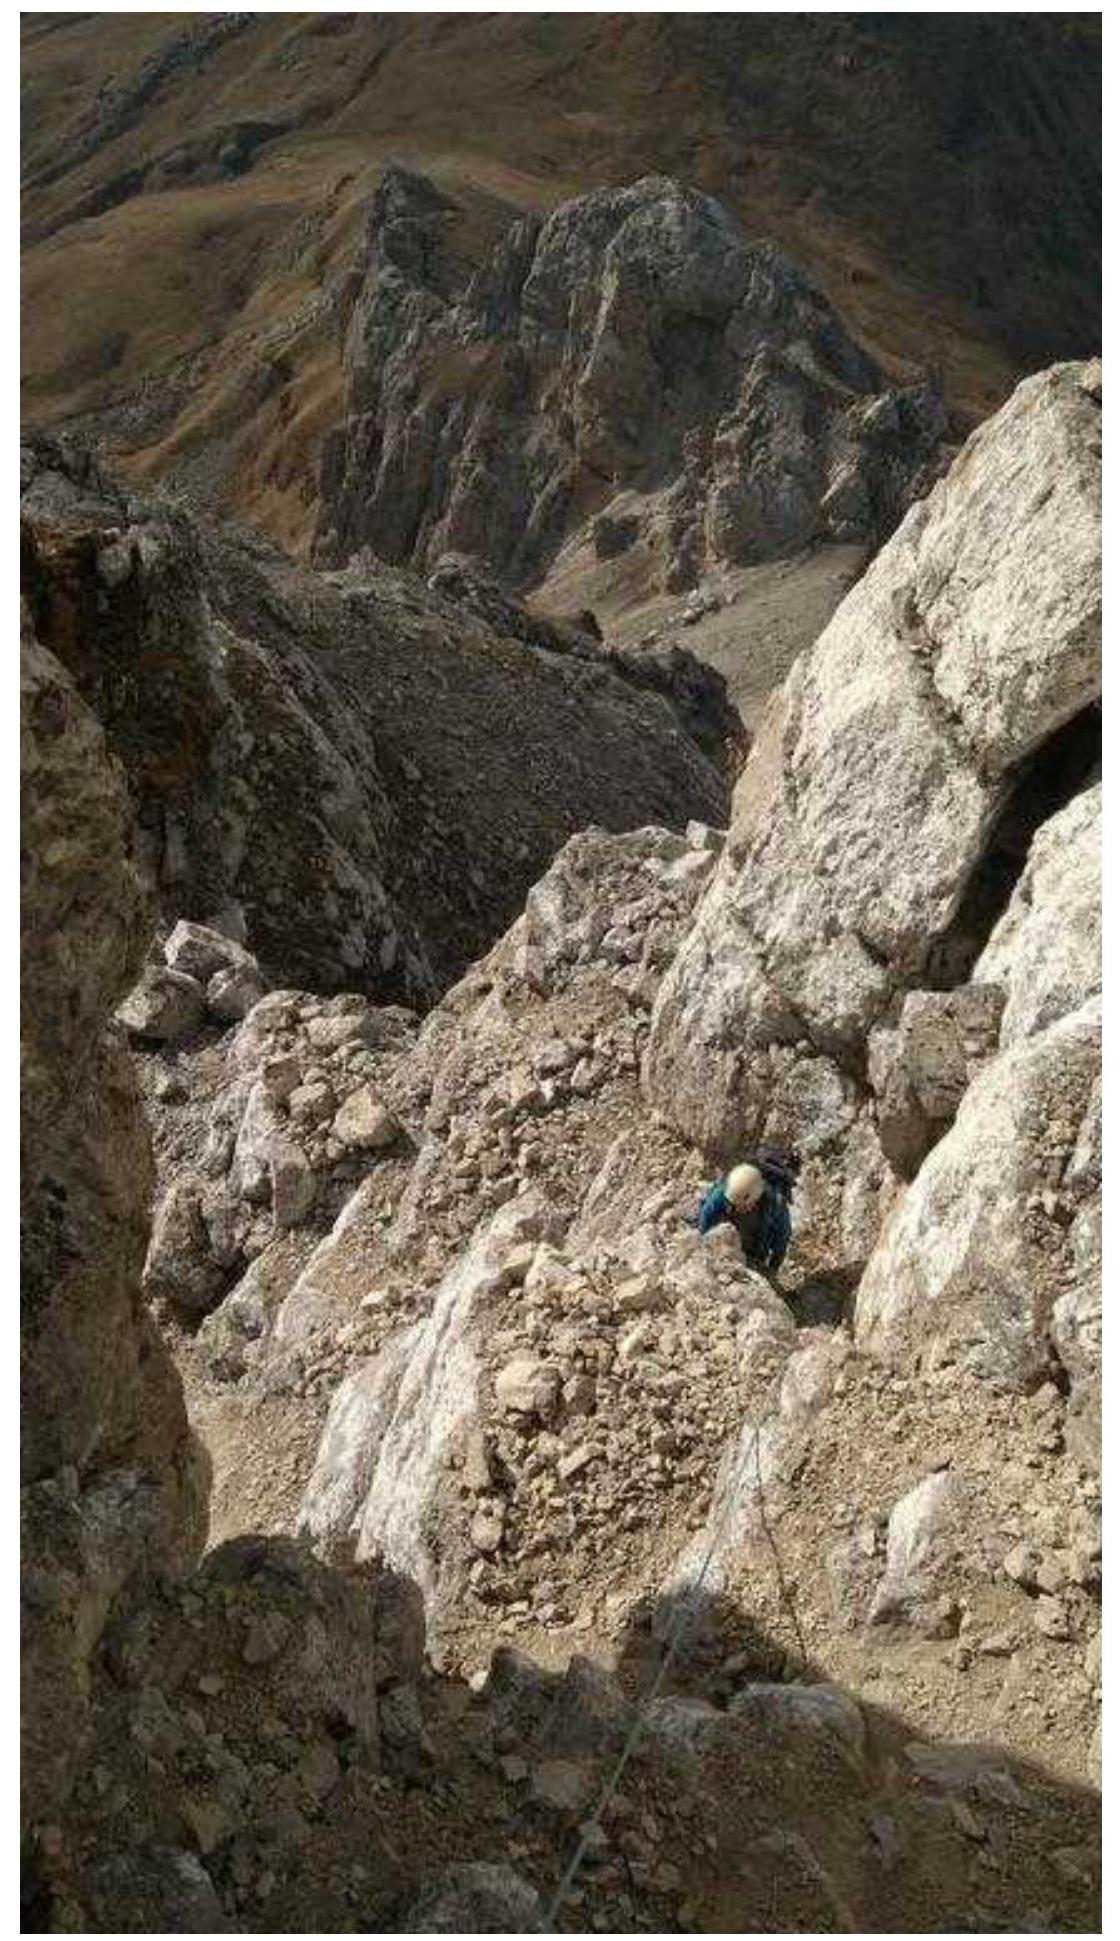
Fig. 16. View down from the summit plateau to the last section.
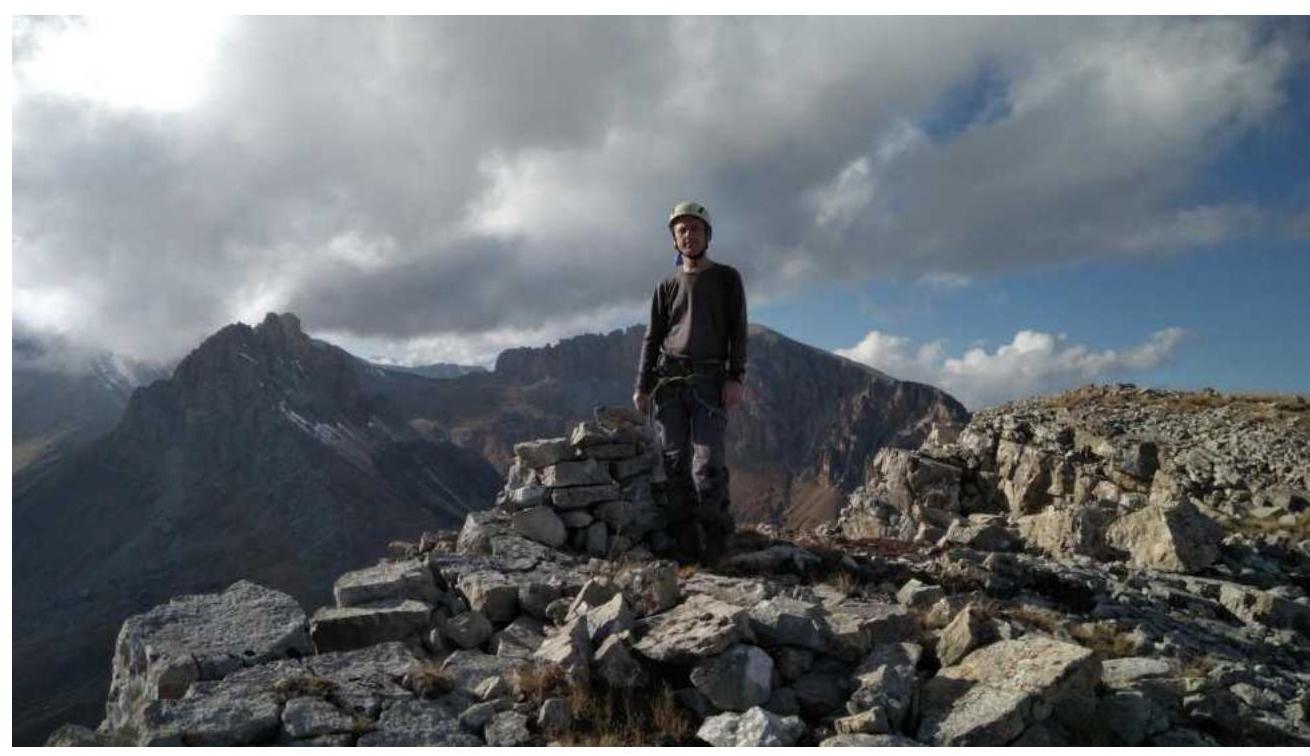
Fig. 17. Photo on the summit.
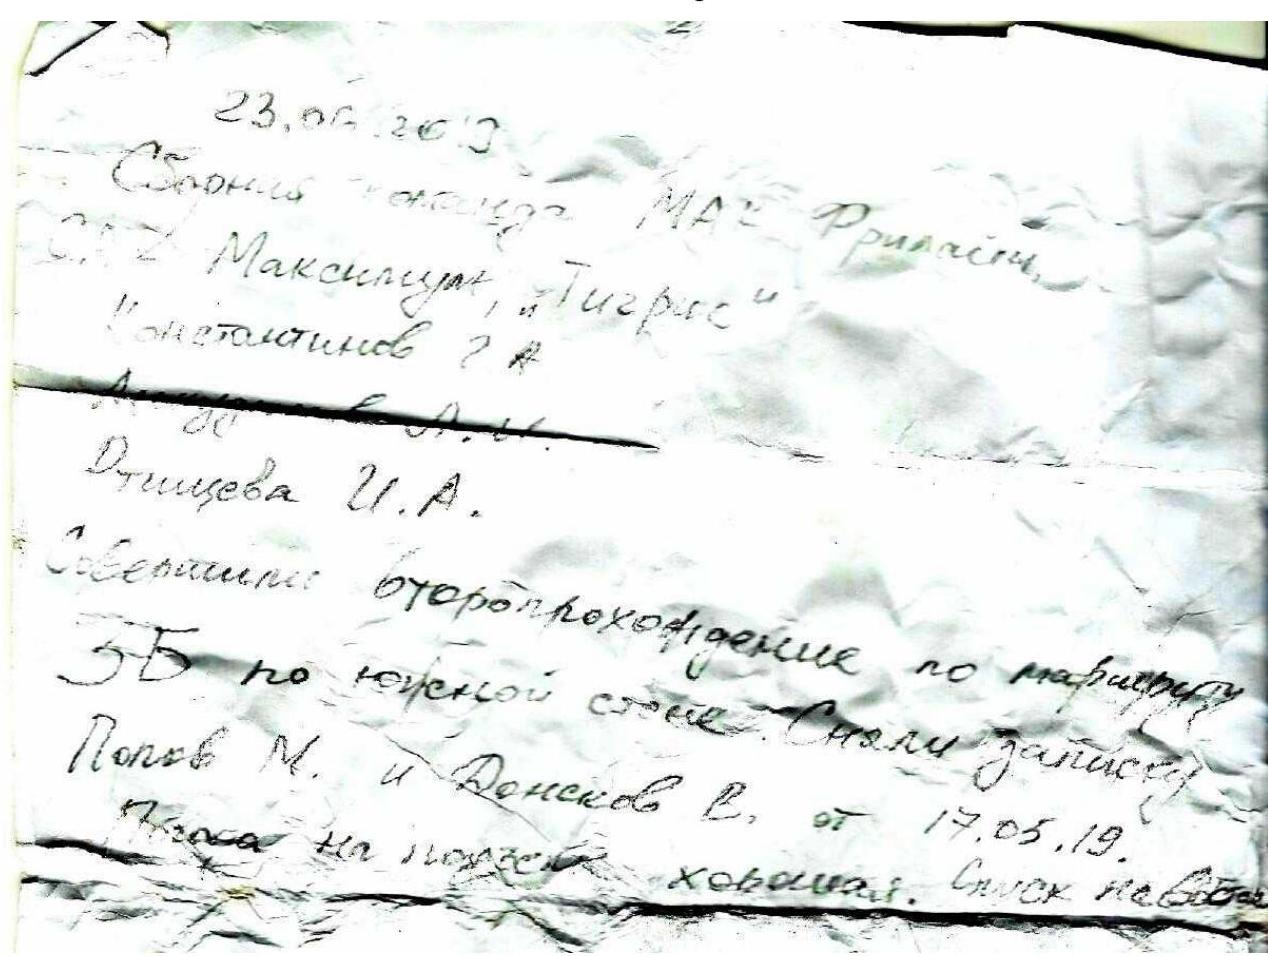
Fig. 18. Note on the summit.
Overall Route Assessment
The route is logical, always following the least easy path among the possible options. Climbing is saturated, especially in the upper part of the route, but also quite even, with all sections done with free climbing. The route is very safe from falling rocks. The only potentially dangerous spot is the chimney on section R8–R9, but the belayer is safely sheltered in a niche. A drawback of the route is that it will be challenging to set up a rappel if needed. The upper part of the route has relatively rich terrain but is quite winding. The lower part of the route is relatively straight but passes through smoothed monolithic rocks. If necessary, one can attempt to cross from section R4–R5 to the route through the center of the South Face, where the lower part has richer terrain.
For both stations and intermediate protection points, friends of size 5 and above were used. Friends of sizes 9 and 10 (the latter having a size of 140/90 mm and weighing 300 g) were used repeatedly, and despite their bulk, it's essential to have them on the ascent. Friends of sizes 6–8 are highly desirable to be duplicated. Stoppers and hexes are not needed. The optimal rope length is 50 m.
Comparing the route to other routes in the Rocky Ridge, it can be said that it is comparable to the 3B route on Dashtsar via the South Face (Egorin, 2006) in both length and difficulty of key sections. On the other hand, the key sections on the 3B route to Muldzugi-Barzond via the center of the South Face and to Western Meshchany via the South Face and SW ridge (both Popov, 2019) are significantly more challenging.
The area is very attractive for climbing year-round, especially during the off-season. Important advantages include:
- the possibility of driving directly to the overnight stay location
- short approaches
- southern exposure of almost all routes
- reliable terrain
- relatively low height
- absence of passes.